![]() To create user and group objects, use iManager or ConsoleOne.
To create user and group objects, use iManager or ConsoleOne.
![]() To set up a template so that all users you create receive a set of common characteristics, use iManager or ConsoleOne to create a template object.
To set up a template so that all users you create receive a set of common characteristics, use iManager or ConsoleOne to create a template object.
![]() To create account restrictions, access the user or group properties through iManager or ConsoleOne.
To create account restrictions, access the user or group properties through iManager or ConsoleOne.
![]() To set or change passwords, access user object properties with iManager or ConsoleOne.
To set or change passwords, access user object properties with iManager or ConsoleOne.
![]() To view or change eDirectory object or property rights, use iManager or ConsoleOne.
To view or change eDirectory object or property rights, use iManager or ConsoleOne.
![]() To view or change file system rights, use ConsoleOne.
To view or change file system rights, use ConsoleOne.
![]() To view or change directory and file attributes, use ConsoleOne.
To view or change directory and file attributes, use ConsoleOne.
![]() To use NCP packet signatures, use NoRM to set the Packet Signing parameter on the server to the appropriate signing level. Use the Advanced Settings page of the Novell client property pages to configure the appropriate packet signing level on your Windows workstations.
To use NCP packet signatures, use NoRM to set the Packet Signing parameter on the server to the appropriate signing level. Use the Advanced Settings page of the Novell client property pages to configure the appropriate packet signing level on your Windows workstations.
![]() To set intruder detection, use iManager or ConsoleOne.
To set intruder detection, use iManager or ConsoleOne.
![]() To lock the server console, use
To lock the server console, use SCRSAVER.NLM.
![]() To remove DOS and prevent NLMs from being loaded from insecure areas, use the
To remove DOS and prevent NLMs from being loaded from insecure areas, use the SECURE CONSOLE command.
Like no other time in the history of computing, regular users and small network administrators are being confronted with the issues of securing their networks. The Internet has uncovered the deficiencies in standards, protocols, and operating systems by enabling hackers and other ne’er-do-wells the opportunity to test networks from distant locations. Malicious viruses, worms, and Trojan horses seek to infiltrate your network to harm and destroy.
And yet the most likely source of network attack is from your own users, whether out of malice or ignorance. Viruses can be introduced, security procedures circumvented, and sensitive systems and data left unprotected. Clearly, any effective security program has to protect from both internal and external threats.
OES NetWare offers a broad set of security features. Many of these features are implemented and managed through Novell eDirectory, which helps you develop a robust network security infrastructure without creating a management nightmare. OES NetWare security concepts and features can be organized into five main categories:
![]() User-related objects
User-related objects
![]() Authentication
Authentication
![]() Authorization
Authorization
![]() Data security
Data security
![]() Other security features
Other security features
Novell has always been adept at providing effective network security, primarily because NetWare is not an operating system that lends itself to simple security attacks. However, today’s network security involves a lot more than assigning passwords to network users. Today’s complex computing environments require advanced techniques for assuring that only those persons required to access network resources are able to do so. It is important to understand these basic topics to lay the groundwork for discussions of specific security products and features.
Note
ConsoleOne has traditionally been the method for performing most object administration in eDirectory. However, because Novell’s direction is to move all of this functionality to the browser-based iManager environment, all object manipulation that is currently available in iManager will be discussed from the perspective of that utility, rather than from ConsoleOne.
This might seem like an odd place to talk about user objects and related features, but critical security problems can arise from a misunderstanding of the ways in which eDirectory users can be assigned trustee rights. There are three main objects that are used to organize your network users. You can use iManager or ConsoleOne to create and manage each of these types of objects (for more information on iManager and ConsoleOne basics, see Chapter 4, “OES Management Tools”):
![]() User object
User object
![]() Group object
Group object
![]() Organizational role
Organizational role
These objects form the foundation from which network services and privileges are ultimately delivered. After all, user-related objects define the human elements of your network. Immediately after a new OES NetWare and eDirectory installation, the only user object that exists is Admin. Although it might be comforting to think of a network of one, you are going to have to create user accounts for every one of your users. After users have been created, they can begin working on the network. In most cases, users on a network will notice very little difference from working on a standalone computer. They still use the applications they were using before. They still open, save, and delete files the same way. They can still play the same games—but only if you let them!
And that’s the goal of network security: to prevent users from taking some action, either unintentionally or intentionally, that might compromise the integrity of the network or expose network resources in such a way that can cause harm to the network or the organization. There are several levels of network security in today’s networks, and OES NetWare gives you a great deal of control over each.
To create an eDirectory User object, complete the following steps:
1. (Optional) Create a directory for all users’ home directories. For example, you might want to create a network directory called Users on volume VOL1. For more information on NetWare volumes, see Chapter 10, “OES NetWare File Storage and Management.”
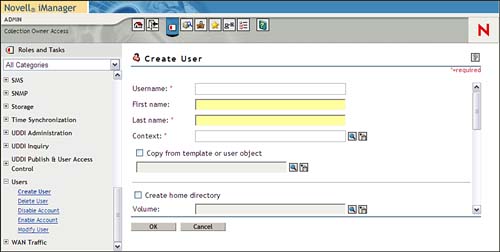
2. Launch iManager. In the Navigation frame, open the Users group and select Create User (see Figure 7.1).
3. Specify the information you want and click OK. You should pay particular attention to the following fields:
![]() Username—(Required) Enter the login name for this user. This is the name the user will enter when he or she authenticates to eDirectory.
Username—(Required) Enter the login name for this user. This is the name the user will enter when he or she authenticates to eDirectory.
![]() Last Name—(Required) Specify the last name of this user. This field is required so that you can perform name-based searches on eDirectory.
Last Name—(Required) Specify the last name of this user. This field is required so that you can perform name-based searches on eDirectory.
![]() Context—Specify the container in which the user object should be created.
Context—Specify the container in which the user object should be created.
![]() Password—Select this option and you can either specify the user password or force eDirectory to prompt the users for a password upon their first login.
Password—Select this option and you can either specify the user password or force eDirectory to prompt the users for a password upon their first login.
Warning
It is possible to create an eDirectory user object without a password, but it is highly discouraged due to the network security breach that results.
If you plan to assign many of your users certain identical properties, you can use a user template object. The template object will automatically apply default properties to any new user you create using the template. However, it does not apply those properties to any users who existed before you created the user template. Network administrators often use a template to grant default eDirectory and file system rights automatically to users.
To create a user template object, complete these steps:
1. (Optional) Create a directory for all users’ home directories. For example, you might want to create a network directory called Users on volume VOL1. For more information on NetWare volumes, see Chapter 10.
2. From iManager, select the View Objects icon in the Header frame.
3. In the Navigation frame, click any container object and choose Create Object from the task list.
4. Select Template from the list of available objects and click OK.
5. Specify the name of the Template object and the context in which it should be created and click OK.
After the object is created, you configure any of the common characteristics you want assigned to all users you create. To do this in iManager, browse to and select the object in the left frame. Modify the template by selecting the appropriate task and providing the appropriate information. Most of the template information will be specified in the Modify Object and the Rights to Other Objects tasks.
Group objects are used to apply a common set of trustee rights to different user objects. User objects assigned to a group are made security-equivalent to that group, meaning that any rights given to the group object will also be applied to each of its member users. Creating a group is very similar to creating a user.
Complete the following steps to create a group and assign group membership to a user:
1. Launch iManager and select the View Objects icon in the Header frame.
2. In the Navigation frame, browse to and select a container object and choose Create Group from the task list.
3. Specify the name of the Group object and the context in which it should be created and click OK.
4. Click Modify to access the Group object properties pages. From there you can provide any object-specific information and add members to the group by selecting the Members link.
Click OK when finished to save the Group properties.
Organizational roles function like groups of one. (They can have multiple occupants for process redundancy.) They use explicit security equivalence to provide specific rights to a user who needs to be able to perform a specific task. Organizational roles are generally used to grant some degree of administrative capability for a tree or branch of the tree. Although similar in some respects, an organizational role should not be confused with the role-based services of iManager. The iManager roles are much more flexible in their application than organizational roles. For more information on iManager roles, see Chapter 4.
Complete the following steps to create an organizational role and assign occupancy to a user:
1. Launch iManager and select the View Objects icon in the Header frame.
2. In the Navigation frame, browse to and select a container object and choose Create Object from the task list.
3. Select Organizational Role from the list of available objects and click OK.
4. Specify the name of the Organizational Role object and the context in which it should be created and click OK.
5. Click Modify to access the Organizational Role object properties pages. From there you can provide any object-specific information and specify the occupant of the Organizational Role. Click OK when finished to save the Organizational Role properties.
After it’s created, you can assign any user object to an organizational role to grant specific rights related to specific responsibilities within your organization.
Authentication provides the doorway for access to network resources. Without a strong authentication mechanism, sensitive network resources are essentially laid bare for anyone to access. The primary authentication method currently used with eDirectory is the username/password combination. Novell Modular Authentication Service (NMAS) makes it possible to integrate more advanced authentication and authorization techniques into your NetWare environment. Furthermore, NMAS offers universal passwords, which improve the traditional password-based authentication method.
NMAS is designed to help you protect information on your network. NMAS offers a more robust framework for protecting your OES NetWare environment. If you’re not familiar with the different pieces of NMAS, you should get to know the following concepts. More information about each of these is provided in the OES NetWare online documentation.
NMAS can be useful in helping secure your network environment at specific times:
![]() User identification occurs prior to the actual authentication process. It provides a way to automatically gather a user’s authentication information and use it to populate the Novell Login dialog in the Novell Client.
User identification occurs prior to the actual authentication process. It provides a way to automatically gather a user’s authentication information and use it to populate the Novell Login dialog in the Novell Client.
![]() Authentication is the opportunity for users to prove they are who they claim to be. NMAS supports multiple authentication methods.
Authentication is the opportunity for users to prove they are who they claim to be. NMAS supports multiple authentication methods.
![]() Device removal detection is the capability to lock down a workstation after authentication when it becomes clear that the user is no longer present.
Device removal detection is the capability to lock down a workstation after authentication when it becomes clear that the user is no longer present.
Each of these phases of operation is completely independent. You can choose to use the same, or completely different, identification techniques for each phase. To provide this functionality, NMAS introduces a few additional concepts to NetWare authentication:
![]() Login factors
Login factors
![]() Login methods and sequences
Login methods and sequences
![]() Graded authentication
Graded authentication
NMAS uses three approaches, known as login factors, to logging in to the network. These login factors describe different items or qualities a user can use to authenticate to the network:
![]() Password authentication—Also referred to as “something you know,” password authentication is the traditional network authentication method. It is still responsible for the lion’s share of network authentication, including LDAP authentication, browser-based authentication, and most other directories.
Password authentication—Also referred to as “something you know,” password authentication is the traditional network authentication method. It is still responsible for the lion’s share of network authentication, including LDAP authentication, browser-based authentication, and most other directories.
![]() Device authentication—Also referred to as “something you have,” device authentication uses third-party tokens or smart cards to deliver the secret with which you authenticate to the network.
Device authentication—Also referred to as “something you have,” device authentication uses third-party tokens or smart cards to deliver the secret with which you authenticate to the network.
![]() Biometric authentication—Also referred to as “something you are,” biometric authentication uses some sort of scanning device that converts some physical characteristic into a digital pattern that can be stored in eDirectory. When users attempt to authenticate, their biometric patterns are compared against the stored version to see whether they match. Common biometric authentication methods include fingerprint readers, facial recognition, and retinal scans.
Biometric authentication—Also referred to as “something you are,” biometric authentication uses some sort of scanning device that converts some physical characteristic into a digital pattern that can be stored in eDirectory. When users attempt to authenticate, their biometric patterns are compared against the stored version to see whether they match. Common biometric authentication methods include fingerprint readers, facial recognition, and retinal scans.
A login method is a specific implementation of a login factor. Novell has partnered with several third parties to create a variety of options for each of the login factors described earlier in this chapter. A post-login method is a security process that is executed after a user has authenticated to eDirectory. One such post-login method is the workstation access method, which requires the user to provide credentials to unlock the workstation after a period of inactivity.
After you have decided upon and installed a method, you need to assign it to a login sequence for it to be used. A login sequence is an ordered set of one or more methods. Users log in to the network using these defined login sequences. If the sequence contains more than one method, the methods are presented to the user in the order specified. Login methods are presented first, followed by post-login methods.
Another important feature in NMAS is graded authentication, which enables you to grade, or control, access to the network based on the login methods used to authenticate to the network. Graded authentication operates in conjunction with standard eDirectory and file system rights to provide very robust control over data access in an OES NetWare environment.
There are three main elements to graded authentication:
![]() Categories—NMAS categories represent different levels of sensitivity and trust. You use categories to define security labels. There are three secrecy categories and three integrity categories by default: biometric, token, and password.
Categories—NMAS categories represent different levels of sensitivity and trust. You use categories to define security labels. There are three secrecy categories and three integrity categories by default: biometric, token, and password.
![]() Security labels—Security labels are combinations of categories that assign access requirements to NetWare volumes and eDirectory objects and properties. NMAS Enterprise Edition comes with eight security labels:
Security labels—Security labels are combinations of categories that assign access requirements to NetWare volumes and eDirectory objects and properties. NMAS Enterprise Edition comes with eight security labels:
![]() Biometric and password and token
Biometric and password and token
![]() Biometric and password
Biometric and password
![]() Biometric and token
Biometric and token
![]() Password and token
Password and token
![]() Biometric
Biometric
![]() Password
Password
![]() Token
Token
![]() Logged in
Logged in
![]() Clearances—Clearances are assigned to users to represent the amount of trust you have in them. In the clearance, a read label specifies what a user can read and a write label specifies locations to which a user can write. Clearances are compared to security labels to determine whether a user has access. If a user’s read clearance is equal to or greater than the security label assigned to the requested data, the user will be able to view the data.
Clearances—Clearances are assigned to users to represent the amount of trust you have in them. In the clearance, a read label specifies what a user can read and a write label specifies locations to which a user can write. Clearances are compared to security labels to determine whether a user has access. If a user’s read clearance is equal to or greater than the security label assigned to the requested data, the user will be able to view the data.
By configuring these elements of graded authentication, you can greatly increase the security of your network data and apply different types of security to data of different levels of sensitivity.
NMAS requires both server- and client-side software to perform its authentication services. Installation of the NMAS client happens during the installation of the Novell Client and is described in Chapter 3, “OES NetWare Clients.” On the server, NMAS is one of the default services and will be installed automatically with any service that requires its services, such as Native File Access.
However, if necessary, you can install NMAS manually from iManager or from the graphical server console.
To install NMAS from iManager, complete the following steps:
1. Launch iManager and open the Install and Upgrade link and then select Install and Upgrade.
2. Click Remote Product Install in the right frame.
3. Browse to the location of the OES NetWare CD 1 (Operating System) and click OK.
4. Browse to and select the server to which you want to install NMAS and click Next. Authenticate as an Admin user to the server you selected.
5. At the Components screen, select only Novell Modular Authentication Service and click Next.
6. Select the NMAS Login Methods you want to install and click Next. Drag the mouse over each method name to see a brief description of how the method is used.
7. At the Summary screen, select Copy Files to install NMAS. You need to insert or specify the location of the OES NetWare product’s CD-ROM.
8. At the Installation Complete screen, click Close to complete the installation.
After NMAS is installed, there are several configuration options, depending on your specific environment and needs. Server-side configuration is available through either iManager or ConsoleOne. After the NMAS server options are configured, you can configure the NMAS client to leverage NMAS capabilities. Generally, the process involves the following:
![]() Creating a login sequence—This process identifies the specific login methods that will be used for login and post-login operations, and the order in which they will be applied if multiple login methods are specified.
Creating a login sequence—This process identifies the specific login methods that will be used for login and post-login operations, and the order in which they will be applied if multiple login methods are specified.
![]() Assigning a login sequence to a user—After it’s created, a login sequence is available for use by a user. A default login sequence can be defined, and users can be forced to use a specific login sequence.
Assigning a login sequence to a user—After it’s created, a login sequence is available for use by a user. A default login sequence can be defined, and users can be forced to use a specific login sequence.
![]() Graded authentication—With the login environment configured, you can now define those network resources that are available with each login method. Graded authentication enables you to label network resources and require certain levels of authentication to access those resources.
Graded authentication—With the login environment configured, you can now define those network resources that are available with each login method. Graded authentication enables you to label network resources and require certain levels of authentication to access those resources.
![]() Customizing the user login—The Novell Client supports several customization options based on the type of authentication that is being used. For more information on the Novell Client, see Chapter 3. You can also review Appendix A, “Novell Client Properties,” for detailed information on the Novell Client property pages.
Customizing the user login—The Novell Client supports several customization options based on the type of authentication that is being used. For more information on the Novell Client, see Chapter 3. You can also review Appendix A, “Novell Client Properties,” for detailed information on the Novell Client property pages.
For more detailed information on each of these NMAS configuration steps, see the Novell online documentation.
In addition to its other authentication and authorization options, NMAS also provides a way of dealing with the different password requirements of some of Novell’s cross-platform services. The traditional Novell password, although quite effective for NetWare-based authentication, is limited by its inability to integrate with non-NetWare systems. Universal password proposes to resolve this problem by simplifying the management of different password and authentication systems with your OES NetWare environment.
Universal password resolves several deficiencies in the current password authentication model across the various OES NetWare services, including
![]() Native file access—Native file access protocols such as CIFS, AFP, and NFS cannot interoperate with the traditional NetWare password. Rather, they use a separately administered simple password, which is less secure than the NetWare password and must be managed separately. For more information on Native File Access, see Chapter 3.
Native file access—Native file access protocols such as CIFS, AFP, and NFS cannot interoperate with the traditional NetWare password. Rather, they use a separately administered simple password, which is less secure than the NetWare password and must be managed separately. For more information on Native File Access, see Chapter 3.
![]() LDAP—Similar to NFAP, LDAP binds are largely incompatible with the traditional NetWare password and also run the risk of sending unencrypted passwords.
LDAP—Similar to NFAP, LDAP binds are largely incompatible with the traditional NetWare password and also run the risk of sending unencrypted passwords.
![]() LDAP user import—It is possible to import users from foreign directories via LDAP, but imported passwords conform to the rules of the native system and are encrypted in the native format. This makes them largely incompatible with the traditional NetWare password and forces them to be managed through the simple password mechanism.
LDAP user import—It is possible to import users from foreign directories via LDAP, but imported passwords conform to the rules of the native system and are encrypted in the native format. This makes them largely incompatible with the traditional NetWare password and forces them to be managed through the simple password mechanism.
![]() Password synchronization—With the availability of meta-directory tools such as DirXML and Account Management, you often end up with multiple passwords stored as different object attributes. These passwords can be synchronized as long as changes are performed using the proper interface, such as the Novell Client. Changes made in other ways can cause synchronization problems.
Password synchronization—With the availability of meta-directory tools such as DirXML and Account Management, you often end up with multiple passwords stored as different object attributes. These passwords can be synchronized as long as changes are performed using the proper interface, such as the Novell Client. Changes made in other ways can cause synchronization problems.
If these issues mentioned, and the use of international characters in passwords, are not problems for you, you might not need to enable universal password.
However, as your network becomes increasing web-integrated and managed, universal password will likely become more attractive.
Universal password leverages the Novell International Cryptographic Infrastructure (NICI) for cryptographic services, and NICI now includes a special cryptographic key that can be shared across multiple servers. Known as the SDI domain key, it removes the problems associated with encrypting data using server-specific keys. The SDI domain key can be shared across multiple servers so that any server in the domain can decrypt data.
The universal password environment requires OES NetWare on at least one of the servers in any replica ring that holds user objects that will leverage the universal password. To do this, identify the container(s) that holds the objects of those users who will be using universal password, and then locate the eDirectory partition in which that container resides and identify the server(s) that hold replicas of that partition. At least one of those servers will have to be an OES NetWare server.
Because of this requirement, universal passwords are not enabled by default in OES NetWare. However, as you plan your OES NetWare migration, plan to upgrade at least one server in each partition first and then move to other replica servers. This strategy will help smooth the way for using universal password throughout your network.
OES NetWare includes SDIDIAG.NLM for configuring the SDI domain in preparation for enabling universal password. Prior to creating the SDI domain, you should check any non-OES NetWare servers that you want in the SDI domain to see whether they meet the minimum requirements:
1. From the server console, load SDIDIAG.NLM.
2. Authenticate as an Admin user in the tree and click OK.
3. Enter the following command; if any problems are noted, use the information in SYS:SYSTEMSDINOTES.TXT to help you resolve them and then continue with the configuration:
CHECK -v >> sys:systemsdinotes.txt
4. (Conditional) Verify that each SDI domain key server that is not running OES NetWare is running NICI v2.4.2 or later. To do this, enter the following command at the server console of each server in the SDI domain:
M NICISDI.NLM
The version must be 24212.98 or later. If not, you must either upgrade the server to OES NetWare or update the NICI on this server to v2.4.2 or later.
Note
NICI v2.4.2 requires eDirectory 8.5.1 or later, so if you are running an older environment, the preparation for universal password can be significant. You can download NICI v2.4.2 from Novell’s support website at http://support.novell.com/filefinder/.
Based upon the results of the configuration tests, you can add or remove SDI domain key servers with SDIDIAG.NLM as well.
To add a server to the SDI domain, complete the following steps:
1. Load SDIDIAG.NLM at the server console.
2. Authenticate as an Admin user in the tree and click OK.
3. Enter the following command to add a server:
AS -s Full Server Name
For example:
AS –s .prv-serv1.provo.quills.quills-tree
To remove a server from the SDI domain, use the same process, but use the following command:
RS -s Server Name
For example:
RS –s .prv-serv1.provo.quills.quills-tree
After you have placed all the necessary servers in the SDI domain, use SDDIAG to check that each server has the cryptographic keys necessary to communicate securely with the other servers in the tree. To do this, complete the following steps:
1. Load SDIDIAG.NLM at the server console.
2. Authenticate as an Admin user in the tree and click OK.
3. Enter the following command to add a server:
CHECK –v >> sys:systemsdinotes.txt –n Container DN
For example, to check the container provo.quills in quills-tree, you would type the following:
CHECK –v >> sys:systemsdinotes.txt –n provo.quills.quills-tree
This operation reports any inconsistencies between the cryptographic keys on the various SDI domain servers. If any problems are noted, use the information in SYS:SYSTEMSDINOTES.TXT to help you resolve them and then continue with the configuration.
After all the pieces are in place, you are ready to enable universal password:
1. Launch iManager, open the NMAS Management link, and select Universal Password Configuration.
2. Specify the container for which you want to enable universal password and click View.
3. Select the Enable radio button and click Apply and OK.
The Novell Client software will start using universal password automatically. When you reset a password, you will actually be resetting the universal password, which transparently synchronizes the traditional NetWare and simple passwords for your users. They won’t notice any difference in behavior. However, this transparent synchronization is fully operational only when running OES NetWare with the latest Novell client software (version 4.9 or later for Windows 2000/XP clients and version 3.4 or later for Windows 95/98 clients). For more information on the specific capabilities of universal password when used in different combinations of NetWare, Novell Client, and various client services, see the NetWare 6.5 online documentation.
In addition to the actual login process, eDirectory provides a variety of login controls designed to help secure the network. Those controls are found in the properties of each user object. The various types of restrictions offered by eDirectory include
![]() Password restrictions
Password restrictions
![]() Login restrictions
Login restrictions
![]() Address restrictions
Address restrictions
![]() Intruder lockout
Intruder lockout
Note
You will also see an Account Balance tab. This is a leftover from a server accounting feature that is no longer supported in OES NetWare.
You can manage the various login controls from iManager or ConsoleOne. Login controls can be set on individual user objects, or they can be defined at the container level, where they will be automatically applied to all users in that container. To get to the login restrictions pages available through eDirectory, complete the following steps:
1. Launch iManager and select the View Objects icon. Locate the object for which you want to set login controls.
2. Click the object and select Modify Object.
3. Select the Restrictions tab and you will see a subpage for each of the controls listed previously. Select the appropriate page.
4. Make your changes and click OK to save your changes.
Each of the login control pages is described in more detail in the following sections.
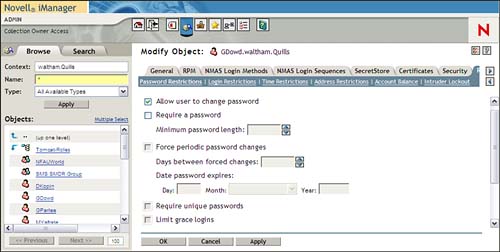
The Password Restrictions page enables you to set password characteristics for eDirectory users, as shown in Figure 7.2. By default, the only selected option is Allow User to Change Password. However, this will not provide any significant degree of security, so you should enable some of the other options:
![]() Allow User to Change Password—Checking this box permits the user to change the password associated with the user object.
Allow User to Change Password—Checking this box permits the user to change the password associated with the user object.
![]() Require a Password—Checking this box forces the user to set an account password. It also enables all other password options. Associated with this option is a Minimum Password Length field, which can be used to require passwords of at least a given number of characters. The default is
Require a Password—Checking this box forces the user to set an account password. It also enables all other password options. Associated with this option is a Minimum Password Length field, which can be used to require passwords of at least a given number of characters. The default is 5, but the value can be set from 1 to 128 characters.
![]() Force Periodic Password Changes—This field enables you to require users to change their passwords regularly. Associated with this option is a Days Between Forced Changes field, which defines how often the password must be changed. The default is
Force Periodic Password Changes—This field enables you to require users to change their passwords regularly. Associated with this option is a Days Between Forced Changes field, which defines how often the password must be changed. The default is 40, but the value can be set between 1 and 365 days.
![]() Date Password Expires—With this option you can define specific password expiration. It also shows when the password will next expire. When the user resets a password, the system will automatically reset this date forward by the number of days specified in the days between forced changes field.
Date Password Expires—With this option you can define specific password expiration. It also shows when the password will next expire. When the user resets a password, the system will automatically reset this date forward by the number of days specified in the days between forced changes field.
![]() Require Unique Passwords—Checking the Require Unique Passwords option enables eDirectory to track the last eight passwords used with this account and prevents the user from reusing these old passwords.
Require Unique Passwords—Checking the Require Unique Passwords option enables eDirectory to track the last eight passwords used with this account and prevents the user from reusing these old passwords.
Note
eDirectory does not implement any pattern recognition algorithms that force users to change the password to a significantly different value. Users can change the value by a single character and eDirectory will not complain. Similarly, eDirectory does not have an option for requiring numeric or special characters as part of the password.
![]() Limit Grace Logins—This option limits the number of times a user is allowed to log in after his password has expired. Associated with it are two fields. The Grace Logins Allowed field enables the administrator to set how many grace logins are permitted. The default is
Limit Grace Logins—This option limits the number of times a user is allowed to log in after his password has expired. Associated with it are two fields. The Grace Logins Allowed field enables the administrator to set how many grace logins are permitted. The default is 6, but the value can be set between 1 and 200. The Remaining Grace Logins field tracks how many grace logins remain before the account is locked out. The administrator can also reset this value to give an expired account more time to reset the password, if necessary.
![]() Set Password (link)—The Set Password link opens a Java utility to change the user’s password. You must first supply the existing password and then the new password.
Set Password (link)—The Set Password link opens a Java utility to change the user’s password. You must first supply the existing password and then the new password.
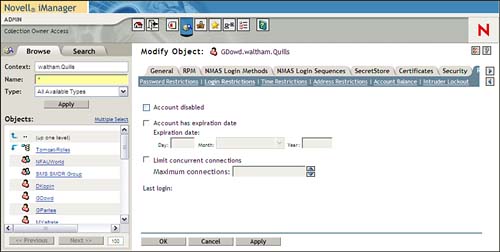
The Login Restrictions page enables you to control the capability of a user to log in to the network, as shown in Figure 7.3:
![]() Account Disabled—Checking this box disables the user account and prevents future login attempts. However, this will not affect a user who is currently logged in.
Account Disabled—Checking this box disables the user account and prevents future login attempts. However, this will not affect a user who is currently logged in.
![]() Account Has Expiration Date—Checking this box enables you to set a date when the user account will be automatically disabled. This option might be used for contract employees or consultants who will be working for a predefined period of time.
Account Has Expiration Date—Checking this box enables you to set a date when the user account will be automatically disabled. This option might be used for contract employees or consultants who will be working for a predefined period of time.
![]() Limit Concurrent Connections—Check this box to define how many times the same account can be used to log in from different workstations simultaneously. If enabled, the default is
Limit Concurrent Connections—Check this box to define how many times the same account can be used to log in from different workstations simultaneously. If enabled, the default is 1, but any value between 1 and 32,000 can be selected.
The Time Restrictions page enables you to limit the time(s) of day when a user can access the network, as shown in Figure 7.4. By default, there are no restrictions.
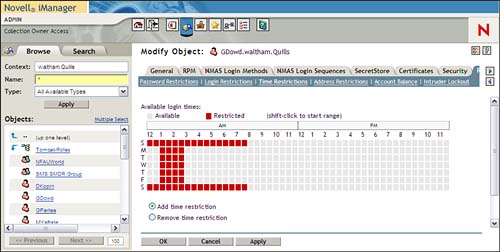
To set a time restriction, click the box for which you want the restriction to occur and then click Update to reflect the change. To select a range of time, hold down the Shift key while moving the mouse over the time range. Each block is 30 minutes. When finished, make sure to select OK to save the new restrictions to eDirectory. If users are logged in when their lockout period is reached, they are issued a five-minute warning, after which they are automatically logged out.
Note
One important caveat to time restrictions is that they are governed by the user’s home time and not his or her current time. For example, if a user in New York takes a trip to Los Angeles and is going to dial in to his home network, the time in New York rather than the time in Los Angeles will determine the time restriction. A 6:00 p.m. EST time restriction would shut the user down at 3:00 p.m. PST. Although that might give your employee time to get in a round of golf, it might not be what you intended when configuring the time restriction in the first place.
The Address Restrictions page can be used to tie a user account to a specific workstation, thereby forcing users to log in from that hardware location only. To add an address restriction, click the plus icon on the right side of the Content frame, which opens the Network Address screen, as shown in Figure 7.5.
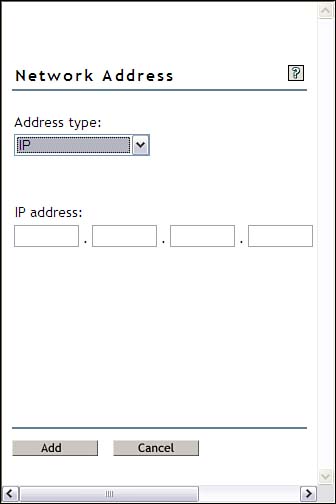
In today’s world of dynamic addressing and roaming users, this option is not as useful as it once might have been, but in very security-conscious environments, it can still be necessary. However, TCP/IP functionality is severely limited by the fact that the utility assumes a Class B subnet mask (255.255.0.0) for all IP addressing—not very practical in today’s overloaded IP world.
The Intruder Lockout page is useful only after a user account has been disabled. Intruder lockout refers to the disabling of a user account after a certain number of unsuccessful login attempts have been made. To re-enable a locked-out account, the administrator unchecks the Account Locked box on this page. The other three entries simply provide information about the status of the locked account.
The actual intruder detection system is configured at the container level rather than at the user level. To configure your intruder detection environment, complete the following steps:
1. Launch iManager and select the View Objects icon. Locate the container for which you want to set intruder detection.
2. Click the object and select Modify Object.
3. Select the Intruder Detection link, as shown in Figure 7.6.
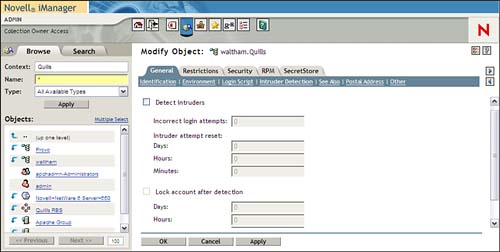
4. Make your changes and click OK:
![]() Detect Intruders—Check this box to enable the intruder detection system for this container. Associated with this check box are fields that enable you to set the number of incorrect login attempts before intruder lockout is activated—the default is
Detect Intruders—Check this box to enable the intruder detection system for this container. Associated with this check box are fields that enable you to set the number of incorrect login attempts before intruder lockout is activated—the default is 7—and the interval within which the unsuccessful attempts must occur—the default is 30 minutes.
![]() Lock Account After Detection—Check this box to enable the account lockout feature. Associated with this check box are fields that enable you to specify the time period for which the account will remain locked—the default is
Lock Account After Detection—Check this box to enable the account lockout feature. Associated with this check box are fields that enable you to specify the time period for which the account will remain locked—the default is 15 minutes. At the end of this period, the account will be reactivated automatically.
When configured, intruder lockout makes it much more difficult for would-be hackers to perform dictionary or other brute force attacks against one of your network accounts.
Now that users have authenticated to the network, you must provide them with access to all the resources they need. This also entails preventing them from accessing resources that they do not need. It wouldn’t do to have sensitive documents describing future products open to and accessible to just anyone. The reality of the corporate world is that some resources must be maintained as “need to know.”
Although determining exactly who needs access to what is a decision beyond most network administrators, Novell eDirectory provides powerful tools for implementing those decisions. This section discusses eDirectory access control concepts and how they work together to provide proper access to objects in the eDirectory tree.
Access control lists (ACLs) are stored in each eDirectory object to identify those other objects that have been granted some sort of control over it. Each object in an eDirectory tree maintains two types of access rights. The first set of rights is entry rights. Entry rights define how an object can be manipulated by other directory entities, as described in Table 7.1.
Table 7.1. Valid Entry Rights in eDirectory
|
ENTRY RIGHT |
DESCRIPTION |
|---|---|
|
|
Allows a trustee to discover and view the object in the eDirectory tree. |
|
|
This right applies only to container objects. It enables the trustee to create new objects within the container. |
|
|
Allows a trustee to delete the object. |
|
|
Allows a trustee to rename the object. |
|
|
Allows a trustee full access to the object and its attributes. |
The second set of rights is property rights. Property rights define how the attributes associated with an object can be manipulated. eDirectory property rights are described in Table 7.2.
Table 7.2. Valid Property Rights in eDirectory
|
PROPERTY RIGHT |
DESCRIPTION |
|---|---|
|
|
Allows a trustee to compare, or see, whether an attribute contains a given value. |
|
|
Allows a trustee to read an attribute value. This right confers the Compare right. |
|
|
Allows a trustee to add, delete, or modify an attribute value. This right confers the add or delete Self right to the attribute. |
|
|
Allows a trustee to add or delete its name as an attribute value (if applicable). |
|
|
Assigns a trustee all attribute rights. |
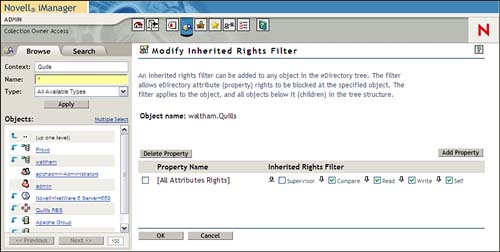
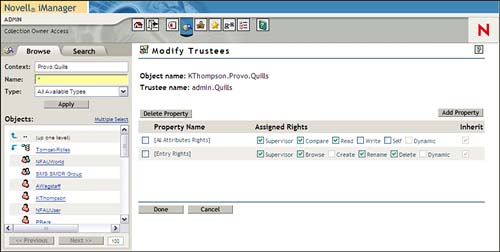
When entry and/or property rights are conferred to an eDirectory entity, it becomes a trustee of the conferring object. The list of trustees, and the specific object and property rights they have been granted, is maintained in an access control list associated with each eDirectory object. Figure 7.7 shows a representative ACL as seen from iManager.

As shown in Figure 7.7, the ACL maintains three pieces of information about a trustee assignment: object name, property name, and effective rights:
![]() Object Name—This field identifies the object that is being granted rights. It can also contain one of the special entry references outlined in Table 7.3.
Object Name—This field identifies the object that is being granted rights. It can also contain one of the special entry references outlined in Table 7.3.
Table 7.3. Special Trustee References in eDirectory
|
REFERENCE |
DESCRIPTION |
|---|---|
|
|
eDirectory uses this reference to mask or filter privileges rather than grant rights. |
|
|
eDirectory uses this reference to grant rights to all objects in the eDirectory tree, including both authenticated and nonauthenticated objects. |
|
|
eDirectory uses this reference to grant rights to all authenticated entries. |
|
|
eDirectory uses this reference to grant all rights to the client that created the object. |
|
|
eDirectory uses this reference to allow objects to add or delete themselves as values of attributes and to grant the object rights to its own attributes. |
![]() Property Name—This field specifies the type of right that is being granted. It also specifies how that right is to be applied. Rights can be assigned to a specific property, to all properties, or to the object itself.
Property Name—This field specifies the type of right that is being granted. It also specifies how that right is to be applied. Rights can be assigned to a specific property, to all properties, or to the object itself.
![]() Effective Rights—This field lists the rights that have been granted for a given property. In the eDirectory schema, most object classes specify a default access template that is used to create an ACL attribute for a new object. This default template provides basic access control for the new entry, enabling it to function in the directory. Different object classes have different default ACL templates to reflect their different needs. For example, the default ACL template for the user object grants the Write right to its own login script attribute. This enables users to change their personal login scripts as necessary.
Effective Rights—This field lists the rights that have been granted for a given property. In the eDirectory schema, most object classes specify a default access template that is used to create an ACL attribute for a new object. This default template provides basic access control for the new entry, enabling it to function in the directory. Different object classes have different default ACL templates to reflect their different needs. For example, the default ACL template for the user object grants the Write right to its own login script attribute. This enables users to change their personal login scripts as necessary.
Inheritance is one of the most powerful—and sometimes frustrating—concepts in eDirectory security planning. It is similar to the security equivalence concepts (discussed previously) in that it deals with the determination of effective rights at any given point in the eDirectory tree. On the one hand, inheritance promises to save untold amounts of work by automating the assignment of rights in the eDirectory tree. On the other hand, because of the way that inheritance works, things sometimes don’t happen exactly as you might have planned.
Novell has been using inheritance for a long time to apply rights to the NetWare file system. If a user was granted rights at a specific directory, those rights implicitly applied to everything from that point down in the directory structure—until explicitly removed. The same principle applies to eDirectory: If a user is granted rights at a given container object, those rights are implicitly applied to each object in the tree from that point downward—until explicitly removed.
eDirectory implements inheritance through a dynamic model. This means that rights are calculated in real-time whenever an eDirectory object attempts to perform any directory operation. To do this, eDirectory starts at [Root] and walks the tree down to the object, building a set of effective rights for that object along the way. If the effective rights for that object permit the requested operation, it is allowed to continue. If not, the operation is denied.
At first, it might seem very inefficient to traverse the eDirectory tree from [Root] each time effective rights need to be calculated—and it would be—except that eDirectory resolves this inefficiency through the use of external references.
External references exist to protect database integrity by storing information about partitions that do have local replicas. In other words, the Master replica of a child partition will maintain an external reference to [Root]. To determine the effective rights for a user, eDirectory need only consult the locally stored external references instead of potentially crossing the entire network to find the information it needs. This reduces network traffic and increases the speed of eDirectory tremendously. For more information on external references, see Chapter 6, “Novell eDirectory.”
Inherited Rights Filters (IRFs) are used to restrict inheritance in a directory tree. IRF use looks pretty straightforward on the surface, but it can cause all kinds of interesting situations to arise. More calls have been logged to Novell’s Technical Support groups because administrators got carried away with controlling every single aspect of eDirectory security instead of just trusting the environment to handle things properly.
Warning
Don’t implement IRFs unless you are absolutely sure you understand the consequences of doing so.
That said, it is sometimes desirable to limit the flow of rights through the eDirectory tree—either to segment administration or to isolate portions of the tree. If this becomes necessary, IRFs are the way to go. Just remember that less is usually more in this case. If you find yourself creating a large number of IRFs, it might be a sign of some fundamental eDirectory design issues. See Chapter 6 for more information on eDirectory tree design.
The first thing to recognize about IRFs is that they can filter supervisory rights in eDirectory, unlike supervisory rights in the NetWare file system. This makes it possible to limit the control of Admin users higher up in the tree, but it also threatens to destroy your capability to administer the directory tree properly.
To configure an IRF, complete the following steps:
1. Launch iManager and select the View Objects icon. Locate the container or object for which you want to set an IRF.
2. Click the object and select Modify Inherited Rights Filter.
3. Click Add Property to create an IRF.
4. Select the property for which you want to define an IRF and click OK. You can create an IRF for entry rights, for all properties, or for specific properties.
5. Uncheck those rights that you want to be blocked by the IRF and select OK to save your changes. The IRF properties page is shown in Figure 7.8.
Warning
It is very important that you remember the dynamic nature of rights calculation in eDirectory. For example, if you are going to create a container administrator and filter administrative rights to that container from above, create the new admin object first. If you set the IRF first, you will find yourself locked out—unable to define a user with administrative control for the container. An IRF is a two-edged sword.
Explicit rights are those specifically assigned to an object at some point in the eDirectory tree. When one object is given specific rights to another, it is called a trustee. To assign explicit rights, complete the following steps:
1. Launch iManager and select the View Objects icon. Locate the container or object for which you want to add a trustee.
2. Click the object and select Modify Trustees.
3. Click Add Trustee. Browse to the eDirectory object to which you want to assign trustee rights and click OK. You can select multiple objects.
4. Click the Assigned Rights link next to each object, specify the appropriate rights for this trustee and then click Done (see Figure 7.9):
![]() Property and Rights—Specify the rights you want to grant for this trustee. If you want to assign specific property rights only, click Add Property to select specific properties from a list. You can assign entry rights, all property (attribute) rights, specific property rights, or any combination of the three.
Property and Rights—Specify the rights you want to grant for this trustee. If you want to assign specific property rights only, click Add Property to select specific properties from a list. You can assign entry rights, all property (attribute) rights, specific property rights, or any combination of the three.
![]() Inheritable—If you are assigning a trustee to a container object, you can check the Inheritable box if you want those rights to flow down to other objects within the container.
Inheritable—If you are assigning a trustee to a container object, you can check the Inheritable box if you want those rights to flow down to other objects within the container.
Assigning explicit rights is a very straightforward process, but as with IRFs, there are some caveats. For example, unlike security equivalence, explicit assignments are not cumulative. An explicit assignment preempts the implicit rights that a user might have had through inheritance. Making explicit rights assignments can easily eliminate rights that existed previously. Make sure you understand what is being provided through inheritance and security equivalence, and how your explicit assignment will affect those existing rights, before making manual changes to trustee rights.
Security equivalence in eDirectory is used to assign one object identical eDirectory rights to those already assigned to another object. eDirectory offers explicit and implicit security equivalence. Under the rules of inheritance described previously, security equivalence will continue to flow down from the point it is granted. In other words, if JHarris in Provo.Quills is granted equivalence to the Admin object, those rights will be granted at [Root] just like they are for Admin. Equivalence provides a method to grant users in one area of the eDirectory tree rights to objects in another.
Tip
Using security equivalence is not an efficient way to manage access. If you find yourself using lots of security equivalences, it is a strong indication of a poor eDirectory tree design. See Chapter 6 for more information on eDirectory design.
Implicit security equivalence occurs automatically when an object is inserted into the eDirectory tree. Every eDirectory object has security equivalence with the following objects:
![]() The
The [Root] object
![]() The
The [Public] trustee
![]() Each container between it and
Each container between it and [Root]
Security equivalence to [Root] and [Public] provides basic access to eDirectory so that the new object can perform basic network tasks, such as navigating the directory, locating servers, and initiating an authentication request. All specific rights are derived from the inheritance from the container object(s) within which the object exists.
Explicit security equivalence is identical to implicit security equivalence, except the network administrator has to assign the equivalence manually. Use explicit security equivalence whenever one user needs identical explicit rights as another but cannot get those rights through normal inheritance or implicit security equivalence. To assign explicit security equivalence, complete the following steps:
1. Launch iManager and select the View Objects icon. Locate the container or object to which you want to grant security equivalence.
2. Click the object and select Modify Object.
3. Select the Security tab and click Security Equal To.
4. Specify the object to which this object will be security-equivalent and click OK.
5. Click OK to save the security equivalence.
Explicit security equivalence is most often used with group objects, which were discussed earlier in this chapter. Each member of an eDirectory group is assigned security equal to the group object. In this way each user receives the rights associated with that group. Contrary to rights assignment, security equivalence is cumulative. This means that an object’s implicit and explicit security equivalence will be added together to determine its effective rights.
The whole point of all the preceding rights controls is to ensure that a given user, or other eDirectory object, has the appropriate rights on the network to do what’s needed. Effective rights are the cumulative result of all the different rights tools working together. In the end, there are eight ways that one object can get rights to another:
![]() Object 1 is a trustee of Object 2. Therefore, Object 1 has explicit rights to Object 2.
Object 1 is a trustee of Object 2. Therefore, Object 1 has explicit rights to Object 2.
![]() A parent container of Object 1 is a trustee of Object 2. Therefore, Object 1 has rights to Object 2 because of implicit security equivalence.
A parent container of Object 1 is a trustee of Object 2. Therefore, Object 1 has rights to Object 2 because of implicit security equivalence.
![]() Object 1 has explicit security equivalence to Object 3, which is a trustee of Object 2. Therefore, Object 1 has trustee rights to Object 2, which are equivalent to Object 3.
Object 1 has explicit security equivalence to Object 3, which is a trustee of Object 2. Therefore, Object 1 has trustee rights to Object 2, which are equivalent to Object 3.
![]()
[Public] is a trustee of Object 2. Therefore, Object 1 has rights to Object 2 through implicit security equivalence to [Public].
![]()
[Public] is a trustee of a parent container of Object 2, and those rights flow down the tree due to inheritance. Therefore, Object 1 has rights to Object 2 through the combination of implicit security equivalence and inheritance.
![]() Object 1 is a trustee of one of Object 2’s parent containers, and those rights flow down the tree to include Object 2 due to inheritance.
Object 1 is a trustee of one of Object 2’s parent containers, and those rights flow down the tree to include Object 2 due to inheritance.
![]() A parent container of Object 1 is a trustee of a parent container of Object 2. Therefore, Object 1 has rights to Object 2 through a combination of explicit rights, implicit security equivalence, and inheritance.
A parent container of Object 1 is a trustee of a parent container of Object 2. Therefore, Object 1 has rights to Object 2 through a combination of explicit rights, implicit security equivalence, and inheritance.
![]() Object 1 is security-equivalent to Object 3, which is a trustee of a parent container of Object 2. Therefore, Object 1 has rights to Object 2 through the combination of explicit security equivalence and inheritance.
Object 1 is security-equivalent to Object 3, which is a trustee of a parent container of Object 2. Therefore, Object 1 has rights to Object 2 through the combination of explicit security equivalence and inheritance.
Note
Inherited rights filters cannot affect the effective rights in the first four cases because no inheritance is being used. However, IRFs can modify or eliminate the effective rights provided in the last four cases because they depend on inheritance.
With eight ways to derive effective rights between two objects, it’s easy to see how rights issues can get complicated very quickly. In most cases, the best solution is to let inheritance do the work of assigning rights wherever possible. The default combination of implicit security equivalence and dynamic inheritance is suitable for 90% of the directory installations out there.
Assign rights through containers and let them flow downward. As your directory tree evolves over time, situations can arise that cannot be satisfied by inheritance alone. If this happens, use groups, explicit assignments, and IRFs sparingly to address these exceptions.
When using IRFs, be careful that a single object doesn’t become a point of failure. Consider what might happen if a user object is corrupted, or if that user becomes malicious. Always have a second or third option for accessing a branch of the tree that is restricted. Just as the military establishes a chain of command so that the mission can continue if one person is lost, eDirectory administrators have to make sure that proper access can continue—or at least be repaired—if the default method of access is lost.
One exciting instance of authorization is the capability to assign specific administrative roles to users in the eDirectory tree. Although this was possible in a limited fashion with the use of organizational roles, iManager offers you a previously impossible level of control and ease-of-use. You can now define most any network activity as a role, and assign the eDirectory rights necessary to perform that activity to a user or group of users. For more information on configuring role-based administration with iManager, see Chapter 4.
The whole point of eDirectory-based security concepts, such as authentication and authorization, is to provide a secure environment within which data can be used and protected. The mantra of the 21st century is “information is power,” and you want to be sure you aren’t sharing your competitive advantage with your competitors.
OES NetWare leverages eDirectory to extend the idea of authorization to the server file system. The NetWare file system is manageable through the server, volume, folder, and file objects in eDirectory. In this way, you can manage file access through the same tools used to manage the rest of your network.
You can implement two types of security tools in the file system, either together or separately, to protect your files:
![]() Trustee rights—Trustee rights are equivalent to entry rights for eDirectory objects. Trustee rights define the possible actions that can be taken with volume, folder, and file objects, and who or what can perform those actions.
Trustee rights—Trustee rights are equivalent to entry rights for eDirectory objects. Trustee rights define the possible actions that can be taken with volume, folder, and file objects, and who or what can perform those actions.
![]() Attributes—Unlike trustee rights, which define acceptable behavior for different users and groups, attributes define the characteristics of individual volume, folder, or file objects. Because attributes trump trustee rights, they control the activities of all users, regardless of which trustee rights are assigned.
Attributes—Unlike trustee rights, which define acceptable behavior for different users and groups, attributes define the characteristics of individual volume, folder, or file objects. Because attributes trump trustee rights, they control the activities of all users, regardless of which trustee rights are assigned.
File system trustee rights enable users and groups to work with files and directories in specific ways. Each right determines whether a user can do things such as see, read, change, rename, or delete the file or directory. File system rights obey inheritance rules just like directory rights. When rights are assigned to a file, they define a user’s allowable actions for that file only. When rights are assigned to a directory, they affect a user’s allowable actions on not only the directory itself but also everything stored within that directory.
Although file system rights are similar in nature to the eDirectory rights for objects and properties (described earlier in this chapter), they are not the same thing. File system rights are separate from eDirectory rights. They affect only how users work with files and directories. eDirectory rights affect how users work with other eDirectory objects.
There are eight file system trustee rights. You can assign any combination of those file system rights to a user or group, depending on how you want that user or group to work.
Table 7.4 describes the available file system rights and how they affect directory and file access.
Table 7.4. File System Rights
|
FILE SYSTEM RIGHT |
ABBREVIATION |
DESCRIPTION |
|---|---|---|
|
Read |
R |
Directory:Allows the trustee to open and read files in the directory. File:Allows the trustee to open and read the file. |
|
W |
Directory:Allows the trustee to open and write to (change) files in the directory. File:Allows the trustee to open and write to the file. |
|
|
Create |
C |
Directory:Allows the trustee to create subdirectories and files in the directory. File:Allows the trustee to salvage the file if it was deleted. |
|
Erase |
E |
Directory:Allows the trustee to delete the directory and its files and subdirectories. File:Allows the trustee to delete the file. |
|
Modify |
M |
Directory:Allows the trustee to change the name, directory attributes, and file attributes of the directory and its files and subdirectories. File:Allows the trustee to change the file’s name or file attributes. |
|
File Scan |
F |
Directory:Allows the trustee to see the names of the files and subdirectories within the directory. File:Allows the trustee to see the name of the file. |
|
Access Control |
A |
Directory:Allows the trustee to change the directory’s IRF and trustee assignments. File:Allows the trustee to change the file’s IRF and trustee assignments. |
|
Supervisor |
S |
Directory:Grants the trustee all rights to the directory, its files, and its subdirectories. It cannot be blocked by an IRF. File:Grants the trustee all rights to the file. It cannot be blocked by an IRF. |
Note that an explicit Supervisor right can be added or removed only at the entry point to the file system (where you go from directory object to file system object).
Just like eDirectory rights, file system rights can be inherited. This means that if you have file system rights to a parent directory, you can also inherit those rights and exercise them in any file and subdirectory within that directory.
Inheritance keeps you from having to grant users file system rights at every level of the file system.
You can block inheritance by removing the right from the IRF of a file or subdirectory. As with directory objects, every directory and file has an inherited rights filter, specifying which file system rights can be inherited from a parent directory. By default, file and directory IRFs allow all rights to be inherited.
Inheritance can also be blocked by granting a new set of trustee rights to a subdirectory or file within the parent directory. As with the eDirectory rights, inherited and explicit file system rights are not cumulative. Explicit assignments replace the inherited rights from a parent directory.
Security equivalence for file system rights works the same way as security equivalence for eDirectory rights (explained earlier in this chapter). You can assign one user to have the same eDirectory rights and file system rights as another user by using the Security Equal To Me tab in an object’s properties page.
As with eDirectory rights, determining which file system rights a user can actually exercise in a file or directory can be confusing at first. A user’s effective file system rights are the file system rights that the user can ultimately execute in a given directory or file. The user’s effective rights to a directory or file are determined in one of two ways:
![]() A users’ inherited rights from a parent directory, minus any rights blocked by the subdirectory’s (or file’s) IRF
A users’ inherited rights from a parent directory, minus any rights blocked by the subdirectory’s (or file’s) IRF
![]() The sum of all rights granted to the user for that directory or file through direct trustee assignment and security equivalences to other users
The sum of all rights granted to the user for that directory or file through direct trustee assignment and security equivalences to other users
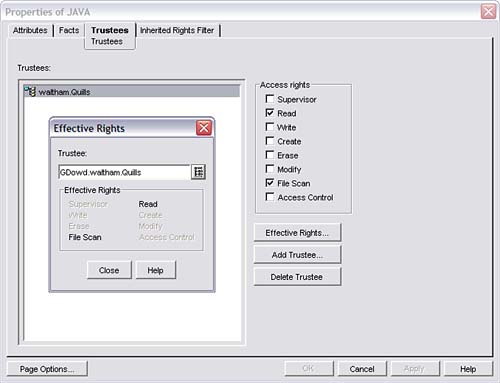
iManager can’t yet take you into the NetWare file system. You can assign rights at the volume level, but not at the directory or file level. Use ConsoleOne to work with file system rights. To see or change a user’s trustee assignments, complete the following steps:
1. Launch ConsoleOne and browse to the point in the file system, volume, folder, or file with which you want to work.
2. Right-click the folder/file and select Properties. Select the Trustees tab.
3. Click Effective Rights. Browse to the user object for which you want to view file system rights and click OK.
4. The user’s effective rights will be listed in black type, as shown in Figure 7.10.
You can make a user a trustee of a file system object by doing the following:
1. From the Trustees page, click Add Trustee. Browse to the user object you want and click OK.
2. Check those explicit file system rights that you want to grant the user and click OK.
If the user is already a trustee, simply highlight the appropriate user object in the Trustees window and perform step 2.
Changes to explicit security equivalence are done using the same process described previously in the “Authorization” section, earlier in this chapter.
Another important NetWare security tool for securing files and directories is attributes. Attributes are properties of files and directories that control what can happen to those files or directories. Attributes, which are also called flags, are different from trustee rights in several ways:
![]() Attributes are assigned directly to files and directories, whereas rights are assigned to users.
Attributes are assigned directly to files and directories, whereas rights are assigned to users.
![]() Attributes override rights. In other words, if a directory has the Delete Inhibit attribute, you can’t delete the directory even if you’ve been granted the erase right.
Attributes override rights. In other words, if a directory has the Delete Inhibit attribute, you can’t delete the directory even if you’ve been granted the erase right.
![]() Likewise, attributes don’t grant rights. Just because a file has the read-write attribute doesn’t mean you can write to it if you don’t have the Write right.
Likewise, attributes don’t grant rights. Just because a file has the read-write attribute doesn’t mean you can write to it if you don’t have the Write right.
![]() Attributes affect all users, including the Admin user.
Attributes affect all users, including the Admin user.
![]() Attributes affect some aspects of the file that rights do not, such as determining whether the files in a directory can be purged immediately upon deletion.
Attributes affect some aspects of the file that rights do not, such as determining whether the files in a directory can be purged immediately upon deletion.
Knowing these distinctions between file attributes and trustee rights will help you better understand the behavior of the NetWare file system.
Eight attributes apply to either files or directories. There are an additional six that apply only to files. These attributes are listed in Table 7.5.
Table 7.5. File and Directory Attributes
|
ATTRIBUTE |
FILE |
DIRECTORY |
DESCRIPTION |
|---|---|---|---|
|
Archive needed |
X |
Indicates that the file has been changed since the last time it was backed up. |
|
|
Execute-only |
X |
Prevents an executable file from being copied, modified, or deleted. Use with caution! After it’s assigned, it cannot be removed, so assign it only if you have a backup copy of the file. You may prefer to assign the Read-only attribute instead of the Execute-only attribute. |
|
|
X |
Allows the file to be opened and read, but not modified. All NetWare files in |
||
|
Sharable |
X |
Allows the file to be used by more than one user simultaneously. Useful for utilities, commands, applications, and some database files. All NetWare files in |
|
|
Hidden |
X |
X |
Hides the file or directory so it isn’t listed by the |
|
System |
X |
X |
Indicates a system directory that might contain system files (such as DOS files). Prevents users from seeing, copying, or deleting the directory. (However, does not assign the System attribute to the files in the directory.) |
|
Transactional |
X |
When used on database files, enables NetWare’s Transaction Tracking System (TTS) to protect the files from being corrupted if the transaction is interrupted. |
|
|
Purge immediate |
X |
X |
Purges the file or directory immediately upon deletion. Purged files can’t be salvaged. |
|
Delete inhibit |
X |
X |
Prevents users from deleting the file or directory. |
|
Rename inhibit |
X |
X |
Prevents users from renaming the file or directory. |
|
X |
X |
Prevents a file or directory from being migrated to another storage device. |
|
|
Immediate compress |
X |
X |
Compresses the file or directory immediately. |
|
Don’t compress |
X |
X |
Prevents the file or directory from being compressed. |
|
Don’t suballocate |
X |
Prevents a file from being suballocated. Use on files, such as some database files, that need to be enlarged or appended to frequently. (See Chapter 10 for information on block suballocation.) |
To assign attributes to a file or directory, complete the following steps:
1. Launch ConsoleOne and browse to the folder or file with which you want to work.
2. Right-click the object and select Properties.
3. Select the Attributes tab, shown in Figure 7.11. Check the attributes you want and select OK to accept your changes.
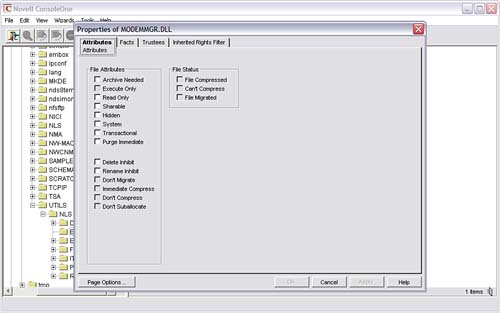
There are three File Status boxes on the Attributes page. These are informational and indicate the following:
![]() File Compressed—Indicates whether the selected file or folder is stored in a compressed format on the NetWare volume
File Compressed—Indicates whether the selected file or folder is stored in a compressed format on the NetWare volume
![]() Can’t Compress—Indicates that selected file compression would not achieve any significant space savings on this file
Can’t Compress—Indicates that selected file compression would not achieve any significant space savings on this file
![]() File Migrated—Indicates that the selected file has been moved to a secondary storage system, such as tape
File Migrated—Indicates that the selected file has been moved to a secondary storage system, such as tape
One other point of interaction between directory and file system is the login script. The eDirectory login script is a batch file that outlines basic operations that should be performed every time the user logs in to the network. Login script operations can include environment variables, drive mappings, program execution, and message display. Details of login script operation and configuration are available in Appendix B, “NetWare Login Scripts.”
NCP Packet Signature is a feature designed to prevent a would-be hacker from spoofing a network connection. Spoofing involves hijacking a connection by forging network packets that appear to be from a legitimate user connection. This feature requires workstations and servers to “sign” each NCP packet automatically with a signature and to change the signature for every packet.
Packet Signature is an optional security feature and can slow network performance on busy networks. Because spoofing requires access to a physical network connection, you might prefer not to use packet signatures if your network is in a relatively trusted environment or if the threat of intruders stealing sensitive information is low.
There are four levels of NCP Packet Signature, which must be set on both workstations and servers. If the levels on the workstation and server don’t form an allowable combination, the two computers will not be able to communicate with each other.
To set the signature level on a server, launch NoRM and select Set Parameters in the Navigation frame. Select NCP in the right frame. Look for NCP Packet Signature Option. You can also set the packet signature level from the server console prompt by typing
SET NCP PACKET SIGNATURE OPTION=number
Replace number with the signature level (0 through 3) you want the server to use. After the server has been booted, you can execute the SET command to increase the signature level. If you want to decrease the level, however, you have to reboot the server. Table 7.6 shows the NCP Packet Signature levels.
Table 7.6. Server Levels for NCP Packet Signature
|
LEVEL |
DESCRIPTION |
|---|---|
|
0 |
Does not sign packets |
|
1 |
Signs packets only if so requested by other entity |
|
2 |
Prefers to sign packets, but will still communicate with an entity that cannot sign |
|
3 |
Both entities must sign packets |
To set the signature level on a Windows workstation, complete the following steps:
1. Right-click the red N in the system tray and select Novell Client Properties.
2. Select the Advanced Settings tab and browse to Signature Level.
3. Select the appropriate level, 0[nd]3, and click OK to save your changes.
Figure 7.12 shows how the signature levels on servers and workstations combine to allow unsigned packets, force signed packets, or deny login.
Starting with NetWare 5, Novell has provided a comprehensive security infrastructure. It provides the foundation for delivering advanced security solutions with NetWare and eDirectory. NICI provides all cryptography-related services to eDirectory and its related services. Novell Certificate Server provides a public key infrastructure that integrates with today’s standards-based security systems.
NICI and Certificate Server work largely behind the scenes to provide critical services to your network. Hopefully, you won’t have to do much with them directly, but it is good to know a little about them to better understand how your network operates.
NICI is a modular security framework that is responsible for all cryptographic services in the NetWare and eDirectory environments. The advantage of using NICI as a security foundation is that it eliminates the need to build cryptographic functionality into each application. Because of varied export laws across countries, applications would have to be written in several versions if they were to be used worldwide.
NICI consolidates all cryptographic functionality into eDirectory. Applications leverage the existing cryptographic infrastructure and do not have to worry about multiple versions. It also means that all security management can take place from eDirectory management tools. The modular nature of NICI enables the support of varied cryptographic export laws through the policy manager in NICI. NICI prevents the insertion and use of cryptographic modules that would violate export laws. Because of this, NICI has received export approval from the United States. All applications that leverage NICI for their cryptographic functions need only to pass a cursory export review, rather than having to endure the whole process.
Certificate Server is a set of services that implements a Public Key Infrastructure (PKI) to create key public key-pairs, generate certificates, import externally generated certificates, and revoke expired or invalid certificates.
PKI is also referred to as asymmetric encryption. Asymmetric encryption algorithms were developed in the 1970s as a way to avoid having to transmit cryptographic keys to those who needed to be able to decrypt secure messages. Asymmetric encryption uses a mathematically related key-pair instead of a single key to provide the encryption and decryption capabilities. When a message is encrypted using an asymmetric key, it can only be decrypted using the other half of the key-pair.
In a PKI, each person is assigned a key-pair and one of those keys is published as the public key (see Figure 7.13). The other is carefully guarded as the private key. If someone wants to send you a secure message, he encrypts it using your public key and sends it out. The sender knows the only person who can decrypt that message is the person with the other half of the key-pair—you!
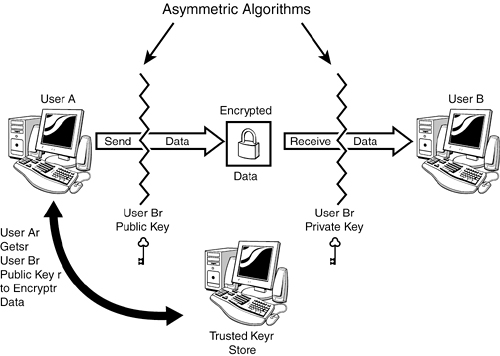
Switching to the receiving end of that secure message (see Figure 7.14), you decrypt the message using your private key and find out that it is a note from the sender—except that you can’t be sure he or she was actually the person that authored it. What if someone is attempting to impersonate the sender by sending you a forged message? Well, PKI also solves this problem by providing the capability to “sign” a message electronically.
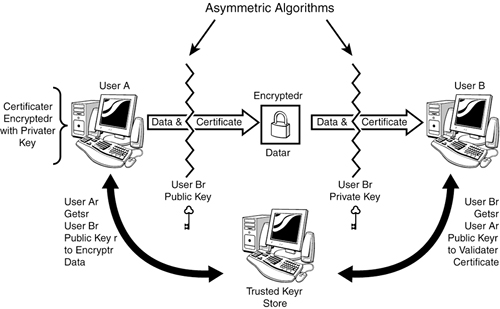
The next hurdle for PKI is creating repositories for all the public keys that are in use. Public keys are stored, together with vital statistics about the owner, in a standard certificate format known as X.509. These certificates can then be stored in large databases known as Certificate Authorities (CA). Certificate Server provides organizations the capability to use eDirectory as a CA. Cryptographic keys and certificates can be created and/or managed by eDirectory. Certificate Server can also interact with external entities, such as VeriSign or Entrust, through the use of standard communication protocols and certificate formats. Certificate Server supports the dominant standards in the security space. You can make eDirectory the hub for all your security needs, from secure authentication and resource access to secure communications with external parties and non-repudiation of business-critical communications.
When OES NetWare is installed, all the necessary security objects are created automatically, including an organizational certificate authority and the necessary key-pairs to support cryptographic activities. During the installation, two server certificates are created: one for DNS and one for IP. These certificates are used to create secure SSL connections with client workstations. You can also create other server certificates, as needed, to support additional secure services on your OES NetWare servers. To create a server certificate, complete the following steps:
1. Make sure you are logged in to the eDirectory tree as an administrator with supervisory rights to the container in which the server resides.
2. Launch iManager and open the Novell Certificate Server link in the Navigation frame.
3. Select Create Server Certificate. After the Server Certificate Wizard opens, specify the requested information and click Next:
![]() Server—Specify the server that will own the certificate that is being created.
Server—Specify the server that will own the certificate that is being created.
![]() Certificate Nickname—Specify the name of your server certificate. This name will be combined with the server name to create a unique name for the server certificate object.
Certificate Nickname—Specify the name of your server certificate. This name will be combined with the server name to create a unique name for the server certificate object.
![]() Creation Method—Select the method for creating the certificate. Standard uses typical certificate parameters, whereas Custom enables you to define each option manually. Import enables you to specify a PKCS#12 file from which to get the necessary data.
Creation Method—Select the method for creating the certificate. Standard uses typical certificate parameters, whereas Custom enables you to define each option manually. Import enables you to specify a PKCS#12 file from which to get the necessary data.
Follow the prompts from there to complete the installation. If you select Custom, be prepared to supply the following information:
![]() CA that will sign the certificate (default: your organizational CA)
CA that will sign the certificate (default: your organizational CA)
![]() Key size (default: 2048 bits)
Key size (default: 2048 bits)
![]() Key type (default:
Key type (default: SSL)
![]() Algorithm for creating the certificate (default:
Algorithm for creating the certificate (default: SHA-1)
![]() How long the certificate will remain valid (default:
How long the certificate will remain valid (default: 2 years)
![]() Certificate root (default: your organizational certificate)
Certificate root (default: your organizational certificate)
To make use of a PKI, users must have key-pairs and certificates of their own. Complete the following steps to create a user certificate:
1. Make sure you are logged in to the eDirectory tree as a user with supervisory rights to the user objects as well as rights to read objects in the security container.
2. Launch iManager and open the Novell Certificate Server Management link in the Navigation frame.
3. Select Create User Certificate. After the User Certificate Wizard opens, specify the user object(s) for which you want to create a digital certificate and click Next.
4. Specify the requested information and click Next:
![]() Server—Specify the server that will own the certificate that is being created.
Server—Specify the server that will own the certificate that is being created.
![]() Certificate nickname—Specify the name of the user certificate. This name will be combined with the user object name to create a unique certificate object name.
Certificate nickname—Specify the name of the user certificate. This name will be combined with the user object name to create a unique certificate object name.
![]() Creation method—Select the method for creating the certificate. Standard uses typical certificate parameters, whereas Custom enables you to define each option manually.
Creation method—Select the method for creating the certificate. Standard uses typical certificate parameters, whereas Custom enables you to define each option manually.
Follow the prompts from there to create the user certificate(s). If you select Custom, be prepared to provide the same type of information as previously specified for the server certificate.
One of the most important overall aspects of network and organizational security is the capability of monitoring and demonstrating compliance with security processes. Novell Nsure Audit provides the tools you need to audit compliance with security policies and external regulations.
An auditing strategy requires that you first define an appropriate security policy, based on the realities of your organization, the requirements of your industry, and the business climate. After this is done, Nsure Audit can help you monitor compliance with those policies and determine the policy’s overall effectiveness.
To do this, Nsure Audit can monitor and log network events relevant to your defined security policies. You can also configure Notification Filters to let you know, in real time, when a policy violation occurs and potentially trigger an automated response to the violation.
Novell Nsure Audit uses a modular architecture. Depending on usage, these components can be located on a single server or distributed across multiple servers. The full auditing system consists of the following components:
![]() Secure Logging Server—The Secure Logging Server is the server component of the Nsure Audit client/server architecture. It receives incoming events and requests from the Platform Agents; logs information to the data store; monitors designated events; and provides filtering, notification, and automatic reset services according to the specified audit policy.
Secure Logging Server—The Secure Logging Server is the server component of the Nsure Audit client/server architecture. It receives incoming events and requests from the Platform Agents; logs information to the data store; monitors designated events; and provides filtering, notification, and automatic reset services according to the specified audit policy.
![]() Platform Agent—The Platform Agent is the client component of the Nsure Audit client/server architecture. It receives audit data from the system applications and securely transmits it to the Secure Logging Server.
Platform Agent—The Platform Agent is the client component of the Nsure Audit client/server architecture. It receives audit data from the system applications and securely transmits it to the Secure Logging Server.
![]() Data Store—The Data Store stores and protects the audit log. It allows only the Logging Service to write to the audit database. In addition to the MySQL database that is included with OES NetWare, Nsure Audit also supports Oracle, Microsoft SQL Server, Syslog, and flat file database environments.
Data Store—The Data Store stores and protects the audit log. It allows only the Logging Service to write to the audit database. In addition to the MySQL database that is included with OES NetWare, Nsure Audit also supports Oracle, Microsoft SQL Server, Syslog, and flat file database environments.
![]() Reporting Applications—iManager and Nsure Audit Report function as reporting applications that enable you to access and view audit data.
Reporting Applications—iManager and Nsure Audit Report function as reporting applications that enable you to access and view audit data.
For more information on the Nsure Audit architecture, see the OES online documentation at http://www.novell.com/documentation.
You can install Nsure Audit as part of your initial server installation, or you can install it after the fact. The installation process will include the following general steps:
![]() Select and configure a database that will function as the event repository for the Nsure Audit.
Select and configure a database that will function as the event repository for the Nsure Audit.
![]() Install the Secure Logging Server component of Nsure Audit on a single server in your tree.
Install the Secure Logging Server component of Nsure Audit on a single server in your tree.
![]() Install the Nsure Audit iManager plug-in on your iManager server.
Install the Nsure Audit iManager plug-in on your iManager server.
![]() Install the Platform Agent component and instrumentation on each system on a supported platform that will report events.
Install the Platform Agent component and instrumentation on each system on a supported platform that will report events.
You will use the same process to install any, or all, of the Nsure Audit components onto a NetWare server. To install Nsure Audit from iManager, complete the following steps:
1. Launch iManager, open the Install and Upgrade link, and then select Install NetWare 6.5 Products.
2. Click Remote Product Install in the right frame.
3. Browse to the location of the OES NetWare CD 1 (Operating System) and click OK.
4. Browse to and select the server to which you want to install Nsure Audit and click Next. Authenticate as an Admin user to the server you selected.
5. At the Components screen, select Novell Nsure Audit Starter Pack and click Next.
Note
If not already installed, select iManager, Apache, Tomcat4 servlet container as part of the installation. If you are going to use MySQL as the Nsure Audit database and it is not yet installed, select MySQL as well.
6. At the Summary screen, select Copy Files to install Nsure Audit. You need to insert or specify the location of the OES NetWare CD 2 (Products).
7. At the Component Selection screen, make your selections and click Next:
![]() Install Secure Logging Server—Select this option to install the Secure Logging Server functionality to this server. The Secure Logging Server should be installed to one, and only one, server per eDirectory tree.
Install Secure Logging Server—Select this option to install the Secure Logging Server functionality to this server. The Secure Logging Server should be installed to one, and only one, server per eDirectory tree.
![]() (Conditional) Autoconfigure MySQL—If this server will function as the Secure Logging Server, select this option to set up the MySQL database to function as the Nsure Audit database. This option will fail if MySQL is not already installed or selected for installation together with Nsure Audit.
(Conditional) Autoconfigure MySQL—If this server will function as the Secure Logging Server, select this option to set up the MySQL database to function as the Nsure Audit database. This option will fail if MySQL is not already installed or selected for installation together with Nsure Audit.
![]() Install Platform Agent—Select this option to permit this server to send audit events to the Secure Logging Server.
Install Platform Agent—Select this option to permit this server to send audit events to the Secure Logging Server.
![]() Secure Logging Server Address—If this server is not the Secure Logging Server, specify the IP address of the Secure Logging Server to which it will send its audit events. By default, this field specifies
Secure Logging Server Address—If this server is not the Secure Logging Server, specify the IP address of the Secure Logging Server to which it will send its audit events. By default, this field specifies localhost, meaning that this server also functions as the Secure Logging Server.
8. (Conditional) At the Database Options screen, provide the required information and click Next. If you selected the Autoconfigure MySQL option, the installation program displays the Database Options window so you can configure MySQL for use with Nsure Audit:
![]() MySQL Database Host—The IP Address or host name of the MySQL database server. By default, this field specifies
MySQL Database Host—The IP Address or host name of the MySQL database server. By default, this field specifies localhost, meaning that this server also functions as the Secure Logging Server.
![]() Port—Defines the port at which the Secure Logging Server connects to the database server. If this field is left blank, the Secure Logging Server uses the default MySQL port assignment,
Port—Defines the port at which the Secure Logging Server connects to the database server. If this field is left blank, the Secure Logging Server uses the default MySQL port assignment, 3306.
![]() DB Username—User account the Secure Logging Server uses to log in to the database. This account has all privileges to the default database and can log in from any IP address. The default username is
DB Username—User account the Secure Logging Server uses to log in to the database. This account has all privileges to the default database and can log in from any IP address. The default username is auditusr.
![]() DB User Password—Password the logging server uses to authenticate with the database. You must confirm this password. The default password is
DB User Password—Password the logging server uses to authenticate with the database. You must confirm this password. The default password is auditpwd.
![]() Database Name—Name of the database to which the logging server writes events. The default database name is
Database Name—Name of the database to which the logging server writes events. The default database name is naudit.
![]() Table Name—Database table to which the logging server writes events. The default table is
Table Name—Database table to which the logging server writes events. The default table is log.
9. At the Installation Complete screen, click Close to complete the installation.
After it’s installed, Nsure Audit must be configured prior to use. The next section provides a brief introduction to the components used to configure the Nsure Audit environment.
During the installation process, Nsure Audit creates eDirectory objects that you will use to configure and manage the audit environment:
![]() Logging Services container—The logging services container is created at the root of your eDirectory tree. In most cases, you will place most of your Nsure Audit objects in this container.
Logging Services container—The logging services container is created at the root of your eDirectory tree. In most cases, you will place most of your Nsure Audit objects in this container.
![]() Logging Server object—The logging server object represents the physical server where the Secure Logging Server is loaded. It stores all the properties and attributes for the Secure Logging Server.
Logging Server object—The logging server object represents the physical server where the Secure Logging Server is loaded. It stores all the properties and attributes for the Secure Logging Server.
![]() Channel containers and objects—Channel objects enable you to define the manner in which Nsure Audit provides event notification and log events. Channel objects are stored in a channel container. By default, a channel container is created within the logging services container when Nsure Audit is first installed.
Channel containers and objects—Channel objects enable you to define the manner in which Nsure Audit provides event notification and log events. Channel objects are stored in a channel container. By default, a channel container is created within the logging services container when Nsure Audit is first installed.
![]() Application containers and objects—Application objects represent applications that log to or request information from Nsure Audit. Application objects store an application’s authentication information and its associated log schema, which catalogs the events that can be logged to that application. Application objects are stored in an application container. By default, an application container is created within the logging services container when Nsure Audit is first installed.
Application containers and objects—Application objects represent applications that log to or request information from Nsure Audit. Application objects store an application’s authentication information and its associated log schema, which catalogs the events that can be logged to that application. Application objects are stored in an application container. By default, an application container is created within the logging services container when Nsure Audit is first installed.
![]() Notification Containers and Objects—Notification objects represent specific events tracked by Nsure Audit. They specify what event should be watched for and the associated action when the event is encountered. Notification objects are stored in a notification container. By default, a notification container is created within the logging services container when Nsure Audit is first installed.
Notification Containers and Objects—Notification objects represent specific events tracked by Nsure Audit. They specify what event should be watched for and the associated action when the event is encountered. Notification objects are stored in a notification container. By default, a notification container is created within the logging services container when Nsure Audit is first installed.
All configuration and management of the Nsure Audit environment is handled from iManager. You can create and edit Nsure Audit objects from the Object view (see Figure 7.15).
Nsure Audit is a robust enterprise auditing system, and the specifics of its configuration will depend on your organization’s needs, the applications and events that will be monitored, and the types of notifications that you want to result from those events. For detailed information on configuring Nsure Audit, refer to the OES online documentation at http://www.novell.com/documentation.