
![]() To create and manage eDirectory objects, you can use iManager for most tasks. However, ConsoleOne is still available and more efficient in some cases. Use what you like.
To create and manage eDirectory objects, you can use iManager for most tasks. However, ConsoleOne is still available and more efficient in some cases. Use what you like.
![]() To manage replicas and partitions, use iManager.
To manage replicas and partitions, use iManager.
![]() To manage the eDirectory schema, use iManager.
To manage the eDirectory schema, use iManager.
![]() To prevent WAN links from being kept open excessively, use iManager to configure WAN Traffic Manager to restrict routine WAN traffic to specific times or days (or to other limits you specify).
To prevent WAN links from being kept open excessively, use iManager to configure WAN Traffic Manager to restrict routine WAN traffic to specific times or days (or to other limits you specify).
![]() eDirectory manages most popular indexes automatically, with no intervention on your part.
eDirectory manages most popular indexes automatically, with no intervention on your part.
![]() You can view the list of default indexes with ConsoleOne by selecting the Indexes tab in Server object, Properties. You can also create custom indexes from this page.
You can view the list of default indexes with ConsoleOne by selecting the Indexes tab in Server object, Properties. You can also create custom indexes from this page.
![]() Use iManager to merge eDirectory trees by selecting the Merge Tree option under eDirectory Maintenance. You can also use the console-based
Use iManager to merge eDirectory trees by selecting the Merge Tree option under eDirectory Maintenance. You can also use the console-based DSMERGE.NLM.
![]() LDAP services for eDirectory provide robust eDirectory access to LDAP clients. Using ConsoleOne or iManager, configure LDAP through the LDAP Server and LDAP Group objects in eDirectory.
LDAP services for eDirectory provide robust eDirectory access to LDAP clients. Using ConsoleOne or iManager, configure LDAP through the LDAP Server and LDAP Group objects in eDirectory.
![]() Use iManager to configure DNS and DHCP services for eDirectory.
Use iManager to configure DNS and DHCP services for eDirectory.
![]() To monitor eDirectory messages, use Trace from iMonitor or one of the DSTrace utilities from the server console.
To monitor eDirectory messages, use Trace from iMonitor or one of the DSTrace utilities from the server console.
![]() Use iMonitor to repair an eDirectory tree (click the Repair icon in the header frame). You can also use the eDirectory option in iManager. Some repair operations also require the use of console-based
Use iMonitor to repair an eDirectory tree (click the Repair icon in the header frame). You can also use the eDirectory option in iManager. Some repair operations also require the use of console-based DSREPAIR.NLM.
To understand Novell eDirectory, you must first invert the standard view of network architecture. Many people assume that because the directory requires a Network Operating System (NOS) on which to run that it is part of the NOS. In reality, it is just the opposite. The directory defines the “world” of your network. As such, network servers are part of the directory, not vice versa. This is a critical shift in thinking if you are going to work effectively with directories in today’s complex computing environments.
In the simplest of terms, eDirectory is a distributed and replicated database of network information that provides your network with four key services:
![]() Discovery—eDirectory makes it possible to browse, search, and retrieve information about the network. You can search for objects such as users, printers, and applications, or for specific properties of objects such as names, phone numbers, and configurations.
Discovery—eDirectory makes it possible to browse, search, and retrieve information about the network. You can search for objects such as users, printers, and applications, or for specific properties of objects such as names, phone numbers, and configurations.
![]() Security—eDirectory provides a central point for authentication and access control across your entire network. You can grant specific rights to users or groups of users, control the flow of data across the network, and protect sensitive or personal information through the use of cryptographic technologies. Most importantly, eDirectory provides the foundation for managing security across networks so you can safely and efficiently communicate with partners, suppliers, and customers without having to create a separate infrastructure to do so.
Security—eDirectory provides a central point for authentication and access control across your entire network. You can grant specific rights to users or groups of users, control the flow of data across the network, and protect sensitive or personal information through the use of cryptographic technologies. Most importantly, eDirectory provides the foundation for managing security across networks so you can safely and efficiently communicate with partners, suppliers, and customers without having to create a separate infrastructure to do so.
![]() Storage—eDirectory is at its heart a database. As such, it includes the capabilities to safely and securely store network data and protect it from corruption. It also provides a way to classify different data types so you can manage the type of data in eDirectory and determine how it can be used. Finally, eDirectory enables you to split the database into discrete pieces and distribute those pieces across multiple servers to provide fault tolerance and improved performance for network users.
Storage—eDirectory is at its heart a database. As such, it includes the capabilities to safely and securely store network data and protect it from corruption. It also provides a way to classify different data types so you can manage the type of data in eDirectory and determine how it can be used. Finally, eDirectory enables you to split the database into discrete pieces and distribute those pieces across multiple servers to provide fault tolerance and improved performance for network users.
![]() Relationship—eDirectory enables you to model relationships between objects on the network so you can move configuration information away from specific devices and make it global. Practically, this means that users can receive their profiles, privileges, and services regardless of location, connection device, or network access point. This is the foundation for providing a relatively new set of services known as Secure Identity Management (SIM), which would not be possible without a robust directory at its core.
Relationship—eDirectory enables you to model relationships between objects on the network so you can move configuration information away from specific devices and make it global. Practically, this means that users can receive their profiles, privileges, and services regardless of location, connection device, or network access point. This is the foundation for providing a relatively new set of services known as Secure Identity Management (SIM), which would not be possible without a robust directory at its core.
Novell released its first version of eDirectory, then known as NetWare Directory Services, in 1993 with NetWare 4. It has been in constant improvement since that time, making it the most advanced and widely used directory in the world. The name was changed to Novell Directory Services with the release of NetWare 5 in 1998. In 2000, Novell’s directory was rechristened Novell eDirectory, and was modularized so that it can be installed on platforms other than NetWare—including Linux, Windows 2000/XP, and various flavors of Unix. The following sections provide you with an overview of eDirectory architecture, design considerations, and common administrative tasks and the tools needed to do them.
There are three main aspects to the eDirectory architecture:
![]() Physical database
Physical database
![]() Rules governing data
Rules governing data
![]() Organization of data
Organization of data
Each of these is addressed individually in the sections that follow.
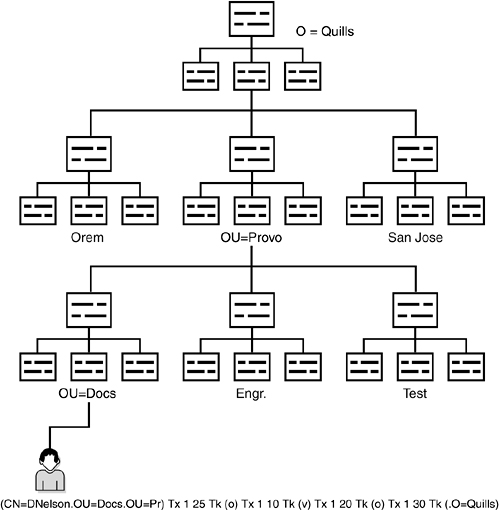
At its lowest physical level, eDirectory is a database. A typical database comprises a dataset together with methods of searching and retrieving specific data from the dataset. eDirectory is an object-oriented, hierarchical database. A hierarchical database maintains data (objects) in a logical tree structure. Specific objects are located by traversing (walking) the tree. Each object in the eDirectory database is uniquely identifiable by a combination of the object name, or Common Name (CN), together with information describing the location of that object within the tree, or Context. Figure 6.1 shows a possible tree structure and the relationship between object name and logical position within the directory. The combination of Common Name and Context is known as the Distinguished Name.
The underlying eDirectory database is organized as a b-tree, which those of you with a programming background will recognize as a well-known type of data structure. B-trees are ordered, or sorted, trees in which the root node always stores values at the midpoint of the sorted value set. As new elements are added, the tree automatically reorders itself. The eDirectory b-tree nodes contain multiple elements, each of which is a directory object.
The result of these two characteristics is a data structure in which a huge number of elements can be stored, and elements that are stored can be located very quickly.
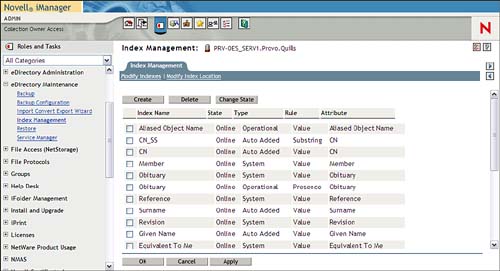
The eDirectory database also makes extensive use of indexing. Data is sorted in a variety of ways to decrease the time required to locate a given piece of data even more. Each index is a smaller b-tree structure that is automatically updated whenever any relevant piece of the database is added, changed, or deleted. When a query is received by eDirectory, internal logic determines what index, if any, should be used to most efficiently respond to the query. Figure 6.2 shows you some of the default indexes created by eDirectory. You can also add custom indexes by completing the following steps:
1. Launch iManager.
2. In the Navigation frame, open the eDirectory Maintenance group and click Index Management.
3. In the Content frame, select the server for which you want to manage indexes.
4. Click Create. Provide the required information and click OK.
![]() Name—Specify a name for the new index.
Name—Specify a name for the new index.
![]() Attribute—Select the attribute on which the new index should be sorted.
Attribute—Select the attribute on which the new index should be sorted.
![]() Rule—Select the type of index you want created from the drop-down list. Select Presence to create an index based on whether the specified attribute has a value. Select Value to create an index based on values of the specified attribute.
Rule—Select the type of index you want created from the drop-down list. Select Presence to create an index based on whether the specified attribute has a value. Select Value to create an index based on values of the specified attribute.
eDirectory will automatically create the index based on your configuration choices.
Rules defining valid object types, where they can be stored, and what can be done with each of the object types are maintained within the eDirectory schema. The schema provides the structure to the eDirectory tree. The schema is comprised of a set of object classes. Object classes describe the types of objects that can be created in eDirectory. Each object class contains a set of attributes that specifies the type(s) of data that can be stored within each object. In this way, the schema creates the logical view of the eDirectory data that network administrators and users make use of every day.
Novell provides a base set of object classes in eDirectory but has recognized that it cannot account for every possible use of the directory. To address this, the eDirectory schema is extensible, meaning that third parties are free to define new object classes and attributes to extend eDirectory capabilities.
eDirectory organization has two aspects: the physical organization and the logical organization. Physical organization of data in eDirectory revolves around its distributed nature and the need to provide fault tolerance for the eDirectory database. Each piece of the total eDirectory database is known as a partition.
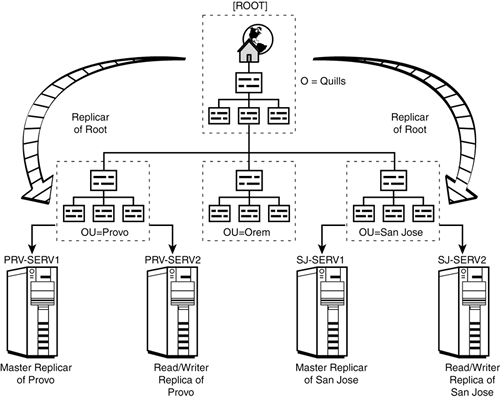
To make the data contained in a given partition more secure and accessible, multiple copies of that partition can be stored across the network. This process of creating and maintaining multiple partition copies is known as replication, as shown in Figure 6.3. Replication is an extremely powerful capability, and Novell has designed eDirectory with a complex set of checks and balances to maintain the integrity of directory data across the distributed environment.
The logical organization of data in eDirectory determines how data will be presented to users and administrators. The logical organization is what you see when you look at eDirectory. The schema controls this logical eDirectory organization. The schema essentially defines the types of data that can be stored in eDirectory and the acceptable set of operations that can be performed on that data.
The eDirectory schema defines a class of objects that can store other objects. These are known as container objects, or simply as containers. Containers are the building blocks used to create the structure of the eDirectory tree. Objects that cannot hold other objects are known as leaf objects. Leaf objects define the actual network resources available in the eDirectory tree.
Each class of leaf object contains a unique set of attributes that describe the data and functionality associated with that object. Leaf objects can include users, printers, network routers, applications, or even other databases. Because the eDirectory schema is fully extensible, new object classes can be defined and created within eDirectory by anyone who might need them.
A key purpose of implementing a network directory is to make the operation of the network more efficient and easy to use. Unfortunately, this means that the directory cannot be rolled out without any consideration for the environment into which it is being installed. There are a few basic rules that should be followed when designing an eDirectory tree:
![]() The top of the tree reflects the physical layout.
The top of the tree reflects the physical layout.
![]() The bottom of the tree reflects the organizational structure.
The bottom of the tree reflects the organizational structure.
![]() Organize objects to facilitate access and administration.
Organize objects to facilitate access and administration.
![]() Partition and replicate for scalability and fault tolerance.
Partition and replicate for scalability and fault tolerance.
Each of these issues is addressed in the sections that follow.
The top one or two levels of an eDirectory tree form the foundation for everything that comes later. If these levels are not configured properly, the whole tree suffers. Similar to the construction of a house, the eDirectory tree foundation needs to be stable and not prone to changes in structure.
The stable part of an organization tends to be its capital assets (buildings and equipment). Organizational structure might change and merge, but it still generally uses the same physical facilities. Make use of this stability by designing the foundation of the eDirectory tree around physical locations.
There are four main points to address when designing the top levels of the eDirectory tree:
![]() Name the tree
Name the tree [Root].
![]() Determine use of country and locality objects.
Determine use of country and locality objects.
![]() Define the organization object.
Define the organization object.
![]() Define location-based organizational unit objects.
Define location-based organizational unit objects.
When you name your eDirectory tree, you are naming the [Root] object. Make the name descriptive and unique. It should also be different from other container objects. Many use the following tree name convention: Organization Name_TREE.
Next you have to decide how to create the first level in your eDirectory tree. This involves determining whether you are going to incorporate the use of a country or locality (L) object into your eDirectory tree design, as shown in Figure 6.4.
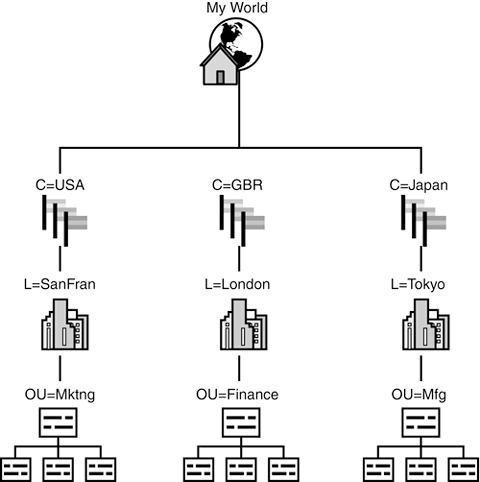
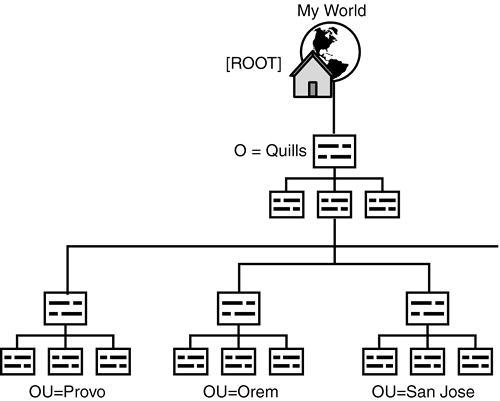
Country and locality object use is optional and may not make sense depending upon your directory structure. However, if it is important to comply with X.500 naming syntax to interact with external X.500 directories, these objects can be used. Other than that, it is probably easier to start with the organization (O) object and define geographical regions under the organization as organizational unit (OU) objects, as shown in Figure 6.5.
Next, you must determine the name of your organization object. Every eDirectory tree must have at least one organization container. Normally, this is the first level of the tree, so using the organization name is a good way to go.
Finally, define subsequent levels of the tree around the physical network infrastructure currently employed (or planned) by the organization. Regional sites are usually defined as level-two organizational units. A third level may also be appropriate for larger organizations to designate branch offices. Usually, three levels dedicated to the geographical structure of the organization will accommodate even the largest organizations.
The opposite is true for smaller companies. In some cases where the company is located at a single site, the physical levels can be eliminated altogether. However, this strategy is not recommended if there is any chance the company will grow into multiple sites in the future, because the lack of containers based upon physical sites will make it more difficult to expand the eDirectory structure as the organization grows.
The bottom portion of the tree is where all the action is. Unlike the top of the tree, we fully expect adaptation and evolution to occur over time at the lower levels of the tree. This means we need to design flexibility into the system.
For this reason, the lower levels of the eDirectory tree will grow based not on physical locations, but on organizational structure, as shown in Figure 6.6. The best way to visualize the eDirectory tree at this point is to look at a current copy of your company’s org chart. You need to understand the divisions and/or departments that operate at each physical site to create the lower levels of the eDirectory tree.

The reason that organizational unit containers are so useful at this level is that they enable you to group resources together. You can put the users in the marketing department with their printers, servers, and applications, allowing those users and resources to be managed together. As you will see in the next section, this grouping also enables you to minimize the overhead associated with maintaining replica integrity and currency.
Now that you have the general tree design and containers created, the consideration becomes how to organize the leaf objects that will populate the eDirectory tree. The two primary considerations for this are
![]() Make it as easy as possible for users to access the resources they need.
Make it as easy as possible for users to access the resources they need.
![]() Make it as easy as possible to control and administer network resources centrally.
Make it as easy as possible to control and administer network resources centrally.
In most cases, you will be able to place resources such as servers, printers, and departmental applications in the same container with the users who will need access to those resources. However, if users in multiple containers will share resources, place those resources one level above the user containers. This makes the resource much easier to locate.
Furthermore, if you group users based upon common needs, you can manage things such as access controls, login scripts, and policies from the container level, rather than managing each user individually. Only the exceptions to the general container rules need to be specifically managed. Management by exception is tremendously powerful as a tool for reducing complexity and increasing efficiency.
As a distributed database, eDirectory requires a mechanism for dividing the entire database into discrete chunks that can be installed on different servers across the organization. This is done through a process of partitioning and replicating the database.
eDirectory enables the creation of partitions to distribute the directory database across the network. A copy of a given eDirectory partition is known as a replica. By creating multiple replicas of a given partition, you build fault tolerance into the directory architecture. If a server holding a partition replica fails, the partition is still available from other replica servers.
Locating those portions of the eDirectory database close to those users who make use of them dramatically increases eDirectory performance. It also greatly reduces network traffic associated with directory queries. This is particularly important when multiple sites are connected by costly WAN links. The last thing you want to do is use WAN link bandwidth for background operations such as searching for a server or printer.
When the first eDirectory server is installed, a [Root] partition is automatically created and a replica of that partition is stored on the eDirectory server. When [Root] exists, the rest of the directory can be built by adding the necessary container and leaf objects.
As other eDirectory servers are installed, replicas of [Root] should be created to provide fault tolerance. If you maintain a small network at a single site, the [Root] partition might be all you need. Replicate it to two or three servers for fault tolerance and you are done. However, if your network environment is more complex, more work should be done to create an efficient eDirectory environment.
Planning your eDirectory partition strategy is similar to planning the top levels of the eDirectory tree. Partition creation should follow the physical network infrastructure. WAN links should always be considered boundaries between partitions. This eliminates the need for eDirectory to pass background traffic across these links. Refer to Figure 6.3 for a view of partitioning along geographical lines.
Each Child partition should then be replicated to multiple servers at the site that partition is serving. After partitions have been created based upon the physical boundaries, it is not usually necessary to partition the bottom layers of a tree. However, there are two possible exceptions to this:
![]() A Child partition might also be further partitioned to limit the number of partition replicas that exist across the network. A large number of replicas for any given partition will increase the background traffic required for synchronization. It also complicates partition repair operations that may be necessary. A good rule of thumb is to try to limit the total number of replicas of a given partition to 10 or fewer.
A Child partition might also be further partitioned to limit the number of partition replicas that exist across the network. A large number of replicas for any given partition will increase the background traffic required for synchronization. It also complicates partition repair operations that may be necessary. A good rule of thumb is to try to limit the total number of replicas of a given partition to 10 or fewer.
![]() If you are using Filtered replicas to create specific views of eDirectory information, it is entirely acceptable to further divide a Child partition.
If you are using Filtered replicas to create specific views of eDirectory information, it is entirely acceptable to further divide a Child partition.
The goal of your partitioning strategy should be a small [Root] partition and a Child partition for every physical site in the network. The [Root] partition should end up containing only [Root] and the organization object. The reason for this is explained in the next section.
As mentioned earlier, a replica is a physical copy of an eDirectory partition. By default, the first replica created is designated as the Master replica. Each partition will have one, and only one, Master replica. Other replicas will be designated as Read/Write, Read-Only, and Subordinate references. There are five types of eDirectory replicas:
![]() Master replica—The Master replica contains all object information for the partition. Objects and attributes maintained in the partition can be modified from the Master replica. These changes are then propagated to other servers holding replicas of this partition. Furthermore, all changes to the partition itself, such as creating other replicas or creating a Child partition, must be performed from the perspective of the server that holds the Master replica.
Master replica—The Master replica contains all object information for the partition. Objects and attributes maintained in the partition can be modified from the Master replica. These changes are then propagated to other servers holding replicas of this partition. Furthermore, all changes to the partition itself, such as creating other replicas or creating a Child partition, must be performed from the perspective of the server that holds the Master replica.
![]() Read/Write replica—A Read/Write replica contains the same information as the Master replica. Objects and attributes maintained in the partition can be modified from the Read/Write replica. These changes are then propagated to other servers holding replicas of this partition. Any number of Read/Write replicas can be created. However, for the sake of overall directory performance, it is recommended that the total number of partition replicas not exceed 10. This type of replica cannot initiate partition operations.
Read/Write replica—A Read/Write replica contains the same information as the Master replica. Objects and attributes maintained in the partition can be modified from the Read/Write replica. These changes are then propagated to other servers holding replicas of this partition. Any number of Read/Write replicas can be created. However, for the sake of overall directory performance, it is recommended that the total number of partition replicas not exceed 10. This type of replica cannot initiate partition operations.
![]() Read-Only replica—A Read-Only replica contains all the same information as the Master and Read/Write replicas. Users can read, but not modify, the information contained in these replicas. The replica is updated with changes made to the Master and Read/Write replicas. In practice, Read-Only replicas are seldom used because they are unable to support login operations. The login process requires updating some directory information. Because a Read-Only replica does not support directory updates, it cannot provide login services. One potential use is maintaining a backup copy of a partition. The Read-Only replica will receive all partition updates but will not participate in the update process in any way.
Read-Only replica—A Read-Only replica contains all the same information as the Master and Read/Write replicas. Users can read, but not modify, the information contained in these replicas. The replica is updated with changes made to the Master and Read/Write replicas. In practice, Read-Only replicas are seldom used because they are unable to support login operations. The login process requires updating some directory information. Because a Read-Only replica does not support directory updates, it cannot provide login services. One potential use is maintaining a backup copy of a partition. The Read-Only replica will receive all partition updates but will not participate in the update process in any way.
![]() Filtered replica—A Filtered replica can be either a Read-Only or a Read/Write replica. A Filtered replica is designed to provide specific services or applications, including other directories, with only the eDirectory information they need. Creating replicas that contain only certain types of objects and/or specific subsets of object attributes accomplishes this goal. For example, a Filtered replica might hold only user objects with their associated names, phone numbers, and email addresses for a corporate directory application.
Filtered replica—A Filtered replica can be either a Read-Only or a Read/Write replica. A Filtered replica is designed to provide specific services or applications, including other directories, with only the eDirectory information they need. Creating replicas that contain only certain types of objects and/or specific subsets of object attributes accomplishes this goal. For example, a Filtered replica might hold only user objects with their associated names, phone numbers, and email addresses for a corporate directory application.
Note
These replica types exist primarily to eliminate the single point of failure in an eDirectory environment. A recommended design goal is three replicas—one Master and a combination of Read/Write and/or Read-Only replicas. As stated previously, the Read-Only replica is seldom used, so most eDirectory implementations will focus on Master and Read/Write replicas in their production environments.
![]() Subordinate references—Subordinate references are special replica types that provide connectivity between the various partitions that exist in an eDirectory environment. Subordinate references are internal replicas and are not visible to users or configurable by administrators. A Subordinate reference contains a list of all servers that hold replicas of a Child partition. eDirectory uses this list to locate the nearest replica of a Child partition so that it can walk down the tree when searching for an object. Figure 6.7 shows how Subordinate references are distributed across servers.
Subordinate references—Subordinate references are special replica types that provide connectivity between the various partitions that exist in an eDirectory environment. Subordinate references are internal replicas and are not visible to users or configurable by administrators. A Subordinate reference contains a list of all servers that hold replicas of a Child partition. eDirectory uses this list to locate the nearest replica of a Child partition so that it can walk down the tree when searching for an object. Figure 6.7 shows how Subordinate references are distributed across servers.

A partition’s Subordinate reference is stored on all servers that hold a replica of that partition’s parent. Subordinate references effectively point to Child partition(s) that are not stored on that particular server. The distributed nature of eDirectory allows servers to hold replicas of the Parent partition but not all of the corresponding Child partitions.
The eDirectory replication strategy is a balancing act between the need to provide consistency across the directory and the limitations of network hardware and bandwidth. You should follow three rules when creating your replication strategy:
![]() Don’t replicate across WAN links.—WAN links represent one of the most costly network resources. To clutter up these links with unnecessary eDirectory traffic would be a terrible mistake. To avoid this, all copies of a given partition should be maintained locally. The one situation where this rule might not apply (there’s always at least one exception, isn’t there?) is the case of a small satellite office with only one server. In that case, it is more important to protect the eDirectory database by placing a replica across a WAN link than it is to preserve the WAN link bandwidth itself. Fortunately, a partition that contains only one server will not usually generate a lot of eDirectory traffic.
Don’t replicate across WAN links.—WAN links represent one of the most costly network resources. To clutter up these links with unnecessary eDirectory traffic would be a terrible mistake. To avoid this, all copies of a given partition should be maintained locally. The one situation where this rule might not apply (there’s always at least one exception, isn’t there?) is the case of a small satellite office with only one server. In that case, it is more important to protect the eDirectory database by placing a replica across a WAN link than it is to preserve the WAN link bandwidth itself. Fortunately, a partition that contains only one server will not usually generate a lot of eDirectory traffic.
![]() Replicate to limit subordinate references.—Even though Subordinate references don’t participate in the normal eDirectory replica update process, it’s still a good idea to limit the number of Subordinate references to reduce complexity. There are two ways to do this:
Replicate to limit subordinate references.—Even though Subordinate references don’t participate in the normal eDirectory replica update process, it’s still a good idea to limit the number of Subordinate references to reduce complexity. There are two ways to do this:
![]() Limit the number of Child partitions that are created. This is only partially controllable because you always want to define WAN links as partition boundaries. However, this does argue for limiting the number of additional partitions that are created within a single site.
Limit the number of Child partitions that are created. This is only partially controllable because you always want to define WAN links as partition boundaries. However, this does argue for limiting the number of additional partitions that are created within a single site.
![]() Store both Parent and Child partition replicas on the same server wherever possible. If multiple partitions are going to exist at a single site, try to distribute replicas so that Parent and Child partition replicas are stored together.
Store both Parent and Child partition replicas on the same server wherever possible. If multiple partitions are going to exist at a single site, try to distribute replicas so that Parent and Child partition replicas are stored together.
![]() Replicate to improve eDirectory performance.—The final reason to replicate is to provide the best possible performance for network users. If the partition and replication guidelines in this chapter are followed, a user will find most of his or her resources within the local partition. Occasionally it may be necessary to access a resource on the other side of the world. These situations require eDirectory to traverse, or walk, the tree to locate the requested resource. As previously noted, these searches start at
Replicate to improve eDirectory performance.—The final reason to replicate is to provide the best possible performance for network users. If the partition and replication guidelines in this chapter are followed, a user will find most of his or her resources within the local partition. Occasionally it may be necessary to access a resource on the other side of the world. These situations require eDirectory to traverse, or walk, the tree to locate the requested resource. As previously noted, these searches start at [Root] and proceed down the tree until the requested object is located. Placing replicas of [Root] at strategic locations, such as communications hubs, can facilitate these searches. To do this without significantly increasing the overall replication burden, the [Root] partition must be small (only the [Root] object and the organization object) and the number of [Root] replicas should not exceed three or four.
Tip
Novell now offers some advanced services that are helping to redefine directory design and usage in today’s modern networks. For example, Nterprise Branch Office helps greatly reduce the cost and complexity of eDirectory replication at satellite offices. Identity Manager is redefining eDirectory as a world-leading meta-directory that allows data to be transparently synchronized across many potential repositories. Both of these technologies are discussed in Chapter 9, “Advanced OES NetWare Infrastructure.”
After you have an understanding of the basics of eDirectory architecture and design, it is important to understand the activities and tools necessary to maintain eDirectory on a day-to-day basis.
As with the rest of OES NetWare, eDirectory management is now available through ever-more-powerful web-based utilities. OES NetWare includes much more comprehensive eDirectory management options in iManager and iMonitor. For information on installing and configuring both iMonitor and iManager, see Chapter 4 “OES Management Tools.”
iManager provides comprehensive role-based management capabilities for the entire OES NetWare environment. iMonitor consolidates the monitoring and data gathering aspects of several console-based tools, including DSTrace, DSRepair, and DSBrowse. It also includes the reporting functionality of DSDiag. The iMonitor interface is shown in Figure 6.8.
iManager now provides a complete set of eDirectory management tools and functions for object, partition, and replica operations. Much of this functionality is also available from the Partition and Replica view in ConsoleOne. You can also use RConsoleJ for remote access to the server console from ConsoleOne, from which you can run any of the legacy command-line[nd]based utilities.
This section gives you an overview of common eDirectory tasks and the tools used to perform them. eDirectory management tasks can be organized into six main categories:
![]() Partition operations
Partition operations
![]() Replica operations
Replica operations
![]() Tree operations
Tree operations
![]() eDirectory repair
eDirectory repair
![]() Monitoring eDirectory
Monitoring eDirectory
![]() Managing synchronization
Managing synchronization
Note
Managing specific eDirectory objects is covered in the appropriate chapter on that topic. For example, user and group object management is covered in Chapter 7, “Users and Network Security,” whereas printer object management is covered in Chapter 11, “OES NetWare Printing.”
There are three primary partition operations that you will be required to make:
![]() Create a partition.
Create a partition.
![]() Merge a partition.
Merge a partition.
![]() Move a partition.
Move a partition.
Warning
eDirectory does a great deal of work when performing partition operations. In larger eDirectory environments, each of the operations described in the following sections can take a significant amount of time to process completely. Furthermore, each operation has to complete before the next can begin. Make sure you take this into account when planning these tasks.
The first operation we want to look at is creating a partition. As mentioned earlier, partitioning the tree serves to break up the eDirectory database into chunks that can be distributed across multiple servers for fault tolerance and increased performance.
If you want to create a new partition, complete the following steps in iManager:
1. In the Navigation frame, open the Partition and Replicas group and select Create Partition.
2. In the Content frame, browse to and select the container that will be the root of the Child partition and then click OK.
3. Select Close at the message that eDirectory is processing your request.
By default, the Master replica of the new partition is created on the server that maintains the Master replica of the Parent partition. Read/Write replicas are stored on servers that maintain Read/Write replicas of the Parent partition. You can move or change replica placement after the partition has been created.
Sometimes you want to consolidate partitions, such as when moving from an older NDS environment to a much more scalable eDirectory tree. To merge a partition with its parent, complete the following steps in iManager:
1. In the Navigation frame, open the Partition and Replicas group and select Merge Partition.
2. Browse to and select the container that is the root of the Child partition and then click OK.
3. Select Close at the message that eDirectory is processing your request.
When merged, all replicas of the Child partition are removed and the Child partition data will be replicated to the existing Parent partition replicas.
The partition move operation is commonly known as a prune and graft. It involves moving a partition and all its associated containers and objects from one location in the tree to another (pruning a branch from one part of the tree and grafting it in somewhere else). This is the most complex of the partition operations, so note the following qualifications before attempting a partition move:
![]() You cannot move a container unless it is a partition root. If you want to move a container that is not a partition, you first need to define it as a partition. Then you can move the container to its new location and merge it with its new Parent partition.
You cannot move a container unless it is a partition root. If you want to move a container that is not a partition, you first need to define it as a partition. Then you can move the container to its new location and merge it with its new Parent partition.
![]() This operation is available only to partitions that do not have any subordinate (Child) partitions. If you want to move a partition with subordinates, you have to merge the subordinates into the Parent partition first.
This operation is available only to partitions that do not have any subordinate (Child) partitions. If you want to move a partition with subordinates, you have to merge the subordinates into the Parent partition first.
![]() When you move a partition, you must follow eDirectory containment rules that define what type of objects can be placed in each type of eDirectory container object. For example, you cannot move an organizational unit directly under the root of the tree because the containment rules for
When you move a partition, you must follow eDirectory containment rules that define what type of objects can be placed in each type of eDirectory container object. For example, you cannot move an organizational unit directly under the root of the tree because the containment rules for [Root] allow only locality, country, organization, and security objects, and not organizational unit objects.
If you want to prune and graft a partition, complete the following steps in iManager:
1. In the Navigation frame, open the Partition and Replicas group and select Move Partition.
2. Provide the required information and click OK:
![]() In the Object Name dialog box, browse to and select the container you want to move.
In the Object Name dialog box, browse to and select the container you want to move.
![]() In the Move To dialog box, browse to and select the new location for the partition. This will be the container within which the new partition will be placed.
In the Move To dialog box, browse to and select the new location for the partition. This will be the container within which the new partition will be placed.
![]() Check Create an Alias in Place of Move Object if you want users to be able to continue accessing those objects from their original directory context. This is usually a good idea at least until all users have been notified of the location change.
Check Create an Alias in Place of Move Object if you want users to be able to continue accessing those objects from their original directory context. This is usually a good idea at least until all users have been notified of the location change.
3. At the Move summary, click Move to perform the prune and graft.
The summary screen lists all servers involved in the Move operation so that you can make sure everything is in good shape before attempting the move.
Now that you have eDirectory partitions created and situated within the tree, you might notice that the default placement for the replicas is less than perfect. After all, you probably don’t want all Master replicas on one server, and you want to avoid replicating across expensive WAN links, as discussed previously.
Similar to partition operations, replica operations are accomplished from iManager in Partition and Replica Management. There are four primary replica operations:
![]() Add a replica.
Add a replica.
![]() Change the replica type.
Change the replica type.
![]() Delete a replica.
Delete a replica.
![]() Create a Filtered replica.
Create a Filtered replica.
Selecting Replica View in iManager shows you all servers that hold replicas of the selected partition. These servers form the replica ring.
Note
You will likely see Subordinate reference replicas listed in the iManager Replica View. However, Subordinate references are not manageable in iManager, so their placement is purely informational.
If you want to place a partition replica on a server that does not currently have a copy of that partition, complete the following steps in iManager:
1. In the Navigation frame, open the Partition and Replicas group and select Replica View.
2. Browse to and select the partition for which you want a new replica and click Add Replica.
3. Specify the server on which you want to create the replica, select the type of replica you are going to create, and then click OK.
4. Click Done to exit the Replica View.
After it’s created, the new partition will participate in all replication processes for that partition. Too many replicas can slow down partition operations significantly, so try to limit the number of replicas to three.
Sometimes it is useful to be able to change the type of an existing replica. For example, if a Master replica is stored on a server and it is going down for a hardware upgrade, you can change an existing Read/Write replica to be the Master so that eDirectory partition operations can continue normally.
Note
You cannot change the type of a Master replica because a Master replica must exist for every partition. If you want to change a Master replica, change an existing Read/Write replica to be the new Master, and the existing Master will automatically be converted to a Read/Write.
If you want to change the type of a replica, complete the following steps in iManager:
1. In the Navigation frame, open the Partition and Replicas group and select Replica View.
2. Browse to and select the partition for which you want to change a replica type and then click OK.
3. In the Type column, select the replica that you want to change.
4. Specify the type of replica to which you want to change the replica and click OK.
5. Click Done to exit the Replica View.
The replica will immediately start behaving as the new replica type you have selected.
Sometimes, when partitions have been merged or moved, a given replica is no longer necessary. To delete an existing replica from a server, complete the following steps in iManager:
1. In the Navigation frame, open the Partition and Replicas group and select Replica View.
2. Browse to and select the partition for which you want to delete a replica and click OK.
3. Click the red X next to the replica name that you want to delete and click OK in the delete replica window.
4. Click Done to exit the Replica View.
The replica is removed from the server on which it was stored, and all future partition operations will include only the remaining replicas.
If you are using Filtered replicas in your network, you can configure them with the Replica Wizard option in iManager. To create a Filtered replica, complete the following steps in iManager:
1. In the Navigation frame, open the Partition and Replicas group and select Filtered Replica Wizard.
2. Browse to and select the server on which the Filtered replica will reside and then click Next.
3. Click Define the Filter Set to specify the object classes and attributes to include in this Filtered replica. Only one filter can be configured per server, meaning that you can have Filtered replicas of only one type on any given server.
4. Click The Filter Is Empty, select the eDirectory objects and classes that you want included in the Filtered replica, and then click OK. Alternatively, you can select Copy Filter From to specify an existing server with the type of Filtered replica you need, and it will be copied to the new server.
5. (Optional) Click Next to continue. You can click Define Partition Scope to add partitions for which you want to create Filtered replicas on this server. This opens the Replica View so that you can add replicas to the server.
6. Click Finish to create the Filtered replicas as defined.
Filtered replicas are often used when eDirectory is sharing data with an external system, such as another directory or database, but only a subset of eDirectory information is shared.
There are a few operations that you can perform on an entire eDirectory tree, and these are available from iManager as well. Each of these operations is available under eDirectory Maintenance:
![]() Rename a tree.
Rename a tree.
![]() Merge two trees.
Merge two trees.
![]() Graft one tree into another.
Graft one tree into another.
Note
Tree operations are complex operations that are not recommended for those who are not experienced eDirectory administrators. You can easily damage trees with these operations, so be very careful and perform these types of tree operations only when it is absolutely necessary.
Once in a while it might become necessary to rename an eDirectory tree. Perhaps an organizational name change has occurred, or you are moving to match your directory naming scheme to that being used on the web. Whatever the reason, you can rename your tree by completing the following steps in iManager:
1. Under In the Navigation frame, open the eDirectory Maintenance group and select Rename Tree.
2. Specify the name of the server that will perform the rename operation and click Next. You can specify the server by NetWare server name, DNS name, or IP address.
3. Specify suitable authentication information for the tree and click Next. Make sure you authenticate as a user with Supervisor rights to the tree.
4. Provide the necessary information and click Start. Specify the new tree name, the Admin username (with context), and the Admin password. Remember that the tree name can be up to 32 alphanumeric characters (dashes and underscores are also allowed).
5. Click Yes to rename the tree.
The utility will first perform a check on the tree to be sure that it can be renamed successfully. When the rename is complete, you will be prompted to log out and log back in to the “new” tree.
iManager moves the capability to perform a tree merge away from the command-line utility DSMERGE.NLM for the first time. During a tree merge, a source tree is inserted into a target tree so that the tree branches at the Organization level, with each branch corresponding to the contents of one of the formerly distinct trees. To perform a tree merge from iManager, complete the following steps:
1. Under eDirectory Maintenance in the navigation frame of iManager, select Merge Tree.
2. Specify the name of the server that will perform the merge operation for the trees and click Next. You can specify the server by NetWare server name, DNS name, or IP address.
3. Provide suitable authentication information for both the source and target eDirectory trees and click Next. Make sure you authenticate as a user with Supervisor rights to the tree.
4. Provide the necessary information and click Start.
![]() Source tree—The source tree is the tree to which you are currently authenticated. It will be merged into the target tree. Specify the name and password of the Admin user for this tree.
Source tree—The source tree is the tree to which you are currently authenticated. It will be merged into the target tree. Specify the name and password of the Admin user for this tree.
![]() Target tree—The target tree is the tree that will remain after the merge. The source tree information will become part of this tree. Specify the name and password of the Admin user for this tree.
Target tree—The target tree is the tree that will remain after the merge. The source tree information will become part of this tree. Specify the name and password of the Admin user for this tree.
5. Click Yes to rename the tree.
The utility will first perform a check on both trees to be sure that they can be successfully merged. If you encounter an error during this check process, follow the instructions to resolve the conflict and try the merge again.
A graft is a subset of a merge, in which you can choose the insertion point for the source tree objects. During a tree graft, a source tree is inserted into the specified location of a target tree. The source tree is then converted into a domain object and it and all of its contents become part of the target tree. To graft one tree into another, complete the following steps:
1. Under eDirectory Maintenance in the navigation frame of iManager, select Graft Tree.
2. Specify the name of the server that will perform the graft operation and click Next. You can specify the server by NetWare server name, DNS name, or IP address.
3. Specify suitable authentication information for the tree and click Next. Make sure you authenticate as a user with Supervisor rights to the tree.
4. Provide the necessary information and click Start:
![]() Source tree—The source tree is the tree to which you are currently authenticated. It will be grafted into the target tree. Specify the name and password of the Admin user for this tree.
Source tree—The source tree is the tree to which you are currently authenticated. It will be grafted into the target tree. Specify the name and password of the Admin user for this tree.
![]() Target tree—The target tree will receive the source tree information as a domain object after the graft. The source tree information will become part of this tree. Specify the name and password of the Admin user for the target tree. Specify the point at which you want the source tree inserted in the Container field.
Target tree—The target tree will receive the source tree information as a domain object after the graft. The source tree information will become part of this tree. Specify the name and password of the Admin user for the target tree. Specify the point at which you want the source tree inserted in the Container field.
5. Click Yes to perform the graft operation.
The utility will first perform a check on both trees to be sure that they can be successfully merged. If you encounter an error during this check process, follow the instructions to resolve the conflict and try the merge again.
This section identifies some common administrative tasks that will help you effectively monitor the operation of eDirectory in your network and make little repairs as they are found. After all, the one thing more impressive than resolving a serious network problem is preventing it from occurring in the first place. Although this is not always possible, a program of active monitoring and proactive maintenance will go a long way toward getting you home on time at night. For more information on Novell management tools, see Chapter 4.
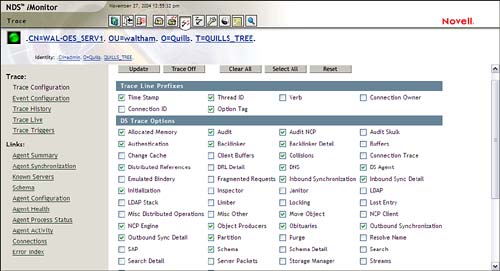
The following tasks are a starting point for maintaining your eDirectory environment. By monitoring eDirectory process execution, you can see every type of communication activity and determine whether any errors are being reported. The best way to keep track of the activities of eDirectory processes is through iMonitor (see Figure 6.9). iMonitor provides comprehensive trace capabilities for eDirectory. More detailed information on DS Trace capabilities in iMonitor is available in Appendix D “eDirectory Reference Materials.”
To access the iMonitor Trace page, select DS Trace from NoRM’s Navigation frame or click the Trace Configuration icon in iMonitor’s Header frame.
iMonitor Trace gives you access to all the process monitoring capabilities formerly available solely through DSTRACE.NLM. Tracing eDirectory activity involves the following tasks:
![]() From the Trace Configuration page, check the eDirectory processes that you want to monitor and click Trace On. Note that Trace preselects some of the more common processes. For more information on the individual options listed here, see Appendix D.
From the Trace Configuration page, check the eDirectory processes that you want to monitor and click Trace On. Note that Trace preselects some of the more common processes. For more information on the individual options listed here, see Appendix D.
![]() To see a live view of the trace, select Trace History in the left side of the navigation frame and click the View icon next to the current trace session.
To see a live view of the trace, select Trace History in the left side of the navigation frame and click the View icon next to the current trace session.
![]() To stop a trace, click Trace Off in the Trace Configuration screen. Because of the added overhead and the size to which log files can grow, you usually want to run DSTrace for only enough time to gather the information for which you are looking.
To stop a trace, click Trace Off in the Trace Configuration screen. Because of the added overhead and the size to which log files can grow, you usually want to run DSTrace for only enough time to gather the information for which you are looking.
eDirectory traces provide a powerful tool to track eDirectory processes and monitor operations when troubleshooting directory issues.
Even if you don’t apply updates immediately, it’s a good idea to be aware of what updates exist and, more importantly, those issues they are intended to resolve. Keep track of the versions that you have installed on your servers, so as you review Novell support documents, you can keep an eye out for any problems that might relate to your environment.
Note
With the release of NetWare 6, Novell implemented a new versioning scheme in an attempt to eliminate inconsistencies in the previous model. Although still known as eDirectory v8.6 or 8.7 to provide eDirectory customers with a version context they are familiar with, the build version takes a considerably different format. For example, the build version of eDirectory that ships with OES NetWare is 10551.36.
You can check the version of eDirectory that you are currently running on any server in the following ways:
![]() iMonitor—Select Known Servers. The DS revision for all known eDirectory servers is listed.
iMonitor—Select Known Servers. The DS revision for all known eDirectory servers is listed.
![]()
DSREPAIR.NLM—Look in the header for the DS version.
![]() Server console—Type
Server console—Type MODULES ds* and look for the entry for DS.NLM.
Note
Review Novell’s support website, http://support.novell.com, on at least a quarterly basis for updates to eDirectory files and utilities.
Check the time sync status for each partition in the tree every couple of weeks. Keep an eye out for synthetic time messages that might keep background processes from completing properly.
You can check the status of time synchronization in the following ways:
![]() NoRM—Select Health Monitor. Browse to and select TimeSync Status. This shows you the time sync status for the server to which you are currently connected. To check another server, switch to it by selecting Managed Server List, under the Access Other Servers heading, and select the server to which you want to connect.
NoRM—Select Health Monitor. Browse to and select TimeSync Status. This shows you the time sync status for the server to which you are currently connected. To check another server, switch to it by selecting Managed Server List, under the Access Other Servers heading, and select the server to which you want to connect.
![]()
DSREPAIR.NLM—Select Time Synchronization from the main menu. This method shows you the synchronization status of all servers known by the server from which you run DSRepair.
![]() Server console—Type
Server console—Type TIME SYNC and review the server’s time sync information. This method enables you to know only if this single server is synchronized.
If time is not synchronizing properly, you can run into problems with the timestamps that are maintained on eDirectory objects. Timestamps indicate when the object was last synchronized.
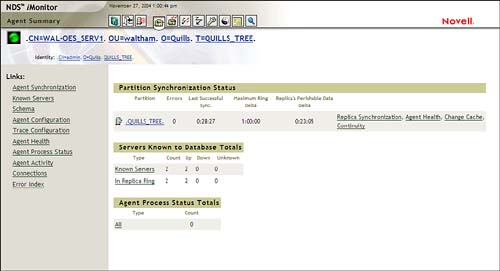
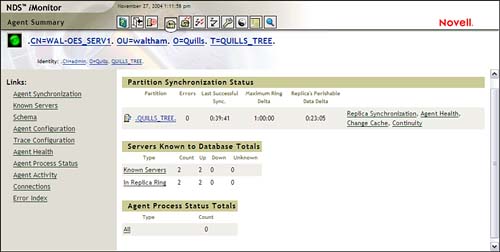
Probably the best-known eDirectory timestamp issue is synthetic time. Synthetic time is when an eDirectory object has a modification timestamp ahead of current network time. If the period between current time and synthetic time is small, this problem will correct itself. However, if the period is large, it is possible to resolve the problem manually by reviewing the eDirectory communications processes to be sure that all replicas are communicating properly. From iMonitor, review the status of the Master replica from Agent Summary. You can drill down on the Master to review current state and a detailed set of statistics. Make sure the Master does not contain any errors, and that it is receiving current updates properly.
Timestamps can be repaired in two ways:
![]() Use
Use DSREPAIR.NLM to repair timestamps and declare a new epoch. To use this option, load DSREPAIR with the -a parameter. Select Advanced Options, Replica and Partition Operations. Select the partition with which you want to work and choose Repair Timestamps and Declare a New Epoch.
![]() Identify the replica(s) with the synthetic timestamps and rebuild those replicas using the Receive All Objects operation:
Identify the replica(s) with the synthetic timestamps and rebuild those replicas using the Receive All Objects operation:
![]() iManager—In the Navigation frame, open the eDirectory Maintenance group and select Replica Ring Repair. Specify the server that you want to receive correct replica information from the Master replica. Select the Receive All Objects option.
iManager—In the Navigation frame, open the eDirectory Maintenance group and select Replica Ring Repair. Specify the server that you want to receive correct replica information from the Master replica. Select the Receive All Objects option.
![]() ConsoleOne—Open the Partition and Replica view in ConsoleOne. Browse to and select the container on which you are going to work and select the Partition Continuity button from the toolbar. In the Partition Continuity table, highlight the replica you need to repair and select Receive Updates.
ConsoleOne—Open the Partition and Replica view in ConsoleOne. Browse to and select the container on which you are going to work and select the Partition Continuity button from the toolbar. In the Partition Continuity table, highlight the replica you need to repair and select Receive Updates.
![]()
DSREPAIR.NLM—Select Advanced Options >> Replica and Partition Operations. Select the partition to work with and select View Replica Ring. Select the replica to be repaired and choose Receive All Objects for This Replica.
You can view synchronization status from several perspectives. However, making sure that all replicas of a given partition are synchronizing properly is probably one of the best ways to keep track of things. Check this every couple of weeks.
You can check the sync status of a replica ring in the following ways:
![]() iMonitor—From the Agent Summary, select the Continuity link next to the Partition for which you want to check synchronization status (see Figure 6.10). This will show you the status of the replica ring in general as well as the status of each replica in the ring.
iMonitor—From the Agent Summary, select the Continuity link next to the Partition for which you want to check synchronization status (see Figure 6.10). This will show you the status of the replica ring in general as well as the status of each replica in the ring.
![]()
DSREPAIR.NLM—Select Advanced Options, Replica and Partition Operations. Select the partition you want to check and choose Report Synchronization Status of All Servers.
If you begin to notice inconsistencies in replica rings, you can use the following general steps to diagnose and resolve the problems:
1. Identify all servers that host replicas of this partition and the type of replica on each server:
![]() iMonitor—Select Agent Synchronization and then select the Replica Synchronization link beside the partition with which you need to work.
iMonitor—Select Agent Synchronization and then select the Replica Synchronization link beside the partition with which you need to work.
![]()
DSREPAIR.NLM—Select Advanced Options, Replica and Partition Operations. Select the partition to work with and select View Replica Ring.
2. Examine the server hosting the Master replica because it functions as the authoritative source for partition information. If the Master replica is the source of the problem, designate one of the Read/Write replicas as a new Master:
![]() iManager—Follow instructions outlined in the previous section on Replica Operations.
iManager—Follow instructions outlined in the previous section on Replica Operations.
![]()
DSREPAIR.NLM—From the server that you want to host the new Master replica, load DSRepair with the -a parameter. Select Advanced Options, Replica and Partition Operations. Select the partition with which to work and choose Designate This Server as the New Master Replica.
3. When a healthy Master replica exists, you can receive updates on the server that is having synchronization problems to eliminate any inconsistent objects:
![]() iManager—In the Navigation frame, open the eDirectory Maintenance group and select Replica Ring Repair. Specify the server holding the Master replica for the partition and select the Send All Objects option.
iManager—In the Navigation frame, open the eDirectory Maintenance group and select Replica Ring Repair. Specify the server holding the Master replica for the partition and select the Send All Objects option.
![]() ConsoleOne—Open the Partition and Replica view in ConsoleOne. Browse to and select the container on which you are going to work and select the Partition Continuity button from the toolbar. In the Partition Continuity table, highlight the replica you need to repair and select Receive Updates.
ConsoleOne—Open the Partition and Replica view in ConsoleOne. Browse to and select the container on which you are going to work and select the Partition Continuity button from the toolbar. In the Partition Continuity table, highlight the replica you need to repair and select Receive Updates.
![]()
DSREPAIR.NLM—Select Advanced Options, Replica and Partition Operations. Select the partition to work with and select View Replica Ring. Select the replica to be repaired and then Receive All Objects for This Replica.
4. Monitor the replica ring after making repairs to make sure that it is successfully sending updates between all replica-hosting servers. You can perform a send updates operation from the Master replica by doing the following:
![]() iManager—In the Navigation frame, open the eDirectory Maintenance group and select Replica Ring Repair. Specify the server holding the Master replica for the partition and select the Send All Objects option.
iManager—In the Navigation frame, open the eDirectory Maintenance group and select Replica Ring Repair. Specify the server holding the Master replica for the partition and select the Send All Objects option.
![]() ConsoleOne—Open the Partition and Replica view in ConsoleOne. Browse to and select the container on which you are working and select the Partition Continuity button from the toolbar. In the Partition Continuity table, highlight the server with the Master replica and select Send Updates.
ConsoleOne—Open the Partition and Replica view in ConsoleOne. Browse to and select the container on which you are working and select the Partition Continuity button from the toolbar. In the Partition Continuity table, highlight the server with the Master replica and select Send Updates.
![]()
DSREPAIR.NLM—Select Advanced Options, Replica and Partition Operations. Select the partition to work with and then select View Replica Ring. Select the Master replica and then Send All Objects to Every Replica in the Ring.
You should regularly use the preceding techniques to monitor synchronization activities and make sure that eDirectory is performing properly.
External references are pointers to eDirectory objects not stored in replicas on the current server. The check examines each external reference and makes sure that it links to a valid eDirectory object. Performing this check on a weekly basis makes sure that queries can traverse the tree properly.
You can do one of the following to check external references:
![]() iMonitor—In the Navigation frame, select Agent Process Status. Review the data under the External Reference Status heading.
iMonitor—In the Navigation frame, select Agent Process Status. Review the data under the External Reference Status heading.
![]()
DSREPAIR.NLM—Select Advanced Options, Check External References.
One nice thing about the external reference check is that it will list any obituaries in your tree. Obituaries are references to deleted objects that are maintained until word of the deletion has been propagated to all servers hosting replicas of the affected partition. It is possible for obituaries and other types of external references to become corrupt or get stuck in the tree.
One thing that can cause this is problems with network addresses. To resolve network referral problems, do the following:
1. Identify the actual assigned IP or IPX addresses for each server involved:
![]() iMonitor—In the Navigation frame, select Known Servers. Select the link for the server you want to look at, and then browse down and select Network Address in the left side of the navigation frame.
iMonitor—In the Navigation frame, select Known Servers. Select the link for the server you want to look at, and then browse down and select Network Address in the left side of the navigation frame.
![]()
CONFIG.NLM—Run this console-based utility on each server you want to check.
2. Check network addresses to make sure that the addresses stored by eDirectory match those being reported by the servers in their SLP or SAP broadcasts. In iMonitor, click the Repair icon and select Advanced. Select Repair Network Addresses and click Start Repair. Use the Known Servers option in iMonitor to repeat this process for each server hosting eDirectory replicas in the network.
3. More severe problems might require a rebuild of replicas that have received invalid network address information, as described in the previous section on verifying schema synchronization.
Checking External References in this way will help ensure the health and smooth operation of your eDirectory environment.
Anytime you make changes to the eDirectory schema, confirm that all servers hosting eDirectory replicas are properly receiving schema updates. You can check the schema synchronization status in iMonitor by selecting Agent Process Status and then reviewing the data under the Schema Sync Status heading.
It is possible that an eDirectory server, due to communications problems or corruption of synchronization timestamps, will fail to receive schema updates as they are applied to the eDirectory environment. The resulting schema inconsistencies can be resolved by doing the following:
![]() Identify the server that is reporting schema errors. This will be the server that has not received the schema updates properly. In iMonitor, force schema synchronization by clicking the Agent Configuration icon in the Header frame and then selecting Agent Triggers in the Navigation frame. Check the Schema Synchronization box and select Submit. Before doing this, make sure that DSTrace is configured to report Schema Sync messages and that it is currently logging in to iMonitor.
Identify the server that is reporting schema errors. This will be the server that has not received the schema updates properly. In iMonitor, force schema synchronization by clicking the Agent Configuration icon in the Header frame and then selecting Agent Triggers in the Navigation frame. Check the Schema Synchronization box and select Submit. Before doing this, make sure that DSTrace is configured to report Schema Sync messages and that it is currently logging in to iMonitor.
Tip
You can also view the schema sync in iMonitor as it occurs with Trace. Using Trace is described previously in this chapter. For information on specific Trace options, see Appendix D.
![]() After the server has been identified, one potential solution is to declare a new epoch on the server. Load DSREPAIR with the
After the server has been identified, one potential solution is to declare a new epoch on the server. Load DSREPAIR with the -a parameter. Select Advanced Options, Replica and Partition Operations. Select the partition with which you want to work and then choose Repair Timestamps and Declare a New Epoch.
Unless you are making frequent changes to the schema, these types of activities shouldn’t be necessary, but you should be aware of how such schema issues can be resolved.
On a monthly basis, search eDirectory for unknown objects. You can do this from iManager by completing the following steps (you can also search for unknown objects from ConsoleOne):
1. In the Header frame, click the View Objects icon.
2. In the left pane, select the Search tab.
3. Select Unknown in the Type field. Make sure that you are searching from [Root] and that the Search Sub-containers option is checked.
Unknown objects can indicate resources that have not been properly installed or removed from the tree. However, they can also indicate that iManager or ConsoleOne does not have a snap-in capable of recognizing that object type, so don’t immediately assume that unknown objects need to be deleted.
It is also possible to get eDirectory object and attribute inconsistencies when replicas of the same partition, for whatever reason, have different information stored about the same eDirectory object or object attribute. To isolate the server(s) that have the faulty information, it is necessary to unload eDirectory on other servers. This type of troubleshooting can be done only during off hours.
To troubleshoot this type of problem, do the following:
1. Identify all servers that host replicas of the partition, and note the type of replica on each server:
![]() iMonitor—In the Navigation frame, select Agent Synchronization. Select the Replica Synchronization link beside the partition with which you need to work.
iMonitor—In the Navigation frame, select Agent Synchronization. Select the Replica Synchronization link beside the partition with which you need to work.
![]()
DSREPAIR.NLM—Select Advanced Options, Replica and Partition Operations. Select the partition to work with and select View Replica Ring.
2. Select one of the servers and unload eDirectory by entering UNLOAD DS.NLM at the server console. This can be done remotely through iManager or RConsoleJ.
3. Use ConsoleOne to query the tree for the faulty objects and/or attributes. If they are still faulty, you know this server’s replica is not the source of the error.
4. Repeat step 3 until the faulty server(s) is (are) found.
5. To attempt to repair the problem, first attempt to receive updates at the faulty server:
![]() iManager—In the Navigation frame, open the eDirectory Maintenance group and select Replica Ring Repair. Specify the server that you want to receive correct replica information from the Master replica. Select the Receive All Objects option.
iManager—In the Navigation frame, open the eDirectory Maintenance group and select Replica Ring Repair. Specify the server that you want to receive correct replica information from the Master replica. Select the Receive All Objects option.
![]() ConsoleOne—Open the Partition and Replica view in ConsoleOne. Browse to and select the container on which you are going to work and select the Partition Continuity button from the toolbar. In the Partition Continuity table, highlight the replica you need to repair and select Receive Updates.
ConsoleOne—Open the Partition and Replica view in ConsoleOne. Browse to and select the container on which you are going to work and select the Partition Continuity button from the toolbar. In the Partition Continuity table, highlight the replica you need to repair and select Receive Updates.
![]()
DSREPAIR.NLM—Select Advanced Options, Replica and Partition Operations. Select the partition to work with and select View Replica Ring. Select the replica to be repaired and Receive All Objects for This Replica.
6. If that fails, attempt to send all objects from one of the known good servers. If possible, use the Master replica for this operation:
![]() iManager—From In the Navigation frame, open the eDirectory Maintenance group and select Replica Ring Repair. Specify the server holding the Master replica for the partition and select the Send All Objects option.
iManager—From In the Navigation frame, open the eDirectory Maintenance group and select Replica Ring Repair. Specify the server holding the Master replica for the partition and select the Send All Objects option.
![]() ConsoleOne—Open the Partition and Replica view in ConsoleOne. Browse to and select the container on which you are working and select the Partition Continuity button from the toolbar. In the Partition Continuity table, highlight the server with the Master replica and select Send Updates.
ConsoleOne—Open the Partition and Replica view in ConsoleOne. Browse to and select the container on which you are working and select the Partition Continuity button from the toolbar. In the Partition Continuity table, highlight the server with the Master replica and select Send Updates.
![]()
DSREPAIR.NLM—Select Advanced Options, Replica and Partition Operations. Select the partition to work with and select View Replica Ring. Select the Master replica and then Send All Objects to Every Replica in the Ring.
7. If that fails, the replica has to be destroyed. At this point you might want to involve Novell Technical Support, unless you are comfortable with the use of advanced DSRepair switches. Load DSREPAIR with the -a parameter. Select Advanced Options, Replica and Partition Operations. Select the partition with which you want to work and then select the Destroy the Selected Replica on This Server option.
These tasks will help you ensure the object health within your eDirectory tree and stay on top of the health of your eDirectory environment.
Replication is an event-driven process, meaning that it is initiated by the occurrence of some external trigger. A few of these trigger events include adding, deleting, and moving directory objects, as well as modifying object attributes. Each trigger event is flagged as being high convergence or not. High convergence means that eDirectory considers this event to be more significant than others, and it should be replicated as quickly as possible.
High convergence events are scheduled for fast synchronization (Fast Sync). Fast Sync occurs every 10 seconds by default. Other events are replicated using slow synchronization (Slow Sync). Slow Sync occurs every 30 minutes by default. Both of these sync processes serve to send the changed information out to each server that maintains a replica of the affected partition. Because only the actual database changes are replicated, as opposed to sending the entire partition, replication operations are generally small.
Because each directory operation is timestamped, the synchronization process relies heavily on the time synchronization processes described earlier in this chapter. During the eDirectory synchronization process, each operation will be ordered based upon its timestamp and will be applied to the eDirectory database in that order.
If your network spans geographical areas, you might want to use the WAN Traffic Manager to control how often eDirectory information is synchronized across the network. WAN Traffic Manager enables you to control when routine eDirectory synchronization takes place so that the traffic is minimized and/or confined to less active times of day.
WAN Traffic Manager is an optional feature of OES NetWare. You can select it for installation during the OES NetWare installation process or you can install it after the fact using iManager.
You need to install WAN Traffic Manager on each server whose traffic you want to control. If servers that share replicas of the same partition are on opposite sides of a WAN link, all those servers should have WAN Traffic Manager installed if you want to control their traffic.
To control the eDirectory traffic, you need to create a WAN traffic policy, which defines the rules that control how the traffic goes out on the network. This policy is stored as a property of each server object. If you have several servers that all require the same policy, you can create a LAN Area object, which contains a list of all the affected servers. Then you can assign the policy to that single LAN Area object, instead of to multiple individual servers.
OES NetWare includes several predefined policies that may suit your situation. For example, one commonly used policy specifies that all routine updates should be performed between 1:00 and 3:00 a.m. You can also edit those policies to create customized policies for your network. For more detailed information about these predefined policies, see the Novell online documentation.
Warning
Creating and using WAN traffic policies can have adverse effects on your eDirectory communications if done incorrectly. Make sure you understand the consequences of the policy before you enact it. For more information on using WAN Traffic Manager, see the OES online documentation.
The following predefined policies are available in OES NetWare:
![]() 1–3AM Group—These policies limit eDirectory traffic to be sent between the hours of 1:00 a.m. and 3:00 a.m.
1–3AM Group—These policies limit eDirectory traffic to be sent between the hours of 1:00 a.m. and 3:00 a.m.
![]() 7AM–6PM Group—These policies limit eDirectory traffic to be sent between the hours of 7:00 a.m. and 6:00 p.m.
7AM–6PM Group—These policies limit eDirectory traffic to be sent between the hours of 7:00 a.m. and 6:00 p.m.
![]() COSTLT20 Group—These policies allow traffic to be sent only if the cost factor is less than 20. You can assign cost factors to destinations in units, such as dollars per hour or cents per minute.
COSTLT20 Group—These policies allow traffic to be sent only if the cost factor is less than 20. You can assign cost factors to destinations in units, such as dollars per hour or cents per minute.
![]() IPX Group—These policies allow only IPX traffic.
IPX Group—These policies allow only IPX traffic.
![]() NDSTTYPS Group—These policies are sample policies for limiting traffic to specific types of eDirectory traffic and events.
NDSTTYPS Group—These policies are sample policies for limiting traffic to specific types of eDirectory traffic and events.
![]() ONOSPOOF Group—These policies allow eDirectory traffic to be generated only across existing WAN links that are already open.
ONOSPOOF Group—These policies allow eDirectory traffic to be generated only across existing WAN links that are already open.
![]() OPNSPOOF Group—These policies allow eDirectory traffic to be generated only across existing WAN connections that are already opened, unless the connection hasn’t been used for at least 15 minutes. (It assumes the connection is being used for another purpose and is not available.)
OPNSPOOF Group—These policies allow eDirectory traffic to be generated only across existing WAN connections that are already opened, unless the connection hasn’t been used for at least 15 minutes. (It assumes the connection is being used for another purpose and is not available.)
![]() SAMEAREA Group—These policies allow traffic only between servers in the same network section (servers sharing a common network address).
SAMEAREA Group—These policies allow traffic only between servers in the same network section (servers sharing a common network address).
![]() TCPIP Group—These policies allow only TCP/IP traffic.
TCPIP Group—These policies allow only TCP/IP traffic.
![]() TIMECOST Group—These are additional policies that cover different types of time and cost restrictions.
TIMECOST Group—These are additional policies that cover different types of time and cost restrictions.
The following sections explain how to set up a LAN Area object and how to assign a WAN policy to a server or LAN Area object.
If you want to assign a single WAN policy to multiple servers, you can save time by creating a LAN Area object that contains a list of all the servers and then assigning the policy to the LAN Area object. Complete the following steps to create a LAN Area object:
1. Launch iManager. In the Navigation frame select WAN Traffic. Click Create LAN Area.
2. Specify the name of the LAN Area object and the context in which you want it stored.
3. Click Create.
4. Select WAN Traffic Manager Overview in the left side of the navigation frame, and click the LAN Area object you have just created.
5. Configure the LAN Area object as needed and click OK:
![]() Policies Tab—From this page, you can define the policy that will govern your eDirectory background process communication. Click Add Policy to select a predefined policy or browse to your own custom policy. After you have chosen a policy, you can modify the policy specifics in the Policy window.
Policies Tab—From this page, you can define the policy that will govern your eDirectory background process communication. Click Add Policy to select a predefined policy or browse to your own custom policy. After you have chosen a policy, you can modify the policy specifics in the Policy window.
![]() Costs Link—From this page you can associate costs with specific network destinations that WAN Manager can use in its policy calculations. The cost value is simply a number that might represent cents or dollars per minute, or packets per second. Click the Add ([ps]) icon to set a cost value and assign it to a TCP/IP or IPX address or address range. You can also define a default cost that will be applied to all addresses that are not specifically assigned a cost in the cost table.
Costs Link—From this page you can associate costs with specific network destinations that WAN Manager can use in its policy calculations. The cost value is simply a number that might represent cents or dollars per minute, or packets per second. Click the Add ([ps]) icon to set a cost value and assign it to a TCP/IP or IPX address or address range. You can also define a default cost that will be applied to all addresses that are not specifically assigned a cost in the cost table.
![]() Server List Link—From this page you can add or remove servers as members of this LAN Area object.
Server List Link—From this page you can add or remove servers as members of this LAN Area object.
When you are finished, the new LAN Area object, along with its associated eDirectory traffic policies, will be active.
Lightweight Directory Access Protocol (LDAP) services for eDirectory enables LDAP clients to access information stored in eDirectory. LDAP is currently the preferred directory access protocol on the Internet. Because eDirectory enables you to give different clients different levels of directory access, you can manage external, internal, and confidential information from the same directory. eDirectory also supports secure LDAP connections so that privileged users can access internal or private information securely without any special client software. All they need is a browser with LDAP support and connectivity to the LDAP server.
Novell LDAP Services for eDirectory are installed automatically during the OES NetWare installation routine. For more information on OES NetWare installation options, see Chapter 2, “Installing OES NetWare.”
Two types of objects are defined in the eDirectory schema to support LDAP Services:
![]() LDAP server object—Use this object to configure the LDAP environment for a single LDAP server.
LDAP server object—Use this object to configure the LDAP environment for a single LDAP server.
![]() LDAP group object—Use this object to configure LDAP client access to eDirectory.
LDAP group object—Use this object to configure LDAP client access to eDirectory.
LDAP Services for eDirectory can be loaded and unloaded manually by loading or unloading NLDAP.NLM on the OES NetWare server.
The LDAP server object stores configuration information in eDirectory about an LDAP server. The LDAP server object is created in the same container as your server object. Each LDAP server object configures one LDAP server.
To configure an LDAP server, complete the following steps in iManager:
1. In the Navigation frame, open the LDAP group and select LDAP Overview.
2. Select the View LDAP Servers tab and click the LDAP Server object with which you want to work.
3. Enter the configurable parameters in the property pages and click the Refresh button to reset the LDAP server. Click OK when you’re finished.
There are six pages of configuration parameters for the LDAP server object:
![]() Information—Sets the general configuration of your LDAP server on this page. The following entries are available:
Information—Sets the general configuration of your LDAP server on this page. The following entries are available:
![]() LDAP Group—Specify the name of the LDAP group to which this server should belong.
LDAP Group—Specify the name of the LDAP group to which this server should belong.
![]() Dereference Aliases When Resolving Names—Check this option to force the LDAP server to resolve to the actual object whenever it encounters an alias object.
Dereference Aliases When Resolving Names—Check this option to force the LDAP server to resolve to the actual object whenever it encounters an alias object.
![]() Connections—Sets the secure connection settings for this LDAP server with the following options:
Connections—Sets the secure connection settings for this LDAP server with the following options:
![]() Server Certificate—Specifies the digital certificate that is used for secure connections on this server. Certificate server creates this certificate during the server installation routine. You should not have to change this value.
Server Certificate—Specifies the digital certificate that is used for secure connections on this server. Certificate server creates this certificate during the server installation routine. You should not have to change this value.
![]() Client Certificate—Specifies how the LDAP server will work with client certificates. Options include Not Requesting Certificates; Requesting, but Not Requiring Client Certificates; and Requiring Client Certificates.
Client Certificate—Specifies how the LDAP server will work with client certificates. Options include Not Requesting Certificates; Requesting, but Not Requiring Client Certificates; and Requiring Client Certificates.
![]() Trusted Root Containers—Specifies the container(s) in which trusted root certificates are stored for those clients capable of using Transport Layer Security (TLS).
Trusted Root Containers—Specifies the container(s) in which trusted root certificates are stored for those clients capable of using Transport Layer Security (TLS).
![]() Require TLS for All Operations—Check this box to require TLS protected connections for all LDAP server communications.
Require TLS for All Operations—Check this box to require TLS protected connections for all LDAP server communications.
![]() Enable and Require Mutual Authentication—Check this box to force the LDAP server to authenticate mutually when using SSL.
Enable and Require Mutual Authentication—Check this box to force the LDAP server to authenticate mutually when using SSL.
![]() Enable Encrypted Port—Sets the TCP port used for SSL connections on this server. Default is port
Enable Encrypted Port—Sets the TCP port used for SSL connections on this server. Default is port 636. This should not be changed unless another service is already using port 636 on this server. Uncheck this box to prevent LDAP clients from using secure connections on this server.
![]() Enable Non-encrypted Port—Sets the TCP port used for LDAP on this server. Default is port
Enable Non-encrypted Port—Sets the TCP port used for LDAP on this server. Default is port 389. This should not be changed unless another service is already using port 389 on this server. Uncheck this box to force LDAP clients to use SSL connections on this server.
![]() Concurrent Bind Limit—Sets the maximum number of simultaneous LDAP connections. This should be set based on the amount of available memory in the LDAP server. Each LDAP request takes about 160KB of memory. The default is no limit.
Concurrent Bind Limit—Sets the maximum number of simultaneous LDAP connections. This should be set based on the amount of available memory in the LDAP server. Each LDAP request takes about 160KB of memory. The default is no limit.
![]() Idle Timeout—Defines the maximum time in seconds that an open LDAP connection can remain inactive before being closed. The default is no limit.
Idle Timeout—Defines the maximum time in seconds that an open LDAP connection can remain inactive before being closed. The default is no limit.
![]() Bind Restrictions—Specifies whether users must supply a username and password to connect. This is useful if you want to prevent anonymous or public access to eDirectory.
Bind Restrictions—Specifies whether users must supply a username and password to connect. This is useful if you want to prevent anonymous or public access to eDirectory.
![]() Searches—Defines the search settings on this LDAP server with the following settings:
Searches—Defines the search settings on this LDAP server with the following settings:
![]() Filtered Replicas—If you have configured a Filtered replica with specific search data, such as a corporate directory, you can specify that LDAP use this replica to perform its searches. If your Filtered replicas are configured for this purpose, they can improve search time significantly.
Filtered Replicas—If you have configured a Filtered replica with specific search data, such as a corporate directory, you can specify that LDAP use this replica to perform its searches. If your Filtered replicas are configured for this purpose, they can improve search time significantly.
![]() Persistent Search—Persistent search is an extension to the LDAP search operation that enables an LDAP client to receive active updates to a given query from the LDAP server. As data on the LDAP server changes, the client will be automatically notified of changes that affect its search. These settings enable you to enable/disable persistent searches and limit the number of concurrent persistent searches.
Persistent Search—Persistent search is an extension to the LDAP search operation that enables an LDAP client to receive active updates to a given query from the LDAP server. As data on the LDAP server changes, the client will be automatically notified of changes that affect its search. These settings enable you to enable/disable persistent searches and limit the number of concurrent persistent searches.
![]() Restrictions—Sets the maximum values for searches in both time and number of entries returned.
Restrictions—Sets the maximum values for searches in both time and number of entries returned.
![]() Nonstandard Behaviors—Two check boxes enable you to support ADSI and legacy Netscape schema requests, and provide operational as well as user attributes when a request for user attributes is made.
Nonstandard Behaviors—Two check boxes enable you to support ADSI and legacy Netscape schema requests, and provide operational as well as user attributes when a request for user attributes is made.
![]() Events—This page enables you to enable event monitoring for external applications that may want to monitor certain eDirectory events. This monitoring can place a significant load on the LDAP server, so you can also specify a maximum server load for event monitoring.
Events—This page enables you to enable event monitoring for external applications that may want to monitor certain eDirectory events. This monitoring can place a significant load on the LDAP server, so you can also specify a maximum server load for event monitoring.
![]() Tracing—This page enables you to enable tracing of certain types of LDAP events. LDAP tracing can place a significant load on the LDAP server, so it should be used only when necessary to gather troubleshooting information.
Tracing—This page enables you to enable tracing of certain types of LDAP events. LDAP tracing can place a significant load on the LDAP server, so it should be used only when necessary to gather troubleshooting information.
![]() Referrals—This page enables you to configure referral options that define how this LDAP server will react if it is unable to process an LDAP request directly:
Referrals—This page enables you to configure referral options that define how this LDAP server will react if it is unable to process an LDAP request directly:
![]() Default Referral URL—Specify the LDAP URL that will point the LDAP client to another LDAP server when no specific referral information is available.
Default Referral URL—Specify the LDAP URL that will point the LDAP client to another LDAP server when no specific referral information is available.
![]() Conditions Which Return Default Referral—These three check boxes enable you to enable/disable situations under which this LDAP server will return a default referral to the client.
Conditions Which Return Default Referral—These three check boxes enable you to enable/disable situations under which this LDAP server will return a default referral to the client.
![]() Referral Options: Always Chain/Prefer Chaining—Chaining causes the LDAP server to contact other LDAP servers to locate the requested data for the client and then return the data to the client. Query work is server-intensive. Always refer/Prefer referrals: A referral is a message returned to the client that tells it where it can go to get the requested information. Both LDAP clients and servers must support referrals, but this eliminates the first LDAP server as a middleman for the LDAP request. The chaining and referral preferences can be set separately for eDirectory searches as opposed to other eDirectory operations.
Referral Options: Always Chain/Prefer Chaining—Chaining causes the LDAP server to contact other LDAP servers to locate the requested data for the client and then return the data to the client. Query work is server-intensive. Always refer/Prefer referrals: A referral is a message returned to the client that tells it where it can go to get the requested information. Both LDAP clients and servers must support referrals, but this eliminates the first LDAP server as a middleman for the LDAP request. The chaining and referral preferences can be set separately for eDirectory searches as opposed to other eDirectory operations.
Using the pages just described, you can configure the LDAP Server object as needed to fit your specific environment.
The LDAP group object enables you to configure user access to the LDAP server. By default, an LDAP group object will be created for each LDAP server object, but if you want to use the same user configuration for multiple LDAP servers, you can combine them into a single LDAP group.
To configure the LDAP group object, complete the following steps in iManager:
1. In the Navigation frame, open the LDAP group and select LDAP Overview.
2. Select the View LDAP Groups tab and click the LDAP group object with which you want to work.
3. Enter the configurable parameters in the property pages and click OK when finished.
There are three pages of configuration parameters for the LDAP Group object:
![]() Information—This page enables you to set a couple of general settings for the LDAP Group:
Information—This page enables you to set a couple of general settings for the LDAP Group:
![]() Server List—Use this option to add/remove LDAP servers from this LDAP group.
Server List—Use this option to add/remove LDAP servers from this LDAP group.
![]() Proxy User—Specifies the eDirectory user object to use as a proxy for anonymous LDAP bind requests. For more information, see “Connecting via LDAP,” later in this chapter.
Proxy User—Specifies the eDirectory user object to use as a proxy for anonymous LDAP bind requests. For more information, see “Connecting via LDAP,” later in this chapter.
![]() Require TLS for Simple Binds with Password—Check this option if you want to prevent unencrypted bind requests that contain a password. This is recommended to prevent passwords from being sent across the network in clear text.
Require TLS for Simple Binds with Password—Check this option if you want to prevent unencrypted bind requests that contain a password. This is recommended to prevent passwords from being sent across the network in clear text.
![]() Referrals—This page enables you to configure referral options that define how this LDAP server will react if it is unable to process an LDAP request directly:
Referrals—This page enables you to configure referral options that define how this LDAP server will react if it is unable to process an LDAP request directly:
![]() Default Referral URL—Specify the LDAP URL that will point the LDAP client to another LDAP server when no specific referral information is available.
Default Referral URL—Specify the LDAP URL that will point the LDAP client to another LDAP server when no specific referral information is available.
![]() Conditions Which Return Default Referral—These three check boxes enable you to enable/disable situations under which this LDAP server will return a default referral to the client.
Conditions Which Return Default Referral—These three check boxes enable you to enable/disable situations under which this LDAP server will return a default referral to the client.
![]() Referral Options: Always Chain/Prefer Chaining—Chaining causes the LDAP server to contact other LDAP servers to locate the requested data for the client and then return the data to the client. Query work is server-intensive. Always Refer/Prefer Referrals: A referral is a message returned to the client that tells it where it can go to get the requested information. Both LDAP clients and servers must support referrals, but this eliminates the first LDAP server as a middleman for the LDAP request. The chaining and referral preferences can be set separately for eDirectory searches versus other eDirectory operations.
Referral Options: Always Chain/Prefer Chaining—Chaining causes the LDAP server to contact other LDAP servers to locate the requested data for the client and then return the data to the client. Query work is server-intensive. Always Refer/Prefer Referrals: A referral is a message returned to the client that tells it where it can go to get the requested information. Both LDAP clients and servers must support referrals, but this eliminates the first LDAP server as a middleman for the LDAP request. The chaining and referral preferences can be set separately for eDirectory searches versus other eDirectory operations.
![]() Attribute Map and Class Map—These pages enable an administrator to associate LDAP schema classes and attributes to corresponding eDirectory schema classes and attributes. A default set of mappings is defined when the LDAP group is created, but it leaves many LDAP classes and attributes unmapped. If you have specific needs, you can map LDAP classes and attributes as needed.
Attribute Map and Class Map—These pages enable an administrator to associate LDAP schema classes and attributes to corresponding eDirectory schema classes and attributes. A default set of mappings is defined when the LDAP group is created, but it leaves many LDAP classes and attributes unmapped. If you have specific needs, you can map LDAP classes and attributes as needed.
Note
Because there are certain LDAP attributes (such as CN and Common Name) that map to the same NDS value, LDAP services support multi-value associations. However, the LDAP server will return the value of the first matching attribute it locates in the list. If you map multiple LDAP attributes to a single NDS attribute, make sure you order the list with the most important attributes at the top; they will take precedence.
All LDAP clients bind or connect to eDirectory as one of the following types of users:
![]()
[Public] user (anonymous bind)
![]() Proxy user (proxy user anonymous bind)
Proxy user (proxy user anonymous bind)
![]() Directory user (eDirectory user bind)
Directory user (eDirectory user bind)
The type of bind the user authenticates with affects the content the LDAP client can access. LDAP clients access a directory by building a request and sending it to the directory. When an LDAP client sends a request through LDAP Services for eDirectory, eDirectory completes the request for only those attributes to which the LDAP client has the appropriate access rights. For example, if the LDAP client requests an attribute value (which requires the Read right) and the user is granted only the Compare right to that attribute, the request is rejected.
Standard login restrictions and password restrictions still apply; however, any restrictions are relative to where LDAP is running. Time and address restrictions are honored, but address restrictions are relative to where the eDirectory login occurred—in this case, the LDAP server. Also, because LDAP does not support grace logins, users can log in to the server yet not be able to bind to LDAP.
An anonymous bind is an LDAP connection that does not contain a username or password. If an anonymous client requests an LDAP connection and the service is not configured to use a Proxy user, eDirectory authenticates the client as a [Public] user.
[Public] is an unauthenticated eDirectory user. By default, [Public] is assigned only the Browse right to the objects in the eDirectory tree. [Public] can see only objects; it cannot browse object attributes. This is typically too limited for most LDAP clients. Although you can change the [Public] rights, this will give those rights to all users. To avoid this, use Proxy user (anonymous bind).
Proxy user (anonymous bind) enables LDAP to connect as a predefined eDirectory user. This gives you the flexibility to offer an anonymous connection that may actually be useful for something—such as accessing public information—without potentially causing security problems by changing [Public].
The key concepts of Proxy user (anonymous bind) are as follows:
![]() All anonymous LDAP access is managed through the Proxy User object. Assign the Proxy user appropriate rights to all objects and attributes in eDirectory.
All anonymous LDAP access is managed through the Proxy User object. Assign the Proxy user appropriate rights to all objects and attributes in eDirectory.
![]() The Proxy user cannot have a password or any password restrictions, such as password change intervals, because LDAP clients do not supply passwords during anonymous binds. Do not allow the Proxy user to change passwords.
The Proxy user cannot have a password or any password restrictions, such as password change intervals, because LDAP clients do not supply passwords during anonymous binds. Do not allow the Proxy user to change passwords.
![]() If you want, you can limit the locations from which a Proxy user can log in by setting address restrictions on the Proxy User object. For more information on creating and configuring eDirectory User objects, see Chapter 6, “Novell eDirectory.”
If you want, you can limit the locations from which a Proxy user can log in by setting address restrictions on the Proxy User object. For more information on creating and configuring eDirectory User objects, see Chapter 6, “Novell eDirectory.”
The Proxy user object is enabled from the Information tab of the LDAP group object, as described previously in this chapter. There is only one Proxy user object for all servers in an LDAP group.
LDAP clients can also connect using regular eDirectory user objects. When authenticated, the LDAP client is allowed access to any information to which the eDirectory user has rights.
The key concepts of eDirectory user binds are as follows:
![]() eDirectory user connections are authenticated to eDirectory with a username and password entered at the LDAP client.
eDirectory user connections are authenticated to eDirectory with a username and password entered at the LDAP client.
![]() If secure connections are not required for password-based connections, the eDirectory password can be transmitted in clear text on the path between the LDAP client and LDAP server.
If secure connections are not required for password-based connections, the eDirectory password can be transmitted in clear text on the path between the LDAP client and LDAP server.
![]() If an eDirectory user password has expired, eDirectory bind requests for that user are rejected.
If an eDirectory user password has expired, eDirectory bind requests for that user are rejected.
You have the flexibility to leverage any of these types of LDAP bind operations to give LDAP users access to eDirectory information they might need.
Novell DNS/DHCP services in OES NetWare integrate the Domain Name Service (DNS) and Dynamic Host Configuration Protocol (DHCP) into the eDirectory database. Integrating these services into eDirectory provides centralized administration and enterprisewide management of network (IP) addresses, configuration, and hostnames.
DNS and DHCP manage the assignment and discovery of IP addresses on a network. By integrating this information into eDirectory, network administrators can manage both DNS and DHCP information together with regular eDirectory information from a single, centralized location. The DNS/DHCP information is stored in the eDirectory database, so it is distributed and replicated like other eDirectory data, making it easier to access and manage. The DNS/DHCP Management utility is available through iManager.
DNS/DHCP services can be installed as an optional service during the OES NetWare installation routine. It can also be installed as a post-installation task through iManager. When you install DNS/DHCP services as an optional product during the server installation, the eDirectory schema is extended to support a variety of DNS and DHCP-related objects. These objects help keep track of IP addresses, DNS and DHCP servers, configurations, host addresses, zones, and the like.
To install DNS/DHCP services from iManager, complete the following steps:
1. Launch iManager and open the Install NetWare 6.5 Products link, and then select Install and Upgrade
2. Click Remote Product Install in the right frame.
3. Browse to the location of the NetWare 6.5 SP3 CD 1 (Operating System) and click OK.
4. Browse to and select the server to which you want to install DNS/DHCP services. Click Next. Authenticate as an Admin user to the server you selected.
5. At the Components screen, select only Novell DNS/DHCP Services and click Next.
6. At the Summary screen, select Copy Files to install DNS/DHCP services. You will need to insert or specify the location of the NetWare 6.5 SP3 CD 2 (Products).
7. Specify the context for the three main DNS/DHCP objects and click Next. More information on each of these objects is provided later in this section.
8. At the Installation Complete screen, click Close to complete the installation.
With DNS/DHCP services installed on the network, an IP client can establish a connection with the network by leasing an IP address from a pool of available addresses, rather than requiring that the workstation be assigned a fixed address individually. This makes IP address management much easier.
When connected to the network, the IP client can automatically detect available DNS name servers, through which it can translate domain names (for example, www.novell.com) into its corresponding IP address (for example, 137.65.168.1). This enables the client to communicate with the server properly. Domain names are a benefit to the human users of computers, not the computers themselves.
All DNS/DHCP configuration and management is handled through iManager. For more information on the basics of iManager, see Chapter 4.
There are several aspects to the configuration of DNS/DHCP services for your OES NetWare network, but the four primary tasks are
![]() Planning for DNS/DHCP
Planning for DNS/DHCP
![]() Setting DNS/DHCP scope
Setting DNS/DHCP scope
![]() Configuring DHCP
Configuring DHCP
![]() Configuring DNS
Configuring DNS
There are three objects to which all DNS/DHCP servers need to have access:
![]() DNS/DHCP Group
DNS/DHCP Group
![]() DNS/DHCP Locator
DNS/DHCP Locator
![]() RootServerInfo Zone
RootServerInfo Zone
Locate the DNS/DHCP objects near the top of your eDirectory tree. You might also want to create an administrative role for DNS/DHCP. After it’s created, you can assign to be members of this group any user objects that you want to be able to use iManager to configure DNS/DHCP. For more information on creating iManager roles, see Chapter 4, “OES Management Tools.”
Consider the following eDirectory issues to maintain optimal performance when providing DNS/DHCP services on your NetWare network:
![]() Where to locate DNS and DHCP servers—Plan to locate your DNS and DHCP servers so that they are physically close to the hosts that require their services. Plan to have one DHCP server in each partition of your network to minimize impact on WAN communications.
Where to locate DNS and DHCP servers—Plan to locate your DNS and DHCP servers so that they are physically close to the hosts that require their services. Plan to have one DHCP server in each partition of your network to minimize impact on WAN communications.
![]() Which replication strategy to employ—Replicate the partition containing the DNS/DHCP Group and Locator objects to all parts of the network that use DNS/DHCP services to ensure access in the event of system unavailability or hardware problems.
Which replication strategy to employ—Replicate the partition containing the DNS/DHCP Group and Locator objects to all parts of the network that use DNS/DHCP services to ensure access in the event of system unavailability or hardware problems.
![]() How to provide fault tolerance—When planning your DNS replication strategy, consider that replication is employed for load balancing when you provide multiple name servers within the DNS zone. Well-planned replication is the best way to provide fault tolerance for DNS/DHCP services.
How to provide fault tolerance—When planning your DNS replication strategy, consider that replication is employed for load balancing when you provide multiple name servers within the DNS zone. Well-planned replication is the best way to provide fault tolerance for DNS/DHCP services.
Keeping these issues in mind will help ensure the integrity and performance of your DNS/DHCP environment.
Setting the scope of the DNS/DHCP services specifies the context of the locator object and the administrative scope for the iManager session. Defining these two values first will improve performance in larger eDirectory environments because it eliminates the need to search for the Locator object and it restricts the retrieval of DNS/DHCP objects to the scope you specify, instead of searching the entire tree.
DNS/DHCP Scope settings will normally last only for the duration of the DNS/DHCP session. However, if you configure DNS/DHCP Scope settings for either DNS or DHCP Management, the settings apply across the session to both roles.
To configure DNS/DHCP Scope settings, complete the following steps:
1. In iManager, open either the DNS or DHCP link and select DNS/DHCP Scope Settings.
2. Specify the eDirectory context of the DNS/DHCP Locator object.
3. Specify the eDirectory container object that will provide the administrative scope of the current session.
4. Click OK.
Setting the DNS/DHCP scope effectively constrains the DNS/DHCP environment within which you will be working during this iManager session.
Configuring the DHCP environment involves the following steps:
![]() Planning DHCP
Planning DHCP
![]() Creating DHCP objects
Creating DHCP objects
![]() Starting DHCP services
Starting DHCP services
Before using DHCP for the first time, you need to gather a lot of network information:
![]() Make a list of all IP hosts to be served by the DHCP server. Include all devices that use network addresses on every segment of your network.
Make a list of all IP hosts to be served by the DHCP server. Include all devices that use network addresses on every segment of your network.
![]() Compile a list of current IP address assignments. Organize your lists of hosts and IP addresses by geographic location. For example, if your network is spread over a WAN, make a list for each location to help you organize the distribution of DHCP resources.
Compile a list of current IP address assignments. Organize your lists of hosts and IP addresses by geographic location. For example, if your network is spread over a WAN, make a list for each location to help you organize the distribution of DHCP resources.
![]() You must have a list of all permanently assigned network addresses. You might also want to make a list of devices that are to be denied IP addresses and those hosts that are to receive strict address limitations.
You must have a list of all permanently assigned network addresses. You might also want to make a list of devices that are to be denied IP addresses and those hosts that are to receive strict address limitations.
Another major issue is deciding how long to set your client leases. You must strike a balance between the amount of network traffic and the amount of flexibility in the system. The longest lease provided by a DHCP server determines the length of time you might have to wait before configuration changes can be propagated within a network. Consider the following issues when setting lease times:
![]() Keep leases short if you have more users than IP addresses. Shorter leases support more clients, but increase the load on the network and DHCP server. A lease of two hours is long enough to serve most users, and the network load will probably not be significant. Leases shorter than this start to increase network and server load dramatically.
Keep leases short if you have more users than IP addresses. Shorter leases support more clients, but increase the load on the network and DHCP server. A lease of two hours is long enough to serve most users, and the network load will probably not be significant. Leases shorter than this start to increase network and server load dramatically.
![]() Leases should be set twice as long as typical interruptions, such as server and communications outages. Decide how long your users should be able to go without contacting the DHCP server and double it to get recommended lease duration.
Leases should be set twice as long as typical interruptions, such as server and communications outages. Decide how long your users should be able to go without contacting the DHCP server and double it to get recommended lease duration.
![]() Hosts that are advertising services on the network, such as web servers, should not have an IP address that is constantly changing. Consider permanent assignments for these hosts. The deciding factor should be how long you want the host to be able to keep an assigned address.
Hosts that are advertising services on the network, such as web servers, should not have an IP address that is constantly changing. Consider permanent assignments for these hosts. The deciding factor should be how long you want the host to be able to keep an assigned address.
The default of 3 days is usually a pretty good balance between the need for a shorter and a longer lease.
After you gather the necessary information, you need to create eDirectory objects to represent this information in eDirectory. Create a DHCP server object from which to configure the DHCP environment. Create subnet objects to represent each LAN segment. Create one or more Subnet Address Range objects to represent all your contiguous strings of IP addresses for each LAN subnet.
When a DHCP server makes or modifies address assignments, it updates the database. The partition where this database is stored should have at least two writable replicas. Having only one replica might be unsafe due to a lack of fault tolerance, but three can be too costly in terms of replication overhead.
To create the necessary DHCP objects, complete the steps in the following sections.
Use iManager to install a DHCP Server object in any of the following container objects, based upon the needs of your network: organization, organizational unit, country, or locality:
1. From iManager, open the DHCP link and select DHCP Server Management.
2. Select Create Server from the drop-down menu and click OK.
3. Browse to and select the server that will act as a DHCP server and select Create.
4. At the Request Succeeded message screen, click OK.
The DHCP Server object will be used as part of the management infrastructure for DHCP.
Use iManager to create and set up a DHCP Subnet object for each of the subnets to which you will assign addresses:
1. From iManager, open the DHCP link and select Subnet Management.
2. Select Create Subnet from the drop-down menu and select OK.
3. At the Create Subnet screen, enter the required information and select Create:
![]() Subnet Name—Specify a unique name for this Subnet object.
Subnet Name—Specify a unique name for this Subnet object.
![]() e Directory Context—Specify the eDirectory context where the subnet record will be stored.
e Directory Context—Specify the eDirectory context where the subnet record will be stored.
![]() Subnet Address—Specify the IP subnet address.
Subnet Address—Specify the IP subnet address.
![]() Subnet Mask—Specify the IP subnet mask.
Subnet Mask—Specify the IP subnet mask.
![]() Default DHCP Server—Specify the DHCP server that will manage this subnet. By default, this server is assigned all address ranges created under the subnet.
Default DHCP Server—Specify the DHCP server that will manage this subnet. By default, this server is assigned all address ranges created under the subnet.
4. At the Request Succeeded message screen, click OK.
IP Address objects are simultaneously created to exclude routing and broadcast addresses.
Use iManager to create and set up Subnet Address Range objects for each pool of addresses you want to be assigned dynamically by DHCP. To create and set up a Subnet Address Range object, complete the following steps:
1. From iManager, open the DHCP link and select Address Range Management.
2. Select Create Address Range from the drop-down menu and select OK.
3. At the Create Address Range window, enter the required information and select Create:
![]() Select the Subnet—Specify the subnet for which the address range is required from the drop-down menu.
Select the Subnet—Specify the subnet for which the address range is required from the drop-down menu.
![]() Address Range Name—Specify a unique name for the subnet address range.
Address Range Name—Specify a unique name for the subnet address range.
![]() Start Address—Specify the beginning of the address range.
Start Address—Specify the beginning of the address range.
![]() End Address—Specify the end of the address range.
End Address—Specify the end of the address range.
4. At the Request Succeeded message screen, click OK.
Optionally, you can also use iManager to create specific IP address objects if you have certain addresses that need to be assigned to specific devices or excluded from dynamic assignment. This requires you to specify the client’s Media Access Control (MAC) address or client ID.
After you have created the necessary DHCP objects in eDirectory, you can start DHCP services on your server by entering the following command at the server console prompt:
LOAD DHCPSRVR
You typically won’t need to anything beyond this, but DHCPSRVR.NLM does support some command-line parameters for specific functions, as noted in Table 6.1.
Table 6.1. DHCPSRVR.NLM Command-Line Parameters
|
PARAMETER |
DESCRIPTION |
|---|---|
|
|
Turns on a screen log of DHCP packets on the NetWare server |
|
|
Turns on a screen log of debug statements and DHCP packets on the NetWare server |
|
|
In addition to |
|
|
Displays the command-line syntax |
|
|
Sets the global polling interval to every |
|
|
Forces the DHCP server to read and write from the Master replica |
To enable DHCP services on a client workstation, configure the TCP/IP properties to obtain an IP address automatically. The next time the client starts, it will send a request to the DHCP server for an IP address.
Warning
Client configuration settings will override the configuration received from a DHCP server. The only exception is the hostname parameter set on the DNS Configuration tab of the TCP/IP Properties window.
For detailed information on DHCP configuration parameters, see the OES online documentation.
Similar to DHCP, configuring the DNS environment involves the following steps:
![]() Planning DNS
Planning DNS
![]() Creating DNS objects
Creating DNS objects
![]() Starting DNS services
Starting DNS services
Consider the following issues and recommendations as you plan your DNS environment:
![]() You will configure a primary DNS name server, which is considered the authoritative source for DNS information. For load balancing and fault tolerance, plan to install one primary and at least one secondary name server.
You will configure a primary DNS name server, which is considered the authoritative source for DNS information. For load balancing and fault tolerance, plan to install one primary and at least one secondary name server.
![]() Secondary name servers receive their zone data from the primary name server. When it starts, and at periodic intervals, the secondary checks with the primary to see whether any information has changed. If the information on the secondary is older than that on the primary, a zone transfer occurs to update the secondary name server’s information.
Secondary name servers receive their zone data from the primary name server. When it starts, and at periodic intervals, the secondary checks with the primary to see whether any information has changed. If the information on the secondary is older than that on the primary, a zone transfer occurs to update the secondary name server’s information.
![]() If you are running a primary name server and providing DNS service for a zone, the size or geography of your network might require creating subzones within the zone.
If you are running a primary name server and providing DNS service for a zone, the size or geography of your network might require creating subzones within the zone.
![]() Novell recommends installing your OES NetWare DNS name server as a primary to take advantage of Dynamic DNS (DDNS) most efficiently. By doing this, if you make changes to the DHCP environment with iManager, those changes can be dynamically recognized by the primary DNS server. Secondary name servers, even non-NetWare secondary name servers, can transfer that revised data from the primary server.
Novell recommends installing your OES NetWare DNS name server as a primary to take advantage of Dynamic DNS (DDNS) most efficiently. By doing this, if you make changes to the DHCP environment with iManager, those changes can be dynamically recognized by the primary DNS server. Secondary name servers, even non-NetWare secondary name servers, can transfer that revised data from the primary server.
![]() If your NetWare servers will operate as secondary DNS servers to a non-Novell master name server, one Novell secondary name server must be specified as the Dynamic DNS or Zone In server (a server that receives zone transfer information from the master name server and updates eDirectory accordingly). Other NetWare secondary name servers can then transfer the information from eDirectory.
If your NetWare servers will operate as secondary DNS servers to a non-Novell master name server, one Novell secondary name server must be specified as the Dynamic DNS or Zone In server (a server that receives zone transfer information from the master name server and updates eDirectory accordingly). Other NetWare secondary name servers can then transfer the information from eDirectory.
![]() If a name server cannot answer a query, it must query a remote server. This is particularly relevant for Internet domain queries. Novell’s DNS/DHCP services enable you to configure primary and/or secondary name servers to act as forwarders. Forwarders that handle the offsite queries develop a robust cache of information. When using forwarders, configure the other name servers in your zone to direct their queries to the forwarder. The forwarder can typically respond to any given query with information from its cache, eliminating the need to pass an outside query to a remote server.
If a name server cannot answer a query, it must query a remote server. This is particularly relevant for Internet domain queries. Novell’s DNS/DHCP services enable you to configure primary and/or secondary name servers to act as forwarders. Forwarders that handle the offsite queries develop a robust cache of information. When using forwarders, configure the other name servers in your zone to direct their queries to the forwarder. The forwarder can typically respond to any given query with information from its cache, eliminating the need to pass an outside query to a remote server.
Considering the issues discussed here will help make sure your DNS environment is planned properly.
There are three main types of DNS objects that you will create for your DNS environment. The following sections provide the steps for creating each type.
The DNS Server object enables you to configure the operation of your DNS servers through eDirectory. To create a DNS Server object, complete the following steps:
1. From iManager, open the DNS link and select DNS Server Management.
2. Select Create Server from the drop-down menu and click OK.
3. At the Create DNS Server screen, enter the required information and select Create:
![]() NCP Server Name—Browse to and select the NetWare server that will act as a DNS server.
NCP Server Name—Browse to and select the NetWare server that will act as a DNS server.
![]() Hostname—Specify a unique hostname for the DNS Server object.
Hostname—Specify a unique hostname for the DNS Server object.
![]() Domain Name—Specify a domain name for the DNS server object.
Domain Name—Specify a domain name for the DNS server object.
4. At the Request Succeeded message screen, select OK.
After it’s created, the DNS Server object will enable you to manage your DNS environment through eDirectory.
Zones define the group of domains and/or subdomains for which you have authority. All host information for a zone is maintained in a single, authoritative database. To create a DNS zone object, complete the following steps:
1. From iManager, open the DNS link and select Zone Management.
2. Select Create Zone from the drop-down menu and select OK.
3. At the Create DNS Zone screen, enter the required information and select Create:
![]() Zone Type—Select Create New Zone. The
Zone Type—Select Create New Zone. The IN-ADDR ARPA zone is used for reverse lookups, translating an IP address into a domain name. For more information on IN-ADDR ARPA zones, see the OES online documentation.
![]() eDirectory Context—Specify a location for the zone object.
eDirectory Context—Specify a location for the zone object.
![]() Zone Domain Name—Specify a domain name for the zone object.
Zone Domain Name—Specify a domain name for the zone object.
![]() Zone Type—Select Primary if this zone will be associated with the primary name server and will function as the authoritative source for domain information. Otherwise, select Secondary.
Zone Type—Select Primary if this zone will be associated with the primary name server and will function as the authoritative source for domain information. Otherwise, select Secondary.
![]() (Conditional) Name Server IP Address—If this is a secondary zone, enter the IP address of the primary DNS name server from which this zone will receive its updates.
(Conditional) Name Server IP Address—If this is a secondary zone, enter the IP address of the primary DNS name server from which this zone will receive its updates.
![]() (Conditional) Assigned Authoritative Zone Server—If the primary DNS server is a NetWare server, select it from the drop-down list.
(Conditional) Assigned Authoritative Zone Server—If the primary DNS server is a NetWare server, select it from the drop-down list.
![]() (Conditional) Name Server Information—If the primary DNS server is not a NetWare server, specify its complete hostname and, optionally, its domain.
(Conditional) Name Server Information—If the primary DNS server is not a NetWare server, specify its complete hostname and, optionally, its domain.
4. At the Request Succeeded message screen, select OK.
You can create multiple DNS zones to better manage more complex DNS environments, and each can be managed separately.
A resource record is a piece of information about a domain name. Each resource record contains information about a particular piece of data within the domain. To create a new resource record, complete the following steps:
1. From iManager, open the DNS link and select Resource Record Management.
2. Select Create Resource Record from the drop-down menu and select OK.
3. At the Create Resource Record screen, enter the required information and select Create:
![]() Domain Name—Select the domain in which the resource record is to be created.
Domain Name—Select the domain in which the resource record is to be created.
![]() (Optional) Hostname—Select the name of the host server. This binds a domain name with a hostname for a specific name server.
(Optional) Hostname—Select the name of the host server. This binds a domain name with a hostname for a specific name server.
4. Specify the Resource Record (RR) type and select Create. Depending on the type of RR you are creating, you will be required to specify different types of record data. For more information on RR types, see the OES online documentation.
5. At the Request Succeeded screen, select OK.
You can create as many resource records as needed to describe and configure your DNS environment properly.
After you have created and set up a DNS Server object and a DNS zone object, enter the following command at the DNS server console:
LOAD NAMED
After NAMED.NLM is loaded, the DNS server can respond to queries for the zone.
You typically won’t need to do anything beyond this, but NAMED.NLM does support some command-line parameters for specific functions, as noted in Table 6.2. You can issue the LOAD NAMED command repeatedly to invoke different command-line options. Although the different features will toggle on/off, NAMED.NLM is loaded only the first time.
Table 6.2. NAMED.NLM Command-Line Parameters
|
PARAMETER |
DESCRIPTION |
|---|---|
|
|
Can be used to add characters to the list of characters prohibited from use in DNS names. All characters in the list will be replaced by dashes (-) before storing them in eDirectory. |
|
|
Dynamic reconfiguration option tells the DNS server to reload the configuration data for the server and zones periodically (every 15 minutes by default) and automatically check for added, deleted, and modified zones. |
|
|
When enabled, the DNS server will start using the backup files if eDirectory is inaccessible. When off, the DNS server will not service the zones for which eDirectory is inaccessible. |
|
|
Displays usage information. |
|
|
Sets the level of detail to be logged. Values are |
|
Specifies the number of CPUs available for use by DNS. Can specify from |
|
|
|
Specifies the port number used by DNS. Default port is |
|
|
Saves the DNS server’s memory usage information to |
|
|
Saves the DNS server’s query statistics information to |
|
|
Purges all caches on the DNS server. |
|
|
Provides information about all zones currently loaded in the DNS server. |
|
|
Enables clustering support for DNS by allowing DNS information to be stored on a volume other than |
|
|
Forces named zone for zone-in transfer. |
To enable DNS services on a client workstation, simply configure the TCP/IP properties to obtain DNS server addresses automatically. The next time the client starts, it will dynamically query for DNS information on the network.