If you have a project that involves text of any kind — be it correspondence, a report, or what have you — you can harness the power of Word 2010 to quickly and easily generate a professional-looking document.
Word features a host of tools designed to improve your efficiency no matter what type of document you need to create, from prefabricated header and footer styles to building blocks for creating your own styles. The program's Research tools provide quick access to reference materials such as thesauri, dictionaries, and encyclopedias. You can even use Word to translate the text in your document into a different language.
In addition to enabling you to generate your own documents, Word 2010 also eases the process of sharing your documents with others. For example, the program's Track Changes feature enables you to easily pinpoint where edits have been made and by whom. And of course, by providing features to expedite blogging, Word enables you to share your writing with the world.
Add a Header or Footer Building Block. 44
Share Building Blocks with Others. 46
Translate Text. 48
Create a Blog Post. 50
Search Through a Document. 52
Look Up a Synonym or Definition. 54
Jump Around Documents with Bookmarks. 56
Navigate Long Documents with the Navigation Pane. 58
Automate Typing with AutoText. 60
Fix Misspellings with AutoCorrect. 62
Emphasize Text with Drop Caps. 64
Set a New Default Line Spacing. 66
Quickly Insert a Horizontal Line. 68
Resume Numbering in an Interrupted Numbered List. 69
Set Off a Paragraph with a Border. 70
Track Changes in a Document. 72
Compare Documents. 74
Add Filler Text. 76
Keep Words Together with a Nonbreaking Space. 77
Summarize Information with a Chart. 78
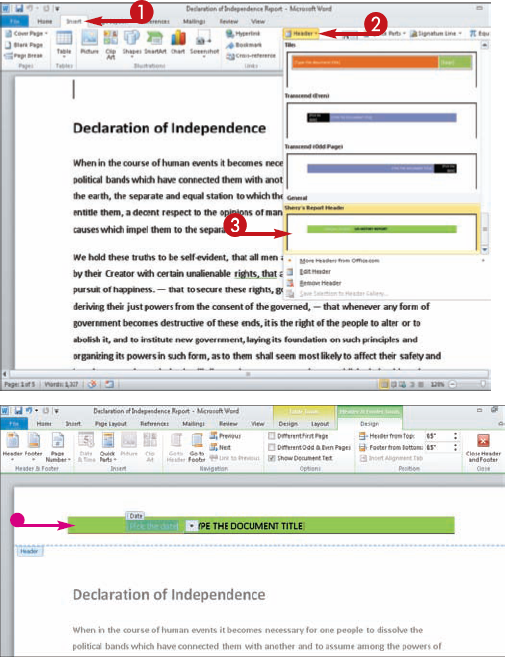
Word offers a gallery of several predefined header and footer designs, called building blocks, that you can apply. Headers appear in the top page margin area, and footers appear at the bottom. Headers and footers are a great way to place repeating information on your document pages, such as a document title, page numbers, company name, and so on. Word's predefined headers and footers make it easy to insert the information.
Alternatively, you can create your own header/footer building blocks — for example, one that contains your name and contact information in the color and font of your choice — and add that design to the gallery. That way, anytime you need to insert that particular header or footer, instead of reconstructing it, you can simply click it in the gallery.
In addition to creating header/footer building blocks, you can also create building blocks with other custom Office elements, such as cover pages, pull-quotes, and so on. Building blocks might also contain specific text or a graphic that you want to reuse throughout your Word documents.


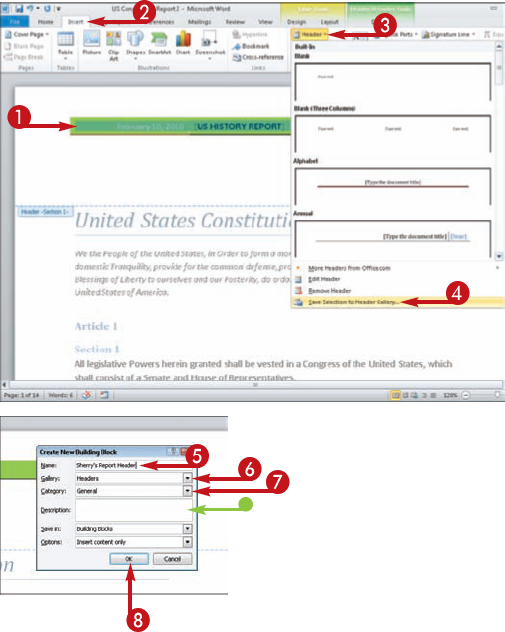
The Create New Building Block dialog box opens.


The custom header/footer is added to the gallery.
Tip
Customize It!
If your document contains section breaks, you can apply different headers and footers to each section. Click in the section for which you want to create a unique header or footer, click Header or Footer in the Insert tab, and click Edit Header or Edit Footer. The Design tab appears in the Ribbon; click Link to Previous to deselect it. Then create the new header/footer or insert a header/footer building block from the gallery. (Repeat for each section in your document.) Designing separate headers and footers for even and odd pages is similar; just click the Different Odd & Even Pages check box (
Apply It!
You can easily add headers or footers in Word 2010 just by clicking the Insert tab on the Ribbon and clicking the Header or Footer buttons in the Header & Footer tool group. Either button displays a list of pre-set headers or footers to choose from; you can you create your own from scratch by clicking Edit Header or Edit Footer.
Although Word offers several predefined Office elements, such as headers and footers, cover pages, pull-quotes, and so on, you can also create your own and add them to Word's gallery of choices. These elements, called building blocks, might contain specific text or a graphic you want to reuse — for example, your company logo or your name and contact information in the color and font of your choice.
You can share the building blocks you create by embedding them in a Word template, which you can then distribute to others. Anytime someone applies the template you distribute to a document, the building blocks you embedded become available in that document.
To attach a template to a document, open the document, click the File tab, and click Options. In the Word Options dialog box, click Add-ins, click the Manage drop-down arrow, click Templates, and click Go. Finally, click Attach in the Templates and Add-ins dialog box, locate and select the template you want to attach, click Open, and click OK.


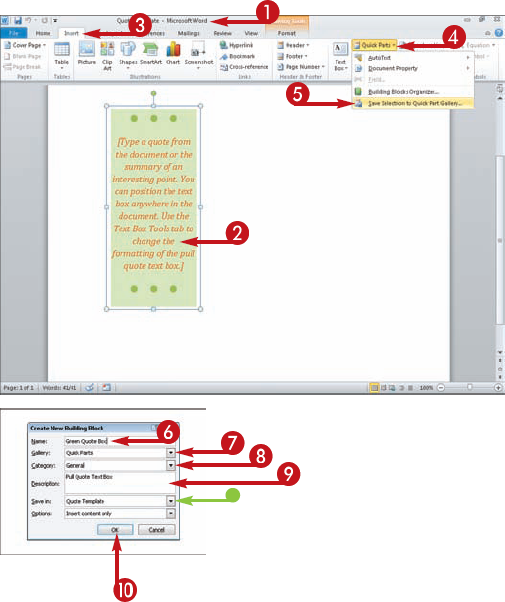
The Create New Building Block dialog box opens.


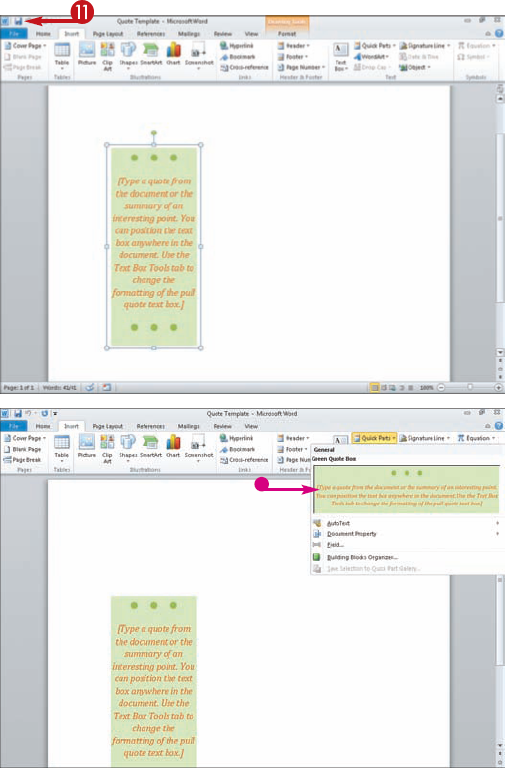

Tip
Apply It!
To insert a building block that has been saved in a template into a document, attach the template to the document, click in the document in the spot where you want the building block to appear, click the Insert tab, click Quick Parts in the Insert group, and click the building block. If the building block does not appear in the gallery, click Building Blocks Organizer, locate and click the block you want to insert, and click Insert.
Important!
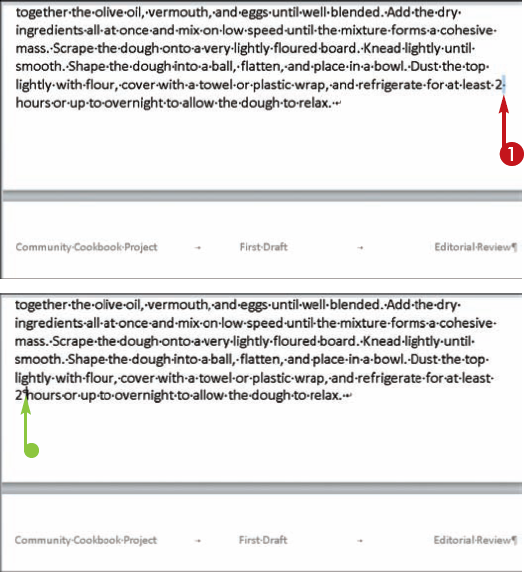
To include any paragraph formatting you have applied in the building block, ensure that the paragraph mark at the end of the paragraph is also selected. If no paragraph marks are visible, click the Home tab and, in the Paragraph group, click the Show/Hide button (
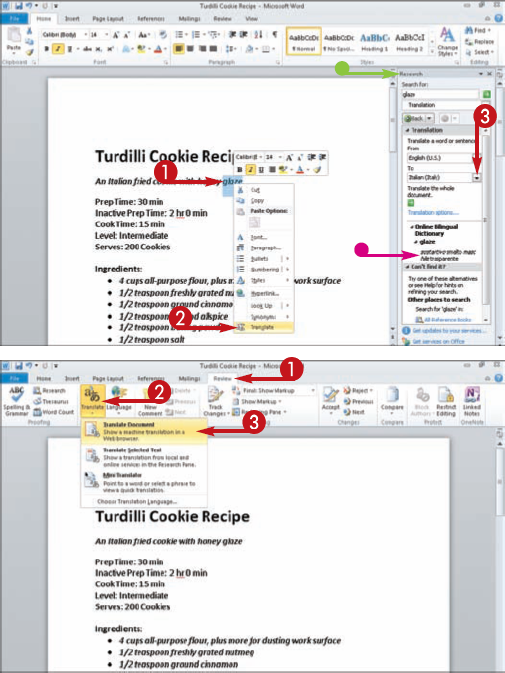
In today's global economy, being able to communicate with others who speak different languages is imperative. Fortunately, Word contains translation tools, including bilingual dictionaries and machine-translation functions, that enable you to quickly and easily translate words or phrases that you write in your native tongue into one of several other languages (and vice versa).
Word can translate text to and from many languages, including Arabic, Chinese, Dutch, English, French, German, Greek, Italian, Japanese, Korean, Portuguese, Russian, Spanish, and Swedish. (Note, however, that your ability to translate text to and from all these languages may be limited by your computer's operating system.)
If you need to translate more than the occasional word or phrase and instead need to translate an entire document, you can use Word to access online translation services, some of which are fee-based.
Note that although translating text in this manner can convey the basics of the content, the full meaning and tone of the text may be lost. If it is imperative that the specifics of what the text contains be conveyed, human translation is recommended.


The Translation Language Options dialog box opens.


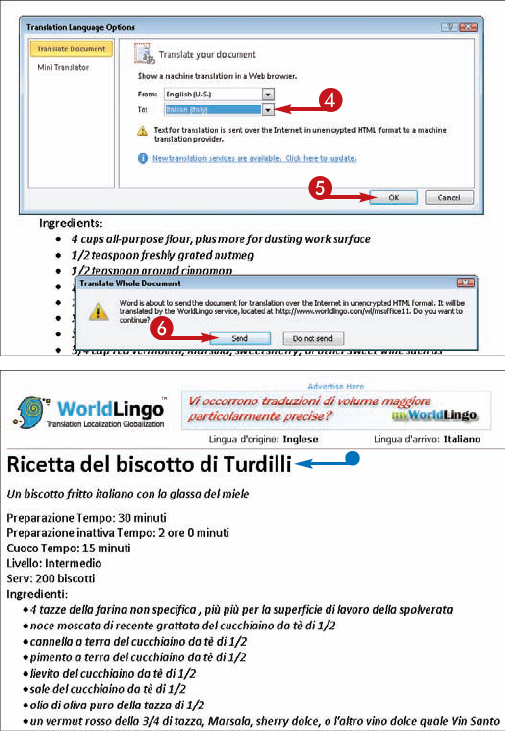

Note
You might find that only a portion of your document has been translated. In order for the rest of the document to be translated, you may need to pay a fee.
Tip
More Options!
You can also use the Review tab to translate a selected word or phrase. Click the Review tab, click the Translate button, and then click Translate Selected Text. Like the right-click method you learned about in the steps, the Research pane opens and offers you tools for translating the phrase.
Caution!
When you upload Word text to a translator site, remember the text is not encrypted. If your document is confidential, you may want to pursue another translation method.
If you are new to the world of blogging, a blog is a sort of online journal. A blog might provide commentary on a topic as broad as food or politics, or as specific as the day-to-day activities of a single individual. Blogs can include text, images, links to other Web pages and blogs, and more.
Recent years have seen an explosion in the number of blogs on the Internet, with some estimates pegging the current number at more than 112,000,000. To accommodate this growing legion of bloggers, Microsoft has developed tools for composing and publishing blogs to sites such as Windows Live Spaces and Blogger from within Word.
Composing blog posts within Word offers several advantages. First, you can use many of Word's formatting features, as well as its spelling- and grammar-checking capabilities on your blog entries. Second, you need not be connected to the Internet until you are ready to publish your piece.
To publish posts written in Word to your blog, you must first establish an account with a blogging site such as Blogger, and then register that account with Word.


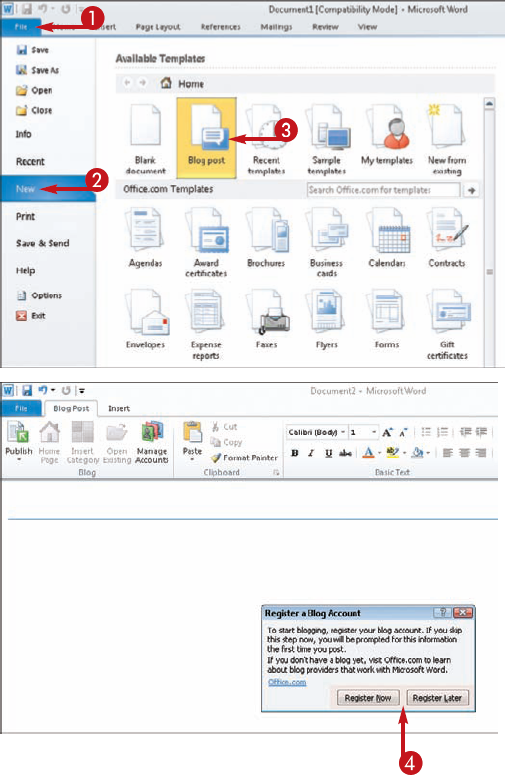
A Register a Blog Account prompt box appears if this is your first time creating a blog document.

A blank blog post appears in the Word window.


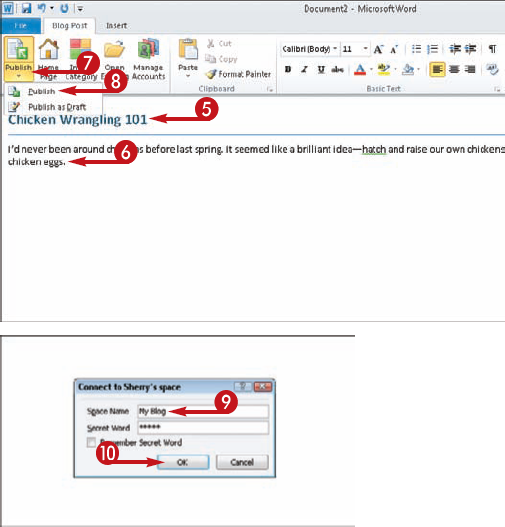
A prompt box appears for you to log into your blog account.


Tip
Apply It!
If you are using Word to create a new blog post for the first time, Word prompts you to register your blog account. When it does, click Register an Account, click the Blog drop-down arrow, and choose your blog service provider. Click Next, enter the username and password for your blog account, click the Remember Password check box if you want Word to log you on automatically (
Apply It!
Some blog providers automate the process of uploading photos to your blog; others require that you establish a separate account with a picture provider — that is, a site devoted solely to storing photos. To determine whether you need a picture provider account, check with your blog provider.
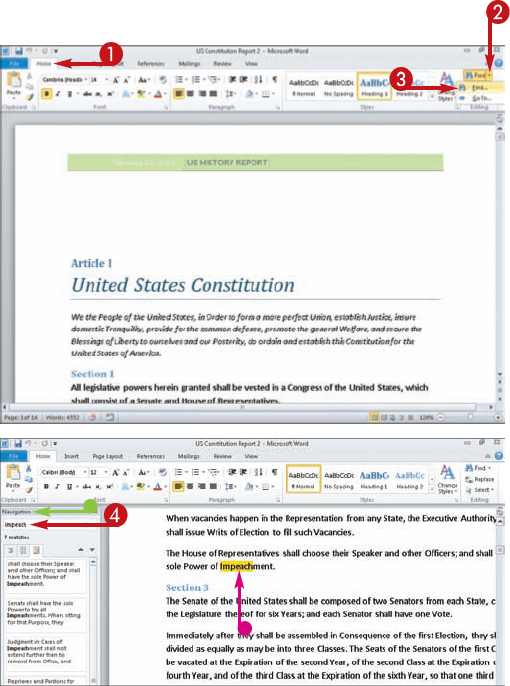
Navigating longer documents can be a bit daunting, especially when you are trying to locate a specific word or phrase. Word offers you several tools to help you search through a document. For simple word searches, the Navigation pane pops up and lets you search through a document, displaying any matches. You can use the pane's Search text box to enter the word or phrase you are looking for and immediately see any matches in the document.
The tried-and-true Find and Replace tool is the other go-to feature for searching through a document. You can use the Find portion of the tool to look for each occurrence of a word or phrase, and you can use the Replace portion of the tool to replace the word with different text. This makes quick work of finding a misspelled name and replacing it with the correct spelling, or searching a report for a particular price point and replacing it with a new price.
You can also use the Go To tab in the Find and Replace dialog box to jump to specific points in a document.


The Find and Replace dialog box opens with the Replace tab displayed.


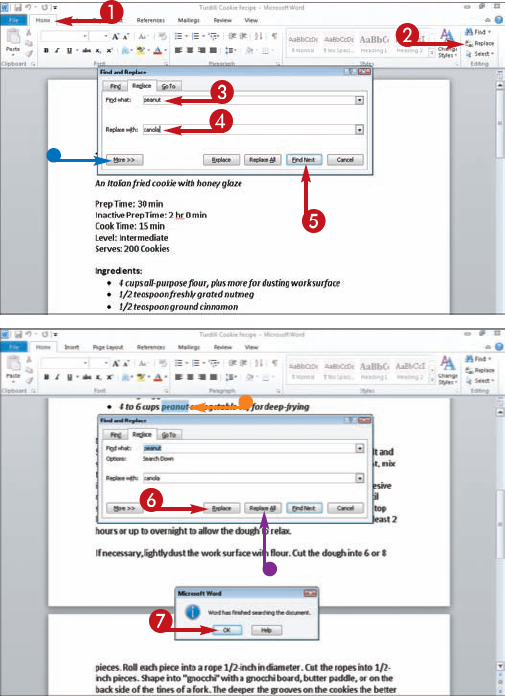


Tip
More Options!
If you want to find a word and not replace it, just use the Find tab in the Find and Replace dialog box. It looks nearly identical to the Replace tab, only lacking the Replace With text box. To find a word, click the Home tab on the Ribbon and click Find to open the Navigation pane. You can type the word or phrase you are looking for in the Search box at the top of the pane; then press Enter to search for the first occurrence of the text.
More Options!
You can find a variety of tools for finding your way around longer documents. Learn more about navigating with bookmarks in the task "Jump Around Documents with Bookmarks" later in this chapter. You can also use the Navigation pane to navigate through longer documents by viewing thumbnails of your pages. See the task "Navigate Long Documents with the Navigation Pane."
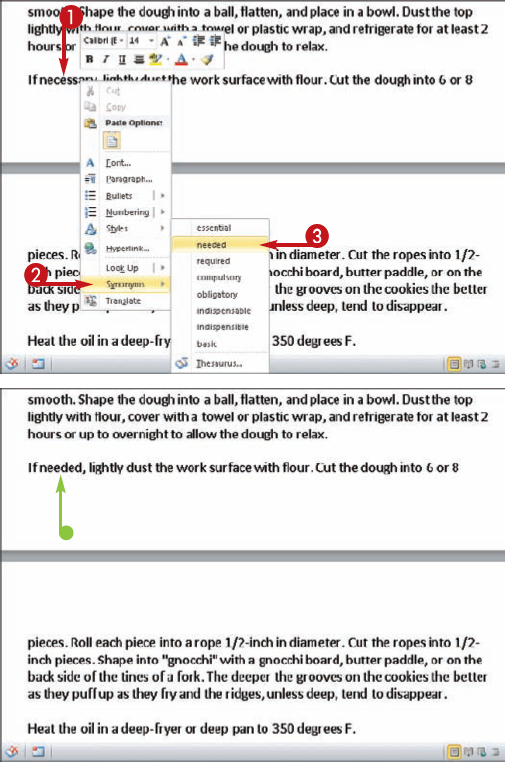
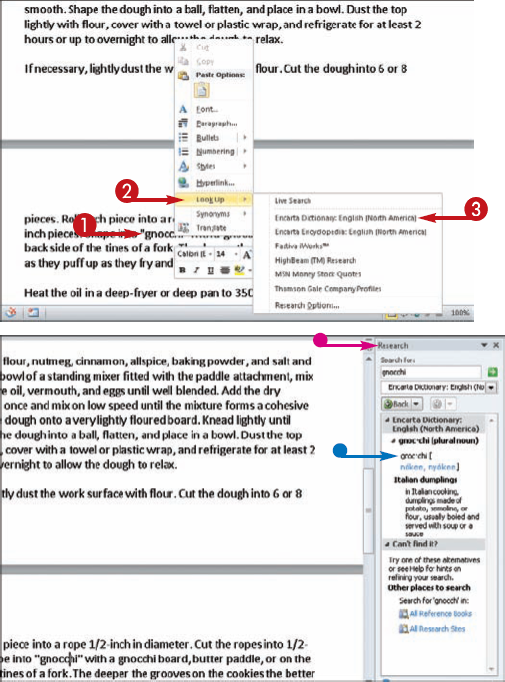
If you are having trouble finding just the right word or phrase, you can use Word's thesaurus tool to find words with similar meanings (synonyms) as well as words with the opposite meaning (antonyms). Word even enables you to access thesauri in different languages. For example, if you are writing a document in French, you can use Word's French thesaurus just as you would use the English version when composing in English. In addition, Word includes a dictionary tool, which you can use to look up words of whose meanings you are not quite certain.
You access these tools from within Word's Research pane, from which you also access the program's translation tools and other reference-based features such as an encyclopedia, as well as research sites including HighBeam Research, the MSN Money Stock Quotes site, and the Thomson Gale Company Profiles site.
Another way to use the thesaurus and dictionary tools is to right-click the word for which you want to see synonyms or a definition. Word displays a context menu from which you can choose the desired option.
Tip
Apply It!
Another way to open Word's Research pane is to click the Research button in the Ribbon's Review tab.
Apply It!
Word's Research pane offers easy access to several online resources, such as the Encarta Encyclopedia, a free Web-based encyclopedia. You can change the reference source at any time in the Research pane. Click the drop-down arrow next to the source name beneath the Search box and choose another reference. If you do not see a source you want, you can use any of the links in the Research pane to access more resources online.
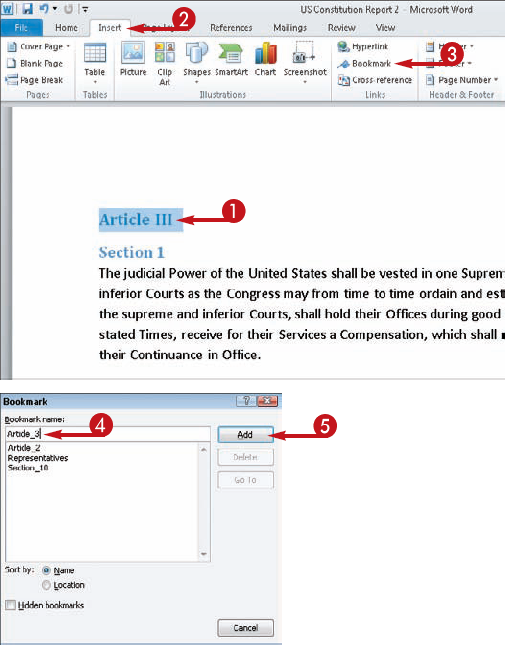
Another useful tool to help you navigate documents that span numerous pages is the ability to create bookmarks. A bookmark is rather like a physical bookmark you place in a book to save your place. A Word bookmark earmarks a specific location within a document. In essence, a bookmark identifies a location or selection of text in a document for future reference. For example, you might add a bookmark to a section in your document that you want to revise later, or you might use bookmarks to help you access an area of the document quickly.
You can assign a unique name to a bookmark, but the name must follow a few naming rules. Bookmark names must begin with a letter, and names can include numbers along with letter characters. However, no spaces are allowed in the bookmark name. If you do need to create a space, use an underscore character instead, such as Section_10.
To navigate to a bookmark, you can press Ctrl+G to open the Find and Replace dialog box to the Go To tab. Select Bookmark from the list, then choose the bookmark name you want to navigate to and click Go To.


Note
You can also press F5 or Ctrl+G.
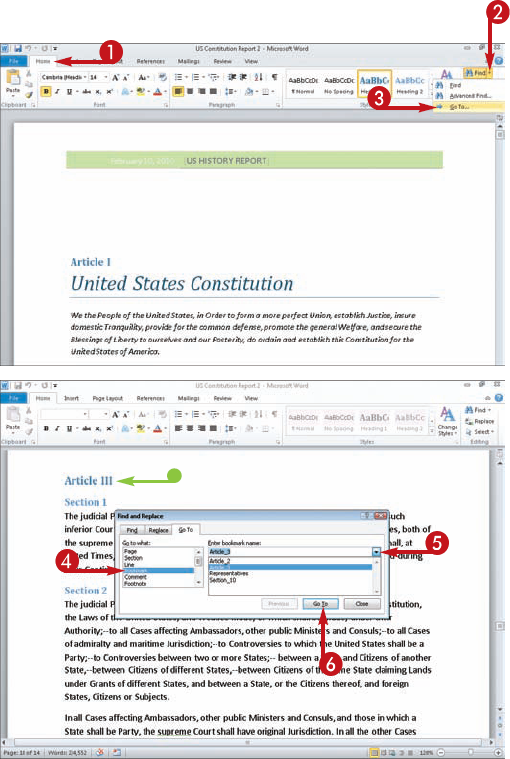
The Find and Replace dialog box opens to the Go To tab.


Tip
Remove It!
To remove a bookmark you no longer need, open the Bookmark dialog box, select the bookmark name from the list box, and click the Delete button.
More Options!
You can also mark a location instead of selected text as a bookmark. Just click the Location option at the bottom of the Bookmark dialog box when defining the bookmark (
You can use the new and improved Navigation pane to help you navigate your way around long documents. For example, if you are working on a long legal document or thesis paper, you can use the pane to quickly navigate to a page, a particular heading, or even a particular word or phrase.
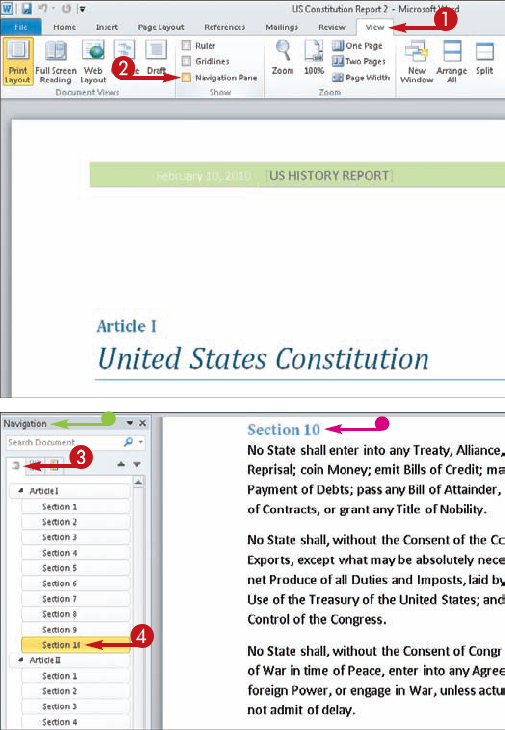
The Navigation pane offers tools for browsing a document. One of the handiest browsing tools is to browse by headings. The Navigation pane lists the document's sections based on styles you assign, such as Heading 1, Heading 2, and so on. You can use the pane's list to quickly jump to a specific heading in your document.
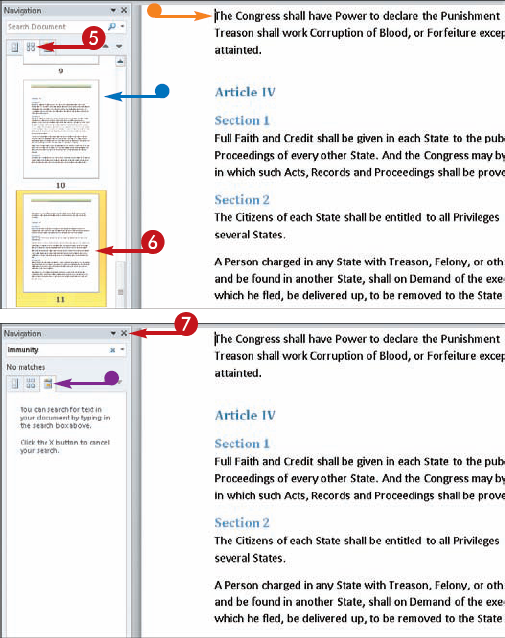
You can also use the pane to browse through a document by viewing thumbnail images of all the pages. To view a page in its entirety, just click the thumbnail image.
The pane also lets you search through your document for words or phrases. This is covered in the task "Search Through a Document" earlier in this chapter.




Note
You may need to scroll to the page you want to view.


Note
See the task "Search Through a Document" to learn more about using the pane's search tool.

Tip
Remove It!
You can also close the pane by clicking the View tab and deselecting the Navigation Pane check box (
More Options!
You can resize the Navigation pane if you need to view more of the headings listed within. Simply move the mouse pointer to the right border of the pane, and then click and drag the pane to resize its width.
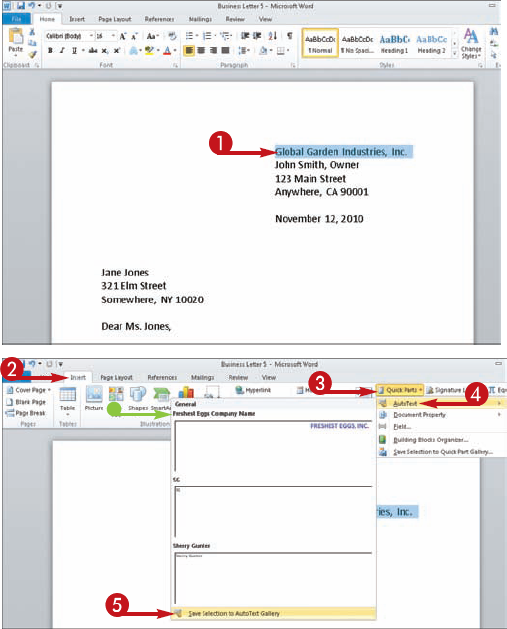
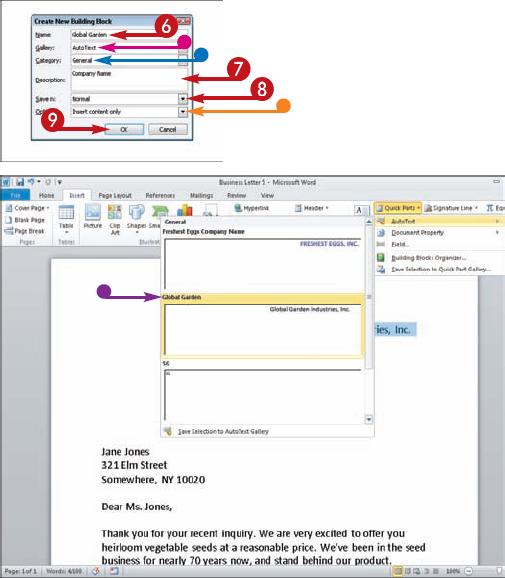
Do you find yourself typing the same long phrase or paragraph of text into a document over and over again? You can take away the tedium by saving the text as an AutoText entry. For example, if your company name is particularly long, you can simply add it to the AutoText Gallery and insert it as you need it.
Word's AutoText feature has been around for a long time, allowing users to speed up repetitious text-entry tasks. With Word 2010, AutoText is a part of the building blocks, a feature that lets you reuse chunks of data throughout your documents. Building blocks, also known as Quick Parts, make it easy to insert preformatted text and graphics. AutoText is a part of this feature, offering its own gallery of stored snippets of text, such as salutations and closings for letters, lengthy legal disclaimers, contact information, and more.
When creating your own custom AutoText entries, you use the Create New Building Block dialog box, where you can assign a unique name for the text, and choose in which template you want to store the entry.
Tip
Remove It!
To delete an AutoText entry you no longer need, display it in the AutoText Gallery, right-click it, and select the Organize and Delete command from the pop-up menu that appears. This opens the Building Blocks Organizer dialog box. With the entry highlighted in the dialog box's list box, click the Delete button to permanently remove the entry.
More Options!
If your Word tasks involve numerous AutoText entries related to a certain project or department, you can create a unique category for the entries, making it easier to find them listed in the Building Blocks Organizer dialog box. To create a new category, click the Category drop-down arrow in the Create New Building Block dialog box and click Create New Category. This opens a Create New Category dialog box where you can assign the new category a name. The next time you create an AutoText entry, you can assign the new category. You can also assign the new category to existing entries listed in the Building Blocks Organizer dialog box.
Word's AutoCorrect feature has long been a tool for automatically correcting misspelled words in your documents. You can also use it to help automate some of your typing tasks. AutoCorrect comes loaded with a long list of commonly misspelled words, and because the feature is turned on automatically, you may have already noticed it kicking in when mistyping words. For example, if you type "teh," AutoCorrect automatically corrects the spelling to "the."
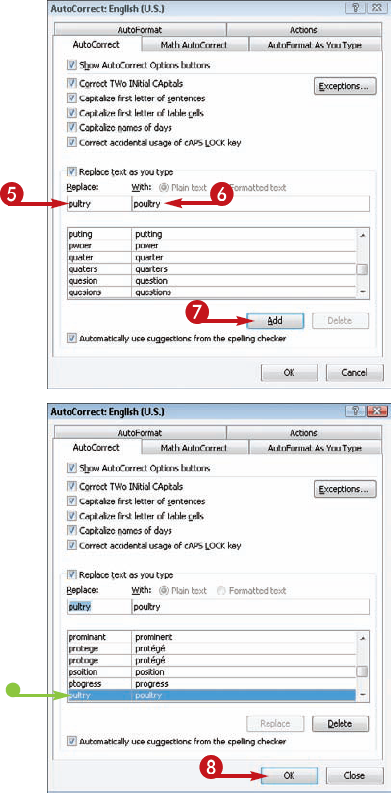
If you are like most people, you probably have a few words not in the AutoCorrect list that you consistently misspell. You can add them to AutoCorrect's repertoire and count on Word to correct the problems as they arise.
In addition to misspellings, you can turn a phrase into an AutoCorrect entry. For example, if your company name is particularly long, you can simply type an abbreviation and Word offers to fill in the rest for you, saving you the time and effort of activating the AutoText Gallery where you normally store snippets of preset text.


The Word Options dialog box opens.


The AutoCorrect dialog box opens.




Tip
Did You Know?
To turn a long phrase into an AutoCorrect entry activated when you type the designated abbreviation, simply type the abbreviation in the Replace box in the AutoCorrect dialog box, and then type the full phrase in the With box. Click Add to add the entry to the listings.
Caution!
If you are having trouble adding a word in the With box in the AutoCorrect dialog box, click the Plain Text option (
Are you looking for a little drama to dress up your text? Word's drop caps feature might be just the thing you are looking for. You can use drop caps to quickly draw attention to the first letter in a paragraph. Commonly used in the printing business, a drop cap is the first letter in a paragraph that drops below the text line and extends into the second line of text, creating a large letter.
Throughout the history of printing, drop caps were used at the beginning of a chapter. You can use them in Word to the same effect.
You can use the Drop Cap dialog box to determine whether the letter drops within a paragraph or outside the paragraph margin. You can also change the drop cap's font, number of lines dropped, and even the distance between the drop cap and the rest of the paragraph text.
As with any formatting technique, it is good practice to use the drop cap feature sparingly. Too many on a page become quite distracting.


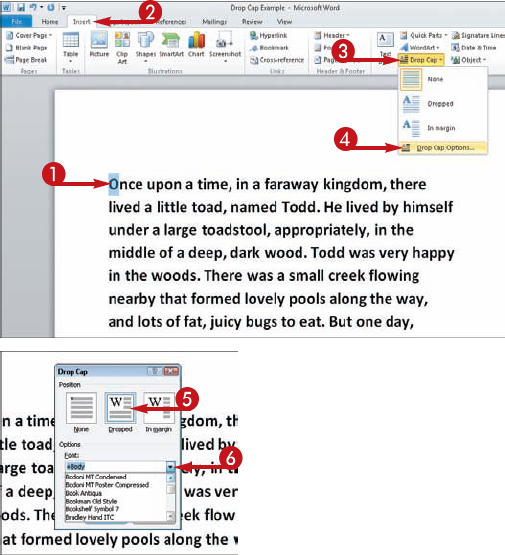
The Drop Cap dialog box opens.


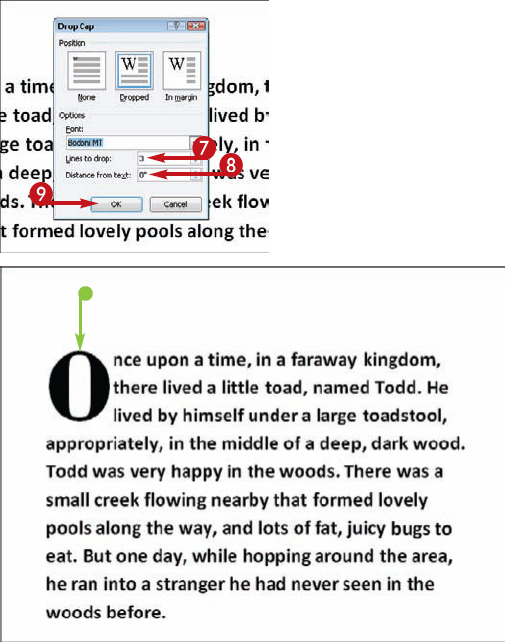

Tip
Try This!
For a quick drop cap without any changes to the settings, just click the Drop Cap button on the Insert tab and click Dropped or In Margin to immediately assign the effect to the selected letter in the document. You can also just click anywhere in a paragraph and apply a drop cap to the first letter using this technique.
Remove It!
To remove a drop cap, select it or click the paragraph containing the drop cap and click the Drop Cap button again, this time choosing None from the menu that appears. You can also open the Drop Cap dialog box and select None from the position options.
As you are well aware, Word 2010 installs with a myriad of default settings in place for controlling everything from font and font size to margins as soon as you start the program. Although most of these settings work well for the average user, you may require different settings based on the type of work you do. Line spacing is an area in which individual document needs outweigh the defaults. By default, the line spacing is set to Multiple, which adds 1.15 points between each line of text. Happily, you can change the default line spacing to suit the way in which you work with Word. For example, if you produce a lot of research and term papers, you may need to set the line spacing to Double, or if you are writing an article or book, you can change the setting to Single spacing.
Another spacing issue you may need to change is the default setting for paragraph spacing. By default, Word adds 10 points after a paragraph. This creates a gap of white space between paragraphs for you. Although this can be pleasing aesthetically, it does not work for all documents. You can change the spacing before and after paragraphs to suit your document needs.


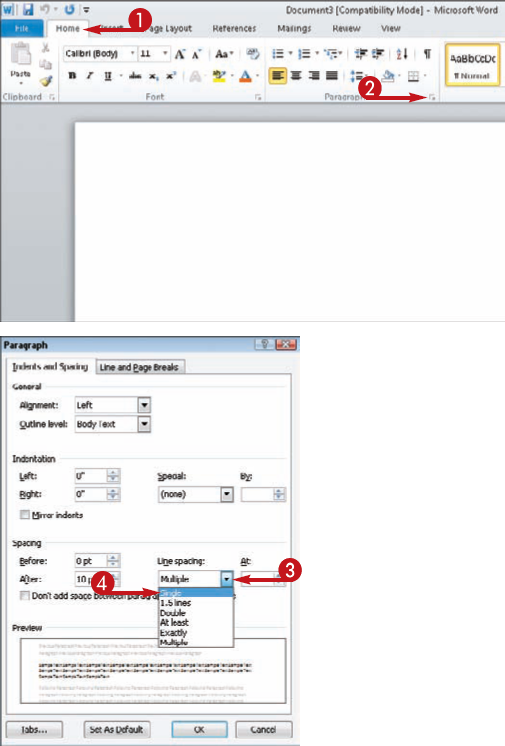
Word opens the Paragraph dialog box.


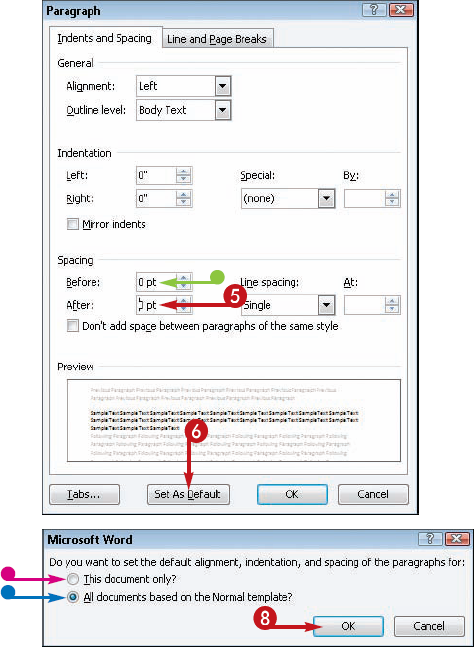
A prompt box appears asking how you want to save the changes.


Tip
Did You Know?
Document settings are saved along with the Normal template, the template that starts every new file you create using the New command or the new file that appears every time you open Word. This default template, though blank in appearance, has all the default settings in place for font, font size, and paragraph settings. To learn more about setting a default font and font size, see Chapter 1.
More Options!
You can also set other new defaults in the Paragraph dialog box for alignment, indentations, and line and page breaks. Simply open the dialog box and make the changes, then click the Set As Default button to make the changes permanent to the current document or all future documents based on the Normal template.
With some documents you create in Word, you may find yourself needing a horizontal line placed on the page. One way to add a line is to draw one using Word's Shapes. This option lets you draw the line precisely where you want it and to the length you want, even adding arrows or other flourishes to either end of the line. While offering you a variety of formatting options for the line, this method takes a little longer to perform.
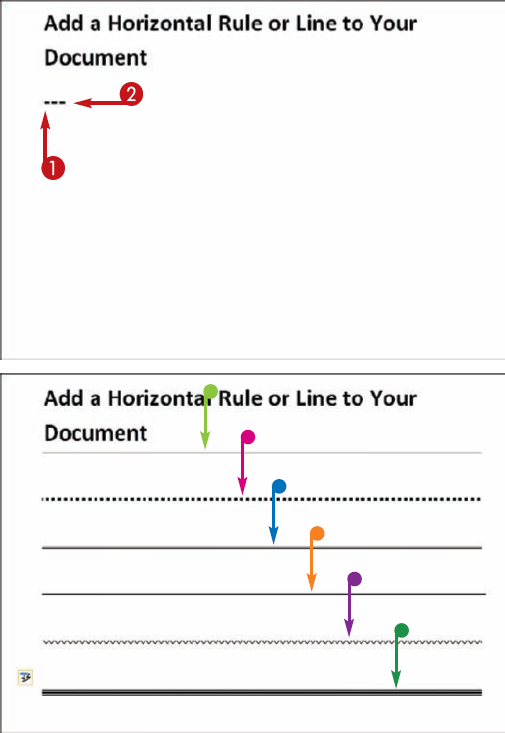
If you are looking for a more straightforward line, consider using this little-known technique — you can type characters on your keyboard and turn them into an instant horizontal line on your document page. You can choose from a solid line that is a 1/2 point thick, a dotted line, a double line, a thick line, a wavy line, or even a thick decorative line.
This technique works only when you add the horizontal line to a new line of text in your document.
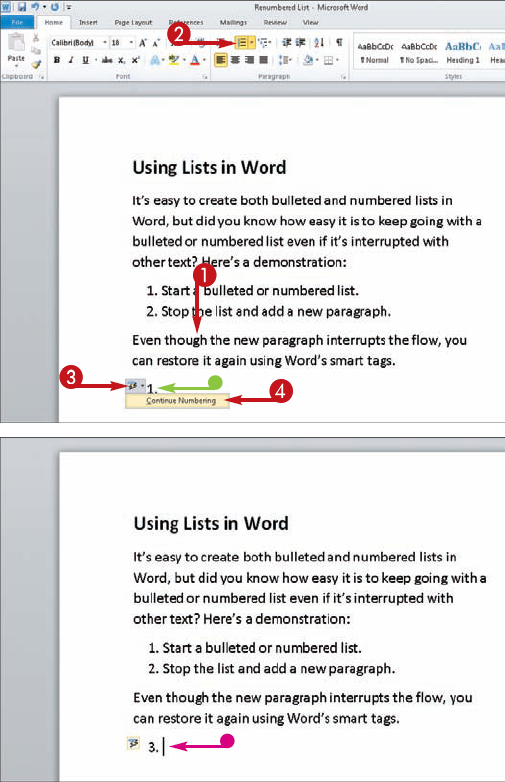
When you use numbered lists in your Word document, you may sometimes need to interrupt the numbered list with a paragraph, and then resume the list. Word's SmartTags can help you pick up where you left off with the numbering. For example, perhaps you are explaining a procedure step by step, but need to add a paragraph clarifying a feature or exception to the steps, and then restart the numbered list to continue on. Ordinarily, you might think you must start a new list to set a new number sequence. Save your time and use this technique instead.
When you reapply the numbers again after the interruption of a paragraph, Word first assumes you want to start a brand new numbered list and promptly adds the number 1 to the list as usual. A SmartTag icon also appears next to the number, resembling a lightning bolt icon. You can activate the SmartTag and choose the Continue Numbering option to resume the numbering sequence. If you choose to ignore the SmartTag, you can simply start a brand new numbered list instead if you just keep typing.
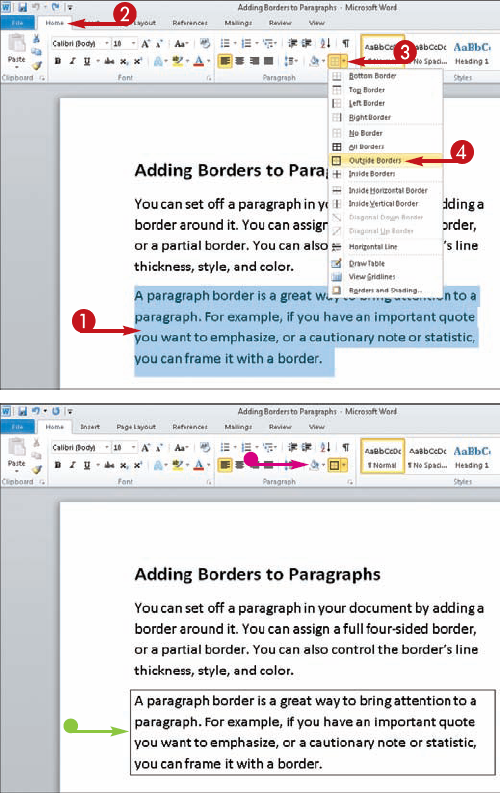
You can use partial or full borders to set off a paragraph within your document. For example, you can use a partial border to set off a pull-quote. A pull-quote is a sentence or two that you copy or extract from the document text to set off for visual and dramatic effect. Pull-quotes commonly appear in magazines and newspapers.
You can also set off an entire paragraph with a border, drawing attention to the text or message. For example, you can use a border to make the reader notice a paragraph of important facts and statistics, or a paragraph of important instructions or details.
For additional border formatting, you can access the Borders and Shading dialog box. You can choose from a variety of line styles and thicknesses, and control the color of the line borders. You can also change border color, set partial borders, or even apply a 3-D, shadow, or custom style. You can preview your border selections in the dialog box before applying them to the actual paragraph.


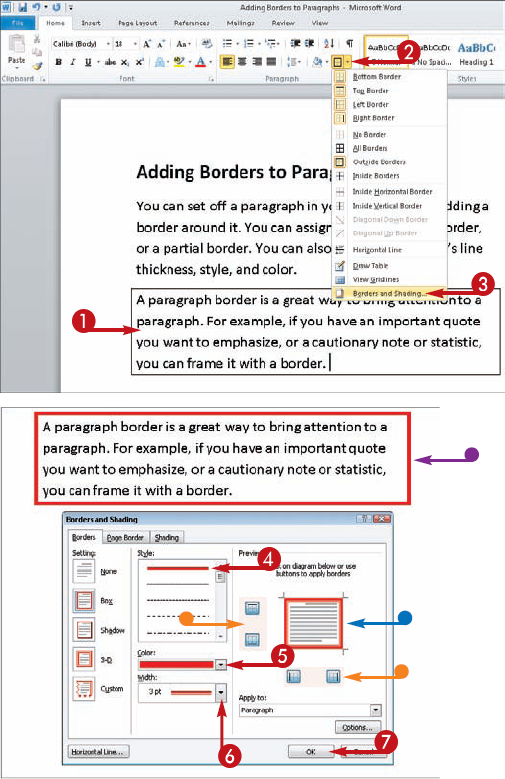
The Borders and Shading dialog box opens.


Tip
Did You Know?
You can add a border to an entire page in your document. You can use the Borders and Shading dialog box to set a page border, line style, color, width, or even apply an artsy border complete with graphical elements. Simply click the Page Border tab in the Borders and Shading dialog box. You can also add page borders using the Page Borders button on the Ribbon's Page Layout tab. This route opens the same Borders and Shading dialog box to the Page Border tab.
Remove It!
To delete a paragraph border you no longer want, select the paragraph, click the Borders drop-down arrow on the Home tab, and then click No Border from the menu.
If you work in an environment in which you share your Word documents with others, you can use the program's Track Changes feature to help you keep track of changes made to the file by you and by others.
When Track Changes is enabled, Word tracks edits such as formatting changes and text additions and deletions you or other users make to the file. Additions appear inline in the text; deletions appear either inline in the text or in balloons in the right margin, depending on the document view. For example, in Word, using Draft view displays deletions inline and comments appear only when you move the mouse pointer over the text; using Print Layout view, however, displays deletions inline and comments appear in balloons in the right margin. If multiple people review the document, each person's changes appear in a different color to help you keep track of who made what edits.
When you review a document that has been edited with Track Changes on, Word flags each change that each user makes in the document, which you can then accept or reject.


Note
If you click the Track Changes button drop-down arrow, you can access tracking options and change the username if you are not using your own computer to edit the file.

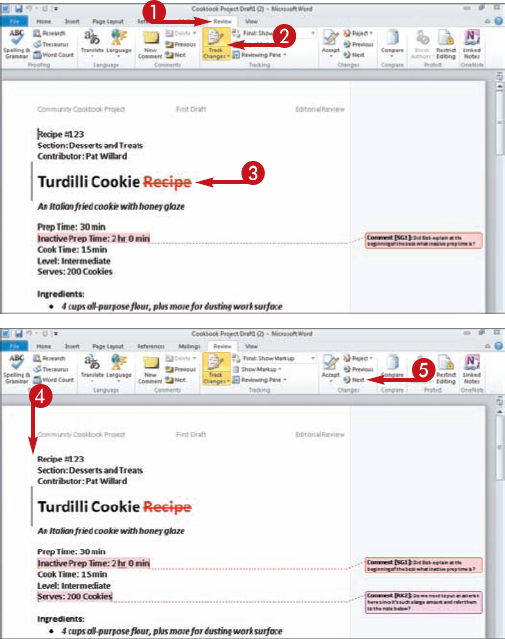

Note
To turn off the Track Changes feature, click the Track Changes button a second time to disable it.

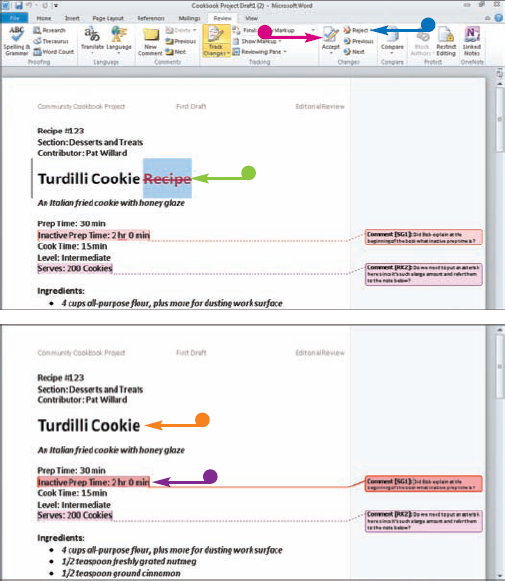
Note
To accept all changes in the document, click the drop-down arrow under Accept and click Accept All Changes in Document.
Tip
Did You Know?
By default, insertions appear as underlined text, and deletions appear either inline as strikethrough text, depending on the view. To change these and other settings, click the drop-down arrow beside Track Changes and choose Change Tracking Options. The Track Changes Options dialog box opens; change the settings as desired.
Try This!
You can click the Accept button's drop-down arrow and choose to accept all the changes in a document. You can also click the Reject button's drop-down arrow and choose to reject all the changes.
If you or someone else makes changes to a document without first enabling the Track Changes feature, but you want to determine exactly what edits were made, you can compare the edited document with the original.
When you compare an original document with an updated version, the result is a third file that flags the discrepancies between the two documents. (The two source documents — that is, the original and revised versions — remain unchanged.) These discrepancies look exactly like edits made with Track Changes enabled; that is, formatting changes and text additions and deletions become visible. Additions and deletions appear inline in the text in Print Layout or Draft view. In Print Layout view, comments appear in balloons in the right margin. In Draft view, comments only appear when you move the mouse pointer over the text.
You review a file generated by comparing documents the same way you review a file that has been edited with Track Changes enabled. Word flags each change in the document, which you can then accept or reject.


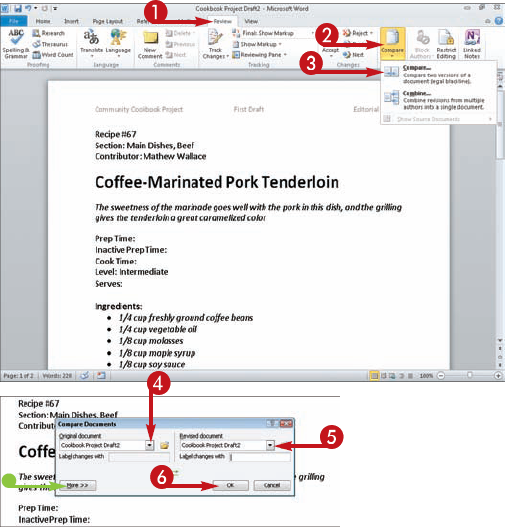
The Compare Documents dialog box appears.


Note
If the original or revised document does not appear in the list, click the Browse button (


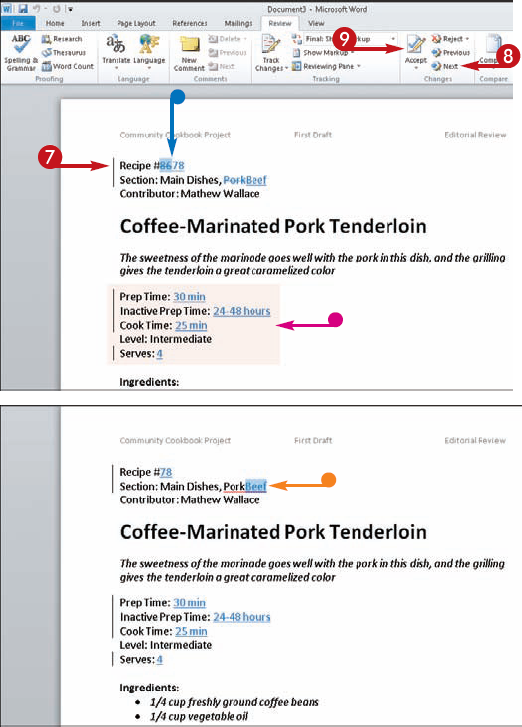
Note
To accept all changes in the document, click the down arrow under Accept and click Accept All Changes in Document.

Tip
Did You Know?
To combine multiple revised files into a single document, click Compare on the Review tab and choose Combine. Select the original version of the document from the Original Document list, and select any of the reviewed versions from the Revised Document list. Click More and, under Show Changes In, click Original Document, and then click OK. Repeat for each revised version of the document.
More Options!
Another way to collaborate with others on a document is to use Word's Comments feature. To add a comment, select the text on which you want to comment, click New Comment in the Comments group of the Review tab, and type your comment in the balloon or field that appears.
You can insert filler text, also called dummy text or placeholder text, into a Word document. When creating a mock-up or layout design for a project in Word, such as a brochure or newsletter, you may need to insert some placeholder text. Filler text allows you to show how text fits into the layout, as well as demonstrate the font and size you plan to use later when you replace the placeholder text with the actual text.
You can use the RAND function to create filler text in Word. If you prefer Latin text instead of English, you can use the LOREM function instead, such as =lorem(4,5). A function is a preset mathematical formula. Using the formula rules of Excel, all functions start with an equal sign, such as =rand(4,5). The numbers in parentheses determine the number of paragraphs and the number of sentences per paragraph. For example, =rand(4,5) creates four paragraphs with five sentences of dummy text in each paragraph. Your own design layout may require more or less paragraphs and sentences.
After inserting the filler text, you can apply formatting to the text.


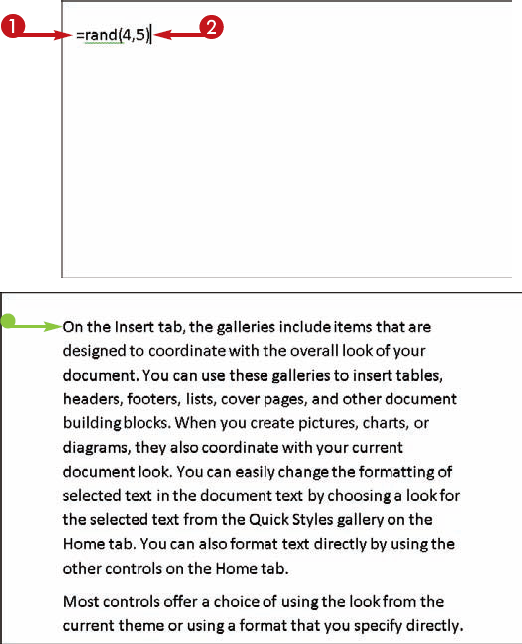
To insert a different number of paragraphs, replace 4 with a different number.
To insert a different number of sentences, replace 5 with a different number.


By default, Word 2010 automatically wraps a line of text to the next line once you reach the right margin of a document. However, this may result in an awkward break up of a multiword phrase or proper names. For example, if you type the name John Smith at the end of the line, Word may wrap the last name to the next line of text. Thankfully, you can apply a nonbreaking space to keep names and other multiword phrases together, and Word breaks before or after the phrase or name rather than in the middle.
Nonbreaking spaces, also called no-break spaces, are often crucial in certain types of reports and papers. You can use nonbreaking spaces to keep measurements together, such as 100 km, or version numbers intact, such as IE 8.9.
Nonbreaking spaces, like other nonprinting paragraph marks, do not appear visible in Print Layout view. If you want to see the spaces, you must turn on Word's Paragraph Marks; click the Show/Hide button (
Charts and graphs are a great way to illustrate your data. Word 2010 includes several tools you can use to add charts and graphs to your documents. For example, you can use the SmartArt feature to quickly insert preset diagrams and simply insert your own text elements to describe a process, hierarchy, or other procedure. If you need a tried-and-true data-based chart, you can tap into the power of Excel's chart-building tools to create pie charts, bar charts, surface charts, and more, all linked and alongside Word.
If you have Excel 2010 installed, you can take advantage of the program's advanced charting capabilities. When you activate the charting feature, Excel opens with a new worksheet ready for you to replace the placeholder text with your own chart data. Using columns, rows, and cells, you enter the raw data to make the chart. Over in Word, the same placeholder chart appears in your document in its full chart form. Data you add in Excel is immediately added to the Word chart, too.
When you create a chart, Word displays additional charting tabs on the Ribbon that you can use to format the chart.
If you do not have Excel installed, the Microsoft Graph feature opens instead.


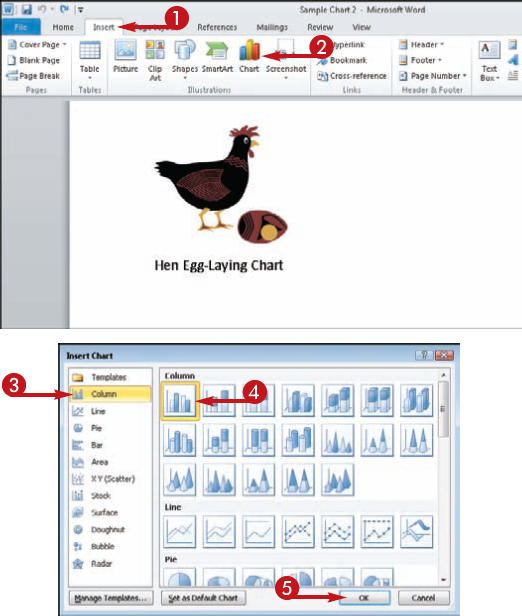
The Insert Chart dialog box opens.


Excel opens and shares on-screen room with your Word document. A data sheet is ready to go in the worksheet, and a placeholder chart appears in the document.
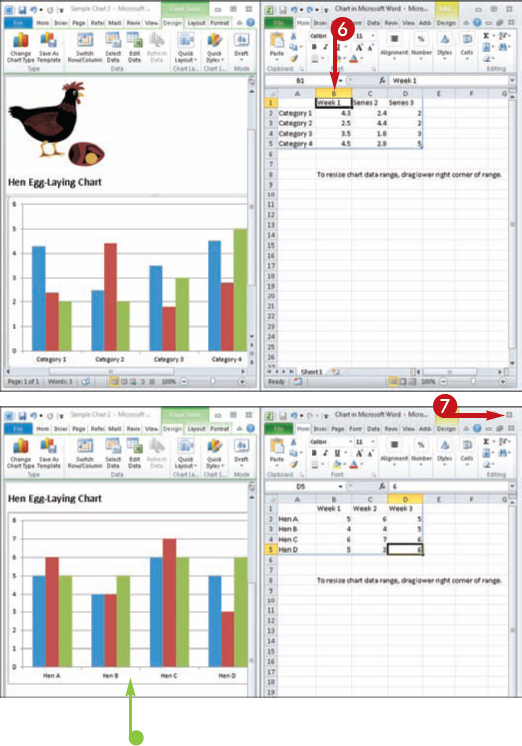


Tip
Apply It!
To change your chart type, select the chart, click the Design tab under Chart Tools, and click the Change Chart Type button. This opens the Change Chart Type dialog box, which is exactly the same as the Insert Chart dialog box in step 3. Choose another chart type and click OK. The chart is immediately updated in the document. To delete a chart, select it in the document and press Delete.
More Options!
If you need to make changes to the chart data, you can reopen the datasheet in Excel and edit the cell data. Click the Design tab and click the Edit Data button. This reopens the Excel program window again with the chart data displayed. Simply edit the data and close Excel when you are finished. The chart is automatically updated in Word as you work.
