Other Word tools help you save time by generating special elements for your documents. One such special element is a bibliography, which lists the books, Web sites, and other sources used in the course of researching and writing your document. You simply add citations to the document that include the relevant information, and Word does the rest. Another special element you can generate automatically in Word is a table of contents that contains all the headings in your document.
To ensure that your document meets the strict standards of academic and professional environments, you can use Word to insert footnotes and endnotes. Word numbers these footnotes, automatically updating them as you add, delete, and move text in your document. This saves you the time and trouble of tracking these items yourself.
Finally, to help you make your documents look more professional, Word includes tools for creating a cover page, including several built-in designs from which you can choose. You can also add line numbers to your pages, or quickly insert cross-references to other parts of your document.
Create a Bibliography. 82
Insert Footnotes and Endnotes. 84
Generate a Table of Contents. 86
Insert a Cover Page. 88
Generate an Index. 90
Add a Cross-Reference. 94
Add Line Numbers to Your Document. 96
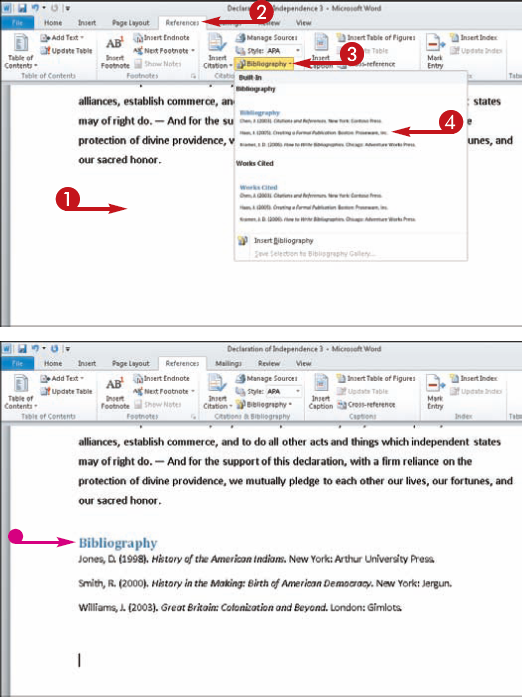
If you are writing an academic paper, you will almost certainly be required to include a bibliography, a listing of all the books and other works cited in the paper. Word enables you to automatically generate a bibliography and format its entries using the style guide of your choice. Style guide options include American Psychological Association (APA), Modern Language Association (MLA), and The Chicago Manual of Style. To specify what style guide you want to use, click the References tab, click the Style drop-down arrow in the Citations & Bibliography group, and choose a style guide from the list that appears.
For Word to determine which entries should appear in the bibliography, you must cite sources in your document as you work. Word then collects the information from these citations to generate the bibliography. When you add a source to a document, Word saves it for use in subsequent documents, meaning that instead of reentering the information, you can search for the existing source.


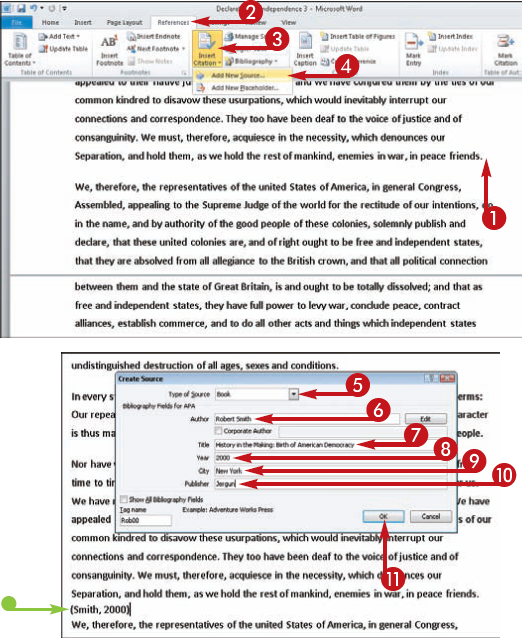
The Create Source dialog box opens.

Note
The fields available in the Create Source dialog box depend on what you select in the Type of Source drop-down list.


Tip
Did You Know?
To reuse a source from another document, click Manage Sources in the Citations & Bibliography group. This opens the Source Manager dialog box. Under the Master List pane, click the citation you want to add to your current document, click Copy, and click Close.
More Options!
If you know you want to add a citation to your document, but you do not have all the necessary information at your fingertips, you can create a placeholder. Click Insert Citation in the Citations & Bibliography group on the Ribbon's References tab, choose Add New Placeholder, and type a name for the placeholder in the dialog box that appears. Later, you can add citation information to the placeholder by clicking Manage Sources in the Citations & Bibliography group of commands, clicking the placeholder under Current List, clicking Edit, and entering the necessary information.
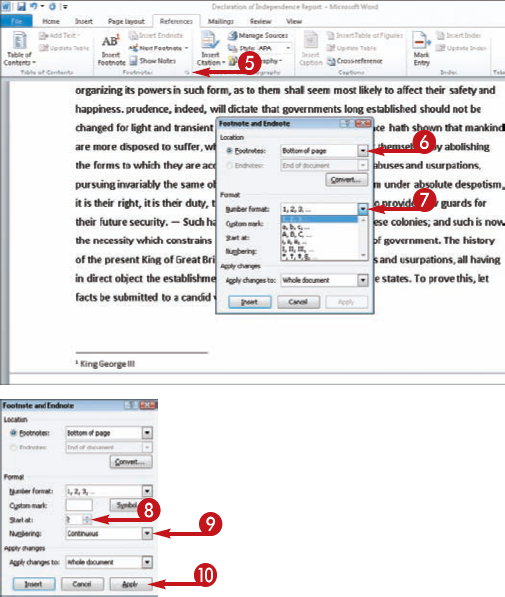
You can use Word to insert footnotes and endnotes in your document. A footnote is an explanatory note, usually in a smaller font, inserted at the bottom of a page to cite the source of or further explain information that appears on that page. The information to which the footnote pertains is flagged, usually with a superscript numeral, but sometimes with a symbol, such as a dagger symbol. Endnotes are like footnotes, but they appear at the end of a section or document rather than at the bottom of a page.
When you insert footnotes or endnotes in a document, Word automatically numbers them for you. As you add, delete, and move text in your document, any associated footnotes or endnotes are likewise added, deleted, or moved, as well as renumbered. You can also easily convert footnotes into endnotes, or vice versa.
To delete a footnote or endnote, but leave the text in the document to which it refers intact, select the superscript numeral or symbol flagging the footnote or endnote and press Delete on your keyboard. Word deletes the flag as well as the note.
One more thing: You must be in Print Layout view to add a footnote or endnote.


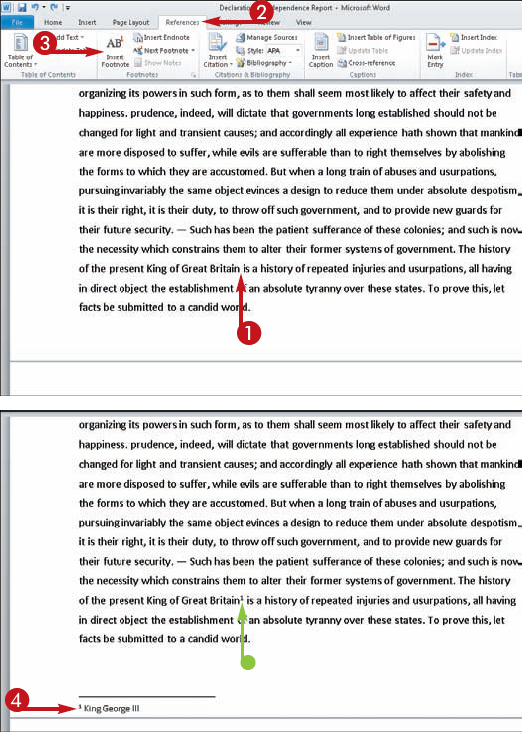


The Footnote and Endnote dialog box appears.




Tip
Customize It!
If a footnote or endnote runs to a second page, you can add standard text, called a continuation notice, to it to indicate that it continues on the next page. To do so, first switch to Draft view, and then, in the References tab, click Show Notes in the Footnotes group. If prompted, specify whether you want to create a continuation notice for the footnotes or the endnotes in the document, click the Footnotes or Endnotes drop-down arrow and click Footnote Continuation Notice or Endnote Continuation Notice, and type the text you want to use in the notice.
Try This!
You can turn footnotes into endnotes, and endnotes into footnotes. To do this, click the Convert button located in the Footnote and Endnote dialog box. To open the dialog box, click the dialog box launcher (
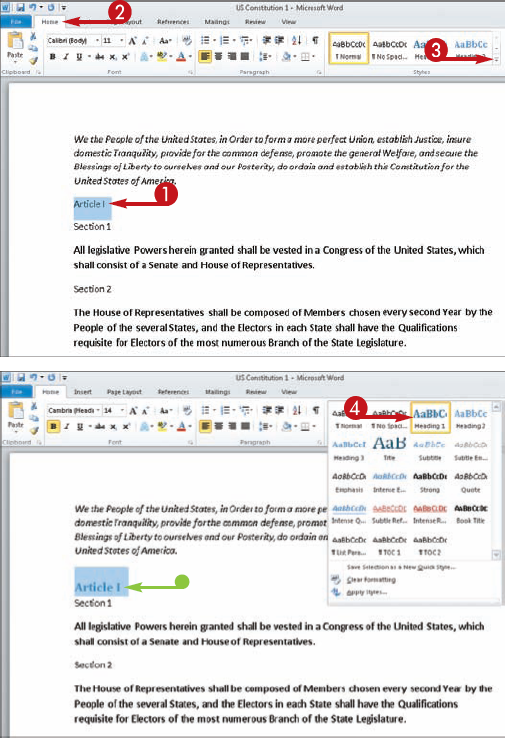
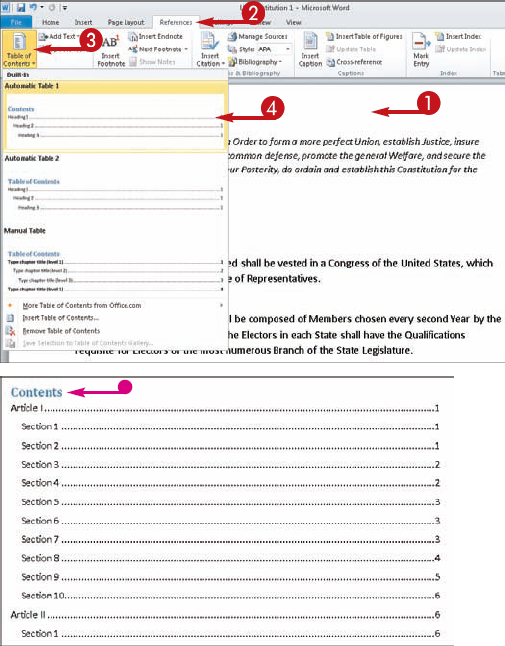
If your document requires a table of contents (TOC), you can use Word to generate one automatically. By default, a TOC generated in Word contains text formatted in one of Word's predefined heading styles. Word generates the TOC by searching for these styles, copying text that has been formatted with them, and pasting it into the TOC. The TOC itself is simply a preformatted table, listing the headings and page numbers for each.
If you used custom styles in your document to create headings rather than Word's built-in styles, you can still generate a TOC; you simply indicate what styles Word should search for in your document when determining what the TOC should contain.
Regardless of whether you use Word's predefined heading styles to generate the TOC or you create a TOC that cites text formatted with custom styles, you can choose from Word's gallery of TOC styles to establish its look and feel.



Note
To delete a TOC, click Table of Contents in the References tab's Table of Contents group and click Remove Table of Contents.
Tip
Customize It!
If you need to generate a TOC using custom styles rather than Word's predefined header styles, click Table of Contents on the References tab and choose Insert Table of Contents. The Table of Contents dialog box opens; click Options. In the Table of Contents Options dialog box, under Available Styles, locate the top-level heading style you applied to your document; then type 1 in the corresponding field to indicate that it should appear in the TOC as a level-1 heading. Repeat for additional heading styles, typing 2, 3, 4, and so on to indicate their levels. Click OK to close the Table of Contents Options dialog box, and click OK again to close the Table of Contents dialog box.
Try This!
If you make changes to your document's headings, you can tell Word to update the table of contents. Just click the Update Table button on the Ribbon's References tab. This opens the Update Table of Contents dialog box where you can choose to update the entire table or just the page numbers.
To add a professional touch to your documents, you can add a cover page. For example, you might include a special cover page for an annual report that is sent to investors.
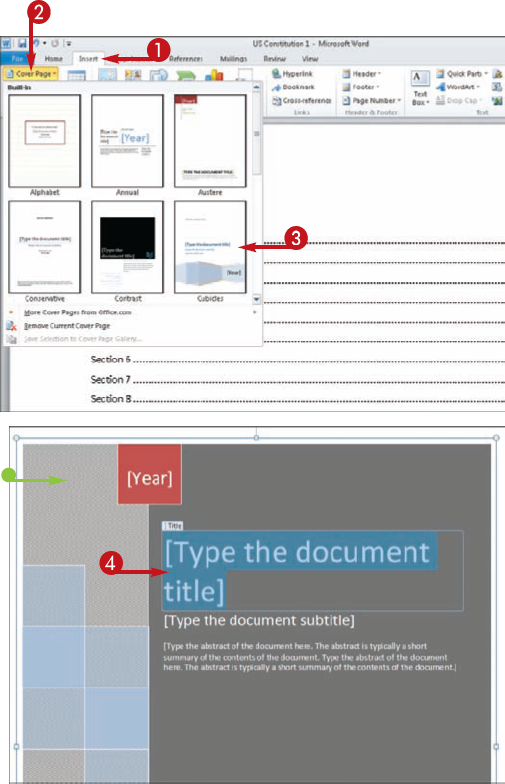
Word enables you to insert predefined cover pages from its Cover Page gallery. Alternatively, you can create your own cover page and save it to the gallery for future use.
Regardless of whether the cover page you add to your document is a predefined cover page supplied by Word or a custom cover page you converted to a building block, the process of adding the cover page to your document is essentially the same.
Once a cover page is added to your document, you simply select the placeholder text and type over it with text of your own. You can also change the look and feel of the cover page just as you would any other page in Word — by using the program's various formatting tools.


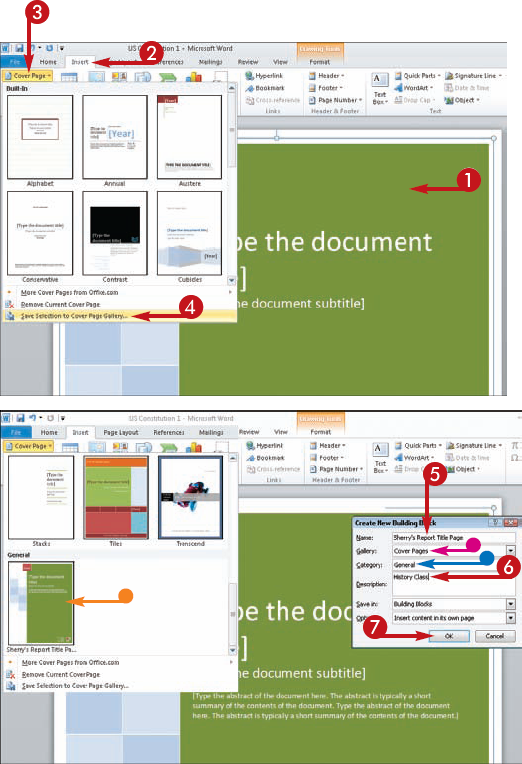
The Create New Building Block dialog box opens.


Tip
Customize It!
If your document contains page numbers along with a cover page, you probably want to omit the number from the cover page. Depending on whether the cover page you added was a predefined one that had a page number placeholder or one you created, you may need to manually remove the page number with a little help from the Page Setup dialog box. Click anywhere in the document, click the Page Layout tab, click the dialog box launcher (
Remove It!
If you add a cover page to your document but later decide you want to remove it, click the Insert tab, click Cover Page, and click Remove Current Cover Page.
If your document requires an index, you can use Word to build one. Before Word can build an index, however, you must mark any words or phrases in your document that should appear in your index. When you do, Word adds a special XE (short for index entry) field to the document that includes the marked word or phrase, as well as any cross-reference information you care to add.
When you create an index, Word searches for the marked words and phrases, sorts them alphabetically, adds the appropriate page-number references, locates and removes duplicate entries that cite the same page number, and then generates the index.
When you mark index entries, you have a few options. One is to mark a single word or phrase, which means it is listed once in the index for that particular spot you reference. Another option is to create entries for text that spans a range of pages, which means the index lists all the references. When you do the latter, you first select the text to which you want the entry to refer, and then create a bookmark for that text. When generating the index, Word refers to the bookmark information to determine the correct page range.


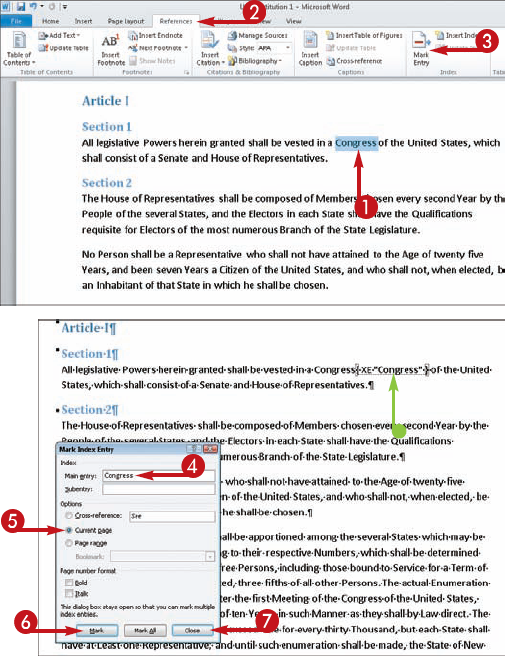
The Mark Index Entry dialog box opens.


Note
If you cannot see the XE field, click the Show/Hide button (

The dialog box remains open so you can continue adding fields to the remainder of the document.


The Bookmark dialog box opens.


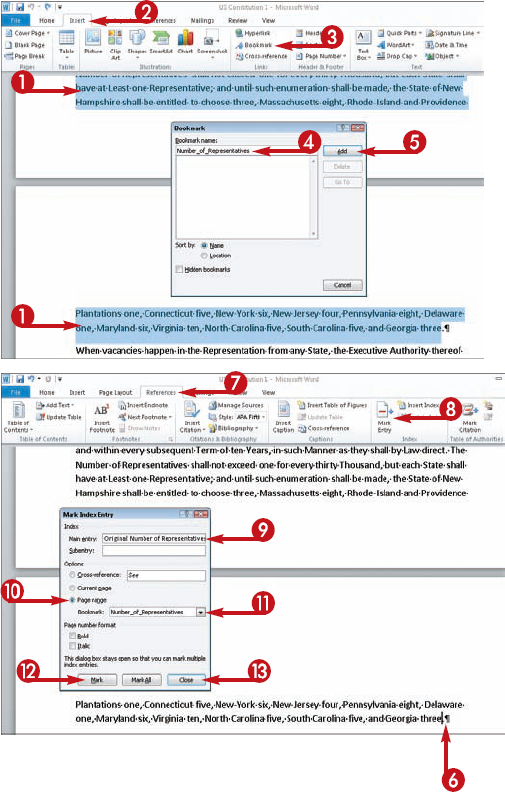


The Mark Index Entry dialog box opens.


Tip
More Options!
If the text you selected should appear as a subentry rather than a main entry, type the entry under which the selected text should appear in the Main Entry field, and then type the selected text in the Subentry field. If the text should appear as a subentry and a main entry, add two XE fields — one for the main entry and one for the subentry. To include a third-level entry, type the subentry under which the third-level entry should appear, add a colon, and then type the third-level entry.
More Options!
To create index entries that refer to other entries, click Cross-reference in the Mark Index Entry dialog box and type the word or phrase to which this entry should refer.
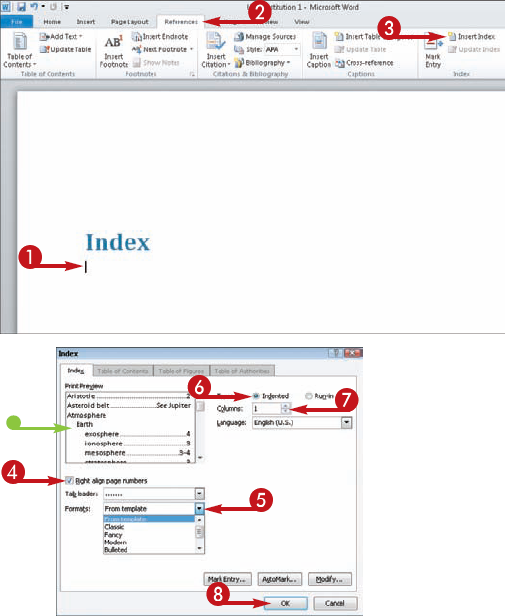
After you have marked all the words and phrases in your document that you want to appear as index entries, you can create the index by either selecting one of Word's built-in index designs or creating a custom design.
If you make a change to your document — for example, adding more index entries, editing existing entries, or changing the text such that the page numbers in the existing index are no longer correct — you can update the index to reflect the change.
Note that to edit an existing index entry, you must find the XE field for the entry and change the text inside the field's quotation marks as needed. To change the contents of an XE field that appears multiple times in your document, click the Replace button in the Home tab, type the XE string you need to change in the Find What field (for example, XE "Winston Churchill"), type the replacement text in the Replace With field (for example, XE "Churchill, Winston"), and click Replace All.

Word automatically highlights the index table for you.


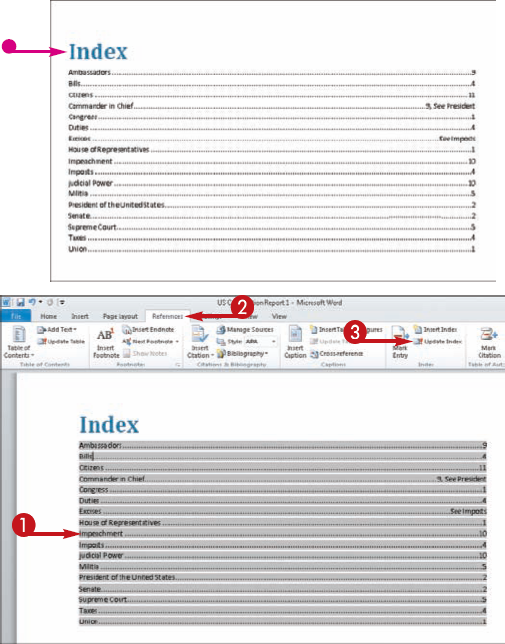
Tip
Customize It!
If you want your index to use a custom layout, click the Formats drop-down arrow in the Index dialog box, choose From Template, and click Modify. The Style dialog box opens; click the index style you want to change, and again click Modify. Finally, select the desired options in the Formatting section of the Modify Style dialog box. To add this custom index style to the template so that all documents you create with the template can use the style, click New Documents Based on this Template.
Remove It!
You delete an index entry by selecting the entire XE field, including the braces ({}) that surround it, and pressing Delete on your keyboard. Be sure to update the index after deleting any entries!
Suppose you want to insert text in one part of your document that refers the reader to a different part of the document for more information. To do so, you can insert a cross-reference. Cross-references can refer readers to text styled as a heading, to footnotes, to bookmarks, to captions, and to numbered paragraphs.
Before inserting a cross-reference, you will probably want to type some introductory text, such as "For more information, refer to." Then add the cross-reference after the text to complete the thought.
If the item to which a cross-reference refers is moved or changed, you can update the cross-reference to reflect the edit. To do so, select the cross-reference you want to update, right-click the selection, and click Update Field. To update all cross-references in the document, select the entire document rather than a single cross-reference.
Note that you can create cross-references only to items in the document that already exist. That is, you cannot create a cross-reference for a document element you have not yet created.


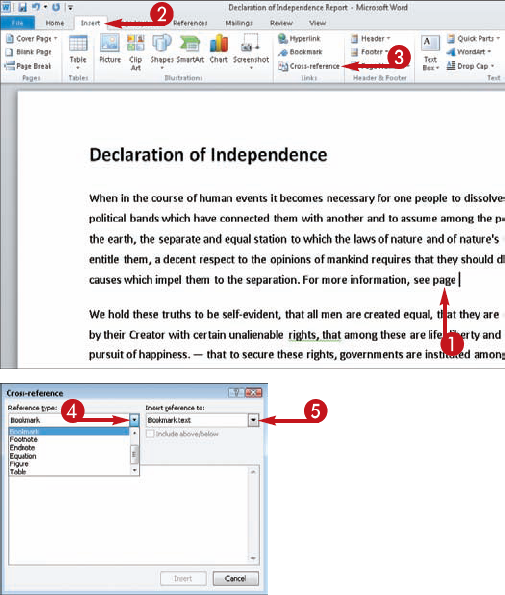
The Cross-Reference dialog box opens.


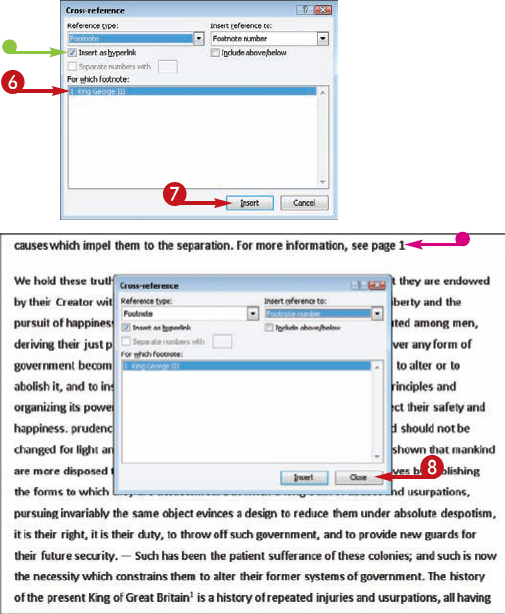


Note
To remove a cross reference, highlight it in the document and press Delete. The reference is immediately deleted.
Tip
More Options!
In order to cross-reference figures or tables, you must use Word's captioning feature to create captions for these elements first. To learn more about adding captions in the Office programs, see the task "Add a Caption to a Graphic" in Chapter 14.
Did You Know?
Hyperlinks are another great way to cross-reference users to other parts of your document. Hyperlinks are links that, when clicked, jump the user to the designated spot. To add a hyperlink, select the text, click the Insert tab and click Hyperlink. This opens the Insert Hyperlink dialog box where you can specify a location to link to in the document based on heading styles or bookmarks.
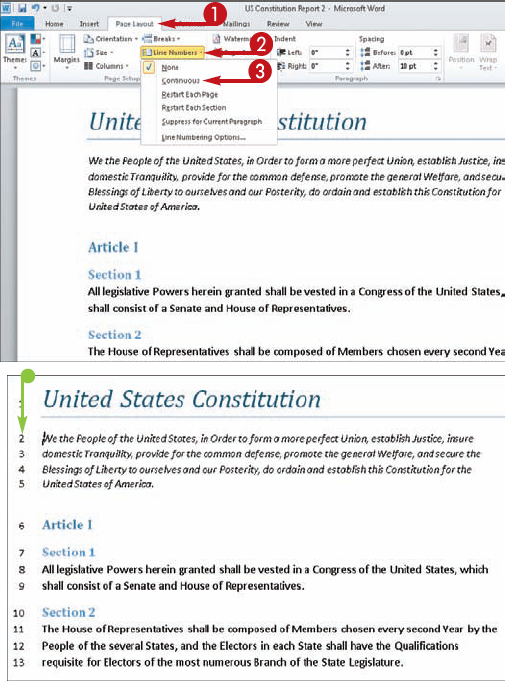
Suppose you are working on a document that is particularly dense, and that will be reviewed by others in hard-copy form — for example, a lease agreement or contract, or something similar. To make it easier for others to reference portions of the document that require additional attention, you can add line numbers to the document.
The line numbers you add can be configured to restart at the top of each page or section in the document or to appear continuously throughout the document. You can also change the numbering increment — for example, entering an increment of 2 to include even numbers only.
Word does not include blank lines in the numbering, only lines in which text is entered. Headings, however, are included.
Note that line numbers are visible on-screen only in Print Layout view. You cannot view the numbers using any of the other view modes.


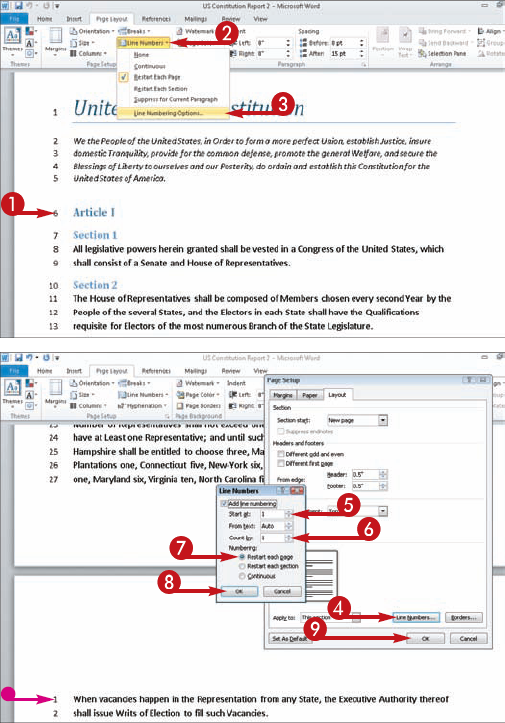
The Page Setup dialog box opens with the Layout tab shown.

The Line Numbers dialog box opens.


Tip
Did You Know?
In addition to inserting line numbers in your document, you can also insert page numbers. Page numbers can appear in the document's header or footer area, or in the document's margins. To add page numbers, click the Insert tab and, in the Header & Footer group, click Page Number. Select where on the page you want the numbers to appear, as well as how you want the numbers to look. To change the page on which the numbering starts and other numbering options, click the Insert tab, click Page Number in the Header & Footer group, and click Format Page Numbers.
Remove It!
To remove line numbers, click the Page Layout tab, click Line Numbers, and choose None.
