
6
Structuring material
6.1 Standardize format
A simple way to split a large file is to mark it with regions corresponding to the separate files you want to obtain. This is done by using the mouse to select a section of audio and then pressing F8. This will create a ‘basic’ region (Figures 6.1 and 6.2). F8 combined with shift or shift/control produce different types of regions used when burning CDs. There is also a ‘Beat’ and ‘phrase’ marker that can be used when generating music loops using options available under ‘EditAuto-Mark…’ (Figure 6.3).
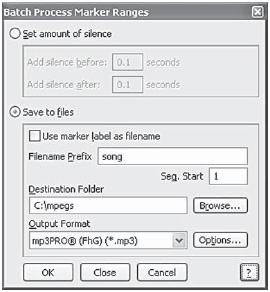
Figure 6.1 Batch process dialog used to split a long file into many small ones
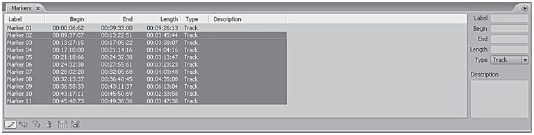
Figure 6.2 Marker list of basic regions
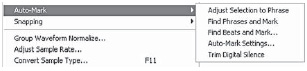
Figure 6.3 EditAuto-Mark…
You can trim each end of a region by dragging its marker to the right place. When you select View Marker List you will then see your selections named ‘Marker 01’ upwards. Select the markers you want to turn into files. This is done in the same way as the Windows file selector. Hold down control individually to select a marker or hold down shift to select all the files from an initial selection to where you click. Press the batch button and you will see a new dialog.
There are two options. The first will insert a set amount of silence before and after each marker. This can be useful to pad out the 0.7 seconds that are often missed at the start of MP3 files. In this case, we want the second option ‘Save to files’. Here you can set the type of file that will be output and to where on the hard disks on your system. The ‘filename prefix’ is what they will be named with ‘01’, ‘02’, etc. added on to the end. In the illustration, I have called the prefix ‘song’ and selected ‘C:mpegs’ as the output path. The resulting files will be ‘C:mpegssong01.mp3’, ‘C:mpegssong02.mp3’, ‘C:mpegssong03.mp3’, etc.
The files marker names can be edited and these changed names can be output as file names by ticking the ‘Use marker label as filename’ box. For example, I will transfer several students work from Minidisc in one go and then divide up the different songs as regions naming each marker with the student's name.
6.2 Batch files
Audition allows you to set up batch files to automate some activities. Using batch files is quite an advanced activity and they can take a while to get right. This means that, in the short term, they may add to the time taken to edit an item. However, once they are sorted, they can be great aids to efficiency. Audition's batch files contain sets of scripts which can be grouped into three types (Figure 6.4).
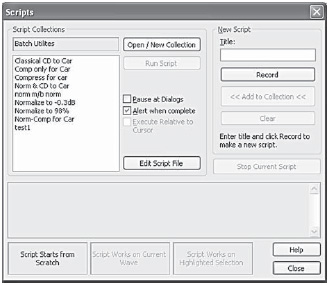
Figure 6.4 Scripts and batch processing dialog showing typical range of scripts
The first type ‘Script starts from scratch’ creates a new file. The first command has to be File/new (Audition will impose this if you forget). This would be useful if you had a standard setup you wanted to create regularly. An example might be to create a file at a particular sampling rate and bit resolution. Generate 20 seconds of line-up tone followed by 10 seconds of silence.
The second type ‘Script works on current wave’ is where the same sequence of treatment is applied to the whole file and you can select a series of files to be actioned. This means that you can run a series of effects transforms that takes several hours to do in total but, instead of several hours of blue bar blues, you can be off doing something more interesting, such as lunch.
The last type ‘Script works on highlighted selection’ is one that is going to be applied to part of a file and consists of a series of treatments, say, equalization followed by normalization followed by 6dB of hard limiting.
Scripts and batch processing can be found under the ‘File’ menu heading.
The scripts are, literally, text files containing instructions in a sort of programming language. But don't panic! You create scripts, not by writing them, but by getting Audition to record what you do to a file. You can save this and recall it in the future.
To use an existing script, click on its name and then click ‘Run Script’ (Figure 6.2).
To record your own script is simply a matter of entering a new name in the New Script title box. This will enable the record button. Which type of script you generate is controlled by your starting point in the editor. If there is no file then the ‘Start from Scratch’ mode is assumed. If a section of the file is highlighted then a script for action on a highlighted section is created. A file with no selection creates the sort of script that can be applied to a series of different files.
Clicking ‘record’ starts the process. You now perform the actions you want to be able to repeat each time the script is run. If you had ticked the ‘Pause at Dialogs’ button then when the script is run, the dialogs will appear for you to enter settings (or press Enter to OK them). With the box not ticked then the values you enter as you record the script are used. It makes sense to use a short test file to create scripts, so you do not have long to wait for each action to be processed during the record process.
The ‘Execute Relative to Cursor’ is an advanced option and is used when operating ‘Works on Current Wave’ script types. With this, you can have all script operations performed offset from your cursor position. If you record the script with the cursor set 10 seconds in from the beginning, then, when the script is run it will operate 10 seconds after your current cursor position. Recording with the cursor at zero is a way of producing a script that works from the current cursor position, rather than using a highlighted section. This might be used for generating line-up tone sequences, for example.
As you would expect, the script recording is stopped by clicking ‘Stop current script’. The ‘«Add to Collection«’ button is now enabled so that you can save what you have done, or you can cast it to oblivion by clicking “Clear’. This is the best option if you have made a mistake.
For most people who are not Techies, redoing the recording is preferable to clicking the ‘Edit Script File’ button, as this dumps you into Notepad and a raw text file that is the actual batch file of commands for the whole collection of scripts.
Where this can be useful is when you want a set of near identical scripts. For example if you want to add a bit of silence to the front, normalize and then add a variable amount of hard limiting. In the illustrated case (Figure 6.5) this is a script I have used for preparing speech recordings of audio books that are going to be transferred to MP3 files. I have four files that change the amount of hard limiting to give values of 6, 8, 12 and 16 dB of hard limiting. The scripts are identical except for the value on the line starting ‘2:’ under ‘amplitudehard limiting’. Rather than record four times, with different values, I copied the section from ‘Title:’ to ‘End:’ and pasted it in three times to the text file. I then edited each section to have a different title for the script and changing the hard limiting value.
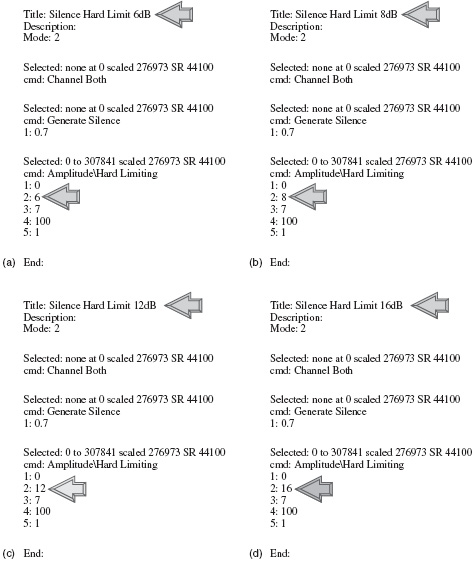
Figure 6.5 Four files that change the amount of hard limiting to give values of (a) 6 dB; (b) 8 dB; (c) 12 dB and (d) 16 dB
File/Batch processing gives you access to copying and changing files with or without running scripts.
The Batch Processing dialog will appear. It has five tabs along the bottom. The first is ‘Files’. Click ‘Add files’ to get the file selector and add the files you want to the list (don't forget that the Windows file selector allows you to select more than one file at a time). If, having loaded a number of files, you see some that you realize you should not have included then you can highlight them with the mouse and remove them by clicking the ‘Remove’ button (Figure 6.6).
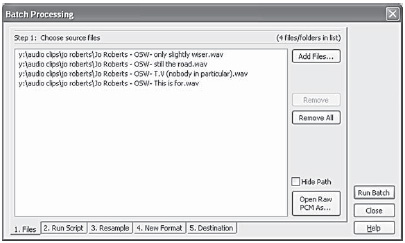
Figure 6.6 Adding and deleting files from the batch process
The second tab ‘Run Script’ allows you insert a script by ticking the ‘Run a script’ box. The browse button allows you to select a script collection file and then the drop down box gives you access to the actual script (Figure 6.7).
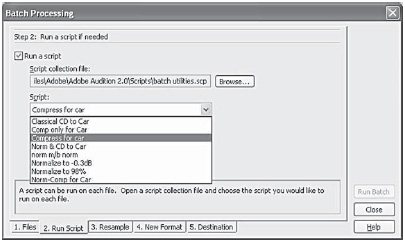
Figure 6.7 Selecting a script
The third tab allows you to change the sample rate, etc. when you have ticked the ‘con-version settings’ box. The ‘Change Destination Format’ button produces the comprehensive ‘Convert Sample Type’ form which is also produced in the Edit view by F11 or ‘Edit/Convert Sample Type’ (Figure 6.8).

Figure 6.8 Selecting a sample format
A table gives you a choice of standard sampling frequencies or you can type in a nonstandard one. Normally resampling will involve pre and/or post filtering but this can be switched off (probably to demonstrate why you need it!). You can convert between stereo and mono, controlling how left and right channels are mixed. Dither settings can be altered and a bit depth of 8, 16 or 32 bit can be selected. The Low/High Quality slider adjusts the quality of the sampling conversion. Higher values retain more high frequencies (they prevent aliasing of higher frequencies to lower ones), but the conversion takes longer. Lower values requires less processing time but result in certain high frequencies being ‘rolled off’, leading to muffled-sounding audio. Adobe advise that values between 100 and 400 are fine for most conversion needs (Figure 6.9).
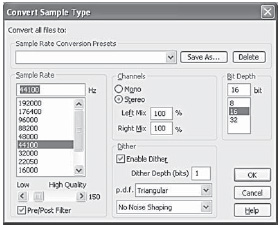
Figure 6.9 Selecting file format dialog
The fourth tab selects the new file format (MP3, .WAV, etc.). If you have not set the previous tab to resample the files to a common format then this tab will scan the selected files and produce a list of the different formats used. By selecting from this list you can change the option for each list (Figure 6.10).
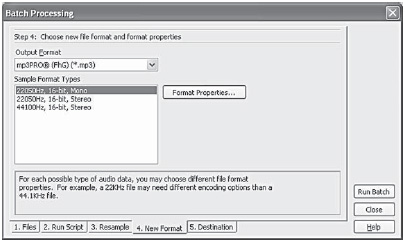
Figure 6.10 Selecting file format options
The fifth tab controls the destination of the batch copies files. The simplest option is simply to copy them into the source file's folder. This can be messy and as like as not it is more convenient to create a folder specifically for the batch copied files and select it with the browse button. Ticking the ‘overwrite existing files’ is safe in these circumstances and more convenient when you decide to redo the sequence. Personally I would never tick the ‘Delete Sources file if converted OK’ option; it is far too dangerous. The ‘Remove from the Source list’ can help you keep track of things in a busy session (Figure 6.11).
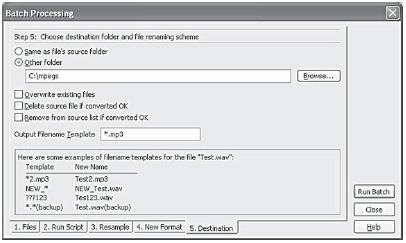
Figure 6.11 Selecting file names
Finally the ‘Output Filename Template’ is a powerful way of adjusting the output filename. You can force another extension, or alter the filename itself (the portion before the ‘.’). There are two characters to use when altering the Output Filename Template: a question mark ‘?’ which will signify that a character does not change and a star ‘*’ which will denote the entire original filename or entire original file extension. The destination panel gives some useful examples.
6.3 32-bit files
The normal format is 32-bit Normalized Float (Type 3) (Figure 6.12). This is the format Audition is happiest with. The only reason to change this is if the files are going to be used by a different piece of software that uses a different format. In its Cool Edit days ‘32-bit 16.8 float’ was the default and is retained for compatibility. If the other software will not accept Audition's normal format then try that option next. This is because these two formats make use of a second file that Audition can generate when saving audio. This file has the same name as the saved audio file but has the extension .pk. This ‘peaks’ file is actually a specialized graphic file. It contains the information that Audition uses to generate the waveform picture on the screen. This file is much shorter than the audio file and can be loaded very quickly. The software checks that the .pk file was actually generated at the same time as the audio file. If it is valid then the ‘picture’ of the audio can be flashed onto the screen extremely rapidly. It also provides the software signposts as to where individual sections of audio are within the real audio file so that Audition knows where to go. Without this file the audio will load much slower. Try deleting a .pk file and then loading the corresponding file and you will see the difference. You will see Audition scanning the file while it regenerates the file. Incidentally, because of this automatic regeneration, you need not save the .pk files when you are archiving a project. The other formats have to be read in and the .pk graphics files created from scratch which gives a slow loading time.
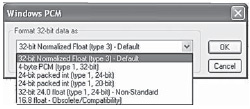
Figure 6.12 32-bit options for .WAV files