
7
Multitrack
7.1 Loading
When you first install Adobe Audition 2.0 it loads the ‘Audition Theme’. This is a short demonstration of what it is capable of and will reward study of how it is set up. Figure 7.1 is how it shows on a 1024 x 768 laptop. Given a larger resolution screen more information can be shown. Figure 7.2 shows the same opening screen but as shown on a 1600 x 1200 screen.
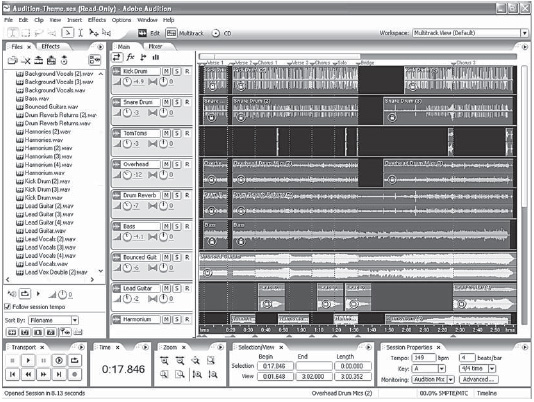
Figure 7.1 The start-up screen after installation showing the ‘Audition Theme’
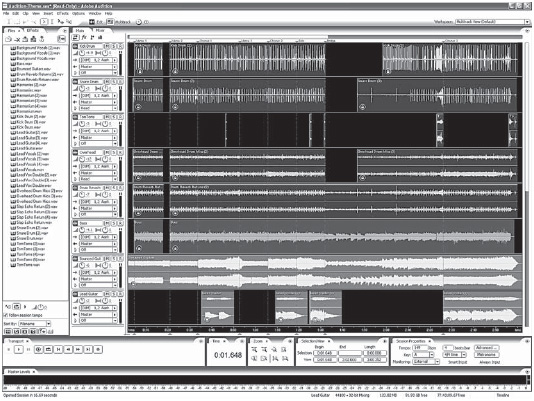
Figure 7.2 The start-up screen after installation showing the ‘Audition Theme’ 1600 x 1200 screen
But, at first, even a blank new session can look intimidating (Figure 7.3).
7.2 Tour
A simple music balance such as in Figure 7.4 can look intimidating at first but, fact, it is a minimalist portrayal of what is happening. Adobe Audition can handle a mix that would require several square metres of control surface area using a traditional analog mixing desk. One of the great problems with a computer realization of the tools for the job is that you are limited by the size and resolution of the screen and, as like as not, a single mouse to control the process in conjunction with the keyboard. An experienced music balancer would rely on their peripheral vision to detect problems from hundreds of lights, displays and meters on their mixer.
Fortunately not every job is a 100-channel mix of a worldwide broadcast giga-gig involving the glitterati of the music world and Adobe Audition is adept in allowing you to hide what you don't need to see with its controls divided into dockable, resizable panels and frames. On the one hand, it can make full use of the two-screen capability of Windows XP using large high-resolution monitors and, on the other, fit a single laptop screen.
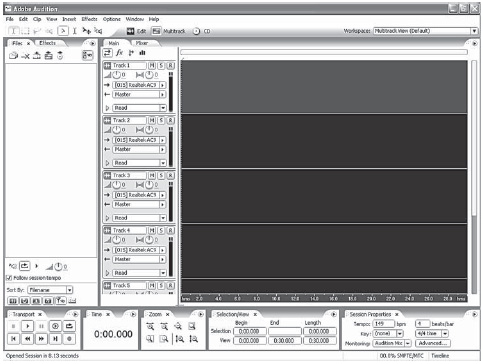
Figure 7.3 Multitrack new session view
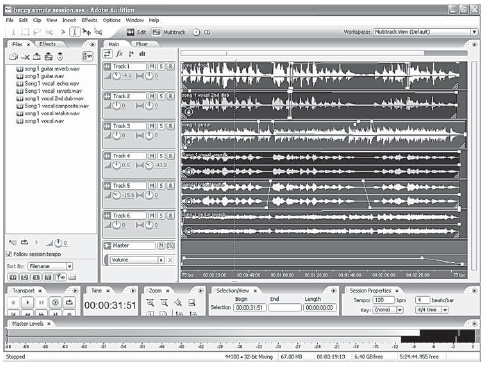
Figure 7.4 Multitrack simple balance
Examining the simple balance using the default multitrack view, we can see the menu at the top of the screen. Below this on the left are eight icons which control the mouse tools for the edit and multitrack views. The right hand four are for the multitrack view (Figure 7.5).
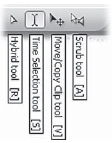
Figure 7.5 Mouse tool icons
The hybrid tool combines the functions of time selection and move/copy. The scrub tool allows you to audition individual clips.
Below, the left panel lists the files in use. The icons at the top are for manipulating the file list. Those at the bottom are playback options for auditioning the files in the list. Followed by options as to which files are shown: audio, loops, video, markers (show cue and track ranges as separate entries) and show full paths. Tabbed behind is a list of effects for ease of selection.
To the right is the main panel which shows six source tracks and a master track. In this case each track has a single file on it but any number can be added either as whole tracks or sections of track. Audition calls these ‘clips’. Each clip can be nondestructively ‘topped and tailed’ by dragging the bottom corner of either end – a grab handle is revealed when the clip is selected by clicking on it (Figure 7.6).

Figure 7.6 Clip grab handle for trimming start of audio
The master track represents the final mix volume. Normally hidden, I have revealed a volume envelope which shows a fade placed at the end. This is done by right clicking the master track and enabling ‘Expand automation lanes’.
Audition is capable of more than a straight mix; it can create and use ‘busbars’. ‘Bus’ is short for ‘omnibus’ and derives from early electricity power stations where individual generators were combined together onto a common circuit. This is the same word as derived from the road bus ‘Omnibus transport’ ‘Transport for all’.
As the currents were so high this was a copper bar rather than a wire. The term has been carried over to audio. In the simple set-up the master output is sometimes called the ‘masterbus’ (Figure 7.7).
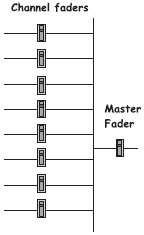
Figure 7.7 Simple mixer schematic
This is all simple mixers have; but more sophisticated mix setups with multiple busbars are used by professional mixers.
Figure 7.8 shows a schematic of a mixer with a single busbar with its own associated fader. A sophisticated desk will have more than one busbar and even busbars can have busbar sub-mixes. Why would you want this? Ultimately, the answer is the 20 finger and thumb limit of two human hands for handling faders. There is also the practical convenience of group mixes. The classic example is a drum kit with perhaps five or six microphones on it. You will want to lift or lower the whole drum kit in the mix; moving that many faders is likely to disrupt the internal mix on the drums. Having a single group or bus fader to represent the drums is a boon.
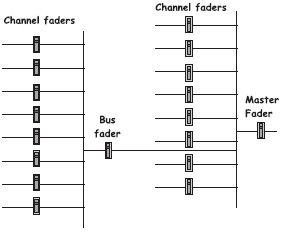
Figure 7.8 Simplified bus mixer schematic
When you are mixing using computer software there is an additional reason for busbars and that is processing. While it is technically possible, say, to feed each drum mic to reverb, that will be five or six lots of intensive processing. Whether your computer is up to this will depend on how powerful it is and what other tasks it is performing. A single set of processing on the drum bus will save a lot of processing power.
Returning to our simple mix, the tracks have a panel on their left. Beside each of the six tracks shown are the individual controls for each track, as shown in Figure 7.9
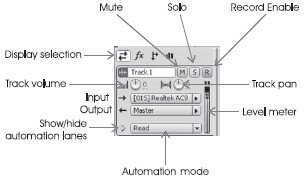
Figure 7.9 Track description panel
The first thing to realize is that Audition hides a great deal of information as, much of the time, you don't need it. If you are not using the effects why show them? At other times information is concealed because there is no room on the screen. This track control panel is the most obvious example of this. For a start, there are four icons at the top which select between four sets of display (Figure 7.9). But whatever you select you will get the vital controls. These are the default ‘Volume’ and ‘Pan’ controls. Personally, find rotary controls operated by a mouse very irritating but they perhaps have an advantage in terms of displaying their setting efficiently. Compared with some audio software control gives a finger cursor with horizontal arrows (Figure 7.10).
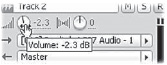
Figure 7.10 volume control
Briefly a tool tip will show the current setting of the control. Pressing down the left hand mouse removes the finger symbol leaving just the horizontal arrows (![]() ). Moving the mouse cursor left/right OR up/down will change the setting. Holding down SHIFT while you do this will make the change faster while CONTROL will make it slower. These shift and control modifiers work for most of the mouse-controlled variable controls except for the faders on the graphical mixer. The drag works on the knob, its icon and also the numerical display. Additionally you can double click a numerical value and type in a new one.
). Moving the mouse cursor left/right OR up/down will change the setting. Holding down SHIFT while you do this will make the change faster while CONTROL will make it slower. These shift and control modifiers work for most of the mouse-controlled variable controls except for the faders on the graphical mixer. The drag works on the knob, its icon and also the numerical display. Additionally you can double click a numerical value and type in a new one.
Also shown are the editable track names, Mute, Solo and Record enable buttons. In Figure 7.9 you can also see input source and where the output is fed (to the master output, to a busbar or to a physical sound card output. The last could be to feed artist's headphones or external ‘fairy-dust’ hardware). At the bottom is the selection for real time automation. On the right is a level meter. Incidentally, if you are tight on processing power, you can switch these track meters to look at the inputs only or you can shrink the height of the track so that they are removed. The default is the input/output set with a choice of showing the effects in use, the sends to the effects and the EQ setting (Figure 7.11).
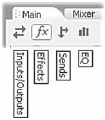
Figure 7.11 Facility view selector icons
If a lot of tracks are being shown on the screen then an even more truncated display will be shown (Figure 7.12).
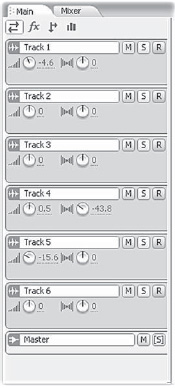
Figure 7.12 Truncated track display
But an individual track can be widened by dragging the bottom of the panel; the mouse cursor will change to a ![]() symbol. Figure 7.13 shows track in a minimalist configuration and track 2 in expanded.
symbol. Figure 7.13 shows track in a minimalist configuration and track 2 in expanded.

Figure 7.13 Track 2 expanded with outputs selected
The essential ability of a multitrack recorder is that it can record on all of its tracks simultaneously, on only one, or on any number in between. So, in addition to the transport record button, each track has a red record enable button marked ‘R’. If this is not selected then the track is in ‘safe’ mode and will not go into record when the main record button is selected. Additionally, already recorded tracks are be played back as a guide to the new recordings.
Sometimes you want to listen ‘inside’ the mix; the green ‘M’ button when pressed and illuminated will mute the track. This can be very useful for tracking down where an unwanted noise is coming from. The yellow ‘S’ solo button has the opposite effect. It mutes all the other tracks and plays only the selected track. Industry practice is for solos to be deselected when a new solo is pressed. This is what happens with Audition, provided CONTROL is pressed, otherwise a simple toggle action takes place. This is the reverse to how Audition 1.5 worked.
With multiple tracks, you are not restricted to stereo recording. Adobe Audition 2.0 is limited only by the processing capacity of the computer as to the number of simultaneous tracks you can have. Much multitrack recording is built up layer by layer, so a 60-track recording does not need 60-record inputs they can be recorded one at a time through a single record input.
Unlike some audio editors, Adobe Audition 2.0 can handle both mono and stereo files. Others can only provide stereo by linking mono tracks together. If they import a stereo file then that is split into two separate mono tracks. With Adobe Audition 2.0 you can use a mixture of mono and stereo tracks within the same session.
7.3 FX
Figure 7.14 shows the effects. Three are shown, inserted prefader. There is room for 16 different effects and you can see how a scroll bar on the right has appeared so that the slots off the screen can be selected. Each effect can be switched on or off using the ‘power’ button on the left or they can all be switched off using the ‘power’ button at the top of the panel. Effects, inevitably use processor power and even the most powerful computer is going to flag eventually. The symptoms are that it cannot keep up with real time and there are skips and mutes in the output. Fortunately there are ways round this. These centre round the fact that a straight play back of a file takes less processing than an effect. One answer is to use the edit view to generate, say, reverb (a particularly processor intensive task), and create a new file which only has reverb and no direct sound. This laid alongside the original and mixed as required. The disadvantage is that you have to do it all again if you want to change the character of the reverb rather than merely its volume. With Adobe Audition 2.0 it is altogether more efficient. Above the scroll bar is a ‘freeze’ button ![]() setting this to on (gray turns to blue) will produce a progress bar while a file is produced and will substitute for the real time processing of the effect. The waveform display will turn blue.
setting this to on (gray turns to blue) will produce a progress bar while a file is produced and will substitute for the real time processing of the effect. The waveform display will turn blue.

Figure 7.14 Effects display selected
Deselecting it will instantly return to ‘live’ processing. Thus you can freeze all the effects you are happy with; unfreezing them as required. A minor disadvantage is when you load a session with frozen files, you have to wait until they are regenerated. No, only joking, this is an option if you are short of hard disk space. Provided ‘Save frozen audio tracks with session’ is ticked on the Edit/preferences/multitrack tab (F4) the frozen data are saved into a folder named after the session file name with ‘(frozen tracks)’ appended to the end.
Figure 7.15 shows the ‘sends’ panel. This shows a single send with its volume and pan control (as always, the track volume and pan are shown above). The ’send’ is the destination of the output of the selected effect. This has to go to a bus; it cannot go straight to the master output. Clicking the right arrow allows you to select or create buses as destinations (Figure 7.16). You can then allocate buses as specialized outputs with their own faders and controls. An obvious one is for reverberation. You also have the choice of feeding the effect from before or after the track volume/fader. With reverb, a prefader ![]() setting will mean that if you fade out a vocalist between verses and they cough, then this will be fed to reverb and be audible where a post-fader
setting will mean that if you fade out a vocalist between verses and they cough, then this will be fed to reverb and be audible where a post-fader ![]() setting will not be as the feed will fade out with the track volume. However if you are using a bus to feed the vocalist's headphones then they will not want to hear what you are doing to their track; just a constant feed.
setting will not be as the feed will fade out with the track volume. However if you are using a bus to feed the vocalist's headphones then they will not want to hear what you are doing to their track; just a constant feed.
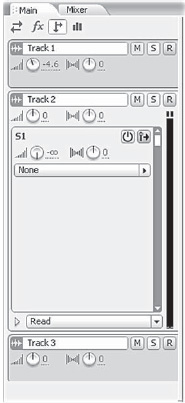
Figure 7.15 ‘Sends’ display selected
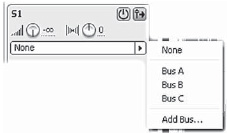
Figure 7.16 ‘Sends’ bus selection
Figure 7.17 shows the last panel which control the real time EQ available for the track. The parameters before the three equalizers are shown only as text – no graphical knobs here. EQ1 is a low-frequency shelf control. EQ2 is a variable ‘Q’ mid-range control and EQ3 is a high-frequency shelf equalizer. The ‘power’ button inserts the EQ. Remember that power-off saves on processing power compared with just setting the controls to zero. Clicking the EQ button brings up the EQ panel complete with a graphical display of the setting. EQ1 and EQ3 can be changed to variable Q controls like EQ2 by clicking the ‘shelf’ symbols on the right of the horizontal sliders (Figure 7.18).
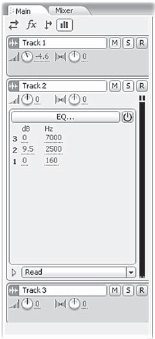
Figure 7.17 ‘EQ’ display selected
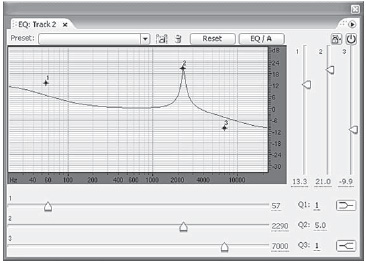
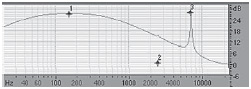
Figure 7.18 Equalizer controls
The horizontal sliders control the turnover frequencies for the equalizers with the vertical sliders controlling the amount of lift or cut. In fact there are two equalizers which can be switched between by clicking the EQ button which will toggle between reading ‘EQ/A’ and ‘EQ/B’. This is so that you can compare two settings; typically EQ/B will be set to flat however it can be useful to store your best yet setting so you can compare it with your latest attempt.
‘Q’
‘Q’ is a term to describe the steepness of a filter. The boost or cut is defined as being at a particular frequency. For a shelf filter this frequency is the point where there is 3 dB change at the full setting. For a peaking ‘presence’ filter this is the centre frequency. ‘Q’ is a measure of the width. In the diagram, EQ1 is set to a very low Q (0.06) and has a very broad effect. EQ3 is set to a very high ‘Q’ (20) and has a very narrow width.
Tabbed behind the main panel is a full-scale graphical mixer which has the same controls rearranged as a mixer. There are some additional controls. Selecting ![]() to
to ![]() will reverse the phase of the CHANNEL; both left and right outputs are reversed, not, as you might expect just the right output. This is to handle a mono or stereo microphone on, say a drum kit, that is reversed in phase with the other mics on the same kit. Just above the fader is an unconventional control: selecting
will reverse the phase of the CHANNEL; both left and right outputs are reversed, not, as you might expect just the right output. This is to handle a mono or stereo microphone on, say a drum kit, that is reversed in phase with the other mics on the same kit. Just above the fader is an unconventional control: selecting ![]() to
to ![]() will sum the left and right outputs to mono. This would be useful where a domestic stereo mic is being used as a mono pickup.
will sum the left and right outputs to mono. This would be useful where a domestic stereo mic is being used as a mono pickup.
Potentially confusing is that each channel has two volume controls. The top volume control is a preset for the volume to be set with the others for a ‘straight-line mix’. The second volume control is the fader which corresponds to the control at the left of the main track display. Both of these are used to alter the mix during the run of the item and are both available to automation. Care should be taken not to confuse the ‘Send’ volume and pan controls with those just described.
7.4 Automation
All these settings represent an overall control of whatever is on the track; it may be just a single clip or many. While the overall volume is set by the track's ‘vol’ and ‘pan’ controls; as we have seen, this is not the only way the volume of a clip can be altered. Firstly the volume and pan setting of the clip itself can be adjusted by using the clip properties dialog: Clip/clip properties for a selected clip or right click the clip for popup. This produces Figure 7.19.
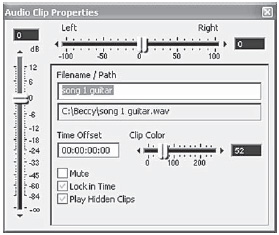
Figure 7.19 Audio clip properties dialogue
The sliders alter Volume and pan (or type a value into the associated boxes). The track can also be named and given a color. This is so that you can help yourself find your way round a mix you are returning to movements by giving different colors to vocal, drums, guitars, etc.
Additionally, each clip has volume and pan ‘envelopes’ which can be altered using the mouse. These are only visible when selected using the ‘View’ menu. Finally the setting for the track can be altered using the automation provided by the graphical mixer. When played back the faders move reproducing the movements you made while recording an automation run. There are five modes (Figure 7.20):

Figure 7.20 Automation settings
1 ‘Off’ disconnects the channel from the automation system although you can still edit the envelopes previously generated.
2 ‘Read’ will read already recorded data but not allow it to be changed. You can, however, rehearse some changes but they will not be saved.
3 ‘Latch’ begins recording when you first adjust a setting, and continues to record new settings until playback stops.
4 ‘Touch’ is similar to Latch, but returns settings to previously recorded values when you stop adjusting them.
5 ‘Write’ Similar to Latch, but records current settings when playback starts, without waiting for a setting to change.
An alternative to overriding recorded fader movements is to reveal the track automation lanes which will graph the fader movements. You can, if you wish enter a mix directly to the automation lane and the mixer faders will follow your envelope.
AUTOMATION LANES AVAILABLE
Volume
Mute
Pan
Track EQ power on/off
Track EQ: Band 1 frequency
Track EQ: Band 1 gain
Track EQ: Band 1 Q
Track EQ: Band/Low shelf
Track EQ: Band 2 frequency
Track EQ: Band 2 gain
Track EQ: Band 2 Q
Track EQ: Band 3 frequency
Track EQ: Band 3 gain
Track EQ: Band 3 Q Track EQ: Band/High shelf
Insert FX: Power on/off
Insert FX: Wet/Dry mix
Insert gain: Gain amount
Most of the mixer parameters are automated and can have their individual automation lanes revealed. Figure 7.21 shows the complete list revealed for one track. As you can see, unless you have a very large screen this is unlikely to be practical.

Figure 7.21 All the automation lanes for one track revealed
For playback, each track, be it mono or stereo, is fed to either a busbar or to an audio sound card output (Figure 7.22a, b).
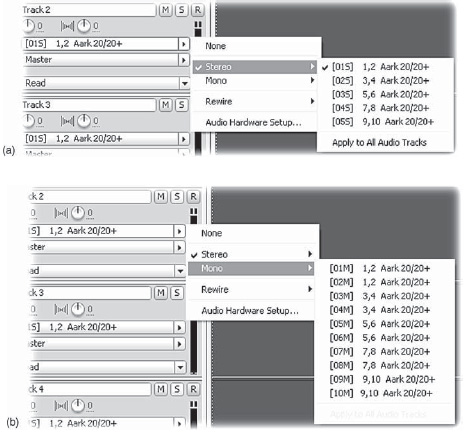
Figure 7.22 Example of audio output switching
When starting a ‘New session’, you can also select the sampling rate which is fixed for the entire multitrack session. You can mix 8-, 16- and 32-bit files but those with a different sampling rate will be converted when they are imported. The session normally records at 32-bit resolution but can be set to 16 in the Preference/multitrack tab (F4). The 16/32-bit option in the Export/Audio mix down dialog selects what the mix down output will be.
Important though multiple ins and outs are, they are likely to be little used outside music mixing where the multiplicity of outputs are useful mainly for feeds to an external mixer. The power of the non-linear editor is also the ease with which it can merge and mix mono and stereo audio into a continuous mono or stereo final mix. Audio items are added and laid out, as required, on any number of mono or stereo tracks. They can be regarded as a large number of play-in machines in a studio. Without our intervention, all the material will be mixed together at full level with no panning.
Clips
You can also set the volume and pan for individual clips on a track. These may represent separate wave files or they may represent wave files that have been split by the multitrack editor. They look like separate wave files but are, in fact, sections of a wave file. This is done by right clicking on a clip. Within the popup menu, Clip Properties gives you a vertical slider that adjust the volume of just that block and a horizontal slider to adjust the pan. The settings are shown in text at the start of the block with the letters ‘V’ and ‘P’ standing for volume and pan. These setting are in tandem with the track settings and do not override them (Figure 7.23).
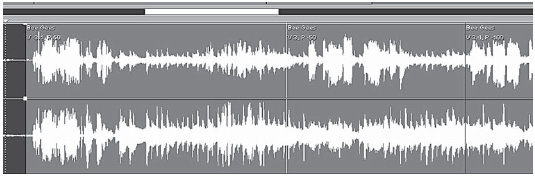
Figure 7.23 Three-wave blocks with different volume and pan settings indicated by text at the top left of each block
A good use for this is to make successive wave blocks consistent in level so that the master track level works for all the blocks. The block pan can be used to create consistent pan setting for individual speakers in a documentary feature. If you split a wave block (select track(s) and CONTROL/K or ‘Split’ from right mouse click popup) the two sections carry the same volume and pan settings.
7.5 Envelopes
As well as these ‘global’ settings for the whole track or block, you can control Volume and Pan on a moment-by-moment basis. This is done using ‘envelope’ controls within the track. To be able to see the envelopes, you have to set the ‘View/Show clip pan envelopes’ and ‘View/Show clip volume envelopes’ menu options so that they are ticked.
Until changed, the Pan envelope is a straight line along the centre of the track, and the Volume envelope is a straight line along the top of the track. These represent Pan Centre and Full Volume (as modified by the track settings on the left). Moving the mouse cursor onto an envelope line produces a ‘ + ‘ symbol. Clicking will produce a small blob where you clicked. This is a ‘handle’ which can be dragged by the mouse to change the setting. You must select the track by clicking it before this works.
To produce a simple fade-out (Figure 7.24), create a handle where you want the fade to start, and another one to the right of it. Drag this second handle to the bottom of the track (representing zero volume) and left or right to the point you wish the fade to finish. (You will not be allowed to drag it to before the start of the fade handle. However, this can be a useful ‘end stop’, if you just want to switch off the track.)
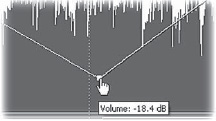
Figure 7.24 Moving envelope handle
You will discover that the level immediately begins to increase after the fade, because the end of the envelope line is attached to the handle at the end of the track. This needs to be dragged to the bottom, so that the whole of the rest of the track is faded out.
Now you have your basic fade you can adjust it for timing by listening and, if necessary, moving the handles. A simple straight-line fade is often inadequate but you can add as many intermediate handles as you like to make the fade curved, or to have several sections (see Section 7.9 ‘Fades and edges’ on Page 74).
You only need to use the pan envelopes where you want the sound from a track actually to be heard moving. You should beware of doing this to speech, as it is a distraction and reduces communication; the listener is likely to react on the lines of ‘Oh they've started moving. Why? … er … what did they say?’
The pan envelopes are set in entirely the same way as the volume envelopes although, much of the time, a single pan setting for the overall track is all that is needed. In both cases, a handle can be removed by dragging it off the top or the bottom of the track.
Figure 7.25 shows a short section of a mono track. This starts at full volume and ends with a fade. The pan setting starts at centre. Then there is a sudden pan full left followed by a slow pan from full left to full right. The next two sections are panned fully right and then fully left with the track ending panned centre.
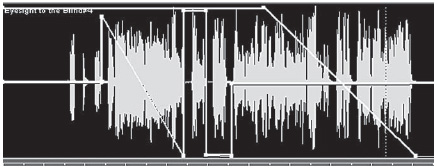
Figure 7.25 Pan and volume envelopes being used together
When you want to move a handle, you position the mouse cursor over the handle until the cursor becomes a pointing finger. You can now drag the handle to where you want it, positioning it anywhere between the previous and next handles. You can see the value which will popup beside the cursor. It takes a little while to get used to this, and it is very easy to create new handles rather than moving an existing one. UNDO can correct this, or dragging the unwanted handle off the track will remove it.
This use of envelopes is a common way of overcoming the imposition of ‘one-finger’ operation by using a mouse. While you can only change one thing at a time, all the changes are remembered exactly. While simpler and less impressive than a screen filled with a pretty picture of a sound mixer, it can be much more effective.
To get rid of one-finger operation you need either an external mixer or an external control device that may look like a mixer, but controls the software settings with the program. Many Digital Audio Workstations work this way, but at a price.
You now have complete control of the audio levels, and timing, of your material. Like many editors, Adobe Audition 2.0 allows real time processing of audio, applying equalization and special effects such as reverberation. This requires a lot of processing and a correspondingly fast machine, but some sound cards have Digital Signal Processors which take the load off the computer's processor and have software to allow effects to be added in real time. Where this is not possible, the technique is to make additional tracks which contain the effects.
7.6 Multitrack for a simple mix
It is very easy to see the non-linear multitrack mode as a complication to be avoided. For simple cut and paste editing, this is often true; however, as soon as mixing becomes involved, it is invaluable. It gives you the ease of multi-machine mixing with quarter inch tape, combined with absolute repeatability and flexibility.
Due to the integrated nature of the editor it can be convenient to ‘pop in’ to the multitrack editors when all that is required is to make a simple mix.
The following example takes a section of Berlioz's Damnation of Faust which has one bar repeated in it. A simple cut edit does not work as a retake has been cut in, which does not match the original. The answer is to crossmix between the two takes during the one bar overlap.
This is simply done by entering the multitrack mixer. If the wave file is already in the linear editor, it will already be in the editor's organizer list (Alt/9). All that needs to be done is to right click it, and click the ‘Insert into Multitrack’ option or just drag the file to a track. (To make the illustrations clearer, I have zoomed in vertically to show just two tracks.)
Next, the end of the first take of repeated section is selected with the mouse, and the track split at that point. This is done by right clicking on one side of the cursor and selecting the option to split the track or, if the playback cursor is already in position using the keyboard shortcut CONTROL/K. You will see the file name appear as well as the edge of clip drag handles (Figure 7.26).
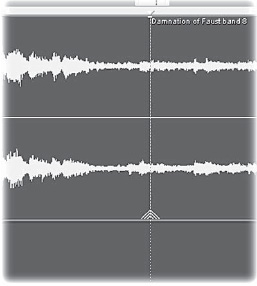
Figure 7.26 Splitting “Faust” file
Now that the audio is in two parts, the second half can be dragged, using the right mouse button, down to track two. In Figure 7.27 I have highlighted the first take of the repeated section.
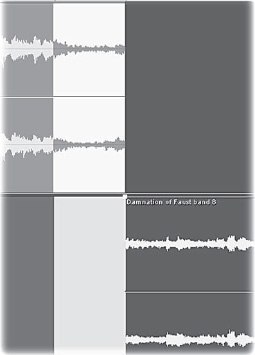
Figure 7.27 ‘Faust’ file split and second section moved to track two
The next thing to be done is to slide the second section to the left until the overlapping section matches musically that of the track above (Figure 7.28).
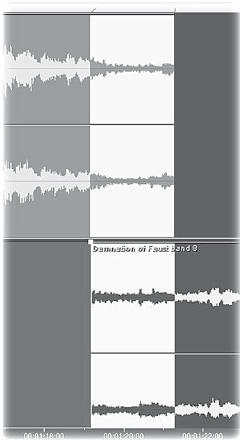
Figure 7.28 ‘Faust’ slid to correct timing, ready for cross fade
At this stage, the rhythm matches but the level bumps and a cross fade needs to be implemented. This can be done manually with the volume envelope but it is much easier to use the automatic cross fade facility.
First the cross fade area is highlighted. Then both clips are highlighted by clicking with the control key held down. Now select the cross fade from the right-click context menu.
There are four types of cross fade to choose from (Figure 7.29a, b, c, d). They all have their uses. However, linear cross fades tend to give a boost to the level in the middle of the fade. Logarithmic fades should give a better approximation to equal power throughout the transition. Due to their asymmetrical shape, there is a choice of ‘direction’. Sinusoidal is another equal power option. There is no substitute for trying the different options. The UNDO option is one menu click away (or CONTROL/Z). Playing the different transitions will soon convince you as to which is best for any edit.
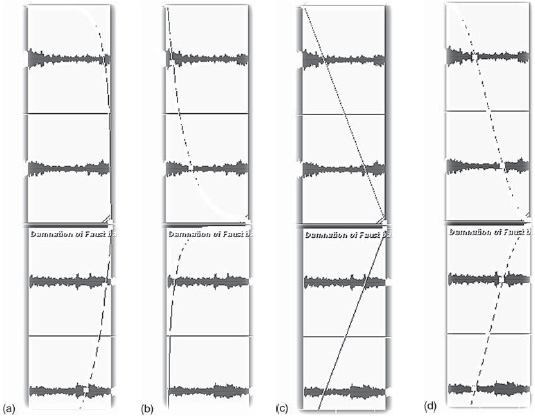
Figure 7.29 Logarithmic in (a), logarithmic out (b), Linear (c), Sinusoidal (d)
To transfer this edit back to a file in the linear editor you merely mix down your tracks (File/export/audio mixdown and then save the file). If you are confident with your editing, you will select a short section with a little each side of the cross fade and mix down just that section. This can be copied and pasted into your original in seconds.
7.7 Chequer boarding
Once a programme item becomes much more than a simple interview or talk, then mixing becomes necessary. While mixing is possible with linear editors using Mix Paste, it usually involves a lot of UNDO cycles to get it right. The multitrack non-linear editor makes it so easy.
In the days of reel-to-reel tape, programmes of any complexity would be split into banded ‘A’ and ‘B’ reels with odd numbered inserts on the ‘A’ reel and even numbered inserts on the ‘B’ reel. Each insert could then be started over the fading atmosphere at the end of the preceding insert. Where both items had heavy atmosphere the incoming band would start with atmosphere and a cross fade made. Wherever necessary a third ‘C’ reel would be made up to carry continuity of atmosphere over inserts with tightly cut INs and OUTs (Figure 7.30).
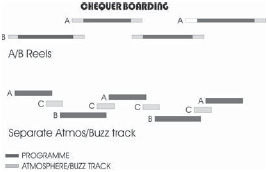
Figure 7.30 ‘Chequer boarding’ on tape
In a multitrack editor, this technique is often known as chequer boarding. Figure 7.31 shows a programme of music linked by a presenter. Some of the music is segued and so the chequer board principle is invaluable. (Segue is an Italian music term adopted by radio and show business to mean one item following another without a break. It is pronounced ‘seg-way’.) For convenience, the links are given their own track (track 1) and the music tracks their own ‘A and B reels’.
A degree of extravagance in allocating tracks is not a problem. In the days of reel-to-reel tape, studios were often limited by the number of physical play-in tape machines available (and by how good the tape operator was!). Here, each track is effectively a different play-in machine. We can have as many of them as our hardware will support – rather better than a four-machine radio studio.
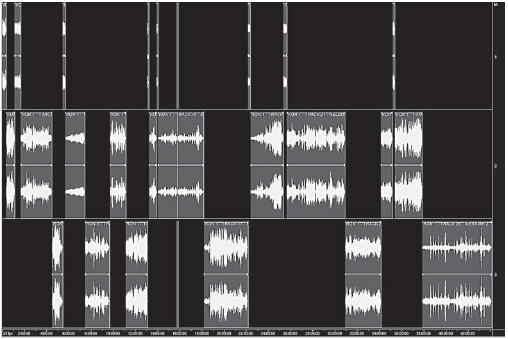
Figure 7.31 ‘Chequer boarding’ on Cool Edit Pro
Even better, we are no longer reliant on the tape operator. Each ‘play-in’ is automated; fixed until we change it. No longer does one muffed play-in require a whole take to be redone. If an item comes in slightly late or early, it only takes a moment with the mouse to slide the clip until it is right (drag using the right mouse button).
While totally dominant in music recording, reel-to-reel multitrack was never a very useful device for drama and features because of this one limitation; you could not slide tracks relative to one another. There are ways to emulate this, but only by adding considerable complexity to the process.
7.8 Track bouncing
There are times when you want to undertake a quick mix to make a composite track. For example, you have two versions of a vocal track and you want to mix the good bits together into a single track. You can ‘track bounce’ selected tracks by using the ‘Edit/Bounce to new track’ menu option. If you enable the ‘Lock in time’ option on the newly created wave block right click menu, then it will stay in exact synchronization if you move it to another track.
The three bounce options (Figure 7.32) are straightforward: ‘All Audio clip in session’ does what it says; ‘Audio clips in selected range’ will mix down all the audio clips, horizontally as selected by the normal time range selection (Figure 7.33a) and ‘Selected Audio clips’ are clips you have selected wherever on the track layout. (Hold down control to select more than one clip.) Figure 7.33b shows the middle clip of each group of three not selected and the resulting Mixdown.

Figure 7.32 Track bounce options menu
This speeds up background mixing and helps clear up your work area as you can now delete the originals from your session (although not, for safety, from your hard disk). The contents of all or selected enabled (unmuted) tracks are combined, with track and waveform properties (such as volume and pan) affecting the way the final mix sounds. Session elements such as looping, images and envelopes are all reflected in the mixed waveform.
As track bounce also picks up your real time FX it is also a way of ‘locking’ a track so that it is saved to hard disk and so is quickly reloaded, rather than having to be regenerated, when you reload a session. It is not possible to select a locked FX block, so you should unfreeze it first.
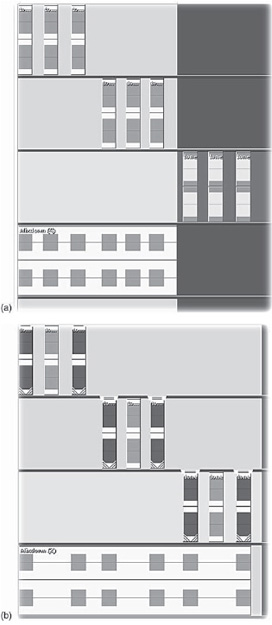
Figure 7.33 Results of mixdown options
7.9 Fades and edges
However, a little more than simple chequer boarding is required. Together, a studio manager on the mixing console and a good tape operator would make material merge seamlessly by skilled and instinctive use of faders, both on the console and on the play-in machines. Often inserts would be started, not with an actual fade-in, but with edge-ins, where the item was started with a sharp fade-up to ‘half fader’, and then a fade-in over a second. Sound balancers have also learned that most items sound better if they are started 2 dB to 4 dB low and edged up, over a second or so.
On a PC, all these instinctive skills have now to be defined. This is why many people, with the necessary money, will pay for an external mixing device to control the computer's mixer. This preserves the power minutely to adjust levels within an item merely by having your fingers on the faders. This ‘pinky-power’ can control up to ten sources simultaneously. A computer mouse can only control one. However, because of the automation provided by a PC, each change can be made individually and cumulatively.
It makes sense to preserve the old split of duties between the sound mixer and the tape operator. When preparing your material, pay attention to how each file begins and ends; put a rapid fade-out on the atmosphere at the very end of the file. Put an edge-in on the front. You can set this up as a ‘Favorite’. Starting values of -6 dB and -3 dB fading up to zero are useful here.
Edge-ins should be inaudible to the listener. They are there to smooth the seams. Actual fade-ins and fade-outs, ones that are going to be perceived as such by the listener, are best done using the envelope controls of the multitrack mixer or the automated fader on the mixer.
Fades usually have the role of establishing a passage of time. The old convention, from the ‘golden age of the wireless’, was a slow fade-out followed by a slow fade-in. These days, the fades are much faster and the fade-in is more of a steep edge-in.
Fades also have the function of allowing voice-overs to be heard over music. Very rarely should the listener be aware that this is being done. What will sound particularly horrible will be a mix where the music is audibly dipped to make a hole for the voice to enter, with another hole following the end of speech before the music is faded back up.
Most important is that the voice-over should fit the music. The music should return at the start of a musical sentence. The dip-down is less critical in the context of pop music but, with more formal features, the voice should pick up from a cadence, or the end of the musical sentence.
When mixing voice-overs ‘live’, I used to say to presenters that I would ‘go on the whites of your tonsils’. By this I meant that the music would dip on the very first syllable of their link. Equally it sounds better if the fade back up starts about a syllable before the end of the link. This is less critical if the presenter has hit the beginning of a musical phrase as you are fading up in the micro-pause between notes.
Music fade-outs are often done badly. A vital thing to realize is that any fade-out consists of three separate parts (Figure 7.34):
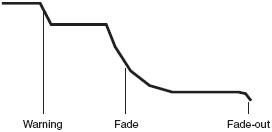
Figure 7.34 Notional structure of a fade-out
1 warning the listener they are about to lose the music,
2 fading down,
3 fade-out.
This applies as much to a clean fade as to one where the presenter comes in over the end.
The classic example of the latter is the opening signature tune, a feature of so many audio items, from broadcast programmes to cassette promotions. The music starts full level and then towards the end of a musical phrase, the level is dipped slightly to warn the listener and then almost immediately after faded down so that the presenter can start their link at the end of the phrase with the music running under. The music is then lost under the presenter, and brought out on a cadence, or end of phrase.
Fading classical music badly can cause real offence, but pop music deserves equal care. Again the three-part fade applies; a slight dip at the start of the last phrase and then a fade towards the closing cadence, with the music taken out at the end of the cadence. A common mistake, especially when the fade is made while looking at the score, is to leave the start of the fade too late so that the listener is not prepared for the music to end.
Where the fade has to be quick, say, because the illustration is about the words of a song, then, rather than lose the last few words on a fade to cadence, a 4-6 dB dip at the beginning of the last line can provide the psychological warning and make the quick exit far less offensive.
7.10 Prefaded and backtimed music
A common technique to bringing a programme out on time, especially a live one, is to have ‘prefaded’ closing music. A piece of music is dubbed off, say of 1 minute duration, and started with the fader shut exactly 1 minute before the end of the programme. As the presenter makes their closing remarks, the music is faded up behind them, to bring the programme to a rousing and punctual close.
A technique used by some producers is to end the last item with music which is then run under the presenter's close and then faded up so that it ends. This effectively offsets the prefade back to the last item. However, it sounds so much better if that last piece of music actually begins at a musically satisfying place, rather than just emerging arbitrarily. A cheat that works most of the time – although I remain offended that it does – is to dub off the item's closing music to the end, and run that separately as a backtimed prefade closing music. The two recordings will not be in synch, yet, because they are the same music, they can usually be cross faded under the presenter's closing link without being audible to the listener.
These techniques may seem unnecessary for a recorded programme, as it can be edited to time. However, time to edit can be a scarce resource and it may be much more cost-effective to use a prefaded closing music than to spend another hour looking for cuts. Of course, you do not have to do any actual back-timing. All you have to do is to slide your closing music until its end is at the duration that you want. You then use the amplitude envelope control to fade it in at the right point.
7.11 Transitions
Transitions are the stuff of dramatic effect, not only in drama itself, but also in documentary. Cross fading from one acoustic environment to another or from one treatment to another can be extraordinarily effective.
The first type of transition, going from one location to another, is simply managed. Two tracks are used and the incoming track slid along to overlap the end of the exiting track. You can use Adobe Audition 2.0’s automatic cross fade generation, as described earlier in this chapter, or you can manually create the envelopes if this does not produce the effect you want. Always remember that you can modify the cross fade that Adobe Audition 2.0 did for you by moving the envelope ‘handles’ with the mouse. With a transition, you are rarely going to use a perfectly engineered equal loudness cross fade.
The second type of transition is from one type of treatment to another on the same material. Examples include an orchestra playing in another room. The music is treated to remove all the high frequencies. The characters move into that room, and you want the high frequencies to return as they make that move, or they open the door. Sometimes you want to go from music or speech apparently heard acoustically – a jukebox playing in a coffee bar – to music heard directly off the recording. Here you need to take the good quality original and treat it, literally by playing it on a loudspeaker and recording it with a microphone (or, in a studio, playing the music on the foldback loudspeaker). A small room effect may be used instead.
With the example of the orchestra, your treated track is identical in length with the original and is inherently in synch with it. Within the multitrack editor place the cursor roughly where you want the treated track and, without moving the cursor, insert it. They will both line up on the cursor. Now they need to be grouped together so that you can move them without losing synchronization. Click the first track so that it is selected and any other selection lost. Now, holding down the control button, click the other. They should now both be selected. Right click on one of the waves and click ‘group clips’ on the popup. You can do this from the ‘Clip/Group clips’ (CONTROL/G) menu item as well. Now, when you move them about they will move together, until you match the dialog in the best way.
You now take the handles at each end of the volume envelope on the good quality track and move them to the bottom, so that there is no output from the track. Listening to the mixed output, adjust the track gain for the treated track so that it fits behind the dialog. If it is supposed to be coming from behind a door, then you may wish to pan the track to one side or the other.
At the point in the dialog where you wish to make the transition, create a cross fade by adjusting the envelopes on both waveforms. You can adjust the gain of the incoming untreated track with the track volume control, or by using the volume envelope.
In the second example, the music recorded off a loudspeaker, the two files will be of different lengths. However, it is very easy to slide one file with respect to the other until you can hear that they are in synch. Now you can group the two files and treat the transition in the same way as before.
7.12 Multitrack music
Music recorded on a multitrack recorder can be transferred to your computer very easily, if you have a multitrack sound card with enough inputs. This can even be done digitally with the right gear. A common interface is a variant on the optical TOSLINK connector. The same plug is used, but an eight-channel digital signal is sent instead. A common type of multitrack recorder is the video cassette- based machine, which records eight digital audio tracks instead of a picture. These can be linked together to become 16-, 24-, 32-track, etc. recorders.
In cases of desperation, short pieces of music, say up to 5 minutes, can be transferred using only stereo equipment. The multitrack tape must be prepared by having a synchronizing ‘slate’ recorded simultaneously on all of the tracks just before the music. A convenient way of doing this, in a studio, is to use the slate talkback: the talkback that goes to the multitrack and not to the artists. A short ident, and a sharp sound like a coin tapping the talk-back mic, should be adequate. At the end of the music, a similar slate is recorded. The tracks can now be copied two at a time, either directly to the computer, or to a stereo recorder, preferably digital. When the tracks have been transferred to your computer, they should be split into their corresponding mono files. This will have been done automatically if you have used the multitrack facility to record them as two mono files rather than a single stereo file. Each wave file will begin with identical recordings of the slate. Each file is edited so that it starts with the most recognizable part of the ‘sharp’ sound. Sample accuracy editing is advisable, and practical, here.
Once loaded into the multitrack editor and lined up at 0:00:00:00 the files should now be back in synch. How much error has been introduced can be ascertained by examining the end slates. Usually, in my experience, the error, even with an analog multitrack, is better than two European Broadcasting Union (EBU) frames (2/25th second) which for many types of music (and performance) is good enough. Better accuracy can be obtain by using Adobe Audition's effects transforms to varispeed tracks digitally so that the error is corrected. The mix down can now be undertaken within Adobe Audition 2.0.
7.13 MIDI and video
MIDI and video files (AVI, WMV, ASF and QuickTime) can be loaded into the multitrack file and can be used as references for audio tracks. The picture is represented by a graphic of a series of frames like a sprocketless 35 mm film on the multitrack display itself (Figure 7.35). The display has three options; blank frames, a thumbnail of the first frame or selected frames throughout the video. Its track has no operational controls at the left. The actual picture can be seen in a separate window by clicking ‘Window/Video’. The audio has the full range of operational controls.
A MIDI file's notes are represented graphically but has only the mute and solo buttons available at the left along with a volume control. There is an additional ‘Map’ button that allows you to adjust the MIDI device and channel assignments. The MIDI part also has a volume envelope for adjusting it within the mix.
7.14 Loops
WAV files can be configured as loops. Right click the block and select ‘Loop properties’. Once so configured they can be dragged out to repeat for as long as required. The prime function for this is to use samples of drum beats, etc. to make up a rhythmic background for music balances. For speech and drama work this can be very useful for looping small sections background effects or actuality to extend them. However, beware that short loops soon set up their own rhythm. Longer loops can also become recognizable if run for a long time. For example, a horn sounding in a traffic noise loop will become startlingly obvious the third or fourth time around! Adobe Audition also uses .CEL files which are essentially .MP3 files with a .CEL extension. Each .CEL file has a header that contains loop information, such as the number of beats, tempo, key, and stretch method. The .CEL format avoids a potential problem with .MP3 files. During encoding, a very small amount of silence is added to the beginning, end, or both of an .MP3 file. The silence is very short – often only a few samples long. When you work with a loop, though, it's enough to throw off the entire loop. As it saves a .CEL file, Adobe Audition calculates how much silence will be added to the .MP3 file and writes this information into the .CEL header. Then, when Adobe Audition opens a .CEL file, it reads this information and automatically removes the silence from the file so that it loops smoothly.

Figure 7.35 AVI video and a MIDI file open in Adobe Audition 2.0