
Chapter 13
Relevant Parts of Windows
In This Chapter
![]() Understanding operating systems
Understanding operating systems
![]() Checking out the desktop
Checking out the desktop
![]() Finding the taskbar
Finding the taskbar
![]() Getting at the Start menu
Getting at the Start menu
![]() Working with notifications
Working with notifications
![]() Opening the Settings app
Opening the Settings app
![]() Accessing the Control Panel
Accessing the Control Panel
This book’s topic is primarily hardware, the clunky stuff. To make that clunky stuff work, you must interact with software. The chief piece of software in a computer is the operating system. On a PC, that operating system is Microsoft Windows. Frequently, you’ll find Windows rubbing into the PC’s various hardware parts.
What’s an Operating System?
As the top bird on the PC software totem pole, the operating system has several duties:
- Control the computer’s hardware: Hardware does nothing without software to tell it what to do, and the operating system is that software.
- Manage all the computer programs: The operating system isn’t the only software in your computer, but it is the software in charge of all the other software.
- Organize the storage system: The operating system is in charge of the computer’s memory, both long-term or mass storage, and short-term or memory. With the mass storage system, Windows is in charge of, organizes, and maintains all the files created and stored on the PC.
- Interface with you: As its final task, the operating system deigns to interact with you, the human. There is no requirement that this duty be a pleasant one.
All these tasks are important, but for this book the first task is key: The operating system controls the hardware. The mass storage system also plays a role, which is covered in Chapter 7.
-
 The operating system is the most important piece of software in your computer. It’s in charge.
 - The operating system comes with the PC when you buy it. Though you’re free to buy another operating system, you won’t.
-
 Other operating systems are available for the PC, but Windows defeated them all in a bloody battle involving treachery, betrayal, and sweeping romantic drama that only high school computer nerds would appreciate.
Windows and Its Gooey, Glorious Graphical Interface
One of an operating system’s duties is to interface with you, the human. Windows does that by presenting itself graphically. You use hardware to make it all work: the keyboard, mouse, and the computer monitor.
Windows itself employs various means and methods for you to interact with and control your PC hardware. It’s important to know where these items are located and how to use each one.
- This book is updated to cover Windows 10, but Windows 7 is also mentioned kindly. Windows 8 is deliberately ignored.
-
Windows sports a graphical user interface, or GUI. It’s pronounced “gooey.” Seriously.
Starting at the desktop
Windows 10 blessedly returns all your computer action to a central location called the desktop, illustrated in Figure 13-1. If the screen is overburdened with windows or other detritus, press the Win + D keyboard shortcut to whisk yourself instantly to the desktop.
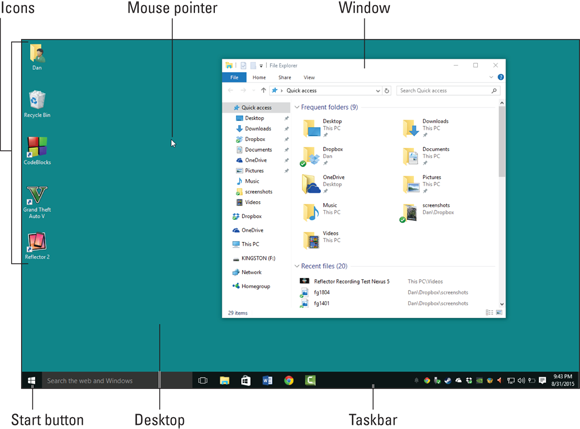
Figure 13-1: The desktop and all its trappings.
About the desktop you’ll find a fun festival of interesting goobers, as labeled in Figure 13-1. Other sections in this chapter offer details on the more useful items.
Of all the distractions, the desktop is the place where the actual windows appear. These windows contain your programs, games, and other fun computer whatnot. The windows can show up smaller than the desktop, but can also be unfurled to cover the entire screen.
Icons affixed directly to the desktop represent programs, files, and folders. Double-click an icon to open it. Programs run. Files open inside the program that created them, or inside the one used to view the file’s data. Double-click a folder to view its contents.
- It’s possible to run Windows 10 in Tablet mode, in which case the desktop is eschewed in favor of a full-screen approach to using all your programs and other Windows features. The Tablet mode button is found in the Action Center, covered elsewhere in this chapter.
- The desktop background is called the wallpaper. It can be a fancy image or picture, or a slide show, or dull and gray, as shown in Figure 13-1.
- Windows 7 featured desktop widgets, which displayed interesting information right on the desktop. Upon the introduction of Windows 10, these widgets were taken to a landfill in the Arizona desert and haven’t been heard from since.
-
The desktop is called a desktop for traditional reasons. Early graphical operating systems featured a desktop that really did look like a desktop, complete with paper pad, clock, glue, scissors, and other desktop-y things.
Working the taskbar
The action in Windows takes place on the desktop, but that action starts at the taskbar. The taskbar is optimally found lurking at the bottom of the screen, as shown in Figure 13-2. Here are some fun things to identify on the taskbar:
- Start button: This button is where you start programs and control Windows. See the next section.
- Cortana: A feature unique to Windows 10, Cortana can be used to search the PC or Internet or to bark out commands.
- Pin area: Use the icons on this part of the taskbar to quickly start programs or perform common tasks in Windows. The Task View icon helps manage windows on the desktop.
- Window buttons: A button appears on the taskbar for each window or program running in Windows. Those things are called tasks, which is why the taskbar is called the taskbar and not the candy bar. They appear along with the icons pinned to the taskbar.
- Notification area: This part of the taskbar shows tiny icons that help you run your computer or alert you to certain things going on.

Figure 13-2: The Windows taskbar.
The taskbar is locked into position, held at the bottom of the desktop by digital bolts made of the strongest bits. Still, the taskbar can be unlocked and moved wantonly to any screen edge. Further, the taskbar can hide itself, so it may not appear at all.
Accessing the Start menu
 On the left end of the taskbar, you’ll find the Start button — assuming that the taskbar is docked at its usual spot at the bottom of the screen. As its name suggests, the Start button is used to start things in Windows. What kinds of things? Trouble!
Seriously, click the Start button to display the Start menu, shown in Figure 13-3. It’s from that menu that you can start just about any program or activity in Windows.
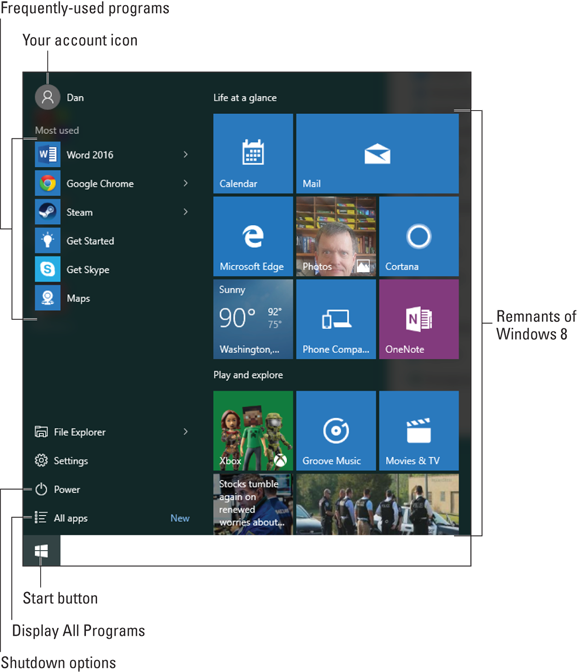
Figure 13-3: The Windows 10 Start menu.
To view all programs installed on your PC, click the All Apps item, shown in the figure. In earlier versions of Windows, the item is titled All Programs. Choose a program to start from the list that’s displayed. Some programs are found in folders on the All Apps list: Open the folder, and then click the icon to start a program.
- The Start menu looks different in Windows version 7 and earlier. Program icons appear on the left, and shortcuts to common Windows features are listed on the right side of the Start menu.
-
 A quick way to pop up the Start button menu is to press the Win key on your computer’s keyboard.
 - Press the Esc key to dismiss the Start menu.
Looking at the notifications area
Those teensy icons on the far right side of the taskbar aren’t just sitting around, waiting for a bus. Nope, they are part of a thing called the notification area. The icons, along with the current date and time, allow you to control various things in Windows, check in on running programs, adjust the volume, and perform other miscellaneous chores.
Figure 13-4 illustrates some of the more common icons. To see the full lot, click the upward chevron, as illustrated in the figure.
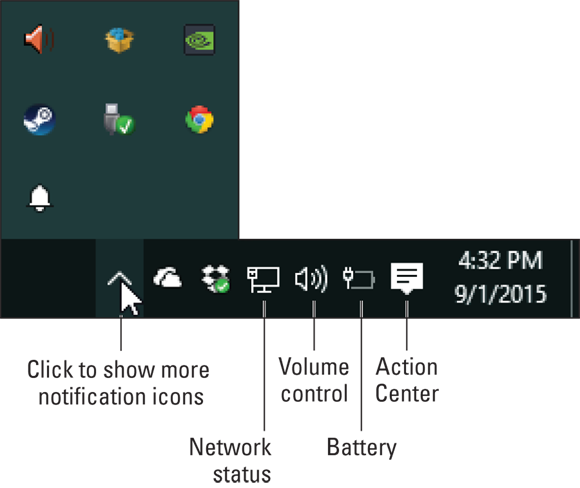
Figure 13-4: The notification area.
As with just about everything in Windows, the notifications area can be customized. You can see a lot of icons there, a few, or none. Also, icons may come or go. Follow these steps:
- Right-click the time display on the taskbar.
- Choose the Properties command from the shortcut menu.
-
In Windows 10, click the link Select Which Icons Appear on the Taskbar.
In earlier versions of Windows, click the Customize Notification Icons link to set how other items come and go in the notifications area.
Don’t let the random nature of the notifications area perturb you. I set all my PCs to show all the icons all the time, which works great on a widescreen monitor.
- You can see more information about the special programs by clicking, right-clicking, or double-clicking the wee icons. Windows is inconsistent on the action required, so try all three: click, right-click, and then double-click.
- Some icons display pop-up bubbles with messages in them as various things happen in Windows. Click the X in the pop-up bubble to dismiss the message.
Summoning the Action Center
The Windows 10 method for imparting important system information is to slide a notification in from the right edge of the screen. You can click that notification banner or display the Action Center to view all Windows 10 notifications.
Press the Win + A keyboard shortcut to summon the Action Center, shown in Figure 13-5. The top part contains notifications, updates, and alerts. The bottom part lists Quick Settings, which you can click or tap to turn a PC feature on or off.
- If your PC, laptop, or tablet features a touchscreen, swipe inward from the right edge of the screen to view the Action Center.
-
 You can also display the Action Center by clicking the Action Center notification icon, shown in the margin.
 -
Windows also sports a security screen called the Action Center. It’s easily accessible in Windows 7, but buried in the Control Panel for Windows 8 and 10. That Action Center provides a quick summary of the PC’s security settings. See Chapter 22.
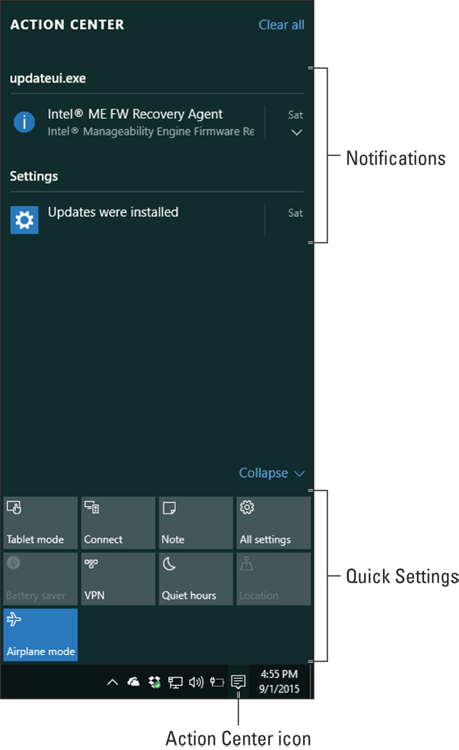
Figure 13-5: The Windows 10 Action Center.
Settings and Controls
To control various PC hardware settings, you’ll find yourself visiting one of two key locations in Windows. The first location, introduced in Windows 8, is the Settings app. The second location, common in all versions of Windows but hidden in Windows 10, is the Control Panel.
Using the Settings app
Apparently, it’s the desire of our Microsoft overlords to use the Settings app to control all aspects of Windows. This approach works for the most part, although the Control Panel remains as a backup.
To activate the Settings app, choose Settings from the Start menu. The keyboard shortcut is Win + I. Why the letter I? I dunno.
The Settings app window lists nine major categories, as shown in Figure 13-6. Choose a category, and then select a more specific subcategory from the items shown on the left side of the screen. Details appear on the right, as illustrated in the figure.
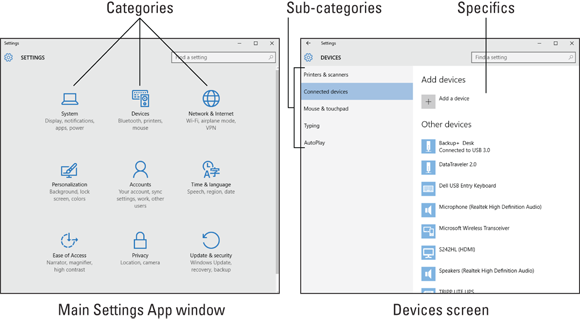
Figure 13-6: The Windows 10 Settings app.
After you’ve changed or checked a setting, close the Settings app: Click the X button in the upper right corner of the window.
-
Use the Quick Settings area of the Action Center to quickly change many PC settings — for example, the Connect setting used to access a Wi-Fi network.
- Because the Settings app is an app (as opposed to a program), it’s designed for both mouse and touch input. That explains why its appearance is large and friendly as opposed to more traditional Windows programs, which are tiny and intimidating.
- The Settings app may eventually lead you to the Control Panel. See the next section.
Visiting the Control Panel
For generations, the Control Panel has been the go-to spot for adjusting PC hardware and changing Windows settings. Until now.
Windows 8 eschewed the Control Panel for the Settings app, and Windows 10 gladly extends that tradition. The Control Panel isn’t gone, but it’s being shown the exit.
To summon the Control Panel in Windows 10, right-click the lower left corner of the screen. Up pops what I call the super-secret menu. Choose the Control Panel command from that menu.
In earlier versions of Windows, to display the Control Panel, click the Start button and click the Control Panel menu item on the right side of the Start menu.
The Control Panel is shown in Figure 13-7. Choose a category or link to make a setting. Sometimes, you have to click a few links to get down to the specific spot you need to access.
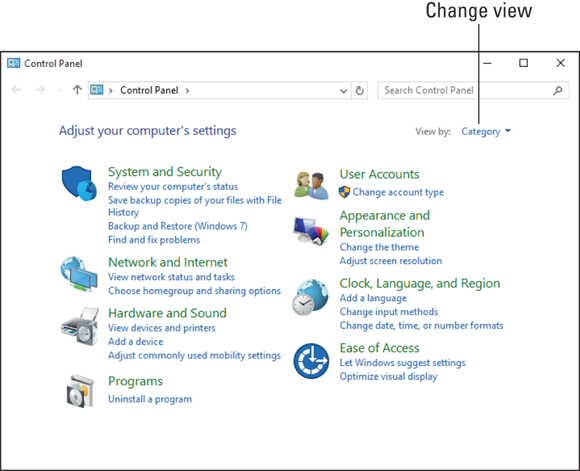
Figure 13-7: The Control Panel.
For example, to view a list of hardware devices available to your PC, open the Control Panel. Below the heading Hardware and Sound, click the View Devices and Printers link.
Close the Control Panel window when you’re done messing around.
- The Control Panel originally displayed its categories as a slate of icons. To restore that mode, click the View By menu and choose either Large Icons or Small Icons from the menu. Many Windows old-timers find this method faster than using Category view, although most documentation refers to Category view.
-
According to the nerds, eventually the Control Panel will be replaced by the Settings app in future Windows updates.