
Chapter 14
Programs On Your PC
In This Chapter
![]() Understanding software
Understanding software
![]() Adding software to your PC
Adding software to your PC
![]() Starting programs
Starting programs
![]() Adding programs to the taskbar
Adding programs to the taskbar
![]() Installing software from the Internet
Installing software from the Internet
![]() Installing software from media
Installing software from media
![]() Removing software
Removing software
The PC is a lovely piece of computer hardware, but without the proper software, that hardware just sits pretty and consumes electricity. Obviously, software is important to the PC. In fact, beyond the operating system, the software consists of those programs you use to make the computer a useful and productive tool.
Software Nomenclature
The term software generally refers to computer programs. So if it’s a program, it’s software. And if someone is talking about software, they’re pretty much talking about one or more computer programs.
Software exists in many forms, which makes it a broad topic. For example, the programs encoded on the chips inside your PC help the computer to start, control various peripherals, and offer basic functionality to the hardware. That’s all software, often referred to as firmware.
The operating system is software, and it’s the most important piece of software because it controls the entire computer.
Beyond the firmware and the operating system, software consists of those programs you run to get work done, to be social, to goof off, and so on. This software is referred to by a collection of specific terms:
- App: An abbreviation for application, although the term technically describes smaller, specific software found on a smartphone or tablet. Apps in Windows 10 are designed to look good on a PC, laptop, tablet, or mobile device.
- Application: Traditionally refers to productivity software. An application is a program that does the work or creates something. For example, word processing is a software application.
- Driver: A special type of program that controls specific hardware. For example, a video driver is required for the operating system to use the PC's graphics hardware.
- Game: Software for fun, of course.
- Malware: Refers to nasty software — the viruses, Trojans, spyware, and other nasty programs that are designed to cause you angst. No one installs this type of software on purpose.
- Program: A general term for all software. Whether it’s an app, a game, or a driver, it’s a computer program.
- Utility or tool: Software designed to help you manage the computer or diagnose or fix problems. For example, you may use a tool to optimize the performance of your computer’s storage system.
No matter what the term, it’s all software on your PC.
Run That Program
Your computer day involves more than just staring blankly at the monitor. Of course, I’m assuming that your supervisor is watching while you use the computer. When you work by yourself or are at home, please feel free to stare blankly at the monitor. When you want to get something done, you need to rustle up some programs.
Hunting down programs in Windows
Microsoft tries to make things super easy for Windows users. Rather than have one boring, standard way to start a program — which would be easy and simple — you have a multitude of options.
In each case, start a program by locating its icon and clicking or double-clicking that icon. Here’s where to hunt:
- The desktop: Locate a program icon or shortcut affixed to the desktop. Double-click to open the icon and run the program.
- The taskbar: Programs pinned to the taskbar are opened with one click. I keep my most favorite programs on the taskbar.
- The Start menu: Programs you open frequently appear atop the Start menu, on the right. Other programs are pinned as tiles on the left. Click once on the program icon or tile to run the program.
- The All Apps menu: Click the All Apps item on the Start menu to view a list of all apps installed on your PC. Click an item to run that app. Sometimes, you have to open a folder to find the app you’re looking for.
Figure 14-1 illustrates the All Apps menu in Windows 10. The tiles appear on the right side of the Start menu, even when the All Apps menu is displayed.
- Press the Win key to see the Start menu.
- The All Apps menu is named All Programs or just Programs in some versions of Windows.
- Some programs or apps may run automatically. For example, a program may start up when you first sign in to Windows.
- Programs that run “in the background” may pop up on the screen from time to time. For example, the Steam online gaming system always runs, even though you don’t see its window on the desktop.
- Clicking on a taskbar notification might launch a program.
- Newly installed programs appear highlighted on the All Apps menu. That way, you can easily find stuff you’ve just installed.
-
 The All Apps menu doesn’t show all the programs on your PC, but rather all the most useful ones. Though your computer has thousands of programs, you use only a handful regularly.
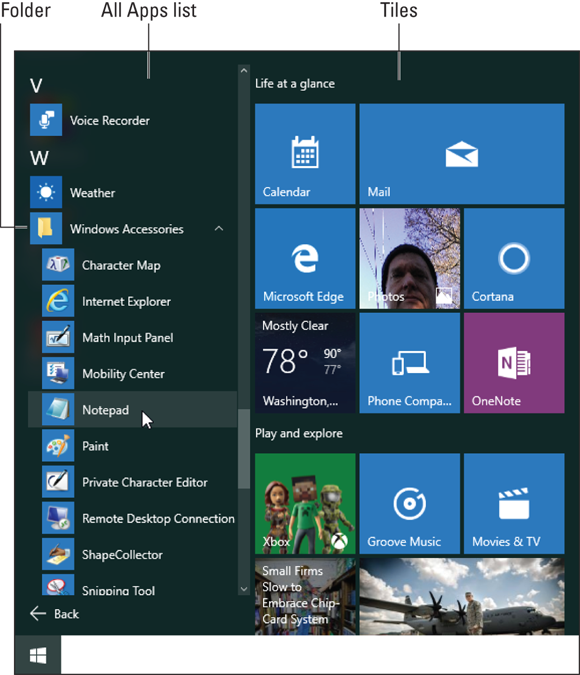
Figure 14-1: The All Apps list.
Starting an app from Tablet mode
If you run your PC with Tablet mode active, you see things the way people who disliked Windows 8 saw things: The Start menu is replaced by a tile-spangled screen. All programs and apps run full-screen in Tablet mode.
To activate Tablet mode in Windows 10, follow these steps:
- Press Win + A to summon the Action Center.
- Click the Tablet mode tile.
Tablet mode is illustrated in Figure 14-2. Officially what you see — tiles and other icons — is called the Start screen. To start an app, click a tile, as illustrated in the figure.
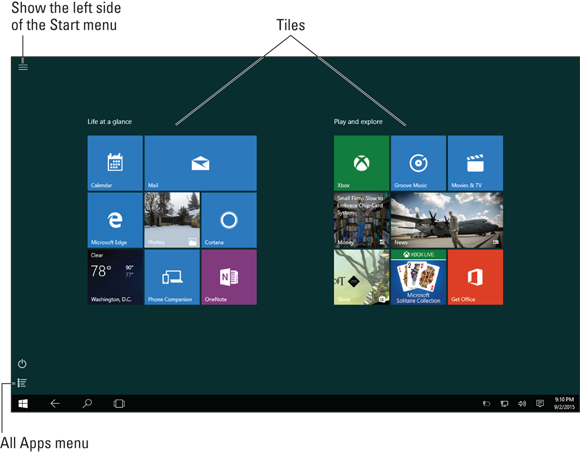
Figure 14-2: Windows 10 Tablet mode Start screen.
The All Apps menu is still available: Click the All Apps button, illustrated in Figure 14-2. It works the same way as described in the preceding section.
To exit Tablet mode, repeat the steps in this section.
Finding a program when you know its name
 Sometimes you know the name of the program you want to start. A fast, easy shortcut is to press the Win key to pop up the Start menu and just start typing the name.
For example, to run the Notepad program, press the Win key and, on the keyboard, type note — that’s all you need to type because Notepad appears at the top of the Start menu. Press the Enter key to launch the program.
Pinning a program
The best way to start a program is to click its icon on the taskbar. Second best is to double-click an icon on the desktop. Third best is to find a program right on the Start menu. How do these programs relocate to such prime Windows real estate? They are pinned.
To pin a program to the taskbar or Start menu, follow these steps:
-
Click the Start button or press the Win key.
Up pops the Start menu.
- Click All Apps in Windows 10; otherwise, choose All Programs.
- Right-click the program you want to pin to the taskbar, desktop, or Start menu.
-
Choose the location where you want to pin a copy (or shortcut) for the program.
Your options are Pin to Start and Pin to Taskbar.
If the item is already pinned, the commands (refer to Step 4) read Unpin instead of Pin. That’s the command you choose to remove an item from that specific location.
Placing a program shortcut on the desktop is a bit trickier, and it would be nifty if Microsoft had placed that shortcut on the menu in Step 4, but they didn’t. So in Step 4, choose the Open File Location command. A File Explorer window appears with the program file highlighted. Right-click that icon and choose Send To ⇒ Desktop (Create Shortcut).
- Programs pinned to the Start menu become tiles, shown on the right side of the menu. These tiles also appear on the Start screen when the PC is using Tablet mode.
- Not every program’s shortcut menu features the Open File Location command.
- To remove an icon from the desktop, drag it to the Recycle Bin.
-
I pin only my most frequently used programs to the taskbar; maybe only three or four items. Any more and the taskbar becomes too crowded.
Install and Remove Programs
Computer programs don’t magically spawn on your computer, growing like mutating fungus in some post-apocalyptic nightmare. Nope, you must invite the programs in. Invitations are extended directly, obtained from the Internet as a download, or installed from media such as a thumb drive or an optical disc.
Just as you let software in, you eventually let software back out of your computer. The process is called uninstalling, and it rarely involves the use of high explosives.
Obtaining software from the Internet
The most common way of installing software today is over the Internet. You either browse to a website where you can download the software or you obtain download instructions inside a software box you bought at a brick-and-mortar store.
Generally speaking, the process works like this:
-
Purchase the software, if required.
Sometimes you can download a free trial version. Or you can obtain the real version and use it in a limited capacity until you pay for and register the software.
- Visit the web page that contains the download link.
-
Click the link or graphical image that initiates the download.
 Pay very close attention at this point! Ensure that you’re obtaining the program you want and no extras, add-ons, toolbars, or other programs. You may have to uncheck items on the page to decline these offers. Don’t be too hasty with the installation options, or else you may end up stuck with some software on your PC — software that you don’t want and which is trouble to remove. If you’re presented with a choice of different types of files to download, choose the program file link, which often ends with the EXE filename extension. Avoid choosing a compressed folder, Zip, or archive file, because doing so involves extra steps before you can actually install and run the program.
 -
Mind the security warning.
Some web browsers alert you whenever software attempts to flow into your computer. You must grant permission; otherwise, who-knows-what might be downloaded into your PC.
 If you ignore my warning in Step 3, the web browser and PC security programs won’t catch the “bonus” software you download. Technically — and legally — you are granting permission for that extra software to be installed.
 -
Sit and watch as the file is copied from the Internet to your computer.
Doh-dee-doh-doh.
By the way, what’s downloaded is often an install or setup program, which will configure and install the software you’ll eventually use.
- Choose the option to run the program.
- If you're greeted with a security warning, click the Allow button.
-
Obey the directions on the screen to finish the installation.
The directions are specific to whatever it is you're installing.
After installing the program, you can run it or do anything you would normally do with any software installed on your computer. The only difference is that the new software was obtained from the Internet instead of installed from an optical disc or other media.
- In Windows 10, freshly installed software appears at the top of the All Apps list.
- The software downloaded from the Internet can be free, a trial version, a one-time paid version, or a subscription.
-
If the software requires a product key or purchase code, write down that code! If the information arrived in an email message, print out the message. Keep that information in an easily accessible location.
- Get used to obtaining software from the Internet. It’s the way most software will be installed on PCs in the future. Well, actually now. It’s the way software is being installed right now.
-
If you search for hacker tools or free movies, music, books, or other illegal material, odds are good that you'll end up at an illegitimate website. The result may be a virus or another infection on your PC, not the software you wanted.
Installing a program from external media
In the physical realm, new software is purchased at the store, or it arrives bright and shiny from a friendly, sweaty guy driving a delivery truck. Either way, your job is to get the software out of the box and into your PC in a fully functional state. Here’s how to do that:
-
Open the software box and locate the installation media.
If more than one optical disc is present, note in which order they’re used; the discs should be numbered, and you start with the first disc.
-
Insert the installation media into an appropriate drive on the PC.
If you’re lucky, the installation program runs automatically after the media is inserted. Otherwise:
-
If you see a notification about what to do with the media, choose the option to install the software.
Sometimes this process involves two steps, as illustrated in Figure 14-3. First, you must acknowledge the new media, and second, you direct Windows in what to do.
-
If prompted with a User Account Control (security warning), click the Yes button to confirm installation.
Only when you’re not actively installing something would you refuse the request.
-
Follow the instructions on the screen.
Work through the directions on the screen to install, set up, and configure the new software.
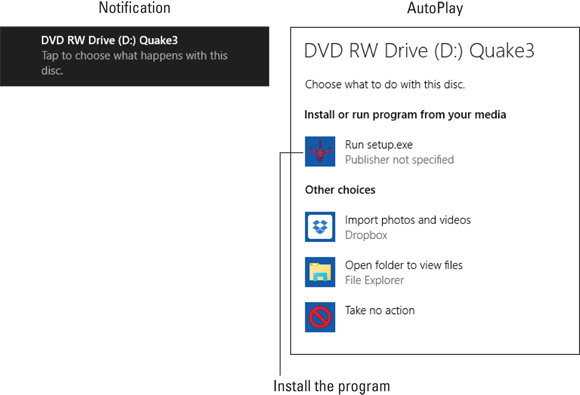
Figure 14-3: Installing software from an optical disc in Windows 10.
It takes time to learn new software — even computer games. It’s natural to be frustrated at first. That’s okay; you’re only human. Just keep trying, and eventually you’ll learn the program. Of course, buying a good book about the software is an excellent idea!
- Generally speaking, few — if any — stores let you return computer software after you open the box.
- I recommend keeping the box. Use it to store the installation media as well as the manual or whatever trivial items came in the box.
- If the software requires a registration number or installation code, keep it in the box or another handy location.
Uninstalling a program
Nothing makes Windows more irate than when software is rudely and abruptly removed from your computer. Don’t use pliers, and especially don’t use a periosteal elevator. Instead, follow the proper uninstall procedure.
In Windows 10, you use the Settings app to uninstall software. Obey these directions:
-
Open the Settings app.
Press the Win + I keyboard shortcut.
- Click the System button.
-
On the left side of the screen, choose Apps and Features.
The right side of the screen fills with a list of all installed apps on your PC. It may take time for the list to populate.
-
Click to select the program or app you want to evict.
Two buttons appear below the item’s entry: Move and Uninstall.
-
Click the Uninstall button.
A pop-up featuring a second Uninstall button appears.
- Click the second Uninstall button to confirm the program or app’s removal.
- If prompted with a security warning, click the Yes button to proceed.
-
Continue following directions on the screen.
Some software removes itself instantly, while others attempt to quiz you on removal, set options, and perhaps offer another series of buttons to click.
In Windows 7 and earlier versions of Windows, follow these steps to remove software:
-
Open the Control Panel.
Directions to the Control Panel are found in Chapter 13.
-
Click the Uninstall a Program link, found below the Programs heading.
The Programs and Features window appears, listing all software installed on your PC.
- Select the program you want to uninstall.
- Click the Uninstall or Uninstall/Change button on the toolbar.
- If prompted by a User Account Control, type the administrator password or click the Continue button to proceed.
-
Continue reading instructions on the screen to uninstall the program.
The uninstall directions vary from program to program, but eventually the program is removed.
Use these steps to uninstall software. Deleting a shortcut icon doesn’t uninstall a program. Deleting a program file doesn’t uninstall the software, either. No, follow the steps in this section to properly, officially, finally remove software.