
Chapter 17
The Weird World of Networking
In This Chapter
![]() Understanding networking
Understanding networking
![]() Reviewing network hardware
Reviewing network hardware
![]() Choosing a wireless network
Choosing a wireless network
![]() Setting the network type
Setting the network type
![]() Visiting the Network window
Visiting the Network window
![]() Assigning a shared folder to a drive letter
Assigning a shared folder to a drive letter
![]() Working with shared folders
Working with shared folders
![]() Sharing media
Sharing media
Even if it’s the only computer in the room, if the PC is connected to the Internet, it’s part of a network. That makes networking a basic part of owning a computer, like having a printer or a sore neck. Because networking can be vast, uncharted, dangerous ground on which to tread, you better bone up on some basics before you do something foolish.
Why Network?
Networking is about sharing. Specifically, a network allows multiple computers to share their resources. These resources include mass storage devices, printers, media players, and modems. The modems (and it should be only one modem, but my editor believes in parallel lists) are what provide Internet access.
Like everything computerish, networking involves hardware and software. The hardware part is included with your computer as well as specific network components described elsewhere in this chapter. The software part is supplied by Windows.
- Networks come in wired and wireless varieties. The difference is in how you connect to the network.
- A non-network way to access the Internet is to use the old phone system and a dialup modem. This type of connection is very rare these days. Odds are good that if your PC uses a dialup connection, it’s already configured and ready to go. If so, don’t mess with it!
Network Hardware
The nifty thing about network hardware is that once you set it up, you’re done. Add the modem and the gateway and connect whatever cables you bother to use, and the network itself is complete. It may not work all the time, but you seldom if ever need to reconnect or reconfigure network hardware.
- Most networks today are wireless, meaning that connecting to the existing network hardware is a software operation. See the later section “Connecting to a wireless network.”
-
 The best way to fix a network is to turn off the modem and gateway, wait, and then turn each one on again: Turn on the modem. Turn on the gateway. This procedure fixes most network woes.
Reviewing the network configuration
A typical computer network setup includes several items, some of which have oddball names. Here’s the list:
- Computers, printers, phones, tablets
- The networking adapter, or NIC
- The cables (or not)
- The gateway or router
- A broadband modem
These items are illustrated in Figure 17-1, which lovingly maps out the parts of a typical computer network. As you can see, it’s possible and pretty much standard to mix wired and wireless devices on the same network.
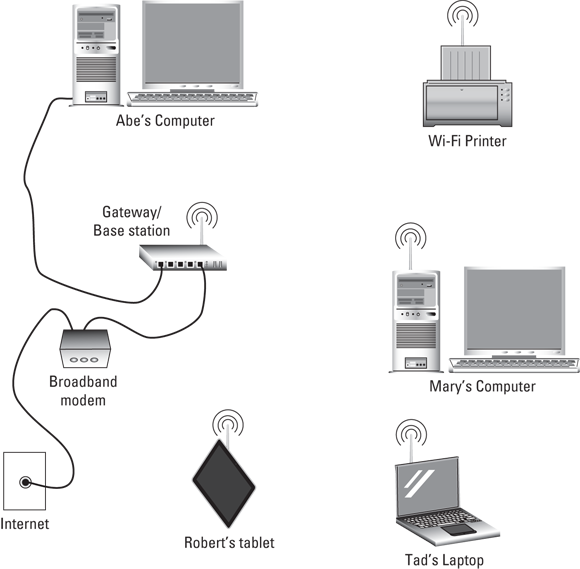
Figure 17-1: A typical computer network.
The network devices — computers, printers, and mobile devices — each sport a NIC, or network interface card. That’s the hardware that connects the device to the network, either wired or wirelessly.
For a wired network, cables connect all network devices to a central location. One end of the cable connects to the PC’s Ethernet jack. The other end plugs into the gateway. If the gateway runs out of jacks, a switch or hub can be added to accommodate more connections.
At the center of the computer network is the gateway. It's the location where all the network devices connect. Wires connect the wired network devices; magical leprechauns connect the wireless devices.
The gateway’s job is to coordinate local network activity and to communicate with a larger network, the Internet. It may also provide firewall support, which helps prevent bad guys on the Internet from accessing the computers on your local network.
The final piece of the network puzzle is the broadband modem. It bridges the connection between the gateway and the Internet.
- NIC is pronounced “nick,” as in “nick-nack paddywhack.”
- All PCs sold today come with a wired NIC. Laptops come with both wired and wireless NICs.
- You can add a wireless NIC to a desktop PC by connecting in a USB Wi-Fi adapter or installing a Wi-Fi expansion card. See Chapter 10.
- For a wired NIC, you plug the network cable into the Ethernet adapter on the PC’s rump.
- Wireless NICs show no visual parts, although some desktop PC wireless NIC’s feature one or more antennae.
- Computer network cable comes in a variety of lengths and in several bright and cheerful colors.
- There is no incorrect way to plug in a network cable; you can plug either end into the computer’s NIC. Plug the other end into the gateway. Snap, snap.
- Network cables are often cleverly disguised, hidden behind furniture or drapery, or run through walls and ducts. The presence of such ugly cables has motivated most people to use Wi-Fi instead of wired networking.
- Several types of broadband modems are common: cable, DSL, satellite, and WiMAX. Your ISP supplies the modem, either for lease or sale.
- You should leave the broadband modem on all the time. Oh, what the heck: Leave the gateway on all the time as well. These devices are designed to operate ’round the clock.
Setting up a gateway
If you’re setting up your own network, one task is more important than all the others. That’s the proper configuration of the gateway, or “router.” (You can call it a router all you want, but it’s a gateway.)
The two items you must set are the administrator’s password and the Wi-Fi password. If you neglect to set either one, you run the risk that your friendly neighbors might initiate a hostile takeover of your network. That’s a bad thing.
Directions for configuring the gateway are found on a flimsy sheet of paper that you probably lost when opening the box. The steps work like this:
- Plug in the gateway so that it has power.
-
Connect the gateway to the modem.
The modem plugs into a special jack, often labeled WAN, which stands for wide area network.
- Connect any wired devices to the gateway.
-
Use a connected computer to access the gateway’s web page.
You type the gateway’s IP address into your PC’s web browser window. The address might be supplied on that flimsy sheet of paper you lost. It looks similar to 192.168.0.1 — a series of numbers.
-
Log in to the gateway.
Use the default account name, usually admin, and the default password, either admin or password or whatever’s printed on the flimsy sheet of paper.
-
Change the gateway’s administrator password.
This is an important step. The bad guys know the default password for every router. It’s the first thing they try.
-
Assign a network name for the Wi-Fi network, set up security, and set a Wi-Fi network password.
How you perform this step varies, but all three tasks are important, especially the Wi-Fi password.
-
Write down the admin and Wi-Fi network passwords.
Write them down on a sheet of paper. Tuck that paper beneath the gateway so that you’ll always know where it is. And don’t put anything else on the paper that may confuse you in the future; just write down and label the passwords you set and put nothing else on the paper!
-
Continue obeying directions to configure the gateway.
Often the final step is to restart the gateway, which is done via software. Only unplug the gateway if you’re required to do so for maintenance or troubleshooting.
The good news: Once you’ve configured the gateway, you’re done. The only other time you need to access it is for an update or when troubleshooting your network.
- Don’t get cute or fun with the Wi-Fi network password. Use something complex and tough to guess.
- Bookmark the gateway’s website; save it in your PC’s web browser.
- Setting Wi-Fi network security can be a tough decision. Trust me, few people know what those acronyms mean. Definitely use security, and most likely the suggested security setting is best.
-
 When you need more wired connections for the gateway, obtain a switch. It’s basically just a gang of Ethernet ports, which let you add more computers, printers, and other gizmos to the network. The switch helps you expand a wired computer network.
 - If the wireless signal can’t reach everywhere in your home or office, get a Wi-Fi extender. Any gateway works, actually. Use the main gateway’s configuration web page and direct it to extend its network to the second Wi-Fi gateway. This type of setup is called a wireless distribution system, or WDS.
The Network Connection
With the hardware in place, you might ask the question, “How do I connect to the network?” Good question, although you don’t connect to the network — your computer does. This ain’t The Matrix.
Connecting to a wired network
Windows automatically finds any network into which the PC is plugged. So, by turning on your computer and having that network hose connected, you’re more or less done with network configuration for a wired connection.
Upon the initial connection, you may see a prompt asking you about the network type. Choose the option Private or Home for a home or office network, or any location you know is secure. Otherwise, or when in doubt, choose Public. See the later section “Checking the network type” for more details.
Connecting to a wireless network
Accessing a wireless, or Wi-Fi, network involves more steps than connecting a wired network. Primarily, you must choose the Wi-Fi network and enter the password. The good news is that Windows remembers Wi-Fi connections, so once the initial connection is made, the PC reconnects automatically to the Wi-Fi network whenever it’s in range.
In Windows 10, follow these steps to access a Wi-Fi network:
-
Open the Settings app.
The keyboard shortcut is Win + I.
- Click the Network & Internet button.
- Ensure that Wi-Fi is chosen from the left side of the window.
-
Choose a wireless network from the list.
Networks are shown by their name and signal strength. Those at the top of the list have a better connection.
-
Place a check mark by the option Connect Automatically.
This option ensures that the laptop automatically reconnects to the network whenever it’s in range.
- Click the Connect button.
- Type the network password and click the Next button.
-
If you’re on a home or work network, click the Yes button; otherwise, click No.
Click Yes to set the Private or Home network type. Click No for a public Wi-Fi network, such as in a café or at the airport. See the later section “Checking the network type.”
In Windows 7, follow these steps to connect to a Wi-Fi network:
-
Click the Wireless Networking icon, found in the notifications area.
 When you click the Wireless Networking icon, a list of available wireless networks appears, as shown in Figure 17-2.
 -
Choose a network from the list.
The list shows the network name and its signal strength.
- Place a check mark by the Automatically Connect option if you plan to use the same wireless network in the future.
-
Click the Connect button.
Windows attempts to “make friendly” with the wireless network.
-
If you see a warning that the network is unsecured, click the Connect Anyway option.
This message is common for certain free wireless networks that don't require a password for connection. Click the Connect Anyway option to proceed.
- Enter the network’s password, if you’re prompted to do so.
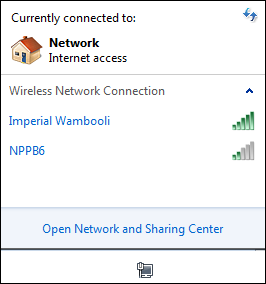
Figure 17-2: Available wireless networks.
Some public Wi-Fi networks require that you log in or pay to complete the connection process. If you’re unsure, open a web browser window and navigate to any web page. If you’re successful, the connection is good. Otherwise, heed the directions on the web page that appears to sign in and complete the connection.
Connecting to a hidden Wi-Fi network
Some Wi-Fi networks don’t broadcast their name. It’s hidden for security reasons; obviously, you can’t access the network unless you know the name. Assuming that such a Wi-Fi network is in range, and you have the name, follow these steps to access it:
-
Open the Control Panel.
In Windows 10, press the Win + X key combination and choose Control Panel from the super-secret menu that pops up.
-
Below the Network and Internet heading, click the View Network Status and Tasks link.
The Network and Sharing Center window appears.
- Click the link Set Up a New Connection or Network.
- Choose the Manually Connect to a Wireless Network option, and click the Next button.
-
Type the network name in the Network Name box.
You obtain the name from whoever is in charge of the network. The name is also known as an SSID.
-
Fill in the rest of the information as provided by the same source as the network name.
Set network security and encryption and whatever other options appear.
-
Ensure that the option Start This Connection Automatically is enabled.
This step saves you some time by preventing you from having to repeat these steps later.
-
Click the Next button.
Windows goes out and finds the unnamed wireless network.
- Choose the Connect To option.
At this point the network has been added to the list of visible Wi-Fi networks. You must still connect to the network and enter a password. Refer to the preceding section.
The network name is referred to as the SSID, where SSID stands for Service Set IDentifier.
Checking the network type
One of the most important things you do when first connecting to a network is to set the network type. This step is about security. Obviously, you want more network security when connecting to the car mechanic’s Wi-Fi than you do when connecting to your home network.
In Windows 10, the two network types are: Public and Private. The Public setting offers more security, which you need when accessing a public network. The Private setting is best for home or the office.
To review the current network type, follow these steps:
-
Open the Control Panel.
In Windows 10, right-click the Start button and choose Control Panel from the super-secret pop-up menu. In Windows 7, choose Control Panel from the Start menu.
-
Below the Network and Internet heading, click the link View Network Status and Tasks.
The currently connected network is shown in the Network and Sharing Center window, shown in Figure 17-3. The current network type is displayed beneath the network name, such as Private Network, shown in the figure.
-
Close the Control Panel window when you’re done.
Or, if you need to reset the network type in Windows 7, keep reading in the next section.
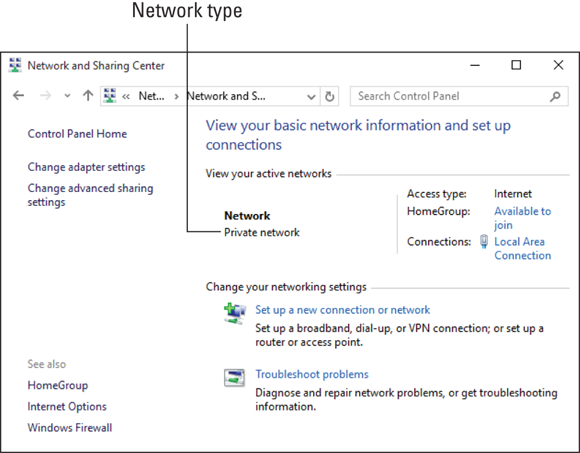
Figure 17-3: The network connection type revealed.
In Windows 7, the network types are Home, Work, and Public. The Windows 7 Home type is the same as the Windows 10 Private type. The Windows 7 Work and Public types are the same as Public in Windows 10.
Resetting the network type
Say you goof and accidentally choose Public for your home network or Private (or Home) for Starbucks. If so, you need to change the network type.
In Windows 10, to change the network type for a wireless connection, you must disconnect from the network and forget that connection. Only when you reconnect to the network can you choose another type. See the later sections “Disconnecting from a network” and “Forgetting a Wi-Fi connection.”
To change a wired connection’s network type in Windows 10, follow these steps:
- Press Win + I to summon the Settings app.
- Click the Network & Internet button.
- On the left side of the window, choose Ethernet.
-
On the right side of the window, click the tile that reads Local Area Connection.
The tile may have a different name, but it’s the one at the top of the right side of the window.
-
To make the network private, set the toggle switch to the On position; for a public network, ensure that the setting is Off.
The setting controls network access to your PC, so for a private or home network, turning on the setting is fine; for a public network, you want to turn off that setting.
In Windows 7, follow the steps from the preceding section to display the Network and Sharing Center window. Click the network type link, such as Home Network or Private Network. Choose a new network type from the Set Network Location window.
 Always choose the Public network type when you’re using your PC or a laptop in a public location. This choice is the most secure.
Disconnecting from a network
There's no need to disconnect from a wired network. Just leave the cable plugged in all the time and Mr. PC will be fine.
You can manually disconnect from a wireless network by turning off the PC or simply moving out of range. Otherwise, follow these steps to disconnect from a network in Windows 10:
- Open the Settings app and click the Network & Internet button.
-
Click the currently connected wireless network.
The word Connected appears below the network name.
-
Click the Disconnect button.
The Wi-Fi network connection is broken.
To manually disconnect from a wireless network in Windows 7, click the Network icon in the notification area and choose the wireless network from the pop-up window. Click the Disconnect button.
The wireless network will automatically reconnect if you’ve configured it to do so, as recommended in this chapter. That happens if you move out of range and then back into range, or if you restart the computer.
Forgetting a Wi-Fi connection
Windows remembers which Wi-Fi networks your computer has accessed. That way, you can reconnect to an established network instantly — unless you direct Windows to forget about a network.
To forget a Wi-Fi network connection or simply review the list of saved networks, follow these steps in Windows 10:
-
Open the Settings app.
The keyboard shortcut is Win + I.
- Click the big button labeled Network & Internet.
- On the right side of the window, click the Manage Wi-Fi Settings link.
-
Scroll down the list to locate the heading Manage Known Networks.
At this point, you could be done and simply behold the list of former Wi-Fi sweethearts. If you need to purge a network, such as that motel in Bakersfield you know you’ll never return to, continue with:
- Click the name of network to forget.
-
Click the Forget button.
Windows discards the network information, which includes the saved network password.
Of course, you can always reconnect to any network. You need to supply the password again, as well as set the network type, as described elsewhere in this chapter.
On the Network
Networking is about sharing resources. To view those resources shared on the network, open the Network window:
- Press Win + E to summon a File Explorer window.
-
From the items on the left side of the window, click Network.
You see shared network resources, similar to what’s shown in Figure 17-4.
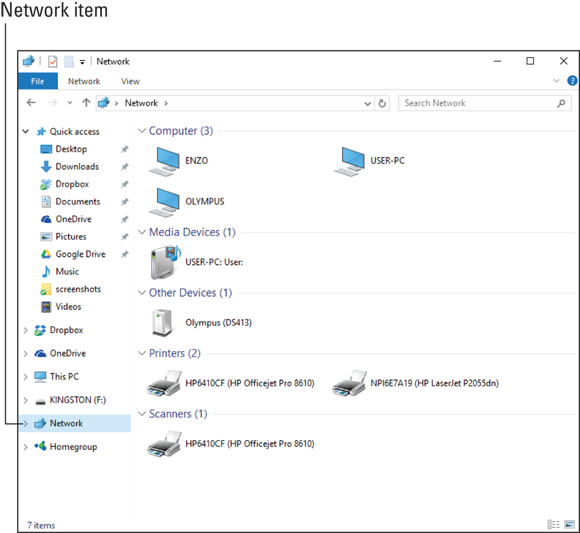
Figure 17-4: The Network window.
The Network window organizes available network resources by category. In Figure 17-4, you’ll find icons for computers, media-sharing devices, storage devices, network printers, and even a scanner.
- Access to network resources, such as those shown in Figure 17-4, happens primarily over Private (or Home) networks. See the earlier section “Checking the network type” for details.
- Available network printers are accessed automatically. See Chapter 11 for details on printing.
- When your computer is connected to a public network, you won’t see as many resources in the Network window. That’s because Windows automatically cranks up the network security and restricts network access on such networks.
Accessing a network folder
You access a folder elsewhere on the network just as you would access any folder on your PC’s mass storage system. The difference is that you need to browse to the folder from the Network window and sign in to the other system to use the folder. Follow these steps:
-
Open the Network window.
Refer to the steps in the preceding section.
-
Open a computer icon to see which folders it's sharing.
If the computer shows no shared folders, try another or contact the computer user and order them to buy a copy of my book and learn how to share a folder, as covered in the later section “Sharing a folder.”
-
Double-click a folder to access its contents.
Folders with security — which should be all of them — require a user account and password for full access.
- Log in to the shared folder; type your username and password.
-
Browse the files in the shared folder.
At this point, using the folder works like using any other folder on your PC.
A better way to share files is to use cloud storage, as described in Chapter 16. It’s possible to share a whole folder with someone else, in which case you both have access to the folder’s files. Cloud storage services work across a local network as well as the Internet.
Mapping a network drive
If you find yourself accessing a shared network folder all the time, consider mapping that folder to a drive letter in your PC’s mass storage system. Follow these steps:
- Press Win + E to open a File Explorer window.
-
In Windows 10, choose This PC from the left side of the window.
This step isn’t necessary in Windows 7, because you already see the My Computer window. Like the This PC window, it lists local storage and network locations.
- In Windows 10, click the Computer tab.
-
Click the Map Network Drive button.
The Map Network Drive dialog box appears.
-
Choose a drive letter.
Pick something from the list of available letters. I recommend using something high-up so that the mapped network drive won’t interfere with any removable storage you add to your PC. For example, I map drive letter V to my network file server.
-
Click the Browse button.
A mini network window appears, listing available storage devices on the network. These are locations flagged for shared folders, as described in the preceding section.
- Select a network computer or server and then a shared folder.
-
Type the username and password to access the network resource.
You must have an account on the other computer, or know the username and password, to map a shared folder.
- Ensure that the Reconnect at Sign-in (or Logon) option is checked.
- Click the Finish button.
You see a new “drive” appear in the window, one with the letter you assigned in Step 5. Opening this drive icon displays the contents of the shared folder on the network.
Sharing a folder
If you want other people on the network to have access to your PC’s mass storage system, well, they can’t. But they can have access to a folder on your computer. To do so, you must share the folder. Sharing makes the folder — and its contents (all files and subfolders) — available to all other computers on the network. Here’s how to share a folder:
-
Right-click the folder you want to share.
You must be in the parent folder to share one of its subfolders. See Chapter 15 for details on how parent and subfolders work.
-
Choose Properties from the folder’s pop-up menu.
The folder's Properties dialog box appears.
- Click the Sharing tab.
- Click the Advanced Sharing button.
-
Put a check mark by the option labeled Share This Folder.
You can set a share name, which helps to better identify the folder on the network.
If you want others to have full access — to add as well as delete files — click the Permissions button and place a check mark in the Allow column by the Full Control item. -
Click OK.
The folder is now shared.
- Click the Close button to dismiss the folder's Properties dialog box.
Other PCs can now access the folder on the network, as described in the preceding section.
- To unshare a folder, repeat the steps in this section, but in Step 5 remove the check mark.
-
Others can access the shared folder only if they know your username and password on your computer. You can add an account for them on your PC, which can be used to access the shared folder.
-
 Don’t share an entire storage device, such as Drive C. Don’t share your entire Home folder. Doing so is a security risk. Share only specific folders, such as a project folder.
Accessing shared media
Some PCs, as well as specific network devices, cough up their media for network sharing. For example, you can access photos, videos, or music on another computer on the network. The topic is called media sharing.
If any PCs or other gizmos on the network have activated media sharing, you can use a media player to access that media. The most obvious way to do so is to open an item listed in the Network window under Media Devices. Follow the directions on the screen to determine what to do next, such as choose an app to access the pictures, music, or video.
Activating media sharing on your PC
No computer willingly coughs up its media for sharing. You must command Windows to provide your PC’s media as a resource, open and shared on the network. Heed these directions:
-
Open the Control Panel.
In Windows 10, press Win + X. In Windows 7, press the Win key. Choose Control Panel from the menu.
-
Below the Network and Internet heading, click the link View Network Status and Tasks.
The Network and Sharing Center window appears.
- From the left side of the Networking and Sharing Center window, click the link Change Advanced Sharing Settings.
-
Scroll down the list to locate the Media Streaming entry.
You may need to click one of the down-arrow buttons to expand part of the sharing settings to find Media Streaming.
-
Click the Choose Media Streaming Options link.
The Media Streaming Options window appears.
-
Click the Turn On Media Streaming button.
If you don’t see that button, media sharing is already configured. You’re done. Otherwise:
The screen that appears lists network computers and various sharing options. You can fiddle around here, but everything is pretty much set to share pictures, videos, and music from your PC to those network devices.
-
Click the OK button, and close the various other windows you’ve opened.
You’re all done.
Your PC is now sharing its media to other network devices. It’s the digital equivalent of a Craigslist ad saying, “Come into my house and take my pictures, albums, and videos,” but far less chaotic.