
Chapter 24
Maintenance Chores
In This Chapter
![]() Increasing storage capacity
Increasing storage capacity
![]() Running storage utilities
Running storage utilities
![]() Fixing the network
Fixing the network
![]() Understanding power management
Understanding power management
![]() Choosing a power management plan
Choosing a power management plan
![]() Resetting Windows 10
Resetting Windows 10
They don’t really talk about it in the brochures, and it’s not a topic that pops up at cocktail parties, but PC’s do require some maintenance. It’s a computer, after all. Though you could hire a charming young person who wears a white lab coat, it’s probably a better idea that you attempt to undertake the maintenance chore yourself. It’s not that difficult to do and, surprisingly, most of the time the PC does its own maintenance for you.
Storage Utilities
Utilities and tools is a definite category of computer software. It’s a broad category, including items such as backup, Windows update, networking, and other items strewn through this tome.
Perhaps the most interesting and popular types of computer utility are those that deal with mass-storage devices — the “disk utilities” from days gone by. These programs are still around, although Windows does a lot of self-maintenance, which for the most part renders regular use of these programs optional.
Freeing storage space
I hope you bought a nice, roomy primary storage device for your PC. It’s one area that comes back to haunt you when you get skimpy. That’s because the primary storage device can fill up with files faster than the exhibition hall for the She-Hulk cosplay contest at Comic-Con.
To check storage stats and potentially free up space, follow these steps:
- Press Win + E, the keyboard shortcut to summon a File Explorer window.
- In Windows 10, choose This PC from the list of items on the left side of the window.
- Right-click on a storage device, such as the primary hard drive, C.
-
Choose Properties.
The storage device’s Properties dialog box appears, which lists a chart graphically illustrating hard drive usage, similar to what’s shown in Figure 24-1.
When storage gets low, it’s shown graphically in the storage device’s Properties dialog box. The graphic may even turn red in the main This PC or Computer window. That’s when you’ve waited too long and you must take action.
-
Click the Disk Cleanup button.
The Disk Cleanup window appears, showing items you can remove from the device’s storage and approximately how much storage will be gained.
-
Peruse the list of files to delete, placing check marks by various categories.
Pretty much everything in the list can go.
-
Click the OK button to free up some space.
The operation may take some time. Be patient.
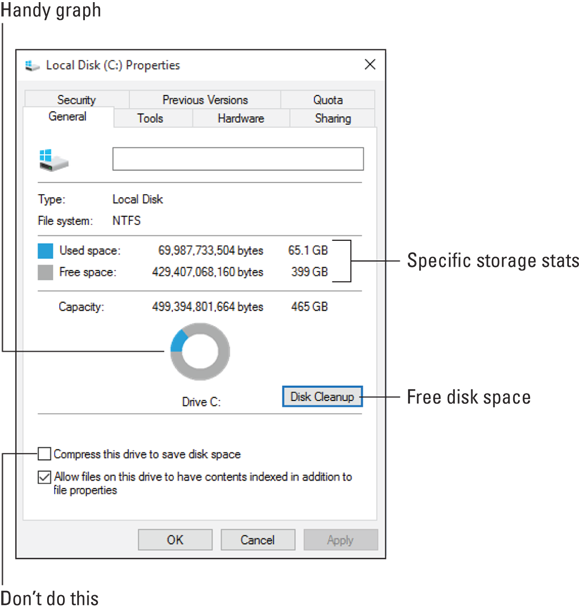
Figure 24-1: Checking storage usage statistics.
You can click the Clean Up System Files button before Step 7 to scour nonpersonal locations on the storage device. This step may add a few extra megabytes of free storage, but don’t get your hopes up.
Other ways of increasing storage include:
- Remove any programs you don’t use. Refer to Chapter 14 for information on uninstalling programs. Especially if you haven’t used a program in a while, get rid of it.
- Purge the Downloads folder. I keep everything I download, but that information could also be archived to external storage to free up space on the primary storage device.
- Perform a file search for excessively large files. Details on this type of search are found in the online bonus material available for this book. Quickly: Use the Windows Search command to locate files larger than 200 MB. Peruse the list and purge those biggies you no longer need.
- Copy your music, videos, and photos to the cloud. These media are still accessed from the Internet, but the files don’t occupy storage on your PC.
If you can’t free enough space, you need to obtain a larger, primary storage device. Have a PC consultant or another professional clone your PC’s current primary mass-storage device onto a higher-capacity device. The key word is clone, which creates an exact copy so that you don’t lose anything or need to reinstall software.
 One solution you may see recommended is to compress the drive. The option is shown earlier, in Figure 24-1. Though that may work as a temporary solution, it involves long-term complications that don’t really address the basic issue.
Checking for errors
Windows does its own error-checking on your PC’s storage, especially the primary mass-storage device or Drive C. This checking happens automatically. In fact, you may notice Windows performing a media check when you start Windows. That’s normal: Windows may have detected a problem and it’s working to fix it.
To manually run a media check, follow these steps:
-
Open the This PC or Computer window.
Press Win + E to start the File Explorer program; in Windows 10, choose This PC from the items listed on the left side of the window.
-
Right-click the storage device you want to check.
It can be any storage device, from a thumb drive to the primary storage device.
- Choose Properties.
-
In the device’s Properties dialog box, click the Tools tab.
You see two tools available: the traditional file checking tool, once known as check disk, and the defrag tool, both illustrated in Figure 24-2.
-
Click the Check or Check Now button.
The storage device may not need checking. A prompt appears in that instance, which also reminds you that Windows automatically checks storage devices.
-
Click the Scan Drive button.
Wait while Windows checks out the device.
- Peruse the results.
- Close the window when you’re done.
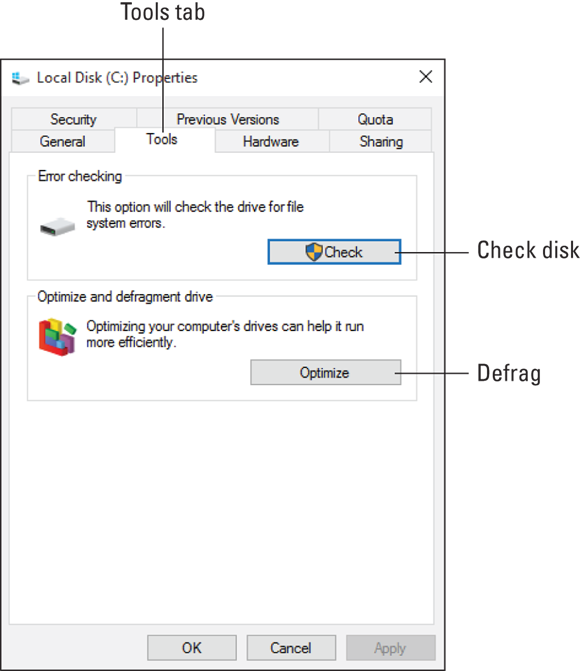
Figure 24-2: Storage utilities.
If any errors are found, you may be prompted to correct them, though Windows fixes most errors automatically.
 In the old days, PC users would run the check disk, or chkdsk, utility any time they suspected something was wrong with the computer’s hard drive. It was almost a type of witchcraft, with the user believing that running the utility would somehow magically cure all hard drive — or even general PC — woes. That’s no longer the case.
Running defrag
The defrag utility is sheer genius. Developed in the late 1980s, it corrects a storage problem that drastically slowed down file access. I remember running an early defrag utility on my PC and being utterly blown away by how much faster the system ran afterward.
Today, not only does a defrag or storage optimization utility come with Windows, but your PC also regularly runs that utility to ensure that the storage devices are all running at maximum efficiency. You don’t need to defragment anything! But if you’re curious, or you just want to run the utility for old-time’s sake, follow these steps:
- Press Win + E to summon a File Explorer window.
-
In Windows 10, choose This PC from the left side of the window.
You see a list of storage devices for your computer.
-
Right-click on the storage device you want to optimize.
Do not click on an SSD, a thumb drive, or a media card. Only hard drives can be optimized by using the defrag utility.
- Choose Properties.
-
In the device’s Properties dialog box, click the Tools tab.
Refer to Figure 24-2.
-
In Windows 10, click the Optimize button; in Windows 7, click the Defragment Now button.
The Optimize Drives window appears, as shown in Figure 24-3. The window is titled Disk Defragmenter in Windows 7.
-
Review the current fragmentation status of available storage devices.
For the most part, you should see a zero-percentage-fragmented statistic on all drives. Some drives, such as SSDs, thumb drives, and media cards, show that optimization isn’t available.
- If you insist upon moving forward, select a drive from the list.
-
Click the Analyze button in Windows 10; in Windows 7, click Analyze Disk.
Windows may show an updated statistic for the media’s current fragmentation status. Or it may not. In the old days, if a drive was less than 5 percent fragmented, you didn’t optimize.
-
Click the Optimize button or Defragment Disk button to defrag the media.
The process takes awhile. A report is generated when it’s complete.
- Close the Optimize Drives window or Defragment Now window when you’re done.
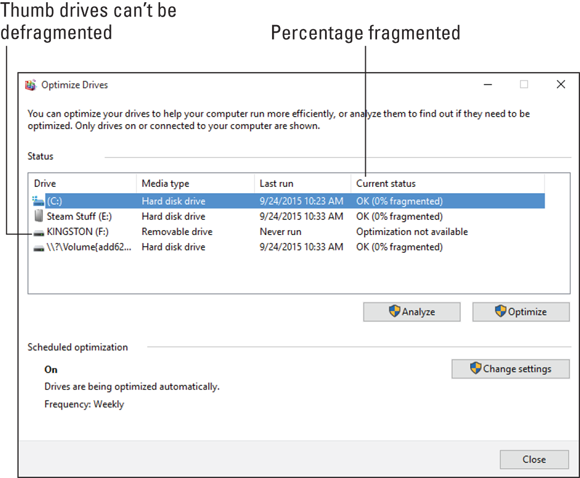
Figure 24-3: The Optimize Drives window.
Again, this process is done automatically by Windows. Only if you see a truly messed-up value (a value higher than 5 percent after Step 9) should you proceed with optimizing the media. Otherwise, you’re just wasting time.
-
Never, ever, run a defrag utility on an SSD, thumb drive, or media card. These storage media are damaged by the action of the defragmentation process, which isn’t a healthy thing. The Windows Optimize utility is smart enough to recognize such a storage device, and it refuses to work on it. Don’t force it to!
-
Defrag is short for defragmentation. The operation takes files that have been split into smaller pieces and glues them back together, which optimizes file access. The files are split to take advantage of the storage media in a way that maximizes the number of files that can be stored.
Network Troubleshooting
The Internet is such a vital part of using a PC that you actually do lose some functionality when the network goes down. As with most PC troubleshooting, an easy fix-it cure isn’t available. Instead, work through the problem in a logical way. Ask yourself these questions, in order:
-
Is the modem working?
Look at the modem. Are its lights flashing? All its lights on? If not, phone your ISP and ensure that there isn’t an outage in your area. They may even be able to test the modem to determine whether the problem is theirs or somewhere on the local network.
-
Is the Internet down?
Try to visit a web page, especially a popular site like Google or Amazon. Sometimes individual websites go offline. Mail service can go down. And Internet outages do occur. If that’s true, all you can do is wait.
-
Can you see other PCs in the Network window?
Pop up a network window as described in Chapter 17. Can you see other devices on the network? If not, check the network connection, wired or wireless. Restarting your PC may help reestablish the connection.
-
Have you restarted the gateway (router)?
Unplug the gateway. Wait a few moments. Plug it back in. Restarting the gateway may “clear its head” and get the network back up.
-
Have you restarted the entire network?
The final step is to restart the entire network. Turn off everything: modem, gateway, any hubs or switches, and every network device. The devices include computers, tablets, phones, and printers.
Start with the modem. Turn it on first. Wait. Turn on the gateway. Wait. Turn on any switches or hubs. Wait. Turn on network devices. This process is tedious, but sometimes it resolves network distress.
 Change is the number-one reason things go awry in any system. If you’ve added new devices to the network, updated software, or replaced hardware, that might explain why the network went hinkey.
Manage the PC’s Power
Your computer lusts for power. It’s not the same power that some megalomaniac or fast-food store manager would want. No, the PC wants power from the wall. Electricity. Juice. As lord of your computer, you can control how much power the PC consumes, managing its thirst so that the system works but your electric bill doesn’t go through the roof.
- Power management is a general term used to describe the capability of computers and other appliances, such as television sets and disintegration chambers, to become energy-smart.
- The power management hardware is what enables a computer to sleep, hibernate, and turn itself off.
Setting power options in Windows 10
One of the many things Windows 10 improved over its ancestors is how to handle power management. Follow these steps:
- Press Win + I to summon the Settings app.
- Click the System button.
-
From the list on the left side of the screen, choose Power & Sleep.
Power management settings appear on the right side of the screen.
-
Choose a timeout for the screen.
This timeout determines when the PC cuts power to the monitor. At that point, the monitor enters low-power mode.
If you have a laptop or your PC uses a UPS battery-powered backup, one menu item appears for battery power. The second or only item is the plugged-in power timeout.
I set a sleep timeout of 1 minute on battery power and 30 minutes for wall power.
-
Choose a timeout for the PC’s system.
This timeout sets when the computer itself goes into low-power mode.
If the PC is backed up by a UPS power supply, or you have a laptop, the On Battery Power menu appears; otherwise, you see only the When Plugged In option.
As with the screen (or monitor) timeout, I set values of 1 minute on battery power and 30 minutes for standard power.
The timeout values start ticking when you ignore the PC. If you don’t touch the mouse or tap a key on the keyboard for the given timeout, the screen or computer itself enters low-power mode.
While in low-power mode, the PC saves energy. To rouse the system from that mode, tap a key on the keyboard or wiggle the mouse.
See Chapter 4 for information on using a UPS. If a desktop PC is connected to a UPS, both with a power and USB connection, the battery-power options appear in the Settings app.
Configuring a power management plan
For Windows 7, as well as Windows 10, you can create a customized power management plan. Follow these steps:
- Open the Control Panel.
- Click the Hardware and Sound heading.
-
Click the Power Options heading.
The Power Options window appears, as shown in Figure 24-4.
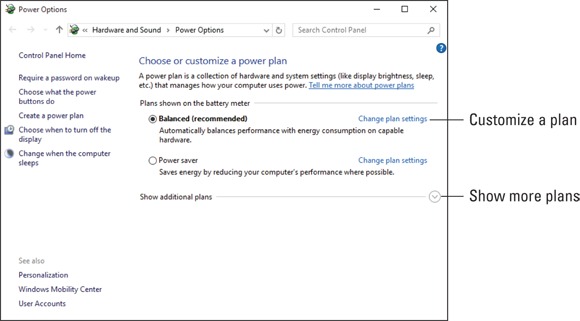
Figure 24-4: The Power Options window.
The Power Options window features various plans for managing the power in your PC, as listed in Figure 24-4. You can see more plans by clicking the downward-pointing arrow button thing, as illustrated in the figure.
Each plan tames two power-mad items in the computer’s hardware inventory: the monitor and the console. Specifically, the plans control when to dim or turn off the display and when to sleep the rest of the computer.
The key to invoking the power control is the timeout. The computer observes your activity; when there hasn’t been any input for a given amount of time, Windows turns off the display or puts the computer to sleep. That action saves energy.
To choose a plan, select the radio button next to the plan name. Close the Power Options window and you're done.
You can also customize any plan, or create your own plan, by clicking the Create a Power Plan link on the left side of the Power Options window (refer to Figure 24-4). Follow the directions on the screen. Be sure to give your power plan a clever name, such as Dan’s Plan, which is ideal when your name happens to be Dan.
Adding the Hibernate option
Windows has never put the option to hibernate your PC in an obvious place. Because of that, my advice for putting the computer into Hibernation mode is to assign the Hibernate command to a position on the Power menu. Here’s what to do in Windows 10:
-
Press Win + X and choose the Control Panel command from the super-secret shortcut menu.
The Control Panel appears.
- Choose Hardware and Sound.
- Below the Power Options heading, choose the link Change What the Power Buttons Do.
- Click the link Change Settings That Are Currently Unavailable.
-
Place a check mark in the box by Hibernate.
This option is found at the bottom of the window; scroll down to locate it.
- Click the Save Changes button.
- Close the Control Panel window.
After following these steps, the Hibernate command appears on the Start menu’s Power menu.
The Windows 10 Do-Over
Life may not have a reset button, but Windows does. Specifically, Windows 10.
If you suffer dire mishap to your PC, or if you intend to sell or give away the computer, you can reset Windows so that all your personal information is removed, programs uninstalled, and settings reverted to the time when Windows 10 was first installed or upgraded.
Obviously, resetting Windows is a drastic step. You don’t perform this procedure to fix minor ills. If you’re ready and willing, obey these steps in Windows 10:
- Press the Win + I keyboard shortcut to bring up the Settings app.
- Click the Update & Security button.
- From the list of items on the left side of the screen, choose Recovery.
- On the right side of the screen, click the Get Started button.
-
Choose whether to keep your files or remove everything.
If you choose Keep My Files, only Windows is unwound back to its original state. Otherwise, if you choose Remove Everything, the entire PC is reset.
After you make the choice, Windows examines a few things and provides a summary of the operation and a confirmation message.
-
Confirm that you want to proceed.
You cannot undo or cancel the operation after it begins. -
Proceed.
Sit back and wait.
After the process is complete, your PC starts and Windows 10 pops up its bright, cheery head. It asks you the same questions it did when you first started your new PC or upgraded your old PC with Windows 10. Yes, you are a complete stranger.
You can either proceed with setting up Windows again or turn off the PC, because it’s ready to be sold, traded, bartered, or simply left to die alone in a field somewhere.