
When we are developing an application, we should always be thinking about how we can make our microservices more secure. There are some techniques and methods that every developer should know in order to avoid security problems. In this chapter, you will discover the ways to use authentication and authorization to use in your microservices, and how to manage the permissions of each functionality once your users log in. You will also discover the different methods you can use to encrypt your data.
We can define encryption as the process of transforming information in such a way that only authorized parties are able to read it. This process can be done practically at any level of your application. For example, you can encrypt your whole database, or you can add the encryption in the transport layer with SSL/TSL or with JSON Web Token (JWT).
These days, the encryption/decryption process is done through modern algorithms and the highest level where the encryption is added is on the transport layer. All the algorithms used in this layer provide at least the following features:
- Authentication: This feature allows you to verify the origin of a message
- Integrity: This feature gives you proof that the content of the message wasn't changed on its way from the origin
The final mission of the encryption algorithms is to provide you with a security layer so that you can interchange or store sensitive data without having to worry about someone stealing your information, but it is not free of cost. Your environment will use some resources dealing with encryption, decryption, or handshakes among other related things.
As a developer, you need to think that you will be deployed to a hostile environment--production is a war zone. If you start thinking this way, you will probably start asking yourself the following questions:
- Will we deploy to hardware or to a virtualized environment? Will we share resources?
- Can we trust all the possible neighbors of our application?
- Will we split our application into different and separated zones? How will we connect our zones?
- Will our application be PCI compliant or will it need a very high degree of security due to the data we store/manage?
When you start answering all these questions (among others), you will start figuring out the level of security needed for your application.
In this section, we will show you the most common ways to encrypt the data in your application so that you can later choose which one to implement.
Note that we are not considering full disk encryption because it is considered to be the weakest method to protect your data.
When you are dealing with sensitive data, the most flexible and with lower overhead method of protecting your data is using encryption in your application layer. However, what happens if, for some reason, you cannot change your application? The next most powerful solution is to encrypt your database.
For our application, we have chosen a relational database; specifically, we are using Percona, a MySQL fork. Currently, you have two different options to encrypt your data in this database:
- Enable the encryption through MariaDB patch (another MySQL form that is pretty similar to Percona). This patch is available in 10.1.3 and the later versions.
- The InnoDB tablespace level encryption method is available from Percona Server 5.7.11 or MySQL 5.7.11.
Perhaps you are wondering why we are talking about MariaDB and MySQL when we have chosen Percona. This is because the three of them have the same core, sharing most of their core functionalities.
As a developer, you need to know the weakness of using a database level encryption in your application. Among others, we can highlight the following ones:
- Privileged database users have access to the key ring file, so be strict with user permissions in your database.
- Data is not encrypted while is stored in the RAM of your server, it is only encrypted when the data is written in the hard drive. A privileged and malicious user can use some tools to read the server memory and as a consequence, your application data too.
- Some tools like GDB can be used to change the root user password structure, allowing you to copy data without any issues.
Imagine that instead of using Percona, you want to use MariaDB; database encryption is available thanks to the file_key_management plugin. In our application example, we are using Percona as data storage for the secrets microservice, so let's add a new container for MariaDB only so that you can later give it a try and interchange the two RDBMS.
First, create a mariadb folder in your Docker repository inside the secrets microservice on the same level as the database folder. Here, you can add a Dockerfile with the following content:
FROM mariadb:latest

RUN apt-get update
&& apt-get autoremove && apt-get autoclean
&& rm -rf /var/lib/apt/lists/*

RUN mkdir -p /volumes/keys/
RUN echo
"1;
C472621BA1708682BEDC9816D677A4FDC51456B78659F183555A9A895EAC9218" >
/volumes/keys/keys.txt
RUN openssl enc -aes-256-cbc -md sha1 -k secret -in
/volumes/keys/keys.txt -out /volumes/keys/keys.enc
COPY etc/ /etc/mysql/conf.d/
In the preceding code, we are pulling the latest official MariaDB image, updating it, and creating some certificates that we will need for our encryption. The long string saved in the keys.txt file is a key we generated ourselves with the following command:
openssl enc -aes-256-ctr -k [email protected] -P -md sha1
The last command of our Dockerfile will copy our bespoke database configurations inside the container. Create our custom database configuration in etc/encryption.cnf with the following content:
    [mysqld]
    plugin-load-add=file_key_management.so
    file_key_management_filekey = FILE:/mount/keys/server-key.pem
    file-key-management-filename = /mount/keys/mysql.enc
    innodb-encrypt-tables = ON
    innodb-encrypt-log = 1
    innodb-encryption-threads=1
    encrypt-tmp-disk-tables=1
    encrypt-tmp-files=0
    encrypt-binlog=1
    file_key_management_encryption_algorithm = AES_CTR
In the preceding code, we are telling our database engine where we store our certs and we enable the encryption. Now, you can edit our docker-compose.yml file and add the following container definition:
    microservice_secret_database_mariadb:
      build: ./microservices/secret/mariadb/
      environment:
        - MYSQL_ROOT_PASSWORD=mysecret
        - MYSQL_DATABASE=finding_secrets
        - MYSQL_USER=secret
        - MYSQL_PASSWORD=mysecret
      ports:
        - 7777:3306
As you can see from the preceding code, we are not defining anything new; you now probably have enough experience with Docker to understand that we are defining where our Dockerfile is located. We set up some environment variables and mapped the 7777 local port to the container 3306 port. As soon as you have made all your changes, a simple docker-compose build microservice_secret_database command will generate the new container.
After building the container, it's time to check whether everything is working. Spin up the new container with docker-compose up microservice_secret_database and try to connect it to our local 7777 port. Now, you can start using encryption in this container. Consider the following example:
    CREATE TABLE `test_encryption` (
      `id` int(10) unsigned NOT NULL AUTO_INCREMENT,
      `text_field` varchar(255) NOT NULL,
      PRIMARY KEY (`id`)
    ) ENGINE=InnoDB `ENCRYPTED`=YES `ENCRYPTION_KEY_ID`=1;
In the preceding code, we added some extra tags to our SQL; they enable the encryption in the table and use the encryption key with the ID 1 we stored in keys.txt (the file we used to start our database). Give it a try and, if everything runs smoothly, feel free to make the necessary changes to use this new database container instead of the other one we have in our project.
Percona and MySQL 5.7.11+ versions come with a new feature out of the box--support for InnoDB tablespace level encryption. With this feature, you can encrypt all your InnoDB tables without too much fuss or configuration. In our example application, we are using Percona 5.7 on the secrets microservice. Let's look at how to encrypt our tables.
First, we need to make some small amendments to our Docker environment; first of all, open microservices/secret/database/Dockerfile and replace all the content with the following the lines of code:
    FROM percona:5.7
    RUN mkdir -p /mount/mysql-keyring/
      && touch /mount/mysql-keyring/keyring
      && chown -R mysql:mysql /mount/mysql-keyring
COPY etc/ /etc/mysql/conf.d/
At this point in the book, you probably don't need an explanation of what we did in our Dockerfile, so let's create a new config file that we will later copy to our container. Inside the secret microservice folder, create an etc folder and generate a new encryption.cnf file with the following content:
    [mysqld]
    early-plugin-load=keyring_file.so
    keyring_file_data=/mount/mysql-keyring/keyring
In the configuration file we created earlier, we are loading the keyring lib, where our database can find and store the generated keyrings used to encrypt our data.
At this point, you have everything you need to enable the encryption, so rebuild the container with docker-compose build microservice_secret_database and spin all your containers up again with docker-compose up -d.
If everything is fine, you should be able to open your database without any problems and you can alter the tables we stored with the following SQL command:
ALTER TABLE `secrets` ENCRYPTION='Y'
You may be wondering why we altered our secrets table if we already enabled the encryption in the database. The reason behind this is because the encryption doesn't come enabled by default, so you need to explicitly tell the engine which tables you want to encrypt.
Using encryption in your database will reduce the performance of your application. Your machines/containers will use some resources dealing with the encrypt/decrypt process. In some tests, this overhead can be over 20% when you are not using the tablespace level encryption (MySQL/Percona +5.7). Our recommendation is to measure the average performance of your application with and without the encryption enabled. This way, you can ensure that the encryption will not have a high impact on your application.
In this section, we showed you two quick ways of adding an extra layer of security to your application. The final decision for using these features depends on you and the specifications of your application.
Transport Layer Security (TSL) and Secure Sockets Layer (SSL) are cryptographic protocols used to secure communication in an untrusted network, for example, the Internet or LAN of your ISP. SSL is the predecessor of TSL and both of them are often used interchangeably or in conjunction with TLS/SSL. These days, SSL and TSL are practically the same thing and it makes no difference if you choose to use one or the other, you will be using the same level of encryption, dictated by the server. If an application, for example, an e-mail client, gives you the option to choose between SSL or TSL, you are only selecting how the secure connection is initiated, nothing else.
All the power and security of these protocols rely on what we know as certificates. TSL/SSL certificates can be defined as small data files that digitally bind a cryptographic key to an organization or a person's details. You can find all kinds of companies that sell TSL/SSL certificates, but if you don't want to spend money (or you are in the development phase), you can create self-signed certificates. These kinds of certificates can be used to encrypt data, but the clients will not trust them unless you skip the validation.
Before you start using TSL/SSL in your application, you need to know how it works. There are many other books dedicated to explaining how these protocols work, so we will only give you a sneak peek.
The following diagram is a summary of how the TSL/SSL protocol works; first, you need to know that TSL/SSL is a TCP client-server protocol and the encryption starts after a few steps:
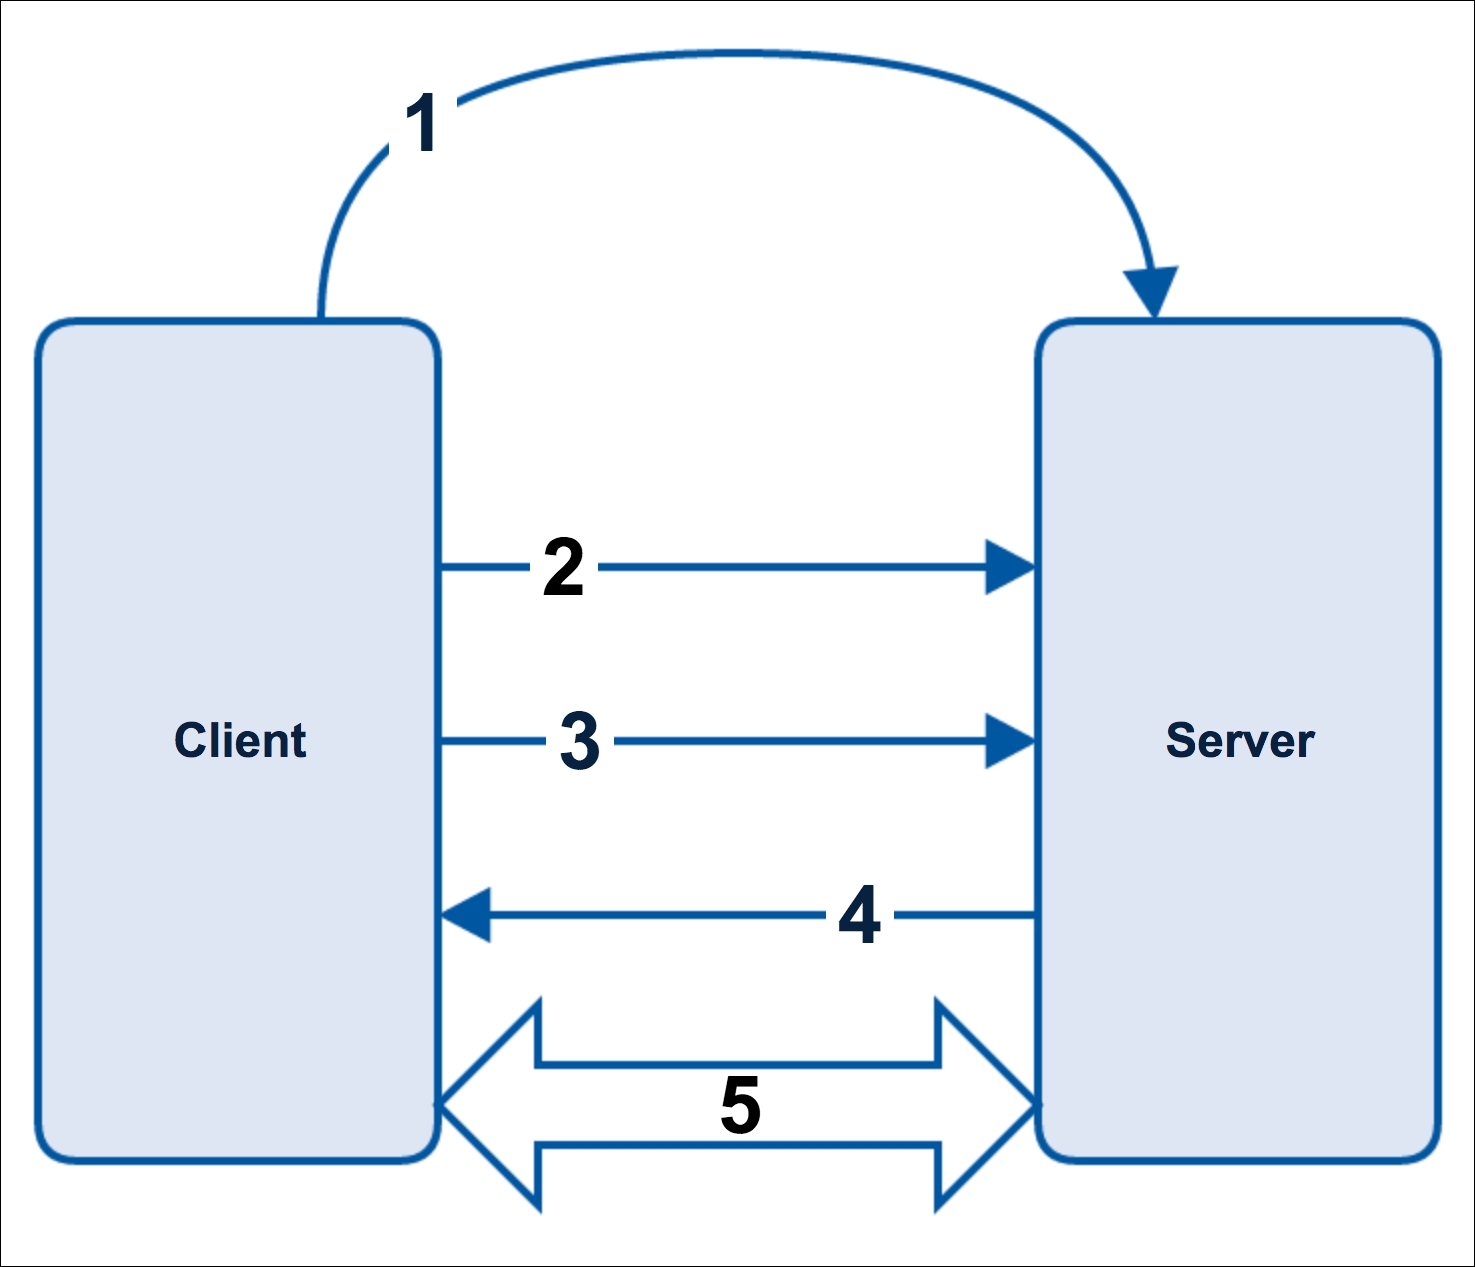
TSL/SSL protocol
The following are the steps of the TSL/SSL protocol:
- Our client wants to start a connection to a server/service secured with TSL/SSL, so it asks the server to identify itself.
- The server attends to the petition and sends the client a copy of its TSL/SSL certificate.
- The client checks if the TSL/SSL certificate is a trusted one and if so, sends a message to the server.
- The server returns a digitally signed acknowledgement to start a session.
- After all the previous steps (handshake), the encrypted data is shared between the client and the server.
As you can imagine, the terms client and server are ambiguous; a client can be a browser trying to reach your page or the client can be a microservice trying to communicate with another microservice.
As you learned before, adding a TSL/SSL layer to your application adds a little overhead to the overall performance of your app. To mitigate this problem, we have what we call TSL/SSL termination, a form of TSL/SSL offloading, which moves the responsibility of encryption/decryption from the server to a different part of your application.
TSL/SSL termination relies on the fact that once all the data is decrypted, you trust all the communication channels you are using to move this decrypted data. Let's see an example with a microservice; take a look at the following image:

TSL/SSL termination in a microservice
In the preceding image, all the in/out communications are encrypted using a specific component of our microservice architecture. This component will be acting as a proxy and it will be dealing with all the TSL/SSL stuff. As soon as a request from a client comes, it manages all the handshake and decrypts the request. Once the request is decrypted, it is proxied to the specific microservice component (in our case, it is NGINX) and our microservice does what is needed, for example, getting some data from the database. Once the microservice needs to return a response, it uses the proxy where all our response is encrypted. If you have multiple microservices, you can scale out this small example and do the same--encrypt all the communications between the different microservices and use encrypted data inside the microservice.
You can find multiple softwares that you can use to do TSL/SSL termination. Among others, the following list flags the most well known:
- Load balancer: Amazon ELB and HaProxy
- Proxies: NGINX, Traefik, and Fabio
In our case, we will use NGINX to manage all the TSL/SSL termination, but feel free to try other options.
As you probably know already, NGINX is one of the most versatile softwares in the market. You can use it as a reverse proxy or a web server with a high performance level and stability.
We will explain how to do a TSL/SSL termination in NGINX, for example, for the battle microservice. First, open the microservices/battle/nginx/Dockerfile file and add the following command just before the CMD command:
RUN echo 01 > ca.srl
&& openssl genrsa -out ca-key.pem 2048
&& openssl req -new -x509 -days 365 -subj "/CN=*" -key ca-key.pem -out ca.pem
&& openssl genrsa -out server-key.pem 2048
&& openssl req -subj "/CN=*" -new -key server-key.pem -out server.csr
&& openssl x509 -req -days 365 -in server.csr -CA ca.pem -CAkey ca-key.pem -out server-cert.pem
&& openssl rsa -in server-key.pem -out server-key.pem
&& cp *.pem /etc/nginx/
&& cp *.csr /etc/nginx/
Here, we created some self-signed certificates and stored them inside the /etc/nginx folder of the nginx container.
Once we have our certificates, it's time to change the NGINX configuration file. Open the microservices/battle/nginx/config/nginx/nginx.conf.ctmpl file and add the following server definition:
    server {
      listen 443 ssl;
      server_name _;
      root /var/www/html/public;
      index index.php index.html;
      ssl on;
      ssl_certificate /etc/nginx/server-cert.pem;
      ssl_certificate_key /etc/nginx/server-key.pem;
      location = /favicon.ico { access_log off; log_not_found off; }
      location = /robots.txt { access_log off; log_not_found off; }
      access_log /var/log/nginx/access.log;
      error_log /var/log/nginx/error.log error;
      sendfile off;
      client_max_body_size 100m;
      location / {
        try_files $uri $uri/ /index.php?_url=$uri&$args;
      }
      location ~ /.ht {
        deny all;
      }
      {{ if service $backend }}
      location ~ .php$ {
        try_files $uri =404;
        fastcgi_split_path_info ^(.+.php)(/.+)$;
        fastcgi_pass {{ $backend }};
        fastcgi_index /index.php;
        include fastcgi_params;
        fastcgi_param SCRIPT_FILENAME
        $document_root$fastcgi_script_name;
        fastcgi_intercept_errors off;
        fastcgi_buffer_size 16k;
        fastcgi_buffers 4 16k;
      }
      {{ end }}
    }
The preceding piece of code sets up a new listener in the nginx server, in the 443 port. As you can see, it is very similar to the default server settings; the difference lies in the ports and the location of the certificates we created in the previous step.
To use this new TSL/SSL endpoint, we need to make some small changes to the docker-compose.yml file and map the 443 NGINX port. To do this, you only need to go to the microservice_battle_nginx definition and add a new line in the ports declaration, as follows:
- 8443:443
The new line will map our 8443 port to the nginx container 443 port, allowing us to connect through TSL/SSL. You can give it a try now with Postman but, due to the fact that it is a self-signed certificate, by default it is not accepted. Open Preferences and disable SSL certificate verification. As homework, you can change all our example services to only use the TSL/SSL layer to communicate with each other.
In this section of the chapter, we have shown you the main ways in which you can add an extra layer of security to your application, encrypting your data and the communication channel used to interchange messages. Now that we are sure that our application has at least some level of encryption, let's continue with another important aspect of any application--authentication.