
12
Integrating via Messaging
WHAT’S IN THIS CHAPTER?
- Integrating bounded contexts with asynchronous messaging using NServiceBus and Mass Transit
- Designing and modeling messaging systems around important events in the domain
- Understanding how messaging frameworks work
- Creating architectural diagrams
- Explanation of the conceptual differences between commands and events
- Theory and examples of industry-standard messaging patterns
- Dealing with eventual consistency
- Monitoring errors in messaging systems
- Monitoring service level agreements (SLAs) in messaging systems
Wrox.com Code Downloads for This Chapter
The wrox.com code downloads for this chapter are found at www.wrox.com/go/domaindrivendesign on the Download Code tab. The code is in the Chapter 12 download and individually named according to the names throughout the chapter.
Hopefully the concepts in the previous chapter got you excited about the prospect of building scalable distributed systems while still getting the full benefits of Domain-Driven Design (DDD). This chapter aims to provide you with the foundational skills you need so that you can immediately begin to apply those concepts to real systems. To acquire the necessary initial skills, you’re going to build an e-commerce messaging application using NServiceBus and Mass Transit. Along the way, you will see how to incorporate the knowledge you gain from domain experts into your model by using techniques that make domain concepts explicit in the code. You see how naming your messages after events that occur in the problem domain is one especially good technique for achieving this.
Throughout this chapter, the examples focus on showing common scenarios you are likely to come across. Some of these you will be familiar with from Chapter 11, “ Introduction to Bounded Context Integration,” such as adding reliability to synchronous Hypertext Transport Protocol (HTTP) calls that hit services you don’t control. Building a system is only a small part of the puzzle, though, because systems need to be maintained. So in this chapter you’ll also learn how to deal with changes to message formats that affect multiple teams, how to monitor the performance and errors of your messaging system, and how to scale out to multiple machines as business needs increase.
One of the big benefits of having loosely coupled systems is that you can have independent teams that can achieve high development throughout, as discussed in the previous chapter. In this chapter, you will see at the implementation level how you can organize your source files and projects to enable this. Before you get down to that level, it’s often useful to design a system so that each team understands how its bounded contexts fit into the big picture. So in this chapter, you will learn how to create architecture diagrams that allow you to visualize important decisions and capture your domain-driven use-cases.
Messaging systems do have drawbacks, and this chapter demonstrates how to deal with some of them. One drawback compared to HTTP calls is that there is no standardization of formats. This can be a problem if you want to integrate two solutions using different messaging frameworks. However, this is a partially solved problem by using a messaging pattern called the messaging bridge. In this chapter, you will build a messaging bridge that connects an NServiceBus messaging system to a Mass Transit messaging system.
Before you begin writing code, there are some details about messaging systems that you need to learn about. These will greatly improve your ability to understand what you are building as you work through the examples. This chapter discusses those next.
Messaging Fundamentals
Messaging applications are fundamentally different from traditional, nondistributed object-oriented applications. Although they bring new benefits such as fault tolerance and scalability, they also bring new challenges, such as an asynchronous programming model that requires a significantly different mind-set. However, in addition to the theory presented in the previous chapter, the messaging fundamentals introduced in this section should give you all the foundational knowledge you need to begin building reactive applications using asynchronous messaging. The first concept you’ll need to learn about is the message bus, which is the glue that holds the system together.
Message Bus
If one centralized component in the system was responsible for transmitting all the messages, the whole system would collapse if it stopped working. Equally as concerning, this single component would make it more difficult for individual parts of the system to be scaled according to business need. You can solve these problems by using a message bus—a distributed system that has agents running on every component that sends or receives messages—avoiding the need for a centralized single point of failure. A message bus is all of these pieces collectively working together, as shown in Figure 12.1.

FIGURE 12.1 Message bus architecture.
Using a message bus allows bounded contexts to be completely decoupled from each other. Each bounded context—more specifically, each component—is connected only to the bus. If a component goes offline, none of the other connected components is affected.
Reliable Messaging
Sending messages from one of your bounded contexts to another could be costly if there were no guarantees the message would ever get there—customers aren’t very happy when you charge their credit card but fail to ship their product because a message got lost in your system somewhere. This is the reason that reliable messaging is needed. Unfortunately, it’s almost impossible to guarantee that a message will always be delivered only once. If a message is sent and no acknowledgement is received, it can be sent again. But what if the message was received but the acknowledgement wasn’t? Of course, the same message will be sent again under the incorrect assumption that the first was not received.
Because of the challenges with reliable delivery, there are a variety of reliable messaging patterns, each with its own challenges and trade-offs, including: at-least-once, at-most-once, and only-once delivery as previously alluded to.
As you learn about messaging systems, you’ll see that at-least-once is normally the preferred option, even though it does still carry the risk that a message may be handled twice. To avoid problems that this may cause, like charging valuable customers twice for a single order, this chapter shows how to combine at-least-once-delivery with idempotent messages.
At-least-once delivery involves retrying messages that failed or no acknowledgement from the receiver was received (appearing to fail). The actual plumbing for retrying failed or unacknowledged messages relies on a pattern known as store-and-forward.
Store-and-Forward
When a message is sent, it might not reach the recipient. The network could fail, hardware could fail, or programming errors could manifest. The store-and-forward pattern remedies many such problems by storing the message before it is sent. If the message reaches the recipient and is acknowledged, the local copy is deleted. However, if the message does not reach the recipient, it is tried again. You’ll see in this chapter how messaging frameworks deal with most of the complexity by allowing you to set up rules about how often messages should be retried and how long to wait between attempts.
Most messaging frameworks use queues to store messages. So when Service A sends Service B a message, the message ends up on Service B’s queue. When Service B processes the message, it takes it off the queue. However, if Service B doesn’t complete processing the message, it also gets put back on the queue and retried later.
Commands and Events
Sometimes you will want to send messages that specify something needs to happen, such as PlaceOrder from Chapter 11. These kinds of messages are known as commands. With commands there is a logical coupling between the sender and the receiver because the sender knows how the receiver should handle the message. Commands are only handled by one receiver, which is quite inflexible. Alternatively, events signal that something happened, such as OrderCreated. Events are more loosely coupled than commands because the sender doesn’t know how the receiver will handle the message. In fact, the sender doesn’t know who handles the messages. This is because events are based on the publish/subscribe pattern.
The looser coupling offered by publish/subscribe means events are often preferable to commands. One significant advantage of events is that you can add new subscribers without changing existing code. This allows the business to add a completely new bounded context without changing any existing code or slowing down other development teams. In the e-commerce example from the previous chapter, the new Marketing bounded context could be added to the flow just by subscribing to the OrderCreated event, as illustrated in Figure 12.2.

FIGURE 12.2 Adding new event subscribers doesn’t affect existing code.
You might run into some debate online about naming commands and events. You’re free to make your own choices, but the most common opinion is to name commands as instructions that you want to happen—PlaceOrder, ChangeAddress, RefundAccount—and to name events in the past tense describing what has happened—OrderCreated, MovedAddress, AccountRefunded.
Eventual Consistency
If you’re building messaging systems in which each bounded context has its own database, you will end up in situations that aren’t common in systems that use big transactions. An order without payment confirmation is a common example. In a system that uses transactions, this state might not be possible because creating an order is part of the same atomic operation that processes payments. Should the payment fail, no order will be created. Conversely, messaging solutions would allow this state because they remove big transactions and are eventually consistent.
One of the most important aspects of eventually consistent systems is managing the user experience. In consistent systems, users wait until the whole transaction completes. At which point, they know the order was created, the payment was processed, and the shipping was arranged. However, you know from Chapter 11 that big transactions do not always scale very well. In eventually consistent systems, users often get an immediate confirmation that the intent to place an order has been received, with a further e-mail confirmation later when payment and shipping have been processed and arranged, which can appear to be a degradation of user experience.
You can use eventual consistency as a positive by turning to the business and asking what should happen in eventually consistent states. Sometimes you can unlock hidden business policies or opportunities. For more detailed reading, Udi Dahan’s “Race Conditions Don’t Exist” blog post is highly recommended (http://www.udidahan.com/2010/08/31/race-conditions-dont-exist/).
Building an E-Commerce Application with NServiceBus
Now is your opportunity to get practical experience building a reactive messaging system. To begin with, you’ll build an e-commerce system where users can make online purchases of their favorite products. You will use commands, events, and other well-known messaging patterns to appreciate how messaging systems provide the platform for enhanced scalability and reliability. When you’re ready, your first task is to download NServiceBus so that your machine is equipped with the necessary dependencies to work through the examples.
It’s not too difficult to get started with NServiceBus; simply download and run the installer. To follow along with this chapter, you need to choose version 4.3.3 (https://github.com/Particular/NServiceBus/releases/download/4.3.3/Particular.NServiceBus-4.3.3.exe). This adds the required dependencies to your operating system, including Microsoft Message Queuing (MSMQ) and the Distributed Transactions Coordinator (DTC). As you will see shortly, you still need to reference the NServiceBus assemblies in your projects.
Designing the System
Before you crack open an IDE, it can be helpful to visualize what you are trying to build. This can be particularly useful when some of the concepts are new. Seeing how they fit together allows you to better understand what you’re actually building as you go along. Designing the e-commerce application in this chapter requires three design steps. One step is to create a containers diagram showing application groupings, technology choices, and communication protocols. Another step is to create a component diagram showing the flow of logic between bounded contexts. But the first and most important step is to start with the domain.
Domain-Driven Design
As you’ve learned in the first part of this book, arguably the most important aspect to building software is to understand why you are building it so that you can provide value to people you are building the system for. So when designing a system, it is highly recommended that you spend a significant amount of time with domain experts building up a ubiquitous language (UL) and making implicit domain concepts explicit. Several DDD practitioners recommend that you start by identifying important events that occur in the domain. This is known as Event Storming, and it can be highly synergistic with messaging applications (http://ziobrando.blogspot.co.uk/2013/11/introducing-event-storming.html).
Domain Events
When you’re building bounded contexts that integrate by sharing commands and events, you have an excellent opportunity to map important events that occur in the domain with the events occurring in the software system. This pattern is used by a number of well-known DDD practitioners to express domain concepts explicitly in the messaging systems they build. To do this yourself, you first need to identify important events that occur in the real-world domain. These are known as domain events.
In Part I of this book, “The Principles and Practices of Domain-Driven Design,” you saw a number of ways to capture domain knowledge, including events. This normally occurs when you are with domain experts during knowledge-crunching sessions, informal get-togethers, or even team lunches and such. In the previous chapter, a number of events occurred in the real-world domain and would still occur even if there was no software system. Some of them are Order Placed, Payment Accepted, and Shipping Arranged. When you are building a messaging system, it can pay dividends if you make an extra effort to look for domain events like these.
Once captured, your domain events form part of the UL, and you can start to piece them together to learn how they combine to form full business use cases. An excellent way to store and share this knowledge is by visualizing the sequence of events on a component diagram.
Component Diagrams
By sketching out high-level logic before you write code, you are in a better position to build the component efficiently and properly because you understand what you are doing. This is where a component diagram provides a lot of benefit. A useful time to start creating component diagrams is during knowledge-crunching sessions with domain experts. You can produce basic sketches together using just boxes and lines to communicate domain events and processes. When you then sit down to start coding, you already have an idea of what you need to build and terminology from the UL that needs to be modeled in your system.
Component diagrams have no formal structure; they communicate the flow of logic or interaction between certain components. You shouldn’t go too high level and show technology choices, and you shouldn’t go too detailed and show class or method names. You can see an example of this in Figure 12.3, which shows the flow of messages between bounded contexts in the e-commerce application you’re going to build.
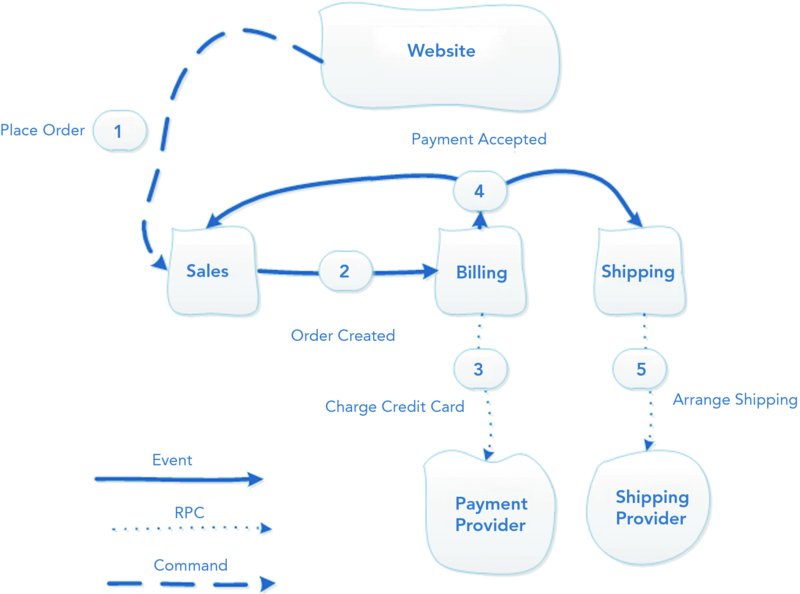
FIGURE 12.3 A component diagram showing domain events.
You can have as many component diagrams as you feel are necessary. In this example, there is one component diagram that communicates the flow of the order placement scenario. You could start by following this convention: having one component diagram per high-level use case and assessing how that works for you.
Containers Diagrams
Once you have spent time with domain experts and you are starting to understand the domain, at some point you’ll need to start building the system. It’s at this time you need to map the requirements of the business onto a working, distributed software system that provides them value. One technique that can help you balance the functional domain requirements with the nonfunctional technical requirements is to create containers diagrams.
How do the different parts of an application talk to each other? How can you be confident the system will provide the necessary fault tolerance and scalability? How can you make sure everyone on the team understands what is being built so they don’t do something completely wrong? These are important questions for most software projects, and a containers diagram helps you answer them. This type of diagram shows how different parts of the system are grouped, how different parts of the system communicate, and what the major technology choices are.
Take a look at Figure 12.4, which is a containers diagram of the e-commerce application that is the focus of this chapter.

FIGURE 12.4 A containers diagram for a typical e-commerce application.
Some of the key points to take note of in the system design follow:
- Internal communication between bounded contexts uses messaging.
- Unreliable communication with the external payment provider is wrapped with a messaging gateway to add reliability.
- Each bounded context is able to use different technologies, including choice of database technology.
- Bounded contexts do not share databases or other dependencies.
- The website retrieves information from bounded contexts using the HTTP application programming interfaces (APIs) they provide via AJAX requests from the browser.
From the containers diagram in Figure 12.4, you can see that fault tolerance and scalability have been addressed by using messaging. You can also see that each bounded context provides an API that the browser can use to get data to show on web pages using HTTP. The diagram also validates some technology choices. For instance, because each bounded context is using C#, you can use a single messaging technology (NServiceBus) that makes integration easier. However, if your requirements stated that new bounded contexts may be built using different languages and platforms, the design might make you think deeper about choosing NServiceBus or any messaging technology and instead prefer REST (which you will build a system with in the next chapter) for its friendlier cross-platform integration.
Some of the design decisions may make sense following the discussion from the previous chapter. Other decisions you may find counterintuitive or just disagree with. And that’s completely fine. By the end of this chapter, all the design decisions in this application will have been covered. You can then decide for yourself if you agree.
Evolutionary Architecture
Through frequent collaboration with domain experts, you continue to learn more about the domain. You’ve seen that you need to refactor your domain models and enhance the UL as the learning process continues. Accordingly, the design of your system needs to be updated to reflect your learnings. If new events are added to the domain or your context boundaries need to be adjusted, you should try to model your architecture around your new findings and update your diagrams accordingly. When you do this, your diagrams continue to be relevant, help people make informed business decisions, and better understand what they are building. Your architecture will also be more closely aligned with the problem domain.
Sending Commands from a Web Application
Placing an order begins with customers checking out on the website. This is the first step in the component diagram shown in Figure 12.3. To get started with the messaging system, you need to create a web application that can initiate this process by sending a PlaceOrder command representing the customer’s wishes. For this example, a simple MCV 4 website with just a single page where orders can be placed will be used. Figure 12.5 shows what this will look like.

FIGURE 12.5 The basic web page for placing an order.
As you can clearly see, the appearance of the UI is not a significant part of this chapter. However, pushing data into the messaging system is.
Creating a Web Application to Send Messages with NServiceBus
Before creating the web application, you need to create a blank solution inside Visual Studio called DDDesign. This solution will eventually host the entire system. Figure 12.6 illustrates the process of creating an empty Visual Studio solution.

FIGURE 12.6 Creating an empty Visual Studio solution.
In an NServiceBus application, messages are the contract between bounded contexts. The messages must be accessible to the bounded context that publishes them and the bounded contexts that consume them. So a good convention is for each bounded context to have a project that contains just the messages it publishes. Other bounded contexts can reference this project to access the messages.
Defining Messages
The component diagram in Figure 12.3 shows that the first step is a PlaceOrder command being sent from the website to the Sales bounded context. This makes the PlaceOrder command a message that belongs to the Sales bounded context. Therefore, the first project you need to create is the Sales bounded context’s messages project. You can do that by adding a new C# class library called Sales.Messages to the DDDesign solution you just created.
Inside your newly created Sales.Messages project, you can now add the PlaceOrder command that represents the real-world scenario of a user indicating he would like to buy certain products. For this example, add a folder called Commands to the root of the project and a class called PlaceOrder with the following content:
namespace Sales.Messages.Commands
{
    public class PlaceOrder
    {
        public string UserId { get; set; }

        public string[] ProductIds { get; set; }

        public string ShippingTypeId { get; set;}

        public DateTime TimeStamp { get; set; }
    }
}Now you’re in a position to create the website that can send the PlaceOrder command. Inside the same solution, you need to add a new ASP.NET MVC 4 project, choosing the empty template and the Razor View Engine. Name this project DDDesign.Web. These steps are illustrated in Figure 12.7 and Figure 12.8.

FIGURE 12.7 Adding the DDDesign.Web MVC 4 web application.

FIGURE 12.8 Selecting empty ASP.NET MVC template with the Razor view engine.
Now you need to right-click on the DDDesign.Web project icon in the Solution Explorer and choose Add ![]() Reference. Then select the Solution
Reference. Then select the Solution ![]() Projects option. Finally, you can add a reference to the Sales.Messages project, as illustrated in Figure 12.9.
Projects option. Finally, you can add a reference to the Sales.Messages project, as illustrated in Figure 12.9.

FIGURE 12.9 Adding a reference to the Sales.Messages project from the DDDesign.Web project.
For the website to send commands, it needs NServiceBus running inside it. You can make that happen by adding a reference to NServiceBus using the NuGet package manager console inside Visual Studio. Just run the Install-Package command, as demonstrated in Figure 12.10 and the following snippet:
Install-Package NServiceBus –ProjectName DDDesign.Web -Version 4.3.3
FIGURE 12.10 Installing NServiceBus with the NuGet package manager console.
Configuring a Send-Only NServiceBus Client
Now that you have referenced the NServiceBus dependencies, you need to configure NServiceBus to actually run inside the web application. NServiceBus makes this quite easy with the self-hosting option, which you can configure in Global.asax.cs, as shown in Listing 12-1.
As Listing 12-1 shows, there isn’t too much configuration needed. However, among those few lines are some key details. First, the last line of configuration, SendOnly(), tells NServiceBus that this application only sends messages and does not receive them. If you look back at the containers diagram, you can see that this is exactly as per the design. In NServiceBus nomenclature, a send-only application is known as a client.
The DefiningCommandsAs() method is used to specify a convention that lets NServiceBus know which classes in the solution are commands. In this example, you can see it is any class whose namespace contains the word Commands. If you look back to where you defined the PlaceOrder command, you’ll see that it is inside a folder called Commands and therefore will be picked up by this convention. You don’t have to use this convention; you can use any convention you like, and you can even use XML configuration instead if you prefer.
The other key piece of configuration is the line UseTransport<Msmq>(). As mentioned at the start of the chapter, a message bus usually stores messages in a queue for fault tolerance so that messages can be retried if there is an error. This line of configuration instructs NServiceBus to use Microsoft’s MSMQ. You can also use RabbitMQ or ActiveMQ.
Sending Commands
Now that the bus is configured and available, you can use it to send commands. In this example, that is accomplished by adding an OrdersController that a web page posts the user’s order back to. The OrdersController then sends the PlaceOrder command using the bus you configured earlier. To add the OrdersController, right-click on the Controllers folder inside the DDDesign.Web project and choose Add ![]() Controller. Type in OrdersController as the controller name and click Add. Figure 12.11 illustrates this.
Controller. Type in OrdersController as the controller name and click Add. Figure 12.11 illustrates this.

FIGURE 12.11 Adding the Orders controller.
Once you’ve created the OrdersController, you can replace the entire contents of the file with the code in Listing 12-2.
This example is intentionally quite simplistic to accentuate the messaging aspects. Sending messages with NServiceBus is relatively straightforward anyway. You just create an instance of your message and, together with the name of the recipient, pass it to Bus.Send(), which sends the message asynchronously. When sending commands, make sure you specify the recipient because commands are only handled in a single place. Later you will see that specifying the recipients is not necessary when publishing events. This is a useful distinction to remember.
You can also see in this case an example of eventual consistency. The user gets an immediate response before the order has successfully been processed by each part of the system. This was specifically highlighted in Chapter 11 because it provides fault tolerance should any of the steps in the use case fail. If you remember, it also allows the website to be scaled independently of other parts of the system because it does not wait for them to do processing as would be the case with remote procedure call (RPC) solutions. It would be useful to briefly revisit the last chapter if these benefits aren’t clear.
Only one thing now remains before PlaceOrder commands are sent: a web page with a form to enter the order details needs to be added. To create that web page, you first need to add a folder called Orders inside the Views folder in the DDDesign.Web project. Inside the newly created Orders folder, add a file called Index.cshtml. Then delete the entire contents of Index.cshtml and replace it with the contents of Listing 12-3. If you have done this correctly, your solution structure should resemble Figure 12.12.

FIGURE 12.12 Solution structure after adding Orders controller and view.
Listing 12-3 is just a simple HTML form that allows the order to be placed. Figure 12.5 shows how this page appears when rendered.
Handling Commands and Publishing Events
Now that the web application has a page that allows customers to create orders and a controller that will use the supplied details to send a PlaceOrder command on the bus, you need to actually handle PlaceOrder commands. Looking back to the diagram in Figure 12.3, you can see that PlaceOrder commands are handled by the Sales bounded context, which processes the command and publishes an OrderCreated event. So in this section, you’ll create a component in the Sales bounded context that contains this logic.
Creating an NServiceBus Server to Handle Commands
NServiceBus servers are like Windows Services—they are applications that run in the background without a UI. In this example, an NServiceBus server is added to handle PlaceOrder commands inside the Sales bounded context. Following the naming convention of {BoundedContext}.{BusinessComponent}.{Component}, add a new C# class library called Sales.Orders.OrderCreated. The name OrderCreated indicates the message type published by the component. This is the convention for naming components used in this chapter.
To turn your class library into an NServiceBus server, you need to install the NServiceBus.Host NuGet package. You can do that by running the following command in the NuGet package manager console inside Visual Studio (it should be entered as a single-line command):
Install-Package NServiceBus.Host -ProjectName
Sales.Orders.OrderCreated -Version 4.3.3
NServiceBus servers come configured with many common defaults. But one thing they don’t know about are your custom conventions. To set the conventions in the Sales.Orders.OrderCreated project, replace the contents of the EndpointConfig class that NServiceBus automatically creates with the code shown in Listing 12-4. All it’s doing is applying the same defaults for locating commands that you set up for the web application, plus a similar convention for locating events. Do note the two additional interfaces that this class has been updated to inherit: IWantCustomInitialization andAsA_Publisher.
Inside your Sales.Orders.OrderCreated component, you want to handle PlaceOrder commands. To be able to do this, you need to add a reference to the Sales.Messages project.
A useful convention for handling messages is to create a class called {MessageName}Handler. So in this example, you should create a class called PlaceOrderHandler in the root of the Sales.Orders.OrderCreated project. Once you’ve done that, you can replace the contents with the code shown in Listing 12-5.
Listing 12-5 shows the PlaceOrderHandler simply printing the details of the received PlaceOrder command to the console. This is just temporary so that you can run the application and see everything working so far. However, there are some important details to note regarding NServiceBus message handlers. First, NServiceBus knows that any class inheriting IHandleMessages<T> handles messages of type T. Second, it will inject an instance of IBus if you declare a property of type IBus named Bus. That’s quite useful, as you are about to see shortly, because it allows you to send other messages, including events, inside your message handlers.
Configuring the Solution for Testing and Debugging
Before moving on to publishing events, this is a good opportunity to test that everything is working so far and that you have a basic understanding of how messaging works. NServiceBus makes it easy to debug a distributed system on your local machine. All you need to do is configure each project to start up appropriately, as detailed in the following steps:
- Right-click on the solution file in the Solution Explorer and select Properties (Figure 12.13).
- Select the Startup Project option beneath Common Properties.
- Activate the Multiple Startup Projects radio button.
- Set the Action as Start for the DDDesign.Web and Sales.Orders.OrderCreated projects.
- Move DDDesign.Web to the bottom of the list.
- Check that your screen looks like Figure 12.14.
- Click OK.

FIGURE 12.13 Selecting solution properties.

FIGURE 12.14 Configuring each project to start up.
At this point, you can press F5 to start debugging the application. The web application loads in the browser, and the Sales bounded context loads in a console. If you look carefully at the console, you can see that NServiceBus takes care of lots of the hard work, such as creating all the necessary queues, as shown in Figure 12.15.

FIGURE 12.15 An NServiceBus server setting up an application.
To test the system, you need to navigate to the /orders action in the browser that automatically opened and fill out the form. (You just need to append “orders” to the localhost URL the browser automatically opens with.) Then look back at the console output of the host, and you will see it printing the details of the message it received.
Publishing Events
Now that the web application is sending commands that the Sales bounded context is successfully receiving, the second step on your component diagram shows that the Sales bounded context needs to create the order and publish an OrderCreated event when it has done so. To begin, you need to define the OrderCreated event in the Sales.Messages project. Similar to the way you created the PlaceOrder command, simply add a folder called Events in the root of the project, and then add a class called OrderCreated inside it, as shown in Figure 12.16.

FIGURE 12.16 Adding the OrderCreated event to the Sales.Messages project.
Inside your OrderCreated event, you need to add the necessary pieces of information that are part of the event. Just add them as properties to the class, as shown in Listing 12-6.
Now that you’ve defined the OrderCreated event, you are free to publish it when you need to. To publish any event, invokeBus.Publish(), passing in an instance of the event. Listing 12-7 shows the updated PlaceOrderHandler saving the order to the database, and then notifying interested parties it has done so by publishing an OrderCreated event.
For publishing events to be worthwhile, you need to be able to handle them and apply your domain policies.
Subscribing to Events
Handling events is really just the same as handling commands. To demonstrate, you’ll now see how to implement the next step on your component diagram (Figure 12.3)—step 3—which involves the Billing bounded context subscribing to and handling the OrderCreated event that the Sales bounded context publishes. Your component diagram also shows that step 4 involves the Billing bounded context publishing a PaymentAccepted event. So, following the convention of naming components after the messages they send, you now need to add a new C# class library project to the solution called Billing.Payments.PaymentAccepted. Inside your new project, you need to carry out a few familiar steps:
-
Add a reference to the NServiceBus packages using the package manager (run as a single-line command):
Install-Package NServiceBus.Host -ProjectName Billing.Payments.PaymentAccepted -Version 4.3.3 -
Add your event-locating conventions to EndpointConfig. This component will be publishing messages, so in the same file, configure it as a publisher by inheriting AsA_Publisher:
using NServiceBus; namespace Billing.Payments.PaymentAccepted { public class EndpointConfig : IConfigureThisEndpoint, AsA_Server, IWantCustomInitialization, AsA_Publisher { public void Init() { Configure.With() .DefiningEventsAs(t => t.Namespace != null && t.Namespace.Contains("Events")); } } } - Add a reference to the Sales.Message project.
-
Add an OrderCreatedHandler to the root of the project:
using NServiceBus;
using Sales.Messages.Events;
using System;

namespace Billing.Payments.PaymentAccepted
{
    public class OrderCreatedHandler : IHandleMessages<OrderCreated>
    {
         public IBus Bus { get; set; }

         public void Handle(OrderCreated message)
         {
             Console.WriteLine(
              "Received order created event: OrderId: {0}",
              message.OrderId
             );
         }
    }
}
There’s one additional step required when handling events with NServiceBus. You need to update the App.config in the subscriber’s project to identify the source of the event messages it subscribes to. In this case, the Billing.Payments.PaymentAccepted component wants to subscribe to OrderCreated events published by the Sales.Orders.OrderCreated component. So the App.config in Billing.Payments.PaymentAccepted should be updated, as shown in Listing 12-8.
Making External HTTP Calls Reliable with Messaging Gateways
You saw in Chapter 11 that one of the major benefits of a reactive solution is improved fault tolerance. One particular scenario you saw was downtime of external services, such as the payment provider. In the old RPC scenario, the order would have failed. But in this solution, as you will see, you can insulate yourself from failures that happen to external services by using a messaging gateway. Messaging gateways wrap unreliable communication with a message so that it can be retried until the stricken service is available again.
Messaging Gateways Improve Fault Tolerance
Before implementing the messaging gateway, here’s a quick example to help you fully understand why it’s needed. Imagine that the OrderCreatedHandler was implemented as per Listing 12-9.
Can you see possible conditions related to Listing 12-9 that would annoy paying customers? If you need a clue, think about communication with external services. What would happen if the database was down when Database.SavePaymentDetails() was executed? The message would fail and be put back in the queue. But you’ve already charged the customer’s credit card at this point. When the message is retried, the customer is charged again and again. This is precisely why you need a messaging gateway.
Essentially, messaging gateways split one big transaction in half, so if one of the calls fails, you don’t repeat actions that have already been carried out (like charging a customer’s credit card). In the Billing bounded context, communicating with the payment provider is one-half and updating the database is the other. To implement a messaging gateway, you just need to add an extra message in-between them, which is the next step of this example.
Implementing a Messaging Gateway
As mentioned, messaging gateways are just a pattern; it’s a case of splitting one message handler into two or more, where there is unreliable network communication. Therefore, there is no special facility provided by messaging frameworks—you just need to create and send additional messages. The real detail, though, is ensuring that you isolate the risky communication as much as possible.
Start by Defining the Messages
The first responsibility of the OrderCreatedHandler is communicating with the external supplier. You could fire an event indicating this has happened. However, because the messaging gateway is more of an implementation detail for fault tolerance and not a domain event, you don’t want to expose it to other components. Therefore, it makes sense to go with a command to ensure it is only handled in a single place. In this example, the command is called RecordPaymentAttempt. You know from the component diagram that the Billing.Payments.PaymentAccepted component also needs to publish a PaymentAccepted event. So you can add both of those messages to a new C# class library called Billing.Messages. Remember to put the command in a Commands folder and the event in an Events folder, as Figure 12.17 illustrates. The format of those two messages is shown in Listing 12-10.

FIGURE 12.17 Adding the two messages to the Billing.Messages project.
Then Implement Each Handler
You’re now ready to add the robust OrderPlacedHandler that doesn’t contain the vulnerabilities of the version in Listing 12-9. In this version, the call to the payment provider is wrapped with a RecordPaymentAttempt command. Saving the payment details to the database then comes in the next handler. Don’t forget to add a reference to Billing.Messages in the Billing.Payments.PaymentAccepted component. You can then add the OrderCreatedHandler shown in Listing 12-11.
One small detail to note is the Bus.SendLocal() call. Hopefully this makes sense, because the sending component also needs to handle the command. SendLocal() just sends the message to the same NServiceBus host that sent the message, where it then looks for a handler of that message.
To complete this step, add a handler for the RecordPaymentAttempt command that simulates recording the payment to the database. Listing 12-12 shows how this handler should look. You can put it in the same file as the OrderCreatedHandler if that helps you to mentally piece together the flow of messages.
Controlling Message Retries
Now is a great opportunity to really understand the value of using messaging. You’re going to actually see the message bus retry messages because an external service is unavailable. In the process, this example fully makes use of the messaging gateway you just implemented. What you need to do to simulate failure is change your stub payment provider implementation to throw an exception the first two times it is called and then happily accept the third request.
Simulating Failure
If you update the PaymentProvider so that it resembles Listing 12-13, you will be almost ready to see the fault tolerance of your reactive system in action.
Before you tested your first message handler earlier in this chapter, you had to set each NServiceBus component to start up when the solution was started. You also need to do that now for the Billing.Payment.PaymentAccepted component so that you can test your messaging gateway. So ensure you’re start-up settings resemble Figure 12.18.

FIGURE 12.18 Setting all your NServiceBus servers to start up.
Now you can press F5 to run the application. After you’ve done that, navigate to the /orders page in your browser and place an order. Pay special attention to the console window for the Billing.Payments.PaymentAccepted component. At first you will just see that OrderCreatedHandler received the OrderCreated event. Below that you’ll see that the PaymentAccepted event was published, as shown in Figure 12.19. But if you scroll up in the console window, you actually see that was the third attempt. Figure 12.20 shows you the messages NServiceBus printed to the console when it failed to process the first message. Look how it even shows the exception type and message you threw in your stub payment provider: System.Exception: Service unavailable. Down for maintenance.

FIGURE 12.19 Looks like the payment was processed successfully.

FIGURE 12.20 Actually, the payment failed twice first.
Second-Level Retries
If the payment provider is down for a long time, say ten minutes, NServiceBus may have reached the limit for the number of times it retries the message. Fortunately, NServiceBus has a feature called 2nd level retries, allowing you to specify custom retry periods that cover longer durations. In this example, it would be useful to retry the message every ten minutes for an hour. The configuration in Listing 12-14 shows how to do that.
Sometimes messages will never succeed because the system cannot handle them. Perhaps a message wasn’t validated properly, or data got wiped from the database that needed to be looked up to process the message. These are known as poison messages and inevitably end up in the error queue. You’ll learn more about the error queue later in this chapter, including how to monitor it and handle messages that end up in it.
Eventual Consistency in Practice
At this point in the place order process, the system could be considered to be in an inconsistent state. Although the order was created by the Sales bounded context and payment has been processed by the Billing bounded context, the Shipping bounded context does not know this and hasn’t arranged shipping yet. This would never happen in some systems, where the whole series is a single atomic transaction that succeeds or fails completely. So this can be considered an example of eventual consistency. It’s an opportune moment for you to learn how to deal with eventual consistency when you are integrating bounded contexts using messaging.
Dealing with Inconsistency
Eventual consistency can lead to undesirable scenarios. For example, if a payment has been rejected, you can’t just roll back the transaction and not create the order (as many non-eventually consistent systems would); the order was already created as part of a previous transaction in a different component and currently lives in that component’s database. What you can do, though, is roll forward into a new state. You’d probably tell the customer the order could not be completed because payment failed. Ideally you would tell her immediately when she tries to place an order. However, you have to remember that you’re trying to build a scalable fault-tolerant solution and you need to make sacrifices. Upsetting the few customers who cannot successfully place orders so that everybody else gets a superior user experience is often an acceptable trade-off.
When you are in an inconsistent state, you need to roll forward into a new state that represents the wishes of the business or the real-world domain processes you are modeling.
Rolling Forward into New States
To deal with the eventual consistency of a failed order, you can work with the business to create a new component diagram of the payment failed use case and use it to see what state you need to move into. Imagine that you did speak to the business and were told that when a payment is rejected, it is the Sales team’s responsibility to inform the customer the order was cancelled. Figure 12.21 shows a partial component diagram for this use case.

FIGURE 12.21 The payment rejected use case.
As you can see in Figure 12.21, all you need to do to deal with this eventually consistent scenario is publish a PaymentRejected event in the Billing bounded context and handle it in the Sales bounded context by sending an e-mail to the customer. To implement this use-case you just need to send and handle a few messages. To avoid repetition that is not shown here, you can implement it yourself if you want to using previous examples as a guide.
Bounded Contexts Store All the Data They Need Locally
The next steps on your component diagram (remainder of 4, then 5, and 6) involve the Shipping bounded context arranging shipping. But there’s a problem. Look at the PaymentAccepted event again:
public class PaymentAccepted
        {
        public string OrderId { get; set; }
        }
How can you arrange shipping when all you have is the ID of an order? Unfortunately, you can’t, so you need to carefully consider your options. To keep things simple, imagine that each user has just one address and it lives inside the database belonging to the Sales.Customers business component. One option is to RPC across to the Sales.Customers business component using HTTP to get the data you need. But then you’ve introduced a temporal coupling. If the Sales.Customers database or RPC endpoint goes down, the Shipping bounded context cannot function. If other bounded contexts went straight to the Sales.Customers database, the Sales development team would not be able to refactor or change the database according to their own best needs without worry of breaking other bounded contexts.
Another option is to publish the customer’s address on the PaymentAccepted event. This approach is also dangerous because, essentially, you are aggregating two messages by adding the properties from the first message to the second. In a use case in which four messages are sent, the fourth message needs to contain all the properties of the first three. This could cause high coupling and hard-to-debug issues trying to work out where data came from. Being pragmatic, you could try to get away with it in a few places, but it’s highly unrecommended unless you have a compelling business case.
Storage Is Cheap—Keep a Local Copy
An option that many teams take in this situation to reduce unwanted coupling is to store all the data each bounded context needs locally. This is often a good trade-off because storage is cheap these days. As an example, you can buy a 1TB hard drive for around $50 at the time of writing. What this means to you is that both the Sales bounded context and the Shipping bounded context should store the customer’s address. Shortly you’ll see some of the concerns people have with this, but for now just try to focus on implementing the Shipping bounded context using this approach. Those concerns will be addressed afterward.
Figure 12.22 illustrates the user registration process. Notice how an event is published—NewBusinessUserRegistered—and two bounded contexts subscribe to this event. The Shipping bounded context’s Regular Customers business component takes the customer’s ID and address. The Marketing bounded context’s Online Marketing business component takes the customer’s ID address, and the market the business operates in. Both bounded contexts store the data locally, even though it’s the same initial data being stored in multiple places.

FIGURE 12.22 Multiple bounded contexts store the same piece of data locally.
To implement the remaining part of the e-commerce system you’ve been building in this chapter, you’ll use local storage. Before that, you need to create the Shipping.BusinessCustomers.ArrangeShipping component that subscribes to the Sales bounded context’s OrderCreated event and the Billing bounded context’s PaymentAccepted event. You can get to that stage by carrying out the following steps:
- Create a new C# class library called Shipping.BusinessCustomers.ShippingArranged.
- Add a reference to the Sales.Messages and Billing.Messages projects.
- Add the NServiceBus dependencies using the NuGet Package Manager.
- Copy across the conventions for locating commands and events into EndpointConfig. Also make EndpointConfig inherit AsA_Publisher and IWantCustomInitialization, as Listing 12-15 illustrates.
- Add an OrderCreatedHandler and PaymentAcceptedHandler to the project, as shown in Listing 12-16.
- Add subscription configuration for the OrderCreated and PaymentAccepted events to the project’s App.config. Your App.config should then resemble Listing 12-17.
- Configure the project to start up.
- Add a C# class library called Shipping.Messages with an Events folder containing the ShippingArranged event shown in Listing 12-18.
- Add a reference to the Shipping.Messages project in the Shipping.BusinesCustomers.ArrangeShipping component.
- Configure the Shipping.BusinessCustomers.ArrangeShipping project to start up in Visual Studio.
If you’ve done everything correctly, your system should now be working up to the point of arranging shipping. Try running the application by pressing F5, navigating to the /orders page, and filling out the form. You then see three console windows appear—one for each component. Inside the Shipping.BusinessCustomer.ArrangeShipping console you should see that the ArrangeShipping component stored the UserId and OrderId from the Sales bounded context’s OrderCreated event, and it then used the UserId to look up the address when it handled the PaymentAccepted event. You should see console output that looks like Figure 12.23 (with the values you entered into the form).

FIGURE 12.23 Shipping bounded context storing data locally and using it to arrange shipping.
Common Data Duplication Concerns
Now that you’ve seen how to store data locally to each business component, it’s time to go over some of the concerns that people express when confronted with this considerable change in philosophy. A lot of people raise the issue of data being duplicated because they are concerned with how inefficient it may be. Others question how you can handle data updates, such as a customer updating his address, when there are duplicate copies scattered around. Messaging systems in particular raise the concern of messages arriving out of order. Imagine that a user signs up and then places an order immediately. What would happen if the Shipping bounded context was asked to arrange shipping before it had stored the user’s address?
Remember, storing data locally is not ideal. But it often reduces coupling, providing a better platform for scalability, fault tolerance, and rate of development. Having central points of control for logic or data in a distributed system can be dangerous for these reasons. But the concerns raised are serious.
The Data Is Conceptually Different
Two business components may store the price of a product. For example, the Billing bounded context will store the latest price so that when users place an order, they are charged the current price. But the Sales department will probably want to store the price of a product when the order was placed. Think about purchases you make online yourself. When you ask for a refund and you have a receipt, you get the money you paid at the time, not the latest price. This is an example of why, even though bounded contexts appear to duplicate the same data, conceptually the data is different—it’s used for different purposes, and it changes for different reasons.
Avoid Inconsistencies by Using Validity Periods
Businesses often change the price of products for special promotions, lack of popularity, or newer alternatives appearing on the market. When this happens, there is the opportunity for one bounded context to update the price before another. A problem arising from this is that users may see one price on the website but be charged a different price when they add it to their basket. This common concern can easily be addressed by adding validity periods to a message. The following snippet shows a PriceUpdated event with AvailableFrom and AvailableTo fields that indicate the period of time that the price in this message is valid for:
   public class PriceUpdated
   {
       public string ProductId { get; set; }

       public double Price { get; set; }

       public DateTime AvailableFrom { get; set; }

       public DateTime AvailableTo { get; set; }
    }
When sending messages with validity periods, it’s best to send them as soon as you can. The more notice you give to each bounded context, the more time it has to prepare for the new message taking effect. Often you can align your strategy with business rules. In this example, you could talk to the business and ask how much notice it gets for price changes. You could then agree with the business that you can guarantee all prices can be up to date if you get at least 24 hours’ notice, for example.
The Economics of Duplicating Data
You’ve just seen that conceptually the data is different, so the word duplication is semantically incorrect in some cases. But whether it is financially cost effective is based on a number of factors you need to consider. It was mentioned previously that a 1TB hard drive costs around $50. The bigger your bulk purchase, the more cost efficient this becomes. Cloud storage is also incredibly cheap.
It’s what you don’t pay for that contains hidden costs, though. How much would you lose by having software components and teams that were tightly coupled to the same data? Think about your scalability needs; try to imagine how much quicker you could build your system by having isolated teams. It’s difficult to predict these costs, but considering that storage is so cheap, teams are normally happy to accept the costs of duplicating data so they can focus on delivering business value faster.
Messages Arriving Out of Order
What would happen if a user signed up and placed an order, but the Shipping bounded context received the PaymentAccepted notification before it received the user’s address? In this kind of situation, you can simply put the message back on the queue and retry it again later, by which time the message containing the address will have been processed. In general, this is how to deal with out of order messages.
Pulling It All Together in the UI
Pushing data into a messaging system, as you’ve seen so far in this chapter, is only part of the story. You also need to be able to get data out of the messaging system. Again, this can require a different mind-set compared to some traditional practices, especially when you are storing data locally in each business component. You saw a clue about how to achieve this in the containers diagram illustrated in Figure 12.4. The answer is that bounded contexts often need to expose their data over HTTP for web applications to fetch.
In the next chapter, you will see lots of good practices for, and concrete examples of, building HTTP APIs to expose your domain functionality and data. In this section, you’ll learn about a few of the concepts and trade-offs that are especially important in messaging systems. Many of the other concepts from the next chapter will still be relevant to some extent, though.
Business Components Need Their Own APIs
If you work to the principle that each business component has its own private database, the only sensible way to share data with a web application is for each business component to have its own set of APIs exposing that data. Figure 12.24 visualizes this suggested layout.
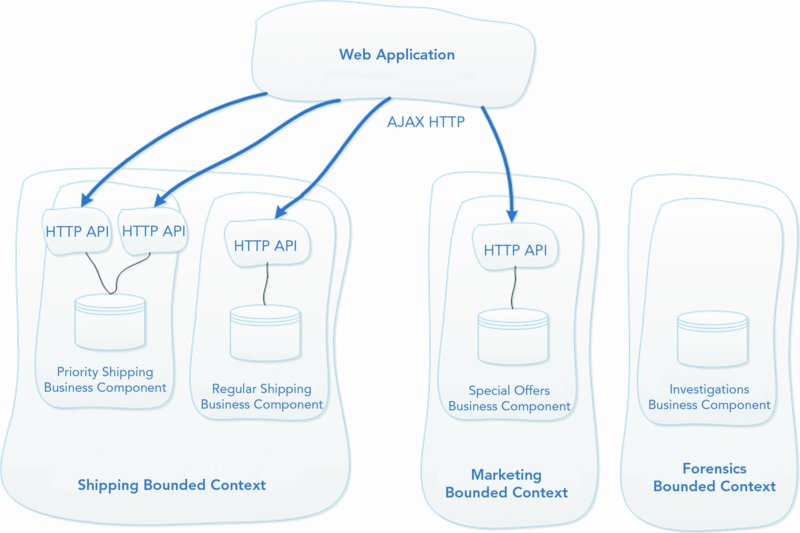
FIGURE 12.24 Business components have their own APIs.
As you can see in Figure 12.24, some business components have chosen to have two web applications exposing their data. In contrast, other business components do not provide APIs because they do not expose data; they simply consume it and carry out other tasks. Inside your business components, you are free to do as you please. The number of projects, the number of APIs, and even the technologies used are down to your best judgment and the needs of the project.
Be Wary of Server-Side Orchestration
It can be tempting to query all your APIs on the server (inside a controller) and send a combined model to the web page. Unfortunately, this can undo a lot of the hard work of building a loosely coupled, fault-tolerant system, because you have introduced another coupling point. First, if one of the APIs is down, there may be an error and the page may not render. Think carefully, though. Is that really necessary? Imagine that you built a page showing a catalogue of products, at the bottom of which page you showed special offers. Figure 12.25 exemplifies this by indicating how different parts of the page get their data from different APIs.

FIGURE 12.25 Pages get their data from multiple APIs.
Do you think the business would want customers to see an error screen preventing them from spending money if the Marketing bounded context was experiencing issues and could not provide the special offers? Some businesses would definitely prefer you to still show the main list of products, even if you couldn’t show the special offers. You could do this with server-side orchestration, but it requires more effort and can easily be forgotten. Also, the controller in your web application that performs the orchestration is an extra component that could fail. Some teams prefer to load the data directly from within the page using AJAX for these reasons.
UI Composition with AJAX Data
Looking back at Figure 12.25, you can see that each part of the page pulls in the relevant bits of data it needs from the different APIs. So why not just make AJAX web requests directly in the page and remove the need for server-side orchestration? Your APIs can return lightweight JSON, while your web pages use your favorite JavaScript libraries for managing and presenting the data. This style of UI composition can work especially well when you are trying to build fast, singe-page applications (SPAs) or generic APIs that are used by many other websites.
UI Composition with AJAX HTML
Instead of returning data, such as JSON or XML, from your APIs, you can just return HTML that is directly rendered on the page. Proponents of this style of UI composition tend to prefer the ability of each bounded context to decide how certain parts of the page are rendered. Looking back at Figure 12.25, for example, if the Marketing bounded context returned HTML, it could control how the special offers section of the page appeared. It could even restyle the special offers section of the page whenever it wanted just by returning updated HTML.
Although UI composition with HTML gives extra control to each bounded context, it can be hard to manage the consistency of the page that would normally be easy to achieve when the HTML lived in a single file. This approach is also difficult to apply when multiple web applications share the API. But it’s certainly an option that some teams use, and you should at least consider the advantages of applying it on your projects.
Sharing Your APIs with the Outside World
APIs aren’t always for internal use. Sometimes they are used by multiple applications that you don’t own. For some companies, an API is even the main product. You will learn in the next chapter how to create HTTP APIs, using patterns like REST, to expose them to external consumers.
Maintaining a Messaging Application
Once you’ve built a messaging system, there are still big challenges you need to deal with. You’ll need to monitor the system to ensure it is behaving well and supporting the needs of the business. You’ll want to see how well the application is performing, and you’ll definitely want to find any errors that are occurring so you can fix them and prevent lost revenue. Importantly, you will need to put in place a strategy for dealing with development changes that affect multiple teams, such as change in the structure of a domain event.
Message Versioning
At some point, you will almost certainly be required to change the format of a message. But the message format is the contract between two teams. Any changes to the format may require input and collaboration from both teams. Although these scenarios are inevitable, one of the goals of loosely coupled Service Oriented Architecture (SOA) systems is that teams don’t slow each other down. Changing the contract between multiple bounded contexts is a situation in which this could happen.
If you were to just change the format of a message and deploy it, the systems that had not upgraded to the new format wouldn’t work anymore. What you need is a strategy that allows you to update message formats in a way that doesn’t break existing consumers. This would then allow all the teams involved to update to the new format when it was important for them to do so. Until then, they could use the old format. This is why you need to aim for backward compatibility when you change message formats.
Backward-Compatible Message Versioning
Maintaining backward compatibility with your messages can be an important step in ensuring that integration between bounded contexts remains intact. It can also be important in enabling each bounded context to be developed independently, without teams having to have lots of meetings and schedule a simultaneous rollout when the message format changes. Consider the OrderCreated event from earlier in the chapter:
  public class OrderCreated
  {
      public string OrderId { get; set; }

      public string UserId { get; set; }

      public string[] ProductIds { get; set; }

      public string ShippingTypeId { get; set; }

      public DateTime TimeStamp { get; set; }

      public double Amount { get; set; }
  }
Imagine that a new authorization came in from the business permitting customers to have more than a single address. All the business’s online competitors allow this, so the business really needs to establish feature parity. To enable the new functionality, the OrderCreated event needs to contain an AddressId. For many messaging frameworks, this is a breaking change, meaning that adding this new field to the contract will break existing subscribers who do not update to the latest version.
Look at the situation a little more closely, though. Both the Shipping and Billing bounded contexts subscribe to the event. It’s important that the Shipping bounded context knows the new address so the order can be sent there. But does the Billing bounded context need to know that? In some domains, it probably doesn’t care, because it only sends bills to the customer’s e-mail address. Even if it did send paper mail, it would send it to the billing address, not the shipping address. So is there any need to divert the Billing team away from adding important business value, just to accommodate a new message format that they don’t care about? In many cases there’s not, and backward-compatible message versioning saves teams that don’t care about the new format from wasting valuable time on technical issues that don’t add business value.
Messaging frameworks can vary in how they let you define and update message formats. You’ll now see how to achieve backward-compatible message versioning with NServiceBus, but the concepts will be loosely applicable to any messaging framework you use.
Handling Versioning with NServiceBus’s Polymorphic Handlers
In this section, you’ll make the OrderCreated event backward compatible so that the Shipping bounded context uses the new version, whereas the Billing bounded context uses the existing version. This involves just a few short steps:
- Create a new version of the message that inherits the original version.
- Update handlers that require the new version to handle the new version.
- Add subscription details for the new message in each subscriber’s App.config.
- Update the sender to send the new version of the message.
No changes are necessary to a service that doesn’t care about the new version (they will still get messages in the old format).
In this example, carrying out these steps involves creating an OrderCreated_V2 event that inherits from the OrderCreated event, updating Shipping.BusinessCustomers.ArrangeShipping to handle the new event, and finally sending an OrderCreated_V2 event from the Sales bounded context.
First, add the OrderCratedEvent_V2 event in the same folder as the original OrderCreated event. It should look like Listing 12-19. Second, your updated OrderCreatedHandler should look something like Listing 12-20, taking advantage of the new message format, and using the AddressID supplied in the message. You’ll also need to update App.config in Shipping.BusinessCustomers.ShippingArranged to identify where the new OrderCreated_V2 event will be published from, as per Listing 12-21. Finally, you can send an OrderCreated_V2 event, as shown in Listing 12-22.
If you run the application now, the Billing bounded context should work as it used to, handling the original message format (because an OrderCreated_V2 is still an OrderCreated). The Shipping bounded context incorporates the new address logic using the same OrderCreated event but cast as an OrderCreated_V2. One thing to notice is that the address used for the order will not be sent with the OrderCreated event. It will be sent from another event, such as UserAddedAddress. The Shipping.BusinessCustomers business component needs to subscribe to this event and store the address locally.
Monitoring and Scaling
When a system is up and running, it’s important to keep any eye on errors to ensure that users are getting an acceptable level of service. It’s also important to measure SLAs and business metrics so that the business can use them as the basis for making key decisions, such as how to evolve the product or the business model. Measuring SLAs also informs the development team when the system is too slow and it’s time to consider scaling. You’ll now see how to handle errors, measure technical and business metrics, and scale bounded contexts using NServiceBus. These concepts should apply to other messaging frameworks, too, although they will be implemented differently, of course.
Monitoring Errors
You saw earlier in this chapter that messages that are not successfully delivered or processed are retried. In that example, though, you just added some logic to ensure the payment provider only failed twice. This is known as a transient error, because the situation resolves itself after some time. However, sometimes errors are not transient, and no matter how many times a message is retried, it always fails. These are poison messages (discussed in more detail at http://msdn.microsoft.com/en-us/library/ms166137.aspx). At some point, your messaging framework will stop retrying poison messages. Most messaging frameworks then put them in a special queue called the error queue, where manual intervention is required to remove the messages.
You can see the error queue in action by updating one of your message handlers to always throw an exception. Try replacing the logic in your Sales.Orders.OrderCreated.PlaceOrderHandler’s Handle() method so that it simulates a permanent error condition as follows:
public void Handle(PlaceOrder message)
{
    throw new Exception("I have received a poison message");
}
Running your application and placing orders now causes the message to repeatedly fail and ultimately end up in the error queue of the component that sends the poison message. (You need to wait for a red error message to appear in the console.) To confirm this, you need to activate the Server Explorer in Visual Studio, expand Servers, expand the name of your machine, and then expand Message Queues. Finally, you can expand the Private Queues node and examine the contents of the error queue, as shown in Figure 12.26.

FIGURE 12.26 Locating the error queue in Visual Studio’s Server Explorer.
To inspect all the messages in the error queue, expand the Queue messages node. If you want to inspect the contents of a single message, right-click on it and choose Properties, highlight the BodyStream row, and click the button with three dots that appears in the right column. Figure 12.27 shows an example of viewing the BodyStream value of a message in the error queue.

FIGURE 12.27 Viewing the contents of a message in the error queue.
Monitoring the error queue is an important activity that lets you spot production bugs quickly. But how you actually monitor the queue is up to you. Fortunately, you have a number of choices. For example, you can use the Open Source Wolfpack monitoring tool (http://wolfpack.codeplex.com/) or even create your own monitoring system.
Once a message is put in an error queue, manual intervention is required to determine what happens to it next. After inspecting the message, you might realize that the problem has gone away and the message should be fine (it was really a transient error), or there is an error in the code, meaning the message will never successfully be handled. Either way, when the problem has been fixed, NServiceBus ships with a tool that sends all messages back to their queue so they can be attempted again (ReturnToSourceQueue.exe).
You can learn more about monitoring and dealing with errors from the NServiceBus documentation (http://support.nservicebus.com/customer/portal/articles/860511-getting-started—fault-tolerance).
Monitoring SLAs
How many orders were placed in the past two hours? How long does it take an order to be processed? How long is the external payment provider taking to charge credit cards? These are all questions that can be answered by measuring the rate and frequency of messages flowing through your system. They’re important for helping the business make decisions, and they’re important for helping the tech team remove bottlenecks and improve capacity planning.
It should be possible to capture metrics and feed them into your own analytics systems with your preferred choice of technologies. With MSMQ and NServiceBus, you get a lot of monitoring goodies out of the box. Both technologies provide additional performance counters, which you can see in the NServiceBus documentation (http://support.nservicebus.com/customer/portal/articles/859446-monitoring-nservicebus-endpoints). You can then import these metrics into your preferred monitoring system using Windows Management Instrumentation (http://msdn.microsoft.com/en-us/library/aa310909(v=vs.71).aspx).
Scaling Out
When your metrics are telling you that messages are spending a long time in the queue, and the businesses are telling you that customers are complaining about slow turnaround times, you need to scale the system to process messages faster. Because it’s inefficient to keep buying bigger servers, you often need to add more servers and spread the load among them. In a messaging system, this means multiple instances of the same component feeding off the same queue. Unfortunately, this represents a slight problem, because NServiceBus creates queues on the machines that are processing the messages and won’t allow the queues to be accessed from other machines. However, NServiceBus has a load balancer-like solution for these scenarios called the distributor. You should be able to get going by quickly reading the official documentation for it (http://support.nservicebus.com/customer/portal/articles/859556-load-balancing-with-the-distributor). Should you choose another messaging framework, it will probably have similar solutions for scaling.
Before throwing more hardware at the problem, NServiceBus does have a setting that may allow it to run faster on a single machine. The MaximumConcurrencyLevel setting on the TransportConfig node, as shown in the following snippet, controls the number of threads NServiceBus will use. The following snippet shows four threads being granted to NServiceBus:
<TransportConfig MaxRetries="5" MaximumConcurrencyLevel="4" />Integrating a Bounded Context with Mass Transit
You’ve chosen messaging because it gives you lots of freedom and loose coupling in your architecture. But then you find out you’re tied to NServiceBus, which is actually another form of coupling (platform coupling). This can be a problem if you want to build new systems in different technologies or incorporate existing systems that don’t run on .NET. Platform coupling in messaging systems is a well-known problem with a well-known solution: a messaging pattern called the messaging bridge.
In this section, you’ll see how you can use a messaging bridge to integrate another service that employs a different messaging framework: Mass Transit (you could also use a messaging bridge to integrate with non-.NET systems). You will learn a little about how Mass Transit differs from NServiceBus, and you’ll learn enough of the basics to get started with it. But first, try to picture this scenario: The company that you built the e-commerce system for earlier in this chapter has acquired a successful start-up that deals with promotions. The start-up’s platform is already set up to process messages and send out free gifts to random customers when they place an order. To integrate it into your e-commerce NServiceBus system, the acquired platform needs to be able to subscribe to the OrderCreated events placed by the Sales bounded context, as shown in Figure 12.28.

FIGURE 12.28 Promotions bounded context integrating into e-commerce messaging system.
Unfortunately, it’s not so simple for the new Promotions bounded context to subscribe to the OrderCreated event because it isn’t using NServiceBus. This is where the messaging bridge comes into play.
Messaging Bridge
When you have two separate messaging systems that need to share messages, a messaging bridge (http://www.eaipatterns.com/MessagingBridge.html) is one way of addressing the issue. It’s usually not possible to form a single, fully connected message bus using two independent frameworks, but by using a messaging bridge, you can connect individual endpoints from each messaging system to effectively create a link, as illustrated in Figure 12.29.

FIGURE 12.29 A messaging bridge is like a link.
Implementing a messaging bridge usually just involves creating an application that can receive messages from one messaging system and hand them over to the other. In your e-commerce system, it’s a case of creating a new subscriber to the http://OrderCreated_V2 event that converts the event and then pushes it into the new bounded context that uses Mass Transit.
Before you can build that, you need to build the Promotions bounded context that uses Mass Transit. And before that, you need a brief introduction to Mass Transit.
Mass Transit
Variety is often a good thing, which is why .NET developers are lucky to have Mass Transit (http://masstransit-project.com/)—an alternative messaging framework to NServiceBus that can be used stand-alone or alongside other messaging frameworks. The latter case is demonstrated in this example. Although it is implemented differently and has its own API, Mass Transit still shares many commonalities with NServiceBus.
Installing and Configuring Mass Transit
Inside the existing solution you created for the NServiceBus parts of the application, you need to add a new C# class library called Promotions.LuckyWinner.LuckyWinnerSelected. Then you can add Mass Transit to it by running the following commands in the package manager console (run each as a single-line command):
Install-Package MassTransit
–ProjectName Promotions.LuckyWinner.LuckyWinnerSelected
- Version 2.9.5
and
Install-Package MassTransit.msmq
–ProjectName Promotions.LuckyWinner.LuckyWinnerSelected
- Version 2.9.5
At this point, you have all the Mass Transit dependencies referenced in your project, so the next step is to configure an instance of the Mass Transit bus. You’ll be happy to know that configuring Mass Transit can be done purely in code. It’s quite minimal, too, as Listing 12-23 demonstrates. You can add the contents of Listing 12-23 to your new project.
At the top, you can see that the Mass Transit classes are imported with the first using statement. Inside the main method is where the bus is configured using Bus.Initialize(), which gives you a configuration object so you can set up the bus according to your needs. In this example, the bus is being configured to use MSMQ, which you should be familiar with from earlier in this chapter.
Although Listing 12-25 shows the bare-bones configuration needed to get the bus running with MSMQ, it doesn’t tell Mass Transit about the kinds of messages that need to be handled or how to handle them.
Declaring Messages for Use by Mass Transit
In keeping with the minimalist theme, Mass Transit messages can be any C# class; they do not have to be named in any way or inherit from any base classes. Because this example is to create a message bridge with NServiceBus, you could just reference and use the same OrderCreated class that NServiceBus will publish. However, to make this example stand-alone, it’s best if you create a copy of the class in this project. In this way, the two sides of the bridge do not share a dependency. If you were creating a cross-platform messaging bridge, code dependencies would not be possible anyway.
Below the Program class you created from Listing 12-23, add an OrderCreated class to represent the order-created domain event. This class is now available for Mass Transit to use; you just need to tell Mass Transit how and when to use it. Listing 12-24 shows what your OrderCreated event should look like.
Creating a Message Handler
Again, when configuring message handlers, Mass Transit maintains a lightweight, code-only approach. To create a message handler, you just need to define a method somewhere that handles the message you are interested in. You can then tell Mass Transit to call that method when it receives a message of the required type. This will make sense after an example.
Create a class called OrderCreatedHandler with a single Handle() method that takes an instance of the OrderCreated event you just created inside this project. To keep things simple, you can put this class just below the Program class in the same file, as you just did with the OrderCreated class. Listing 12-25 contains the implementation of the OrderCreatedHandler.
Now you’re ready to tell Mass Transit how to put your event and handler together.
Subscribing to Events
There’s not much work to adding event subscriptions with Mass Transit; just update the code-only configuration to inform Mass Transit which queue to watch for messages and what do with them. Listing 12-26, which is an updated version of the bus initialization you saw in Listing 12-23, sets up a subscription for the OrderPlaced event.
The first new line instructs Mass Transit to look on the promotions.ordercreated queue on the machine the application is running on (localhost). Mass Transit creates this queue for you, and it can be inspected in Visual Studio’s Server Explorer in the same way you inspected the error queue previously. When Mass Transit finds a message on that queue, it looks for a subscription to the message’s type. You can see how such a subscription is being set up to handle OrderCreated events on the other new lines of configuration you just added in Listing 12-26. All that’s happening is that inside the config.Subscribe() invocation Mass Transit is told to create a new instance of the OrderPlacedHandler and pass the message it has taken off the queue to its Handle method.
Linking the Systems with a Messaging Bridge
Now is the interesting part: implementing the messaging bridge. To do that, in this example you create a new NServiceBus handler that subscribes to the NServiceBus event and pushes it onto the queue Mass Transit has been configured to receive from. Imagine if you were not using Mass Transit, .NET, or Windows. It doesn’t really matter, because you’re putting the message in a queue that another messaging framework, running on any run-time or operating system, can take messages off.
To start building your messaging bridge, you need to create a new C# class library inside the same solution called Promotions.LuckyWinner.LuckyWinnerSelected.Bridge with an OrderCreatedHandler that contains the content in Listing 12-27. You need to import NServiceBus using the package manager, configure message conventions, reference Sales.Messages, and set up the subscription in App.config. (Refer to earlier parts of the chapter if you need a reminder about how to carry out these steps, or check this chapter’s code samples).
As mentioned, this handler subscribes to the NServiceBus event and puts it in the queue Mass Transit has been configured to watch. There are a few key details to understand. First, notice how there is no reference to Mass Transit? All the bridge does is use the MSMQ classes provided by the System.Messaging.dll (you need to add a reference to that) to put messages into a queue. The second big aspect to notice is the format of the messages. Mass Transit first looks for a header indicating what type of content is contained in the messages. You can see this being set to application/vnd.masstransit+xml, which tells Mass Transit the body contains XML. Mass Transit then treats the body of the message as XML, expecting it to be in the format that is returned from ConvertToMassTransitXmlMessageFormat(). Once all that is done, you just create a queue and send a message to it, as shown in the final two lines of Handle().
From this example, you can see a few of the concerns related to a messaging bridge. To push a message into a messaging framework, you need to understand what format it expects. You also need to go down a few levels of abstraction and deal with the queues yourself. Understanding the internals of your messaging framework might be extra work, but it isn’t always a bad thing, especially when you often need to monitor the queues and check that everything is working as expected.
If you find that building messaging bridges is becoming inefficient on a project but you still want to build scalable, fault-tolerant systems using some reactive principles, REST may be better. REST and other HTTP-based solutions are covered in the next chapter.
Publishing Events
Publishing events with Mass Transit is almost identical to publishing events with NServiceBus, as shown in the following snippet:
Bus.Instance.Publish(new LuckyWinnerSelected(UserId ="user123"));As an exercise, see if you can build a new component with Mass Transit that handles events published by the Promotions.LuckyWinner.LuckyWinnerSelected component.
Testing It Out
Your messaging bridge should now be working, so your new Promotions bounded context should be able to handle OrderCreated events. All you need is proof of this. To test the application, carry out the following few steps:
- Set the application as a start-up project and a console application following the advice in this blog post: http://possiblythemostboringblogever.blogspot.co.uk/2012/08/creating-console-app-in-visual-studio.html.
- Run the system (press F5).
- Place an order as before (browse to /orders).
- Check that the NServiceBus consoles are printing the messages as they previously did.
- Check that the console for the Mass Transit component received the OrderCreated event. If it all works, the console should resemble Figure 12.30. (Yours will be different based on the user ID you entered into the form.)

FIGURE 12.30 Mass Transit receiving messages via the bridge.
Where to Learn More about Mass Transit
Mass Transit contains lots of useful functionality that was not shown in this chapter. For example, it can be used with other queuing technologies such as Rabbit MQ. Mass Transit also has a strong community. So if you’re keen to learn more about it, you can view all of the source code on GitHub (https://github.com/phatboyg/MassTransit), you can read the official documentation (http://masstransit-project.com/), or you can read and post questions on the Mass Transit mailing list (https://groups.google.com/forum/#!forum/masstransit-discuss).
The Salient Points
- Messaging systems are used to build scalable, fault-tolerant systems based on reactive principles and loose coupling.
- When combining Domain-Driven Design (DDD) with messaging systems, use domain events as messages in the system to make domain concepts explicit in the code.
- Containers diagrams can give you early feedback about the design of your messaging system.
- Component diagrams can be used to model the flow of messages using the ubiquitous language (UL).
- Commands are messages that specify something should happen; they are handled in one place.
- Events are used to specify something has happened; events can be handled by multiple subscribers.
- A message bus is a distributed component that has an agent running inside each application that needs to send or receive messages.
- A messaging gateway is a technical pattern used to hide the complexity of an external system and add reliability.
- Messaging systems often synergize with the local data storage principle for scalability and fault tolerance. But that gives rise to eventual consistency.
- Eventual consistency is often a necessity for efficient scalability.
- Rolling forward into new states is a common pattern for dealing with eventual consistency that can lead to openings for new business-rule opportunities.
- UI composition of APIs exposed by components is the recommended practice for presenting information on web applications.
- Backward-compatible messaging versioning is a key pattern for ensuring that teams do not slow each other down when message formats need to change.
- You can use messaging bridges to connect disparate messaging technologies, but it’s not always the simplest or most robust solution; HTTP-based alternatives like REST may be a better approach.