
Chapter 4
Penetrate and Exploit
IN THIS CHAPTER
![]() Getting into the mind of a hacker
Getting into the mind of a hacker
![]() Taking a deeper look at attack vectors and how to thwart attacks
Taking a deeper look at attack vectors and how to thwart attacks
![]() Demystifying encryption
Demystifying encryption
![]() Running Metasploit to find exposed vectors
Running Metasploit to find exposed vectors
Penetrate and exploit might sound like the title of an intense video game where you have to break into an enemy’s fortress and expose their weakness to the world. What that means in the context of pen testing isn’t too far off from that and is also intense. Penetration involves the attempt (perhaps successful, perhaps not) to circumvent or break through security barriers, to access a company’s data, for instance. An exploit is when an intruder successfully penetrates the barriers and then takes advantage of a system’s vulnerability.
A good part of your day as a pen tester is to think like a hacker. Where can they penetrate your systems? What information can they exploit for their own gain? This can sometimes take creative thinking!
I also discuss attack vectors in this chapter. They can be confusing to new pen testers because the bad guy hackers often know where to start their attacks, and the white hats need to figure that out. This chapter helps to demystify that by explaining client-side and server-side attacks, wireless attacks, and other points of entry into a secure location. I devote the last section of this chapter to introducing you to encryption, which can be a white hat’s best friend and a black hat’s enemy.
Here’s the hard truth: You can’t secure everything. You can’t make everything bulletproof. The open nature of systems and having the ability to access resources and using them will always leave some form of hole in your security plan. What you should be aware of is that there will always be the ability to penetrate and exploit just by the basic usage of the network and its systems alone. Every time you go on the Internet and access a website (Amazon, say) to go shopping, you can also potentially launch an attack on that entity through the same exact path you used to access its services.
Understanding Vectors and the Art of Hacking
A solid understanding of how an attacker can penetrate and exploit your valuable resources is a necessity. But it’s a challenge because the technology is always changing and advancing. So do the types of attacks.
For example, in the past you could set up a tight perimeter with a firewall and make sure all your internal devices were configured with antivirus protection to avoid malware attacks and be assured your network was pretty secure. Now, with wireless networks, mobile devices, the Internet of Things (IoT), cloud interfaces, and the sheer complexity of technology, a good firewall isn’t enough to keep your network secure.
As we look into the future, things are going to get even more complicated. With IoT, you can imagine that just about anything and everything can and will be connected to a computer network.
The basis where all hacks start from is a vector. A vector (or path) of attack is how a hacker can get in. When every single device is connected to a computer network, it can be an entry point into safeguarded data or assets. The attack vector isn’t only widened, it’s also made deeper. Consider these vectors in regard to your networks:
- Through your protected (or unprotected) firewalls to the Internet
- Through a router that connects your network to the outside world (public or private)
- From an older dialup or other out-of-band access systems in your organization
- Through an unsecured wireless connection inside your organization
- From a device inside the network (similar to a black box solution) running a program such as Raspberry Pi
- Someone walking through the front door of your facility and faking access to get into secure zones in your data center
- A spoofed phone call from a known source number to trick a helpdesk agent into changing a password, giving access to a system
This is just a few that you’ll encounter, and I explore many other vectors throughout the book.
 Constantly considering new and creative ways a hacker can attack vectors is defense in depth. Once you start thinking outside the scope of known vectors, you’ll have a successful career in pen testing.
Examining Types of Penetration Attacks
Getting into a network through a password is just one way for a hacker to attack a system. A hacker can access many more vectors to penetrate a network. In the following sections, I discuss a few of them and how you can test for them.
Social engineering
Social engineering attacks are the most commonly used type of penetration attack, and yet they’re the easiest to prevent with enough safeguards in place. They actually don’t rely on technology at all.
All that is required in a social engineering attack is for someone — whether knowingly or tricked into it — to give a username/password to a hacker. They extract the information either by calling the employee and pretending to be an authorized person (such as an IT professional). Or they can simply set up a clone website (such as a bank website or intranet portal) that looks like the one the person is expecting. The hacker sees everything entered in the clone website, including username and password.
Then the hacker has access to everything that person has (imagine money, insider information, and any other company secrets). It’s simply the easiest route a hacker can take. It takes a lot less time to trick a person into handing over a username/password than it does trying to brute-force their way through firewalls.
You can track down social engineering using Kali; you can also prevent it from happening in the first place. I discuss both in the following sections.
Using Kali to combat social engineering
You can use Kali (see Chapter 3) to root out people vulnerable to social engineering by simulating one. The Social Engineering Toolkit (SET) allows you to attack by the numbers.
One way to do this is by cloning a website to test internal end users. For example, you can clone the company’s intranet where end users log in and use certain features for work. This portal may also give them access to company assets, applications, and other forms of data. If you can conduct a test and see how many end users would fall for this type of attack, you can use that information to find ways to ensure that this doesn’t actually happen in your company. This may come from end user education to explain that they may see clues (perhaps in the URL itself) or other suggestions such as spoofing or a spear phishing email pointing them to it. By doing so, you may help to secure your internal assets through educating your end users. (End users can sometimes be technologies weakest link.)
Here’s how to clone a site using Kali Linux:
- Choose Kali Linux ⇒ Exploitation Tools ⇒ Social Engineering Toolkit, as shown in Figure 4-1.
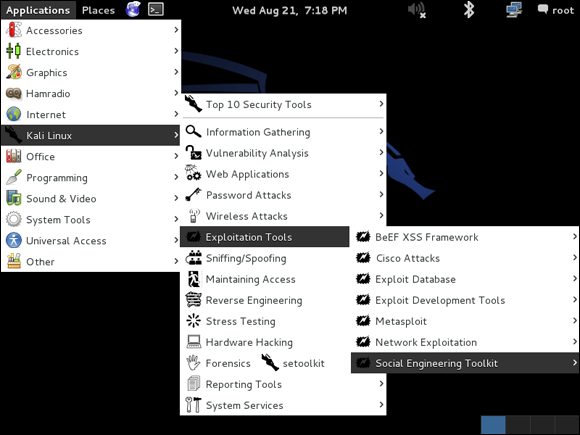
FIGURE 4-1: Accessing the Kali Linux menu to begin a social engineering attack.
- Choose Social Engineering Attacks, as shown in Figure 4-2.
Choose Website Attack Vectors, as shown in Figure 4-3.
By choosing Website Attack Vectors, you’re selecting the vector where an end user can use a website as the landing point of the spoofed attack.
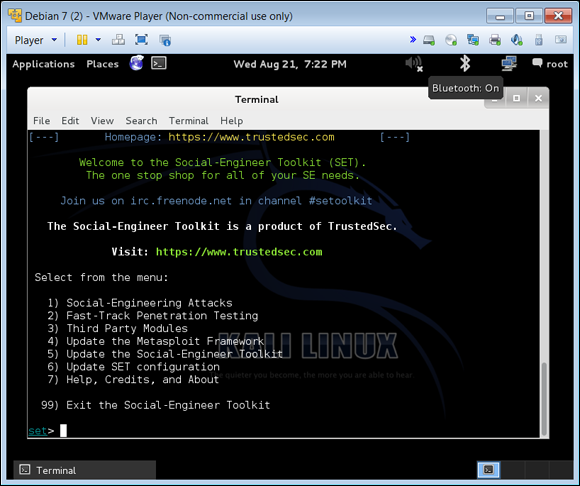
FIGURE 4-2: From the Toolkit menu, choose Social-Engineering Attacks.
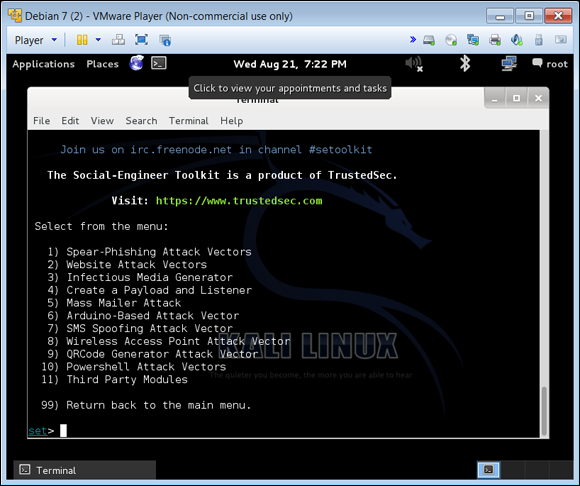
FIGURE 4-3: Choose Website Attack Vectors from this list.
Choose Site Cloner, as shown in Figure 4-4.
This option clones a site so that it appears to be the exact copy of the original. You can also use web templates or create a custom import; however, I’m keeping this example simple with a site cloner.
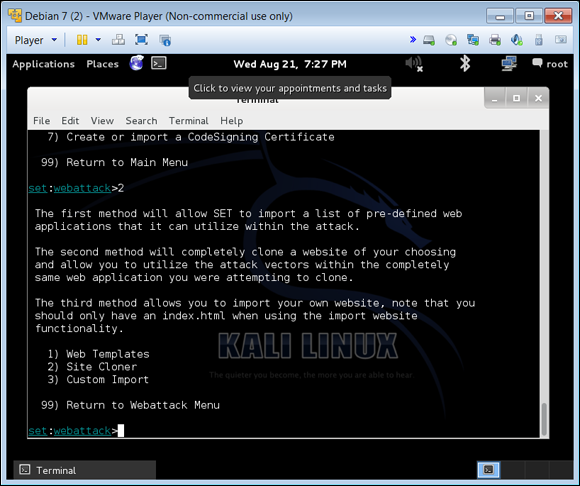
FIGURE 4-4: Cloning a site re-creates an exact replica of it.
Select Localhost and then press Enter.
You can also redirect the cloned site to another server or location. Localhost is simply the local computer that defaults to an IP address of 127.0.0.1, meaning it will set up the cloned website on the local computer you’re working on. You can set this to whatever site, IP, or host you would like if conducting this test on a different host system. Figure 4-5 shows the options I selected to get a cloned website set up.
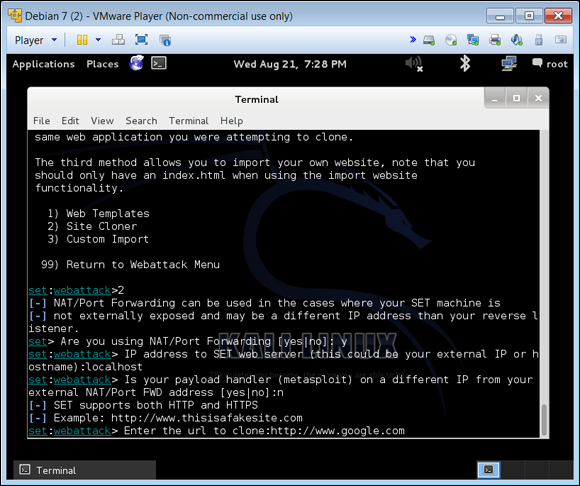
FIGURE 4-5: The options I chose to create a clone website.
Now your clone website is ready. (Figure 4-6 shows how I set up a fake Google.com.)

FIGURE 4-6: I set up a clone Google.com — for pen-testing purposes only!
The purpose of the clone site is to see whether you can use it as a test in your own organizations or for your clients. If you attach this to an email and send it as a phishing attack in your organization, you can then assess how many logged into or entered data into your fake website. Log into the server hosting the site and look at how many logins or attempts you get, which can give you an idea on who is using the site and how much. You can then set up a corrective action of training for your client base.
 You can only use your clone website for white hat hacking or pen testing in a security vulnerability test fashion.
Preventing social engineering the non-tech way
Other ways you can prevent social engineering from happening is to ensure that there is a strict (and enforced) password protection policy in place. For example, you can configure your network security to force end users to create only hard to guess passwords and make them change passwords (and not reuse them) over a period of time. And not write them down anywhere! You can also hold mandatory education classes that help end users recognize clone websites, phishing URLs, and cold calls.
Other attempts at social engineering is from dumpster diving (which can be an actual garbage dumpster outside) but more likely the trash inside the office space itself. Having a shredder or other paper disposal unit for this purpose is essential to keeping good housekeeping and basic security in check to thwart this type of simple attack. Lastly, shoulder surfing (or keyboard surfing) is also another simple attack where someone simply observes what is typed, memorizes it, and then duplicates it.
Client-side and server-side attacks
The endpoints are the weakest areas in security (human beings are one of those endpoints). The technology they use (desktops, mobiles, laptops, tablets, and phones) are the other endpoints.
Figure 4-7 shows a very simplified view of a common network with three different segments: the segment where end users live, which is usually where the endpoints exist as well as wireless access points (WAPs) and most of the connectivity takes place; the segment where network resources such as data access via a database, network servers, virtualized servers, network attached storage, and applications live; and the segment where people gain access to the outside world via a firewall, network router, private or public links such as the Internet, and access to other data and applications via cloud resources.
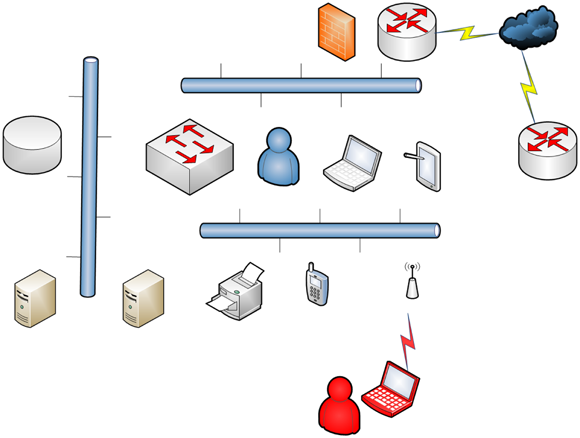
FIGURE 4-7: The different areas of attack vectors.
Viewing a simple network such as this, you can see where a network attacker or hacker can gain access to any of it from inside the network and sometimes from outside of the network. Your job is to test all these exploits, try to penetrate all of these resources, and if you do gain access, shore it up before a hacker gains access to the vector.
A list of access points includes (but not limited to):
From the outside in: The ability to penetrate a firewall is extremely difficult. One of the ways attackers try to gain access into a computer network is via router hopping from routers they can access outside of your network (perhaps in your ISP) and through to your DMZ (demilitarized zone, any external-facing area of your network that is exposed to untrusted networks) and into your private and protected internal network.
This is the hardest way and inconsequently it’s also the most monitored via a company’s security operations team. To pen test this area, I would suggest external scans to the edge and all access points from the outside of the network in. I would also suggest testing your ISP and working with it to make sure that it’s also running penetration tests on its network systems.
- The inside or internal network: You can conduct a pen test using tools such aa Nmap to map the inside network and see what is available and accessible. I introduce Nmap in Chapter 3.
- The inside wireless network: This is the most likely attack vector because it’s usually left open for ease of use. Many companies run parallel SSIDs (and networks) where inside resources are controlled and secured and those just looking to gain access to the Internet with a BYOD (Bring Your Own Device, a scenario in which employees use personal devices — phones, laptops, tablets, and so on — to access company assets) may use the open unsecured wireless network.
- Malware: Malware (or malicious software) are other forms of software that implants trojans, backdoors, open ports, worms, and bugs inside your systems that allows others to connect remotely and exploit systems. Running pen tests (scans) and identifying open listening ports and other various holes can help to find these types of issues rather quickly.
- Endpoints: Privilege escalation on Windows systems is a common one where software is installed or bugs are found in drivers and other pieces of software that allows an attacker to gain access to trusted areas of the operating system.
- Users: This is one of the hardest vectors to deal with because it may be one of your most senior technical assets abusing their power and privilege. In these cases, it’s helpful to have a separation of duties and in some cases, random auditing, accounting, and the ability to capture logs via authentication that allows these types of attack vectors to be monitored and handled if abused.
 This list is by no means exhaustive. It’s simply enough to get you started and hopefully thinking that penetration testing needs to be done in all vectors so that you can identify the many possibly entry points into your systems, data, and assets.
Password cracking
All interconnected devices need to communicate and almost every single one of them requires an account so human beings can access and use them. Other services can sit over them (think enterprise management software) and overlay the management of them with a bigger tool. Either way, they require accounts to be managed, and accounts require credentials — a username and a password.
Despite the warnings over the years, people still use obvious and easy-to-guess passwords for their systems (such as the names of their children or pets). And because usernames are usually some version of first initial and last name (or other common variation) with the company’s domain name as the second portion, old school hackers can easily gain access by just guessing at the logon credentials.
Fortunately, many systems are set up to require strong passwords (passwords using upper and lowercase, numbers, special characters), and for them to be changed on a routine basis. But hackers still have a fairly easy way to get in through password cracking.
Password cracking is accomplished through a tool that attempts all possible username and password combinations using a dictionary file. With enough time, the correct username/password combination is usually found. This can be done locally or done remotely via tools (such as Kali and Metasploit). Figure 4-8 shows an example of a password cracking attack with Metasploit Pro.
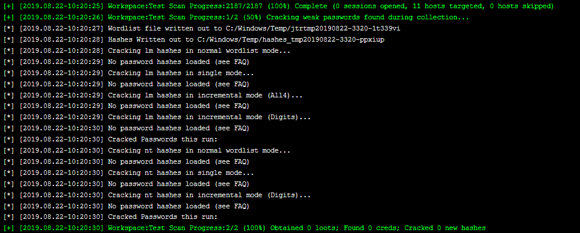
FIGURE 4-8: A password crack via Metasploit.
This kind of attack is exactly why security professional implore people to change their passwords on a regular basis. With enough time (and computers have all the time in the world), usernames and passwords can be hacked. If passwords are changed, it lessens the chance that a computer will hit on the right combination of letters, numbers, and special characters.
Cryptology and Encryption
One of the most common attacks is password cracking, and the use of encryption can thwart many of the tools I discuss in this chapter. Keep the following points in mind as you dive into how encryption works:
- Encryption is the process in which you have cleartext data that you run through a protected cipher; this produces a key to decrypt (decode) the data. You want to protect the key, so when you transmit the data, only the recipient can decode and use it.
- Cryptology is the study and work done with encryption methods. Many consider it to be one of the hardest parts of learning about security because it’s complex and confusing.
- Although you need to understand many concepts about encryption to exploit them, you can let the tool handle most of the work to run a pen test on encryption. Then you can view the reports to get an understanding of what the tool found and what risks you need to mitigate.
- I cover some of the most common forms of encryption here at a very high level of how they are used and their practicality when running pen tests. This is not an all-inclusive discussion because encryption, the math involved, and all of the different ways it’s implemented could fill a 300-page book (at least).
- If you are new to encryption, use this chapter to run the tools and reports. Later, you can study things as they start to appear in your reports. This gives you a springboard to learning more about encryption and its methods.
Security analysts and pen testers like to use the CIA (confidentiality, integrity, and availability) triad to model security operations using encryption. By using this model, you can design any form of security using encryption whether you’re securing data in transit or data at rest.
When you transform data with encryption (typically done with a transform set), it hides and makes the data. Figure 4-9 shows that while accessing a website that is protected by encryption, all communications sent through are encrypted and can’t be read in cleartext if data is captured and reviewed.

FIGURE 4-9: Using Wireshark to capture and expose data protected by SSL.
As a pen tester, encryption is a great way to show that you aren’t at risk by someone simply running a packet capture tool, grabbing some network traffic, and picking out information that gives them access to your network. This is why encryption is so important.
SSL/TLS
Secure Sockets Layer (SSL) is a protocol that provides encryption, an authentication method, and provides message integrity. It comes in different bit strengths and the bit strength denotes how secure it is. For example, 40-bit encryption is not as strong as 128-bit encryption (SSL 3.0). Tools such as Metasploit or Nessus help you identify weak versions of encryption.
Transport Layer Security (TLS) is an open-community standard that provides many of the same services as SSL. It’s more extensible and more commonly used in today’s infrastructures. SSL and TLS are used when data is in transit (not at rest).
SSH
Many older systems still have a telnet daemon or service running that allows an attacker to begin a password cracking attack. A secure shell (SSH) is the stronger replacement for telnet.
It’s an application and protocol that is used to remotely log in to another computer using a secure tunnel and allows you to secure data (much like SSL does) in transit from being captured and used through encryption. A session key is exchanged from the computer requesting a connection to the computer you want to connect with, and this builds the secure channel between them.
IPsec
The Internet Protocol Security (IPsec) protocol also builds secure channels between devices using a Virtual Private Network (VPN). VPNs are used to create a tunnel between a sender and a receiver so that data in transit can be secured with encryption. Specific algorithms and cryptographic keys are required for IPsec to work and it can be complicated to configure. Most of the time, this type of encryption is set up on network devices looking to communicate with other network devices to share information, such as routing updates, tables, and adjacency information. It commonly uses pre-shared keys to credentials to build secure connections.
Using Metasploit Framework and Pro
Metasploit is a tool maintained by Rapid7 (rapid7.com). You can download a free trial for Linux or Windows and get it up and running pretty easily for test and use within minutes. If you want to learn the tool and run your first pen test with it, simply sign up for an account by accessing the free trial links. You’ll get a copy of Metasploit Pro for download; install it (an easy process), and then request a trial key via the login interface where you set up the tool.
Before I get into the specifics of using this tool, a few words of caution:
- Be patient. Depending on your network segment and what options you select, the pen test can take some time.
Do not scan without permission. Make sure you’re conducting an ethical hack/pen test and that you not only have permission but have created awareness about it with key IT personnel.
This way if something goes wrong, you can stop the scan and assess the damage and correct it. Even when you take precautions, scans cause issues at times, especially on a production network.
- Always monitor a scan. Scanning and walking away isn’t recommended because you may identify a critical risk that needs to be assessed (and perhaps corrected) immediately. It should also be monitored by security operations analysts for this reason alone.
- Keep your tools up to date. The Metasploit Administration menu has a software update option (in the top-right corner of the dashboard).
- Back up any critical data before you scan. You’ll want to back up data on hosts you think might be corrupted or otherwise negatively impacted by the scan.
Follow these steps to run a scan with Metasploit Pro:
- Access Metasploit on your local system by going to the URL set up for you during the installation process:
https://localhost:3790/ Log in and click the Quick PenTest link.
The Quick PenTest wizard shown in Figure 4-10 opens.

FIGURE 4-10: Metasploit Pro’s Quick PenTest wizard.
Choose a target profile, give your project a name, and enter the Target Addresses.
You can choose the Everything option, which takes longer to conduct, or specific targets, such as Windows Targets.
At this prompt I left all of the defaults and added a project name and a target address to scan. This tool has some intelligence to start with a default scan of the local subnet you’re attached to based on your IP address. Here it captured a small private addressing range of 192.168.1.0/24. It allows for the scanning of 254 hosts on the subnet.
Click Start Scan.
Figure 4-11 shows the scan as it runs. One of the tools it starts with is a network mapping service with Nmap.
Once the scan completes and the segment is mapped, the tool then probes, tests, and runs a series of vulnerability tests and other services to get a complete picture of the segments risks and what can be exploited.
When the scan is complete, access the findings by viewing the output on the Metasploit console window and buffer or in logs.
When you complete your scanning and assessment, you’ll review reports and findings to see what you need to fix, monitor or add to a risk register. I cover findings, reporting, and determining next steps in Part 4.
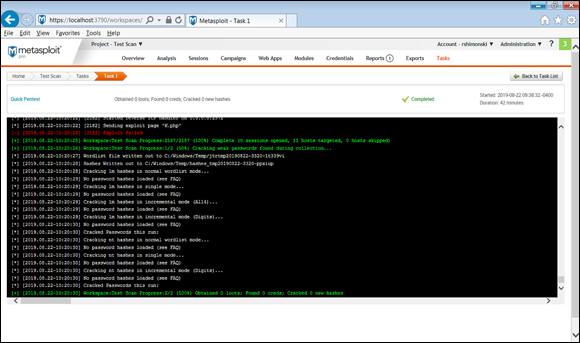
FIGURE 4-11: Running a quick pen test with Metasploit Pro.
Your toolkit leverages some of the same tools found in other aspects of your toolset. For example, having Kali in your toolkit includes Nmap. Having Metasploit in Kali includes Nmap. You can also use Nmap by itself as a standalone tool, which I show in Chapter 3.
I showed you a Windows version outside of Kali Linux, so you can get in the habit of seeing pen test tools being used on both a Windows and Linux system. This way, no matter what you decide to use as a toolkit (Linux native, Windows, or a VMware or Virtual Box host), you’ll be ready to scan! Using the tools on either platform is a nearly identical process, so you can mix and match. That said, if you wanted to run Metasploit from Kali, you can do that from the Exploitation Tools menu.