
Chapter 13
Retesting
IN THIS CHAPTER
![]() Examining why a retest is a good thing
Examining why a retest is a good thing
![]() Testing and retesting … and testing and retesting: The reiterative process
Testing and retesting … and testing and retesting: The reiterative process
![]() Knowing when to retest
Knowing when to retest
![]() Using the report and risk register to choose what to retest
Using the report and risk register to choose what to retest
![]() Doing the retest
Doing the retest
After you’ve conducted a pen test, written your report, and made your recommendations, the next step is to make sure all that work was done correctly for the sake of an increased security posture. What that means is that it’s time to retest.
There are important reasons to retest:
- Ensure the original pen test findings no longer pose a threat. Or, if they do and you decide to monitor them instead, you can review for any other weaknesses that may be created between the original test and retest.
- Test the fixes. This includes what goes into production, the configurations made to fix things, and the services added (or removed). You also want to make sure configuration changes don’t expose other issues.
- Scan any software that was updated. If software is updated with any patches, security fixes, new drivers, or any other upgrades, it must be vulnerability scanned and retested to ensure it has no exposed points post-remediation.
When you can run a retest and produce a clean and healthy report, this is the final outcome you hope for, but the process is iterative. In this chapter, I cover the fundamentals of conducting a retest and show how the iterative process makes a circular workflow that builds on mitigation and remediation efforts.
Looking at the Benefits of Retesting
After you conclude the phases of pen testing and become more familiar with that process and have made recommendations from the output of your ethical hacking, it’s time to do it all over again. This time, however, hopefully when you retest, there is less to find! This is one of many benefits to retesting.
Pen test retesting benefits include:
- Testing the ability to respond to incidents. As you conduct more pen testing efforts, vulnerability scans, mitigation work, and overall security efforts, everyone on the team (and individually) becomes more knowledgeable and better responders. It also builds team cohesion for bigger events.
- Testing the ability to harden systems. Making recommendations and applying them can be a difficult challenge. It’s tough to work on systems as it is, but to make radical changes at times and test them, can be tough on the people performing the work. The more this effort takes place, the easier it becomes for people performing it, especially when it comes to paperwork such as change management.
- Testing the viability of the risk register. Your risk register is the central database repository of your critical issues, flaws, and problems. If you’re running your pen test program correctly, you have a comprehensive database of all of these issues, but also ways to mitigate them, monitor them, and solution them. Conducting tests and retest value checks your risk register for sure!
- Scanning for and finding new issues post remediation. There is no harm in retesting and getting more scans of your network, penetration testing, and other methods to test security if you’re allowed and able to do so! The more you test the more you know and thus, the more secure you will be.
 Conducting a pen test and then a retest does not mean you are 100 percent secure. Pen testing is a continuous program that doesn’t stop. When new systems are deployed, new technology brought online, software is patched or upgraded — to name just a few scenarios — the environment experiences a change that potentially allows a security posture to be weakened. Therefore, you must consider pen testing, reporting, making recommendations, and the retesting phase iterative.
Understanding the Reiterative Nature of Pen Testing and Retesting
Triggers alert you to the need for a retest. Whether you retest (and when) is determined by whoever’s in charge, or you may make the suggestion yourself.
Figure 13-1 shows the workflow for both a pen test and a retest, where you find the following workflow items:
- Start (start the process).
Do an assessment of information required to conduct a pen test.
This may be part of a project plan (or a bigger project program) where you have a stakeholders meeting to gather requirements, as I discuss in Chapter 9. Regardless, when this step is done, you have goals and the scope for your test.
Conduct a pen test.
See Chapter 10 for details.
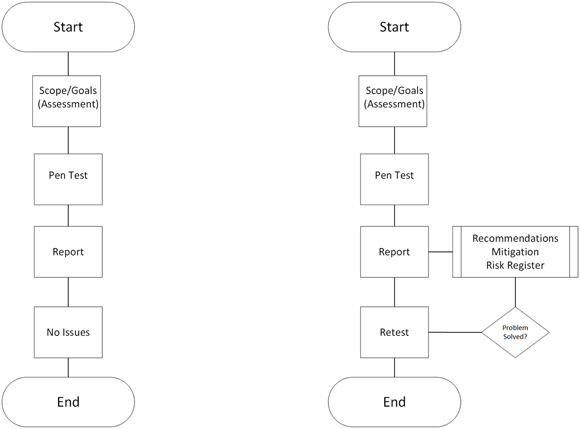
FIGURE 13-1: The pen testing and retesting processes are very similar.
Report out your findings.
Delivering a report, covered in Chapter 11, is likely always a part of your pen testing duties. A subtask or process might be to make recommendations and guide the mitigation process (if that is part of the project scope) and help to work with the risk register.
Technically, at this point, the pen test is complete, but you might be asked to retest.
Retest and report on the new findings.
The process could keep going if you don’t get the all clear.
- End of workflow.
Note that the workflows shown in Figure 13-1 are barebones representations of what the process will look like. You might need to include sub processes in additional swim lanes that point to change control/management and other sub process areas.
After you report, make recommendations, and then retest, you absolutely need to re-report it no matter what — even if you don’t have any recommendations or items to update on the register. This is why you must continually ask, is the problem solved?
Determining When to Retest
The pen test process flowing into retest (refer to Figure 13-1) should be a trigger-based system where a retest becomes a process task in your pen test program on a continuous basis post your first pen test for the organization. Once that first pen test is done and the workflow begins, retests should be qualified at all times based on the process of reporting, finding remediation, and then retesting.
You can also schedule them on a need basis. In Figure 13-2, I set up a process where the risk register is consulted by priority. If a risk is identified as Tier 1, it’s immediately retested as soon as possible. Tier 2 or 3 risks might be able to wait until the monthly or quarterly vulnerability scanning to take place.
 Regardless of how you or your organization sets it up, the truth is, you may not be able to scan whenever you want. This is why change control is so important to follow. You want to know what is on the change calendar and what is going on in the entire organization so there are no conflicts.
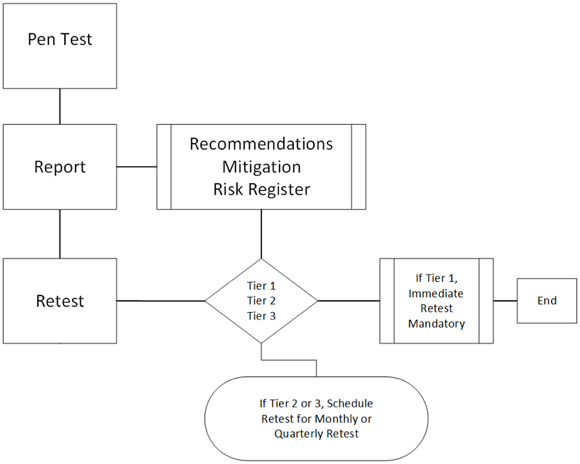
FIGURE 13-2: Prioritizing retesting tasks with a tier system.
Also, you want to ensure that the retest is followed the same way as the original pen test. The same approvals, process, communication, discussions, and workflow must be followed as was covered in Chapter 10.
Choosing What to Retest
If you’ve conducted the pen test thoroughly and diligently documented what you did and what you found, deciding what to retest can be, dare I say, easy? You’ll rely on your documentation, the report, and the risk register.
Consulting your documentation
In Figure 13-3, I have updated my documentation to reflect what changes were made to the vectors and threats identified in the pen test report. I also took the recommendations provided and some of the risk register items to create a visual of what my report may look like so I can use it as reference when putting together a retest plan.
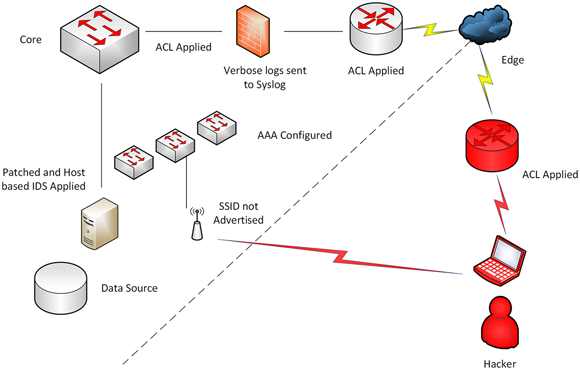
FIGURE 13-3: My updated documentation to reference during the retest.
Here you can see the suggestions in place and a retest may have blocked all of my vectors to enter the network externally. Some of these examples include:
- Block the wireless SSID from allowing me to see it and gain access.
- Use access control lists (ACLs) to block access to critical infrastructure such as routers and switches that stop me from connecting to them.
- Send logs to a logging facility so that none are wiped away and lost.
- Patch all systems and use intrusion detection software on critical data systems.
If all this is done, retest all of it to ensure that every one of these changes have in fact worked and more importantly, have not opened other issues or exposed other flaws.
Running Nessus, Kali, Metasploit, Burp Suite, and Wireshark (amongst others) allow you to identify all these flaws. You should also rerun Nmap to remap the network and search for open ports that may be available. For example, now that you have installed and configured AAA, you may have a new RADIUS server that may need to be patched or secured.
Reviewing the report
The goal of reporting (see Chapter 11) is to focus on what needs to be done based on the goal of the project or the scope of the task you have been given. Defense in depth needs to be considered in all aspects of a retest. You should go back over the original report, documentation, findings, and other items and artifacts and rescan everything you already tested, or you can focus on areas that may have been compromised.
The threat of specific areas should remain the focus, and you should work to mitigate any threats reported in those areas. As I mention in Chapter 11, this is one of the reasons why you don’t want to clutter your reports. Some things may be implied such as overall scan of the network. You may want to simply focus on the edge where you were able to gain access via the edge and hop to another router and gain more access.
You’ll want to review the report prior to retesting to know where to focus your retesting efforts after mitigations have been implemented. If, for example, a pen test was requested to ensure that the security posture of the web architecture was sound in light of recent concerns made internally by IT professionals, you’ll review the report to find:
- Was the web architecture penetrated?
- If so, how was this done specifically?
Figure 13-4 shows some of the remediations you may want to make, such as using SSL/TLS, to reduce risks in a web architecture.

FIGURE 13-4: Using Nessus to find ways to reduce risks in web architecture.
Reviewing the risk register
By closing an item on the risk register, you can mark it as complete and ready for retest. Consider, as example, two items identified in the pen test report and shown in Table 13-1. Here you can see the item number on the risk register, the priority or tier rating, and the pen tester’s notes.
The register could include the recommendations, too, or those can be in a separate document. Whatever the fix is for each item, it needs to be assigned, change control followed to mitigate the issue, and then marked as complete. In this example, the two items found were important to fix to get to the next phase, which is the retest. Depending on the risk and other factors, you can also accept the risk and monitor it if you can’t repair it at the time you find it.
A retest will likely show that this issue no longer exists. If a retest flags the issue again, it goes back into the report and the risk register item is reopened.
You must address all risks in a priority manner. As I marked in the notes in Table 13-1, one of the items is a high priority. If the default credentials are not handled immediately, an exploit will likely happen sooner rather than later.
TABLE 13-1 Reviewing the Risk Register for Issues to Retest
Pen Test Notes |
Tier |
Risk Register Entry # |
Conducting a pen test on 11/1/xx, an Apache Server Web Server was found running with an IP of 219.3.4.12, which is accessible via port 80 from the public Internet. Having conducted a vulnerability scan and pen test probing the ability to log in, the default credentials were found and able to be used, which allowed full access to the system remotely. This vulnerability requires an immediate response and is labeled Tier 1. Recommendation is to change the default credentials into a honeypot and/or disable access to the default account. |
1 |
17 |
Conducting a pen test on 11/1/xx, a Cisco Router was found running with an IP of 10.2.11.1, which is accessible via port 23 from the internal corporate network. Having conducted a vulnerability scan and pen test probing the ability to log in, conducting eavesdropping of this device and capturing credentials sent in cleartext, it was found that this device can be accessed and manipulated. This is the default gateway to an access layer network with no access to the distribution or core as it is protected via ACLs. This vulnerability requires a response and is labeled Tier 2. Recommendation is to disable telnet and applied SSH for secure access. |
2 |
24 |
Running a Pen Retest
To do a pen retest, you follow the same steps from Chapters 9 and 10. You select your tools after your goal and scope have been defined, get appropriate permission and access, set up logging, and then move to gain change control and final approvals to begin. Nothing has changed except you’ll focus on specific areas, items, and artifacts derived from the last pen test, the report, and the risk register.
Although I point out what you can do as a pen tester earlier in this chapter, you are ethically hacking, so you need to know when and where to stop your attack — you don’t want to crash and burn your company or your client’s systems.
As you conduct your test, keep these points in mind:
Pay close attention to the old report and what the new information is showing. For example, you may be re-running Metasploit and finding services, ports, and IPs are responding, some of which may be closed, but others might now be open. For example, in Figure 13-5, you can see that NTP (the network time protocol) service is now operable on a server that wasn’t reported with the original pen test scan.
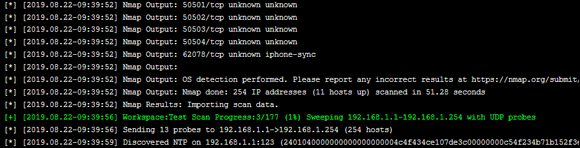
FIGURE 13-5: Mapping a network and finding new problems.
When configurations were made to disable some services, maybe someone accidently turned one on. Or added a new function to secure a service inadvertently turned on a server service you didn’t want enabled.
 Whatever the scenario, make note of your exact steps and findings when identifying any new vulnerability. It may be something you pick up on a vulnerability assessment, but for the pen retest, you should try to exploit it.
As you did with the pen test, find a way in. Using the Nmap ntp-monlist, for example, you can gather information about the NTP server to see what it tells you. Figure 13-6 shows how you can use Nmap to query an NTP server service and identify (or map) it, so you can see what the NTP master server is, the clients, and peers.

FIGURE 13-6: Using Nmap to exploit NTP.
Through this mapping, you can then attack the master once identified to potentially be crashed with a destroy attack, such as an overflow or DoS, and basically throw the entire network into a tailspin. Document this exploit in your log.
- Document your every move. Just as with the initial pen testing, you must keep detailed notes so that you can write another report with your findings. Most times, you can simply update your first report. However, sometimes you may be asked by your stakeholder to submit a new report entirely that can be reviewed in tandem with the older ones. You will present the new findings to leadership and also have them added to the risk register for remediation by priority or tier level.