Chapter 11
Reporting
IN THIS CHAPTER
![]() Exploring parts of the report: From executive summary to the appendixes
Exploring parts of the report: From executive summary to the appendixes
![]() Knowing what to include in the report — and what to leave out
Knowing what to include in the report — and what to leave out
![]() Communicating your findings clearly and professionally
Communicating your findings clearly and professionally
![]() Staying on top of the risk register
Staying on top of the risk register
When you conduct pen tests, you will likely expose at least some weaknesses and vulnerabilities. The next step then is to report on your findings. In this chapter, I show you how to create a professional report to deliver those findings.
The goal of reporting is to focus on what needs to be done. You determine what needs to be done based on the project scope. It can be hard to manage this when you think of security holistically. Remaining vigilant and maintaining a high security posture requires applying defense in depth (the concept that, if you want to secure something, you consider all ways it can be exploited and add layers of security accordingly). You don’t want to clutter your report, but at the same time, you need to be thorough and note any critical issues you find.
 The one major difference between the bad guys hacking and the good guys hacking (ethically) is reporting on what you find. The reports you create in the end ensures the work you do can help to create a program that strengthens security in your organization as a whole. And that helps to keep the bad guys out.
Structuring the Pen Test Report
Your report should come from a combination of the tools you use (some generate reports) and your own written work to explain overall health of the environment. A report comprises any sections outlined in the scope of the project (see Chapter 9), but this list shows sections that commonly appear:
- Executive Summary: The executive summary briefly summarizes all of the key details of the report. It will speak to the reader in a way that lets them know what steps were taken, what the report ultimately found, and an overview or highlight of next steps, which might include recommendations (see Chapter 12).
- Tools, Methods, and Vectors: This section covers the tools you used and the methods you chose to conduct the pen test. In addition to providing a general outline or narrative of your ethical hacks, also detail the paths you took with detailed step-by-step attack patterns and selected vectors.
- Detailed Findings: This is where you will list all security risks, vulnerabilities, penetration points, threats, and concerns. Include the technical aspects of each finding in detail.
- Conclusion: This section of the report reiterates the executive summary but with a focus on the next steps.
- Recommendations: Although your job is ultimately to do the pen test and assess the health of the organization’s overall security posture, you might be additionally responsible for providing guidance on ways to improve the security. If so, put those in a separate section and be as detailed as possible.
- Appendix: Include this section for charts, logs, and any information that falls outside the project scope but which you think could be helpful.
This list shows how some reports are structured to give you a starting point. Your company may have specific ways in which they would like you to report, or you can find other examples online that can give you more ideas to choose from.
Executive Summary
The first part to consider in your report is your Executive Summary. A summary becomes an executive summary when you conduct a summary response in an organization that is likely read by the executive leadership staff.
For those of you who work in these environments, many times you have very little time to speak with and meet with senior executives so think of the executive summary as an elevator pitch. You need to very quickly and concisely talk to your goals, outcomes, and provide a high-level view of key findings. Keep details for the body of the report, not in the summary.
Overall, the goal of the summary is to let the reader know what steps were taken, what was ultimately found, and next steps. If these are the details of a pen test, an executive summary might look like what’s shown in Figure 11-1:
- A companywide issue with all Apache web servers that can be accessed remotely without a required patch (more suited for the body in findings).
- You have or had a goal to identify whether your company-wide web architecture was secure for the upcoming holidays because the company relies on the integrity of these systems to be profitable in the fourth quarter.
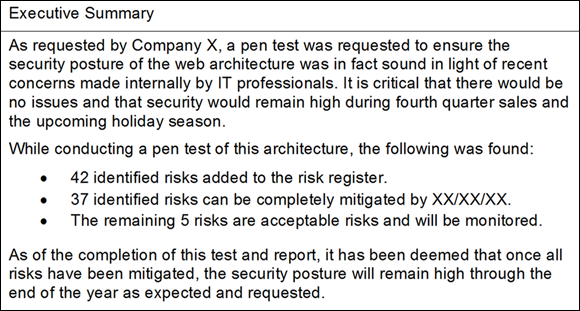
FIGURE 11-1: An example executive summary.
This (as noted) is only a suggestion; however, it fits all audiences. I didn’t get into details about patches, vendors, systems names, technical jargon or any other albeit important, but unnecessary information for the executive summary. Those details can be added into other sections and appendices.
Another one of the biggest items to consider for the executive summary is scope. This should read very clearly in the first part of your report. I covered that a scan was needed and completed. I didn’t get into what vectors I chose, tools used, methods and so on. I had to identify the web architecture because that was in scope. I didn’t have to scan every part of and pen test the entire enterprise’s technical footprint. The scope of the pen test was to identify whether security posture was high on the web architecture, and that’s what I included in the summary.
Tools, Methods, and Vectors
This section of the report is where you can get more detailed, covering the tools that were used, what methods were chosen to conduct the pen test, paths taken, attack patterns, vectors selected. You can also write a general outline or narrative of the ethical hacks.
Figure 11-2 shows an example. You can either detail or map the specifics of what paths or vectors you took, what tools you used, and any specific methods of attack. This can be considered the attack narrative.
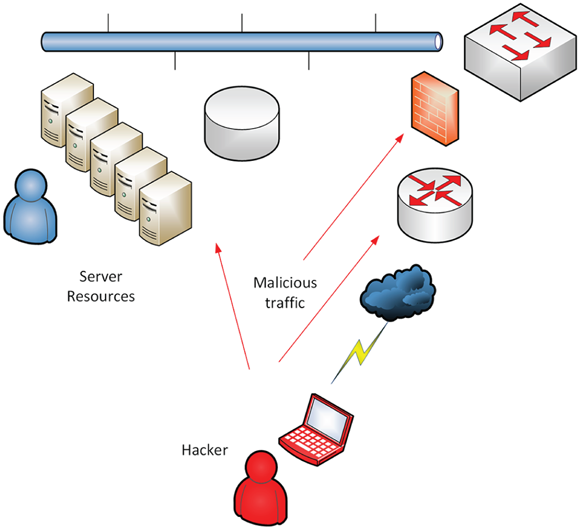
FIGURE 11-2: Documenting and reporting attack vectors is part of your narrative.
Figure 11-3 shows an example of what this section may look like.
Depending on the length and complexity of the pen test, this section can continue on with a step-by-step (or hop-by-hop) layout of the attack narrative and how certain information was found based on the assessment. The specifics here can really help to build a technical map for other teams you might collaborate with to address the risks.

FIGURE 11-3: An example of a Tools, Methods, and Vectors section.
You should always assume other technical teams (with permission of course) may be reading your report to help mitigate the risks. You are the pen tester, but the system administrator will likely be the one who needs to patch the DNS server that’s providing zone transfers. The report findings may need to go to the SQL database administrator (or developers) who can help to fix the DBs to stop injection. These folks work with the risk register to close out the items prior to retest.
Detailed findings
All security risks, vulnerabilities, penetration points, threats, and concerns with a list of all technical aspects of each finding are provided in detail. This is the part of the report that allows you to really dig deeply into the specifics of your findings.
If you were able to penetrate a specific port and IP address combo or thwart a router’s security, all that should go into detailed findings. You can also use the notes created and the tools report and audit output for help building your main report as shown in Figure 11-4.
The biggest difference between this section and the one previous is that this is where you can place the items identified and outcomes from the attack narrative. In this example, you may want to use the Metasploit audit logs to show all the vulnerabilities identified. You may want to show the specifics of the logs (in minute detail) where you found the zone transfer issue. You should show all details; however, if it seems to be too much information, you can choose to summarize for the sake of brevity. I would encourage you, though, to be cautious so you don’t remove information that is needed for your report.
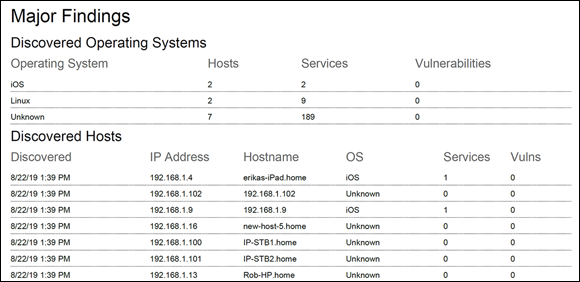
FIGURE 11-4: Include your main findings in your report.
It’s these details that allows the technical teams to not only fix what you found in the pen test, but also identify any and all other issues that may be (or not) relevant to the conducted pen test. For example, your goal (in scope) may have been to protect web architecture, but the technical teams found that all of the Windows Servers are missing critical patches that help mitigate other issues that the tools may have found.
You don’t want to overwhelm anyone, confuse the report, or stray too wildly from the goal/scope, but you’re beholden to inform those of any and all security infractions you identify along the way. Cover those details that fall outside the project’s scope in the appendices.
Conclusion
The Conclusion section takes everything you compiled into your report and succinctly wraps it up with a focus on next steps if any. Repeating what you wrote in the executive summary can be okay, as long as you switch the focus to next steps. You can of course outline next steps in the body or anywhere else in the report, but the conclusion at the end should take one last look at next steps holistically and purposefully. Figure 11-5 shows an example.
As you can see, the next step is to do a retest (which I cover in Chapter 13) to ensure that any documented changes, fixes, risk avoidance, or compliance items were handled and done so correctly. A retest will prove that.
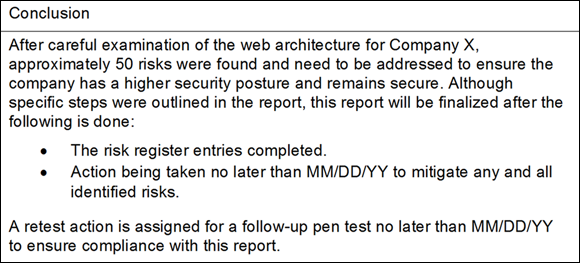
FIGURE 11-5: An example of a report conclusion.
Recommendations
As a pen tester you may need to supply some help to those who need it depending on the scope of the project or the size of the company. Smaller organizations may require you to help fix what you found and if you can, add this to your report. You can create a separate section or add it into the detailed findings.
As you will see, the detailed findings, appendices, and recommendations can be repurposed and reorganized based on what you need for your report. You could have a recommendations list in your appendix.
 Recommendations should be made if they’re in scope. Not all pen testers are required to recommend how to fix the items they found in the pen test. Should you know how to fix the items you have identified? If you want to learn more about security and how to be a better pen tester than the answer is yes, but it doesn’t mean that it needs to be in the report you submit. If it is in scope then you should by all means create a list of items you believe that the company or organization should do to mitigate the risks you have identified. See Chapter 12 where I cover recommendations in detail.
Appendix/Appendices
Many reports might have extra information that may or may not be fully relevant to the scope or goal of your pen test and report. Place such information at the end of the report in an appendix or appendices (if you have multiples). Other information that can go here may be port charts, maps, full audit, or tool logs and other items that can be helpful to those using or reading the report.
Creating a Professional and Accurate Report
Writing the report isn’t just about including the correct sections that I describe in the preceding section. You need to be professional, show correct data, and not mispresent findings. I’ve compiled this list of do’s and don’ts to help ensure you deliver a great report.
Be professional
For the report itself, consider using company letterhead, or company branded office documents.
For the report out, which I discuss later in this chapter, consider using PowerPoint, Keynote, or another presentation program to put your findings in a nice, visual layout.
Stay focused
The purpose of this pen test is to make sure you help an organization identify potential threats through analysis, assessment, and testing. You can then use a report to help develop mitigation strategies that can help with risk avoidance. If it’s a major security concern, it may be a topic to broach but if it is not, it should be left out of your report.
Also, never steer away from what the purpose of your pen test is to meet your own needs or wants. You don’t want to point out design issues that impact performance, vendor choices you may not like, or delve into areas outside of the intended purpose.
Avoid false positives
As you conclude your test and then your report, you need to ensure that your report has very carefully been cleaned up so that it doesn’t misrepresent the outcomes of your test and it clearly depicts what needs to happen next. One of the items you want to ensure isn’t in your report is unnecessary information. To take this topic one step further, you should ensure that you have inspected your data collection to filter any false positives from your report findings.
For those of you who are familiar with firewalls and firewall logs (as an example), if you look at the log output you can immediately get overwhelmed. That said, you may want to use snippets of information. You can also clean up the information in a way that highlights what you want the report reader to focus on.
Lastly, you don’t want incorrect or erroneous information in the report. Because of that, you should do a data clean up (or sanitize the data) prior to using it. An example may be, if you’re trying to show a log entry for someone entering FTP ports from an unauthorized IP address, you would want to remove any information from the authorized ones. These may show up as false positive information where the access was flagged and recorded, but it doesn't impose a threat and/or are relatable to the pen test and threat assessment.
Classify your data
Another important factor for your reports may be to consider doing a data classification exercise so that your report findings can be grouped for easy interpretation and easy assignment for remediation. For example, if you place your findings in categories such as subvert attacks, destroy attacks, or other examples provided in this book, you can also prioritize the threat level based on these findings.
The goal is to make sure that important data is easy to identify and assign. When attempting to ensure risk compliance, management, avoidance, and acceptance, you want to make sure you do not miss any priorities based on the outcomes from your pen test.
Encourage staff awareness and training
Your report should contain information that points to areas in your pen testing and ethical hacking that leads to a need for staff training and awareness. For example, if you were able to hack via social engineering, phishing, trickery, deception, or any other form of hack I cover in this book to subvert stealth attacks, you need to highlight these areas in your report as a need for training and awareness.
Delivering the Report: Report Out Fundamentals
After report creation comes delivery: This is the report out, and it should be reported to those who need to hear it, the stakeholders in your project or program. Who you will ultimately be reporting out to should be identified up front as part of the preparation I discuss in Chapter 9.
 As pen test reports can contain some highly sensitive (and sometimes dangerous) information, it’s imperative you give your report to only those who need to know. Your findings should be considered secret unless you have permission to declassify them. Because the report essentially creates a step-by-step roadmap on how to get past very expensive security technology and steal company data, you should secure and perhaps even password protect or encrypt your report for safe keeping.
The report out follows the same structure as your report, with the same sections. Because you will be presenting your report during the report out, creating a presentation with slides helps you cover the appropriate talking points while showing the information in a clear, visual, and professional manner.
Updating the Risk Register
A report is just a document. It is what you do with the information in the report that matters. After you outline a series of remediations that need to take place, add them to the risk register and then prioritize them. The risk register, which I introduce in Chapter 2, is the database of risks that need to be worked on to lower risk, and those can be either risk aversion or risk avoidance specific.
As you scan, assess, penetrate, and test, you will find issues to add to the risk register. The report is created specifically for each test while the register is a living, breathing document that accompanies all post-test reports and that is continually updated. Risk registers generally include the risks and vulnerabilities you found, how you discovered them, the level of risk associated with each, and a priority for dealing with each. For example:
Low-level risks: The risk can be small where you know there is a problem, but you accept the risk of it being a problem because you might not be able to fix it at this time. Maybe a patch is not yet available by a software vendor, and you have to wait.
You might identify a risk and decide to monitor it, but if there is a penetration and exploitation of that risk, it will lead to very little threat. An example may be if the company’s reputation is hurt slightly by upsetting a few clients who rely on the systems, but they were not available for the day. It was disruptive but not harmful to the clients. You might accept this as a low-level risk.
- High-level risks: A high-risk item may be one that is likely to be exploited. And if it is, that may cause major financial losses for company, as well as a big negative impact on their reputation, or worse, a loss of life.
Dealing with the risk register is just part of being a pen tester, and it might require some project management on your part. Standard project plans with Gantt charts, critical paths, and assigned resources and tasks can be used. A company might prefer agile methods or a scrum team that uses scrum boards to assign resources and tasks. You’ll get your remediation either documented post report or risks mitigated through task completion. Either way, be aware that this is an important part of the post testing/analysis/report out process.
Depending on what was established during the preparations (see Chapter 9), the process for dealing with risk mitigation might look something like this:
- Collect data and organize it into a report.
- Map the identified risks into the risk compliance program.
Determine a fix.
An example may be the SQL injection attack identified in the pen test report. The fix may be to secure the database with patching, configuration, or additional security applied.
Assign the fix.
Resource allocation is an important part of project management. You want to be sure whoever is assigned can handle the efforts before you attempt to rescan. There is no reason to retest if you know the vulnerabilities still exist.
- Go through the change control process to mitigate the issue.
Mark the item as complete and retest.
A retest will likely show this issue no longer exists. If a retest flags the issue again, it goes back into the report and the risk register item is reopened.