

CHAPTER
1
Configuring your Development Workstation
In Part I of this book, you will learn how to build mobile solutions using the PeopleTools development framework. You will use Application Designer and online configuration pages to construct and configure web-based applications. No other tools are required except what you installed when you implemented PeopleTools. There are, however, a few client-side development tools that help you build better solutions quicker. In this chapter, you will learn how to install and configure these development tools. Before installing new software, let’s review the various types of mobile applications.
Mobile Application Types
In this book, we will discuss three different types of mobile applications:
![]() HTML5 web applications
HTML5 web applications
![]() Native applications
Native applications
![]() Hybrid applications
Hybrid applications
When running one of these applications on a mobile device, it may be quite difficult to distinguish between the various types. From a development perspective, however, the application type can have a significant impact on deployment, maintenance, and functionality.
HTML5 Web Applications
HTML5 is very closely aligned with mobile. Support for LocalStorage, offline applications, and responsive layouts fit well with the ever-changing, sometimes-disconnected nature of mobile devices.
The three key differences between HTML5 applications and the other two types of mobile applications are
![]() Delivery mechanism
Delivery mechanism
![]() Device feature accessibility
Device feature accessibility
![]() Portability
Portability
In simplest terms, HTML5 applications are just plain web pages accessed through a web browser. These applications are deployed and “installed” through a device’s web browser, not an app store. They do not have locally installed binary files. I use the term “installed” loosely because the installation of an HTML5 application involves creating an icon that either points to a local web cache or a remote web site.
One of the primary limitations of HTML5 applications is feature accessibility. It would not be wise to allow all web pages access to your camera, contacts, installed application data, etc. Applications that require access to these device capabilities must ask for your permission. With that said, we are seeing an interesting shift in device accessibility: newer devices are making more of these features accessible to HTML5 applications in a secure manner.
A primary motivation for building HTML5 applications is portability. Through web standards and browser support, HTML5 makes it possible to write an application using a single technology and deploy it to a variety of different mobile operating systems.
Native Applications
Native applications are built using a device-specific toolkit and are written using vendor-specific languages. A developer targeting multiple devices would need to maintain multiple code lines, one for each operating system. These applications are usually delivered through a tightly controlled app store. A key reason for choosing native applications over HTML5 is to gain access to device capabilities that are not available to HTML5 applications.
Hybrid Applications
Hybrid applications are standard HTML5 web applications that run in a native container. They are often distributed through a web store in a manner similar to native applications. Hybrid applications share the pros and cons of each of the other two types of applications. Similar to HTML5 applications, hybrid applications share a common code base across multiple operating systems. Since these applications are web applications, they also share the real time, always current nature of HTML5 applications. Through their native containers, hybrid applications gain trusted access to device capabilities in a manner similar to native mobile applications. PhoneGap, a popular hybrid container, makes device capabilities accessible through a plugin architecture exposed through a JavaScript Application Programming Interface (API).
![]()
NOTE
We will cover PhoneGap (and Apache Cordova) in Part III of this book.
HTML5 Defined
PeopleSoft Fluid and Mobile Application Platform (MAP) applications are considered HTML5 applications. What is HTML5? Simply put, HTML5 is the fifth revision of the HTML specification. It includes a few new semantic elements: header, nav, section, article, but the real magic of HTML5 is in its API and related specifications. These APIs include support for multimedia, SVG, Canvas, web storage, offline web applications, drag-and-drop, and many others. When a person or organization identifies a web application as an HTML5 application, they often also include the following related specifications: CSS3, geolocation, Web Workers, Web Sockets, WebGL, etc. Here is the definition we will use: If you can find an article about it on the HTML5 Rocks website (http://www.html5rocks.com/), we will call it HTML5.
Development Tools
Through the remainder of this chapter you will learn how to install various development tools that help you build mobile applications.
Browsers
To effectively test HTML5 applications, access to a browser that supports HTML5 is critical. All modern browsers support HTML5: Chrome, Firefox, Internet Explorer 10, Safari, and Opera. You can view your favorite browser’s scorecard at http://html5test.com/ or see scores for all modern desktop browsers at http://html5test.com/results/desktop.html.
If we are building mobile web applications, why do we care about a desktop browser? Modern desktop browsers include a lot of developer tools and extensions that are not available on mobile devices. Testing and debugging mobile web applications is easier on a desktop browser.
WebKit
WebKit is the rendering engine used by a significant number of modern web browsers, including Android, Amazon’s Kindle e-reader, Safari, iOS, BlackBerry 10, and many other lesser-known web browsers. Until recently, even the Google Chrome web browser used WebKit. So what is WebKit exactly? It is an open-source web parsing and layout engine, NOT a web browser. WebKit determines where to place elements and the WebKit “port,” or browser, draws those elements. Since most mobile devices share this same rendering and layout engine, Cascading Style Sheet (CSS) and Document Object Model (DOM) support are similar across mobile devices. As web developers, we don’t need to concern ourselves with the intricacies of WebKit. Nevertheless, knowing about WebKit is important.
You can learn more about WebKit from these online resources:
If your organization maintains tight control over your desktop browser and you discover that your organization’s standard browser does not support HTML5, all is not lost. Take heart. You have the following options:
![]() Lobby for special treatment so you can use a modern browser.
Lobby for special treatment so you can use a modern browser.
![]() Use a mobile emulator with its modern browser.
Use a mobile emulator with its modern browser.
![]() Use a modern browser in VirtualBox.
Use a modern browser in VirtualBox.
Using a mobile emulator will give you a modern browser, but will not include the robust developer tools found in desktop browsers. Using VirtualBox, however, you can easily spin up a virtualized desktop using Windows or Linux that contains the latest Chrome, Firefox, or Internet Explorer browser. I am a big fan of virtualization. I am actually writing this book in a VirtualBox VM. I am a hardcore Linux user (Oracle Enterprise Linux, of course), but I am required to use Microsoft Word for my manuscripts. To cooperate with the publication process, I spin up a Windows 7 VM with Microsoft Word and type away.
Text Editors
HTML5 applications consist of plain text files. This means your computer already has all of the software you need to construct HTML5 applications. If your operating system is Windows, you have Notepad. If you are using Linux, your operating system has gedit, kate, vim, vi, emacs, and many other text editors. Let’s create a quick HTML5 web page to get a feel for constructing HTML5 apps with a plain text editor. Type the following into a text editor, save, and then load it into your favorite HTML5 browser.
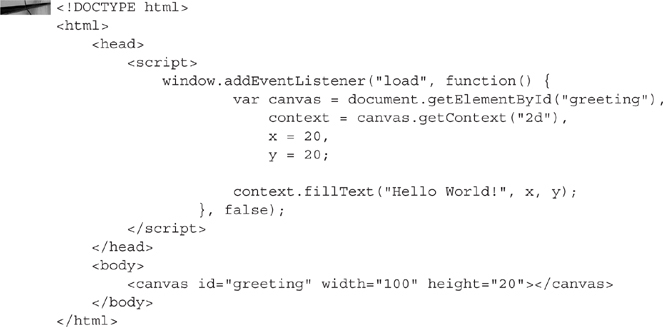
After loading this into your web browser, you should see something similar to Figure 1-1.
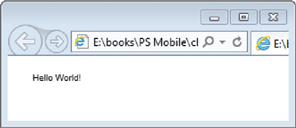
FIGURE 1-1. Screenshot of “Hello World!” HTML5 canvas page
When it comes to text editors, Linux users definitely have an advantage over Windows users because all of the common Linux text editors support syntax highlighting. Unfortunately, Windows Notepad users are left wanting. If you find yourself in this category, then you may want to try out some of the advanced syntax highlighting text editors available for Windows. Here is a list of some common text editors:
![]() Notepad++
Notepad++
![]() jEdit
jEdit
![]() vim
vim
![]() Sublime
Sublime
![]() UltraEdit
UltraEdit
![]() TextPad
TextPad
![]() EditPlus
EditPlus
Notepad++ is probably the most popular free text editor among PeopleSoft developers. jEdit is my personal favorite free text editor because of its flexible plugin architecture. But for those willing to pay for a good text editor, Sublime wins hands down.
![]()
NOTE
You can download SQR and PeopleCode syntax files for Notepad++ from http://greyheller.com/Blog/editing-enhancements-for-sqr-and-peoplecode.
Debuggers and Browser Tools
As we saw in our “Hello World!” HTML5 example, the code we write represents instructions that the browser will interpret. I find it quite convenient to see how the browser will interpret my instructions in real time. Here are some tools I use for online prototyping and debugging:
![]() Built-in browser tools
Built-in browser tools
![]() Firebug
Firebug
![]() Fiddler
Fiddler
![]() Weinre
Weinre
Browser Tools
Internet Explorer, Safari, Chrome, and Firefox all contain developer tools that let you inspect, debug, and execute scripts against the currently loaded page. In Chrome, IE, and Firefox, you display the developer tools by pressing the F12 key on your keyboard. Safari is a little different. If you are using Safari, I suggest reviewing the following articles to see how to turn on developer tools:
![]() http://macs.about.com/od/usingyourmac/qt/safaridevelop.htm
http://macs.about.com/od/usingyourmac/qt/safaridevelop.htm
![]() http://www.jonhartmann.com/index.cfm/2011/4/28/Enabling-Safari-Developer-Tools
http://www.jonhartmann.com/index.cfm/2011/4/28/Enabling-Safari-Developer-Tools
Figure 1-2 is a screenshot of our “Hello World!” HTML5 page in Chrome developer tools.
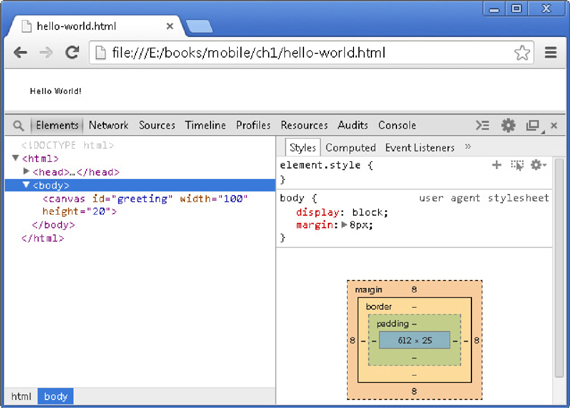
FIGURE 1-2. Chrome developer tools
Firebug
With Chrome and Safari’s Elements, Network, Sources, Timeline, Profiles, Resources, Audits, and Console tabs, you can learn just about anything about the page you are viewing. But when it comes to prototyping and stepping through JavaScript, I prefer a Firefox plugin named Firebug. Firebug allows me to easily test JavaScript fragments and prototype CSS changes. Figure 1-3 is a screenshot of me prototyping some CSS in Firebug.

FIGURE 1-3. CSS prototyping in Firebug
Fiddler
Fiddler is a network debugging proxy. It allows its user to eavesdrop on the back-end communication happening between the browser and an HTTP(S) server. This is extremely valuable when debugging Ajax requests and HTTP redirects. You can download Fiddler from http://www.telerik.com/fiddler. Figure 1-4 is a screenshot of Fiddler.
FIGURE 1-4. Fiddler
Weinre
Weinre is a remote web inspector. It gives you tools similar to Firebug or WebKit (Chrome and Safari), but for remote browsers. This is especially convenient when debugging applications running on mobile devices. When this book was written, you could find information about Weinre at http://people.apache.org/~pmuellr/weinre/docs/latest/.
Weinre runs through Node.js. To use it, first visit http://nodejs.org/download/ and install the Node.js binaries appropriate for your operating system. After installing node, open a command prompt and type the following command:
![]()
After installation, start the Weinre server by executing the command weinre at the command prompt. View the Weinre graphical user interface through Google Chrome web browser by navigating to http://localhost:8080/. A Weinre page should appear with instructions and links to demos. From the Weinre page, open the debug client user interface link in a new tab. You will find the URL for the debug client under the Access Points heading. The URL should point to something like http://localhost:8080/client/#anonymous. Next, launch one of the target demos in a new tab. The demo should connect to the debug client allowing you to inspect elements, view resources, see downloaded files, and type commands into the console. To test the console, type window.location and press ENTER. After a brief moment, you will see an object appear in the Web Inspector Console output. Figure 1-5 is a screenshot of the Weinre web inspector.

FIGURE 1-5. Weinre web inspector
Integrated Development Environments
When making minor changes to files or prototyping something new, I like the lightweight, unstructured benefits of a syntax highlighting text editor. But when building applications, I prefer the robust features of an Integrated Development Environment (IDE). My two favorite web development IDEs are Eclipse and NetBeans. Personally, I find that Eclipse offers a prettier user experience, whereas NetBeans offers tighter HTML5 integration. Even though I can configure Eclipse to accomplish many of the tasks I require, such as JSLint integration, NetBeans 7.4 offers these features right out of the box. The examples in this book are based on NetBeans 7.4.
To download NetBeans navigate to http://www.netbeans.org/downloads/ and select the HTML5 & PHP Download. This is the smallest download and will give you just what you need to build HTML5 applications. Figure 1-6 is a screenshot of the NetBeans download options.
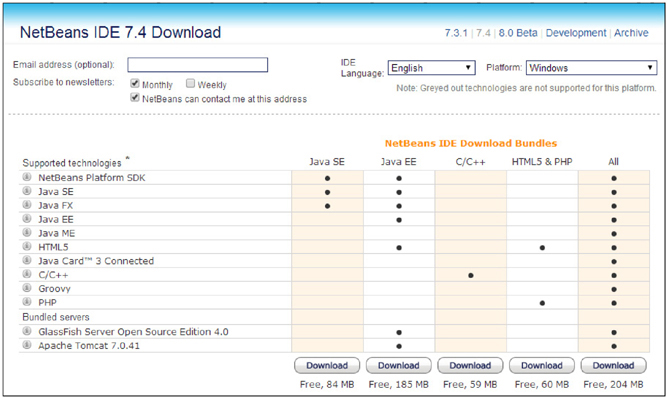
FIGURE 1-6. NetBeans download options
![]()
NOTE
The NetBeans installer will check your system for the latest version of the Java JDK. If not found, it will take you to the download site, so you can download and install it.
NetBeans Test Application
Let’s create an HTML5 application in NetBeans just to confirm that our IDE is properly installed. Launch NetBeans from your operating system’s applications menu or from your new desktop icon. When NetBeans appears, select File | New Project. Figure 1-7 is a screenshot of the New Project dialog.
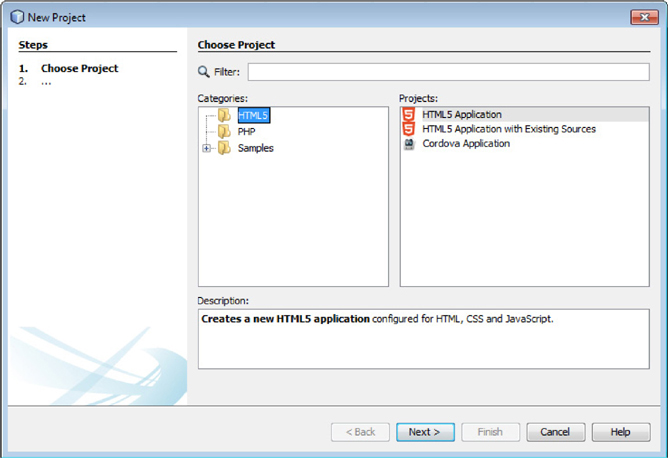
FIGURE 1-7. NetBeans New Project dialog
From the Categories list, select HTML5, and then from the Projects list, select HTML5 Application. Name your project ch01_nbtest. Take note of the project location and project folder. We will use these later to create web server mappings. My project folder is C:UsersjmarionDocumentsNetBeansProjectsch01_nbtest. Figure 1-8 is a screenshot of the new project’s file system properties.
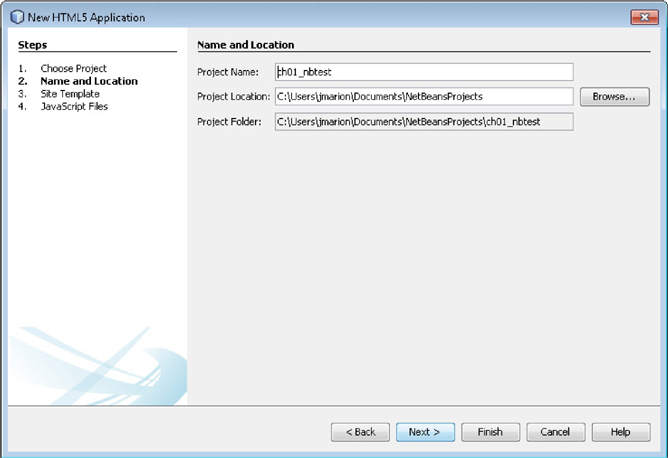
FIGURE 1-8. NetBeans project file system properties
NetBeans has built-in support for several HTML5 templating systems and gives you the option to select one from a list. When you choose a site template, your projects files, libraries, and structure are determined by the template. Templates usually give you an HTML structure, CSS formatting, and responsive layout. You don’t have to select one, but templating systems are rather convenient. Templates provide a lot of user experience features, allowing the developer to focus on structure and content. For this test application, choose the Download Online Template option and select the Twitter Bootstrap template. Figure 1-9 is a screenshot of NetBeans template options.
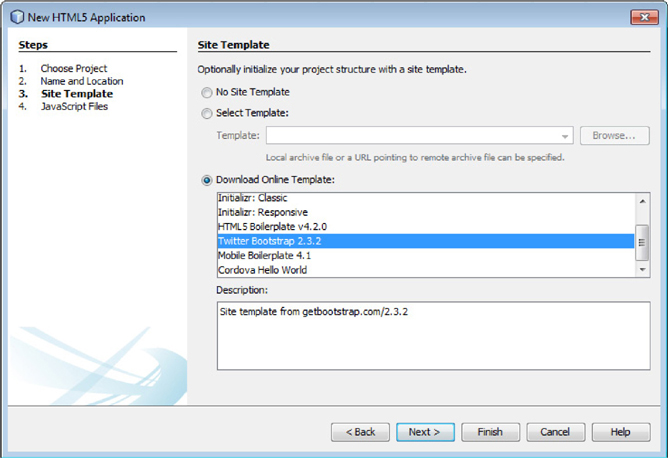
FIGURE 1-9. NetBeans template options
Step 4 of the New Project dialog allows you to select from a predefined list of JavaScript libraries. We aren’t actually going to use any of these libraries in the project, but feel free to scroll through the list and look for your favorite JavaScript libraries. Notice that you can select different versions of each library from the Versions column. Click the Finish button to create the new project. Your project should look similar to the project in Figure 1-10.
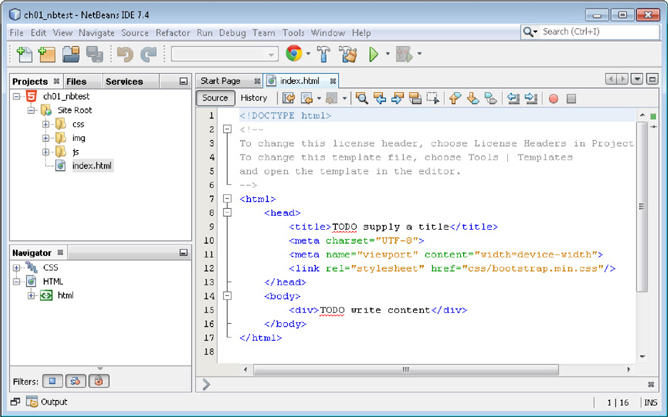
FIGURE 1-10. New project in NetBeans IDE
![]()
NOTE
You may see an “Updated: Never” link just below the list of libraries. If that is the case, I recommend you click the link to update your list of libraries.
You can view the prebuilt index.html page in a web browser by right-clicking the source file in the project browser or right-clicking the text in the editor window and selecting Run File from the context menu. If you have Google Chrome installed, NetBeans will open the index.html file in Chrome using the NetBeans connector. The NetBeans connector allows you to step through JavaScript code and debug HTML5 applications inside of NetBeans instead of through Chrome’s developer tools. Figure 1-11 is a screenshot of the index.html file in the Chrome browser.
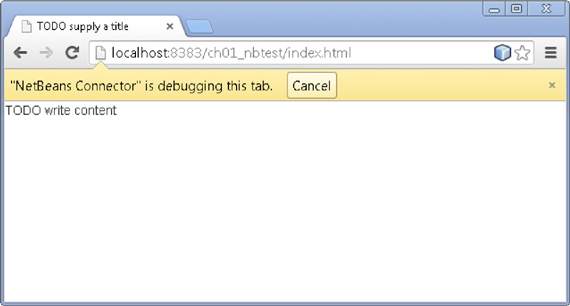
FIGURE 1-11. The application’s index file in Google Chrome
A Bootstrap page should be a visually attractive page. Notice that ours isn’t very pretty. This is because it doesn’t contain a reference to the bootstrap CSS file. Add a reference by inserting the following just below the last meta tag in the head section as shown below:
![]()
![]()
NOTE
The type attribute is optional in HTML5. I left it out to save bandwidth. Every byte counts.
When entering text into NetBeans HTML editor, notice how it intelligently suggests elements, attributes, and values based on the editor’s context. Another great feature of an IDE like NetBeans or Eclipse is auto formatting. Press the combination ALT-SHIFT-F to format the editor’s contents according to the standard HTML formatting template.
Web Server
Some of our code will include Ajax requests. Ajax is a data-transfer mechanism that allows us to transparently communicate between our mobile web pages and a back-end web server. These requests must run from a web server and can only communicate with the domain of origin. If we want to test local web pages that use Ajax, we need to have a local web server. There are many web servers to choose from. I am most familiar with Apache httpd (plus it is free). Later, we will reverse proxy PeopleSoft content into an Apache httpd domain for Ajax requests. The instructions I provide at that time will pertain to Apache httpd.
Cross-origin Resource Sharing
There was a time when browsers required developers to proxy all content into the same domain to abide by the “Domain of Origin” security policy. The purpose of the “Domain of Origin” policy is to eliminate cross-site scripting vulnerabilities. Modern browsers now support a cross-domain mechanism called cross-origin resource sharing (CORS). You can read more about CORS at http://en.wikipedia.org/wiki/Cross-origin_resource_sharing. Since PeopleSoft Integration Broker does not support CORS, our alternatives are to
![]() Proxy Integration Broker content into another domain.
Proxy Integration Broker content into another domain.
![]() Enable CORS through a reverse proxy server.
Enable CORS through a reverse proxy server.
The Apache Software Foundation does not distribute binaries for the latest version of httpd. Therefore, you will need to find a binary distribution of Apache httpd. I prefer the one from https://www.apachelounge.com/download/. Installing Apache Lounge is usually just a matter of expanding a zip file into c:. You can find the complete installation instructions in the ReadMe.txt file included in the downloaded zip file. The Apache directives used by the examples in this book relate to Apache version 2.4 (with alternate 2.2 syntax in comments).
Configure a Virtual Directory
Your NetBeans project exists in one folder, but your web server is configured to serve content out of a different folder. Let’s assign a web server virtual directory to our NetBeans project’s web root. First, find your NetBeans project’s web root folder. You can identify the root folder by right-clicking on the Site Root folder in your NetBeans project explorer (the outline in the upper left) and selecting Properties from the context menu. This displays your Project Folder and Site Root Folder. Your web root is the concatenation of these two properties. Based on Figure 1-12, you can see that my web root folder is C:UsersjmarionDocumentsNetBeansProjectsch01_nbtestpublic_html.

FIGURE 1-12. Project Properties dialog
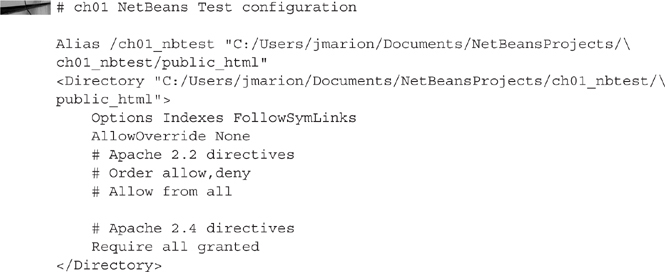
Next, create a new configuration file in your Apache web server’s conf directory. My configuration file is located in the directory c:Apache24conf, but yours may be in a different location. Name your new file ch01_nbtest.conf. To this new file, add the contents:
![]()
NOTE
The code fragment’s paths were too long for the printed page. I intentionally placed line breaks in the path and used the Apache conf file line continuation character “” at the end of each line. If you place your entire path on a single line then you do not need to add this special character to your configuration file.
When creating your configuration file, replace the path to my NetBeans project with the path to your NetBeans project. I included my path for reference purposes. Be sure to use a slash in your file paths instead of the standard Windows file path backslash.
Now we need to tell Apache to use our configuration. Rather than clutter the delivered httpd.conf file with all of our development configurations, we can store them in separate files and Include them in Apache’s main configuration file. Open the file httpd.conf from the Apache configuration directory (conf directory). Scroll to the end of the file and add the following line:
![]()
After making these changes, start Apache from a cmd prompt by executing the following command (assuming Apache 2.4 is installed at c:Apache24):
![]()
Test your Virtual Directory configuration by using a web browser to navigate to http://localhost/ch01_nbtest. If you see the test index.html page, then your configuration is correct.
Installing Emulators
We can do a pretty good job of testing HTML5 mobile applications with a modern HTML5 web browser. Nevertheless, just to confirm that your sites work properly with your target devices, it is a good idea to test your web pages on real devices and potentially in device emulators.
Android
Android has a complete development environment that runs on multiple operating systems. We won’t need the full Android Development Toolset until Chapter 9. We could just install Android SDK Tools only. But if you plan to build native Android applications, then it will be good to download the full bundle. Begin by navigating to https://developer.android.com/sdk/index.html. Search for the Download the SDK ADT bundle button. Figure 1-13 is a screenshot of this button’s appearance when writing this chapter.

FIGURE 1-13. SDK ADT bundle download button
The ADT SDK is delivered as a zip file. To install the tools, extract the zip file someplace convenient on your computer. It is customary to place programs like these in your program files directory. Inside your Android installation directory, you will find a program named SDK Manager.exe. Run this program to download a platform for our emulator. The SDK Manager will automatically select several downloads the first time you run it. I recommend you also download the platform version that matches your target devices. The samples in this book use the Android 4.2.2 platform. Figure 1-14 is a screenshot of the SDK Manager with several downloads selected. Use the Install button to download and install the required files. Be advised that this download may take several minutes.
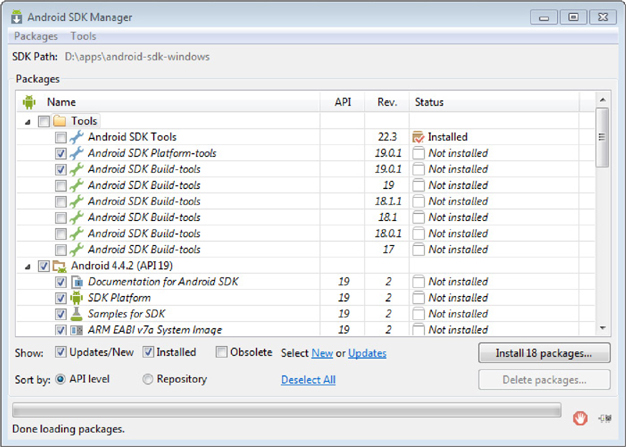
FIGURE 1-14. SDK Manager with downloads selected
![]()
NOTE
The quickest way to launch an emulator is through the command line. Rather than typing the full path to your Android SDK tools and platform-tools directories, I recommend adding these directories to your operating system’s PATH environment variable.
When the download completes, select Tools | Manage AVDs from the Android SDK Manager menu bar. AVD is an acronym for Android Virtual Device. Basically, we are creating a profile that identifies the type of device we intend to emulate. When the Android Device Manager dialog appears, select the New button to create a new virtual device profile. Give the new device profile a name and set its parameters to match your target device. Be sure to stay within the confines of your development computer’s hardware limits. Some of the newer, larger devices can have too much RAM for the standard development laptop. Figure 1-15 is a screenshot of the Create New Virtual Device dialog.
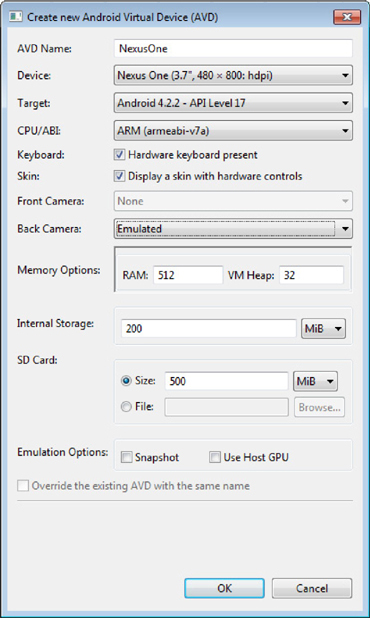
FIGURE 1-15. Create New Virtual Device dialog
You can launch your new AVD from the Android Device Manager or from the command line. To launch from the command line, type emulator –avd NameOfAVD. The following is the command I use to launch my AVD named NexusOne:
![]()
Test your emulator by opening its web browser and navigating to a mobile page. http://maps.google.com/ and http://m.google.com/ are both examples of well-known mobile pages. While you are testing, make sure your Android emulator can access your local development workstation. From your emulator’s web browser, try connecting to http://10.0.2.2/. From the emulator’s perspective, this is your development workstation’s IP address.
Android Emulator Debugging Tips As you start building HTML5 applications for mobile devices, you may want to see the HTTP requests and responses issued by the Android web browser. A simple way to view these requests is to set Fiddler to be your emulator’s proxy server. First enable remote connections in Fiddler by launching Fiddler and selecting Tools | Fiddler Options from the Fiddler menu bar. In the Fiddler Options dialog, switch to the Connections tab and check the box to the left of the label Allow remote computers to connect. Restart Fiddler after changing this setting. Figure 1-16 is a screenshot of the Fiddler Options dialog box.
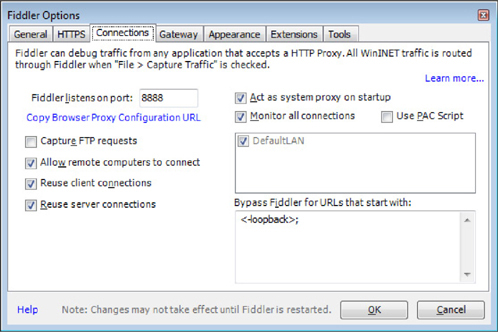
FIGURE 1-16. Fiddler options
With Fiddler ready to accept remote connections, launch your emulator using the following command. This instructs the emulator to send all HTTP(S) requests through Fiddler.
![]()
Alternatively, configure the emulator’s proxy settings by opening the Settings app and then navigating to Wireless & Networks | More | Mobile Networks | Access Point Names | T-Mobile US. Set the Proxy value to match the IP address of the machine running Fiddler (likely your laptop or desktop) and the Port to 8888. When using this method, be sure to clear the emulator’s proxy settings before closing Fiddler. Otherwise the emulator will not be able to connect to external resources.
![]()
NOTE
The command line uses a transparent proxy that may or may not work as expected. I sometimes find that it drops important headers such as the host header.
DNS Resolution You may also want to reference your development workstation by host name rather than IP address. If you type your workstation’s host name into your emulator’s web browser and see a “Webpage not found” error, then open a command prompt on your workstation and execute the following sequence of commands. This will add an IP address/host name mapping to your emulator’s hosts file. Unfortunately, you will need to execute this sequence every time you restart your emulator:

![]()
NOTE
If you receive an error message telling you the system is a read-only file system, then make sure you execute adb remount.
Confirm your hosts file setting changes with the following:

Finally, confirm your settings by attempting to load your local web server in your emulator’s web browser. In my case, my local development workstation’s host name is dev.example.com. Be sure to update the commands above with your host’s name.
BlackBerry
If you intend to deliver applications for BlackBerry devices, then you may want to download a BlackBerry simulator. BlackBerry makes several versions available for download. Most of them are self-contained downloads. The BlackBerry 10 simulators are actually VMWare VMs. You will need to download and install VMWare Player to run these VMs. The BlackBerry 10 simulator is available at https://developer.blackberry.com/develop/simulator/. Follow the instructions to download the simulator installation program (search for the “Install the Simulator” link and then the “Get the Simulator” link), and then run the installer.
Windows Mobile
At the time I wrote this chapter, the Windows Mobile Developer Tool Kit version 6.5.3 was available at http://www.microsoft.com/en-us/download/details.aspx?id=5389. You need only the standard tool kit, not the professional bundle.
iOS
To run an iOS (iPad and iPhone) simulator, you must have a Mac. If you plan to build solutions for iPads or iPhones, then it is critical that you properly outfit yourself with a Mac development machine. When I wrote this chapter, the Xcode IDE was available at https://developer.apple.com/xcode/.
Conclusion
Near the beginning of this chapter, I described HTML5 application source files as plain text files. I also said the only tool you need is a text editor. I then proceeded to explain how to install full IDEs, debuggers, and emulators. Why? Even though these tools are not necessary, they certainly make your development efforts more productive.
Your desktop is now configured for testing and building HTML5 applications. In the remaining chapters of Part I, we will use these tools to test and debug Fluid and MAP applications. In Parts II and III, we will dig further into the development aspects of these tools.