

CHAPTER
7
iScript-based Controllers
In this chapter, you will learn how to use iScripts to connect an HTML5 user experience to PeopleSoft. Specifically, we will create iScripts that serve content and data to the HTML5 views we created in Chapters 5 and 6.
What is an iScript?
I describe iScripts in great detail in Chapter 5 of my book PeopleSoft PeopleTools Tips & Techniques. In fact, iScripts are the backbone of the entire user experience section of that book. Rather than repeat Chapter 5, here is a brief description (for a longer, but still brief description, read the blog post http://jjmpsj.blogspot.com/2008/02/what-is-iscript.html):
iScripts are custom PeopleCode functions that can be invoked by URL. iScripts read URL parameters from the HTTP Request object and render a result through the HTTP Response object. iScripts are very similar to other PeopleCode programs in that they have full access to PeopleCode functions, objects, and the PeopleSoft application database.
We define iScripts as functions inside a record field event. PeopleTools requires the record name be prefixed with WEBLIB_. Although not a requirement, by convention we place iScript functions in the FieldFormula event.
jQuery Mobile with iScripts
In Chapter 5, you created a jQuery Mobile personnel directory prototype. That prototype contains hard-coded search results, details, and profile pages. Let’s transform those pages into PeopleSoft iScripts that can execute SQL and return real results. Here are the steps required:
1. Create a Web library.
2. Write iScripts that process request parameters and return required data.
3. Add new iScripts to a permission list.
4. Create parameterized HTML templates.
5. Refactor the iScripts to return jQuery Mobile HTML fragments.
6. Update the jQuery Mobile application to reference the new iScripts.
7. Upload the jQuery Mobile application to the PeopleSoft web server.
The Search iScript
Launch PeopleTools Application Designer and create a new record definition. To this new record definition, add the delivered field ISCRIPT1. Set the record type to Derived/Work and then save the record as WEBLIB_BMA_JQPD (I know, not very descriptive, but after the required prefix and the site specific prefix, there aren’t many characters left. The PeopleTools maximum record name length is 15 characters). Figure 7-1 is a screenshot of the new record definition.

FIGURE 7-1. WEBLIB_BMA_JQPD record definition
Open the FieldFormula event of the ISCRIPT1 field and enter the following PeopleCode:
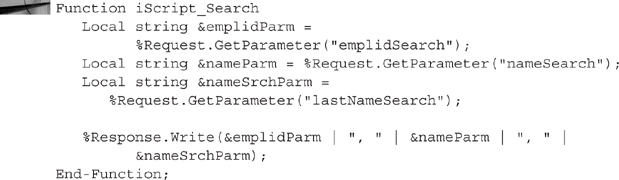
At this stage of development, we just want to write enough PeopleCode to test the iScript. After testing, we will add some SQL to perform a search and then HTML to format the results.
iScript Security
Prior to testing, we have to add our new iScript to a permission list. Your organization may have a plan and recommendations for permission lists. If so, then please follow the guidance of your organization. Otherwise, create a new permission list and role and then use this same permission list and role for all secure content in this chapter and the next (Chapters 7 and 8).
To create a permission list, log into your PeopleSoft application online and navigate to PeopleTools | Security | Permissions & Roles | Permission Lists. Add the new value BMA_PERSON_DIR and set the description to something short and logical such as “Personnel Directory.” Switch to the Web Libraries tab (hint, use the links across the bottom) and add the web library WEBLIB_BMA_JQPD. Next, click the edit link, and then the Full Access button. Figure 7-2 is a screenshot of the Web Libraries tab and Figure 7-3 is a screenshot of the Web Libraries permissions dialog.
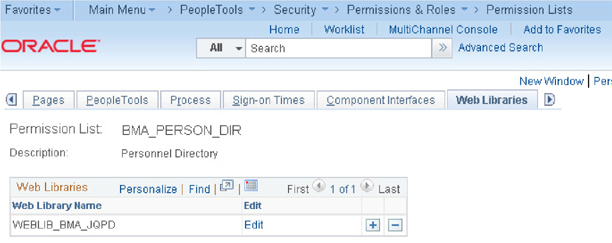
FIGURE 7-2. Web Libraries tab
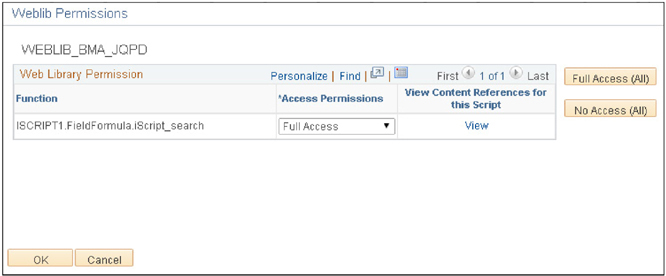
FIGURE 7-3. Web Library permissions dialog
Save the permission list and then navigate to PeopleTools | Permissions & Roles | Roles. Create a new role named BMA_PERSON_DIR. As with the Permission List, give this role a reasonable description. I used the clever description “Personnel Directory.” Switch to the Permission Lists tab and add the permission list BMA_PERSON_DIR. Figure 7-4 is a screenshot of the Permission Lists tab of the new BMA_PERSON_DIR role.
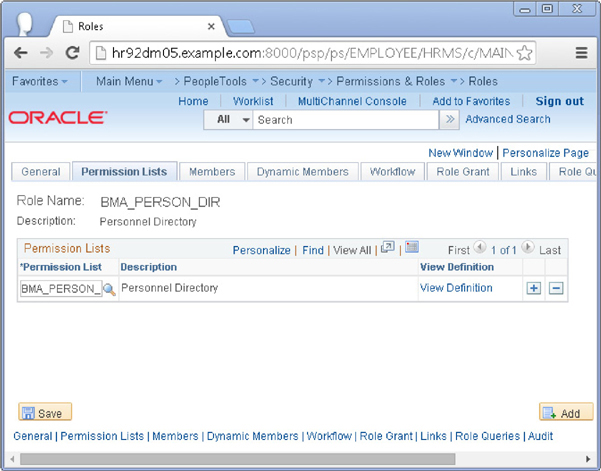
FIGURE 7-4. BMA_PERSON_DIR role
Add the new BMA_PERSON_DIR role to your user profile.
Test the iScript by entering the URL http://<server>:<port>/psc/<site>/EMPLOYEE/HRMS/s/WEBLIB_BMA_JQPD.ISCRIPT1.FieldFormula.iScript_Search. Replace server, port, and site with your installation-specific values. Here is the URL from my VirtualBox demo image: http://hr92dm05.example.com:8000/psc/ps/EMPLOYEE/HRMS/s/WEBLIB_BMA_JQPD.ISCRIPT1.FieldFormula.iScript_Search. Since we entered no parameters, you should see a couple of commas printed in your browser window.
![]()
NOTE
If you see the response “Authorization Error—Contact your Security Administrator” then check your URL. This error message tells you that PeopleTools could not find anything your user profile can access that matched the requested URL. It does not mean the target exists. I have encountered this error because I misspelled a record, field, event, or function name.
Let’s add some query string parameters to our URL to match the fields the jQuery Mobile search form will send to the iScript. Here is an example URL with query string fields and values in bold: http://hr92dm05.example.com:8000/psc/ps/EMPLOYEE/HRMS/s/WEBLIB_BMA_JQPD.ISCRIPT1.FieldFormula.iScript_Search?emplidSearch=KU0001&nameSearch=Sarah&lastNameSearch=Marion. Loading this URL will print KU0001, Sarah, Marion as shown in Figure 7-5.
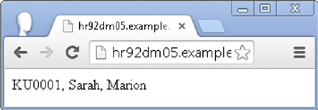
FIGURE 7-5. Query string parameter echo
![]()
NOTE
Echoing query string parameters in this manner is considered a security risk. The most important rule of security is “don’t trust your users.” If anything I type in the address bar appears again in the browser, then it is possible for me to put something malicious in the URL that will run in the browser. Now, arguably, since I am echoing parameters to myself, I will be attacking my own computer. No one said hacking (or security rules) had to make sense.
Implementing Search Behavior
We need to construct an SQL statement that returns a list of results that match the criteria entered on the search page. The search page is designed so that a user can enter information into any of the fields. None of them are required. Any field with a value adds to the SQL statement criteria. This means our SQL statement where clause may differ between requests. When writing SQL for PeopleCode we have to consider three rules:
![]() Prevent SQL Injection attacks.
Prevent SQL Injection attacks.
![]() Don’t embed managed object names in strings.
Don’t embed managed object names in strings.
![]() Optimize SQL for performance.
Optimize SQL for performance.
The criteria values will come from query string parameters. Concatenating these values directly into an SQL statement is the easiest way to create dynamic SQL, but also poses the greatest risk for a SQL Injection attack (don’t ever concatenate unchecked user entered values to create an SQL statement). The alternative is to use bind variables. Using bind variables also satisfies the optimization rule by allowing the SQL engine to cache statements between requests.
Since we will be generating the SQL statement dynamically, it is tempting to hard code object names such as table and field names within strings. Embedding strings renders some of the lifecycle management tools unreliable. An alternative is to use a combination of SQL managed definitions and named definitions. The benefit is that our usage of managed definitions will be visible to lifecycle management tools such as Find Definition References.
Let’s start with a basic SQL select statement without criteria. Create an SQL definition in Application Designer and enter the following SQL. Name the statement BMA_PERSON_SRCH.

The search iScript will have to test each input parameter for a value. If the parameter has a value, then it will need to add a field to a criteria list and a value to a parameter list. The presence of the word list in that last sentence suggests that we will need some arrays. One array will contain an entry for each criterion. The other array will contain a list of corresponding values. By using an array for the criteria, we can later join them into a single string using the word AND as the join method separator. This ensures that we place the word AND only between criterion.
To summarize, the iScript PeopleCode will
![]() Extract the base SQL statement from an SQL definition named
Extract the base SQL statement from an SQL definition named BMA_PERSON_SRCH.
![]() Evaluate query string parameters for valid criterion.
Evaluate query string parameters for valid criterion.
![]() Construct a valid, secure WHERE clause.
Construct a valid, secure WHERE clause.
![]() Execute the constructed SQL statement.
Execute the constructed SQL statement.
![]() Iterate over the results.
Iterate over the results.
![]() Send each result back to the client device as a new row.
Send each result back to the client device as a new row.
Replace iScript_Search with code from the following listing:
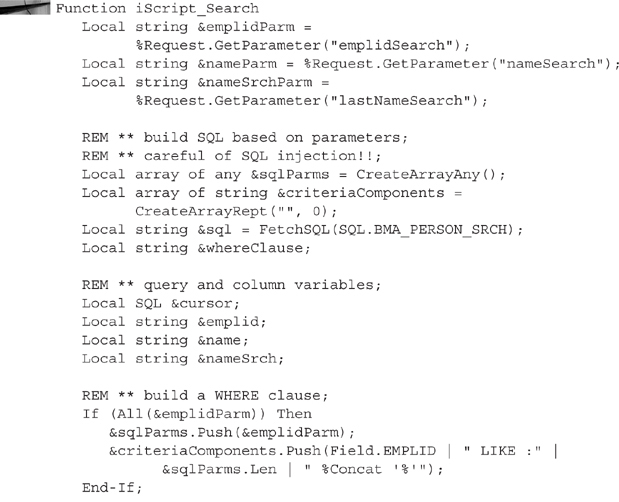
After updating the iScript to contain the above content, test it again by entering query string values that match your data. For example, using the HCM demo database, I can search for all employees whose ID starts with KU, first name starts with C, and last name contains E by requesting the URL http://hr92dm05.example.com:8000/psc/ps/EMPLOYEE/HRMS/s/WEBLIB_BMA_JQPD.ISCRIPT1.FieldFormula.iScript_Search?emplidSearch=KU00&nameSearch=C&lastNameSearch=%25E.
![]()
NOTE
The %25 right before the E is URL encoding for %. % is the SQL wildcard we use to match the first portion of the last name. It also happens to be a reserved URL character so we have to replace it with the hexadecimal equivalent.
Parameterizing the Search Results Page
We now have all of the logic necessary to present search results. We just need to format them to fit our jQuery Mobile user experience. In Chapter 5, we created the format for the search results. Let’s break the Chapter 5 results page into the following two HTML definitions:
![]() A page template
A page template
![]() A row template
A row template
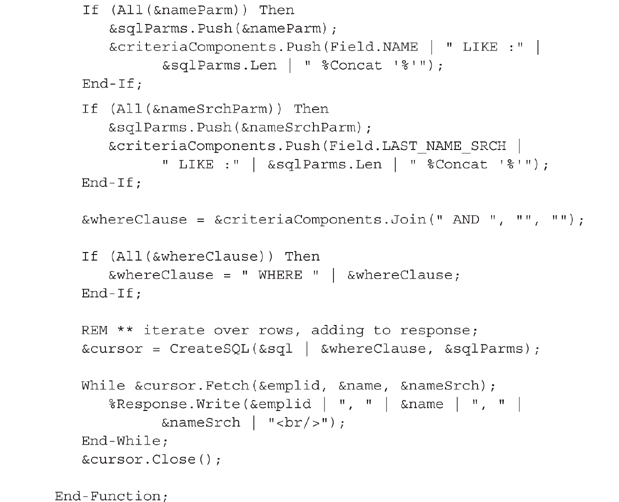
The following code listing contains the HTML for the page template. Place this HTML in an Application Designer HTML definition named BMA_JQPD_SEARCH_RESULT_PAGE:
The %Bind(:1) character sequence in the prior code listing is a placeholder for row data. Create another HTML definition and name it BMA_JQPD_SEARCH_RESULT_LINK. To this new definition, insert the following HTML:

The above template contains three parameters:
![]() URL for the details iScript
URL for the details iScript
![]() Employee ID of the search result row
Employee ID of the search result row
![]() Description (name) of employee
Description (name) of employee
Let’s now refactor the search results iScript to use these new HTML templates. Scroll to the end of the iScript and find the while &cursor.fetch… loop. Starting from the while loop, replace the code for the loop through the end of the function with the following:

Briefly stated, the code above iterates over the resulting rows, pushing each row into an array. It then joins all the array elements into a single string, which becomes the body of the page template. The final step is to write the page template with the results to the client.
Test your changes by reloading the search results URL in your browser. Figure 7-6 is a screenshot of the raw, unstyled HTML that jQuery Mobile will later transform into a smashing user experience.
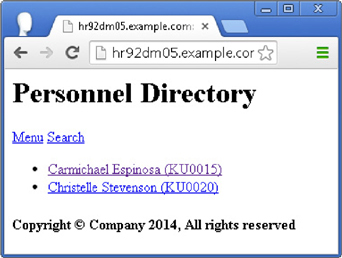
FIGURE 7-6. Unstyled search page
Each row contains a link to a details iScript that does not yet exist. Application Designer lets me save regardless. After refreshing the browser’s results page and clicking a link, PeopleTools presents me with the error message, “Missing function iScript_Details in PeopleCode program ???.???-Other. (180,127).” We will resolve this later when we create the iScript_Details function. Alternatively, add the following stub for this function to the end of the FieldFormula event editor:

The Details iScript
Creating the Details iScript will follow a pattern similar to the search iScript:
1. Gather parameters from the request.
2. Query the database for details.
3. Display the results using an HTML template.
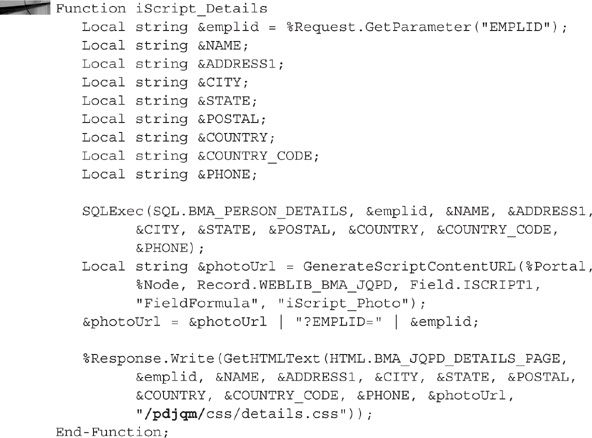
To the FieldFormula event of the record and field WEBLIB_BMA_JQPD ISCRIPT1, add the following PeopleCode:
NOTE
In Chapter 4, we created the SQL definition BMA_PERSON_DETAILS as part of our data model.
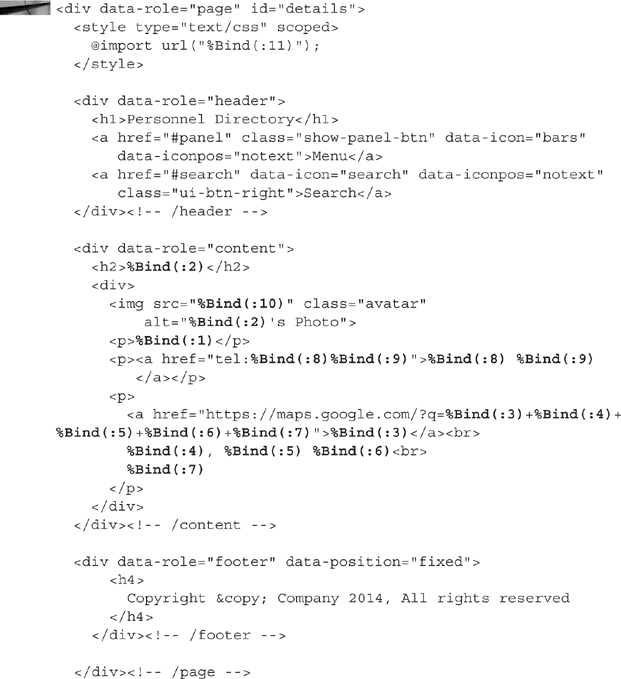
From this code listing, we see that we also need a new HTML page template as well as an iScript: iScript_Photo. The HTML template is a derivative of the details page from Chapter 5. Place this HTML in an Application Designer HTML definition named BMA_JQPD_DETAILS_PAGE.
![]()
NOTE
The PeopleCode above contains the path '/pdjqm/css/details.css', which does not yet exist on your web server. We will create it later in this chapter.
NOTE
Differences between the Chapter 5 version and this chapter are displayed in bold text. Specifically notice that I changed the path to details.css. The path referenced here does not yet exist on your web server. We will create it later in this chapter.
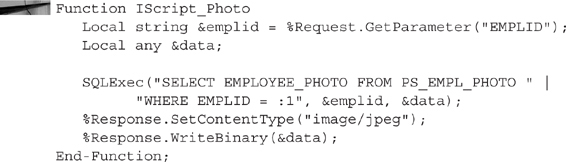
The employee photo iScript comes from Chapter 5 of my book PeopleSoft PeopleTools Tips & Techniques. The code is repeated below:
![]()
NOTE
The original function from PeopleSoft PeopleTools Tips & Techniques was named IScript_EmployeePhoto. I shortened the name to make it easier to type.
Be sure to add these new iScripts to the permission list BMA_PERSON_DIR before testing. Here is a sample test URL for the details page: http://hr92dm05.example.com:8000/psc/ps/EMPLOYEE/HRMS/s/WEBLIB_BMA_JQPD.ISCRIPT1.FieldFormula.iScript_Details?EMPLID=KU0001. Unfortunately, my demo PeopleSoft instance has no employee photos. To compensate, we can use the PeopleTools placeholder avatar called PT_DUMMY_PHOTO. Here is a slightly modified version of the iScript_Photo function that serves the “Dummy Photo” if the requested employee does not have a photo. Changes are in bold text.
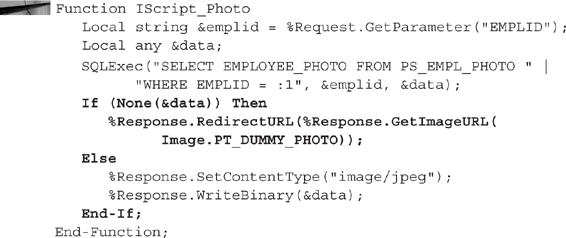
Figure 7-7 is a screenshot of the unstyled details page.

FIGURE 7-7. Unstyled details page
Profile Page
The profile page is the only data-driven page in this mobile application that has no parameters. It is also the only page in this application that is both read and write. Because the page implements both read and write functionality, we will require two services:
![]() A read service to display information about the logged-in user.
A read service to display information about the logged-in user.
![]() An update service to save changes.
An update service to save changes.
We are going to implement the read service a little differently from the other pages in this application. Since the profile page does not require parameters, we can take advantage of a delivered iScript configuration tool built specifically for reading data from the database and then transforming that data into compelling user experiences: Pagelet Wizard.
Using Pagelet Wizard to Configure Mobile Displays
For most of North America, it was 2 weeks before the spring season officially began. To those of us attending the Higher Education Alliance conference in Las Vegas, however, it felt like the middle of summer. After a short, but pleasant stroll through the sunshine between the conference sessions and the demo grounds, I was greeted by my friend Chris Coutre of Ciber Consulting. Chris has been working on some amazing Enterprise Portal implementations and had some ideas he wanted to share with me. I am always curious to hear how our customers and partners are using Oracle products, and especially if Chris Coutre is the one talking. Chris is very intelligent, energetic, and implements a lot of innovative ideas. What he shared with me opened my mind to a whole new way of thinking about Pagelet Wizard. I have always known that Pagelet Wizard is the most flexible and underutilized PeopleTool in the PeopleSoft developer toolbox. Here is what Chris said, “We are using Pagelet Wizard to create mobile applications.” What was that Chris? Come again? Pagelet Wizard for mobile applications? After thinking for a minute, I realized how much sense this makes. In this chapter, you have created two read-only pages. Each page required a separate iScript. That iScript required PeopleCode and security. What if you could create mobile applications without writing any code? This is the Pagelet Wizard sweet spot. It gives you the ability to query the database (through the query data type) and transform those results into any type of response . . . even a jQuery Mobile user experience. Let’s see what this might look like.
iScript Data Source Query Log into your PeopleSoft application online and navigate to Reporting Tools | Query | Query Manager. Create a new query and add the PERSONAL_DATA record to your query. On the Query tab, select the following fields:
![]() EMPLID
EMPLID
![]() NAME
NAME
![]() COUNTRY
COUNTRY
![]() ADDRESS1
ADDRESS1
![]() CITY
CITY
![]() POSTAL
POSTAL
![]() COUNTRY_CODE
COUNTRY_CODE
![]() PHONE
PHONE
![]()
NOTE
Pagelet Wizard–generated XSL refers to columns by ordinal (or position) within the Pagelet Wizard XML. The XSL described later in this chapter refers to fields by name. Field position within the query should not matter because we are using field names rather than positions. For consistency and to avoid errors, however, I suggest you list the query fields exactly as shown here.
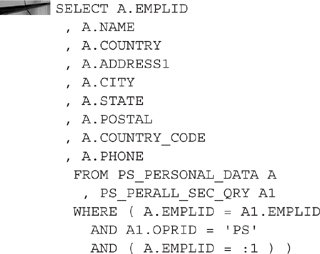
Switch to the Criteria tab and add a prompt to the EMPLID field. Through Pagelet Wizard, we will bind the prompt to a system variable. The following listing contains the SQL for the query:
![]()
NOTE
I did not add PS_PERALL_SEC_QRY or related criteria. These were added by PeopleSoft query to protect sensitive data.
Name the query BMA_JQPD_PROFILE and make it public. Figure 7-8 is a screenshot of the query save dialog.
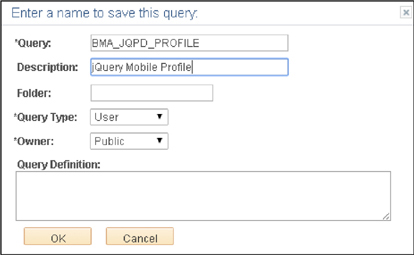
FIGURE 7-8. Query save dialog
Profile Pagelet Wizard Definition Now that we have a valid query, let’s configure the metadata necessary to expose the query to our jQuery Mobile application. Navigate to PeopleTools | Portal | Pagelet Wizard | Pagelet Wizard and create a new pagelet named BMA_JQPD_PROFILE. Click Add to move to step 1 of the Pagelet Wizard. None of the required information in step 1 is important for this example because we aren’t actually publishing the pagelet. Nevertheless, enter meaningful values into each required field. For example, jQuery Mobile Profile into the Title field and then click the Next button to move to step 2.
In step 2, set the Data Type to PS Query and then select the query BMA_JQPD_PROFILE (which is the query you just created). Figure 7-9 is a screenshot of step 2. Click the Next button to move to step 3.
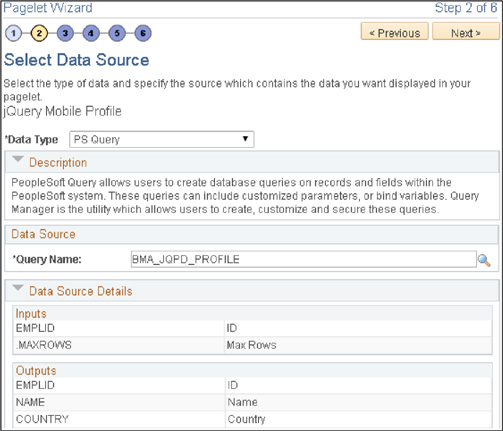
FIGURE 7-9. Step 2 of the Pagelet wizard
Step 3 allows us to specify values for prompts. This is where we specify that the Pagelet Wizard should only display results for the logged-in user. For the EMPLID field, select the System Variable usage type and then set the Default Value to %EmployeeId. Figure 7-10 is a screenshot of step 3. Click the Next button to move to step 4.
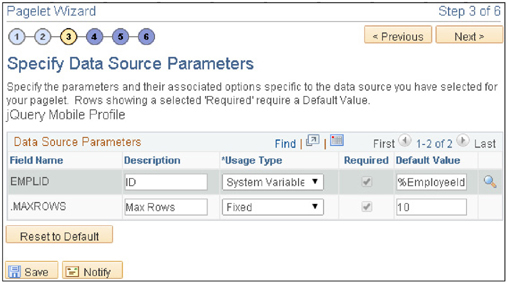
FIGURE 7-10. Step 3 of the Pagelet wizard
Step 4 allows us to determine how to display the query results. Each data type has its own list of Display Formats. Some formats, such as the Custom format, are shared by other Data Types. Others, such as Table, are specific and apply to only one Data Type. The Display Formats shown in Figure 7-11 are delivered for the PS Query Data Type. You can also create your own Display Formats. My favorite custom Display Format is one that I created to perform meta-HTML transforms. For example, in the XSL we are about to create, we will hardcode the path to an iScript. I am not fond of hardcoding paths like these because URLs differ between development, test, and production systems. I wrote a custom Display Format that allows me to use meta-HTML sequences such as %ScriptContentURL(…) instead of hardcoded URLs. In step 4, choose the Custom Display Format. This will allow us to use XSL to transform the query results into a jQuery Mobile page fragment. Figure 7-11 is a screenshot of step 4. Click the Next button to move to step 5.
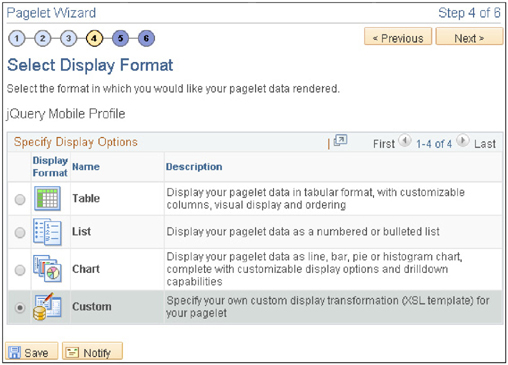
FIGURE 7-11. Step 4 of the Pagelet wizard
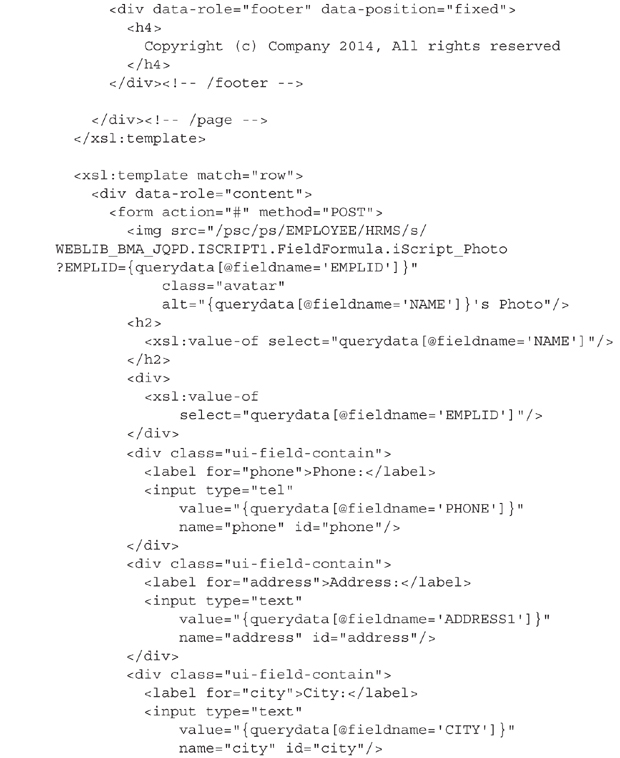
Step 5 is our last stop on the Pagelet Wizard train. In this step, we have the opportunity to enter the XSL that will transform our Query XML into jQuery Mobile markup. The XSL is really just our Chapter 5 profile.html page with some XSL template tags for context and XSL and XPath selection statements for values. When working with Pagelet Wizard XSL, I like to copy the XML from Pagelet Wizard into a local file and then build my XSL, applying the transforms locally in an editor like NetBeans or Eclipse. I can then validate the XSL as well as visually inspect the output prior to pasting the XSL into Pagelet Wizard. The following listing contains the XSL I generated for transforming the query’s results into the jQuery Mobile profile page fragment.
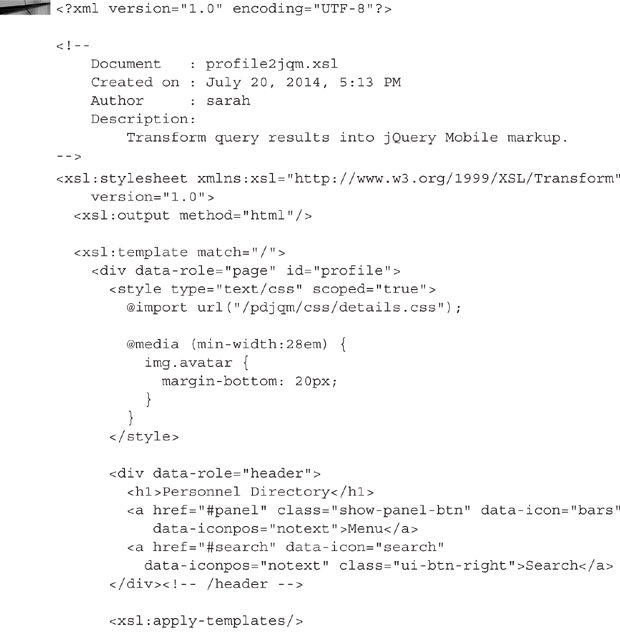
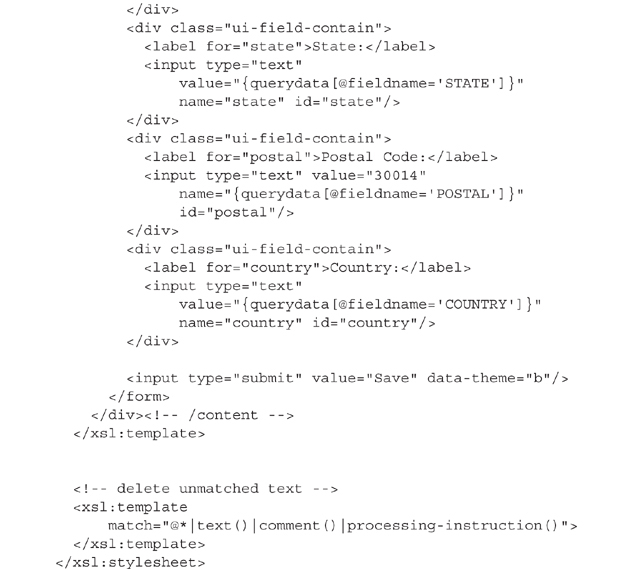
NOTE
The XSL template contains an HTML form that points to #. This means that the save button does not actually work.
Figure 7-12 is a screenshot of step 5. After entering the XSL and clicking outside the XSL box (to trigger the FieldChange event of the XSL field), save your Pagelet.
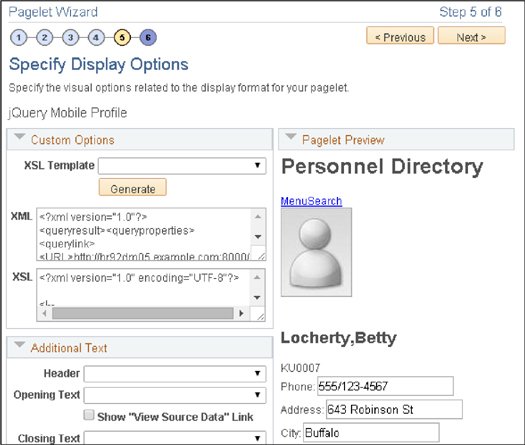
FIGURE 7-12. Screenshot of step 5 of the Pagelet wizard
You can test this iScript outside of Pagelet Wizard by accessing the Pagelet Wizard runtime iScript URL. Here is an example from my demo instance: http://hr92dm05.example.com:8000/psc/ps/EMPLOYEE/HRMS/s/WEBLIB_PTPPB.ISCRIPT1.FieldFormula.IScript_PageletBuilder?PTPPB_PAGELET_ID=BMA_JQPD_PROFILE. Similar to the other iScript pages created thus far, this one is not very pretty. We are just a few steps from hooking these page fragments into the jQuery Mobile app we created in Chapter 5, allowing jQuery Mobile to progressively enhance each page.
Integrating These iScripts with jQuery Mobile
We now have fully functional page fragments that include
![]() Search results page with live data
Search results page with live data
![]() A person detail page
A person detail page
![]() A personal profile detail page
A personal profile detail page
These page fragments contain some minor jQuery Mobile markup but they aren’t very pretty, responsive, or mobile. They are just fragments designed to be used in the context of a container page that includes jQuery Mobile. By making a couple of changes to the search.html page we built in Chapter 5, we can transform the appearance of these new iScript page fragments.
Updating the Chapter 5 Source Code
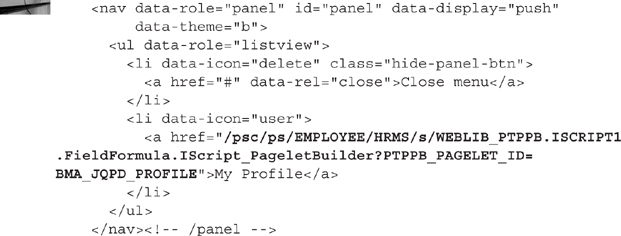
Open your Chapter 5 jQuery Mobile project in your favorite Integrated Development Environment (NetBeans perhaps?). Locate and open the search.html page. This is the starting point for our application and is the only page we have to update. In fact, search.html is the only HTML page we still need from this project (for now). The rest of the pages were just prototypes used to develop our iScripts. Within search.html, find the text profile.html and replace it with /psc/ps/EMPLOYEE/HRMS/s/WEBLIB_PTPPB.ISCRIPT1.FieldFormula.IScript_PageletBuilder?PTPPB_PAGELET_ID=BMA_JQPD_PROFILE. Here is a sample code fragment, with the changed URL in bold text:
Next, find the search form within search.html. It has the attribute action with a value of results.html. Replace the text results.html with the URL for the search iScript we created earlier: /psc/ps/EMPLOYEE/HRMS/s/WEBLIB_BMA_JQPD.ISCRIPT1.FieldFormula.iScript_Search.
Uploading the Project
The mobile prototype currently runs through an embedded NetBeans web server. The PeopleSoft iScript, on the other hand, runs in a PeopleSoft web server on an entirely different host name and/or port. For jQuery Mobile Ajax page loading to work, the browser needs to think both are running in the same web server instance. There are a handful of ways to accomplish this. Here are four:
1. Proxy PeopleSoft through the same web server as our jQuery Mobile application.
2. Use the jQuery and jQuery Mobile version included with PeopleTools, and move everything from the Chapter 5 project into a PeopleTools managed definition.
3. Deploy the jQuery Mobile prototype into the PeopleSoft web server.
4. Deploy the jQuery Mobile libraries to the PeopleSoft web server, but upload all of the application files as iScript accessible pages.
For this chapter, let’s choose option three: deploy to the PeopleSoft web server. We will save the proxy example for Chapter 8. Copy the Chapter 5 project’s public_html folder into your PeopleSoft web server. In my HCM demo image, the web server’s root directory is located at /home/psadm2/psft/pt/8.53/webserv/peoplesoft/applications/peoplesoft/PORTAL.war. I used pscp to copy a zip archive of the public_html folder.
![]()
NOTE
There are many different mechanisms to transfer files. pscp is common to Linux and Unix servers because it uses the SSH service, which is usually running for remote administration. Other copy methods include FTP, SFTP, FTPS, and just standard SAMBA file transfers.
Here is the command line transcript showing how I used 7zip and pscp to upload the modified Chapter 5 project to my PeopleSoft web server. I am using the HCM 9.2 VirtualBox demo image available from My Oracle Support.
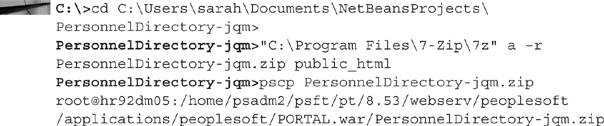
![]()
NOTE
Since I am using a VirtualBox demo image, I know the root password. Unless you are the system administrator for your PeopleSoft server, chances are high that you do not know the root user password. All that matters is that you have write access to the PeopleSoft web server directory. If your production systems and credentials are like mine, you have credentials for the Linux server, but don’t know the password for the user with write access to the web server directory. In this scenario, I copy the file as myself, log in using SSH, and then use sudo to become the web server user. As the web server user, I can move and expand the zip file.
Once the file is on the server, I become the web server owner and then expand the file into my PeopleSoft Web server root directory. Here are the commands I executed from a PuTTY SSH session:

Test your uploaded version to ensure that the iScripts execute properly from the jQuery user interface. Start by navigating to the search.html file in the pdjq directory we created earlier. The URL from my VirtualBox VM looks like this: http://hr92dm05.example.com:8000/pdjqm/search.html. After entering search criteria, you should see search results similar to the contents shown in Figure 7-13 (but with your data, of course).
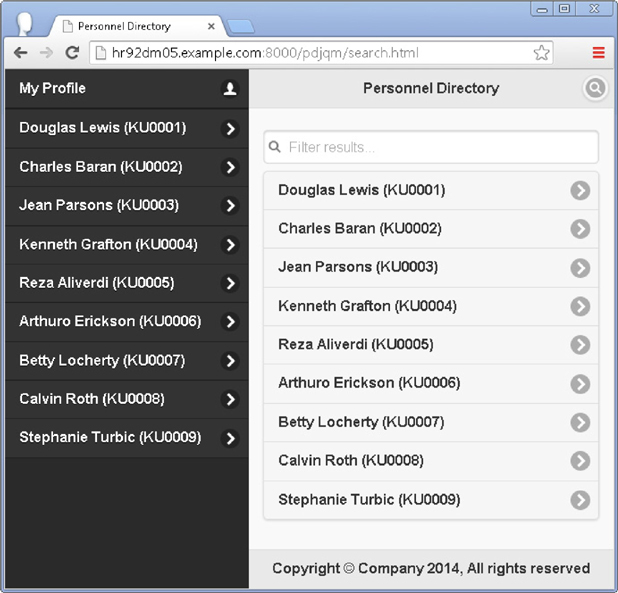
FIGURE 7-13. Search results page
NOTE
We did not implement authentication. One of the benefits of using the PeopleTools 8.53 delivered jQuery Mobile is that authentication is handled by the PeopleSoft application. Be sure to log into PeopleSoft before attempting to access the mobile URL.
Handling Authentication
iScripts require a PS_TOKEN cookie. The only way to acquire this cookie is to log into PeopleSoft. Just for fun, clear your browser cookies and then load the jQuery mobile app from http(s)://<yourserver>/pdjqm/search.html. The search page will appear, just fine. Enter some search criteria and then press the search button. You should see a PeopleSoft login page. Attempting to login, however, doesn’t work! Figure 7-14 is a screenshot of the login page viewed through jQuery Mobile.
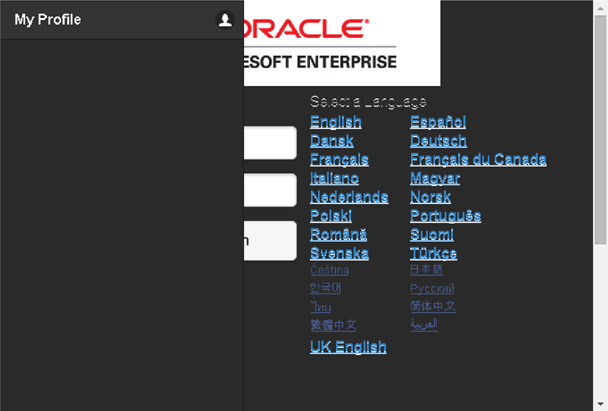
FIGURE 7-14. Defective login screen
jQuery Mobile attempts to perform all of the server side interactions through Ajax. jQuery Mobile parses Ajax responses and attempts to place page content in the correct location. The PeopleSoft login doesn’t work because the JavaScript supplied by PeopleSoft is outside of the body tag—jQuery Mobile ignores content that is outside the body tag.
One way to solve this problem is to authenticate before showing the search page. This requires us to place the search page under PeopleSoft control—move it into PeopleSoft managed metadata. The easiest way to make this switch would be to use Pagelet Wizard as we did for the profile page, but unfortunately the contents of search.html conflicts with step 5 of the Pagelet Wizard. Step 5 is required before we can use the Pagelet Wizard iScript.
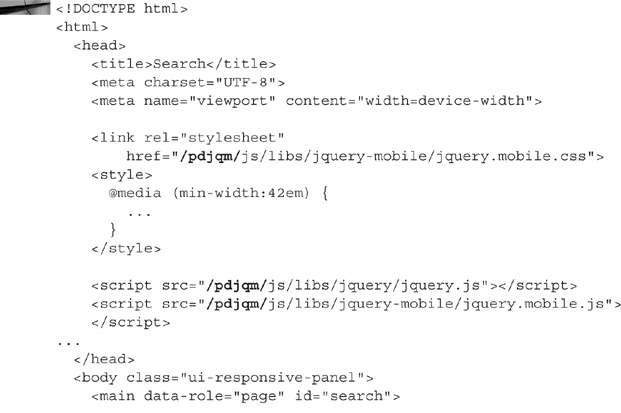
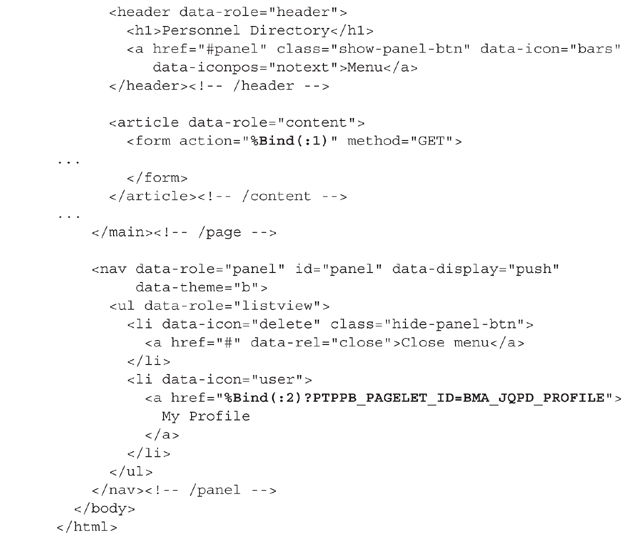
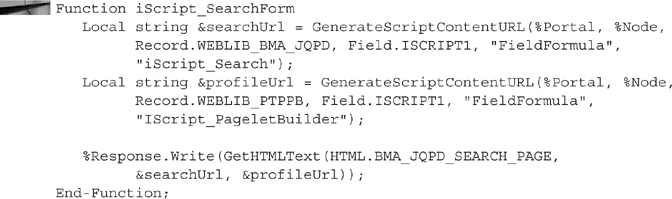
An alternative is to create our own iScript. Log into Application Designer and create a new HTML definition. Before (or after) pasting the existing search.html page contents into this the new HTML definition we need to change a couple of file paths. The search.html file paths reference libraries using relative paths, but we need to change them to semi-absolute paths (absolute, but without the server name). Since we are modifying the HTML anyway, let’s update the search form’s action attribute and the profile link to use bind variables as URLs. We can then let PeopleTools build the correct iScript URLs rather than hardcode node names, portal names, and so on. The following HTML fragment identifies the lines that require modification. I included several lines for context. Changes are in bold text. After making these changes, name the new HTML definition BMA_JQPD_SEARCH_PAGE.
Next, open the WEBLIB_BMA_JQPD record definition and then open the ISCRIPT1 FieldFormula event editor. We need to create a new iScript to serve BMA_JQPD_SEARCH. Scroll to the end of the event and add the following PeopleCode:
Before testing, be sure to add this new iScript function to the BMA_PERSON_DIR permission list. Next, test the search page by navigating to your version of the URL http(s)://<yourserver>/psc/<site>/EMPLOYEE/HRMS/s/WEBLIB_BMA_JQPD.ISCRIPT1.FieldFormula.iScript_SearchForm (modified with your server’s connection information). Here is the URL for my virtual machine (for reference purposes): http://hr92dm05.example.com:8000/psc/ps/EMPLOYEE/HRMS/s/WEBLIB_BMA_JQPD.ISCRIPT1.FieldFormula.iScript_SearchForm. With this URL PeopleSoft will display a signon page when authentication is required. In the next chapter, we will learn how to use REST services to create an anonymous personnel directory.
AngularJS with iScripts
Let’s turn our attention to the Chapter 6 prototype. Chapter 6 was difficult. If you have a working prototype, now is the time to convert the static JSON files to dynamic data sources. Even if you don’t have a working prototype, I encourage you to continue reading. The Chapter 6 prototype requires JavaScript Object Notation (JSON). Through the next few pages you will learn how to use PeopleCode to produce JSON.
We will follow the same pattern as we did with jQuery Mobile by creating a new web library and several iScripts that serve required data. After confirming the iScript services work as expected, we will connect them to the AngularJS prototype. Here is a summary of the steps we will complete:
1. Create iScript data sources using the Document definitions we created in Chapter 4.
2. Create an iScript entry point to manage authentication.
3. Update the AngularJS service URLs to the new iScript URLs.
4. Upload the modified AngularJS application.
The Search iScript
Launch PeopleTools Application Designer and create a new record definition. To this new record definition, add the delivered field ISCRIPT1. Set the record type to Derived/Work and then save the record as WEBLIB_BMA_AJPD. Figure 7-15 is a screenshot of the new record definition.
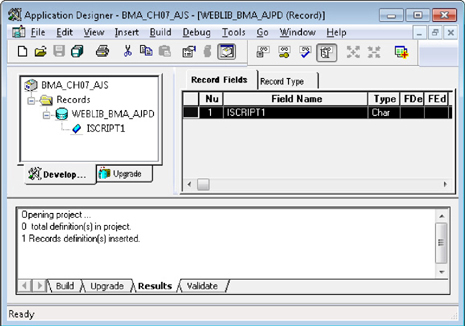
FIGURE 7-15. AngularJS iScript web library
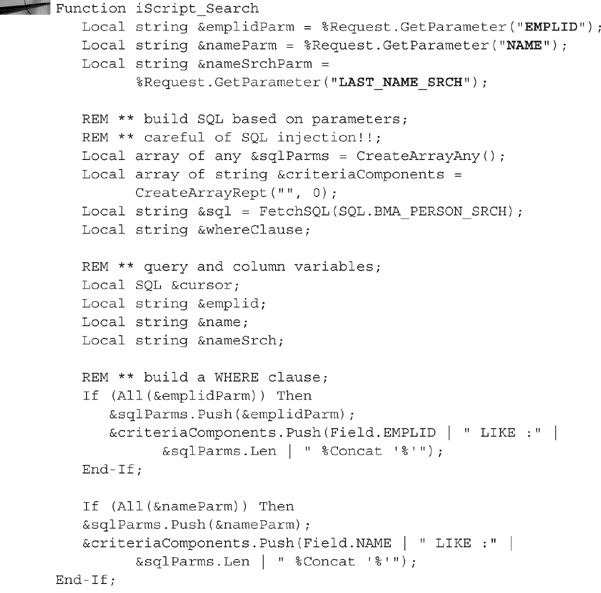
We already created the logic for the search results and details iScripts, so we will copy that logic into our new web library. We can’t use the exact same iScripts, however, because the jQuery Mobile version of these iScripts used HTML templates, whereas the AngularJS version requires JSON data. The following iScript_Search code listing is similar to the jQuery Mobile version, but with the following changes:
![]() Parameter names are different.
Parameter names are different.
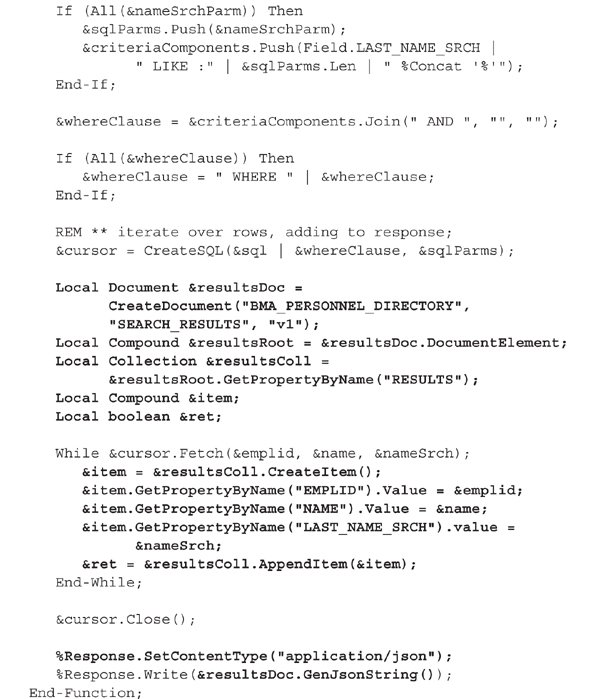
![]() Rather than new HTML definitions, this code listing uses the Documents we created in Chapter 4 to generate JSON data.
Rather than new HTML definitions, this code listing uses the Documents we created in Chapter 4 to generate JSON data.
To the FieldFormula event of field ISCRIPT1, add the following PeopleCode. Differences from the jQuery Mobile version are noted in bold text.
The Documents module is first mentioned in PeopleBooks for PeopleTools 8.51. While the intention of the Documents module has always been to provide an abstraction between rendered data and programming structures, until 8.53 the Documents module only generated XML formatted data. 8.53 added support for JSON rendering and parsing. How can an organization that uses an earlier PeopleTools release generate a JSON response?
Generating JSON is a little tricky because JSON looks a lot like JavaScript but with the following requirements:
![]() JSON structures are either arrays or objects (or arrays of objects) which means they either start with [ or {.
JSON structures are either arrays or objects (or arrays of objects) which means they either start with [ or {.
![]() Property names must be quoted. JavaScript allows for object definitions whose properties aren’t quoted, but JSON requires each property name to be surrounded with quotes.
Property names must be quoted. JavaScript allows for object definitions whose properties aren’t quoted, but JSON requires each property name to be surrounded with quotes.
![]() Within strings certain characters must be escaped even though they may represent valid JavaScript strings.
Within strings certain characters must be escaped even though they may represent valid JavaScript strings.
NOTE
You can find more information about the JSON data format on the json.org website.
It is these special requirements that keep us from using the EscapeJavascriptString PeopleCode built-in function to generate JSON. Here are two options:
![]() Use a Java JSON library such as json.simple or json.org.
Use a Java JSON library such as json.simple or json.org.
![]() Use a combination of HTML definitions, string concatenation, and PeopleCode to build JSON structures.
Use a combination of HTML definitions, string concatenation, and PeopleCode to build JSON structures.
The first option is the safest alternative because it guarantees valid JSON. You can find an example of using the json.simple Java library with PeopleCode in my book PeopleSoft PeopleTools Tips and Techniques. I also have an example of using the json.org parser on my blog at http://jjmpsj.blogspot.com/2008/09/parsing-json-with-peoplecode.html. The problem with using custom Java libraries is that custom libraries require special treatment during upgrades. Specifically, you have to update the Java class path for each app server and/or process scheduler after an upgrade.
Option two is a little more risky. You are responsible for escaping values, joining strings properly, and so on. To help properly escape string values, I posted a PeopleCode JSON Encoder on my blog at http://jjmpsj.blogspot.com/2010/04/json-encoding-in-peoplecode.html. It is still your responsibility, however, to ensure proper concatenation. When generating JSON on earlier versions of PeopleTools, I test my results at http://jsonlint.org/ to confirm that the result produced valid JSON.
Add this new web library and iScript to the BMA_PERSON_DIR permission list and test the iScript by navigating to your environment’s version of http(s)://<yourserver>/psc/<site>/EMPLOYEE/HRMS/s/WEBLIB_BMA_AJPD.ISCRIPT1.FieldFormula.iScript_Search?EMPLID=KU00&NAME=C&LAST_NAME_SRCH=%25E. Using my server, the URL is http://hr92dm05.example.com:8000/psc/ps/EMPLOYEE/HRMS/s/WEBLIB_BMA_AJPD.ISCRIPT1.FieldFormula.iScript_Search?EMPLID=KU00&NAME=C&LAST_NAME_SRCH=%25. If you are not using a demo database, then be sure to change the parameters to match data that exists in your instance. Here is what my demo database returns:
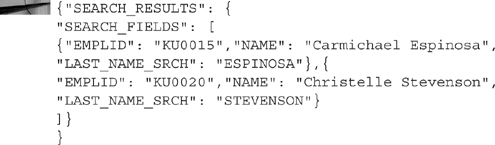
![]()
NOTE
If your web browser prompts you to download the file rather than display the file, then change the parameter for %Response.SetContentType() from application/json to text/plain.
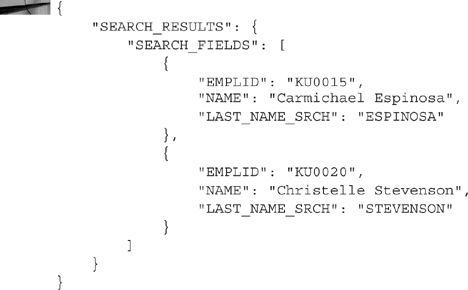
Just to confirm the response is valid JSON, I recommend copying the response, navigating to http://jsonlint.org, and then pasting the response into the Validation box. JSON lint will reformat the data and display a notification telling you whether or not the response data is valid. Here is the formatted response:
Using Documents
Documents describe a hierarchical data structure. We use PeopleCode to interact with the data in these structures. The Document object model is very similar to an XML document’s object model (the XmlDoc object). Just like an XmlDoc, a Document has a root element known as the DocumentElement. That root element is a Compound, which is a fancy way of saying that it contains two or more separate elements. The children of a Compound can be one of the following three types:
![]() Collection
Collection
![]() Compound
Compound
![]() Primitive
Primitive
Our example used all three of these types. We started at the root element, the SEARCH_RESULTS compound and then found the RESULTS collection (an array of SEARCH_FIELDS compound objects). The end of each Document tree contains one or more Primitive leaves. In our example, the leaves are EMPLID, NAME, and LAST_NAME_SRCH.
The Details iScript
The logic for the AngularJS details iScript is the same as the jQuery Mobile iScript. We just have to swap out the HTML templates for the Document definition we created in Chapter 4. Here is the PeopleCode for the AngularJS version of the details iScript with differences noted in bold text.
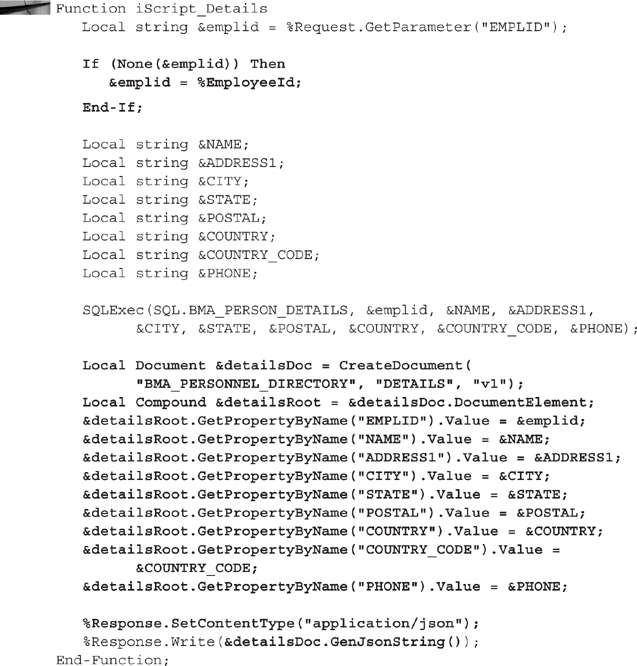
![]()
NOTE
The string parameters to the CreateDocument function are case sensitive. A common mistake is to use an uppercase V in the Document definition and then a lowercase v (or vice versa) when invoking the CreateDocument function.
I added a parameter test to the beginning of this iScript. The jQuery Mobile version of the Personnel Directory sends data mixed with display markup. The AngularJS version does not. The separation of data from display logic allows us to use the AngularJS version’s service URL for multiple displays. For this example, it means we can use the same iScript for both the details and profile pages. The EMPLID parameter test at the top of the iScript assumes that if this iScript is called without an EMPLID then the user is requesting his or her profile.
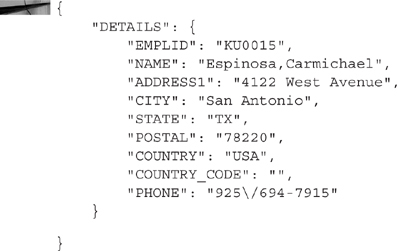
Add this new iScript to the BMA_PERSON_DIR permission list and test the iScript by navigating to your environment’s version of http(s)://<yourserver>/psc/<site>/EMPLOYEE/HRMS/s/WEBLIB_BMA_AJPD.ISCRIPT1.FieldFormula.iScript_Details?EMPLID=KU0015. On my server the URL is http://hr92dm05.example.com:8000/psc/ps/EMPLOYEE/HRMS/s/WEBLIB_BMA_AJPD.ISCRIPT1.FieldFormula.iScript_Details?EMPLID=KU0015. Be sure to update the EMPLID to match data that exists in your system. When I access this URL, the web browser displays the following JSON (formatted using jsonlint.org):
Integrating Our iScripts with AngularJS
We integrate our iScripts into the AngularJS application by updating five URLs:
![]()
SearchService service
![]()
DetailsCtrl controller
![]()
ProfileCtrl controller
![]() The details photo URL
The details photo URL
![]() The profile photo URL
The profile photo URL
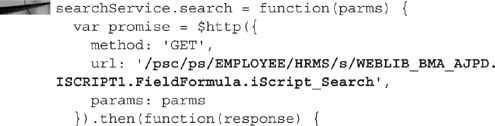
Updating the searchService
In your AngularJS project, open the js/services.js file and find the searchService URL. In my sample, it is line 53. Replace the URL with the iScript URL. The following code fragment contains a couple of lines for context. The changed line is in bold text.
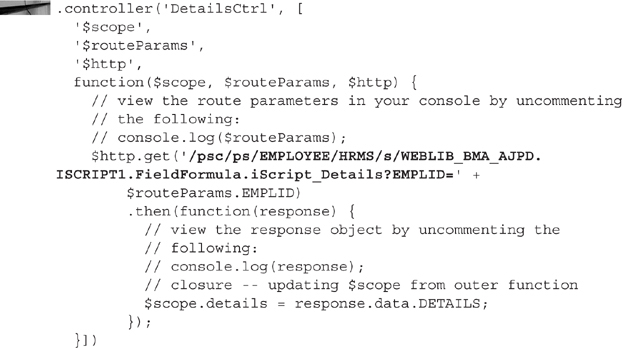
Updating the DetailsCtrl Controller
Open the js/controller.js file in your AngularJS project. Find the DetailsCtrl controller and update the URL to your details iScript URL. The following code fragment contains the entire DetailsCtrl controller with the modified URL in bold text:
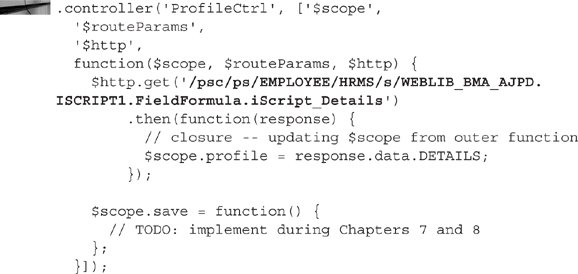
Updating the ProfileCtrl Controller
The profile controller looks strikingly similar to the details controller. Make the same URL change to the profile controller (without the EMPLID parameter). I reprinted the profile controller here with the URL in bold text:
Updating the Details Template Photo URL
Open partials/details.html and identify the img tag near the top of the template. Replace the src attribute name and value with ng-src as follows:

![]()
NOTE
We are switching from the src attribute to ng-src to keep the browser from resolving the src attribute before AngularJS has bound and replaced all of the values.
Updating the Profile Template Photo URL
Open partials/profile.html and identify the img tag near the top of the template. Replace the src attribute name and value with ng-src as follows:

Uploading the Project
Uploading the AngularJS project is very similar to uploading the jQuery Mobile project. Just like jQuery Mobile, AngularJS uses Ajax to fetch data. We need to make the browser think that the iScript data sources come from the same domain as the web application. The easiest way to accomplish this is to copy the AngularJS application into the PeopleSoft web server. Inside the PersonnelDirectory-ajs folder of your AngularJS project, copy the app folder into your PeopleSoft web server. The steps required are the same as the jQuery Mobile project. In the spirit of brevity, I am just including the commands I used to compress, copy, and then expand the project files into the correct location on the web server.
At the Windows command prompt, I executed
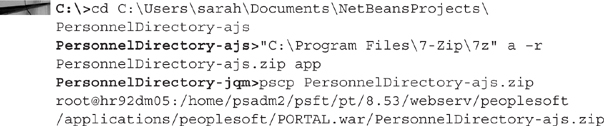
Within an SSH session, I executed

![]()
NOTE
The zip file expanded into a folder named app. I used the mv command to rename that folder to pdajs (Personnel Directory AngularJS) which is a little more meaningful than the original.
Test the application by navigating to your server’s version of http://hr92dm05.example.com:8000/pdajs/ (pdajs is the name of the folder on your web server). Figure 7-16 is a screenshot of the uploaded application using iScripts as data sources.
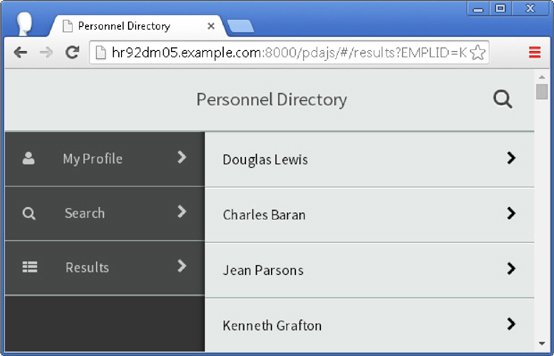
FIGURE 7-16. Screenshot of the AngularJS app connected to PeopleSoft iScripts
![]()
NOTE
If the application doesn’t work properly with the /pdajs/ URL, then rename the folder to /app/ and try using the /app/ URL.
Extra Credit
The profile templates used by each of the solutions presented in the chapter included save buttons. Demonstrate your understanding of the concepts in this chapter by creating an iScript that implements save functionality. Hint: read form parameters using %Request.GetParameter() and use a component interface to update the database.
Conclusion
In this chapter, you learned how to connect the prototypes from Chapters 5 and 6 to real PeopleSoft data using iScripts. The iScript method presented here is just one approach. Some developers believe this approach is easier than others because it requires the fewest number of managed definitions. What it gains in efficiency, however, it gives up in flexibility. As you will learn in the next chapter, the REST service approach has many advantages including anonymous access.