

CHAPTER
4
Creating a Data Model
In the early days of web applications, a primary frustration for developers was the intermingling of data (the model) with presentation logic (the view). As developers, we often wrote Active Server Pages and Java Server Pages applications with data and presentation logic weaved tightly together. It was not practical to hand the view layer over to a designer because the data and presentation logic were inseparable. Developers and architects began looking for a better way. For most, the solution came in the form of a well-known user interface pattern called the Model-View-Controller (MVC) pattern. Although very popular, many find it confusing because so many people interpret the concept differently. And, if differing interpretations isn’t confusing enough, web applications can further apply MVC on both the server and the client tiers. Java Server Faces, Struts, Spring, Ruby on Rails, and ASP.NET are a few of the many common server-side MVC frameworks. More recently, developers are using client-side JavaScript MVC frameworks including Backbone.js, AngularJS, Ember.js, and Kendo UI. Regardless of interpretation or location, the heart of MVC remains constant: Separation of Concerns.
In Chapter 2 of this book, we built responsive mobile applications using PeopleTools page definitions and PeopleCode. We built record definitions for the Model layer and page definitions for the View layer. PeopleTools transparently handled the Controller layer. In Part II, we will continue using PeopleTools for the Model but will transfer the View layer to common HTML mobile frameworks, such as jQuery Mobile, and we will take responsibility for the Controller layer.
In this chapter, we will build the Model layer for our MVC application using SQL, Component Interfaces, and Documents. SQL and Component Interfaces will provide low-level data access. Documents will act as an abstract representation of the data Model and will be used by the Controller to transfer data in and out of the View layer. In Chapters 5 and 6, we will build HTML5 View layers to display and update data from the Model. In Chapters 7 and 8, we will build iScript and REST service controllers to communicate between the Model and View layers. For those of you familiar with both iScripts and/or REST, you may be asking questions such as:
![]() Aren’t iScripts usually used to build the View layer?
Aren’t iScripts usually used to build the View layer?
![]() Isn’t REST for transferring data (the model)?
Isn’t REST for transferring data (the model)?
![]() Why did you use the plural form for iScript and Controller? Doesn’t MVC specify one controller?
Why did you use the plural form for iScript and Controller? Doesn’t MVC specify one controller?
However, we choose to interpret MVC, the key tenet remains: Separation of Concerns. MVC is a very flexible term packed with meaning. For this section of the book, we define MVC as:
![]() Model: data structures implemented as PeopleTools Documents.
Model: data structures implemented as PeopleTools Documents.
![]() View: presentation layer built in HTML5.
View: presentation layer built in HTML5.
![]() Controller: bridge between the Model and View. The controller executes SQL and Component Interface commands to update the Model, and transfers data to the View layer.
Controller: bridge between the Model and View. The controller executes SQL and Component Interface commands to update the Model, and transfers data to the View layer.
Scenario
There are a lot of great mobile scenarios: time entry, asset management, project portfolio management, recruiter interview details, etc. Many of these examples are quite complex and application database specific. My intention in this book is to teach the fundamentals of mobile development for PeopleSoft. With that in mind, I want to keep the scenario simple. For our example, we will build a basic personnel directory using the PeopleSoft PERSONAL_DATA record as our foundation. Most PeopleSoft applications include the PERSONAL_DATA record so this scenario will apply across multiple applications. In the next few chapters, we will build the same personnel directory using multiple layouts, HTML5 frameworks, and PeopleSoft strategies. This will allow us to compare and contrast differences between these technologies.
Our mobile personnel directory will contain three pages:
![]() Search
Search
![]() Search results
Search results
![]() Person details
Person details
The Data Model
Whether we use iScripts or Service Operations, HTML5 or Hybrid applications, our examples will use the same data model based on PeopleTools Documents.
SQL Definitions
PeopleSoft development best practices discourage direct SQL access in favor of Component Interfaces because direct SQL access bypasses component-specific business logic. SQL, however, offers the best performance. A reasonable compromise is to use SQL for read operations and Component Interfaces for create, update, and delete operations. With this in mind, we will create some SQL definitions to support our read operations. Open Application Designer and create a new project definition.
Search and Search Results Page SQL
Our search page will allow us to search by the following fields:
![]() Employee ID
Employee ID
![]() Name
Name
![]() Last Name
Last Name
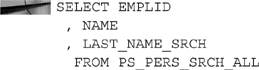
The search results page will contain the same fields. In Application Designer, add a new SQL definition. Name the new SQL definition BMA_PERSON_SRCH. Inside this new SQL definition, add the following SQL:
![]()
NOTE
The PERS_SRCH_ALL record definition used in this SQL definition is the search view used by the online Personal Data Component. It handles name resolution (for people with multiple names), effective dating, and other relational constructs (sounds like this handles relationships even better than Zoosk or eHarmony).
Details Page SQL
The details page will contain the following information:
![]() Employee ID
Employee ID
![]() Name
Name
![]() Phone number
Phone number
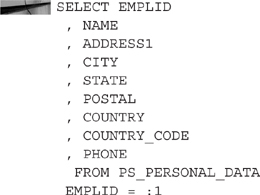
In Application Designer, create a new SQL definition named BMA_PERSON_DETAILS. Inside this new SQL definition, add the following SQL:
Documents
With our data access objects (SQL definitions) defined, we can model our data structures using the Documents module. In Chapter 3, we used Documents as a foundation for MAP development. In the remainder of this book, we will use Documents to model service-oriented data structures. As you learned in Chapter 3, Documents provide an abstract data model that can be rendered in several different formats including JSON and XML.
![]()
NOTE
If you skipped Chapter 3 because your version of PeopleTools does not include MAP, then I recommend returning to Chapter 3 to read the segment describing the PeopleTools Documents module.
Besides describing REST responses, PeopleTools REST services use Documents to describe URL input parameters. You will learn more about this in Chapter 8 when we create Service Operations. We will need Documents for the following data transmissions:
![]() Search parameters received by the controller from the search page (request)
Search parameters received by the controller from the search page (request)
![]() Search results sent from the controller (response)
Search results sent from the controller (response)
![]() Employee ID for the details view (request)
Employee ID for the details view (request)
![]() Employee details (response)
Employee details (response)
Defining the Search Parameters Document
The initial page of our application is a search page. Users will enter search criteria into a parameter form and submit this form. The code that responds to this request will access the search criteria through a Document structure. When creating an input Document (also known as the Template Document) for a REST service, it is important to think about your URL design and the expected REST request type (GET, POST, etc.). If the URL target points to a specific item, such as an employee, then the URL parameter will be an employee identifier, or as we call it in PeopleSoft: EMPLID. The URL for accessing the employee with the ID KU0010 would look something like: …/employees/KU0010. From this URL, we see a natural hierarchy: employees → EMPLID. For our search page, however, the REST service URL will point to a collection of items so we shouldn’t use a specific identifier-type URL. It also isn’t possible to apply a hierarchical structure to our parameters of emplid, name, or last name. Instead, we will use a query-string-style URL pattern. In Chapter 8, we will see how to construct URLs using input documents. For now, we have made enough decisions to create our input Document.
Create the search Document by logging into your PeopleSoft online application and navigating to PeopleTools | Documents | Document Builder. Click the Add a New Value link and enter the values found in Table 4-1:
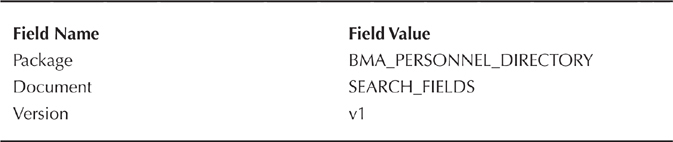
Table 4-1. New Document metadata
Figure 4-1 is a screenshot of the Add New Document data-entry page. Click the Add button to create the document.
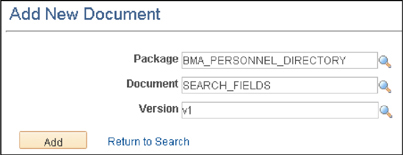
FIGURE 4-1. Add New Document
To this new Document, add three Primitives: EMPLID, NAME, LAST_NAME_SRCH and set their properties according to the values in Table 4-2. As you learned in Chapter 3, Primitive values represent basic data types, such as binary, number, string, etc.
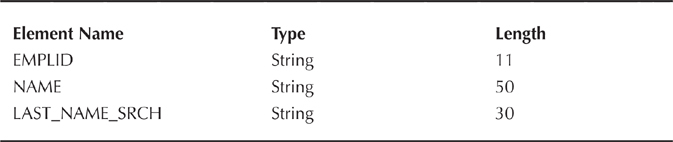
Table 4-2. Document Primitives with their property types and lengths
![]()
The primitives I added share the same names as the fields they represent. This is not required. I use the same names to simplify my designs. This may or may not be desirable. For example, the LAST_NAME_SRCH field name is quite long. A shorter name would reduce the resultant Document size.
Figure 4-2 is a screenshot of the new Document structure. We will use this Document for our search parameters and as the base for the search results compound Document. Be sure to save your Document before continuing.
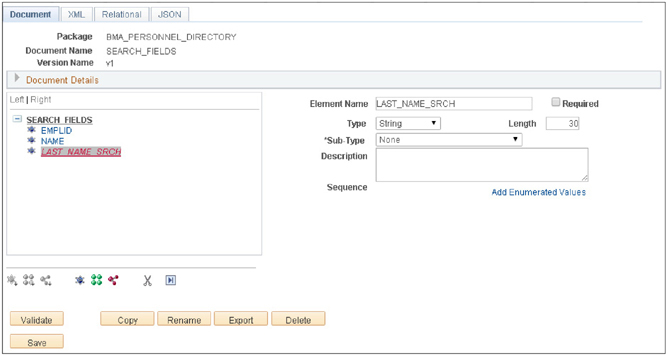
FIGURE 4-2. BMA_PERSONNEL_DIRECTORY.SEARCH_FIELDS.v1 Document structure
Defining the Search Results Document
The second page of our mobile web application is a search results page. The results page contains a list having the same fields as our parameter form. We can model the relationship between the search parameters and search results by creating a new Document that has a collection compound child consisting of the same Document as the search parameters: BMA_PERSONNEL_DIRECTORY.SEARCH_FIELDS.v1. Create a new Document in package BMA_PERSONNEL_DIRECTORY named SEARCH_RESULTS with a version of v1 as shown in Table 4-3.
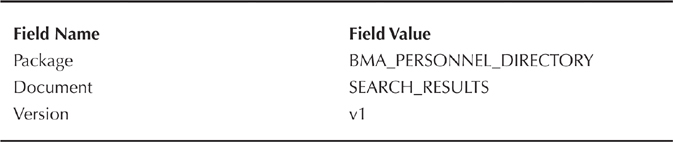
Table 4-3. SEARCH_RESULTS Document metadata
Click the Add button to create the document. To this new Document, add a Collection child named RESULTS. To the RESULTS Collection, add a Compound child referencing BMA_PERSONNEL_DIRECTORY.SEARCH_FIELDS.v1. Figure 4-3 is a screenshot of the Compound child search results. Select the matching row to add the SEARCH_FIELDS Document as the child compound. Figure 4-4 is a screenshot of the entire Document structure.
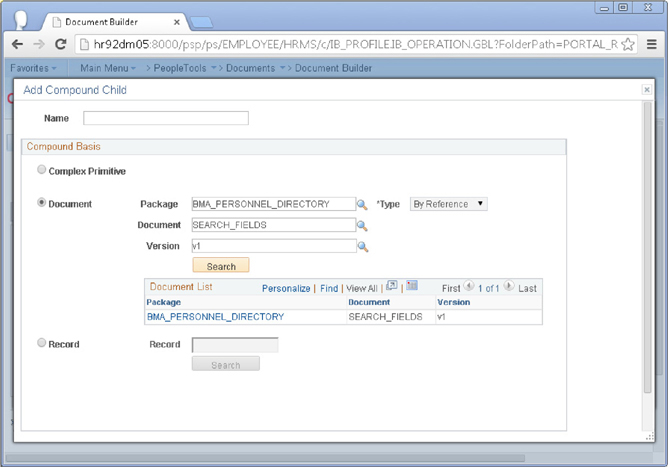
FIGURE 4-3. Compound child search results
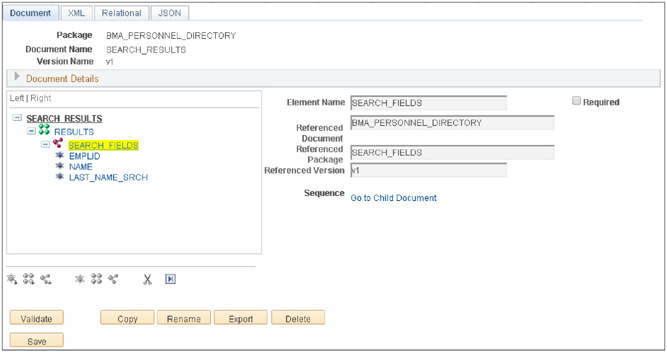
FIGURE 4-4. BMA_PERSONNEL_DIRECTORY.SEARCH_RESULTS.v1 Document
Defining the Details Input Document
From the search page, a user will select an employee and expect to see the employee’s details. Since we know exactly which EMPLID to update, we can use a specific resource-based URL pattern—something similar to …/employees/KU0010. Our input Document, therefore, will contain an EMPLID property. In Chapter 8, we will associate this document with a Service Operation URL pattern.
Create a new Document in package BMA_PERSONNEL_DIRECTORY named EMPLID with a version of v1 as shown in Table 4-4.
To this new Document, add one primitive named EMPLID with a Type of String and a Length of 11. Figure 4-5 is a screenshot of this new Document.
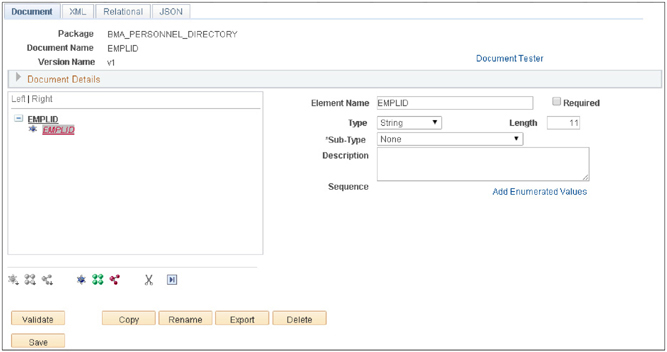
FIGURE 4-5. EMPLID Document
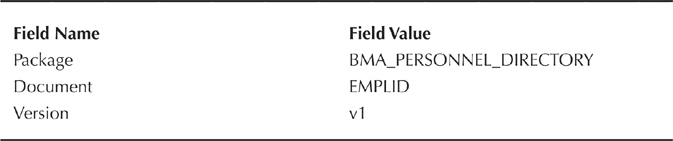
Table 4-4. EMPLID Document metadata
Defining the Details Document
The final page of the application displays information about an employee. Create a new Document similar to the other two, but having a package name of BMA_PERSONNEL_DIRECTORY, a Document name of DETAILS, and a version of v1. Table 4-5 contains a listing of each Primitive to add to this new Document.
Figure 4-6 is a screenshot of this new Document.

FIGURE 4-6. Screenshot of BMA_PERSONNEL_DIRECTORY.DETAILS.v1
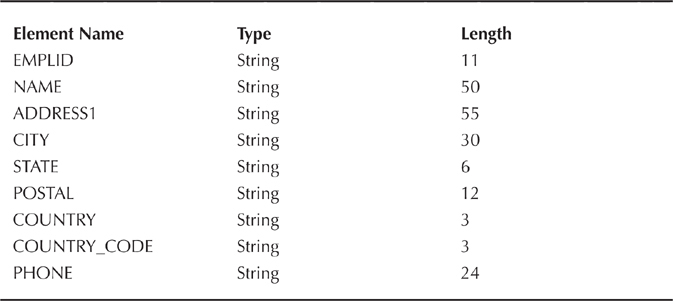
Table 4-5. Details Document primitives
Updating Your Own Profile
Besides basic, read-only functionality, let’s also make it possible for employees to update certain details about their profiles. This, of course, will require authentication, which will give us a great opportunity to highlight a key difference between iScripts and REST services: the security model.
For the update scenario, we will let users change their primary phone number. At the beginning of this chapter, I said we would use Component Interfaces for update operations. Rather than build our own, we can use the delivered CI_PERSONAL_DATA Component Interface. In Chapter 8, we will build a REST service to call the Component Interface. In this chapter, we will define the Document required for receiving the HTTP request.
Create another Document in package BMA_PERSONNEL_DIRECTORY and name it PRIMARY_PHONE. Set the version to v1. Table 4-6 contains a listing of each Primitive to add to this new Document.

Table 4-6. PRIMARY_PHONE Document primitives
Demo Data
In the next two chapters, we will create several Views for the Model layer we designed in this chapter. Let’s use the Document Tester to create demo data files to use with these View layer prototypes.
Access the online Document Tester by navigating to PeopleTools | Documents | Document Utilities | Document Tester. Search for the Document BMA_PERSONNEL_DIRECTORY.SEARCH_RESULTS.v1. When the page opens, you will see the Document structure on the left. The green icon next to the word RESULTS identifies RESULTS as a collection. The following red icon identifies the next element, the SEARCH_FIELDS element, as a compound structure. The RESULTS collection already contains one SEARCH_FIELDS element. For each field: EMPLID, NAME, and LAST_NAME_SRCH, click the field name to enter a value. Figure 4-7 is a screenshot of me setting the EMPLID field in the Document Tester.
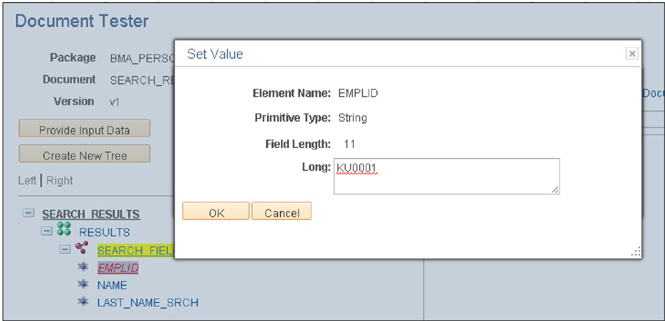
FIGURE 4-7. Setting values in the Document Tester
After adding data to each of the three fields, click on the RESULTS element. A dialog will appear that gives you the option to append a new item or delete the last item. Choose Append Collection Item and click the OK button. This will copy the prior SEARCH_FIELDS node into a new node. Update the values to make each row unique. Repeat these steps to add one more row.
We can use the Document Tester to generate a PeopleCode stub for populating this Document. In Chapter 8, we will write similar PeopleCode to populate this Document. From the Physical Format Type drop-down located in the upper right portion of the Document Tester, select the PeopleCode format and then click the Generate button. I don’t recommend copying the PeopleCode directly out of the Document Tester. The variables are too cryptic to be valuable. This PeopleCode does, however, show you exactly how to populate a Document from PeopleCode:
1. Create an instance of a Document.
2. Access the DocumentElement property.
3. Search for the collection element using the GetPropertyByName method.
4. Create a child node within the collection by calling the CreateItem method of the collection element.
5. Populate the properties of the new child node.
6. Repeat until you have added the necessary elements to the collection.
With this chapter we want to generate some test data. The Document Tester will generate data in XML or JSON format. Use the Physical Format Type drop-down to select the JSON format. HTML5 browsers natively parse JSON into structures that are easy to manipulate from JavaScript. Although possible, XML structures are more complicated to consume in JavaScript. Click the Generate button again to view the Document structure in JSON format. Copy and paste the JSON data into a text file and save it so we can reference it when we prototype the view layer. Figure 4-8 shows JSON formatted data in the Document Tester.
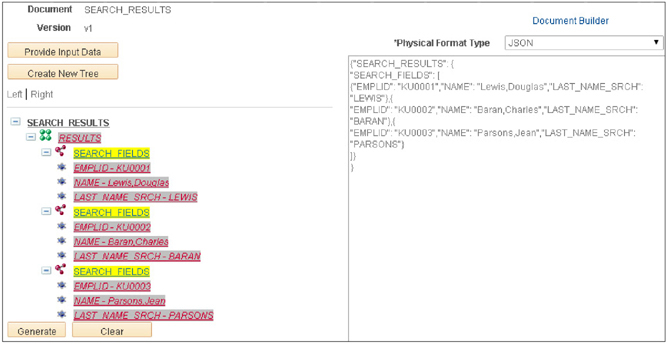
FIGURE 4-8. JSON formatted SEARCH_RESULTS
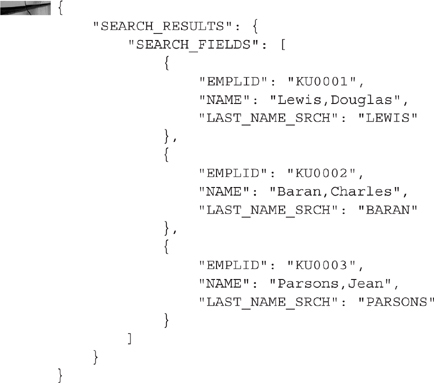
The following listing contains a pretty-printed version of the JSON displayed in Figure 4-8:
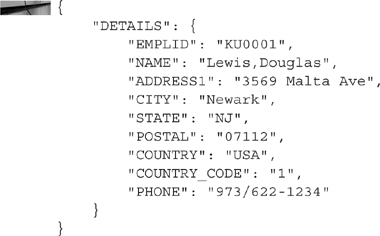
Repeat these steps with the DETAILS Document. Figure 4-9 is a screenshot of the DETAILS Document viewed through the Document Tester.
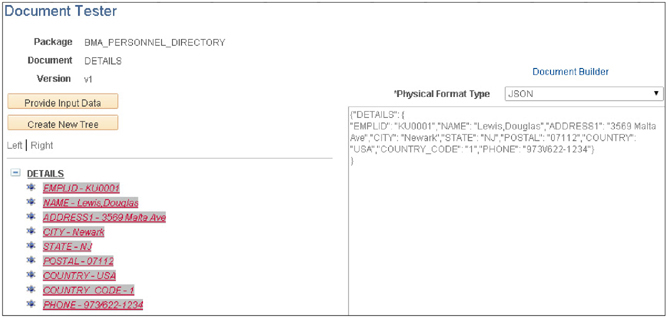
FIGURE 4-9. DETAILS Document in the Document Tester
The following code listing contains the pretty-printed JSON results of the DETAILS document as viewed in the Document Tester. Save these results for use in the next two chapters.
Conclusion
In this chapter, we built the data structures required to support three read-only pages of an HTML5 web application. We also laid the foundation for updating a user’s personal information. We call this the Model layer of the MVC architecture. In the next two chapters, we will prototype the View layer using static data derived from the Model layer. Chapters 7 and 8 will each tie the Model and View together but using different Controller technologies.