

CHAPTER
6
Constructing the HTML View Without jQuery
As you saw in the last chapter, jQuery Mobile dramatically simplifies mobile development. With jQuery Mobile we are responsible for basic HTML structures (lists, forms, and the like). That is it. Through JavaScript and CSS, jQuery Mobile handles the rest (appearance, page transitions, and so on). Although convenient, those jQuery features come at a price: performance. jQuery Mobile expects page structures containing a combination of HTML elements and application data. That is a lot of information to send over a mobile network. In this chapter, we will learn how to build the same mobile Personnel Directory using a client-side MV* pattern that allows us to cache everything locally except data, reducing our network cost to just the data that differs between each page.
Probably the hardest part about writing this chapter was deciding which HTML5 frameworks and libraries to use. There are so many to choose from! For MV*, we can choose from hundreds, with Backbone, Ember, Knockout, Kendo UI, and AngularJS being the most common. Likewise, the Internet is filled with templating and presentation libraries. Common JavaScript template libraries include Mustache, Handlebars, Dust, Underscore, React, and EJS. The more common presentation libraries include Kendo UI, Twitter Bootstrap, Topcoat.io, and Sencha Touch. And we can’t forget Animations: Effeckt.css, Animate.css, and GSAP. For this chapter, I chose AngularJS as the MV* framework, Topcoat.io for styling, and a mix of Animate and GSAP for animations (more on animations at the end of the chapter). AngularJS offers simple two-way data binding as well as templates, routing, and jQuery Lite (jqLite). Topcoat is just CSS (and some images), no JavaScript. For icons, I chose FontAwesome, a library that includes an icon font and CSS declarations.
![]()
NOTE
This chapter assumes you have no familiarity with AngularJS and includes documentation and rabbit trails to help you become familiar with AngularJS.
Chapter 5 is all you need to successfully build mobile web applications. The point of the previous chapter was to demonstrate that mobile development really is simple. This chapter, on the other hand, is not light reading material. The content is challenging! If, however, you are a fearless programmer with a desire to control the finest detail of your application, then this chapter is for you.
Chapters 7 and 8 are each divided into two parts. The first half of each chapter shows you how to integrate PeopleSoft with the jQuery Mobile prototype. The second half shows how to integrate with AngularJS. With that in mind, you could actually skip this chapter and be no worse for it. Nevertheless, I packed some AMAZING stuff in this chapter, so I highly encourage you to be brave and read on. I have full confidence in you. Even if you don’t master web development with AngularJS, you will definitely learn something of value. Carpe diem!
Preparing the Project
Back in the old days of web development (you remember when we walked to school in the snow and it was up hill both ways?)…we downloaded files manually, prepared directory structures, wrote code, and then packaged, tested, and deployed (FTP’d) web applications. Today front-end web developers use a variety of package and build management tools including Yeoman, Grunt, and Bower. These tools configure projects; download libraries; run automated tests; and process, minify, and package files. In this section, let’s try both methods for preparing a project. First, we’ll use the old-fashioned method of building a folder structure and downloading files. Then we will use the automated method. In math class, my math teacher would show us the hard way to solve a problem. Once we understood what we were doing, he would show us a shortcut; same concept here. Once you understand what the automated tools accomplish, then using them is great. Having a basic understanding will help you resolve problems when they arise.
The NetBeans/Manual Approach
Did I say we would create this project the old-fashioned way first? Well, not exactly. We will let NetBeans do most of it. Then we will manually add missing libraries.
![]()
NOTE
While working with code in the NetBeans project, you will see references to bower. Bower is the alternative to the manual approach. You will learn how to use bower later in this chapter.
Creating the NetBeans Angular-Seed Project
Launch NetBeans and create a new project by choosing File | New Project from the NetBeans menu bar. In step 1, choose HTML5 Application for the project type. Press the Next button to move to step 2. Name the project PersonnelDirectory-ajs. Note the Project Location and Project Folder. Later we will download additional libraries into this folder. Press the Next button to move to step 3; select the Download Online Template option and then select the AngularJS Seed template. Click Finish to create the project. Figures 6-1, 6-2, and 6-3 are screenshots of the various New Project wizard steps.
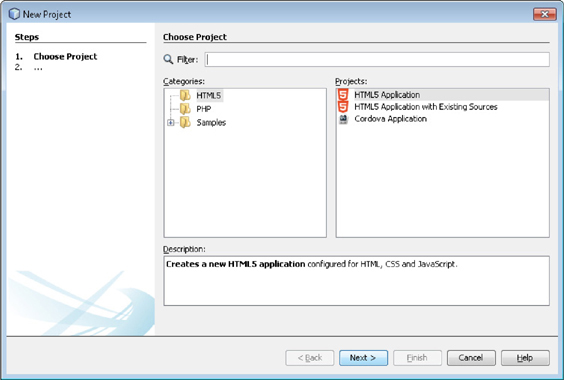
FIGURE 6-1. Step 1 of the New Project wizard
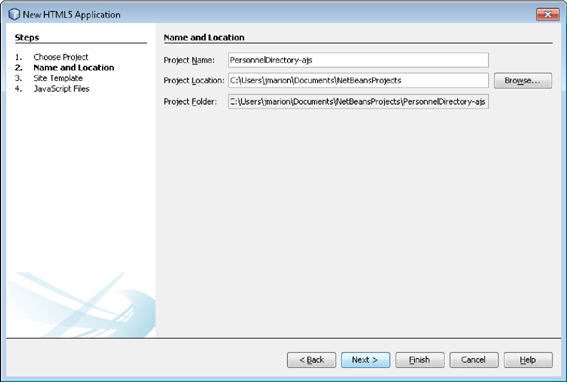
FIGURE 6-2. Step 2 of the New Project wizard
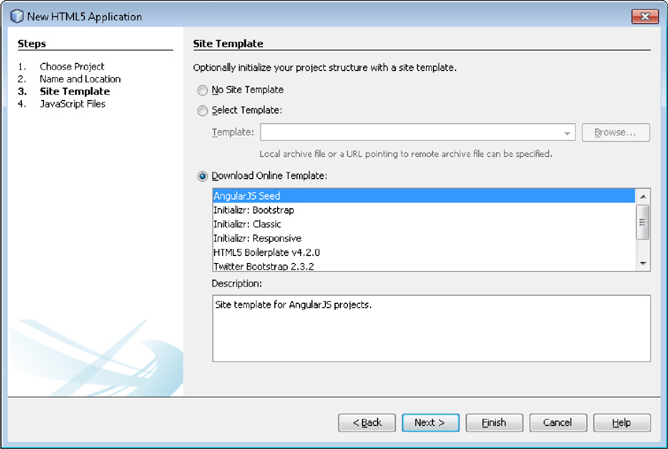
FIGURE 6-3. Step 3 of the New Project wizard
![]()
NOTE
Step 4 of the wizard will automatically download the additional libraries we plan to add to this project. During testing with NetBeans 7.4, however, I found NetBeans to be very inconsistent with its folder structures when downloading libraries into angularjs-seed.
Alternatively, if you prefer a development environment other than NetBeans, you can use Git to clone angularjs-seed from https://github.com/angular/angular-seed. The angularjs-seed project contains complete instructions for downloading and running the seed template. We will discuss more on this later.
Examining and Modifying the Project Folder Structure
Step 2 of the NetBeans project wizard displayed the project root folder. If you did not save a copy of that location, you can find the folder by right-clicking the project name in NetBeans’ project explorer and selecting Properties from the context menu. The Project Folder is the first field of the Sources category. Using Windows Explorer (or your operating system specific file browser), navigate to your project folder. Inside that folder, you should see a subfolder named app. The app folder contains our website content, including css, img, js, and partials folders.
Many of the project folders already contain content. For example, the css folder contains app.css and the js folder contains app.js, controllers.js, directives.js, and so on. This is the sample structure created by the angular-seed project and is the structure we will use for this chapter’s iteration of the mobile Personnel Directory. There are other AngularJS starter projects that organize files differently (for example, by feature rather than by type).
The seed project is designed for use with Bower, a JavaScript package management application and therefore contains no libraries—not even AngularJS libraries. Before downloading additional libraries, create a new folder named lib inside the app folder. We will place downloaded JavaScript libraries in this new folder.
Download AngularJS
AngularJS is an MV* JavaScript framework backed by Google. The AngularJS newsletter says “[AngularJS] is ideal for use when building client-side single-page apps. It is not a library, but a framework for building dynamic web pages. It focuses on extending HTML and providing dynamic data binding, and it plays well with other frameworks (e.g., jQuery). If you are building a single-page app, AngularJS will be perfect for you.” (http://www.ng-newsletter.com/posts/beginner2expert-how_to_start.html).
Our project uses AngularJS for:
![]() Routing
Routing
![]() Two-way data binding
Two-way data binding
![]() Ajax
Ajax
![]() HTML templates
HTML templates
The AngularJS project is modular, which means there is one JavaScript file for each feature. The mobile Personnel Directory project will use three AngularJS modules: the core angular module as well as the angular-route and angular-animate modules. You can find these files within a version specific subdirectory of https://code.angularjs.org/. This chapter was written using files from the https://code.angularjs.org/1.2.9/ download location (1.2.9 was the latest version when I wrote this chapter). Download the following files into the applib directory of your project:
![]() angular-animate.min.js
angular-animate.min.js
![]() angular-route.min.js
angular-route.min.js
![]() angular.min.js
angular.min.js
Download Topcoat
Topcoat.io is a light-weight skinning framework lead by Adobe. We will only use a small fraction of this already small framework: component CSS styling, the Source Sans font, and an image or two. Download the Topcoat framework by navigating to http://topcoat.io/ and clicking the Download button. When I wrote this chapter, the download button was in the upper right corner. Extract the downloaded zip file into your project app directory.
Download FontAwesome
FontAwesome is an AMAZING icon font originally designed for Twitter Bootstrap. Why use a font for icons? Here are a few reasons:
![]() Infinitely scalable—won’t pixelate at larger sizes.
Infinitely scalable—won’t pixelate at larger sizes.
![]() Great for iOS Retina display (because they are scalable).
Great for iOS Retina display (because they are scalable).
![]() Easily colored (CSS color attribute).
Easily colored (CSS color attribute).
![]() You can add display effects such as drop shadow.
You can add display effects such as drop shadow.
Download FontAwesome by using the Download button on the http://fontawesome.github.io/Font-Awesome/ website. Just like Topcoat, extract FontAwesome into the project app directory. Also just like Topcoat, we will only use a small fraction of the functionality provided by FontAwesome. Fortunately, FontAwesome CSS and font file are very small and will be cached by mobile browsers. Figure 6-4 is a screenshot of the file system structure after adding the lib, topcoat, and font-awesome library and folders.
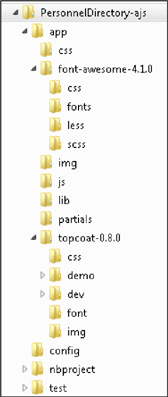
FIGURE 6-4. Project folder structure
Download Animate.css
Animations can have a dramatic influence on usability. Imagine a shopping application where you search for and select items to add to a shopping cart. You probably don’t have to imagine very hard because most of us use shopping applications like this regularly (Amazon perhaps?). As you add items to your shopping cart, how do you know the cart value? How many items are in the cart? Where is that shopping cart anyway? What if, as you selected items to purchase, you saw an animation move the item from the list into a cart representation in the upper right corner of the screen? An animation such as this would automatically train your eyes to look for the shopping cart in the upper right corner.
Animate.css is a CSS library that defines keyframes for several common CSS animations. We will use it later because it integrates well with AngularJS. Download the library by navigating to http://daneden.github.io/animate.css/ and choosing “Download Animate.css.” Save the file in your project’s appcss directory. Your CSS folder should now contain app.css and animate.css
Download GSAP
GreenSock Animation Platform (GSAP) is a very impressive JavaScript animation library. Many developers in the web industry left JavaScript animation in favor of hardware-accelerated CSS animations. There are many benefits to CSS animation, with the greatest being that you can change animations without modifying application code. The CSS-Tricks website, but makes a very compelling argument for JavaScript animations in their article “Myth Busting: CSS Animations vs. JavaScript” (http://css-tricks.com/myth-busting-css-animations-vs-javascript/). We will use the GSAP library later when we discuss animating the user experience.
Download GSAP by visiting the http://www.greensock.com/gsap-js/ website and clicking the Download JS button. When the download dialog appears, click the Download Zip button. From the downloaded file (a file named something like greensock-v12-js.zip) extract the srcminifiedTweenMax.min.js file to your project’s applib directory. Figure 6-5 is a screenshot showing the contents of the lib folder.

FIGURE 6-5. Contents of lib folder
Test Data
In Chapter 4, we created test data: two files named DETAILS.json and SEARCH_RESULTS.json. Copy these into a new folder named test-data. Rename DETAILS.json to KU0001, the employee ID (EMPLID) of the first employee in the search results.
We also need a photo for our test data. In Chapters 7 and 8, we will create services for employee photos. For this chapter, we will use the same static image we used in the last chapter. Either copy the avatar.svg image from your last project or download it with this book’s sample code. Place avatar.svg in the project’s appimg directory.
Your NetBeans project explorer should look something like Figure 6-6. I have included a fully configured sample project zip file named ch06starter.zip in the book’s sample download.
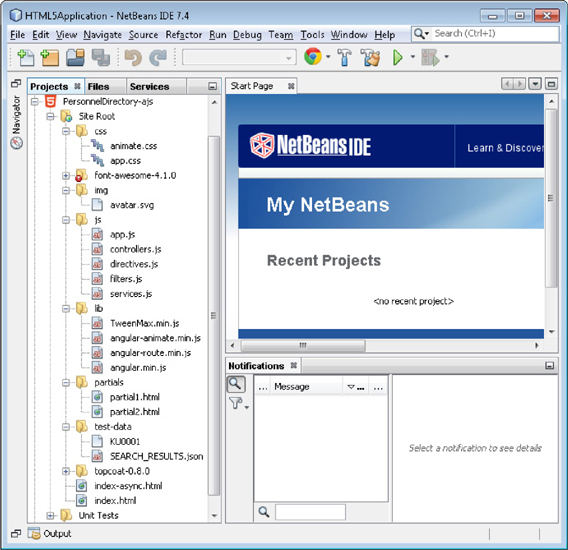
FIGURE 6-6. NetBeans project explorer
Running the Modified Angular-seed Example
Right-click on index.html and choose Run File from the context menu. The Chrome web browser should launch and display a page that looks similar to Figure 6-7. Click the view2 hyperlink to switch to an alternate view. Notice that the part after the # in the URL changes, but you remain on index.html. AngularJS applications are single-page applications, which mean they use Ajax to retrieve content and display that content in a view region.
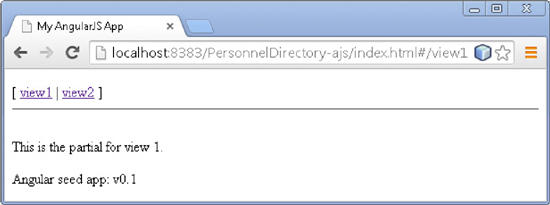
FIGURE 6-7. Screenshot of index.html
The Automated Way
The official angular-seed project is available in a Git repository website at https://github.com/angular/angular-seed. Git is a popular distributed version control system that integrates well with IDEs such as NetBeans, Eclipse, and JDeveloper. NetBeans is great at creating a simple structure for an AngularJS project, but any serious AngularJS development should start with the angular-seed project.
The following scenario and commands were run from a Linux laptop. Mac users will find these listings very familiar. Windows users will need to slightly modify the commands (for example, change the file path from a slash to a backslash, change cp to copy, and mv to move).
![]()
NOTE
If you are not using NetBeans or another IDE that supports the angular-seed site template, then the following steps will help you prepare your project. The steps listed below are optional. Preparing the project using the automation tools described here is not required. If you prepared your project using the manual method discussed earlier, then you are ready to move to the Introduction to AngularJS section.
Cloning the Angular-seed Repository
If you are familiar with git, you can clone the angular-seed repository into a directory using the following commands (commands in bold text):
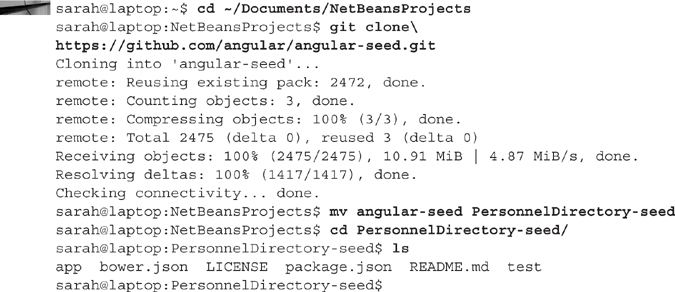
First, I move into my NetBeans projects directory, and then I clone the angular-seed project. Next, I rename the project’s folder. Since we aren’t really working on the angular-seed project, but using that as a template, it makes sense to rename the folder to something meaningful. The final step navigates to the project’s working directory and lists its contents.
If you are not a Git user, then you can download a compressed archive of the repository from the angular-seed repository at https://github.com/angular/angular-seed (search the page for Download Zip). Extract the archive into a directory, rename the angular-seed directory, and then open a command prompt into the seed project directory.
Installing Dependencies
The official angular-seed project uses tools including Karma, http-server, Bower, and so on, which are available from the Node.js repository. The angular-seed project includes a file (package.json) that tells Node Package Manager (npm) what to download and where to put it. From inside the project directory, run the following command:
![]()
![]()
NOTE
We installed Node.js in Chapter 1.
When you run this command, npm will download the dependencies listed in package.json and install them in a new directory name node_modules within the project directory. After installing all of these dependencies, package.json directs npm to run the command bower install. Bower is a JavaScript package manager. Angular-seed uses Bower to download JavaScript libraries used by the seed project, such as AngularJS and the various AngularJS modules. You should now see several new directories in your project’s app/bower_components directory (don’t worry if your bower_components directory is empty. Other build steps will add content to this directory). The project directory should now weigh in around 100 MB. That is quite a bit larger than the original 17 KB of the angular-seed project. Rather than package all the dependencies into angular-seed, the directors of angular-seed chose to distribute just the angular-seed files and use package managers (such as npm and Bower) to download all the dependencies. This ensures that you have the latest versions of the required libraries when you pull the angular-seed project.
![]()
NOTE
The .bowerrc file in the project’s root directory tells Bower where to place library files.
Test the Sample
Here are the steps required to run the sample:
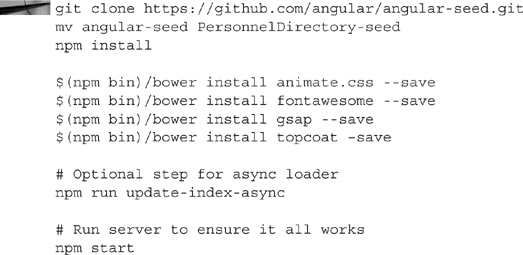
1. git clone https://github.com/angular/angular-seed.git
2. mv angular-seed PersonnelDirectory-seed
3. npm install
We can run the sample application by invoking the command npm start (a command that is defined in package.json) from the command line. Besides a bunch of other text, this command should display:
![]()
When you see this text, it means you now have a web server running on port 8000. To view it, open a web browser and enter http://localhost:8000/app/. This will load the sample angular-seed project and navigate to the default application route (more about routing later). After reviewing the sample, press the CTRL-C keyboard combination (or whatever command was displayed when you started the server) to stop the web server.
Project Specific JavaScript Dependencies
When we created the project through NetBeans, we manually downloaded each JavaScript library. As we saw in this section, angular-seed is configured to use Bower to download libraries. That configuration is stored in the bower.json file. If you open that file in a text editor, you will see that it contains references for angular, angular-route, angular-loader, and so on.
![]()
NOTE
The angular-seed project also contains a reference for html5-boilerplate. We aren’t using html5-boilerplate, so feel free to remove it from your bower.json file.
Since angular-seed uses Bower, we can just ask Bower to download our project’s additional JavaScript dependencies. Tell Bower what to download by running the command bower install <library>. If you want Bower to remember your library choices, add the --save parameter.
How do you run Bower? The npm command installed Bower into the project’s node_modules directory when you ran the npm install command. From the project’s root directory (~/Documents/NetBeansProjects/PersonnelDirectory-seed), run the command ./node_modules/.bin/bower. If you have a bash shell (Linux, Mac, or Cygwin), you can use the shortcut $(npm bin)/bower. The following listing contains a command for each additional library:

![]()
NOTE
The command npm bin returns the current project’s bin directory containing references to all of the local node module binaries. From a bash command line you can execute bower using the shortcut $(npm bin)/bower install.
Running these commands will download the requested libraries to app/bower_components and add them to bower.json. As time progresses and new updates are available for the various JavaScript dependencies, you can run bower update to download the latest version.
NOTE
You can find information about the bower.json file structure online at https://github.com/bower/bower.json-spec. The semantics for the version attribute is quite flexible. You can find additional information about the version number syntax at https://github.com/isaacs/node-semver/.
You could run npm start again, but we haven’t changed any of the code, so you wouldn’t notice any difference.
Asynchronous JavaScript
If you review the contents of the app/ directory, you will see there are actually two different index files. The first is the one we already tested: index.html. The second is index-async.html. The index-async file doesn’t actually work yet. I intentionally ignored it earlier when manually downloading files because index-async requires a special injected JavaScript file. I could have told you how to copy and paste the contents, but the minified contents would be rather difficult to work with. It is so much easier to let npm inject the appropriate content. Inside index-async.html you find the text:

From this comment, we see that the difference between index.html and index-async.html is that index-async.html “loads [files] in any order.” Or, more specifically, it loads JavaScript files asynchronously. The default browser behavior is to load JavaScript files synchronously, blocking the entire load process for each script tag. Asynchronous file loading can significantly improve load-time performance. To enable asynchronous loading, at the command prompt navigate to your project’s root directory (the directory with package.json … and you are probably already there) and enter the command npm run update-index-async. This will replace the content between the @@NG_LOADER_START@@ and @@NG_LOADER_END@@ lines with the contents of the file angular-loader.min.js (which is why that file is listed in the bower.json file).
Execute the command npm start to start the embedded web server and then load http://localhost:8000/app/index-async.html in your web browser. If your web server is already running, you don’t need to start it, just open index-async.html in your web browser. Verify that index-async.html performs the same as index.html. With a sample project as small as this one, you may not notice a performance difference between the index.html synchronous loading and the asynchronous features of index-async.html.
Extra Credit: Prepare a NetBeans Project
If you are not using NetBeans, then of course you won’t be creating a NetBeans project. I like to use a combination of the approaches shown in this chapter. I prefer the development tools provided by NetBeans as well as the dependency automation included with the angular-seed project. With this in mind, I use the tools described in this section to git clone angular-seed and then run the npm and Bower install processes. When those complete, I create a NetBeans project from the seed source and manipulate the NetBeans metadata. If you prefer to use this approach, launch NetBeans and choose File | New Project from the NetBeans menu bar. In step 1 of the New Project wizard, choose the category HTML5 and the project HTML5 Application with Existing Sources. In step 2, for the Site Root, select the app directory of your seed project. The Project Directory is the seed project’s root directory. Figure 6-8 is a screenshot of step 2.
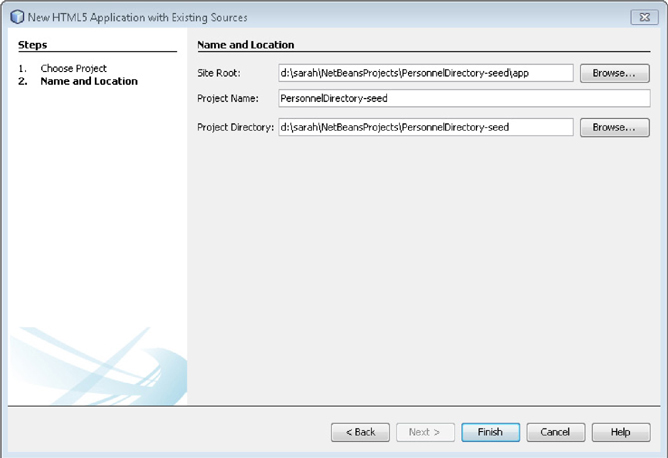
FIGURE 6-8. NetBeans project folder locations
Summary of Steps
The following listing contains the commands we ran to prepare our project:
The remainder of this chapter uses the project you created using the NetBeans/Manual method. I chose this approach because it has fewer dependencies. I encourage the use of angular-seed along with Bower, Node, and npm, but these tools can be difficult to install on certain operating systems. To ensure consistency for all readers, we will use the manual, NetBeans approach. If you are not using NetBeans and prefer the automated Bower approach, then feel free to continue using your new automated project. Just be sure to update paths and file references accordingly. For example, the seed project references libraries from the bower_components directory, whereas I reference libraries from the lib directory.
Introduction to AngularJS
If you already know something about AngularJS, then feel free to skip this section. The point here is to help new AngularJS users become comfortable and familiar with the AngularJS platform. The Internet is packed with great AngularJS tutorials. I recommend starting with the AngularJS tutorial at https://docs.angularjs.org/tutorial. AngularJS even has its own YouTube channel: https://www.youtube.com/user/angularjs.
First, what is AngularJS? Is it a library? Is it a framework? The AngularJS team would prefer that we think of AngularJS as a toolset … or even an extension to HTML. It uses declarative directives for the user interface (views) and JavaScript configurations and dependency injection for the data model, services, and so on (model and controllers). AngularJS dramatically reduces DOM manipulation through two-way data binding and template views (also known as partials). For a great overview, visit http://en.wikipedia.org/wiki/AngularJS.
Enough with the abstract descriptions; let’s build something so you can draw your own conclusions.
My First AngularJS Page
Let’s create a sample page to see AngularJS in action. Select the PersonnelDirectory-ajs project in NetBeans. This is the project you created using the NetBeans/Manual method and contains a lib directory with JavaScript libraries. From the NetBeans menu bar, select File | New File. Choose the file type HTML5 | HTML File. On step 2, name your file sample (the name is not important, but for consistency, name it “sample”). NetBeans will create a new file with the necessary html, head, and body tags. To this file, we will add some AngularJS directives and some sample code.
The first thing we need to do is bootstrap our document. Bootstrapping involves adding an ng-app attribute (known as a directive) to the root of our application (usually the html element, but can be any element). To bootstrap sample.html, add the attribute ng-app to the html element (the html element should be the second line of the document … well, except for the generic licensing comments inserted by NetBeans). The following code listing contains the first two lines of the document after adding the ng-app attribute. Notice that we don’t have to specify an attribute value for ng-app. HTML5 is a simplification of the HTML specification and does not require each attribute to have a value.
Now let’s add some HTML and AngularJS directives to demonstrate two-way data binding. Replace the contents of the body element with the following (AngularJS directives are in bold):

The ng-model attribute of the text field binds the input text element to the userName property of the p object (p.userName). We then display the value of the property using the template {{p.userName}}. Test it out by right-clicking the NetBeans text editor and choosing Run File from the context menu. Type a value into the text field and watch it appear below the text box. At this point, we have not written any JavaScript and we already have a working data-driven web application. This is the power of AngularJS two-way data binding: the model and view remain synchronized.
While reviewing this example in the Chrome web browser (or similar browser), right-click on the paragraph (the part that says “Hello”) and choose Inspect Element from the context menu. Notice that AngularJS added a class attribute with the value ng-binding. Expand the paragraph above the “Hello” paragraph and inspect the input element. Notice the input element also has new classes: ng-valid and ng-dirty. Figure 6-9 is a screenshot of the AngularJS page showing the Chrome inspector.
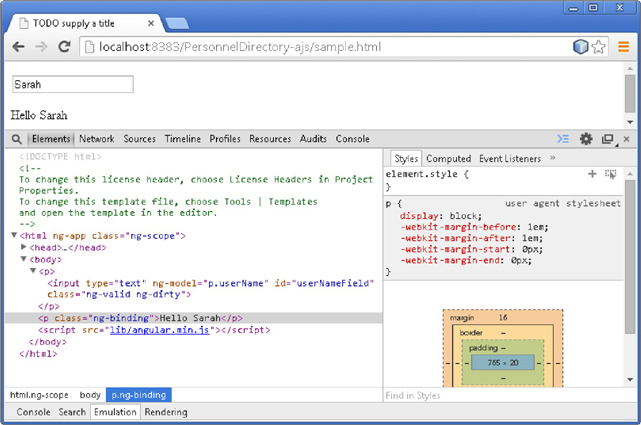
FIGURE 6-9. My first AngularJS page
Bootstrapping AngularJS
When constructing sample.html, our first step was to bootstrap the page by adding the ng-app attribute to the root html element. Bootstrapping identifies the current page as an AngularJS app and directs the AngularJS library to compile and link the current document. Compiling involves traversing the DOM to identify AngularJS directives (ng attributes and elements). Linking registers scope and listeners to DOM elements identified by the compile process.
The ng-app directive is not the only way to bootstrap an AngularJS application. For more control over the bootstrap process, we can manually bootstrap an application using JavaScript similar to the following:
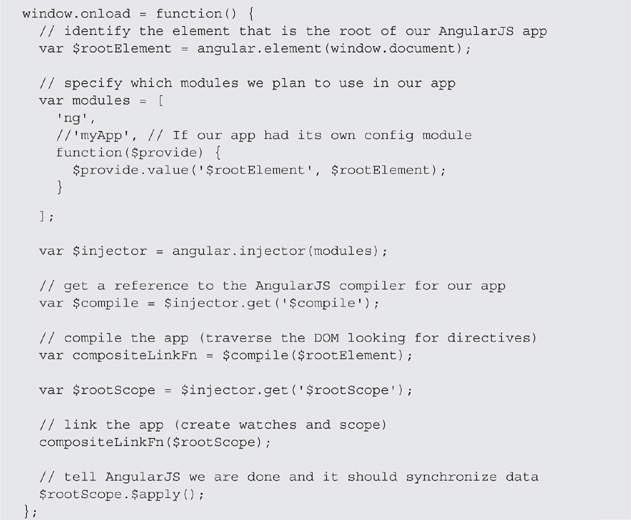
Since we are using the ng-app directive with synchronous file loading, this chapter doesn’t require any special bootstrap code.
AngularJS templates can evaluate standard JavaScript expressions. Add the following just before the angular.min.js script tag:
![]()
Save and view your page in Chrome (or another web browser). You should see the text “Expression: 1 + 2 = 3” displayed in a new paragraph below the “Hello” line.
We can further test two-way data binding by setting and inspecting data model values using JavaScript. For this next test, we will add two buttons below our new expression and a few lines of JavaScript. First, add two buttons:
![]()
Next, add the sayHello and changeMyName JavaScript functions:
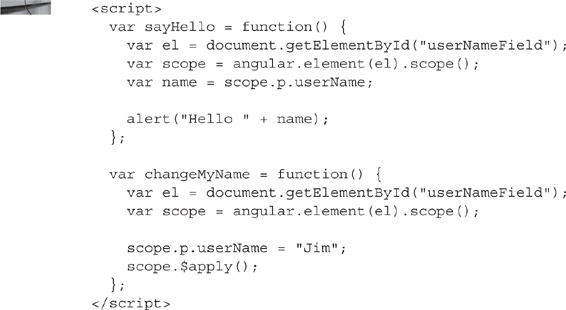
Briefly, the sayHello function above first obtains a reference to the input field using the standard DOM method getElementById. It then uses the AngularJS jQuery Lite method angular.element. The point of using the angular/jQuery lite representation of the element is to access the element’s AngularJS scope. Once we have a reference to the scope, we can read and/or change values within the scope.
The changeMyName function is very similar to the sayHello function. After obtaining a reference to the model and updating model values, changeMyName calls the special AngularJS scope method $apply().
If you are using NetBeans and Chrome and launched the current page through NetBeans’ Run File command, then simply save your changes and switch to Chrome. The NetBeans plugin for Chrome automatically reloads changed files. If you are using a different browser, save your work and manually reload the file to view your changes. Type a name into the input field and click the Say Hello! button. You should see a dialog box containing the text “Hello XXX” (where XXX represents the text you typed). This demonstrates that it is possible to retrieve AngularJS data model values. Clicking the Change My Name button will change the name displayed both in the paragraph and input field. This demonstrates that we can set AngularJS data model values and those changes are automatically synchronized with the view layer. Figure 6-10 is a final representation of the sample.html page. Notice that we didn’t write any DOM manipulation JavaScript. All of our interactions were with the data model.
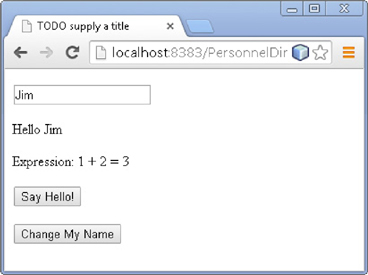
FIGURE 6-10. Final screenshot of sample.html
Now that you have tested the expected scenario and seen it perform as intended, try the following scenario:
![]() Refresh the page.
Refresh the page.
![]() Ensure that the input field is empty.
Ensure that the input field is empty.
![]() Click the Change My Name button.
Click the Change My Name button.
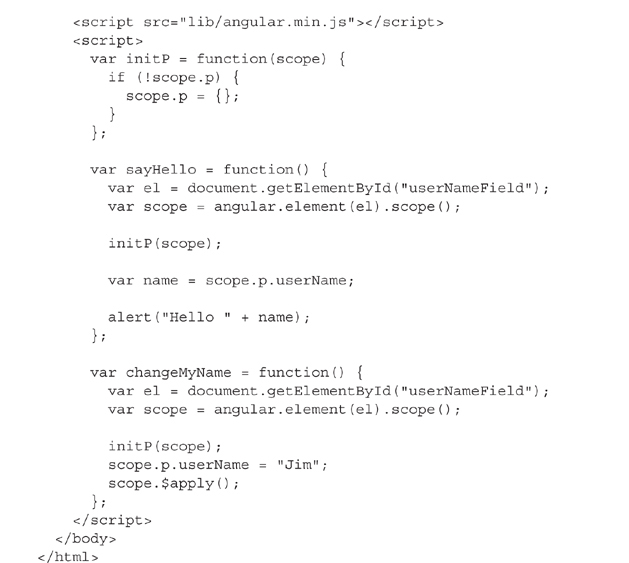
Did the page content change? Did the value change in the input field as it did in our prior test? When I perform this test, the input field stays blank and nothing appears after the text “Hello.” If I open my web browser’s JavaScript console and click the button again, I see the text, “Uncaught TypeError: Cannot set property ‘userName’ of undefined.” What the browser is telling us is the scope does not contain p.userName. This is because AngularJS doesn’t add the p object and its corresponding userName property to the scope until we enter some data. We can resolve this problem by changing our JavaScript to create the p attribute of the scope if it does not already exist. Later in this chapter, you will learn how to use controllers to initialize scope properties and values. The following is an updated JavaScript listing with changes in bold text:

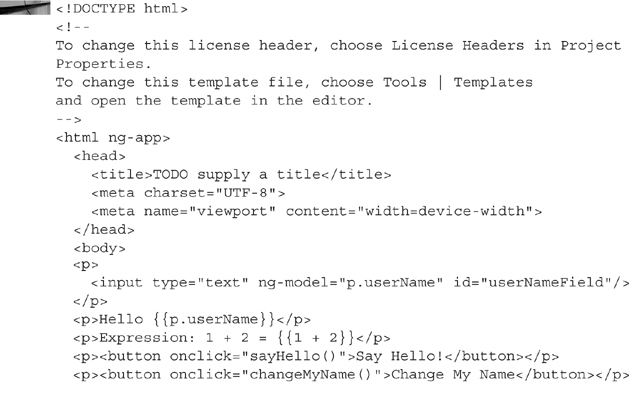
The following is a complete code listing of sample.html:
NOTE
Did you see the template text ({{p.userName}}, etc.) while the page was loading? AngularJS includes a special directive called ng-cloak that you can use to hide template content that is visible during that fraction of a second between the browser loading the content and AngularJS bootstrapping the page.
Scope
You have already seen how we use controllers and $scope to bind data methods to a view. There is another type of scope, and that is the traditional variable scope. In programming languages, scope determines visibility. Most languages have the concept of a global scope. Anything declared at the global scope is accessible to any code accessed throughout the duration of the program. JavaScript running within a web browser has a type of global scope contained by the window object. Anything added to the window object is global and accessible as long as the current web page is loaded. If the browser loads a new page by navigating away from the current page, then anything declared by the current page is destroyed and garbage collected (garbage collection: the process of freeing memory used by variables that no longer exist). When a new page loads, the old window scope is destroyed and a new one is created. You can actually load JavaScript by adding a <script> node, delete that script node, and still run functions declared by that script. Any functions declared at the global scope or in some way attached to the global scope will exist until they go out of scope. The only way to remove them is to place them inside a scope that you manage and can delete. JavaScript developers manage scope through anonymous, self-executing functions and closures.
If AngularJS uses a single-page application pattern, how does it manage memory to ensure that controllers are dropped from memory when navigating between views? AngularJS manages scope through its module pattern. You invoke a method to identify the type (controller, directive, and so on) of module and you give the module a name. This binds an object to a name that you can later inject into other modules. The code for the module exists in a closure. AngularJS can create instances of the module when needed and then destroy them at the appropriate time, for example, when navigating between views.
I recommend the following articles if you are interested in learning more about AngularJS scope and memory management:
![]() http://stackoverflow.com/questions/16947957/how-does-angularjs-handle-memory-management-with-ngview
http://stackoverflow.com/questions/16947957/how-does-angularjs-handle-memory-management-with-ngview
![]() http://tech.small-improvements.com/2013/09/10/angularjs-performance-with-large-lists/
http://tech.small-improvements.com/2013/09/10/angularjs-performance-with-large-lists/
![]() http://thenittygritty.co/angularjs-pitfalls-using-scopes
http://thenittygritty.co/angularjs-pitfalls-using-scopes
Dependency Injection
There is one more topic you need to understand before continuing: Dependency Injection. Dependency Injection is a common design pattern in strongly typed languages. Spring, Guice, and PicoContainer are well-known Java Dependency Injection frameworks (also known as Inversion of Control [IoC] frameworks). The point of Dependency Injection is to decouple services from the code that uses those services. For example, if you want to round a number to the nearest Integer using JavaScript, you might write code that looks something like this:

The Dependency Injection version of the roundPhi function would not use the Math object directly, but would instead contain a Math parameter. The Math parameter would be known as a service. Here is what a Dependency Injection version might look like:

You would invoke the Dependency Injection version like this: roundPhiDI(Math) and it would return the value 2. In this example, the function’s dependency on the Math module is satisfied through the method’s parameter. Why the hassle? Why not just use the Math module? What if you wanted to call roundPhi, but you wanted it to behave slightly differently? For example, what if you wanted to track each time someone invokes Math.round? Would you search your code for every usage of Math.round and add more code to account for its usage? If you are familiar with dynamic languages (such as JavaScript), you might actually take another approach: Monkey Patching (or Duck Punching). The Monkey Patching approach would replace, or patch, the original Math.round with a new version. Here is an example:
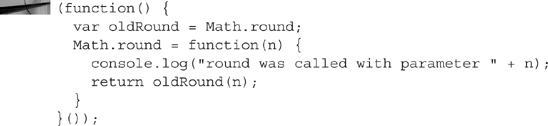
Calling Math.round(1.61803) will still return 2, but will now print “round was called with parameter 1.61803” to the JavaScript console.
Here is another example: What if you wanted to call roundPhi but wanted to change the rounding rules? How would you change round’s behavior for just roundPhi and not globally for all executions of Math.round?
One of the problems with Monkey Patching is that it changes the behavior of known objects without notification. When you call Math.round, you expect it to adhere to the ECMAScript specification. When you use a math service, however, all you know is you invoked the round method, and you expect a whole integer result conforming to the definition for the round method. Implementation details are unimportant. It does not matter to you whether the definition was provided by ECMAScript and implemented by Google V8 or defined by JimScript and implemented by Sarah V12. Your expectations change.
Dependency Injection improves testability. It is possible to test the original roundPhi function in its original state. We can invoke the function and verify the result. But, what are we really testing? How would we really know if it was rounding Phi? What if the result was hard coded to just return 2? Would that be wrong? What if we wanted to use different rounding rules, for example, to return more decimal places? By using Dependency Injection, we can test more than just the function result. We can also verify that its interactions with the Math service will satisfy our requirements. We can create a MathMock object with a round method and then validate the Phi value passed to the round method.
One of the problems with Dependency Injection within a framework is tracking dependency requirements. A simplistic approach is to use method and constructor parameters. This is not very flexible and requires declarations for variables that we may never use. Consider the following example:

The framework controller method expects all of those parameters but the implementation only uses two of the parameters. Modern versions of Java use annotations to identify injection targets. AngularJS uses a parameter array:

Not only does this allow us to inject any number of parameters in any order, it also allows us to inject parameters that the framework had not considered. This allows the developer to determine the parameters. In the above example, SearchService is not part of the AngularJS framework, it is a custom-defined service. When AngularJS encounters the parameter named SearchService, it searches its list of configured modules for a module named SearchService and injects that object into the method argument list.
That covers the basics. Here is a list of my favorite AngularJS resources:
![]() Official AngularJS Tutorial (https://docs.angularjs.org/tutorial)
Official AngularJS Tutorial (https://docs.angularjs.org/tutorial)
![]() A Step-by-Step Guide to Your First AngularJS App (http://www.toptal.com/angular-js/a-step-by-step-guide-to-your-first-angularjs-app)
A Step-by-Step Guide to Your First AngularJS App (http://www.toptal.com/angular-js/a-step-by-step-guide-to-your-first-angularjs-app)
![]() AngularJS Fundamentals in 60-ish Minutes (https://www.youtube.com/watch?v=i9MHigUZKEM)
AngularJS Fundamentals in 60-ish Minutes (https://www.youtube.com/watch?v=i9MHigUZKEM)
![]() Official AngularJS YouTube Channel (https://www.youtube.com/user/angularjs)
Official AngularJS YouTube Channel (https://www.youtube.com/user/angularjs)
Learning from Angular-seed
With the basics of data binding out of the way, let’s review the angular-seed template project and see what we can learn about AngularJS from this boilerplate example.
Comparing Index Files
The angular-seed project includes two index files:
![]() index.html
index.html
![]() index-async.html
index-async.html
![]()
NOTE
The angular-seed project is a living project, meaning it changes regularly. I wrote this book using version 0.1. Your angular-seed project contents may differ from what appears in this text.
There are a few differences between index.html and index-async.html, but the key difference is the loading pattern. The index.html file uses the standard synchronous loading pattern. With this pattern, the web browser will download images, resources, and so on, asynchronously until it encounters a script tag. Upon encountering a script tag, the browser will cease activity and download, interpret, and execute the script. This is a blocking, synchronous pattern and may have performance implications. Because this pattern blocks the browser from interpreting and rendering portions of the user interface, the angular-seed index file places JavaScript files at the end of the body tag, after the user interface renders. The benefit of this synchronous, blocking pattern is that it is easy to understand. You place your script tags in a logical, dependent order and the browser will load them in that order.
The index-async.html file uses an alternative, nonblocking asynchronous pattern. The async index file includes a small amount of JavaScript that it expects the browser to execute synchronously and then uses the $script.js (https://github.com/ded/script.js) library to execute the remainder of the JavaScript asynchronously. This allows the browser to parse and render the user interface before preparing and executing the JavaScript associated with the application.
In the version of angular-seed that I am using, there are a few other differences as well. For example, the index-async version uses ng-cloak to hide the body content until after the compile and link (bootstrap) process. Another difference is the bootstrap method. The synchronous index version uses the ng-app directive to bootstrap the AngularJS application, whereas the index-async version uses JavaScript to bootstrap the AngularJS application after $script finishes loading the JavaScript files associated with this application.
Resolving Dependencies
As with our sample.html file, we need to add a reference to the angular library we previously downloaded (angular-seed assumes you are using bower for dependency management). To make this change, scroll to the end of index.html and locate the following:
![]()
Change the src attribute to reference the files we downloaded into the lib directory as follows (changes are in bold):
![]()
![]()
NOTE
The angular-seed project references the uncompressed, human-readable JavaScript files. Since we don’t intend to read or debug the AngularJS libraries, we chose to download the minified versions. Be sure to reference the “.min” versions in your script files.
Routes
Run the index.html file by right-clicking the code editor and choosing Run File from the context menu. Google Chrome should load the index.html file and display two links: view1 and view2 along with the contents of view1, “This is the partial for view1.” Click the view2 link and watch the contents change. While transferring between view1 and view2, look at the URL in the browser address bar. Notice that it changes between /index.html#/view1 and /index.html#/view2. The browser stays on index.html but displays different content depending on the chosen link (also known as a route). Change the URL to just index.html and notice that it automatically directs to /index.html#view1. We will see how to configure this a little later when discussing routing.
While viewing #/view1, right-click on the phrase “This is the partial for view1” and select Inspect element from the context menu. Chrome Developer Tools will highlight the paragraph (p) element in the source tree. The parent of that paragraph is a div with the attribute ng-view. The ng-view directive is a placeholder for content. When transferring between routes, AngularJS loads content into the ng-view placeholder. The element containing the ng-view attribute becomes the container for the route-specific content.
An AngularJS application is a single-page application that uses Ajax to load content into ng-view, based on the chosen route (or URL). The content displayed by the route comes from a template referred to as a partial. The data displayed in the template is provided by a JavaScript object called a Controller.
Routes are configured in the AngularJS application module. We haven’t talked about the application module yet. The application module is an AngularJS module containing application configuration information. For our application, the two critical configuration pieces are modules and routes. To view the application’s routing information, open the file js/app.js. The following code listing displays the contents of app.js:
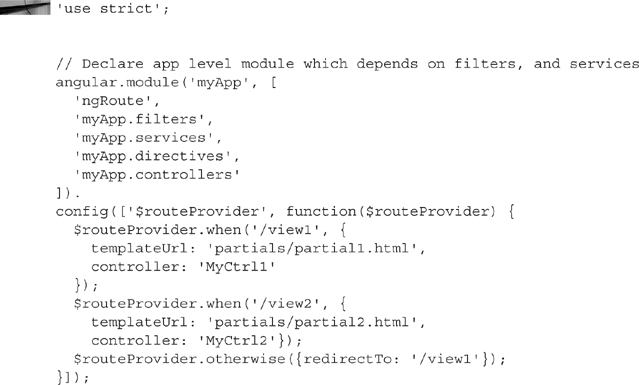
NOTE
Do you see the AngularJS dependency injection pattern? The config method parameter is an array where the first elements in the array are named dependencies and the final parameter is a function containing parameters that correspond to the named dependencies listed in the array.
The bottom half of this file contains $routeProvider.when. Each of these when methods describes a different route. The angular-seed project only contains two routes: view1 and view2. The first parameter to the when method is the route URL pattern. The second parameter is an object describing what to do when AngularJS encounters that route.
How does AngularJS know which module to use as the application module? The application module is specified during the bootstrapping process. In index.html, the application module is specified as the ng-app attribute value:
![]()
The index.html file uses the synchronous auto-bootstrapping method. Earlier we used the ng-app attribute in the sample.html file, but we didn’t specify a value. This is because our sample.html application did not need an application module.
The index-async.html file uses a different approach. After asynchronously loading all of the required JavaScript, bootstraps the document with the myApp module:
![]()
Notice that we can use the same JavaScript for both index.html and index-async.html. The modules are self-contained, meaning their only dependencies are specified as method parameters (dependency injection).
Partials
Partials are HTML fragments that represent templates. The angular-seed project includes two partials: partial1.html and partial2.html. Open the file partials/partial1.html and review its contents. The partial1.html file is not very exciting. Notice that it is just plain HTML. When viewing index.html in your browser earlier, you saw that AngularJS loaded partial1.html into ng-view, based on the routing configuration.
Controllers
Besides URL patterns and templates, routing information also specifies a controller for each route. The controller prepares and manages the data used by a partial template. Open js/controllers.js to view the list of sample controllers defined in angular-seed.
Building with AngularJS
Now that you have an understanding of AngularJS, let’s use it to build another iteration of the Personnel Directory.
![]()
NOTE
The following example uses the PersonnelDirectory-ajs project and synchronous index.html file.
Creating the Search Page
Similar to the jQuery Mobile version, our primary page is the search page. Let’s start by building the search partial.
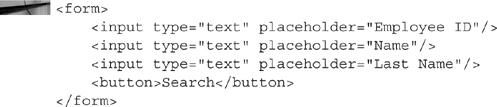
In NetBeans, right-click on the partials folder and choose New | HTML File from the context menu. Name the file search.html. When the new file appears in the editor, replace the contents with the following:
![]()
NOTE
I intentionally left field labels off of this form. I felt the HTML5 placeholder attribute provided enough context and instruction to eliminate labels. Mobile devices don’t have much display area and I didn’t want to waste it with unnecessary information.
Next, we need to connect these form fields to a data model. From Chapter 4 we know that our future search service will expect the fields EMPLID, NAME, LAST_NAME_SRCH. Let’s bind those to an object named searchParms. We also want something to happen when the user clicks search, so we will bind the form submit button to a method appropriately named search. Adding the appropriate ng attributes to our HTML would make it resemble the following (changes in bold type):
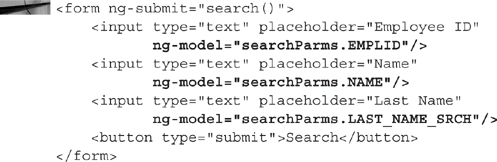
Every view requires a controller. Let’s write just enough code to say we have a controller and then run index.html to see our progress. Inside the js folder, open the file controllers.js. Immediately following the line containing the text angular.module, place the following:

Notice the leading dot (.) before the word controller. My preference is to place the dot immediately before the method to which it refers. The angular-seed project uses the opposite convention, placing a trailing dot immediately following the object to which it refers. To me that trailing dot seems more like a period marking the end of a sentence than a coordinating conjunction linking two related constructs. Whichever convention you prefer, just be consistent. For purposes of this example, make sure you only have one dot. The sample controllers MyCtrl1 and MyCtrl2 are not required, so delete those before continuing. After making these changes your controllers.js file should contain the following:
![]()
NOTE
The final semicolon is not required, but is good practice. If you delete that final semicolon, then NetBeans will display a warning and suggest you add a semicolon. Semicolons tell the JavaScript interpreter where a command ends. Adding semicolons makes your code easier to understand just as adding periods to sentences makes them easier to read. Even better, semicolons allow you to place multiple commands on the same line, something that is critical when you want to minimize file size by eliminating unnecessary white space.
We need to define a route before we can run the search page. Open the js/app.js file in NetBeans to add a new route. Delete the view1 and view2 routes as well. While you are there, change the default (otherwise) route from /view1 to /search. The final $routeProvider configuration should match the following code listing:
To view the search page in a web browser, right-click on index.html and choose Run File from the context menu. The search page should appear similar to Figure 6-11. Not very pretty yet. In fact, it isn’t even functional.
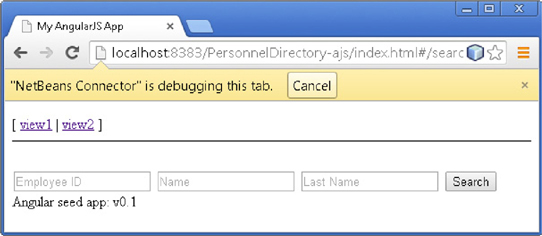
FIGURE 6-11. Screenshot of the unstyled search page
While not completely functional, we have bound our input fields to a data model and can actually see that data model change. From your web browser, open the developer tools (F12 on most browsers). Right-click one of the input fields and choose Inspect Element from the context menu. This will highlight the data-bound field in the structure browser. The field chosen is not important. The important part is that a data-bound field is selected in the structure browser. Switch to the Console tab, type the following, and press ENTER:
![]()
The console will display an object representing the same scope that is available to our AngularJS controller. At this time, the scope doesn’t contain much, just a few $xxx properties. Now enter a value into the Employee ID field and execute the same command again. The new object printed in the console now has a searchParms field, which is an object that contains the EMPLID field. Figure 6-12 is a screenshot of the Console window highlighting the EMPLID attribute in Firefox developer tools.
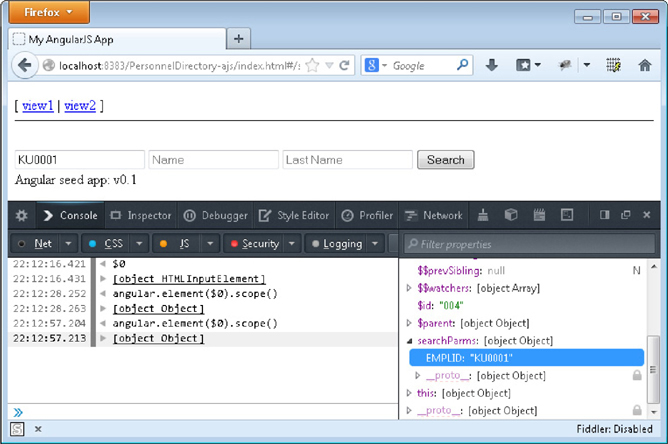
FIGURE 6-12. Viewing the scope within the JavaScript console
Cleaning up index.html
The index.html file contains sample code we won’t use. For example, the top of the page contains references to two navigation cases that no longer exist in app.js. Actually, while viewing index.html in your web browser, click the view1 and view2 links. Nothing happens. Your page stays the same. The URL in the address bar does not change. This is because AngularJS did not find the requested routes #/view1 or #/view2, and the default (otherwise) route in app.js specifies search.html as the page to display for all unrecognized URLs.
Open index.html in your editor. We’ll start at the top and delete items we won’t use. First on the list are any stylesheet links and script elements that point to bower_components. The head HTML element should now just contain the following:
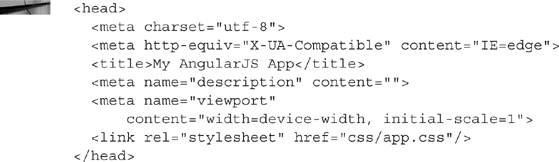
![]()
NOTE
The HTML above has the title set to “My AngularJS App.” This is the default title from the angular-seed project. You may want to change the title to something more meaningful, such as “Personnel Directory.”
Next, remove the ul element that represents the single-page application navigation. We will use the HTML nav element instead. Immediately following the navigation, you may see some IE browser comments suggesting that users of this page upgrade. If you are concerned that users might try to browse your mobile app with Internet Explorer browsers older than IE 7, then keep the comment. Otherwise, eliminate it also.
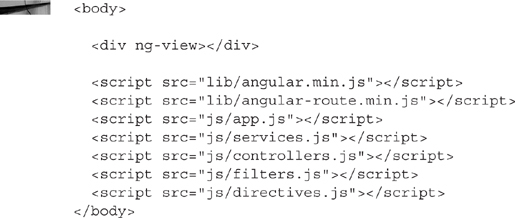
Immediately following the div with an ng-view attribute, you should find a div referencing a custom directive: Angular seed app: v… Delete this line as well. The body element should now consist of just the ng-view div and a handful of AngularJS JavaScript files:
NOTE
I also deleted the comment suggesting that you use ajax.googleapis.com for production applications.
Reload the page and verify that it displays only the three form fields and a submit button.
Styling the Search Page
As you saw from your configuration section, we are using the Topcoat.io CSS library. There are many popular styling libraries, including Twitter Bootstrap. Bootstrap has some great style ideas, but comes with a lot of JavaScript components. Topcoat is just CSS (and some images, but we won’t use those).
Let’s add some style to the search page. Open the search.html page and make the following changes:
![]() To the form, add
To the form, add class='margin'.
![]() To each input field, add
To each input field, add class='topcoat-text-input'.
![]() To the button, add
To the button, add class='topcoat-button' and data-icon='search'.
The search page HTML should now contain the following content:
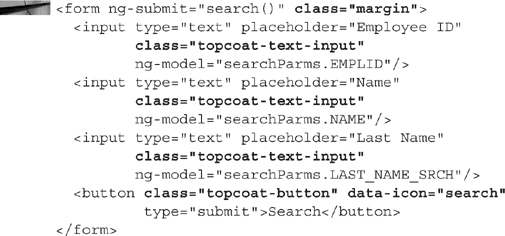
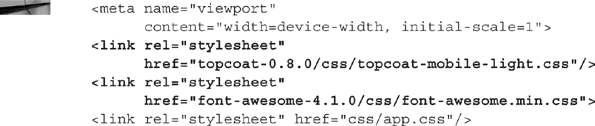
I like to make small incremental changes and review those changes in a browser. You could do that now, but it won’t be very thrilling because we haven’t told the browser how to interpret any of the class attribute values, such as class='topcoat-text-input'. Let’s do that now by adding the topcoat CSS file right before app.css in the head section of index.html. While we are here, we might as well add a reference for FontAwesome. We will use it on the search page to add a magnifying glass icon to the search button. Add the following bold lines to the head section of index.html. I included a few lines for reference but only add the four bold lines in the middle:
The reason we add these references right before app.css is so that we can place application specific overrides in app.css. This allows us to change the way the browser displays topcoat styles without modifying the topcoat CSS file.
Reload your page and enjoy the visual changes. It still isn’t perfect, but we are a lot closer to the appearance of a mobile app. Resize your page and notice that it is already responsive, meaning the layout changes with the page width. Figure 6-13 is a screenshot of the search page at its smallest width.
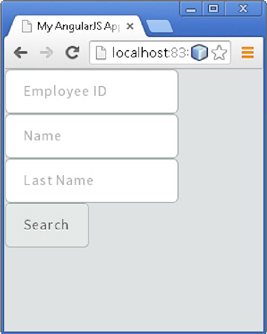
FIGURE 6-13. Small-width search page
The rest of the search page appearance will come from custom defined CSS styles. The angular-seed project includes app.css for custom CSS. When you open this file, you will see that it already contains CSS class definitions. As you look through the contents of this file, notice the use of before and after pseudo selectors as well as how angular-seed uses the content attribute. We will use similar syntax to add icons to buttons. Unfortunately, none of these predefined styles relate to our project, so delete the entire contents of the file.
As we start adding content around the form, such as a header and sidebar, we will want the form to have some spacing, or margin, around it. We already added a class attribute to the form to associate the form with a style class named margin. Add the following text to the css/app.css file to define the margin style class:
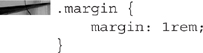
When you save, NetBeans will reload index.html and display the search page with some margin around the form.
Define styling information for the search button icon by adding the following to app.css:
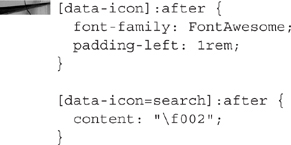
Save and reload the page to see a magnifying glass appear inside the form’s button.
Generic Selectors and Performance
I prefer generic selectors for reuse throughout an application to provide a consistent visual appearance. For example, in our Personnel Directory, now that we have a margin class, all elements that need a margin will have the same margin definition. Likewise, all elements requiring an icon will have the same icon specifications. I use attribute and wildcard selectors without regard for CSS selector performance.
There was a time when I used to consider performance when writing selectors. This is a holdover from my jQuery experience. Writing efficient selectors for early jQuery was critical to application performance. With jQuery, as with CSS, an ID selector is the fastest, so you start with an ID and begin qualifying descendants. jQuery allows us to chain selectors together as separate methods. CSS does not. Both jQuery and CSS start evaluation and qualification on the right, not the left, removing elements that don’t qualify.
Since many of us read left to right, we think that selector engines do as well. We write selectors starting with something highly qualified to narrow down the list of matched elements, and then further qualify the elements within a container. Often times, we include selectors with pseudo and attribute selectors thinking the selector engine will only attempt to match elements of the parent. CSS selector engines don’t work that way. They start from the right and find the subset of elements that match the most qualified part of the selector. For example, a selector engine matching against the CSS3 :last-of-type pseudo-class selector will first find all elements that are the last of their type in a collection and then will work to the left of the selector, eliminating elements that don’t qualify.
The general wisdom around CSS selector performance today seems to be, “don’t try to optimize selectors.” CSS optimization involves a lot of DOM considerations. Each document will optimize differently. To further complicate the issue, each browser will optimize the same document differently. Rather than focus on selector speed, write selectors that make sense. Keep them small, and remove unused selectors. The CSS inside the selector seems to have more impact on performance than the selector itself.
For further reading, I recommend
![]() http://css-tricks.com/efficiently-rendering-css/
http://css-tricks.com/efficiently-rendering-css/
![]() http://benfrain.com/css-performance-revisited-selectors-bloat-expensive-styles/
http://benfrain.com/css-performance-revisited-selectors-bloat-expensive-styles/
![]() http://csswizardry.com/2011/09/writing-efficient-css-selectors/
http://csswizardry.com/2011/09/writing-efficient-css-selectors/
If you prefer the way the form’s layout displays fields in a single row on large displays and wraps for smaller displays, then you can stop styling the form now. If you would like each field on a separate line, then add the following to app.css:
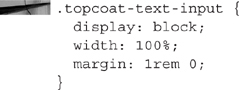
The above CSS declaration overrides attributes specified by Topcoat. For example, Topcoat defines the margin to be 0. So that we have vertical space between each input element, I redefined it to have top and bottom margins of 1rem. Figure 6-14 is a screenshot of the search page after making these changes.
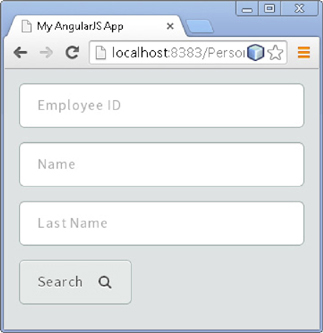
FIGURE 6-14. Final search page
![]()
NOTE
Do you see the placeholder text in each field of 6-14? We used that in lieu of a label to save space on small devices. There are a couple of problems with this approach. The first is that screen readers prefer labels. A potential solution would be to add labels to describe the fields, but then use CSS to hide them. The other problem is with user expectations. I have seen users attempt to select placeholder text so they can delete it before entering data into a field. If you click inside a field with placeholder text, however, the text disappears. Trying to select text that disappears can be very frustrating.
Search Page Logic
The purpose of the search page is to gather information and submit it to the results page. AngularJS form processing works differently from the standard HTML/HTTP form-processing model. The HTML/HTTP form-processing model doesn’t work well with single-page applications. Instead of posting to a server-side processor, AngularJS allows us to process the form results within the current page and controller. The code for the controller would receive the data, make an Ajax request, and then process the results. That seems like too much logic for this view and controller. To keep our sample simple, the search page controller will transfer the gathered requirements to the results controller and results view.
NOTE
An alternative search/results pattern is to place the search form in a collapsible region and display the results immediately following the search form within the same view.
The search form inside the search.html partial page already has the ng-submit attribute that tells AngularJS how to process the form. All we have to do is implement the search method within the controller scope. Open js/controllers.js and change the contents to match the following. The file doesn’t have much, so I included the entire file for reference. Add the text in bold:
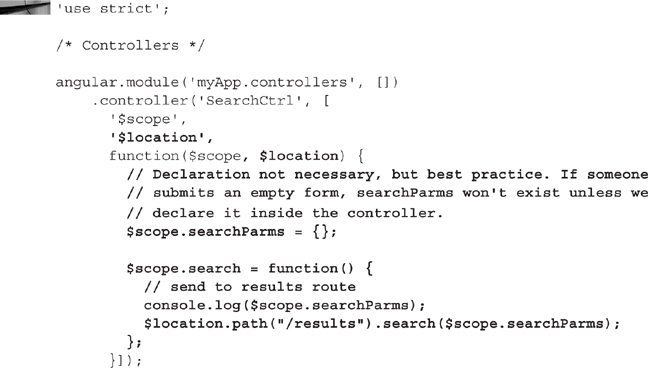
Save and then switch to your web browser. Clicking the submit button won’t appear to do anything. This is because we haven’t created the /results route referenced in the search function. Open your JavaScript console, however, and click submit again. You should see the searchParms object printed in the JavaScript console. Enter some values into the search form and click submit again. Notice that the values in searchParms change to reflect the values within the form. This is the power of AngularJS two-way data binding.
The SearchCtrl controller introduces the $location service. The $location service is patterned after the JavaScript window.location object and manages the browser URL. It synchronizes routes with the browser URL. We use it here to switch to a different route just like we would use window.location.pathname to load a different resource from the same server.
The Results Page
Open app.js and add a new route for the path /results. The template will be partials/results.html, and the controller will be named ResultsCtrl. The code for this new route is as follows:

Place this between the /search route and the otherwise route. The following listing contains the entire .config block for reference. The new route is in bold:
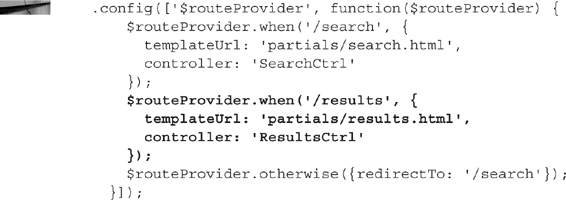
Right-click on the partials folder inside the project explorer and choose New | HTML File from the context menu. Name the new file results. NetBeans will automatically add the .html extension and place the new file in the partials folder. Our results list is exactly that: a list. So let’s add an HTML list template to the results.html file. Replace the contents of the result.html file with the following:

That’s it. Our template is complete. When AngularJS compiles the template, it will see the ng-repeat attribute and repeat the li element once for each p (abbreviation for person) found in the persons array.
![]()
NOTE
I used the abbreviation p for person instead of spelling out person because person is too easy to confuse with the plural form persons used to represent the search results collection.
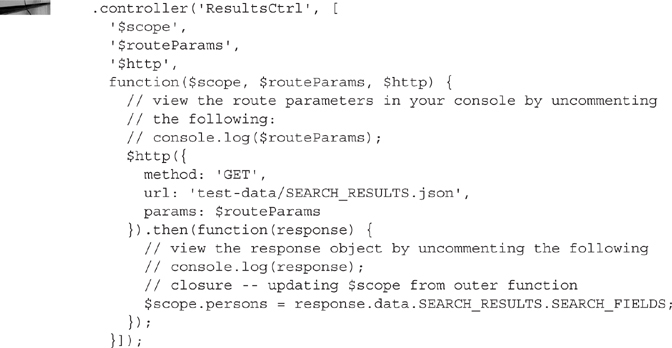
Before seeing search results we have to populate $scope with a collection of search results: the persons array identified in the results.html template. Add the following controller to the controllers.js file:
WARNING
When inserting a new controller, be careful of the terminating semicolon (;). There should be a semicolon at the end of the SearchCtrl controller we created earlier. Be sure to move that semicolon to the very end of the file, after the new ResultCtrl controller. Our controller definitions use method chaining. Including a semicolon in the middle will interrupt that chain.
You can test the route, partial, and controller by navigating to http://localhost:8383/PersonnelDirectory-ajs/index.html#/results. Since we are using hard-coded test data, the parameters are irrelevant. The controller will always access the same data. Your results page should appear similar to Figure 6-15. Verify that your search page is passing parameters to the results page by watching the URL change when you enter data into the search form and click the search button.

FIGURE 6-15. Results page
There isn’t much to the controller. You will find that to be a common theme with AngularJS: There isn’t much code to write. The framework handles most of the complicated stuff. This controller accepts the search page parameters passed to it through the $routeParams service and then forwards them along to another service using the $http service.
NOTE
Our controller currently uses Ajax to fetch a hard-coded text file. That text file doesn’t know how to interpret search parameters so it ignores them. In Chapters 7 and 8, we will write back-end services using PeopleSoft and PeopleCode and then connect those services to this AngularJS application.
This code fragment introduces two new services:
![]()
$http
![]()
$routeParams
The $http service is the AngularJS service we use to interact with remote services—or more specifically, we use it to make Ajax requests. AngularJS prefers asynchronous interactions implemented through a promise object inspired by Kris Kowal’s Q implementation. A promise represents a value that is not yet known, whereas a deferred represents work that is not yet finished. When making an Ajax request, $http returns before it has a response from a server. This is where the promise fits. The $http service returns a promise to complete the HTTP request and return a response. Promises have three methods: then, catch, and finally. We are only using the then method (which can have an optional error callback that matches the catch callback).
The promise returned by $http is a little different from the AngularJS $q promise. A $http promise contains the additional methods: success and error. The success and then methods are two sides of the same coin. They both receive the same information, just in two different ways. The then method receives one parameter, the response object, which exposes the response data, HTTP status code, headers, configuration, and HTTP status text. The success method receives the same information, but as one parameter for each item. I prefer to use then over success simply because I’m trying to get used to the promise pattern. You can read more about the $http service in the AngularJS documentation at https://docs.angularjs.org/api/ng/service/$http.
The $routeParams service is the AngularJS service that provides access to the URL parameters specified in the URL when accessing the route. In this example, we are accessing query string parameters. Later we will see how to access parameters embedded within the URL path. For additional information about the $routeParams service visit https://docs.angularjs.org/api/ngRoute/service/$routeParams.
Styling the Results Page
I’m not happy with the list style. As you saw in Figure 6-15, the links don’t really look like links. The list items are supposed to appear more like mobile buttons. Right now it just looks like a plain list. Let’s add some CSS to resolve this. To the project’s css/app.css file, add the following rules:
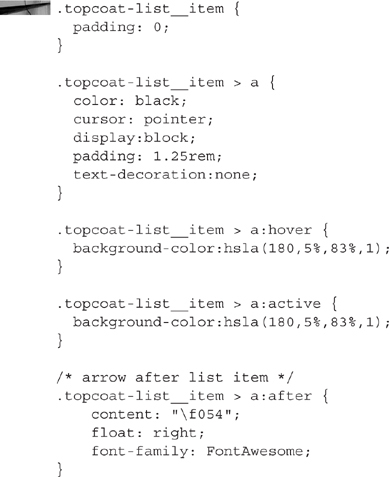
Reload the page in your browser and you should now see arrows to the right of each list item. I also added a hover effect to list items. It won’t help much on a mobile device, but this really helps a desktop user identify the list item as a link.
The Details Page
After selecting a result from the search results list, we should present the user with a detailed view of the result. The detail view route and controller are very similar to the code we’ve already written. The HTML partial (or template), however, is a bit more complicated. Add the following route to the app.js file. Place it between the results route and the otherwise route:

NOTE
We haven’t created partials/details.html yet (just in case you were wondering why you don’t have a details.html file).
The URL pattern for the details view follows the REST-ful pattern of identifying a resource by ID as part of the URL, rather than using a query string parameter. The :EMPLID portion of the route URL will become a property of the $routeParam service injected into the DetailsCtrl controller.
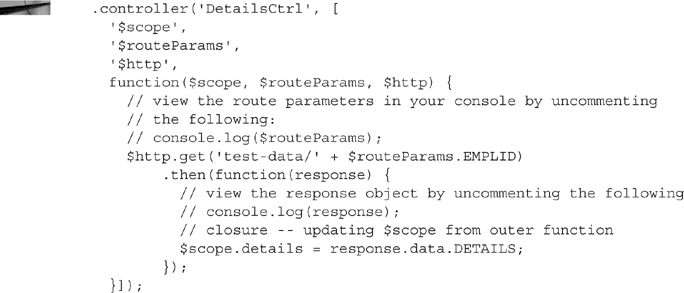
Details Controller
The following controller code should look very familiar. The only difference between the DetailsCtrl controller and the ResultsCtrl controller is the service endpoint. Be sure to move the final semicolon to the end of the file. Don’t leave it on the line following the ResultsCtrl controller.
Modular AngularJS Files
This chapter places all controllers in the same file because the controllers are small. A larger scale application may require more code within controllers. Likewise, if you have more features, you may desire a modular approach where controllers, partials, directives, and related services reside together in a folder structure identified by feature. For example, we may want to place the details controller and partial in a folder named details, and separate that from the search controller and partial by placing them in a folder named search. To implement this feature-based modular approach, create a JavaScript file named something simple like controller.js that contains the following contents:
![]()
This code fragment creates a new module named myApp.controllers. The [] parameter to the angular.module method is what notifies AngularJS that we are creating a module. Later we can retrieve a reference to the myApp.controllers module by invoking the same method without the additional [] parameter. Within each feature folder, we can add a controller.js file with contents similar to the following code. It is the same as the DetailsCtrl controller code above:
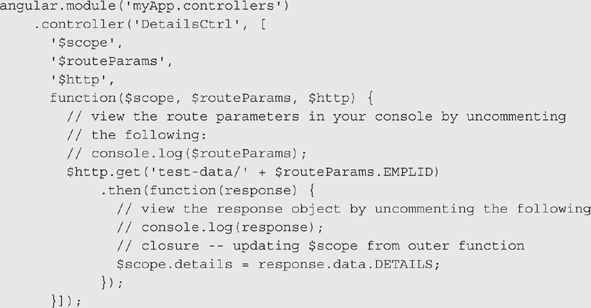
Look familiar? It is the same controller code we used with each of the other controllers. The only difference is the first line: Get a reference to the controller module rather than create a new controller module. In the index.html file, you will now have to load the initial controller.js file that creates the myApp.controllers module as well as each feature-specific controller. Be sure to load the controller.js file that defines the myApp.controllers module before loading any feature specific controllers.
Details View
Create a new HTML file named details.html and place it in the partials directory. Delete the contents of the file and insert the following:
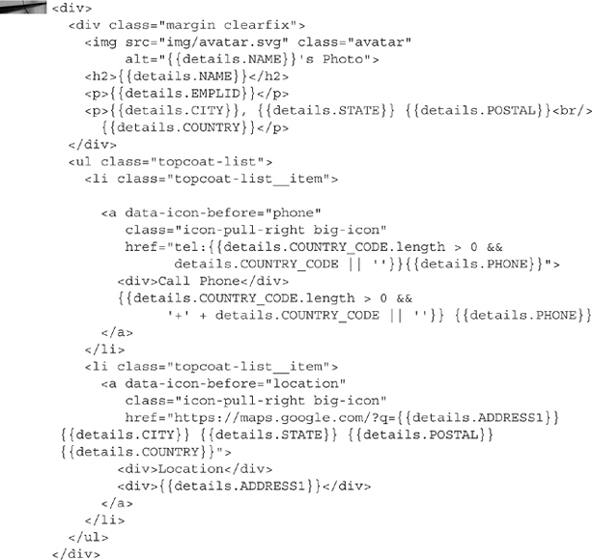
Before applying any styling, test your page in a web browser. You should see something similar to Figure 6-16.
FIGURE 6-16. Unstyled details page
Styling the Details Page
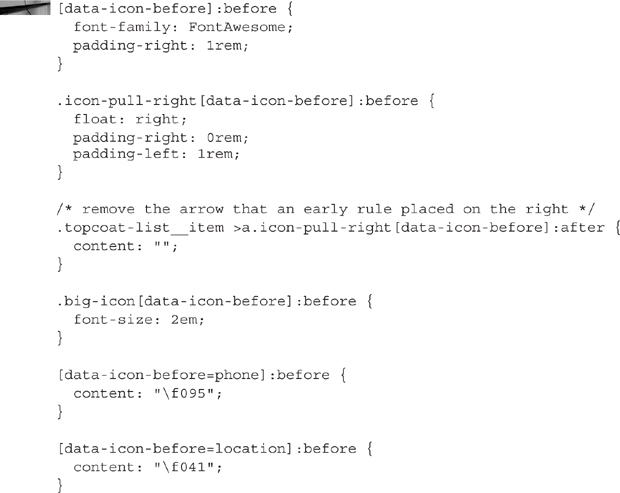
The details.html partial page definition uses some classes defined earlier. For example, we defined the margin class earlier and then took advantage of it in the details header. The icons, however, we want to behave a little differently. We want the image after the text and we want it to float all the way to the right. We also want it bigger than the text around it. To accomplish all of this, I created several CSS selectors, classes, and attributes. Could I have done it all with one CSS class selector? Yes, absolutely. Later we will leverage some of this work, however, when adding other icons that appear before list item elements. Here is the CSS. Add this to the project’s css/app.css file:
NOTE
Are you wondering where I get those content values like f041? They are all listed on http://astronautweb.co/snippet/font-awesome/.
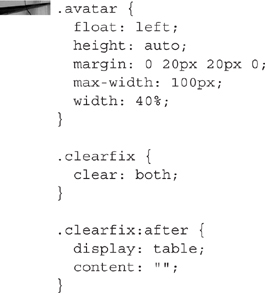
The only item left to style on this page is the avatar/information region. Add the following to the project’s css/app.css file to resize the avatar and align the employee information to the right of the avatar:
NOTE
The clearfix class definition is based on the HTML5 Boilerplate/Twitter Bootstrap clearfix demonstrated at http://nicolasgallagher.com/micro-clearfix-hack/. The point is to make sure the contact details list appears below the avatar rather than beside the avatar.
After applying these CSS changes, your details page should resemble Figure 6-17.
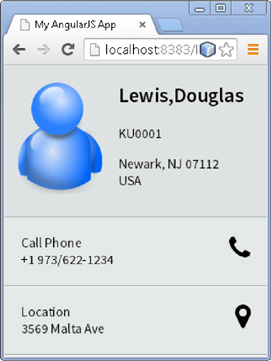
FIGURE 6-17. Styled details page
The Profile Page
The profile page allows a user to update his/her contact details. It looks a lot like the details page, but with text fields for data entry. Before someone can access the profile page, we have to create a route. As with the other routes we created in this chapter, open the project’s js/app.js file and add the following route before the otherwise route:

The partial for the profile is remarkably similar to the details page. Create a new HTML file in the partials directory named profile.html. Replace the contents of the file with the following HTML fragment:
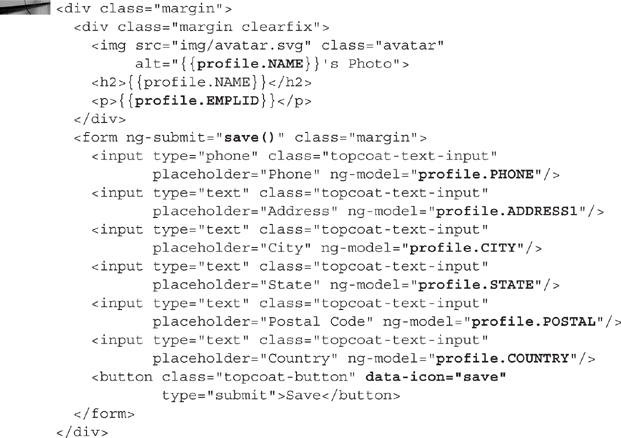
![]()
NOTE
I used bold type in the listing above to highlight Controller and CSS requirements that differ from the earlier details.html partial.
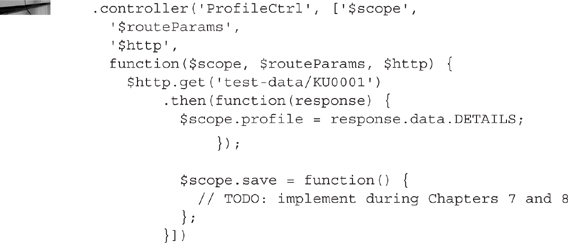
From this listing, we see that our $scope must have a save method and a profile object. Since we don’t have a back-end service available for data, we will just use our KU0001 test data file. Here is an example of the controller used for the profile partial. In Chapter 7, we will replace some of this code with a call to a real service. Add the following JavaScript to the project’s js/controllers.js file right before the last semicolon:
As far as styling the page … well we did such a good job on the other pages that we were able to reuse existing style classes. We do have one new style class to add and that is the rule for the attribute [data-icon=save]. Add the following to app.css:

Unlike the search | results | details flow presented above, we don’t have a way to access the profile page. To view your profile page, change the URL to http://localhost:8383/PersonnelDirectory-ajs/index.html#/profile. Figure 6-18 is a screenshot of the styled profile page.
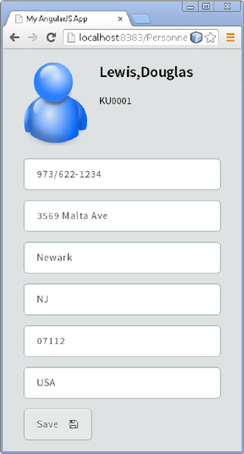
FIGURE 6-18. Profile page
Adding a Header
Desktop applications have title bars that describe the overall theme of a site or page. Because mobile web browsers don’t have the same amount of real estate as their desktop cousins, they don’t always display these title bars. Let’s add a header to our application to provide some type of context for our users. Inside index.html, just before the <div ng-view> element, add the following HTML:
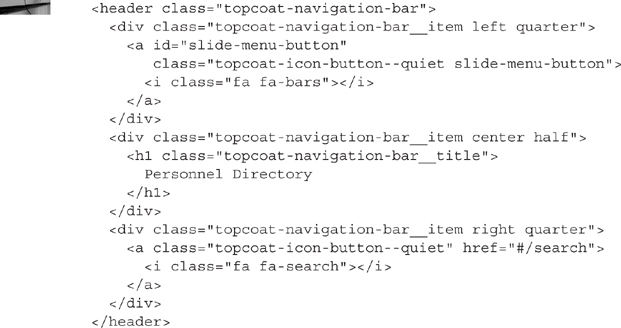
Refresh any of the views in your web browser and you should now see a header. The “hamburger” icon doesn’t work and the icons are too small. Let’s correct the icon size by adding the following CSS to the project’s css/app.css file:
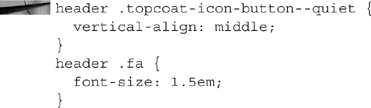
![]()
NOTE
Why do they call it a hamburger? It is called the “hamburger button” because it resembles a bun with a patty in the middle. That is pretty much it. It is a common icon used in responsive design to tell users that there are more options. If you touch the hamburger icon, something will happen.
After saving and refreshing your browser, you should see a page that looks similar to Figure 6-19. If you don’t, click the search button to navigate to the search page and confirm again.
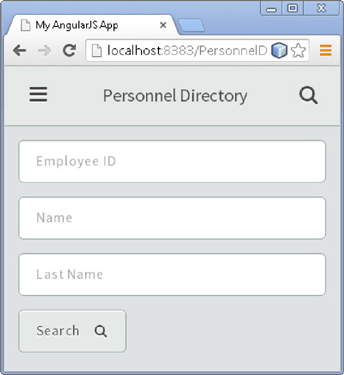
FIGURE 6-19. Search page with header
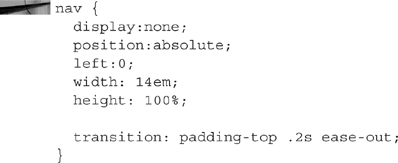
Implementing a Navigation Sidebar
The application header provides an easy way to access the search page, but not a mechanism to access the user profile or the last search results. Let’s implement a sidebar. Within index.html, between the header and the ng-view directive, add the following HTML:
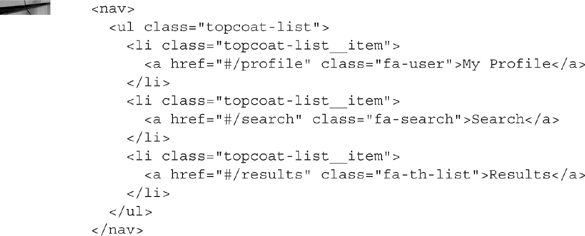
Don’t refresh your page yet. It will look quite ugly … well, OK, refresh it to see what we just added, but I warned you, it isn’t pretty. The navigation list sits inside the body of the main document rather than to the left. Let’s straighten this out with a little CSS. To the project’s css/app.css file, add the following:
That CSS made the left navigation disappear. Now we need to come up with a clever way to make it appear, preferably without a lot of complicated JavaScript. How about toggling a class on the body element to change the CSS selector used by the nav? To the hamburger button, add the following onclick handler. I included the entire button markup for context. Just add the text in bold.

I keep referring to an area in index.html file that represents the ng-view directive. It is represented by the HTML <div ng-view></div>. The div element is not very semantic. Let’s change it to main. Replace <div ng-view></div> with <main ng-view></main>. Save and refresh your page to make sure everything still works as expected.
Let’s add the left-nav CSS selector and see what happens. Add the following to css/app.css:
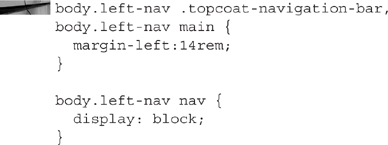
Now when you click the hamburger icon, the header and content area jump to the right and the sidebar appears. I’m not very happy with that jumping behavior. We can fix that nicely with some animation, but I’ll refrain for now and save the animations for later in the chapter.
Styling the Navigation Sidebar
The sidebar is too similar to the list items. I think we should change the appearance to give it more contrast. To css/app.css, add the following:
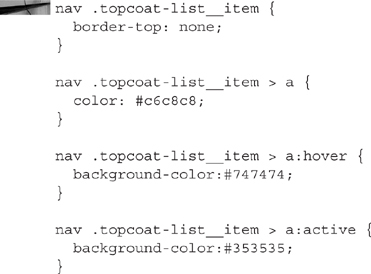
It seems like the sidebar background color should span the entire sidebar, not just the links area. Let’s attempt to solve it by setting the body background color. Add the following to css/app.css:

Well, that definitely changed the color of the navigation area. Unfortunately, it also changed the color of the main content region. Figure 6-20 is a representation of the mess we’ve created.
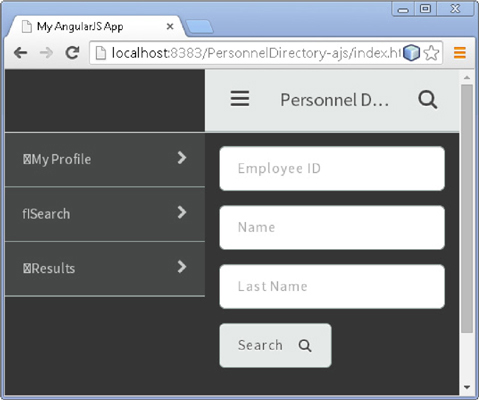
FIGURE 6-20. Sidebar visible, but the form background color is incorrect
We can fix the appearance problem with the following CSS:
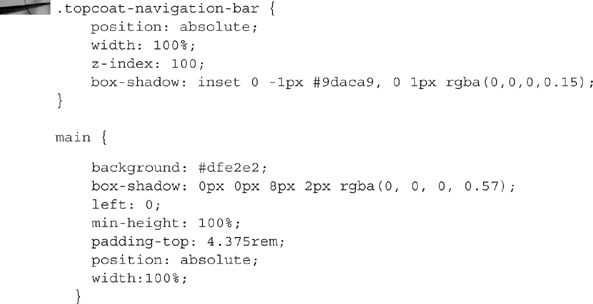
We just have one more item to fix in the navigation. If you look closely at Figure 6-20, you will see that the icons beside the list items contain cryptic symbols instead of recognizable icons. To resolve this issue, add the following CSS to the file css/app.css:

Figure 6-21 is a screenshot of the styled navigation bar.
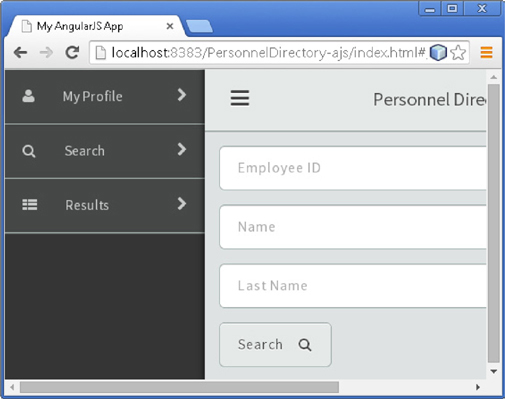
FIGURE 6-21. Styled navigation bar
Making the Navigation Sidebar Responsive
Our content region does not contain much information. With the navigation on the left and invisible until needed, our application is sized appropriately for a mobile phone. When displayed on a tablet, however, we have enough space to make the sidebar visible all the time. We will use media queries to facilitate this responsive design feature.
![]()
NOTE
I intentionally implemented the mobile CSS first and the desktop/tablet CSS second. Mobile phones have less processing power and usually run over wireless networks such as 3G and 4G. Tablets and desktops often have more power and more bandwidth. Rather than building for desktops and using media queries to scale back for phones, we will build for the phone and use media queries to enhance the display for desktops and tablets.
Add the following media query and CSS to the css/app.css file. It is critical that these definitions appear after the nav and main CSS declarations because they override some of the previously defined values.
Save and refresh the page and then try changing the width of the page. Notice how the sidebar appears and hides based on the width of the browser window.
Custom Results Directive
The side navigation has a button labeled “Results” that is supposed to display the last search results. At this time, however, it is just a link to the results page. When transferring to the last search results, it doesn’t actually display the last search results or carry forward the search page parameters to perform a new search. Our results controller is responsible for fetching data. Because that data is scoped to the results controller, it disappears when we transfer to another route. Likewise the search parameters only exist for the life of the search controller and then the results controller, but only because we pass them along to the results controller. To make the last search results exist beyond the life of the ResultsCtrl controller we have to create a service.
Another problem is that the Results button is always visible. If the sidebar existed inside a partial, we could set the visibility of the button based on information within the controller $scope. But the button doesn’t exist inside a partial. The AngularJS way to control the user experience is through directives. A directive can exist outside a partial and has access to services. We can create a new directive and connect it to the Search Service to determine when to show the Results button.
AngularJS Services
AngularJS defines services as “substitutable objects that are wired together using dependency injection (DI).” Basically, that just means services represent objects with properties and methods that you can inject into other services and controllers. AngularJS services have two primary features: lazy instantiation and single instance, which means they aren’t created until they are needed, and once they are created they exist for the life of the single-page application. What makes them valuable to us in this scenario is that we can use a service to store the last search results and then access those results multiple times—basically, a results cache.
We are going to create a service, but before we do, let’s review the three mechanisms AngularJS provides for writing services:
![]() Factory
Factory
![]() Service
Service
![]() Provider
Provider
A Factory and a Service are very similar. The only real difference seems to be the creation mechanism: A Factory is a function you call and that function returns a value. The Factory creates the service. A Service is the object you want created so AngularJS uses the JavaScript new reserved word to create an instance of the Service. A Provider also returns a service but the difference is you can configure them during the application configuration page. You can find a great overview of the differences between Factories, Services, and Providers on the AngularJS website at https://docs.angularjs.org/guide/providers. Look for the heading, “Note: A Word on Modules.”
For our purposes, we can use any one of these options to define a search results Service. To keep things simple we will use the Factory option for this scenario. A more robust solution would be to use a Provider and add the service end point URL as a configuration parameter.
Let’s review the requirements for our Search service:
![]() It will send search criteria to a web service endpoint.
It will send search criteria to a web service endpoint.
![]() It has to cache the results between requests.
It has to cache the results between requests.
![]() It must notify observers that it has data.
It must notify observers that it has data.
We implemented the first requirement in our search controller. Since services exist for the life of the AngularJS application, we can implement the second requirement storing the search results in a variable and then providing access to those results. Let’s implement the third requirement first because it requires a little more thought and code.
The Observer Service The Observer pattern is a common software design pattern where a subject maintains a list of observers and notifies those observers of changes to the subject. Because this pattern is so common, let’s create an injectable, reusable service called ObserverService. In NetBeans, open the file js/services.js. The services.js file contains a sample service that we aren’t using. Replace the contents of the file with the following:
I am a huge fan of Array.forEach. I love the elegance of the callback design pattern, the internal closure, and control over this. So why didn’t I use that pattern when iterating over the list of observers? I ran a test at http://jsperf.com/angularjs-foreach-vs-native-foreach/14 to see which iteration method offered the best performance. I tested the following scenarios:
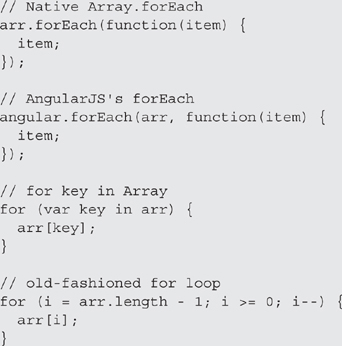
I ran this test on the following browsers:
![]() Google Chrome 35
Google Chrome 35
![]() Chromium 31
Chromium 31
![]() Firefox 24 ESR
Firefox 24 ESR
![]() Internet Explorer 10
Internet Explorer 10
![]() iPad IOS7
iPad IOS7
![]() Andriod 4.0.4
Andriod 4.0.4
With the exception of Firefox, the old-fashioned for loop was +90% faster than the other three iteration options. Firefox results were close enough to say it didn’t matter which option I chose—all iterative constructs were bad to Firefox.
My conclusion? Use the old-fashioned for loop unless you need closures, control of this, or any of the other features unique to the forEach alternatives. Avoid the for (var key in object) pattern.
What about Objects? The for (var key in object) construct used to be the only way to iterate over properties of an object. With Object.keys we have a new alternative that appears to perform much better. Here is an example:
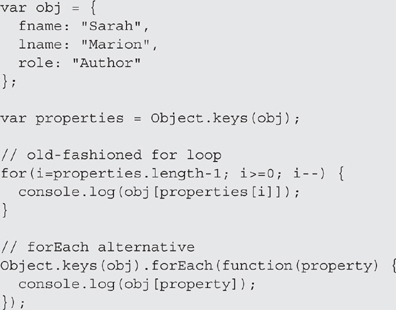
Personally, I think the Array.forEach alternative is more elegant, but if you want performance, it seems the old-fashioned for loop wins. Feel free to visit http://jsperf.com/angularjs-foreach-vs-native-foreach/14 and run the test for yourself.
The ObserverFactory returns an object with a single method: createObserver. The createObserver method creates a new object with the following methods:
![]()
register
![]()
remove
![]()
notify
What we really have here is a factory that creates a factory. Since AngularJS creates one instance of ObserverFactory for an application and we may use the Observer pattern in various modules, we can’t place the observers array right inside ObserverFactory. That would merge the observers for all modules into a single array. Instead, we use the createObserver method to return a new Observer for each module.
![]()
NOTE
At this point my thought is, “Why not create a plain old JavaScript file with an Observer object? Why do I need a factory that creates a factory?” The answer is dependency injection and test-driven development. Using dependency injection allows us to mock test cases and test code fragments as units.
The Search Service While building the personnel directory application, we discovered that we really need access to the search results from more places than just the ResultsCtrl controller. We also realized there is value in caching the search results. Let’s refactor the ResultsCtrl controller by moving the Ajax request from the controller into a new service called SearchService. To the js/services.js file, add the following right before the final semicolon (similar file layout to the controllers.js file):
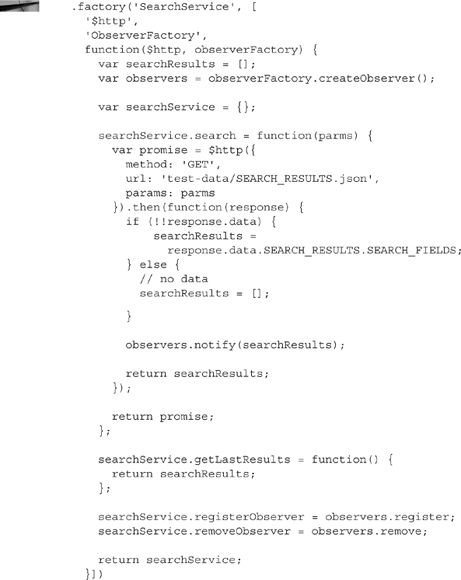
Now open js/controllers.js and change the ResultsCtrl controller to contain the following. I included the entire controller code for context. You only need to change the JavaScript in bold text.
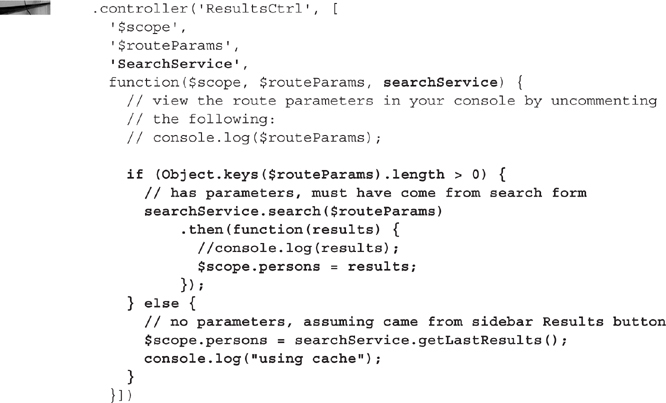
Reload your application and run through the scenarios. Entering search criteria on the search page should return your sample data. Clicking the Results button in the left sidebar should return the same three rows. If you open the JavaScript console, you should see that clicking the left sidebar Results button prints “using cache” to the JavaScript console.
Extra Credit If you click the search button on the search page without entering any criteria the ResultsCtrl controller will think it is supposed to use the cache. The only problem is that there is no cache. Either create a status message that tells the user there are no search results or disable the search button on the search page until the user enters search criteria.
AngularJS Directives
Custom directives are elements, attributes, class names, or comments added to HTML documents to manipulate the DOM. In the Personnel Directory, we want to manipulate the visibility state of the Results button in the left sidebar.
To create a new directive, open the js/directives file. You will see a sample angular-seed directive. Delete that directive and insert the following. I included the entire file contents for context. Only add the text in bold:
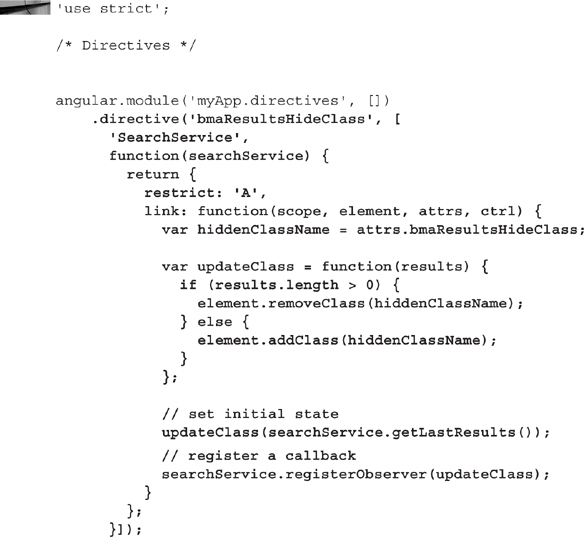
This JavaScript declares a new attribute named bma-results-hide-class. That attribute expects a CSS class name as a value. When the SearchService reports that it has data, the directive will remove the class name identified by bma-results-hide-class. Alternatively, if the SearchService has no data then the directive will add the bma-results-hide-class. We know that the directive creates an attribute rather than an element, comment, or class name because of the restrict: ‘A’ property. We know the name of the attribute by looking at the first parameter to the directive method:
![]()
When compiling a document AngularJS takes a directive such as bma-results-hide-class and converts it to a case-sensitive camelCase normalized name. That means AngularJS removes the dashes and upper cases the first letter of each word following a dash. That is why our directive is named bmaResultsHideClass. In HTML, however, we will refer to it as bma-results-hide-class.
To use this new directive, open index.html and search for the Results li within the nav element. In my file that is at line 50. Add the new attribute bma-results-hide-class='ng-hide'. Here is a sample code fragment:

![]()
NOTE
Editors like NetBeans appropriately identify the new attribute as an error. The HTML5 valid mechanism for adding a new attribute is to prefix that attribute with data-. Using this valid mechanism, our attribute would be data-bma-results-hide-class. AngularJS is designed to adhere to standards and will strip the data- prefix from the attribute before matching it against its list of known directives.
Save and reload index.html in your browser. Since you have not visited the results route, the Results button should not be visible. After performing a search and seeing a list of results, the Results button should appear.
Animation
When I talk to people about adding animation to applications, the typical response is, “Oh, right. Eye candy. Yes, if we have time and it doesn’t get in the way, we can add some animations.” It is true; you can use animations for eye candy, but I believe there is a much more enterprise worthy reason for animation: creating intuitive, usable apps. Animations provide transition between states. When a sidebar appears abruptly over the top of existing content, our mind has to figure out what is happening. What is this new content? Where did it come from? Where is my prior content? If the sidebar slides out from the left, or if the content slides to the right and reveals a sidebar, then our mind is prepared. It watched the entire scene unfold. It knows where the old content is. It knows how to get it back. It knows how the new sidebar appeared. Another example is the shopping cart. When you add items to an online shopping cart, how do you know if the item is really in the cart? For that matter, where is the cart? An animation that shows an item moving from a search list into a cart trains our mind where to look for the cart. We have no doubt that our item is in the cart because we watched it move into the cart. These are the types of animations we should add to our enterprise applications. It isn’t about eye candy. It is about usable, intuitive apps built around the way people think and process information.
In the remainder of this chapter, we will review three different ways to add animations to our Personnel Directory application:
![]() CSS3 transitions
CSS3 transitions
![]() Using the animate.css library with its predefined keyframes CSS3 animations
Using the animate.css library with its predefined keyframes CSS3 animations
![]() The TweenMax GreenSock Animation Platform
The TweenMax GreenSock Animation Platform
Animating with CSS3 Transitions
The first thing we need to animate is the sidebar appearance. When activating the “hamburger” button in the upper right corner, the sidebar appears rather abruptly. As I mentioned before, the appearance is a bit jarring and requires the user to pause and figure out what just happened. Adding a reveal transition can reduce, or even eliminate the “jar” from the experience.
To the css/app.css file, add the following:

This animates the margin-left attribute of the main element as well as any element with the topcoat-navigation-bar CSS class. Whenever the value of margin-left changes, the CSS3 animation processor will move the object left or right between the original value and the new margin-left value. The entire animation will last 0.2 seconds.
Save and reload your page to view the animation. Change the browser width to see the animation activate when the browser crosses the size boundary we defined in our responsive media query. When the page is small enough for the hamburger button to be visible, click the button to display the sidebar. Click the button again to hide the sidebar. Because of the main content area box shadow, the sidebar has the appearance of residing below the main content. Clicking the hamburger button gives the appearance that the main content is sliding to the right to reveal the sidebar that resides underneath it.
Transitions are the easiest animations to apply. They are a simple, yet tasteful way to improve the user experience.
Using animate.css
The animate.css library is a CSS file containing CSS3 keyframes definitions for common animations. You may view a list of defined animations at http://daneden.github.io/animate.css/. Let’s use animate.css to animate the transition between routes within our single-page application.
AngularJS provides support for animation through the angular-animate module. Before proceeding, open index.html and add a reference for the animate.css file to the head section. Add this reference right before the app.css file. The following code fragment includes the appropriate link element as well as the previous two lines and following line for context. Only add the line in bold text to your code.

While still editing index.html, look for <main ng-view and insert the class route-transition. The main element will appear as follows (additions in bold text):
![]()
Next, add a script tag to import angular-animate.min.js. The following code fragment includes the appropriate script tag as well as the previous and following line for context. Only add the line in bold text.

Next, we need to tell AngularJS to use the animation module. Open the file js/app.js and add the ngAnimate module to the list of modules in the myApp module constructor. The following code fragment contains the appropriate line to add as well as the previous and following line for context. Only add the line in bold text.
To the file css/app.css, add the following in its entirety:

Reload index.html in your web browser and watch as the page slides in from the right. Navigate through the app and watch as each page enters from the right, stacking on top of the previous page.
AngularJS manages this animation by adding the ng-animate, ng-enter, and ng-leave CSS class names to the element in transition. When changing routes, for example, AngularJS creates a new element matching the element with the ng-view attribute (our main element). To the main element that is leaving, AngularJS adds the CSS class name ng-leave. To the element that is appearing, it adds the class name ng-enter. When the animation finishes, AngularJS deletes the element tagged with ng-leave.
Animating with the GreenSock Animation Platform
When browsers first adopted CSS3 animations, many web developers switched from JavaScript animations to CSS3 because CSS3 animations are (in theory) hardware accelerated, which means they take advantage of the graphics processor at the hardware level rather than using a timeline to manipulate the DOM and forcing the web browser to repaint itself with each transition. The hypothesis is that CSS3 hardware accelerated animations outperform JavaScript animations. GreenSock (GSAP) wants us to believe otherwise and they make a pretty compelling case. Navigate to http://www.greensock.com/js/speed.html and try the GSAP dots animation test. Try several different engines using the default 300 dots setting. When I run this on my laptop, I don’t notice much difference. If I increase the number of dots to 2000, however, there is no comparison. Using the jQuery engine, I see one ring of dots. Using Zepto, which is very close to pure CSS animation, I see rings of dots slowly progress across the screen. If I switch to the pure GSAP engine, however, the dots start processing immediately and fly by as expected.
Let’s use GSAP to create a complex page transition. Before we get started, we have to clean up the CSS3 animation we added using animate.css. Leave the ngAnimate module and angular-animate.min.js changes in tact. We will create an animations module that will require the ngAnimate module. You can also leave the animate.css file in index.html (although we won’t use it). What we need to remove is the main[ng-view].ng-enter rule we added to the end of the css/app.css file.
Next, create a new file in the js folder named animations.js and add the following JavaScript:
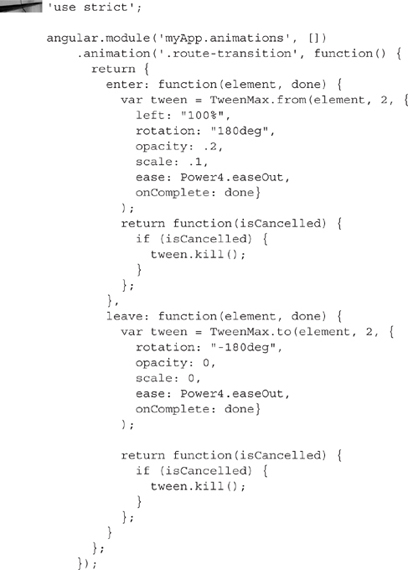
Near the top of this file we tell AngularJS to animate any element with the class name route-transition. For elements with that class name, AngularJS will invoke the enter method when the element appears, and the leave method when the element disappears. The code inside the enter and leave methods tells GSAP (TweenMax) to animate the left, rotation, opacity, and scale attributes all at the same time.
Before running this file, we have to add TweenMax and our new module to index.html as well as load our new animations module into the AngularJS application configuration. Inside index.html, add a reference to TweenMax and a reference to the new animations module. The following listing contains all of the required JavaScript files with the new additions in bold:
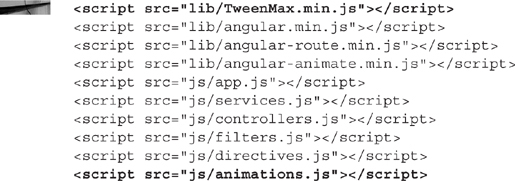
Next, open js/app.js and include the new animations module in the application configuration. The following listing contains the full myApp module constructor with the list of included modules. Only add the line in bold. Be sure every module except the last module has a trailing comma delimiting it from the next row:
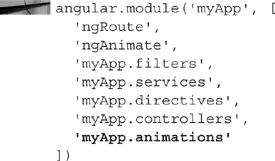
Reload index.html and watch the search page rotate, grow, and fade into view. Enter search criteria and watch as the search form rotates out of view, shrinks, and fades out while the results view rotates, grows, and fades in. Arguably, we have crossed the line from subtle, enterprise enabling animations into eye candy. However, you have to admit, it is pretty amazing and makes our applications a lot more fun to use.
Conclusion
In this chapter, you built a Personnel Directory search application using AngularJS. You saw how to consume external services and how to make the application responsive using media queries. We finished the chapter by experimenting with various animation alternatives. Along the way you learned a lot about AngularJS. In the next two chapters, you will learn how to connect this chapter’s application to PeopleSoft services. In Chapter 7, you will use iScripts to serve data to the Angular JS Personnel Directory. In Chapter 8, you will use PeopleSoft REST web services.