

CHAPTER
9
Native Apps for Best Results
In this section of the book, you will learn how to create native and hybrid applications. Native applications run on a mobile device and require development using an operating system-specific toolkit. Android native development, for example, requires the Android SDK. Hybrid applications are HTML5 applications that run in a native container and have access to native services, such as geolocation, camera, contacts, and so on. In this part of the book, you will build native and hybrid solutions using
![]() Eclipse and Android Developer Tools (more commonly referred to as Eclipse + ADT)
Eclipse and Android Developer Tools (more commonly referred to as Eclipse + ADT)
![]() Apache Cordova hybrid containers
Apache Cordova hybrid containers
![]() Oracle Mobile Application Framework
Oracle Mobile Application Framework
Each of these chapters will revolve around the same demo scenario: the Personnel Directory (just in case you forget who works with you). I don’t know about you, but I’m getting a little tired of creating personnel directories. So why are we creating more? We are utilizing the same tautological example repeatedly so that we have the opportunity to compare various development patterns. This helps us make an “apples to apples” comparison between mobile technologies. Another good reason for continuing to solve the same problem is that it allows us to leverage the PeopleTools definitions we created in prior chapters so we can focus on the development method and non-PeopleSoft development tools rather than distracting ourselves with new PeopleTools definitions. In Part III we will create a few novel PeopleTools definitions, but the PeopleTools and mobile fundamentals are described in Parts I and II of this book.
Introduction to Part III
Here is what to expect from the remainder of this book.
Chapter 9
In this chapter, you will create a native Android version of the personnel directory. We will use the REST Service Operations we created in Chapter 8 as well as the data model from Chapter 4. We will write code using Eclipse and ADT, and then test our applications with an Android emulator. The primary purpose of Chapter 9 is to teach you how to consume PeopleSoft REST services with the Android SDK.
Chapter 10
Chapter 10 will show you how to build a hybrid mobile application. You will learn how to run the AngularJS mobile application from Chapter 6 (and Chapter 8) in the Apache Cordova/PhoneGap container. We will use the Cordova JavaScript API to access a mobile device camera to upload a selfie as an employee photo.
Chapter 11
Oracle has its own hybrid container called Mobile Application Framework (MAF). Rather than building applications in HTML, JavaScript, and CSS, MAF allows developers to create hybrid applications using a combination of Java and declarative constructs. In Chapter 11, you will learn how to use JDeveloper and Oracle MAF to create yet another iteration of the personnel directory.
A word about iOS
What about iOS? Where is the chapter on creating a mobile personnel directory for iPhone and iPad? From a PeopleTools perspective there is no difference between an Android and an iOS application. If you already know how to create iOS applications, then the PeopleTools data and REST service definitions described in Chapters 4 and 8 are all you need to be successful. And, if you aren’t familiar with iOS, there are many great online and print resources available for learning iOS development.
![]()
NOTE
Chapters 10 and 11 will describe two different ways to create hybrid mobile applications, which are mobile applications that run on both Android and iOS.
Now let’s build some high-performance native PeopleSoft apps!
Building a Mobile Android Personnel Directory
Writing about native mobile development is sort of like digging a hole in dry sand. The digger makes progress, but the landscape changes as fast as the laborer’s shoveling. With each shovel full, the worker knows that a portion of it will end up back in the hole. I compare this to Android development because the Android application development landscape is constantly changing. Today we build Android applications using Eclipse and the ADT plugin. Before this book goes to print, however, it is likely that developers will be building Android applications using the Android Studio (currently in beta). With this in mind, this chapter will expend the least amount of effort to create a mobile application that connects to a PeopleSoft instance. I will expound those areas that seem static, but minimize those subjects that will likely change. The point of this chapter is not to teach you Android development. Instead, my intention is to show you how to invoke a PeopleSoft REST service from a native Android application.
Why Native?
The most commonly cited reason for choosing native over mobile web or hybrid applications is performance. Within the performance justification, we find network utilization, memory, and CPU overhead, as well as file install size. You can achieve many of these objectives through good mobile web and hybrid application design. Web and hybrid applications, however, live in a container abstracted from the native Android API. Native mobile application development offers a greater level of control that is not possible with the alternatives.
Introduction to Android Development
Even though I said this isn’t a book about Android development, let’s go ahead and create a simple Android application just to get the feel for the ADT SDK.
Creating a Project
Launch the Eclipse instance you installed in Chapter 1 with Android SDK. I installed mine in C:appsadt-bundle-windows-x86_64-20140702eclipse. When the Eclipse IDE appears, select File | New | Android Application Project from the Eclipse menu bar. In the New Android Application dialog, enter an Application Name such as HelloAndroid. The name doesn’t matter too much because this is just an example application. The Project and Package Name fields will update automatically to match the Application Name. Figure 9-1 is a screenshot of the New Android Application dialog. Notice the yellow triangle with the exclamation mark? It tells me that I should not use com.example as the Package Name prefix. The Package Name is a unique identifier that must stay the same throughout the life of the application. I am using com.example, because the HelloAndroid application is an example, and not meant to be deployed anywhere except to an emulator.
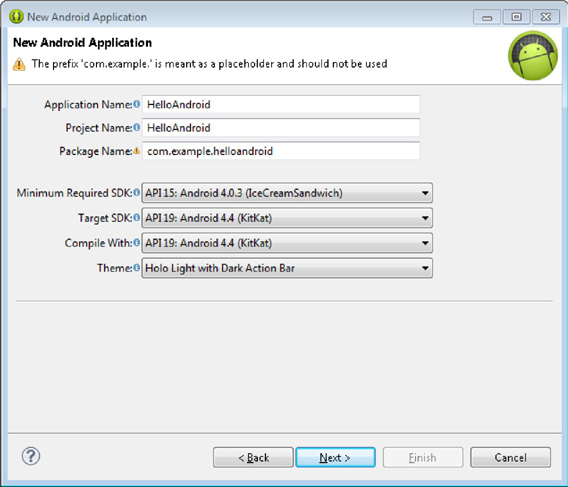
FIGURE 9-1. New Android Application wizard step 1
Just below the application name, select the device target platform range. The minimum required SDK determines the APIs available to your application. Select the lowest platform you expect to support, but no lower. Selecting a platform too low will limit your development opportunities by reducing the available APIs. Click the Next button to move to the next step in the New Android Application wizard.
In step 2, verify that the Create custom launcher icon, Create activity, and Create Project in Workspace checkboxes are selected. Selecting these checkboxes will create the default application structure required to install and launch our new HelloAndroid application. Figure 9-2 is a screenshot of step 2. Click Next to move onto step 3.
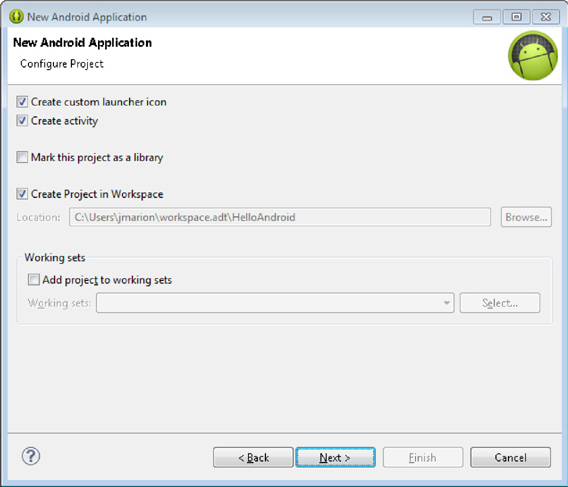
FIGURE 9-2. New Android Application wizard step 2
Click the Next button when asked to configure a launcher icon. We will use the default icon configuration for this example. On step 4, select Blank Activity for the activity template and click the Next button. The final step of the wizard allows you to change the name of the activity. Keep the default activity name of MainActivity and the default layout name of activity_main. Figure 9-3 is a screenshot of the final step of the wizard. Click the Finish button to complete the wizard.
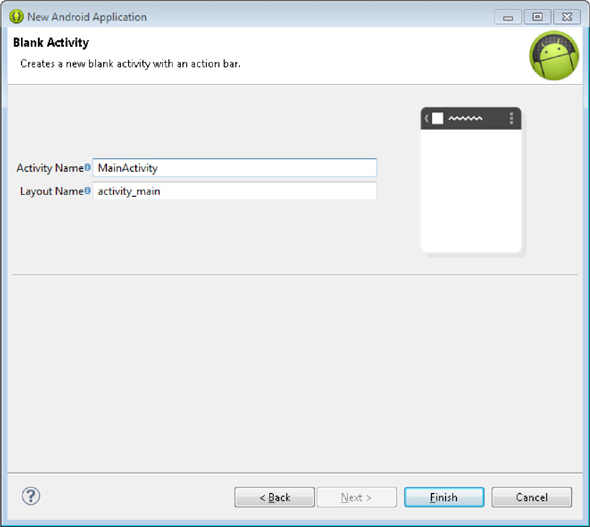
FIGURE 9-3. Final step of the New Android Application wizard
Reviewing the Project
Your new project contains several important files:
![]() AndroidManifest.xml
AndroidManifest.xml
![]() res/layout/activity_main.xml
res/layout/activity_main.xml
![]() res/values/strings.xml
res/values/strings.xml
![]() src/com/example/helloandroid/MainActivity.java
src/com/example/helloandroid/MainActivity.java
The Android Eclipse ADT plugin contains a different editor for each of these files. The AndriodManifest.xml file contains all of the metadata necessary to run an application including activities and permissions.
The resources folder of an Android project contains images, page designs (called layouts), string tables, and other noncode resources. Specifically review the activity_main.xml layout file. This file describes the content of the application’s MainActivity activity. Notice that it contains a single text box containing the text Hello World. Rather than hard coding the text, the value Hello World comes from a string resource that exists in file values/strings.xml.
Inside the src folder you will find a file named MainActivity.java. This file contains the Java code required to initialize the activity including specifying the layout definition and any activity specific menu items.
Launching an Application
Launch the HelloAndroid application by selecting Run | Run from the Eclipse menu bar. When prompted, select Run as Android Application. Eclipse will prompt for the target device, and then deploy and launch the new HelloAndroid application. Figure 9-4 is a screenshot of the HelloAndroid application running in a NexusOne emulator with the WQVGA400 skin.
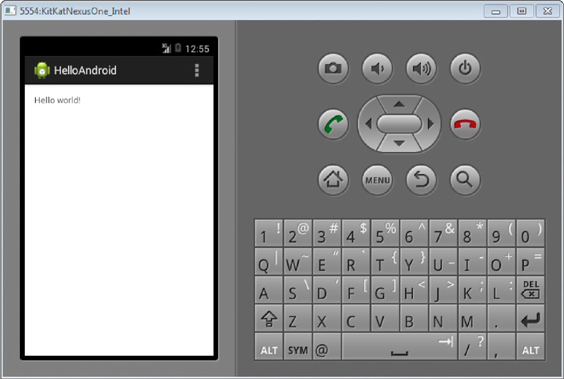
FIGURE 9-4. HelloAndroid application running in an emulator
Networking with Android
Our personnel directory is a little more complex than the HelloAndroid example, although, not by much. Besides making a few modifications to the layout, the personnel directory will require external information gathered through a network connection. Networking is a common Android application task. Many applications, such as Facebook, LinkedIn, and TripCase use Android networking capabilities to send and receive information. Android includes two HTTP client libraries: java.net.HttpURLConnection and Apache HttpClient, neither of which is a good fit for mobile development. These are just bare HTTP client protocol handlers that don’t consider scheduling, caching, concurrency, and many other factors that make mobile networking unique. Developers building high-performance native applications often write their own networking clients on top of the delivered HttpClient and HttpURLConnection client libraries. At the 2013 Google I/O conference, Ficus Kirkpatrick of Google introduced the world to a new networking library named Android Volley. Android Volley is designed to promote performance and Android networking best practices with very little code. In this chapter, we will use Android Volley to manage network requests.
Preparing Android Volley
Android Volley exists as a separate project and is not included with the Android developer tools. To use it we need to download and either package it as a Java library (JAR file) or include it in Eclipse as an Android library project. In this chapter, we will choose the latter: include it in Eclipse as an Android library.
Launch the ADT bundled instance of Eclipse (if it is not already running) and select File | Import from the Eclipse menu bar. When the Import dialog appears, select Git | Projects from Git as shown in Figure 9-5. Click Next to continue to the next step.
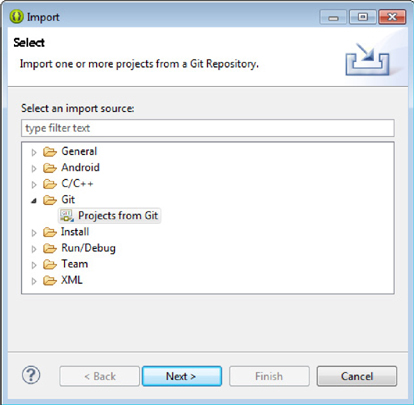
FIGURE 9-5. Select import source dialog
In step 2, select a repository source, select URI. Click Next to move to step 3. When step 3 appears, enter the URI https://android.googlesource.com/platform/frameworks/volley. Eclipse will automatically fill in the Host and Repository path. Figure 9-6 is a screenshot of repository location dialog. Click Next to move to the Branch Selection dialog
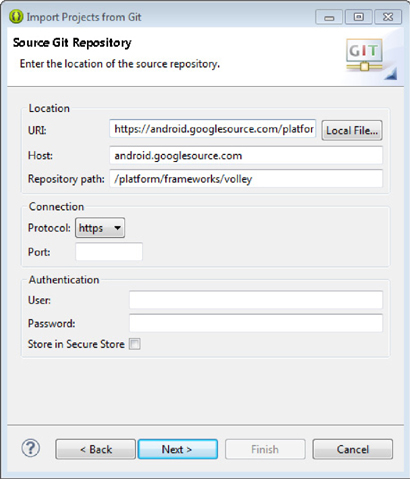
FIGURE 9-6. Import Git repository location selection dialog
Git repositories can have many branches. We are only interested in the master branch. When the Branch Selection dialog appears, select the master branch (Tip: Click the Deselect All button, and then just select master). Click Next to move to the Local Destination selection step. Accept the defaults and click Next to move to the Select a project import wizard type step. Select the Import existing projects option as shown in Figure 9-7.
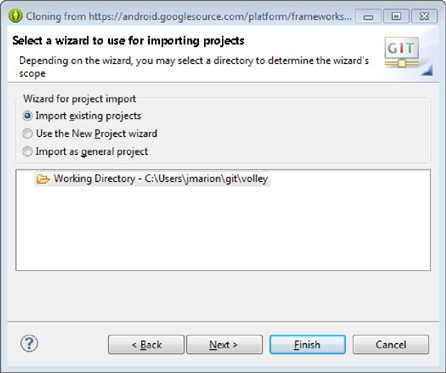
FIGURE 9-7. Select a project import wizard type
When you click the Next button, Eclipse will present you with a list of projects found within the downloaded Git repository. Select the Volley project and unselect the VolleyTests project. Figure 9-8 is a screenshot of the final step in the import wizard. Click Finish to complete the import wizard.
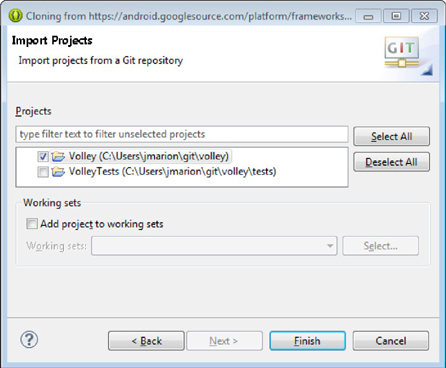
FIGURE 9-8. Final step of the import wizard
NOTE
There is nothing wrong with importing the VolleyTests project along with the Volley project. We just won’t be using it. If you already imported it, you can either delete it or ignore it.
As soon as you click finish, Eclipse will process and compile the Volley project. You may see an error appear in the console telling you that Android tools were not able to find the Volley project’s res directory. Your error message may appear similar to the following:
![]()
Ignore this error. Volley is a library project with no user interface. A container project will supply layouts, string tables, icons, and any other Android resources necessary to create an Android application.
Right-click on the new Volley project and select Properties from the context menu. Find and select the Android item in the list on the left. In the lower right, select the Is Library checkbox to mark this project as an Android library. Figure 9-9 is a screenshot of the properties dialog.
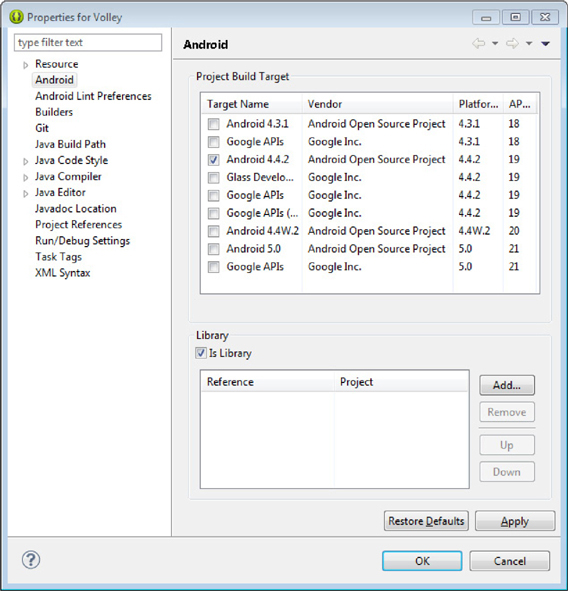
FIGURE 9-9. Volley Android library properties
Building a Native Directory
Create a new Android Application Project named PersonnelDirectory. In the New Android Application dialog, allow Eclipse to fill in the Project Name and Package Name details. Specify values for the Minimum, Target, and Compile SDK. I chose IceCreamSandwich for the minimum and KitKat for the Target and Compile SDK. Figure 9-10 is a screenshot of the New Android Application dialog. Click the Next button to move to the next step. Click the Next button for the remainder of the steps, accepting all of the defaults. On the final step, click the Finish button. Just as with our HelloAndroid project, Eclipse will create a project with all of the files necessary to immediately deploy the new application to an Android emulator.
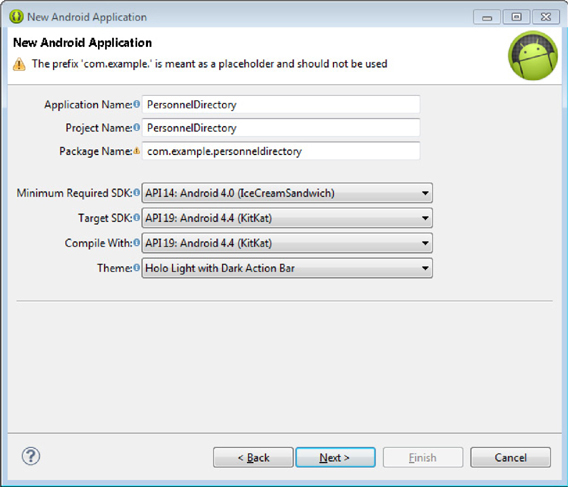
FIGURE 9-10. New Android Application dialog
Next, let’s associate this project with the Volley library. Right-click on the PersonnelDirectory project node within the Package Explorer and select Properties from the context menu. When the Properties window appears, use the outline on the left to select the Android node. Locate the Library section in the lower half of the Properties window and use the Add button to select the Volley library. Click OK to save your changes and close the Properties dialog. Figure 9-11 is a screenshot of the Properties window after selecting the Volley library.
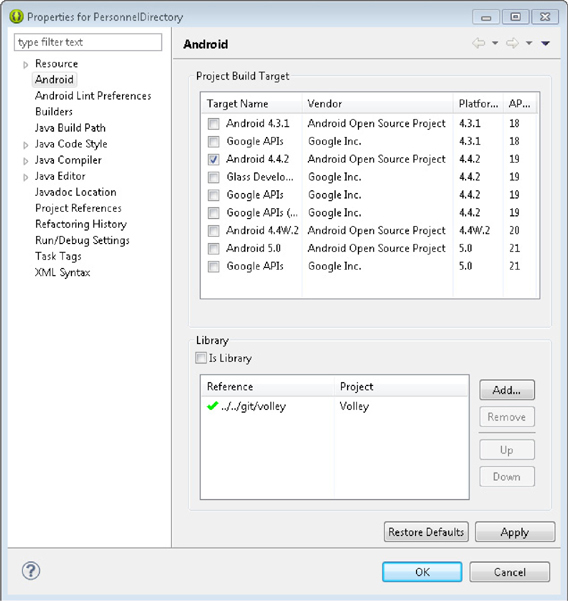
FIGURE 9-11. Android project properties dialog
Design the Search Layout
You should now be looking at the Graphical Layout tab of the activity_main.xml file. If you are not, locate the res/layout/activity_main.xml file in the Eclipse Package Explorer and then open activity_main.xml. We want to turn activity_main.xml into a search page that resembles Figure 9-12.
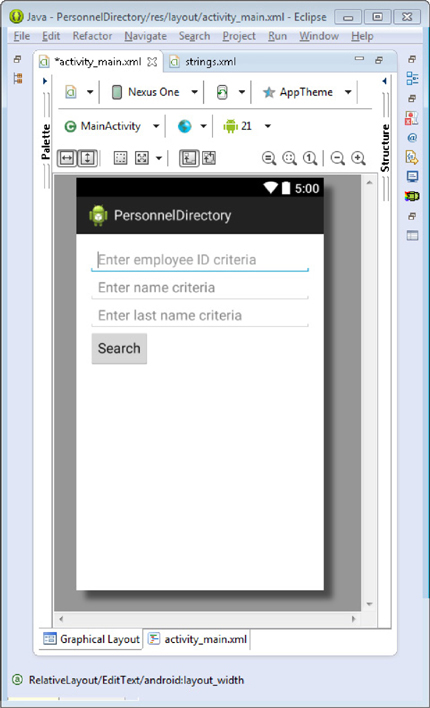
FIGURE 9-12. activity_main.xml search page
We can make the current activity_main.xml look like Figure 9-12 by first removing the existing “Hello world” Text view and adding three Plain Text EditText fields to activity_main.xml. After adding the new fields, change the Id property of each field to @+id/emplid_search, @+id/name_search, and @+id/last_name_search. When prompted, select Yes to update references. We also need to update the hint text for each field. To change the hint text for a field, select the field in the graphical editor and then find the Hint property in the structure viewer on the right. Click the ellipses button (… three dots) and then click the New String button in the Resource Chooser dialog. The Create New Android String dialog will appear. Enter a string value of Enter employee ID criteria and Resource ID of emplid_search_hint. Figure 9-13 is a screenshot of the Create New Android String dialog.
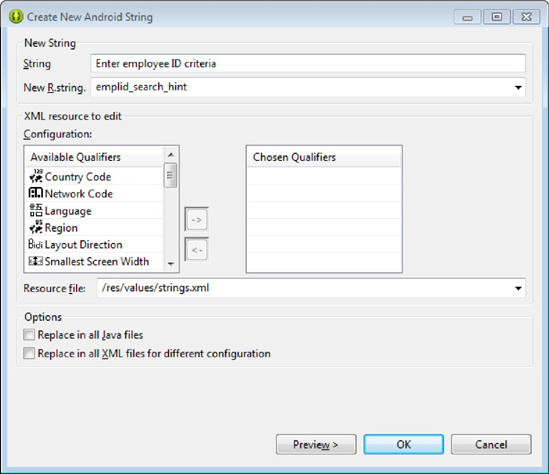
FIGURE 9-13. Create New Android String dialog
Click the OK button to save the new string resource. When you return to the Resource chooser, click the OK button again to update the EditText field hint property. Repeat these steps for the remaining EditText fields, substituting the values from Table 9-1.

TABLE 9-1. EditText hint values
The final step in creating the search layout is to drag a button from the Palette’s form widgets onto the layout just below the last name search field. After dragging a new button to the layout, and with the button still selected, find the Text property in the Properties window. Use the ellipses build button to create a new string resource. Set the new string’s resource ID (R.string) to search_button_label and give it a value of Search.
![]()
NOTE
We could hard code string values for each display field, but that would be neither reusable nor translatable.
While still viewing the Properties window and with the Search button still selected, find the On Click event. Set the value to execSearch. We will create the execSearch method later.
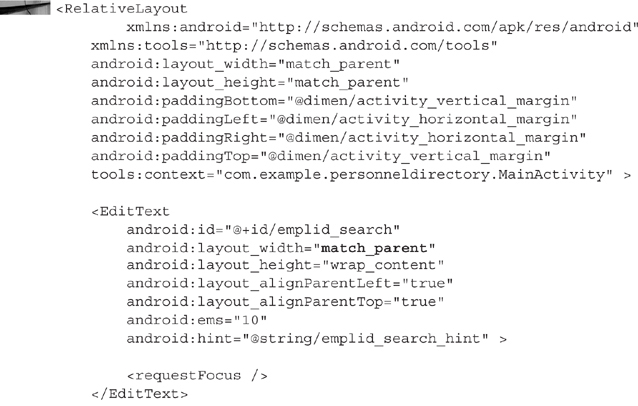
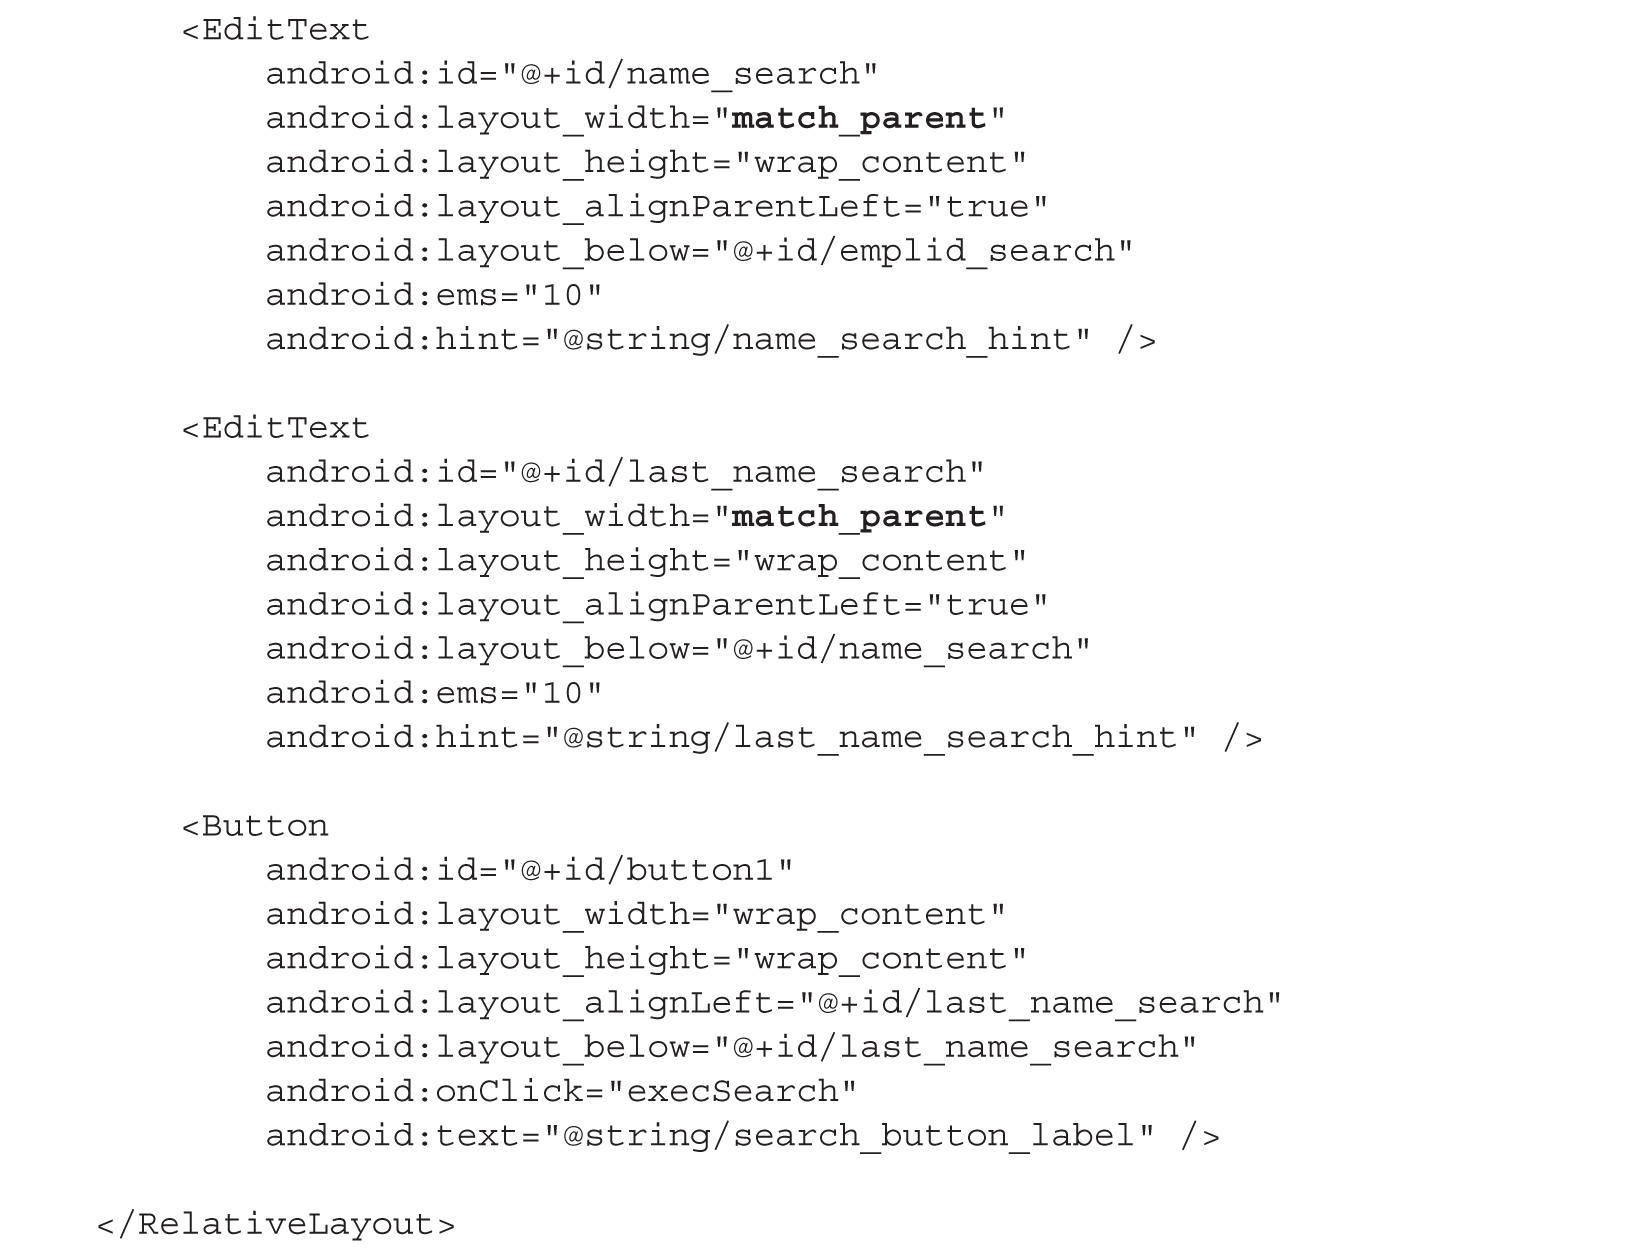
Switch to the layout’s XML view by clicking the activity_main.xml tab to the right of the Graphical Layout tab. For each EditText element, change the android:layout_width attribute value from wrap_content to match_parent. This will stretch the text field width to match the width of the parent container. The following listing contains the XML used to describe the activity_main.xml layout. The layout_width attribute values are in bold print.
Implement Search Behavior
When we created the PersonnelDirectory project, we told Eclipse to create a default activity named MainActivity. We also identified the activity layout as activity_main.xml. We just finished designing activity_main.xml, the search page layout. Now we need to write some Java to implement the layout behavior. Specifically, we have to tell the Android device how to respond when a user taps the Search button.
From within the Package Explorer, find and open the MainActivity.java file located inside the src/com.example.personneldirectory folder. We need to add a button click handler to this file. The button click handler will package the search values entered by the user and transfer those values to a new activity. Find the line near the top of MainActivity.java that defines the MainActivity class. It looks something like:
![]()
Just below that line, add the following:

We will use these three declarations to identify search field values after passing them to the next activity. Now scroll to the bottom, just above the final closing curly brace (}) and enter the following:
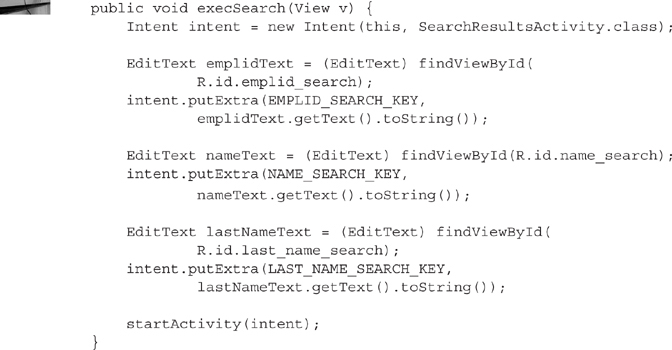
Users of our personnel directory trigger the execSearch method by tapping the search button on the activity_main.xml layout. When invoked, this method copies the user-entered search criteria into a reserved area of an Android Intent object. The method then uses the Android Intent to launch a new activity. That new activity, SearchResultsActivity, doesn’t exist yet so Eclipse will mark it as an error. We will resolve that error later. First, we need to create a data model to hold the user’s search results.
Search Results Data Model
After tapping the search button, our users expect the application to connect to a PeopleSoft server and fetch a list of matching results. Android has a built-in list view that will display those results for us. We just have to create an object that can transform each result item into a displayable String. Create this transformation object by selecting File | New | Class from the Eclipse menu bar. When the New Java Class dialog appears, set the Package value to com.example.personneldirectory.model and then set the Name value to Person. Click the Finish button to close the dialog and create the new class. Figure 9-14 is a screenshot of the New Java Class dialog.
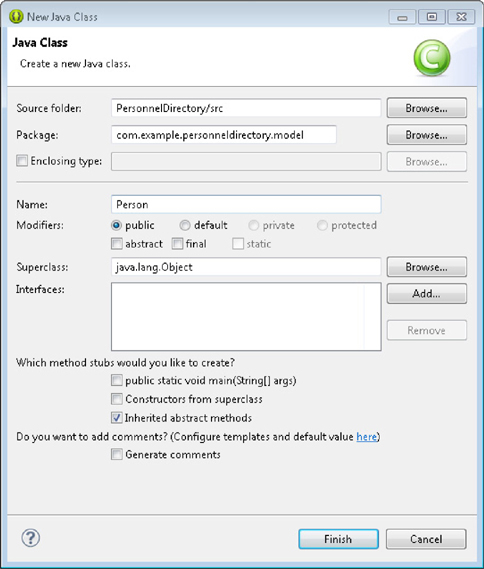
FIGURE 9-14. New Java Class dialog
Replace the contents of the new Java class with the following:
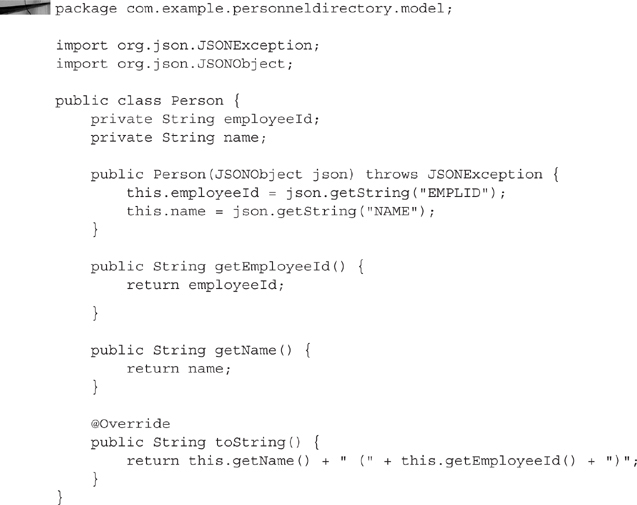
This class is an unexciting, plain old Java object with two important features:
![]() The constructor for this class uses the
The constructor for this class uses the JSONObject parameter to initialize itself.
![]() The class overrides the
The class overrides the toString method to give the Android built-in list view some text to display.
Creating the Search Results Activity
Browsing through the Package Explorer, I see that Eclipse marked MainActivity.java as having an error. Figure 9-15 is a screenshot of MainActivity.java. Notice Eclipse places an error icon next to MainActivity.java inside the Package Explorer. After opening MainActivity.java, I can find the exact location of the error by scrolling through MainActivity.java until I reach the point where there are red markers in the gutters on each side of file. In Figure 9-15 these markers point to a problem with SearchResultsActivity.class. The problem is that we haven’t defined SearchResultsActivity.class.
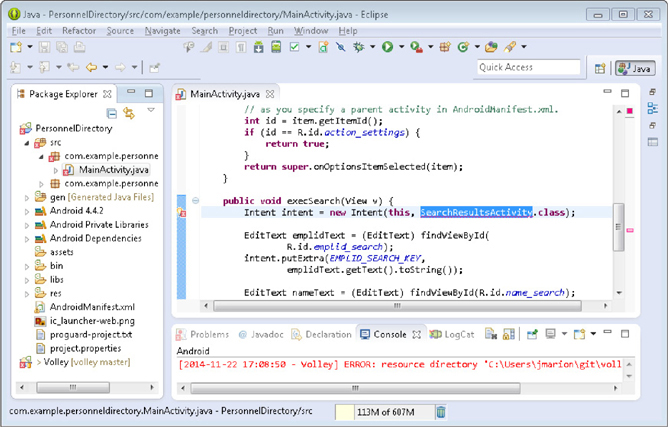
FIGURE 9-15. Eclipse identifying the MainActivity error
The easiest way to create the SearchResultsActivity Java class is to attempt to resolve the error Eclipse identified in MainActivity.java by clicking the error marker in the left-hand gutter. When the context menu appears below the underlined text, select the Create class “SearchResultsActivity” option. The New Java Class dialog will appear with everything prefilled except the Superclass. Change the value of the Superclass to android.app.ListActivity. This will give our class access to list specific behavior. Figure 9-16 is a screenshot of the New Java Class dialog.
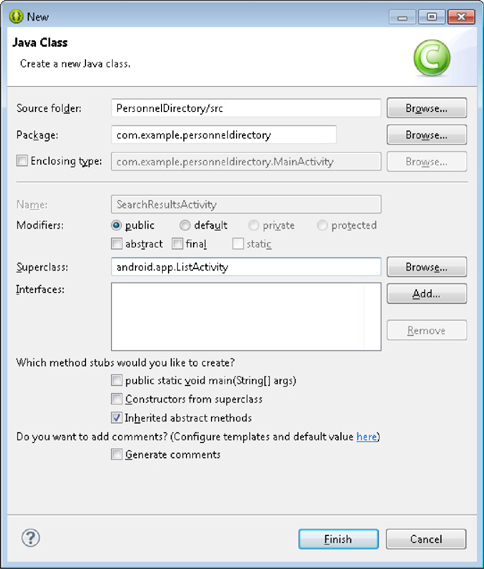
FIGURE 9-16. New Java Class dialog
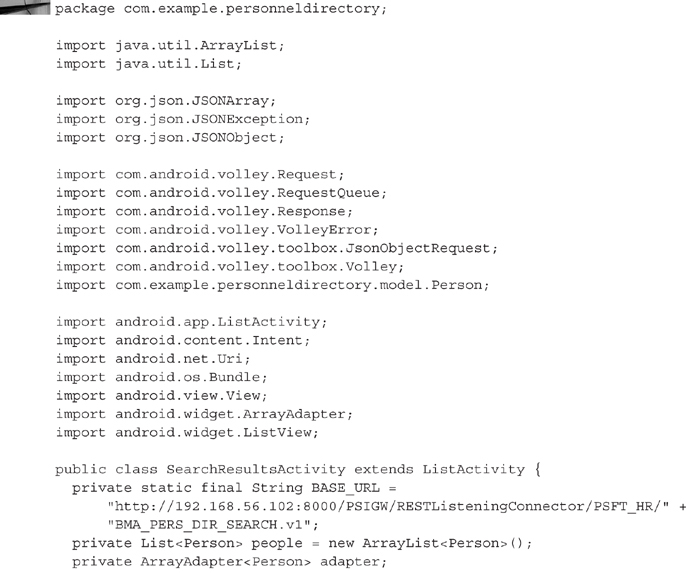
Click OK to close the dialog and then add the following declarations just inside the class definition. I included the first line of the class definition for context. Additions are in bold.

The first variable, BASE_URL, points to a Service Operation we created in Chapter 8 that is running on my local VirtualBox demo image. Replace the IP address with your development server IP address or host name.
![]()
NOTE
If you are using a real device rather than an emulator to test applications, then replace the IP address in BASE_URL with your development server’s IP address or host name. The IP address above points to the host-only adapter on my VirtualBox image. Most PeopleSoft Update Manager images use a host-only adapter with a very similar IP address.
Do I Have to Hard Code an IP Address?
The example here embeds an IP address directly in the code. I did this to keep the example as simple as possible. When developing a mobile application for reuse by a variety of PeopleSoft customers, you may want to create a configuration page where users can enter a target PeopleSoft server. On the other hand, if the mobile application is just for consumption within your organization, you may want to hard code a host name rather than require a configuration. Why make it harder for your users? Facebook, for example, doesn’t require users to enter the target Facebook URL before using their mobile application.
If you prefer to hard code a host name, but aren’t ready to point your mobile application at production servers, then you can trick your emulator into thinking your development server is really your production server by adding a line to the emulator’s hosts file (you might remember this trick from Chapter 1). Open a terminal (cmd on Windows) window and enter the following commands at the prompt (commands are in bold):
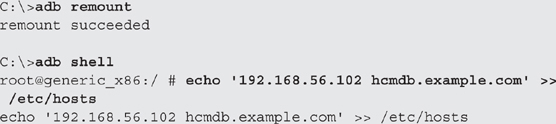
You can verify the contents of the emulator’s hosts file by typing the following at the adb shell prompt:
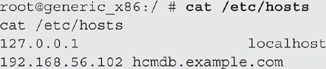
Android will overwrite your custom hosts file the next time it launches the emulator so you will need to apply this change each time you launch the emulator…kind of makes you wonder if it would just be easier to use the development server URL until you are ready to deploy.
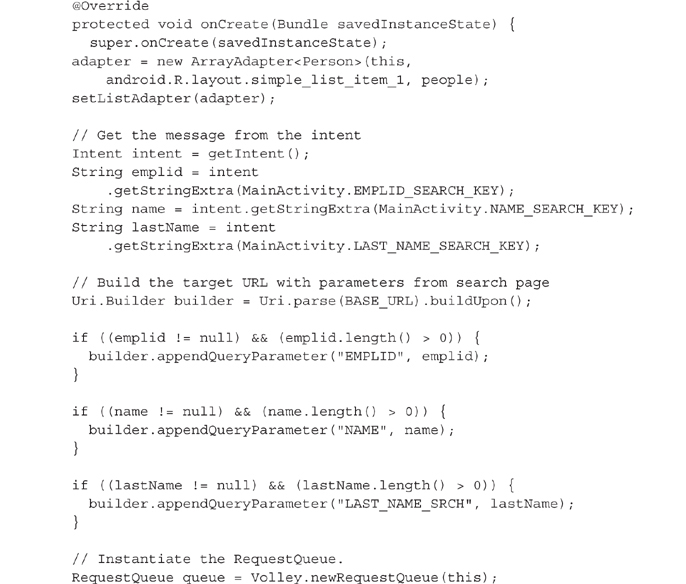
Add the following method declaration just below the private member declarations:
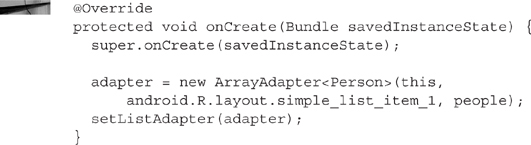
This code tells an Android device that the SearchResultsActivity Activity will display a list. Unlike MainActivity, which requires a Java class and a layout, this activity just requires a Java class. Instead of defining our own custom layout, we are using a special Android defined layout named simple_list_item_1. Now we just have to specify some data.
NOTE
Android contains several built-in layouts. Refer to the blog post: http://arteksoftware.com/androids-built-in-list-item-layouts/ describes list specific layouts.
Place the following code just after the setListAdapter line inside the onCreate method.
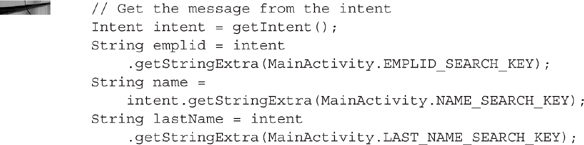
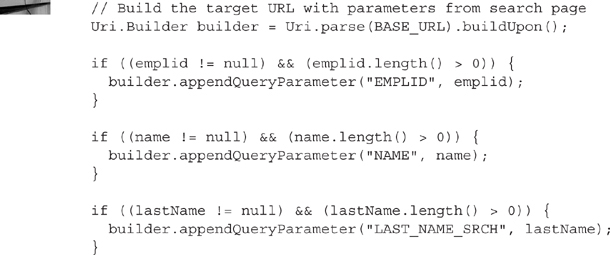
These lines retrieve the search criteria passed to SearchResultsActivity from MainActivity. Next, we will use the Android Uri.Builder to construct the search service URL using parameters sent to SearchResultsActivity through an Intent object. Add the following lines to the end of the onCreate method, just inside the closing curly brace:
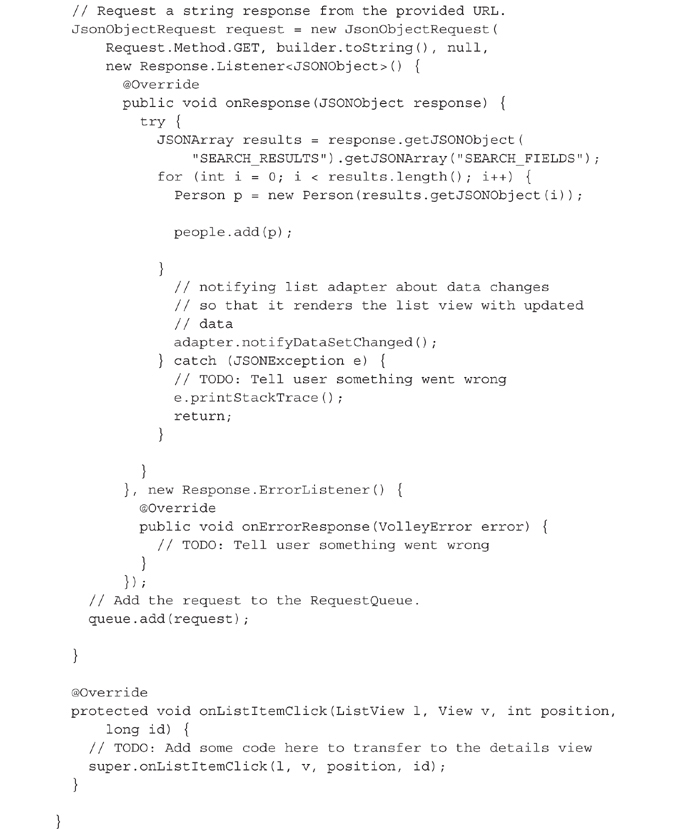
The final step is to dispatch the asynchronous request. On response, our code will convert the service JSON response into a list of Person objects and then tell Android to update the results list. Add the following code to the end of the onCreate method:
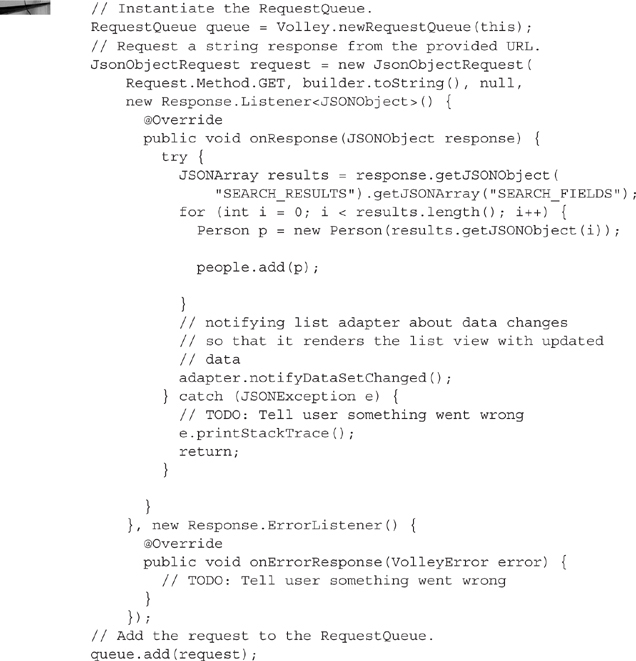
The Java code in this section creates a new Volley request, queues the request, and specifies how to handle the response. Using Volley allows us to focus on what matters to us: packaging a valid request and consuming the response. We do not have to concern ourselves with caching, chunking, state, or any other protocol specific matters. Volley handles these for us.
This code section is critical for another reason. It satisfies the primary requirement of this chapter: Demonstrate how to invoke a PeopleSoft REST service and process the service response.
At this point, Eclipse is likely to be very upset with you and is trying to let you know how it feels by placing lots of red squiggly lines under many of the words in the SearchResultsActivity class. Most of these squiggly lines identify class definitions that need to be imported into the SearchResultsActivity class. You can resolve these errors now by hovering over the word marked with an error and then selecting the suggested class. Be careful to select the correct import class. Some of the suggestions contain multiple options. Validate your selections against the following listing that contains the entire SearchResultsActivity definition including import statements:
![]()
NOTE
The code above will display a list, but tapping an item in the list will not navigate to a new details activity. The code listing contains a stub for the onListItemClick event. To view the list item details you would add an Intent to the onListItemClick method to transfer to a new activity.
Let’s register this Activity class with Android. Open AndroidManifest.xml and switch to the Application tab. Scroll to the bottom of the page and find the Application Nodes section. It should contain one entry named .MainActivity. Click the Add button and then select Activity from the list as shown in Figure 9-17.
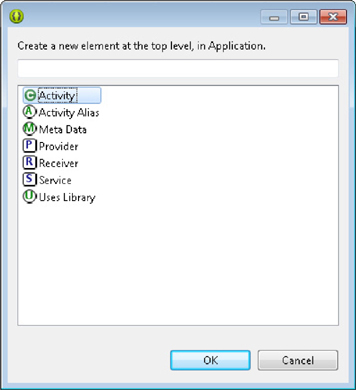
FIGURE 9-17. Select Activity from the list
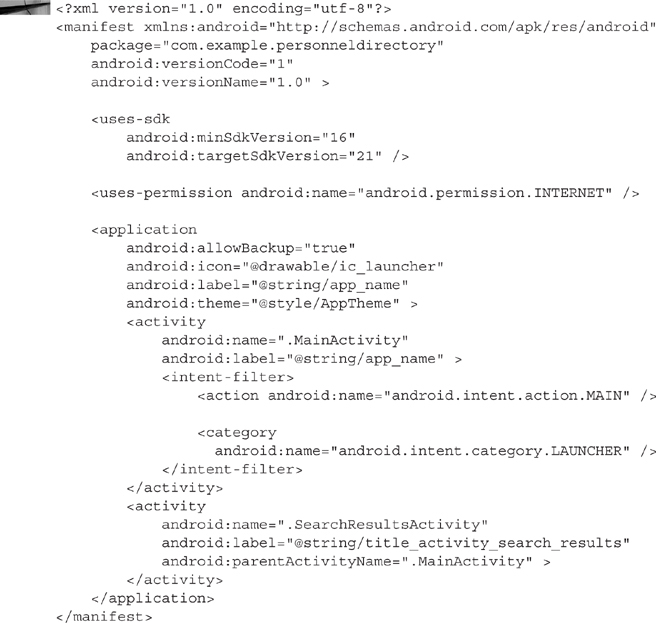
Eclipse will add a new activity to the list of application nodes. With the node named Activity selected, find the Activity properties to the right of the application nodes list and then type .SearchResultsActivity into the Name field. A few fields below the Name field you will see the Label field. Click the browse button and then add a new string with the key (New R.string.) title_activity_search_results and a value of Search Results. The final value for the label should be @string/title_activity_search_results. Scroll near the end of the properties list and find the Parent activity name field. Set the Parent activity name to .MainActivity. Specifying a parent activity will add a back button to the activity header, which allows the user to return to the prior step: entering search criteria.
Switch to the Permissions tab of the PersonnelDirectory.xml manifest file and add a Uses Permission item to the Permissions collection. Set the name of the new Uses Permission to android.permission.INTERNET. This tells Android that the PersonnelDirectory application requires Internet access. At install time, an Android device will read this permission collection and prompt the user to accept or deny access to the Internet service. The following code listing contains the complete PersonnelDirectory.xml manifest file contents:
Deploy and Test the Android Application
Our Personnel Directory app contains enough code to demonstrate web service access. Deploy the Personnel Directory to an Android Emulator by right-clicking the PersonnelDirectory project name in the Package Explorer and selecting Run As | Android Application from the context menu. When prompted, select an emulator. Eclipse will deploy and launch the application inside your chosen emulator. Within the mobile application on the emulator, enter search criteria. I chose KU000%. Tap search and wait for results. Figure 9-18 is a screenshot of the Search Results list displayed in a NexusOne emulator.
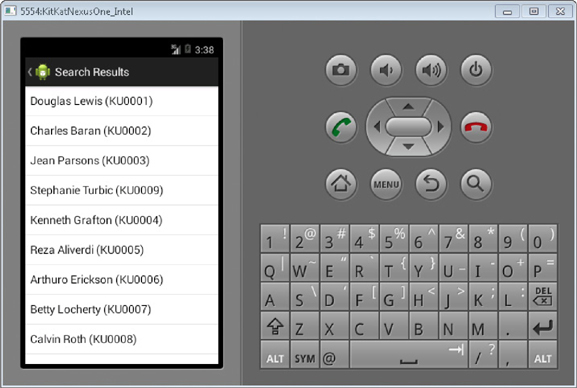
FIGURE 9-18. Search Results list displayed in a NexusOne emulator
Conclusion
We started this chapter with some custom PeopleSoft REST web services borrowed from Chapter 8. We then built enough of an Android native personnel directory to demonstrate invoking PeopleSoft REST services. There are many reasons to choose native development over HTML5, including exerting more control over network requests, performance, and access to device capabilities. In this chapter, we focused on performance by maintaining a thin user interface and exerting more control over network requests. In the next chapter, we will wrap our Chapter 8 HTML5 personnel directory in a Cordova wrapper, which will improve performance and provide access to on-device capabilities.