
Perhaps the greatest challenge to individuals using programs such as Photoshop Elements, and even the professionals who use its granddaddy, Adobe Photoshop, is getting what you see on your monitor to render a reasonable facsimile on a printed page. You can find all sorts of books on color printing — how to get color right, how to calibrate your equipment, and how to create and use color profiles — all for the purpose of getting a good match between your computer monitor, your printer, and the paper used to print your output. It's downright discouraging to spend a lot of time tweaking an image so that all the brilliant blue colors jump out on your computer monitor, only to find that all those blues turn to murky purples when the photo is printed.

If you already read Chapters 2 and 3, you're ahead of the game because you know a little bit about color management, color profiles, and printer resolutions. After you check out those chapters, your next step is to get to know your printer and understand how to correctly print your pictures.
In this chapter, we talk about options — many options — for setting print attributes for printing to your own color printer. If you need to, reread this chapter a few times just to be certain that you understand the process for printing good-quality images. A little time spent here will, we hope, save you some headaches down the road.
The first step toward getting your photos to your desktop printer is to prepare each image for optimum output. You have several considerations when you're preparing files, including the ones in this list:
Set resolution and size. See your printer's documentation for recommendations for resolution. As a general rule, 200–300 ppi (pixels per inch) works best for most printers printing on high-quality paper. If you print on plain paper, you often find that lower resolutions work just as well or even better. Chapter 3 explains setting size and resolution in detail.
Make all brightness and color corrections before printing. Make sure that your pictures appear their best before sending them off to your printer. If you have your monitor properly calibrated, as we discuss in Chapter 2, you should see a fair representation of what your pictures will look like before you print them. Chapters 9 and 10 cover corrections.
Decide how color will be managed before you print. You can color-manage output to your printer in three ways, as we discuss in the next section. Know your printer's profiles and how to use them before you start to print your files.
Get your printer ready. Finally, when printing to desktop color printers always be certain your ink cartridges have ink and the nozzles are clean. Make sure you use the proper settings for paper and ink when you send a file to your printer. Be sure to review the manual that came with your printer to become aware of how to perform all the steps required to make a quality print.
In Chapter 2, we talk about creating color profiles for your monitor and selecting a color workspace. The final leg in a color-managed workflow is to convert color from your color workspace profile to your printer's color profile. Basically, this conversion means that the colors you see on your monitor in your current workspace are accurately converted to the color that can be reproduced by your printer. To print accurate color, you need to have a color profile designed for your printer and the paper you use installed on your computer.
You can manage color in Photoshop Elements in three ways when it comes time to print your files:
Printer Manages Colors: This method permits your printer to decide which profile is used when your photo is printed to your desktop color printer. Your printer makes this decision according to the paper you select as the source paper used to print your photos. If you choose Epson Premium Glossy Photo Paper, for example, your printer chooses the profile that goes along with that particular paper. If you choose another paper, your printer chooses a different color profile. This method is all automatic, and color profile selection is made when you print your file.
Photoshop Elements Manages Color: When you make this choice, color management is taken out of the hands of your printer and is controlled by Elements. You must choose a color profile after making this choice. If color profiles are installed by your printer, you can choose a color profile from the list of profiles that match your printer and the paper source.
No Color Management: You use this choice if you have a color profile embedded in one of your pictures. You'll probably rarely use this option. Unless you know how to embed profiles or receive files with embedded profiles from other users, don't make this choice in the Print dialog box. Because very few Elements users work with files with embedded profiles, we'll skip coverage on this method of printing your files.
Each of these three options requires you to make a choice about how color is managed. You make choices (as we discuss later in this chapter, when we walk you through the steps for printing) about whether to color-manage your output. These selections are unique to the Print dialog box and more specifically in the More Options dialog box for your individual printer.
Note
Color profiles are also dependent upon the ink being used, and refilling cartridges with generic ink can (in some cases) result in colors shifting. Similarly, if the nozzles aren't clean and delivering ink inconsistently, you may see some very strange results.
Without going into all the settings you have to choose from in the Print and More Options dialog boxes; for now, let's just look at printing a photo and managing color. We explain more print options available to you later in this chapter, in the section "Setting Print Options.".
For the following example, we use an Epson printer. If you have a different printer, some of the dialog boxes and terms may appear different. With a little careful examination of the printer driver dialog box, you should be able to apply the following steps for any printer:
Choose File
Print with a photo open in Edit Full mode.
The Print dialog box that opens contains all the settings you need to print a file (see Figure 14-11 later in this chapter for a screen reference of the Print dialog box).
Click Page Setup at the bottom of the Print dialog box and select the orientation of your print. Click OK.
Your choices are either Portrait or Landscape, as shown in Figure 14-1. After you click OK, you return to the Print dialog box.
Choose your printer from the Printer drop-down menu.
Set the print attributes.
Select the number of copies, position, scaling, and output items you want.
Click More Options and choose Color Management in the More Options dialog box.
In the Color Management area, shown in Figure 14-2, make your choices for how to manage color when you print files.
From the Color Handling drop-down menu, select Printer Manages Color. Click OK.
This choice uses your current workspace color [either sRGB or Adobe RGB (1998)] and later converts the color from your workspace to the printer output file when you open the printer driver dialog box.
Click Print in the Print dialog box, and follow the steps for Windows or Mac OS X, whichever you use.
The file doesn't print yet.
In Windows, first, the Windows system Print dialog box opens. Click Preferences and the Printing Preferences dialog box for your printer driver opens as shown in Figure 14-3. Proceed to Step 8.
On the Macintosh, the OSX System Print dialog box opens. You need to make two choices here. Open the drop-down menu below the Pages item in the Print dialog box and choose Print Settings as shown in Figure 14-4. From the Media Type drop-down menu, choose the paper for your output.
The second choice Macintosh users need to make is the selection for Color Management. Open the Print Settings drop-down menu and choose Color Management as shown in Figure 14-5. Leave the default setting at Color Controls (this setting is used when the printer manages color). On the Macintosh, click Print and the file is printed.
Set print attributes (Windows).
In our Epson example, select a paper type such as Epson Premium Glossy (or another paper from the Type drop-down list that you may be using) and then click the Best Photo radio button. (Refer to Figure 14-3.)

Figure 14-3. Click Preferences in the first dialog box that opens, and the selected printer preferences opens.
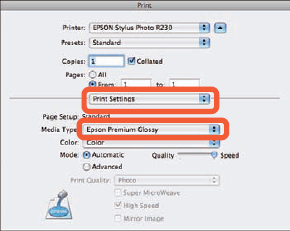
Figure 14-4. Choose Print Settings on the Macintosh and make a choice for the paper you use for the output.
Now, it's time to color-manage your file. This step is critical in your print-production workflow.
Click the Advanced button and then, in the Warning dialog box that appears, simply click Continue (Windows).
The Printing Preferences dialog box opens, displaying advanced settings, as shown in Figure 14-6.
Make your choices in the advanced Printing Preferences dialog box (Windows).
Here are the most important choices:

Figure 14-6. Click Advanced and then click Continue to access the advanced settings in the Epson printer driver.
Select a paper type. You selected paper already? The second drop-down menu in the Paper & Quality section of the dialog box determines the application of inks. Choose the same paper here as you did in Step 8.
Turn on color management. Because you're letting the printer driver determine the color, you need to be certain that the Color Controls radio button is active. This setting tells the printer driver to automatically select a printer profile for the paper type you selected.
Set the color mode. Don't use Epson Vivid. This choice produces inferior results on photos. Choose Best Photo, the Epson Standard, or Adobe RGB, depending on your printer.
Tip
If you frequently print files using the same settings, you can save your settings by clicking the Save Setting button.
To print the photo, click OK and then OK again in the Print dialog box (Windows).
Your file is sent to your printer. The color is converted automatically from your source workspace of sRGB or Adobe RGB (1998) to the profile the printer driver automatically selects for you.


Another method for managing color when you're printing files is to select a printer profile from the available list of color profiles installed with your printer. Whereas in the preceding section, you used your printer to manage color, this time, you let Photoshop Elements manage the color.
The steps in this section are the same as the ones described in the preceding section for printing files for automatic profile selection when you're setting up the page and selecting a printer. When you choose File
Choose File
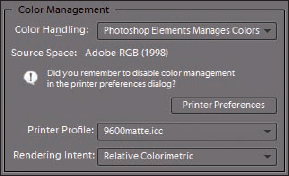
Print. Click More Options to open the More Options dialog box. Click Color Management in the left pane to display the color management options.From the Printer Profile drop-down menu, select the color profile designed for use with the paper you've chosen.
In this example, we use a heavyweight-matte-paper color profile, as shown in Figure 14-7. (Note that custom color profiles you acquire from a profiling service come with recommended color-rendering intents. For this paper, Relative Colorimetric is recommended and is selected on the Rendering Intent drop-down menu, as you can see in Figure 14-7.)
Click Print.
The second Print dialog box opens.
Click the Properties button.
You arrive at the same dialog box shown in Figure 14-3. On the Macintosh you arrive at the same dialog box shown in Figure 14-4.
Click the Best Photo radio button. From the Type drop-down list, select the recommended paper choice. On the Macintosh you make your paper choice as shown in Figure 14-4.
Custom color profiles are also shipped with guidelines for selecting proper paper.
Click Advanced and click Continue to arrive at the same dialog box shown earlier in Figure 14-6. On the Macintosh you choose Color Management from the drop-down menu to arrive at the same dialog box shown in Figure 14-5.
The paper choice selection is automatically carried over from the previous Properties dialog box (see Step 2 in the preceding section). The one setting you change is in the Color Management section.
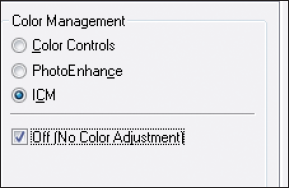
Click the ICM (Image Color Management) radio button and check Off (No Color Adjustment) as shown in Figure 14-8. On the Macintosh, click the Off (No Color Adjustment) radio button (refer to Figure 14-5).
Because you selected the color profile in Step 1 and you're letting Elements manage the color, be sure the Color Management feature is turned off. If you don't turn off Color Management, you end up double-profiling your print.
Tip
Deciding to manage color or not manage color is simplified in Photoshop Elements. In the Color Management area of the dialog box, a message is reported each time you make a selection from the Color Handling drop-down menu. Right below Rendering Intent, you see a message asking if you remembered to turn Color Management on or off. Each time you make a selection for the Color Handling, pause a moment and read the message (shown in Figure 14-7). This is your reminder that you need to follow the recommendation to properly handle color.
Each time you print a file — whether it be a single photo, a contact sheet, a photo package or other type of print — you use the same steps for color management. In the next section we talk about a number of different options you have for printing photos, but remember that you need to manage the color for each type of print you want.
You print files from Elements using the File
On the Mac, you have a few printing options from within Adobe Bridge, but they are limited to printing Contact Sheets and Picture Packages. When you choose options for Contact Sheets and Picture Packages in Adobe Bridge, the files are created and opened in Edit Full mode.
You can select one or more images in the Organizer (Windows) and then choose File
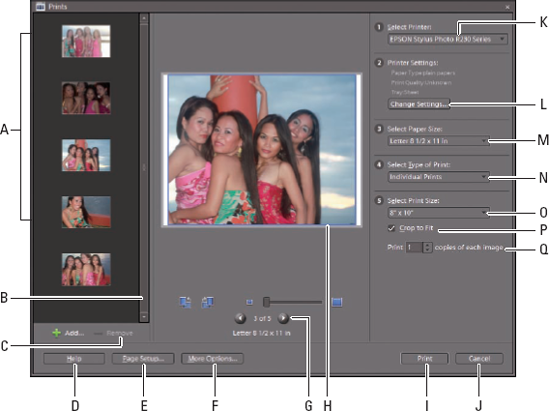
Image Thumbnails: When you select multiple images in the Organizer, all the selected images appear in a scrollable window on the left side of the dialog box.
Scroll bar: When so many photos are selected that they all cannot be viewed in the thumbnail list on the left side of the dialog box, you can use the scroll bar to see all images.
Add/Remove: If the Print Photos dialog box is open and you want to add more photos to print, click the Add (+) icon and the Add Photos dialog box opens. A list of thumbnails appears, showing all photos in the current open catalog. Check the check boxes adjacent to the thumbnails to indicate the photos you want to add to your print queue. You can also choose an entire catalog, albums, photos marked with keyword tags, and photos having a rating.
If you want to remove photos from the list to be printed, click the photo in the scrollable list in the Print Photos dialog box and click the Remove (-) icon.
Help: Click the Help button to open help information pertaining to printing photos.
Page Setup: Click this button to open the Page Setup dialog box (refer to Figure 14-1).
More Options: Click More Options to open another dialog box where additional options are chosen (see the section "Using More Options" later in this chapter).
Scroll Print Preview: Click the arrows to toggle a print preview for all images in the list.
Print Preview: This image displays a preview of the image to be printed.
Print: Click Print after making all adjustments in the Print Photos dialog box.
Cancel: Clicking Cancel dismisses the dialog box without sending a photo to the printer.
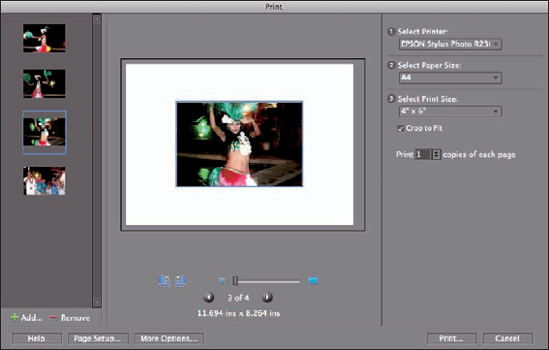
Select Printer: Choose a target printer from the drop-down list.
Printer Settings: Click this button to open properties unique to the selected printer.
Select Paper Size: Choose from print sizes that your printer supports. This list may change when you choose a different printer from the Select Printer drop-down menu.
Select Type of Prints: You have three options available. Print Individual Prints, Contact Sheets, or Picture Packages. For more information on Contact Sheets and Picture Packages, see "Exploring Other Print Options" later in this chapter.
Select Print Size: Select from the print size options that your printer supports.
Crop to Fit: Check this box to crop an image to fit the selected paper size.
Print ___ copies of each image: By default, One Photo Per Page is selected. Remove the check mark and you can choose to print a number of prints on the same page by making selections from the drop-down menu.
When you click the Page Setup button in the Print Photos dialog box, the Page Setup dialog box opens (refer to Figure 14-1). In this dialog box, you can select print attributes that may be unique to your printer. However, you can control the options for most desktop printers in the Print Photos dialog box.
When printing photos from the Organizer, click the More Options button in the Print Photos dialog box. The More Options dialog box opens (refer to Figure 14-2).
If you've used Photoshop Elements prior to version 8, notice that the More Options dialog box has changed. As shown in Figure 14-2, you have three categories listed in the left pane. The three items are as follows:
Printing Choices: Similar to what was available in earlier versions of Elements
Custom Print Size: Various settings for the output size
Color Management: Handles color profile selection and color management options
These three items have been moved from the Print dialog box to the More Options dialog box.
Note
When you want to manage color in Elements 8, as we explained earlier in the section "Working with Color Printer Profiles," you need to open the More Options dialog box.
The default selection is Printing Choices when you open the More Options dialog box. Choices available for printing your photos include
Photo Details: Check the check boxes for the detail items you want printed as labels on your output.
Layout: If you want one photo printed per page, check this box.
Flip Image: This option is used for heat transfer material: Mylar, Lexjet, and other substrates that require E-down printing — emulsion-down printing, where the negative and the image are flipped.
Border: Check Add a Border, and you can specify the size of the border in the check box and choose a unit of measure in the drop-down list. Click the Color swatch to choose a color for the border. Check Include Trim Guideline to print guides for trimming the paper.
Print Crop Marks: Check this box to print crop marks.
If you want to print a photo while in Edit Full mode, choose File
On the Macintosh you find the same settings (see Figure 14-10) as Windows with the exception of the Printer Settings options and Select Type of Prints drop-down menu. Printer Settings are handled in the More Options dialog box on the Mac, and you make the Type of Print choices for Contact Sheets and Picture Packages from within Adobe Bridge.
The basic principles of color management are used each time you print a file to your printer. Up to this point, we talk about printing a single photo. Elements provides you with a variety of other choices for printing files without borders, with a number of different choices for printing photos with decorative frames, picture packages, and contact sheets.
You have choices in the Organizer or Edit Full mode (Windows) or Adobe Bridge (Macintosh) for choosing a command for printing multiple images as either a contact sheet or picture package. On Windows, from within Edit Full mode, when you choose to print a contact sheet or picture package, Elements switches you to the Organizer view. You continue as an action from the Organizer and leave Edit Full mode. On the Macintosh you make the same choices from within Adobe Bridge; after you make the choice, your view is changed to Edit Full mode.
Professional photographers use contact sheets to organize photos and to preview the images before ordering final prints. If you have several shots of a single subject, you may want to see a hard copy of the photos before printing full sizes. Additionally, you can print contact sheets to keep albums of thumbnail images organized in a book without having to preview images in the Organizer or Adobe Bridge.
To print a contact sheet, do the following:
Open the Organizer (Windows) or Adobe Bridge (Macintosh).
In the Organizer/Bridge select photos you want to print on a contact sheet.
Ctrl+click (

Choose File
Print or press Ctrl+P (Windows). On the Macintosh choose ToolsPhotoshop Elements in Adobe Bridge.The Print Photos dialog box opens (Windows). In the dialog box select the printer you want to use for your output from the Select Printer drop-down list.
On the Macintosh the Contact Sheet is assembled for you. After Elements finishes the assembly, the contact sheet document appears as an image file in Edit Full mode. Choose File
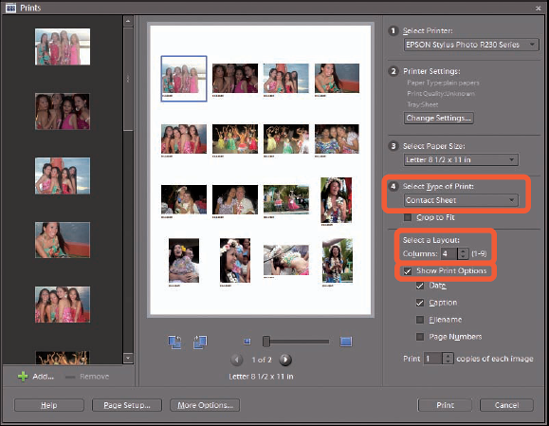
Choose Contact Sheet from the Select Type of Print drop-down menu (Windows).
The Prints dialog box refreshes to show your Contact Sheet options, as shown in Figure 14-11.
Select a layout.
Choose the number of columns you want for the contact sheet. If you specify fewer columns, the images appear larger; as more columns are selected, the images appear smaller. Choose a size according to the number of columns that you want to print.
Check the boxes for the items you want included in the captions.
If you want print options to be shown on your prints, check the Show Print Options check box, and the list of options are displayed below the check box. Caption items can include the date, a text line for the caption, filename, and page numbers.
Click More Options in the bottom left of the dialog box.
Choose a color profile from the Print Space drop-down list. For more on printing with color profiles, see the section "Working with Color Printer Profiles" earlier in this chapter.
Click OK in the More Options dialog box.
Click Print (back in the Print Photos dialog box) to print your contact sheet.
Another option you have for printing multiple photos is picture packages. This feature prints multiple copies of the same photo or multiple copies of many photos.
A picture package is typically a single sheet of paper with the same photo printed at different sizes — something like your graduation photos or prom photos. You can choose to print a single picture package from one photo selected in the Organizer, or you can select multiple photos and print them all as multiple picture packages.
To create a picture package, do the following:
Open the Organizer (Windows) or Adobe Bridge (Macintosh).
In the Organizer Bridge select a single photo or multiple photos that you want to print as a picture package(s).
Choose File
Print or press Ctrl+P Windows. On the Macintosh choose ToolsPhotoshop ElementsPicture Package.The Print Photos dialog box opens. In the dialog box, select the printer you want to use for your output from the Select Printer drop-down list.
On the Macintosh the Picture Package is assembled for you. After Elements finishes the assembly, choose File
Choose Picture Package from the Select Type of Print drop-down list.
The Print Photos dialog box refreshes to show your Picture Package options.
Choose a layout.
Choose a layout from the Select a Layout drop-down menu. As you make layout selections, you see a dynamic preview of the picture package as shown in Figure 14-12. Select different layouts to examine the results and choose the layout you want for your picture package.

Photoshop Elements supports on Windows the Adobe Photoshop Services program, which is a joint effort between Adobe Systems and Adobe Partners. Adobe Photoshop Services are not available from Adobe Bridge on the Macintosh. The Services program offers online ordering of prints and sharing of photos and projects, and it has a huge array of different print products for consumers and professionals.
On the Macintosh you can access a service such as Kodak EasyShare and upload photos apart from Elements. On Windows, you have a direct link to the service from within Elements.
To use the Kodak EasyShare Service for online printing of your photos, follow these steps:
Select files in the Organizer much as you'd select files for printing.
In either editing mode or the Organizer, choose File
Order Prints. Alternatively, you can click the Share tab in the Panel Bin and click the Order Prints button.The Kodak EasyShare Wizard opens, as shown in Figure 14-13. The first screen shown in the wizard is a form for you to create an account.
Warning
If you try to place an order from your office where the IT department prevents you from connecting to some external sources, you may need to have your firewall settings adjusted. Talk to someone in your IT department to help you make a connection.
If you haven't set up an account already, fill in the information and step through the wizard by clicking the Next button on each page. If you have set up an account, supply your logon information.
The selected files in the Organizer are automatically loaded in Step 1 of the wizard's order page.
You can modify your order by deleting files from the order and specifying different print sizes and quantities.
One nice feature in the service is the option to send duplicate prints to another party. You can keep an address book on the provider's Web site and specify whom you want to receive an order. This feature is helpful if you're away spending your children's inheritance on a Caribbean cruise and want to send photos of the great time you're having to all your kids. Just pop open your laptop on the pool deck, load the digital camera images, and connect via a wireless connection. Before you return to Buffalo in midwinter with a suntan, your kids will frown as they fan through the prints they received a week earlier.
Continue stepping through the wizard to upload your files and confirm your order, click the Finish button on the last pane, and your order is complete.
