
The Organizer is a powerful tool that helps you locate files and keeps your photos arranged and organized. You can easily access the Organizer in Windows by clicking the Organizer button on the menu bar while you're in one of the editing modes. Or when you open the Welcome screen, click the Organize button.

If you're a Macintosh user, you don't have the Organizer available in Elements. The Macintosh alternative to the Organizer is Adobe Bridge — a powerful photo organizer that permits you to view photos in folders at a glance.
In this chapter, you can discover how to view and organize your pictures in the Organizer, Adobe Bridge, and the image window, and how the many options help speed up your work in Photoshop Elements.
The default Organizer view is like a slide sorter, and this view is one you're likely to use in all your Elements work sessions. The Organizer provides an efficient means to access the photos you want to open in one of the editors. Just double-click a photo in the Organizer, and you see the image zoom in size to fill an Organizer window. You can carefully examine the photo to be certain that it's the one you want and then just select which editor you want to use from the Editor drop-down list on the menu bar, from the context menu you open on the image in the Organizer window, or by clicking the Fix button in the Panels Bin.
In addition to the default view in the Organizer, you have other ways to view your pictures: in a slide show or side-by-side to compare them.
Before you explore alternative viewing options in the Organizer, take a look at how you add photos to the thumbnail images you see in the Organizer window.
After copying the photos to your hard drive, as we explain in Chapter 4, here's how you add those files to an existing group of images in the Organizer:
Open the Organizer (Windows).
In the Organizer, choose File
Get Photos and Videos From Files and Folders.
The Get Photos and Videos from Files and Folders dialog box opens, as shown in Figure 5-1.
From the View menu (shown in Figure 5-1), choose Large icons (or Medium icons).
In Large icon (or Medium icon) view, thumbnail images of most files appear in a scrollable list large enough to see some detail. (Note: You might not see Camera Raw files and some files saved in different formats.) This view makes it easy to locate the files you want to add to the Organizer. For example, if you want to load only Camera Raw images, you can easily see them represented as icons, rather than the image previews.
Select files to add to the Organizer window.
Click a thumbnail and use either the Shift key or the Ctrl key to select additional photos. When you hold down Shift and click, all photos between the first thumbnail and the thumbnail you Shift-click are selected. When you Ctrl-click, you can select additional noncontiguous photos.
Click Get Photos to add the selected photos to the Organizer window.
To view all photos (new and old), click the Back button on the Shortcuts bar.
The photos you add to the Organizer may appear out of order when you're viewing them in the Organizer. Depending on the sort order, which we explain in the section "Sorting Your Photos," later in this chapter, the additional photos you add to the Organizer can appear before or after, or integrated within, the original photos. Use the scroll bar in the Organizer to view the added photos.

When you open the Organizer, the default view is a Thumbnail display. Your photos, videos, projects, audio files, and so on are shown with a mini image or icon that can be adjusted to different sizes. On the Shortcuts bar, a slider can be moved left to create smaller thumbnail views or right to create larger thumbnail views in the Organizer window.
The Thumbnail display is one of many options for browsing photos and other files in the Organizer. A quick glance at the Display drop-down menu shows alternative views available to you, as shown in Figure 5-2.
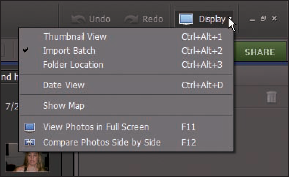
Figure 5-2. Click Display on the menu bar to see the options for alternative views in the Organizer.
Below the default option for Thumbnail views, you find Import Batch. Open the Display menu and then select Import Batch, or press Ctrl+Alt+2 on your keyboard. The display in the Organizer keeps the view set to thumbnails, but the order of your files changes to reflect the date you imported files with the Get Photos and Videos command, which we discuss in Chapter 4. This view can be helpful if you want to organize images according to the dates you imported them.
What's nifty about the Folder Location display is that you can peruse your hard drive for all files and folders while you remain in the Organizer window. Just select Folder Location from the Display menu or press Ctrl+Alt+3 to make an Explorer sidebar show you your hard drive(s), network locations, and offline media.
Choose Folder Location to change the view to the one shown in Figure 5-3. When you want to poke around a folder, right-click and select Reveal in Explorer from the context menu. Windows Explorer opens on top of the Organizer window and shows you all the files contained in that folder.

Figure 5-3. Choose Folder Location from the Display menu and then right-click to open a context menu.
When you find an image you want to edit, right-click and choose Open With
Note
When you want more of the screen window dedicated to seeing the files in the Organizer, hide the Panels Bin by clicking the separator bar. One click on the tiny right-pointing arrow on the separator bar hides the panel. Click the arrow on a collapsed panel to reopen that panel. In Figure 5-3, you see the Organizer window with the Panels Bin hidden, thereby displaying more thumbnail images in the Organizer window.
Choose Date View (Ctrl+Alt+D) from the Display menu to change your Organizer window to a calendar showing you the dates your images were shot. The date information is derived from metadata imported with your images that were recorded by your camera. (For more information on metadata, see "Searching metadata," later in this chapter.)
If you shoot many pictures on a given date, the images are stacked on the calendar for that date. In the right panel, you find arrows that are used to scroll the stacked images left or right, and a number appears in the lower-left corner of the image thumbnail in view. In Figure 5-4, the numbers appear as 5 of 6; on April 13, 2008 (the date at the top of the thumbnail), six photos were taken, and the current view is the fifth photo in the stacked order.

To return to the Organizer thumbnail display, click the binoculars icon or press Ctrl+Alt+O (the letter O, not zero).
How would you like to see a visual display of where your photos were taken geographically? Photoshop Elements provides you the answer with Yahoo! Maps and an option for placing your photos on a world map.
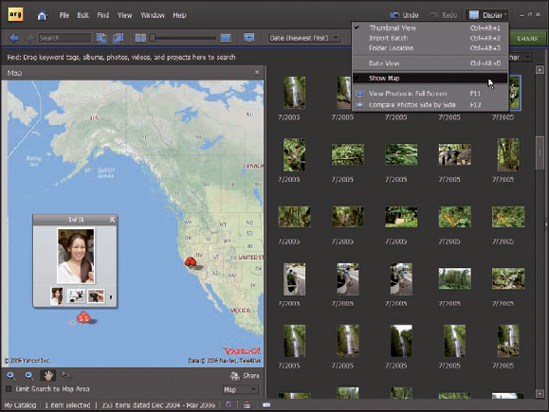
To open Yahoo! Maps in Elements, open the Display menu in the Shortcuts bar and choose Show Map. The Map panel on the left side of the Organizer window opens, as shown in Figure 5-5.
Note
You must have an Internet connection active on your computer to work with Yahoo! Maps.
To map the location of photos shown in the Organizer to Yahoo! Maps, you can choose from a couple different options:
Select photos in the Organizer and drag them to a map location on the map in the Map panel.
Select photos in the Organizer and right-click one of the selected photos. From the menu options, choose Place on Map. In the dialog box that opens, type a city name and click the Find button. If more than one city is reported in the dialog box, click the city name you want to use for the mapped photos.
To move around the map, place the cursor inside the Yahoo! Map panel and drag the map with the Hand tool within the panel window. If you go too far left, don't worry; the Asian, Indian, and Eastern European countries are found by dragging right across the Atlantic and eastward. Dragging left stops somewhere around the International Date Line; so, if you live in Singapore, you need to keep dragging right to find your country.
Zooming in the Map panel is handled by the tools you see at the bottom of the map. Use the Zoom In tool to find cities and road maps in a detailed view. Use the Zoom Out tool after you find the location you want to use.
After you add photos to the map, you can view the images by clicking the red pin placed on the map each time that you add photos to a location. Click the red pin to open a pop-up window that shows a thumbnail view of the current photo with smaller photos in a slide organizer below the primary image thumbnail, as shown in Figure 5-6. Click the left and right arrows in the pop-up window to scroll the slides. Clicking the current image thumbnail in the pop-up window opens the image in a slide show view. To find out more about slide show views, see the following section.

In the Map panel, you can choose from several display options in the drop-down menu on the bottom-right side of the panel. Choose from the default Map, a Hybrid map, or Satellite map. Choose Satellite to locate Uncle Jeremy's house, where the last family reunion took place and you shot all those wonderful pictures.
To close the Map panel, return to the Display menu and choose Show Map again. The panel collapses, and you're back to the standard Organizer view.
Note
When you view panels in Elements, drag the vertical separator bar on a panel to widen the panel or reduce the panel size. Look for the arrowhead on the vertical bar separating the Organizer window from a panel, and click and drag left or right to change panel sizes.
Are you ready for some exciting viewing in Photoshop Elements? To take an alternative view of your Organizer files, you can see your pictures in a self-running slide show (in Full Screen view), complete with transition effects and background music. Full Screen view takes you to a slide show view. For the purposes of clarity, think of Full Screen view and viewing a slide show as the same thing. Full-screen viewing temporarily hides the Elements tools and menus, and gives you the most viewing area on your monitor to see your pictures.
Tip
Viewing files in slide show mode can be helpful for quickly previewing the files you want to edit for all kinds of output, as well as for previewing photos that you might use for an exported slide show, which we explain in Chapter 15.
To set up your slide show and/or enter Full Screen view, follow these steps:
Open the Organizer.
Select images that you want to see in a slide show or use all the images in the Organizer for your slide show.
If no images are selected when you enter Full Screen view, all photos in the Organizer window are shown in Full Screen view.
Choose Display
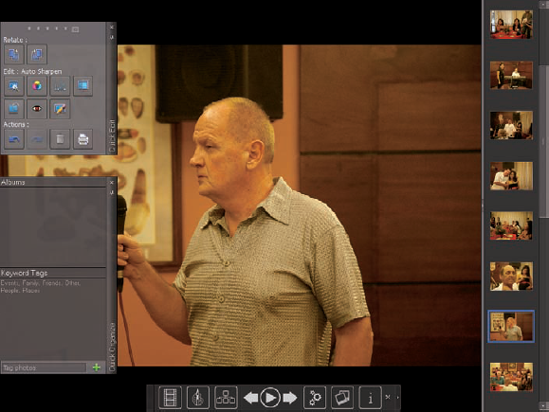
View Photos in Full Screen (or press F11 on your keyboard).In previous versions of Elements, a dialog box opened where you could make preference choices for full screen viewing. Now, in Elements 8, you jump right into the full screen view with some panels and tools displayed as shown in Figure 5-7.
View the slides.
Click the arrow keys at the bottom of the screen to move forward and back through the slides. You can also click the Toggle Film Strip icon (first icon on the left at the bottom of the screen) to show a filmstrip on the right side of the screen. It displays your slides as shown in Figure 5-7. Click a slide, and the main window displays the slide.
Exit the Full Screen View. Press the Esc key on your keyboard to return to the Organizer window.
Tip
You can also open Full Screen View by clicking the Full Screen View of Photos icon in the Shortcuts Bar. Look for the monitor icon with a right arrow.
Manually clicking arrows to view slides is more work than you need to do. With just a few adjustments, Elements can autoplay a slideshow complete with a music background. To sit back and enjoy your sides without clicking a mouse button to advance slides, do the following:
Select images that you want to see in a slide show in the Organizer window.
Press the F11 key on your keyboard to change the view to Full Screen mode.
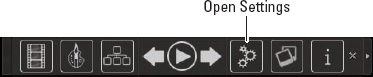
Click the Open Settings tool on the toolbar at the bottom of the window, as shown in Figure 5-8.
The Full Screen View Options dialog box opens.
Make adjustments in the Full Screen View Options dialog box.
Click the Start Playing Automatically check box shown in Figure 5-9. When the box is selected, the slideshow plays automatically. By default, you'll also have an audio file play for the duration of the slideshow.
Press Esc when finished viewing the slideshow.

You can make choices for the music you want played when viewing a slideshow by clicking the Browse button and selecting an audio file from your hard drive. You can determine the slide interval by editing the value in the Page Duration text box and make choices for viewing captions and resizing photos before dismissing the Full Screen View Options dialog box.
Full Screen view provides you with several editing tools. When you open selected photos from the Organizer in Full Screen view, you'll find two panels on the left side of the screen. The Quick Edit panel provides Quick Edit tools for editing photos, such as sharpening images and removing red-eye. The Quick Organize panel permits you to add keywords for easily organizing photos with keyword identifiers. (See Chapter 6 for more on adding keywords to photos.)
The toolbar shown in Figure 5-8 offers options for slide viewing. These tools include (from left to right):
Toggle Filmstrip: Click this tool to show/hide the filmstrip on the right side of the window.
Toggle Quick Edit panel: Shows/hides the Quick Edit panel.
Toggle Quick Organize Panel: Shows/hides the Quick Organize panel.
Previous Photo: Click the left arrow to open the previous photo.
Play/Pause: Click to play or pause a slide show.
Next Photo: Click the right arrow to advance to the next photo.
Open Settings: Click to open the Settings dialog box. (Refer to Figure 5-9.)
Transitions: Click the Transi-tions tool, and the Select Transition dialog box opens as shown in Figure 5-10. When you enter Full Screen view, this tool is selected. Four different transition effects are displayed in the dialog box. You can preview a transition effect by placing the cursor over one of the images. When you find an effect you like, click the image and click OK to change the transition.
Toggle Properties panel: Click this tool to open the Properties dialog box. For more information about changing properties, see Chapter 6.
Show all controls (right arrow): Click the tiny right-pointing arrow at the far right side of the toolbar, and the toolbar expands to reveal additional tools. Here you find a large display icon used for showing the Full Screen default view. The double monitors icon to the right is used to show two slides adjacent to each other in the slideshow.

Tip
The main thing to keep in mind is that the Full Screen view is a temporary viewing option you have in Elements. It's not permanent. You use the view for a quick display method on your computer when you want to show off some photos to family and friends. You do have more permanent options for saving files as slideshows that can be shared with other users, as we explain in Chapter 15.
If you're a Macintosh user, you get Adobe Bridge free with Photoshop Elements 8. Run the installer from the DVD-ROM, and Bridge is automatically installed on your computer.
You can launch Bridge by double-clicking the program icon — or directly from within Elements by clicking the Launch Bridge button in the Elements window.
When you have the Bridge open, try the following tasks:
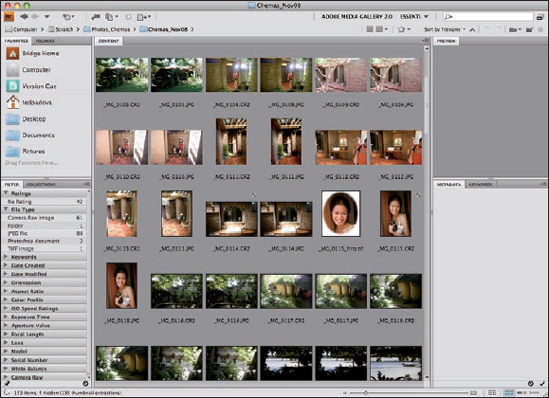
Navigate your Mac hard drive. Along the top left side of the Bridge window, you find access to hard drives and the Desktop. After copying photos to a folder on your hard drive, navigate your computer by clicking the drive and the folder where the photos are located, and you will see photo image thumbnails of the folder contents, as shown in Figure 5-11.
Open files. To open files directly from within Bridge in Elements' Edit Full mode, click the photos you want to open, press the Control key, and click to open a context menu. If you have a two-button mouse, right-click to open the context menu. From the menu options, choose Open With
Organize photos by sorting. Bridge has an abundant number of settings and options — not quite the same as the Organizer, but it is a powerful organization tool. In the top-right corner of the Bridge window, you can sort photos and choose several options for your sort criteria.
Organize photos into Collections. On the left side of the window you find a tab for Collections. This tab is the equivalent to the Organizer's Keyword Tags feature. You can create different collections to organize photos in categories for a more optimized arrangement of your pictures. Examine the icons at the bottom of the panel and you find choices for creating a collection, creating a smart collection, editing a smart collection, and deleting a collection. A Smart Collection provides you with options for dynamically sorting photos based on a variety of criteria.
When you edit images in either Edit Quick or Edit Full mode, you continually interact with the image window. Whether you're zooming in and out of a single window or viewing multiple windows, you need to work comfortably in this area for all your editing tasks. To help you move around the image window, Elements provides a rich set of tools.
Note
If you become familiar with the many viewing options and keyboard shortcuts available in Elements, all your editing jobs will be much easier. The tools, menu commands, and panels we describe in the following sections are essential for just about everything you do in Elements.
Zooming in and out of images is a task you perform routinely while editing images in the image window, and also when working in other windows, such as the Camera Raw window and the Full Screen view. Zooming in is necessary when you want to precisely edit a section of an image or examine detail in a small area. You then need to zoom out to see the edits as they compare to the entire image.
The Zoom tool appears on the Tools panel. To use the tool for zooming in and out, follow these steps to take a look at how it all works:
Click the Zoom tool on the Tools panel to select it (or simply press Z).
Move the cursor, now loaded with the Zoom tool, to the image window and click the place where you want to zoom.
To zoom in more, click again; keep clicking until you zoom in far enough.
To zoom out of an image, keep the Zoom tool selected, hold down the Alt key (Option key on the Macintosh), and click.
The cursor changes to a magnifying glass tool with a minus (−) symbol when you hold down the Alt key (Option key on the Macintosh).
Another way to change a view is to zoom to a target area in an image. Here's how:
Click the Zoom tool on the Tools panel.
Drag a box around the area you want to zoom.
Keep the mouse button pressed, and as you drag the mouse, a dashed rectangle marquee appears, as shown in Figure 5-12.
Move the rectangle marquee if you need to adjust the selection.
Now, it's time to get fancy. If you have a marquee drawn with the Zoom tool and the size appears just right, but you want to move the rectangle, press the spacebar while you keep the mouse button pressed. You can drag the marquee rectangle anywhere in the image to zoom to the area defined by the rectangle boundary.
Release the mouse button.
The view zooms to fit the space defined by the marquee rectangle.

Above the image window and below the Shortcuts bar, you find the Options bar. The Options bar is ever-changing, offering different options when you select different tools on the Tools panel. When you click the Zoom tool, the Options bar changes, as shown in Figure 5-13. You have many similar choices for zooming in and out of images and a few options unique to the Options bar:
Figure 5-13. Click the Zoom tool on the Tools panel to make the Options bar change to reflect choices for zooming in and out of images.
Zoom In/Zoom Out tools: You can choose Zoom In or Zoom Out as separate tools to avoid using the Alt key (Option key on the Macintosh) to toggle between the two.
Zoom percentage: This figure shows you the current zoom level as a percentage. You can edit the text by typing values between 5 and 3200.
Zoom slider: Click the down-pointing arrow to open a slider bar. Drag the slider left to zoom out or right to zoom in.
Resize Windows to Fit: Select this check box to resize the window along with the image zoom. Deselect the box to zoom in and out of an image while the image window remains at a fixed size.
Zoom All Windows: If you have multiple images open and select this check box, zooming with the Zoom tool zooms all open documents simultaneously.
1:1: Zooms the current window to a 1-to-1 ratio, showing the zoom level at which the file will be printed.
Fit Screen: Click this button to fit the image within the image window.
Full Screen: Zooms the current window to fill the screen.
Print Size: Often, this option shows you the same size as 1:1, where the image is zoomed to the size of the print file.
To work on any image in one of the editors, you need to become familiar with moving around the Elements interface and bring photos in view in the main image window.
Note
Elements 8 provides you with a new modification to the user interface. While in Edit Full mode, you'll notice that when several images are open, their filenames are listed at the top of the image window, as shown in Figure 5-14.
Figure 5-14. Multiple files opened in Edit Full mode are listed at the top of the image window according to filename.
The list appears similar to tabs you find in Web browsers. Notice that adjacent to each filename you see an X. Click the X, and the file closes. Click any filename, and the file opens in the image window.
Additional viewing options are available from menu commands found on the Window menu. Choose Window
Tile: Tiling images reduces image window sizes to a size that accommodates viewing all images in scrollable windows within the Elements workspace. Choose Window
Cascade: Choose Window
Float in Window: When photos are opened in the image window, they appear attached to the center area of your monitor. Choose this option to detach the photo from the image window, where you can click and drag the title bar around the image window area.
Float All Windows: When you have multiple photos open, use this option to detach all photos from the image window. After selecting this option, all the photos lose the tab view shown in Figure 5-15.
Consolidate All to Tabs: If you choose Float All Windows and want to return to the tab view, choose this option.
New Window: When you choose this option, you open a duplicate window for the photo in the foreground in the image window. You might use this option to create two views of the same image, where one view is zoomed in to edit some detail work and the other view shows the image in a reduced size for an overall look at the editing results.
Match Zoom: Set the zoom level for one of several images open in Elements and choose Window
Match Location: If you zoom in to, for example, the upper-right corner and then select Match Location, all open images zoom to the same location in the respective photos.

Figure 5-15. Open several images in one of the editing modes and choose Window
Tip
You can also select and bring forward photos in the image window by double clicking image thumbnails in the Project Bin.
When you zoom in on a document larger than the image window can accommodate, scroll bars provide a means for moving the image inside the window. Moving the image around a window is panning the image.
You can also use the Hand tool to pan the image. Zoom in to an image and click the Hand tool. Click and drag the image around the window. If you want to zoom in or out while the Hand tool is selected, hold down the Ctrl key (
The Navigator panel affords you several different options for both zooming and panning an image.
To open the Navigator panel, choose Window

While you select options for zooming on the Navigator panel, the image preview in the panel stays fixed to show you the entire image. When you zoom in and out inside the panel, the corresponding zoom is applied to the active document.
Tip
Either use the zoom tools on the panel or drag the slider left and right to zoom in and out. If you place the cursor inside the image preview thumbnail, you can drag a rectangle and zoom into the image.
Tip
Using the Navigator panel can be particularly helpful if you use two monitors. Just drag the Navigator panel to your second monitor, where you can change zoom levels without having the panel obscure the background image.
With all the Photoshop Elements modes and workspaces, you need a consistent starting place to handle all your editing tasks. Think of the Organizer as Grand Central Station, and from this central location, you can take the Long Island Railroad to any destination you desire. In Elements terms, rather than head out to Port Washington, you travel to an editing mode. Rather than go to the Hamptons, you journey through all the creation areas. In short, the Organizer is the central depot on the Photoshop Elements map.
In addition to being a tool to navigate to other workspaces, the Organizer is a management tool you can use to organize, sort, search, and describe photos with identity information. In terms of sorting and organizing files, Elements provides many different options, and we cover them all in the following sections.
One quick way to sort images in the Organizer is to use the menu in the Shortcuts bar in the Organizer window for date sorting. Two options are available to you, as shown in Figure 5-17.

The sorting options available to you from the menu are
Date (Newest First): Select this option to view images according to the date you took the photos, beginning with the most recent date.
Date (Oldest First): This option displays photos in chronological order, starting with the oldest file.
As we mention in the section "Changing the Organizer display," earlier in this chapter, you can also view files according to the Import Batch date and Folder Locations. Under the Display menu you have options for
Import Batch: You might import a batch of photos in one Photoshop Elements session and import another batch in the same session or in another session. When you select Import Batch, the images appear organized in groups, according to the date the batch was created.
Folder Location: Click Folder Location to make an Explorer pane appear on the left side of the Organizer window. You can browse your hard drive for folder locations and select a folder containing images you imported into the Organizer.
The Organizer's Find menu is devoted entirely to searching photos. From the Find menu, you can locate photos in collections, catalogs, and the Organizer window according to a variety of different search criteria.
On the Macintosh you can search photos in the Adobe Bridge window. At the top right corner of the Bridge window, you find the Search text box. Click the down-pointing arrow adjacent to the magnifying glass, and you can search using Bridge or Apple's Spotlight,
To use the commands on the Find menu on Windows, you need to have photos loaded in the Organizer window, or create collections or catalogs, which we explain in Chapter 6. The categories in the following sections can be searched in the Organizer.
When you have a number of different files in an Organizer window from photos shot on different dates, you can narrow your search to find photos, and all other types of files supported by Elements, through a date search.
On the Macintosh, use the Sort drop-down menu just below the magnifying glass and choose By Date from the menu options in Adobe Bridge.
In the Organizer, the date is taken from the camera metadata; but if a date isn't available from the camera data, the date is taken from the file creation date. The creation date is not likely to be the date you shot the photo.
To search files by date in the Organizer on Windows, follow these steps:
Open files in the Organizer by choosing File
Get Photos and then choosing a submenu command for acquiring files.To open files stored on your hard drive, choose the From Files and Folders submenu command.
Select a date range by choosing Find
Set Date Range.The Set Date Range dialog box, shown in Figure 5-18, opens.
Specify the dates.
Type a year in the Start Date Year text box. Select the month and day from the Month and Day drop-down lists. Repeat the same selections for the end date.
Click OK.
The thumbnails shown in the Organizer window include only files created within the specified date range.

You can tag files with a number of different criteria, as we explain in Chapter 6. When tags are added to images, you can sort files according to tag labels. We cover sorting by tag labels in Chapter 6, too. For now, take a look at the Find menu and notice the Untagged Items command. If you haven't added tags to some items and want to show only the untagged files so that you can begin to add tags, choose Find
Collections are among many items we address in Chapter 6. You can create collections and then select a collection on the Collections panel. Selecting a collection is like having a first level of sorting. You can then search by date or other sort options discussed in the preceding and following sections to narrow the choices.
In Chapter 6, we talk about adding captions and notes to your files. When captions or notes are added to files, you can search for the caption name, contents of a note, or both. To search caption names and notes, follow these steps:
Open files in the Organizer by choosing File
Get Photos and then choosing a submenu command for acquiring files.If you're opening files stored on your hard drive, choose the From Files and Folders submenu command.
Choose Find
By Caption or Note.The Find by Caption or Note dialog box opens, as shown in Figure 5-19.

Figure 5-19. Choose Find
By Caption or Note to open the dialog box in which search criteria for captions and notes are specified.Options in the dialog box are
Find Items with Caption or Note: In the text box, type the words you want to locate.
Match Only the Beginning of Words in Captions and Notes: Click this radio button when you know that your caption or note begins with words you type in the text box.
Match Any Part of Any Word in Captions or Notes: Click this radio button if you're not sure whether the text typed in the box is used at the beginning of a caption or note, or whether it's contained within the caption name or note text.
Click OK.
The Results appear in the Organizer window.
Elements keeps track of what you do with your photos, such as printing, e-mailing, sharing, and performing a number of other tasks. You can search for files based on the file history by choosing Find
Metadata includes information about your images that's supplied by digital cameras as well as custom data you add to a file. Metadata contains descriptions of the image, such as your camera name, the camera settings you used to take a picture, copyright information, and much more.
Searching metadata is easy. Just choose Find

If a magical method is available to you for searching files in Elements, it has to be searching for faces. When you choose Find
Tip
Note that you should first select image thumbnails in the Organizer window and then choose Find
The results of the search magically include all photos containing faces in a new Organizer window. Although the command is intended to identify images you can tag, you can use the command for invoking a search and choosing to view all files containing faces.