
Adobe Photoshop Elements offers you a number of creations that can be shared onscreen or in print. From both the Create and Share panels in the Panels Bin in the Organizer and both editing modes, you have a number of menu choices for making creations designed for sharing.
In Chapter 15, we look at creating files for screen and Web viewing. In this chapter, we talk about creations designed for print and sharing. It's all here in Elements, but shhhhh. Don't tell the Photoshop people because Photoshop doesn't have all these wonderful creation features.

In Chapter 15, we talk about slide shows, videodiscs, online galleries, and video flipbooks. These creations offer different output options, such as e-mailing, burning files to disc, and creating HTML documents — as well as printing and PDF creation.
You work with the remaining creations — Photo Books, Photo Collages, Photo Calendars, Greeting Cards, various sorts of online sharing, and PhotoStamps — by choosing options from the Create and Share panels on Windows. On the Macintosh side you have in addition to Web Photo Galleries, E-mail Attachments in the Share panel. Unfortunately, the Macintosh version of Elements doesn't provide you the vast number of sharing options you find on Windows.
Note
When you make a creation that will ultimately be sent to an online service or shared with other users, keep in mind that you first must select the photos you want in your creation. For example, creating a Photo Book by clicking the Photo Book button on the Create panel first requires you to select photos to let Elements know what photos are to be used in your book. If you happen to click a button and nothing happens, more than likely, you haven't selected any photos.
Many creation options follow a similar set of steps to produce a file that will be shared with other users or sent to an online printing service. In the Panels Bin, you can find all you need to make a new project by making choices for layouts and producing a creation. Among the common tasks you'll find when making a choice from both the Create and Share panels are
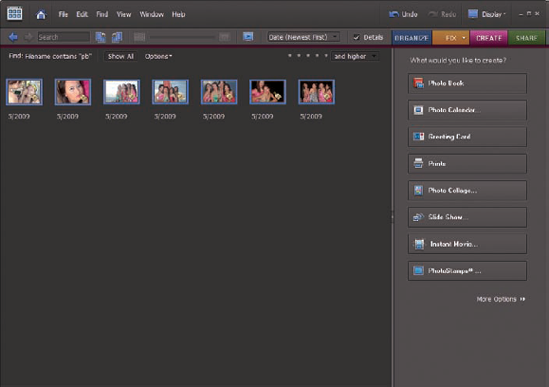
Select Photos: In the Organizer, select the photos you want to use for your creation. Sort photos (as we explain in Chapter 5) or use keyword tags (as we explain in Chapter 6) to simplify finding and selecting photos you want to use for a creation. In Figure 16-1, we sorted photos in a catalog containing several hundred photos and found only seven images meeting the sort criteria.
On the Macintosh, open photos you want to include in new creation in Edit Full mode.
Click a choice in the Create tab: Click the Create tab, and the Create panel in the Panel Bin opens. Click an option for the type of creation you want, such as Photo Book, Photo Calendar (Windows only), Greeting Card, Photo Collage, and so on.
Choose a Theme/Layout: Many of the creation options provide you with a selection of templates you can use for creations. When you click a creation option on the Create panel, the panel changes to display choices for various themes, backgrounds, and borders. You make choices by clicking the theme and/or background.
Number of Pages: Elements automatically creates the number of pages to accommodate the number of photos you selected in the Organizer (Windows) or have open in Edit Full mode (Macintosh). Note that some creations require a minimum number of photos to produce a project. Photo Book, for example, requires a minimum of 18 pages.
After assembling your creation, click the Done button. Elements then adds the selected photos to the layout and the theme you specified in the panel. Be patient and wait for Elements to complete the task.
After a creation has been made, the document appears like any other image you open in Elements. You can crop, modify images, print, and more. Using an Elements file, you choose File
Elements provides some fancy ways to create pages for a photo album. With the Photo Book creation panel, you have many different options for choosing page templates, adding artwork and type, printing your album pages, or sending the files to an online service for professional printing.
Follow these steps to create a Photo Book:
Select files in the Organizer and click the Create tab. On the Macintosh, open photos in Edit Full mode and click the Create tab.
The procedure for all creations is the same. You first select files in the Organizer (or an editing mode) and then click the Create tab in the Panels Bin. Ideally, it's best to create an album, as we explain in Chap-ter 6, and click the album to display the album photos in the Organizer window. But remember, after you display an album in the Organizer, you still need to select all the photos.
Tip
To select all photos shown in an Organizer window, press Ctrl+A (Windows). By default, on the Macintosh all the photos open in Edit Full mode are used in a new creation.
Click Photo Book in the Create panel.
Regardless of whether you're working in the Organizer or an editing mode, the Photo Book option is available in the same Create panel. When you click Photo Book, the order system for Shutterfly opens. (For more on using the Shuttefly online service, see Chapter 14.)
On the Macintosh, when you create a Photo Book, you can save the file as a Photo Project Format or as an Adobe PDF format. To open the file later and edit it, save as Photo Project Format. To upload the file to a service or print the file, save as Acrobat PDF.
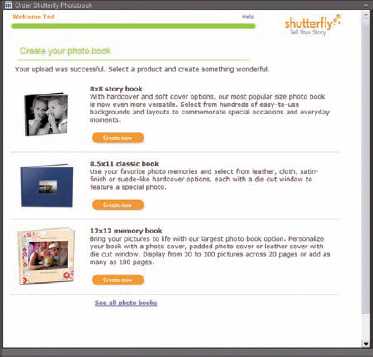
Choose a Photo Book option from the Shutterfly Wizard (Windows).
The Shutterfly Wizard displays several options for ordering a Photo Book, as shown in Figure 16-2. Click one of the Create Now buttons for the type of book you want to order.
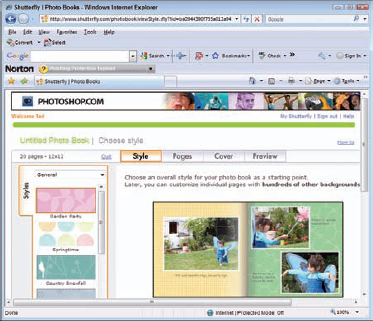
Select a cover style (Windows).
The next screen offers you several options for a cover style. Make a selection and click Next. Your default Web browser opens to the Shutterfly URL, where you are guided through steps to order your book, as shown in Figure 16-3. Proceed through the steps for ordering and identifying recipients.
Creating greeting cards provides you with options for printing greeting cards to your desktop printer or ordering cards using an online service.
To demonstrate using options for themes and content, the following steps explain how to create a greeting card for output to your desktop printer:
Open the Organizer and select a photo (Windows), or open a file in Edit Full mode (Macintosh).
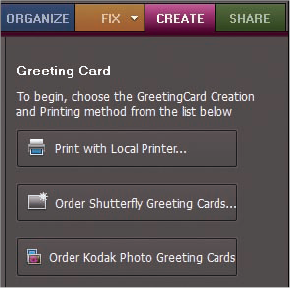
Click the Create tab to open the Create panel, and click Greeting Card.
The options available for creating greeting cards are shown on the panel, as you can see in Figure 16-4.
(Optional) Select a theme from the Choose a Theme scrollable window.
Click Done.
The photo shown in the Project Bin (the one you selected in the Organizer window or opened in Edit Full mode in Step 1) is placed on a design with handles.
Click and drag handles to resize and/or rotate the image within the design.
Choose a Content option.
The Content panel offers a number of choices from drop-down lists. In our example, we added text by choosing Text from the drop-down list shown in Figure 16-5.
To add text, click a style in the scrollable list and click the Apply button. Default text appears on your layout. Highlight the default text and type the text you want to add to your greeting card.
Save the file.
Tip
When you create a project and add photos to your project pages, the photos are added as new layers. If you want to add text or make edits with the Tools panel, you can click the Edit tab and use the same tools on a project as you use in other editing sessions. In other words, you're not restricted to using just the text options you find on the Artwork panel if you want to add text in a different font and style.

Another creation option in Elements is the simple, easy way to create CD and DVD labels. From the Create panel, click More Options and choose a menu item for CD Jacket, DVD Jacket, or CD/DVD Label. From templates provided in the panel, Elements offers you an easy method for printing your own, personal labels and jackets for CDs and DVDs.
Warning
This feature for printing CD/DVD labels is a bit weak in Elements. You may need to fiddle around quite a bit to get the images to fit a label. Using templates provided by the label developers is often a much better method for printing labels.
Several methods of sharing your creations are available in Elements. You can use several resources, such as Photoshop Showcase, Shutterfly, Kodak EasyShare, and more.
Are you ready to design a personal calendar using your favorite photos? Elements helps you design an attractive calendar of the kids, the girl's soccer team, the bullhead moose fraternity, or any other type of activity or event you want to work with. Elements makes it easy to create professional-looking calendars.
Here's how you create a calendar that can be professionally printed and ordered via an online service:
Select photos in the Organizer.
For calendars, you might want to select thirteen photos — one photo for the calendar cover and 12 for each month. You can also choose 12 photos and use one of the calendar months for the cover photo.
Open the Create panel and click Photo Calendar.
The Kodak EasyShare Gallery Services opens.
Sign up or enter your account info.
If you don't have an account, sign up on the opening page in the Kodak EasyShare Wizard. If you have an account, supply your logon and password.
Click through the wizard to upload photos and click the final Next button to log on to the service's Web page.
At this point, you leave Elements and work within a Web browser.
When you first log on to the Kodak Gallery Web page, you are prompted to auto fill or manually fill the calendar.
Click Autofill and click Next.
Select your choice for the background design and theme in the scrollable window, as shown in Figure 16-6. Click Next.
On the layout page, click one of the layout options for the number of photos you want to appear on each month. Click Next.
If you chose twelve or thirteen photos, use the 1-up option shown in Figure 16-7.
Add a title and author/date name.
The preview page provides text boxes where you can add a title for the calendar and supply your name as the author. (See Figure 16-8.)
Preview the calendar by clicking the (preview) button shown in Figure 16-8. Or click the First Month drop-down list and view the layout for each month.
When the calendar appears as you like, click the Order button and proceed to the order page, where you can select the number of copies and recipients for your calendar.


Right from within your Photoshop Elements workspace, you can place orders for prints, Photo Books, and greeting cards, and then have your creations mailed to you and any number of friends and colleagues.
For online print orders, select the photos you want to order and click Order Prints in the Share panel.
The Kodak EasyShare Wizard opens, where you add the order and logon information and then submit your order. The steps are straightforward and intuitive. In addition to having your prints mailed to you, you can also add other recipients in the Order Prints Wizard. Elements makes it easy to send photos to family members living across the country.
Elements on Windows provides buttons that directly link to Kodak EasyShare services. If you're a Macintosh user, you can access the same services by opening http://www.kodakgallery.com in Safari.
After you put together a creation with the Creation Wizard, you can e-mail the creation to your friends, family, or whomever you want by choosing a simple menu command. (We introduce this method and other ways to share creations in the section "Getting a Grip on Assembling Creations," Getting a Grip on Assembling Creations", earlier in this chapter.) Additionally, you can e-mail photos to mobile phones. The options are all located in the Share panel.
Rather than save your file from Elements and then open your e-mail client and select the photo to attach to an e-mail message, you can use Elements to easily share photos via e-mail with one click.
When you want to e-mail a creation, follow these steps:
In the Organizer, select the photos you want to e-mail to a friend. On the Macintosh, open photos you want to share in Edit Full mode.
Open the Share panel and select E-Mail Attachments.
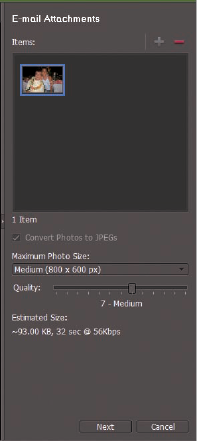
Choose a quality setting for the attachment and click Next.
Drag the slider where you see Quality and observe the file size below the slider, as shown in Figure 16-9. If the file is large, you may need to resize the image in the Image Size dialog box before e-mailing the photo.
Add recipients or bypass this option.
You can add recipients from your Address Book. If you want to add a new recipient, click the icon in the top-right corner of the Select Recipients tab. Check each recipient listed in the Select Recipients pane.
Tip
You can bypass adding recipients to your Address Book. If no recipients are listed in the Select Recipients panel, you can add recipient e-mail addresses in the new message window in your e-mail client, as shown in Figure 16-10.
Click Next, and the photo(s) is attached to a new e-mail message in your default e-mail client.
Review the To, Subject, and Attach fields to be certain the information is correct and then click the Send button.

Tip
By default, Elements uses your primary e-mail client application, which may or may not be the e-mail program you use. You can change the default e-mail client on Windows by pressing Ctrl+K to open the Preferences dialog box when you're in the Organizer and then clicking Sharing on the left pane. From a drop-down list in the Sharing preferences, select the e-mail client application that you want Elements to use.
Almost all the creation and sharing options we discuss in Chapter 15 and this chapter, other than those creations you assemble for printing to a desktop printer, require you to make purchases. Wouldn't it be nice if you could share your photos without paying an online service fee or paying for a Web address? Well, your answer lies in the Photoshop Showcase services that are easily accessible in Elements.
Open the Share panel and click Online Album. Elements provides you with a number of sharing options for distributing photo albums, as shown in Figure 16-11. For more information on creating albums, look over Chapter 6.
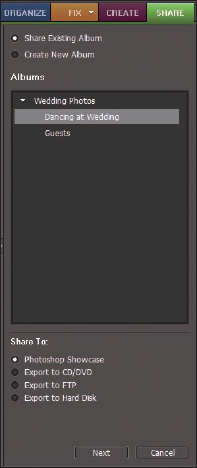
Among your choices for sharing albums are these:
Share Existing Album: If you have an album assembled, the album(s) appears in the Albums list.
Create New Album: If you don't have an album appearing in the list or your want to create a new album, select this option.
Photoshop Showcase: Photoshop Showcase is a free online hosting service. You can share photos and albums and invite family and friends to see your images free of charge.
Export to CD/DVD: This option enables you to export albums to CDs and DVDs.
Export to FTP: Use this option to create slide shows that can be viewed on your Web site.
Export to Hard Disk: Use this option to export an album to your hard drive. The export is an HTML file that you can view in a Web browser.
To share your photos on the free Photoshop Showcase service, follow these steps:
Click the Photoshop Showcase radio button on the Share panel.
The panel changes to display two tabs. One tab is denoted as Content and the other tab is denoted as Sharing. By default, the Content panel is in view and displays all selected photos in the Organizer as thumbnail images.
Select the photos you want to share and then click the Sharing tab.
The panel changes with a preview display of the showcase in the image window, as shown in Figure 16-12.
Make sure Photoshop Showcase is selected and click Done on the Share panel.
The Adobe Photoshop Services Wizard opens.
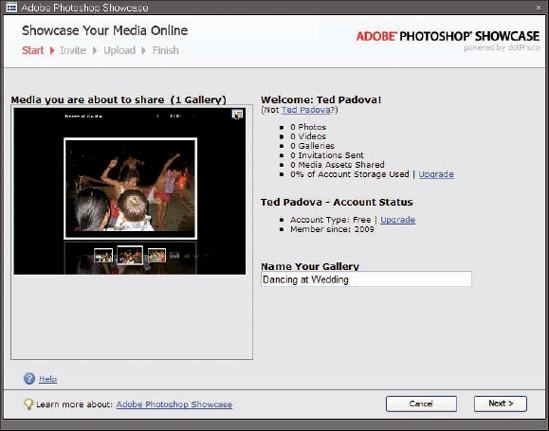
If you do not have an account, you can sign up on the opening wizard page. If you do have an account, supply your logon information and click Next.
The Welcome screen you see is shown in Figure 16-13. The Welcome screen informs you of the amount of space you have remaining on your account and the current usage. If it's your first effort in using the service, you'll find 0% used.
Click Next, and you can add recipients, set viewing options, and upload your photos.
You can restrict viewing to invited participants only or make you showcase public where anyone can view the photos.
When you're finished uploading, click Done.
Your default Web browser loads the Web page where your album resides on Photoshop Services, as shown in Figure 16-14.

Tip
The URL listed in the Location bar in your Web browser can be copied and pasted into an e-mail message. If you elect to display your showcase to all viewers, anyone visiting the URL can see your photos.
