
You have many different ways to import a picture into Elements, where you can play with it, experiment on it, and edit it. If you have a digital camera, you're in the right place; we walk you through all kinds of different options for getting the shots you took with your camera into Elements.

If you have a digital scanner, you're in the right place, too! We talk about scanning photos, as well. If you have CDs, sources of files on the Internet, some massive collection of images written to a DVD, or even a picture or two that you took with your cellphone, you're still in the right place!
In Chapter 1, we flirt with opening files. If you followed the steps in those chapters for opening images, you should have a feel for using the Open tool and Open command. But there's more to acquiring images than just using the Open command, as you can find out in this chapter.
This chapter covers all you need to know about getting images into Elements from all kinds of sources and explains how to move around the workspaces to get your files into Elements.
Copying photos from your digital camera to your computer so that you can work with them in Elements is simple if you're familiar with your camera and the tools at your disposal. In the following sections, you find points to consider about choosing a resolution when you shoot your pictures, as well as how to use the Microsoft AutoPlay Wizard (Windows Vista) and Adobe Photoshop Elements 8.0 – Photo Downloader (Windows and Macintosh) after you hook up your camera to your computer.
When you work with digital photos in Elements, the file format of your images is an important point to consider. You choose this format on your camera before you take your pictures, and the format is carried over to your computer when you pull images off your camera.
The most common file formats that digital cameras offer are JPEG and Camera Raw. Some cameras offer other options, but these two formats are the most common. Low-cost point-and-shoot cameras offer you only the JPEG format, and the more expensive cameras, including the SLR types, offer you both JPEG and Camera Raw:
JPEG: Cameras that produce JPEG images process images with JPEG compression before saving them. It's as though your camera performs a darkroom method of film processing when the shot is taken.
We describe the JPEG file format in Chapter 3.
Camera Raw: This format provides you with an optimum image for editing in Elements. When a Camera Raw image is saved to a media source, all the information the sensor captured is saved with the file. These images are post-processed when you open them. (See the "A Basic Primer on Camera Raw" section, later in this chapter, to find out about opening Camera Raw images.) For example, you can open a Camera Raw image and, before the image opens in Elements, adjust temperature, exposure, and a bunch of other settings. You can return to the original Camera Raw file and change the temperature or exposure, for example, to open the file with different settings. Just like chemical temperature and development time affect analog film processing, similar options affect post-processing Camera Raw images. The difference between analog film and Camera Raw is that after your analog film is processed, you can't change the processing attributes. With Camera Raw, you can go back and post-process the image as many times as you want and change the processing attributes each time.
Camera Raw also supports higher-bit-depth images than JPEG files do. For more understanding of higher bit-depth images, see Chapter 3.
Microsoft AutoPlay Wizard may launch automatically when your computer is connected to a media source. You can use the wizard to download images from your media source to your computer.
On the Macintosh the Adobe Bridge CS4 – Photo Downloader can be launched automatically when you connect a camera or card reader to your computer. You can also open folders on a camera or card reader and copy folders to your hard disk. Adobe Bridge can be used to open folders on your computer, so the downloader is not necessary to organize photos in the Bridge window.
To copy images from a media source or when your camera is connected to your computer, follow these steps:
Hook up the media to your computer.
Connect your camera or external media reader to your computer, or insert a media source into a port or drive on your computer. The methods available to you should be detailed in the user's guide that shipped with your camera.
When you connect your media to your computer, a dialog box opens, providing options for how to handle the media.
Under General Options, click Open Folder to View Files Using Windows Explorer, as shown in Figure 4-1.
Open the folder containing images on the media card.
You might find a folder listed as DCIM or another name when you open the media card in Windows Explorer. Double-click the folder name to open the folder.
Select folders in Windows Explorer and drag them to a folder on your hard drive to copy them to your computer.
The images are copied to the target folder.
Tip
You can set preferences for AutoPlay by clicking the Set AutoPlay Defaults in Control Panel link in the AutoPlay dialog box. When you open the Control Panel preferences, you can choose from a number of options for handling media, as shown in Figure 4-2. If you want to prevent the AutoPlay Wizard from automatically opening, you can select Take No Actions from the media types drop-down menus.


The Adobe Photoshop Elements 8.0 – Photo Downloader (Windows) or the Adobe Bridge CS4 – Photo Downloader (Macintosh) is installed with your Elements program. Photo Downloader acquires images from digital cameras connected to your computer, from card readers, and from card reader ports on your computer. On Windows, Photo Downloader is an alternative application to Microsoft AutoPlay.
To use the Adobe Photoshop 8.0 – Photo Downloader on Windows, follow these steps:
Hook up the media to your computer.
Click Cancel in the Microsoft AutoPlay Wizard (Windows).
Because the wizard auto-launches, the opening pane appears when you make a connection between your camera media source and your computer. To bail out of the wizard, click Cancel.
Open the Organizer and choose File
Get Photos and Videos From Camera or Card Reader.
In the Photo Downloader, shown in Figure 4-3, click the Get Photos button to copy all the files to your hard drive.
If you want to copy a select group of files to your hard drive, click the Advanced Dialog button in the Photo Downloader Standard dialog box.
The Advanced dialog box opens, as shown in Figure 4-4.
Remove check marks from all photos you don't want to copy to your hard drive.
By default, all photos are selected in a box below the photo thumbnails.
Click Get Photos to copy the selected photos to your hard drive.
Immediately after you make your selection, the Organizer window opens (if you selected the box for Open Organizer When Finished in the Standard dialog box). All the photos downloaded to your hard drive appear in a new Organizer window.
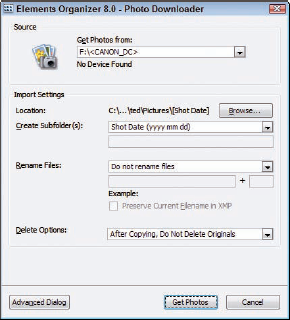
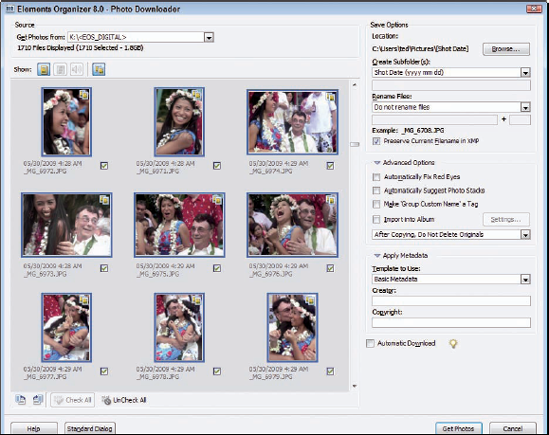
Figure 4-4. Click Advanced Dialog to open the Advanced dialog box, where you can selectively copy photos to your hard drive.
Tip
To simplify the process, stick with using one tool to acquire your digital camera images — either the Microsoft AutoPlay or the Adobe Photo Download Manager.
Adobe Bridge on the Macintosh is your alternative to the Organizer on Windows. You can click the Get Photos icon at the top of the Bridge window to open the Adobe Bridge CS4 – Photo Downloader dialog and choose to copy images via the downloader. An alternative on the Macintosh is to simply copy a folder of photos from a camera, card reader, CD-ROM, or any media device to your hard disk.
The Macintosh version of Elements doesn't use a catalog and therefore, you don't need to add images to a catalog like you do when using the Organizer on Windows. Bridge can be used to explore and view photos in any folder on your hard disk. For the simplest solution, drag folders of photos to your hard disk and in Adobe Bridge, navigate to the folders to view image thumbnails in the window.
Depending on your camera and the camera settings you use, you may need to resize your images after you download them. Many cameras take pictures at 72 ppi, but the physical size of the image varies according to the resolution that the camera LCD is capable of acquiring. You'll frequently need to resize images taken with your digital camera. For more more information on resizing images, see Chapter 3.
Scanners connect through the same ports as cameras and card readers. Unless you have a SCSI (Small Computer Systems Interface) device, which is another type of connection port but almost nonexistent today, you use either USB or FireWire. Most low-end scanners sold now are USB devices.
Even the lowest-end scanners provide 16-bit scans that help you get a little more data in the shadows and highlights. Like with a digital camera, a scanner's price is normally in proportion with its quality.
Just as you'd clean a lens on a digital camera and set various menu selections before clicking the shutter button, you should prepare a few things ahead of time before scanning:
Connect the scanner properly. Make sure that you have all connections made to your computer according to the user manual that came with your scanner. If you just purchased a scanner, check for any lock bolts and remove them according to the instructions.
Clean the scanner platen. Use a lint-free cloth and glass cleaner (applied to the cloth) to remove all dust and particles on the glass. The more dust particles you remove, the easier the job of editing your image in Elements.
Clean the source material. Be certain that the print or film you want to scan is free of dust and spots.
Tip
If you have old negatives that are dirty or that have water spots or debris that you can't remove with a cloth and film cleaner, soak the film in photo flo (a liquid you can purchase at a photo reseller). Be certain that your hands are clean and then run the filmstrip between two fingers to remove the excess liquid. Turn on your shower full force with hot water only and hang film nearby to dry it. Remove the film when it's dry, and you should see a surprisingly clean filmstrip compared to your soiled original.
Get to know your scanner software. When you scan in Elements, the software supplied with your scanner takes charge, and you use the options in this software before it finally drops into an Elements image window.
Prepare the artwork. If you plan on scanning pages in a book or pamphlet, remove the pages or try to make photocopies so that the piece you scan lies flat on the scanner platen. Make sure that you observe copyright laws if you're scanning printed works. For faxes and photocopies, try to improve originals by recopying them on a photocopier by using darker settings.
Tip
Find the scanner's sweet spot. Every scanner has an area where you can acquire the best scans. This area is often called the sweet spot. To find the scanner's sweet spot, scan a blank piece of paper. The sweet spot is the brightest area on the resultant scan. Other areas should be darker. The sweet spot is most often in the upper-left quadrant, the lower-right quadrant, or the middle of the page. Note the area and plan to place your source material within this area when scanning pictures.
All scanning software provides you with options for determining resolution and color mode before you start a new scan. You should decide what output you intend to use and scan originals at target resolutions designed to accommodate a given output. Some considerations include the following:
Scan the artwork or photo at the size and resolution for the final output. If you have a 3-x-5 photo that needs to be 1.5 × 2.5 inches on a Web page, scan the original with a 50-percent reduction in size at 72 ppi. (See Chapter 3 for information about resizing images.)
Size images with the scanner software. If you have a 4-x-6 photo that needs to be output for prepress and commercial printing at 8 × 12 inches, scan the photo at 4 × 6 inches at 600 ppi (enough to size to 200 percent for a 300 dpi image).
Scan properly for line art. Line art is 1-bit black and white only. When you print line art on laser printers or prepare files for commercial printing, the line art resolution should match the device resolution. For example, printing to a 600 dpi (dots per inch) laser printer requires 600 ppi for a 1-bit line-art image. When you're printing to an image setter at a print shop, or when an image is going directly to plate or press, the resolution should be 1200 dpi.
Scan grayscale images in color. In some cases, it doesn't matter, but with some images and scanners, you can get better results by scanning in RGB (red, green, and blue) color and converting to grayscale by using the Hue/Saturation dialog box or the Convert to Black and White dialog box, as we explain in Chapter 3.
Scan in high bit depths. If your scanner is capable of scanning in 16- or 32-bit, by all means, scan at the higher bit depths to capture the most data. See Chapter 3 for more information about working with higher-bit images.
Generally, when you install your scanner software, a standalone application and a plug-in are installed to control the scanning process. Plug-ins are designed to work inside other software programs, such as Photoshop Elements. When you're using the plug-in, you can stay right in Elements to do all your scanning. Here's how it works:
After installing a new scanner and the accompanying software, launch Elements and then open the Organizer (Windows) by clicking Organize on the Welcome screen.
From the Organizer, open the Preferences dialog box by pressing Ctrl+K.
Click Scanner in the left column and adjust the Scanner preferences, as we describe in Chapter 2.
When the Preferences dialog box sees your scanner, you know that the connection is properly set up and you're ready to scan. Here's how to complete your scan:
To open the scanner software from within Elements, choose File
Get PhotosFrom Scanner (Windows).You must be in the Organizer window on Windows to access the File
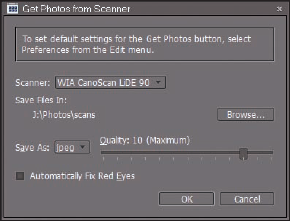
In the Get Photos from Scanner dialog box that appears, as shown in Figure 4-5, make your choices and click OK.
Here you make a choice for your scanner in the Scanner drop-down menu, a location on your hard drive for saving the scanned images, a quality setting, and an option to automatically correct red-eye.
Elements may churn a bit, but eventually your scanner software appears atop the Organizer window, as you can see in Figure 4-6. The window is the scanner software provided by your scanner manufacturer. (Your window looks different than Figure 4-6 unless you use the same scanner we use.)
Preview the scan.
Regardless of which software you use, you should have similar options for creating a preview; selecting resolution, color mode, and image size; scaling; and other options. Click the Preview button and you see a preview before scanning the photo(s).
Adjust the options according to your output requirements and the recommendations made by your scanner manufacturer.
When everything is ready to go, click the Scan button.
The final image drops into an Elements image window.
If you have several photos to scan, you can lay them out on the scanner platen and perform a single scan to acquire all images in one pass. Arrange the photos to scan on the glass and set up all the options in the scanner window for your intended output. When you scan multiple images, they form a single scan, as you can see in Figure 4-7.

Figure 4-6. When you scan from within Elements, your scanner software loads on top of the Elements workspace.
Tip
After you scan multiple images, Elements makes it easy for you to separate each image into its own image window, where you can save the images as separate files. In Edit Full mode, choose Image

When you acquire images in Elements from media sources, such as CD-ROMs, DVDs, external hard drives, and your internal hard drive, the process is very similar to opening files from digital cameras, which we explain in the section, "Grabbing Images from Your Camera," earlier in this chapter. Insert a CD or DVD into the CD/DVD drive, and the Windows AutoPlay Wizard opens just like when you insert a media cartridge or connect a cable from your camera to your computer.
Likewise, you can also open these files in the Organizer (Windows) or Adobe Bridge (Macintosh). Just cancel out of the wizard and follow these steps:
Open the Organizer (Windows) or Adobe Bridge (Macintosh) from the Welcome screen or click Photo Browser (Windows) or Browse with Bridge (Macintosh) from one of the editing modes.
When the Organizer window opens, choose File
Get PhotosFrom Files and Folders (Windows). On the Macintosh, you can create a new folder and simply drag photos from the media source to your new folder.Alternatively, you can choose File
Open the source drive from the listed drives.
You see the photos stored on the media.
Select images and click Get Photos (from the Organizer) or Open (from one of the editing modes) to open the files in the Organizer or an editor.
Now, you can edit the photos in Elements or save them to your hard drive.
Online printing and sharing services require you to set up an account with a service. You can access services provided by Adobe Partner Services by clicking the Share tab above the Panels Bin in the Organizer and clicking either Order Prints or Online Album. To use a service, you begin by setting up an account, as we explain in Chapter 2.
You can create digital photo albums with your images and share them with friends, family, and coworkers. To initiate a sharing service, you send an e-mail invitation to others. Each member of your sharing group needs to set up an account individually. After everyone has an account, you and your friends can then order prints that are mailed from the online service center. All the kinds of prints you might order from a local superstore or photo lab are available from online services, including specialty items, such as calendars.
After setting up an account and choosing a service, you handle sharing services by using the Share panels, as we explain in Chapter 16.
If you want to add images from a cellphone to the Organizer or Adobe Bridge or open images in one of the editing modes, you need to copy files via a USB or Bluetooth connection or e-mail photos if your phone is cabable of using e-mail.
After copying files to your hard drive on Windows, choose File
You may want to start from scratch by creating a new document in Elements. New, blank pages have a number of uses. You can mix and merge images in a new document, as we explain in Chapter 8; create a canvas where you can draw and paint, as we explain in Chapter 12; or use the New dialog box to find out a file's size, dimensions, and resolution.
You can create new, blank documents by using one of several options. On the Welcome screen, which appears when you first launch Elements, click Edit to launch the Edit Full mode. Choose File
Follow these steps to create a new document while working in any editing mode:
Open Elements and select an editing mode.
Click Edit (Start from Scratch on the Macintosh) on the Welcome screen.
Choose File
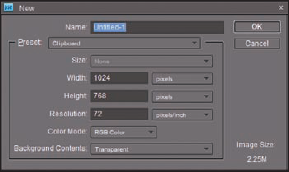
NewBlank File in any workspace or press Ctrl+N.Either way, the New dialog box opens, as shown in Figure 4-9.
Select the attributes for the new file.
You have several options from which to choose:
Name: Type a name for your file.
Preset: From the drop-down list, you can select from a number of different sizes.
Size: You can select a preset size from a long drop-down list. This is optional because you can change the file attributes in the other text boxes and drop-down menus.
Dimensions (Width/Height): Values in the Width and Height text boxes are independent. Either box can be edited without affecting the other. Adjacent to the values in the Width and Height text boxes, you find drop-down menus that offer many different options for units of measure, such as the default units of pixels followed by inches, centimeters (cm), millimeters (mm), points, picas, and columns.
Resolution: Resolution here is similar to editing the resolution value in the Image Size dialog box when the Resample check box is selected. The resolution is an independent value and isn't linked to the dimensions. If you want to know how resolution changes dimensions without resampling, create a new, blank file at the known values and click OK. Then, choose Image
Color Mode: Your choices are Bitmap, Grayscale, and RGB. (See Chapter 3 for more information about color modes.)
Background Contents: You have three choices: White, Background Color, and Transparent. The selection you make results in the color of the blank image. If you choose Background Color, the current background color assigned on the Tools panel is applied to the background. See Chapter 12 for information on changing background color. If you choose Transparent, the image is created as a layer, and the layer name changes to Layer 0, as we explain in Chapter 8.
Image Size: This value (displayed in the lower-right corner of the dialog box) dynamically changes when you change the Width, Height, and Resolution values. The reported value is how much file space is required to save the uncompressed file.
Click OK after setting the file attributes to create the new document.
In addition to creating new, blank files, the New dialog box can be a helpful source of information for all your work in Elements. Suppose that you want to know how many images you can copy to a 2656MB USB storage device or how large your digital camera files will print with a 150 ppi resolution. All you have to do is press Ctrl+N (
Rather than create a new, blank file, you can add pages to an existing file in the form of a project. Just follow these steps:
Open an image in Edit Full mode.
Right-click the photo thumbnail in the Project Bin. By default, the Project Bin opens.
The context menu, as shown in Figure 4-10, appears.
Choose either Add Blank Page (for adding a new, blank page) or Add Page Using Current Layout (to duplicate the current photo as a new page).
Save the file by choosing File
Save As and selecting Photoshop Multiple Project as your file format.Note that the default format in the Save As dialog box is Photo Project Format (*.PSE).
All the pages you add to a project are saved as separate files in a folder created automatically by Elements. When you open any one of the images, it appears separately in the Project Bin. To open an image in the stack, click the image you want to open in the Project Bin. Clicking an image in the Project Bin opens that image in the image window.

Figure 4-10. Right-click and then choose an option for adding a page to the photo selected in the Project Bin.
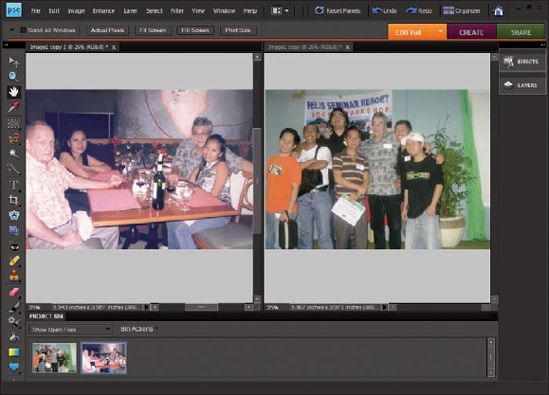
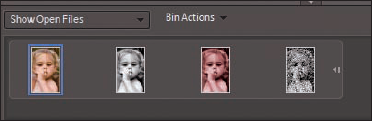
In Figure 4-11, you can see thumbnails of a project where the original RGB image appears on the left, followed by a grayscale image, a sepia-tone image, and a bitmap image — all contained in the same photo project.
We include the elaborate description of Camera Raw in the following sections, after sharing with you all the other options you have for getting images in Elements. We recognize that you may not have a digital camera capable of capturing Camera Raw images, so this information may not be of much interest to you now.
If you don't have a camera capable of capturing Camera Raw images, you might want to look over the following sections to understand how this file format can benefit you. If you purchase a camera equipped with Camera Raw support, you'll have some understanding of the advantages of using this format.
Camera Raw images enable you to post-process your pictures. When you take a picture with a digital camera in Camera Raw format, the camera's sensor records as much information as it can. When you open a Camera Raw file in Elements, you decide what part of that data is opened as a new image.
Suppose that your camera is set for exposure in tungsten lighting, which is used with tungsten flash photography in a studio. If you take this camera outside in daylight and shoot an image, all your images appear with a blue cast because tungsten lighting produces a cooler temperature than daylight.
If you acquire images that are saved in JPEG format, you need to do a lot of color correction after the image opens in Elements. If you shoot the image in Camera Raw format, you just process the image with a warmer temperature (consistent with conditions when the shot was taken), and your color correction in Elements is a fraction of what it is to fix a JPEG image.
Post-processing Camera Raw images requires a plug-in that's installed with Photoshop Elements. When you open a Camera Raw image, the Camera Raw plug-in takes over and provides you with a huge set of options for post-processing the image before you open it in one of the Elements editors.
Note
Each camera developer uses a different flavor of Camera Raw, and some developers use different Raw formats between different models in their product line. Although Adobe tries to keep up with all the various Raw formats, you may find a camera using a format not supported by the Raw plug-in. Be sure to check updates online for Photoshop Elements. As new developments occur, Adobe makes an effort to update plug-ins to support newer formats.
If you read through the first part of this chapter, you know how to acquire images from your camera and copy them to your hard drive. We don't bother going through those steps again; we just assume that you have some Camera Raw images on your hard drive. That's where you want them, anyway. Opening files from your hard drive is much faster than working off media cards.
To open a Camera Raw image, follow these steps:
Open the image by pressing Ctrl+O (

If you want to select several images in a row, click the first image, hold down the Shift key, and then click the last image. If you want to select several nonadjacent images, Ctrl-click each image (
Warning
On the Macintosh you must open the file in Camera Raw using Adobe Bridge. If you open a file from Edit Full mode and choose Camera Raw as the file format, the photo won't open in the raw converter.
Click Open in the Open dialog box.
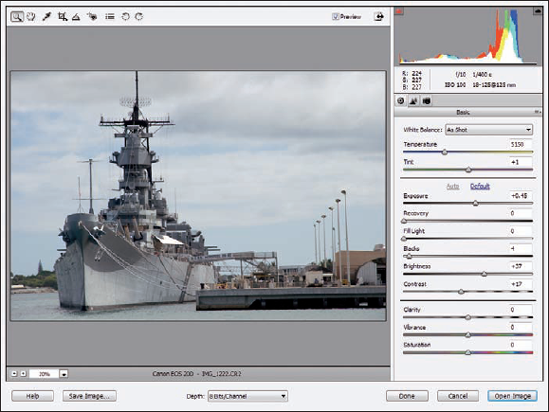
If you're selecting multiple images, only one image appears in the Camera Raw dialog box. When you click Open Image, the next image opens in the Camera Raw dialog box, as shown in Figure 4-12.
As you can see in Figure 4-12, you can use a vast number of options to post-process your image before you drop it into Elements. This window is like a digital darkroom, where you can process the film and see what you're doing to the image before you accept the changes.
Choose from the options to post-process your images.
If you have your monitor properly calibrated, as we explain in Chapter 2, all the adjustments you make for Camera Raw format are dynamically updated in the image preview. Don't be shy. Poke around and adjust settings to see the results in the preview area. The more you play with the settings, the more you find out how to get the best out of Camera Raw.
A large number of settings are in the Camera Raw window, as the following list describes; mark this section to refer to when you work with Camera Raw images:
Tools: Nine tools appear in the window:
Zoom: Zooms in and out of the image preview.
Hand: Moves the image around, like it does in the Elements image window.
Eyedropper: Samples color in the image. We cover using the Elements Eyedropper tools in Chapter 12, and that information also applies to using the Eyedropper in the Camera Raw window.
Crop tool: Draw a marquee with the Crop tool and make your color and brightness adjustments. The adjustments are applied only to the area defined by the Crop tool. When you click Open Image, the photo opens cropped to the area you marked with the Crop tool.
Straighten tool: The Straighten tool enables you to draw a horizontal axis to straighten a crooked photo.
Red Eye Removal: Click the Red Eye Removal tool to remove red-eye caused by flash lighting.
Open Preferences dialog box: Click this tool to open the Camera Raw Preferences dialog box, where you can make some choices for saving image settings, change default image settings, and use the Adobe Digital Negative (DNG) format. You can press Ctrl+K (
Rotate Left: This tool appears first to rotate counterclockwise.
Rotate Right: The last tool you see below the title bar is used to rotate clockwise. These last two rotation tools are self-explanatory.
Preview: Select the box to show dynamic previews of your edits.
Shadow/Highlight Clipping: The Shadow and Highlight buttons above the histogram denoted by up-pointing arrows show clipping in the shadows (dark areas of the image) and highlights (light areas of the image). Clipping means that, in a certain area, some data and, ultimately, some detail have been lost in an image. Think of clipping as something that you don't want to appear in your pictures. When you make adjustments with these two check boxes selected, shadow clipping is shown in blue and highlight clipping is shown in red in the image preview. Take a look at Figure 4-13, in which we exaggerate clipping to show how the clipping preview appears.
RGB values: These values appear below the histogram. When you first open an image, you don't see any values in the RGB area. Click the Zoom tool, the Hand tool, or the Eyedropper tool and move the cursor over the image preview. When you move any of these tools around the image, the RGB values corresponding to the point below the cursor are reported in this area.
Histogram: This graph displays all three channels (red, green, and blue) in an image simultaneously. The histogram changes when you change other options in the Camera Raw window.
The histogram graphs how pixels in an image are distributed. The distribution includes the number of pixels at each color-intensity level (one of the 256 levels you can find out about in Chapter 3).
Note
If images have pixels concentrated in the shadows, you see the histogram skewed to the left. Conversely, images with pixels concentrated in the highlights reveal a histogram skewed to the right.
When you begin to understand histograms better, you can develop your skill to the point where a quick glance at the histogram provides you with a clue to what adjustments you need to make to improve images.
Detail icons: The three icons change the pane below the histogram. The Basic choices are shown in Figure 4-12. Click the Detail icon to apply sharpening and noise reduction, as shown in Figure 4-14, or click the Camera Calibration icon to select a camera profile.
Settings (pop-up menu): This pop-up menu opens when you click the small icon on the far right of the Basic tab. From this menu, you have choices for applying settings to the open image. If you change any setting, the menu option changes to Custom. If you previously made setting choices on a Camera Raw image and want to return to the shot as it was taken by the camera, open the image and select Camera Raw Defaults.
Tip
Another option is Previous Conversion. This selection is handy if you have a collection of images that all require the same settings. After adjusting the first image, open additional images and select Previous Conversion. The Camera Raw plug-in applies the last settings you made to a Camera Raw image to the currently open file.
Sharpening sharpens images. You can choose to sharpen images in the Camera Raw window or in Elements. Try to avoid sharpening here and use the sharpening tools in Elements, as we explain in Chapter 9.
Noise Reduction includes options for adjusting the luminance and color. You've probably seen images with a lot of noise. In extreme cases, they look like the pictures were printed on sandpaper. Noise in an image is okay if that's an effect you intentionally apply to a picture. However, if you want a smooth-looking image, you have to eliminate any noise introduced by the camera. Luminance Smoothing reduces grayscale noise. The next setting is Color Noise Reduction, which is used to reduce color noise.
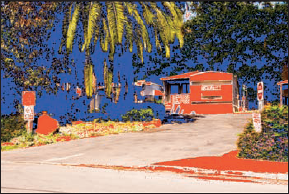
White Balance: White Balance settings (available on the Basic tab — the far-left icon below the histogram, as shown in Figure 4-12) are used to adjust the color balance of an image to reflect the lighting conditions under which the shot was originally taken. Think of the sensor in a digital camera capable of capturing the entire range of white balance the sensor can see. You make a choice not necessarily for what you see, but rather for the white balance for the shot you took. Therefore, if your camera is set for taking pictures under one set of lighting conditions, then you move to another set of lighting conditions and forget to change the settings, you can let the Camera Raw plug-in make a correction for the white balance because the sensor picked up the entire range, and the necessary data is contained in the file.
In Figure 4-15, you can see a picture taken with the camera set for tungsten lighting, but the shot was taken outdoors in daylight. By changing the White Balance in the Camera Raw dialog box, you can see how the settings affect the image color.
Temperature: If one of the preset White Balance options doesn't quite do the job, you can move the Temperature slider or edit the text box to settle on values between one White Balance choice and another. Use this item to fine-tune the White Balance.
Tint: Tint is another fine-tuning adjustment affected by White Balance. This slider and text box are used to correct any green or magenta tints that might appear in a photo.
Brightness adjustments: Several adjustment sliders and text boxes help you control the image brightness and tonal range. Notice the Exposure setting. This item lets you correct photos taken at the wrong exposure. In analog darkrooms, you might ask technicians to push or pull film during processing, which results in longer and shorter processing times. Changing exposure times compensates for under- and overexposing film. A nice advantage of using Camera Raw is that you can change the exposure for one image and then later open the original raw image and change to a different exposure value. Analog film can't be reprocessed, but with Camera Raw, you can reprocess over and over again.
Other options for the brightness and tonal controls are similar to the choices you have in the Elements Edit Full mode. For more information on these adjustments, see Chapter 10.
Cancel/Reset: When you open the Camera Raw window, the button you see by default is Cancel. Press the Alt key, and the button changes to Reset. If you want to scrub all the settings you made and start over, press Alt and click Reset.
Open Image/Open Copy: This single button has two different purposes:
Open Image: This button is the default. Click Open after you choose all your settings to process the photo and open it in Elements.
Open Copy: Press the Alt key, and the button changes to Open Copy. Click Open Copy to open a copy of the raw image.
Done: Clicking Done doesn't open the image in Edit Full mode. Click Done after making changes to the settings, and the new settings become the new defaults for your Raw image. You can clear the defaults by opening the pop-up menu and selecting Camera Raw Defaults.
Zoom: In this drop-down menu, you can choose from several zoom presets. You can also edit the text box, click the minus (−) button to zoom out, or click the plus (+) button to zoom in. Using any option zooms the image preview.
Help: Clicking this button opens a Help document to assist you in understanding more about Camera Raw.
Save Image: Click the Save Image button to open the Save Options dialog box, where you can rename the image to save a copy and make choices for saving in Adobe's DNG format.
Depth: If your camera is capable of shooting higher bit depths, they're listed here. If you want to convert to 8-bit images for printing, you can select the option from the drop-down menu.
Spot Removal tool: Use this tool to remove dust and scratches before opening the file in Elements.
Adjustment Brush tool: Use this tool to adjust brightness, contrast, and color to sections of the image before opening in Elements.


All we can hope to provide in this book is a simple cursory view for using Camera Raw. Several entire books have been written exclusively covering the Camera Raw format and how to open files in the Camera Raw plug-in window. For a more detailed look at using Camera Raw, see Color Management for Digital Photographers For Dummies, by Ted Padova and Don Mason (Wiley).