
After giving your images a makeover — edges cropped, color corrected, flaws repaired, focus sharpened — you may want to get them all gussied up for a night out on the town. You can do just that with filters, effects, layer styles, and blend modes. These features enable you to add that touch of emphasis, drama, whimsy, or just plain goofy fun. We're the first to admit that often the simplest art (and that includes photographs) is the best. That gorgeous landscape shot or the portrait that perfectly captures the expression on a child's happy face is something you may want to leave unembellished. But for the times when a little artistic experimentation is in order, turn to this chapter as your guide.

Filters have been around since the early days of digital imaging, when Photoshop was just a little bitty program. Filters, also called plug-ins because they can be installed or removed independently, change the look of your image in a variety of ways, as shown in Figure 11-1. They can correct less-than-perfect images by making them appear sharper or by covering up flaws, as we describe in Chapter 10. Or they can enhance your images by making them appear as though they're painted, tiled, photocopied, or lit by spotlights. Just make sure to create a backup of your original image if you plan on saving your filtered one. The following sections give you the basics on how to apply a filter and give you a few filtering tips.

You can apply a filter in three ways:
In either Edit Full or Edit Quick mode: From the Filter menu, choose your desired filter category and then select a specific filter.
In Edit Full mode only: Choose Window

In either Edit Full or Edit Quick mode: Choose Filter
Note
Even when you're using the Filter Gallery, make a backup copy of your image, or at least create a duplicate layer, before you apply filters. Filters change the pixels of an image permanently, and when you exit the Filter Gallery, the filters that are applied can't be removed.
Note
You can't apply filters to images that are in Bitmap or Index Color mode. And some filters don't work on images in Grayscale mode. For a refresher on color modes, see Chapter 3.
Although there are no hard and fast rules, most digital-imaging folks classify filters into two basic categories, corrective and destructive:
Corrective filters usually fix some kind of image problem. They adjust color, improve focus, remove dust or artifacts, and so on. Don't get us wrong — pixels are still modified. It's just that the basic appearance of the image remains the same, albeit hopefully improved. Two of the most popular corrective filters, Sharpen and Blur, are covered in Chapter 10.
Destructive filters are used to create some kind of special effect. Pixels are also modified, but the image may look quite a bit different from its original. These kinds of filters create effects, such as textures, brush strokes, mosaics, lights, and clouds. They can also distort an image with waves, spheres, and ripples.
All corrective and destructive filters are either one-step filters or multistep filters. One-step filters have no options and no dialog boxes; select the filter and watch the magic happen. Multistep filters act almost like mini-applications. Choose the filter to open a dialog box that has options for you to specify. The options vary widely depending on the filter, but most come equipped with at least one option to control the intensity of the filter. A multistep filter appears on the menu with an ellipsis following its name, indicating that a dialog box follows the execution of the command.
Sometimes, you don't want the full effects of a filter applied to your image. Sometimes, fading a filter a bit softens the effect and makes it look less "computerish." Here's what you can do:
Choose Layer
Duplicate Layer and then click OK when the dialog box appears.Apply your desired filter to the duplicate layer.
Use the blend modes and opacity settings located on the Layers panel to merge the filtered layer with the original unfiltered image.
(Optional) With the Eraser tool, selectively erase portions of your filtered image to enable the unfiltered image to show through.
For example, if you applied a Gaussian Blur filter to soften a harshly lit portrait, try erasing the blurred portion that covers the subject's eyes to let the unblurred eyes of the layer below show through. The sharply focused eyes provide a natural focal point.
Up to this point in the book, we refer to applying filters to your images. But we use this word rather loosely. You don't necessarily have to apply filters to your entire image. You can apply filters to individual layers or even to selections. You can often get better effects when you apply a filter just to a portion of an image or layer. For example, you can blur a distracting background so that the person in your image gets due attention. Or, as shown in Figure 11-2, you can apply an Ocean Ripple or Wave filter to the ocean, leaving your surfer unfiltered to avoid that overly "Photoshopped" effect.

Tip
Exercising a little restraint in applying filters usually produces a more attractive image.
When you apply a filter, don't be surprised if you're presented with a gargantuan dialog box. This editing window, as it's officially called, is the Filter Gallery. You can also access it by choosing Filter
Follow these steps to work in the Filter Gallery:
Choose Filter
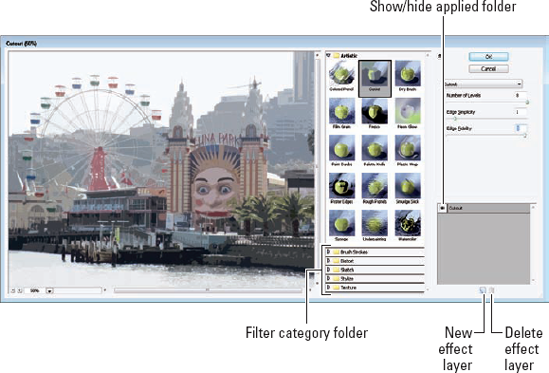
Filter Gallery in either Edit Full or Edit Quick mode.The Filter Gallery editing window appears, as shown in Figure 11-3.
In the center of the editing window, click your desired filter category folder.
The folder expands and shows the filters in that category. A thumbnail displays each filter's effect.
You get a large, dynamic preview of your image on the left side of the dialog box. To preview a different filter, just select it. Use the magnification controls to zoom in and out of the preview. To hide the Filter menu and get a larger preview box, click the arrow to the left of the OK button.
Specify any settings associated with the filter.
The preview is updated accordingly.
When you're happy with the results, click OK to apply the filter and close the editing window.
If you want to apply another filter, click the New Effect Layer button at the bottom of the editing window.
This step duplicates the existing filter.
Choose your desired new filter, which then replaces the duplicate in the Applied Filters area of the dialog box.
Each filter you apply is displayed in the lower-right area of the Filter Gallery dialog box. To delete a filter, select it and click the Delete Effect Layer button. To edit a filter's settings, select it from the list and make any changes. Keep in mind that when you edit a filter's settings, the edit may affect the look of any subsequent filters you've applied. Finally, you can rearrange the order of the applied filters. Doing so changes the overall effect, however.
When you're completely done, click OK to apply the filters and close the editing window.
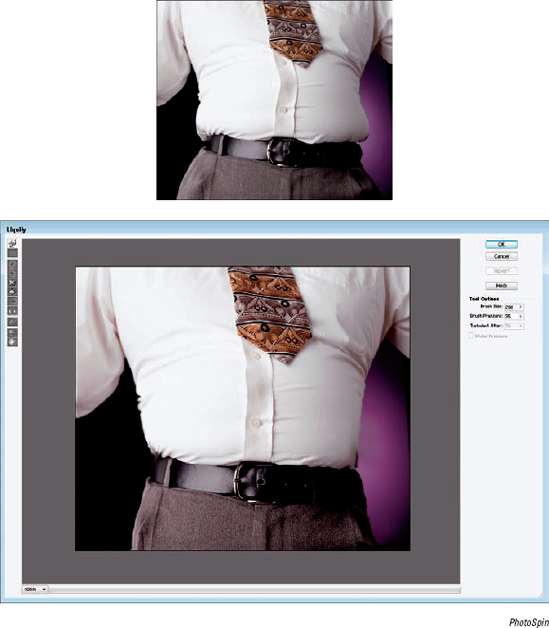
The Liquify filter is really much more than a filter. It's a distortion that allows you to manipulate an image as though it were warm taffy. You can interactively twist, pull, twirl, pinch, and bloat parts of your image. You can even put your image on a diet, as we did in Figure 11-4. You can apply this distortion filter on the entire image, on a layer, or on a selection. This überfilter comes equipped with a "mega" dialog box with its own set of tools (on the left) and options (on the right), as shown in Figure 11-4.
Follow these steps to turn your image into a melted Dalí-esque wannabe:
Choose Filter
DistortLiquify in either Edit Full or Edit Quick mode.Your image appears in the preview area.
Choose your distortion weapon of choice.
You also have a number of tools to help zoom and navigate around your image window.
Here's a description of each tool to help you decide which to use. (The letter in parentheses is the keyboard shortcut.)
Warp (W): This tool pushes pixels forward while you drag, creating a stretched effect. Use short strokes or long pushes.
Turbulence (T): Drag to randomly jumble your pixels. Use this tool to re-create maelstroms of air, fire, and water with clouds, flames, and waves. Adjust how smooth the effect is by dragging the Turbulent Jitter slider in the Tool Options area. The higher the value, the smoother the effect.
Twirl Clockwise (R) and Twirl Counterclockwise (L): These options rotate pixels either clockwise or counterclockwise. Place the cursor in one spot, hold down the mouse button, and watch the pixels under your brush rotate; or drag the cursor to create a moving twirl effect.
Pucker (P): Click and hold or drag to pinch your pixels toward the center of the area covered by the brush. To reverse the pucker direction (bloat), press the Alt (Option on the Mac) key while you hold or drag.
Bloat (B): Click and hold or drag to push pixels toward the edge of the brush area. To reverse the bloat direction (pucker), press the Alt (Option on the Mac) key while you hold or drag.
Shift Pixels (S): This tool moves pixels to the left when you drag the tool straight up. Drag down to move pixels to the right. Drag clockwise to increase the size of the object being distorted. Drag counterclockwise to decrease the size. To reverse any direction, press Alt (Option on the Mac) while you hold or drag.
Reflection (M): This tool drags a reversed image of your pixels at a 90-degree angle to the motion of the brush. Hold down the Alt (Option on the Mac) key to force the reflection in the direction opposite the motion of the brush. This tool works well for making reflections on water.
Resconstruct (E): See Step 4 for an explanation of this tool's function.
Zoom (Z): This tool, which works like the Zoom tool on the Elements Tools panel, zooms you in and out so that you can better see your distortions.
You can zoom out by holding down the Alt (Option on the Mac) key when you press Z. You can also zoom by selecting a magnification percentage from the pop-up list in the lower-left corner of the dialog box.
Hand (H): This tool works like the Hand tool on the Elements Tools panel. Drag with the Hand tool to move the image around the preview window.
Specify your options in the Tool Options area:
Brush Size: Drag the pop-up slider or enter a value from 1 to 600 pixels to specify the width of your brush.
Brush Pressure: Drag the pop-up slider or enter a value from 1 to 100 to change the pressure. The higher the pressure, the faster the distortion effect is applied.
Turbulent Jitter: Drag the pop-up slider or enter a value from 1 to 100 to adjust the smoothness when you're using the Turbulence tool.
Stylus Pressure: If you're lucky enough to have a graphics tablet and stylus, click this option to select the pressure of your stylus.
If you get a little carried away, select the Reconstruct tool and then hold down or drag the mouse on the distorted portions of the image that you want to reverse or reconstruct.
Note that the reconstruction occurs faster at the center of the brush's diameter. To partially reconstruct your image, set a low brush pressure and watch closely while your mouse drags across the distorted areas.
Click OK to apply the distortions and close the dialog box.
However, if you mucked up things and want to start again, click the Revert button to get your original, unaltered image back. This action also resets the tools to their previous settings.
If you've ever tried to capture a looming skyscraper or cathedral in the lens of your camera, you know that it often involves tilting your camera and putting your neck in an unnatural position. And then, after all that, what you end up with is a distorted view of what was an impressive building in real life, as shown with the before image on the left in Figure 11-5. That's not a problem with Elements — now. The Correct Camera Distortion filter fixes the distorted perspective created by both vertical and horizontal tilting of the camera. As a bonus, this filter also corrects other kinds of distortions caused by lens snafus.
Here's how to fix all:
Choose Filter
Correct Camera Distortion in either Edit Full or Edit Quick mode.In the Correct Camera Distortion dialog box, be sure to select the Preview option.
Specify your correction options:
Remove Distortion: Corrects lens barrel, which causes your images to appear spherized or bloated. This distortion can occur when you're using wide-angle lenses. It also corrects pincushion distortion, which creates images that appear to be pinched in at the center, a flaw that's found when using telephoto or zoom lenses. Slide the slider while keeping an eye on the preview. Use the handy grid as your guide for proper alignment.
Vignette Amount: Adjusts the amount of lightening or darkening around the edges of your photo that you can get sometimes from incorrect lens shading. Change the width of the adjustment by specifying a midpoint value. A lower midpoint value affects more of the image. Then, move the Amount slider while viewing the preview.
Vertical Perspective: Corrects the distorted perspective created by tilting the camera up or down. Again, use the grid to assist in your correction. We used the Vertical Perspective to correct the building shown in Figure 11-5.
Horizontal Perspective: Corrects halos and blurs caused by moving the camera (or a subject who can't sit still). For better results, set the angle of movement under the Angle option.
Angle: Enables you to rotate the image to compensate for tilting the camera. You may also need to tweak the angle slightly after correcting the vertical or horizontal perspective.
Edge Extension Scale: When you correct the perspective on your image, you may be left with blank areas on your canvas. You can scale your image up or down to crop into the image and eliminate these "holes." Note that scaling up results in interpolating your image up to its original pixel dimensions. Therefore, if you do this, be sure to start with an image that has a high-enough pixel dimension, or resolution, to avoid severe degradation. For more on resolution and interpolation, see Chapter 3.
Show Grid: Shows and hides the grid, as needed. Choose the color of your grid lines.
Zoom Tool: Zooms in and out for your desired view. You can also use plus and minus icons and the zoom pop-up menu in the bottom left of the window.
Hand Tool: Moves you around the image window when you are zoomed in.
Click OK to apply the correction and close the dialog box.

In addition to the multitude of filters at your disposal, Elements also provides a lot of different effects that you can apply to enhance your photos. Note that some effects automatically create a duplicate of the selected layer, whereas other effects can work only on flattened images. (See Chapter 8 for details on layers.) Finally, unlike with filters, you can't preview how the effect will look on your image or type, nor do you have any options to specify.
Here are the short steps to follow to apply an effect:
Select your desired image layer in the Layers panel.
Or, if you're applying the effect to just a selection, make the selection before applying the effect.
Choose Window
Effects.Select the Photo Effects button at the top of the panel.
Select your desired category of photo effects from the drop-down list in the upper-right area of the panel:
Frame: Includes effects that enhance the edges of the layer or selection, as shown in Figure 11-6.
Faded Photo, Monotone Color, Old Photo, and Vintage Photo: This group of effects makes your image fade from color to grayscale, appear as a single color, or look like an old pencil sketch or a photo on old paper.
Misc Effects: Includes a wide variety of effects to make your image appear as though it's snowing, made of lizard skin or neon tubes, or painted with oil pastels.
Show All: Shows all the effects described in this list.
On the Effects panel, double-click your desired effect or drag the effect onto the image.
Note that you can view your styles and effects by thumbnails or by list. To change the view, click More in the upper-right corner of the panel.

Going hand in hand with filters and photo effects are layer styles. Also designed to enhance your image and type layers, layer styles range from simple shadows and bevels to the more complex styles, such as buttons and patterns. The wonderful thing about layer styles is that they're completely nondestructive. Unlike filters, layer styles don't change your pixel data. You can edit them or even delete them if you're unhappy with the results.
Here are some important facts about layer styles:
Layer styles can be applied only to layers. If your image is just a background, convert it to a layer first.
Layer styles are dynamically linked to the contents of a layer. If you move or edit the contents of the layers, the results are updated.
When you apply a layer style to a layer, an fx symbol appears next to the layer's name on the Layers panel. Double-click the fx to bring up the Style Settings dialog box and perform any editing that's necessary to get the look you want.
Layer styles are stored in a few different libraries. You can add shadows, glows, beveled and embossed edges, and more complex styles, such as neon, plastic, chrome, and various other image effects. A sampling of styles is shown in Figure 11-7.
Here are the steps to apply a style and a description of each of the style libraries:
Select your desired image or type layer on the Layers panel.
Choose Window
Effects.Select the Layer Styles button at the top of the Effects panel.
Select your desired library of styles from the drop-down list in the upper-right area of the panel:
Bevels: Bevels add a three-dimensional edge on the outside or inside edges of the contents of a layer, giving the element some dimension. Emboss styles make elements appear as though they're raised off of or punched into the page. You can change the appearance of these styles, depending on the type of bevel chosen. Adjust parameters, such as the lighting angle, distance (how close the shadow is to the layer contents), size, bevel direction, and opacity.
Drop and Inner Shadows: Add a soft drop or inner shadow to a layer. Choose from the garden-variety shadow or one that includes noise, neon, or outlines. You can adjust the lighting angle, distance, size, and opacity, as desired.
Outer and Inner Glows: Add a soft halo that appears on the outside or inside edges of your layer contents. Adjust the appearance of the glow by changing the lighting angle, size, and opacity of the glow.
Visibility: Click Show, Hide, or Ghosted to display, hide, or partially show the layer contents. The Layer Style remains fully displayed.
Complex and others: The remaining layer styles are a cornucopia of different effects ranging from simple glass buttons to the more exotic effects, such as Groovy and Rose Impressions. You can customize all these layer styles to a certain extent by adjusting the various settings, which are similar to those for other styles in this list.
On the Layer Styles panel, double-click your desired effect or drag the effect onto the image.
The style, with its default settings, is applied to the layer. Note that layer styles are cumulative. You can apply multiple styles — specifically, one style from each library — to a single layer.
To edit the style's settings, either double-click the fx on the Layers panel or choose Layer
Tip
You can also apply layer styles to type layers, and the type layer doesn't need to be simplified.

Here are a few last tips for working with layer styles:
Delete a layer style or styles. Choose Layer
Copy and paste layer styles onto other layers. Select the layer containing the layer style and choose Layer
Hide or show layer styles. Choose Layer
Scale a layer style. Choose Layer
Elements sports a whopping 25 blend modes. Blend modes affect how colors interact between layers and also how colors interact when you apply paint to a layer. Not only do blend modes create interesting effects, but you can also easily apply, edit, or remove blend modes without touching your image pixels.
The various blend modes are located on a drop-down list at the top of your Layers panel in Edit Full mode. The best way to get a feel for the effect of blend modes is not to memorize the descriptions we give you in the following sections. Instead, grab an image with some layers and apply each of the blend modes to one or more of the layers to see what happens. The exact result varies, depending on the colors in your image layers.
The Normal blend mode needs no introduction. It's the one you probably use the most. Dissolve is the next one on the list and, ironically, is probably the one you use the least. (Both blend modes are illustrated in Figure 11-8.)
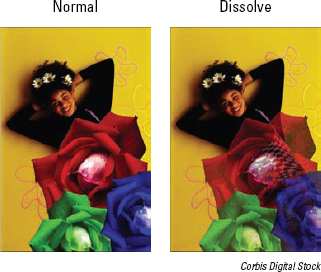
Normal: The default mode displays each pixel unadjusted.
Dissolve: This mode can be seen only on a layer with an opacity setting of less than 100 percent. It allows some pixels from lower layers, which are randomized, to show through the target (selected) layer.
These blend modes produce effects that darken your image in various ways, as shown in Figure 11-9.

Darken: Turns lighter pixels transparent if the pixels on the target layer are lighter than those below. If the pixels are darker, they're unchanged.
Multiply: Burns the target layer onto the layers underneath, thereby darkening all colors where they mix. When you're painting with the Brush or Pencil tool, each stroke creates a darker color, as though you're drawing with markers.
Color Burn: Darkens the layers underneath the target layer and burns them with color, creating a contrast effect, like applying a dark dye to your image.
Linear Burn: Darkens the layers underneath the target layer by decreasing the brightness. This effect is similar to Multiply but often makes parts of your image black.
Darker Color: When blending two layers, the darker color of the two colors is visible.
The lighten blend modes are the opposite of the darken blend modes. All these blend modes create lightening effects on your image, as shown in Figure 11-10.
Lighten: Turns darker pixels transparent if the pixels on the target layer are darker than those below. If the pixels are lighter, they're unchanged. This effect is the opposite of Darken.
Screen: Lightens the target layer where it mixes with the layers underneath. This effect is the opposite of Multiply.
Color Dodge: Lightens the pixels in the layers underneath the target layer and infuses them with colors from the top layer. This effect is similar to applying a bleach to your image.
Linear Dodge: Lightens the layers underneath the target layer by increasing the brightness. This effect is similar to Screen but often makes parts of your image white.
Lighter Color: When blending two layers, the lighter color of the two colors is visible.

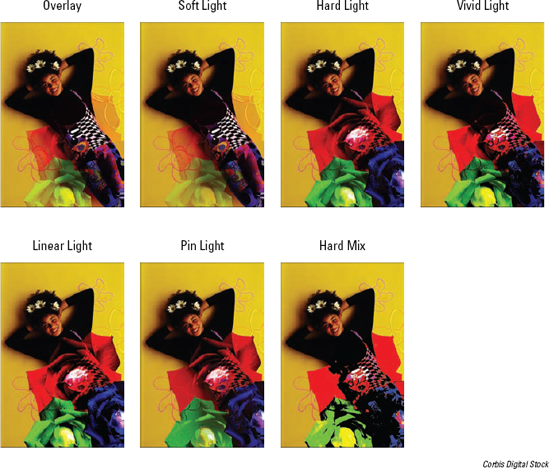
This group of blend modes plays with the lighting in your layers, as shown in Figure 11-11.
Overlay: Overlay multiplies the dark pixels in the target layer and screens the light pixels in the underlying layers. It also enhances the contrast and saturation of colors.
Soft Light: This mode darkens the dark (greater than 50 percent gray) pixels and lightens the light (less than 50 percent gray) pixels. The effect is like shining a soft spotlight on the image.
Hard Light: This mode multiplies the dark (greater than 50 percent gray) pixels and screens the light (less than 50 percent gray) pixels. The effect is similar to shining a bright, hard spotlight on the image.
Vivid Light: If the pixels on the top layer are darker than 50 percent gray, this mode darkens the colors by increasing the contrast. If the pixels on the top layer are lighter than 50 percent gray, the mode lightens the colors by decreasing the contrast.
Linear Light: If the pixels on the top layer are darker than 50 percent gray, the mode darkens the colors by decreasing the brightness. If the pixels on the top layer are lighter than 50 percent gray, the mode lightens the colors by increasing the brightness.
Pin Light: If the pixels on the top layer are darker than 50 percent gray, the mode replaces pixels darker than those on the top layer and doesn't change lighter pixels. If the pixels on the top layer are lighter than 50 percent gray, the mode replaces the pixels lighter than those on the top layer and doesn't change pixels that are darker. The mode is usually reserved for special effects.
Hard Mix: This mode is similar to Vivid Light but reduces the colors to a total of eight — cyan, magenta, yellow, black, red, green, blue, and white. This mode creates a posterized effect.
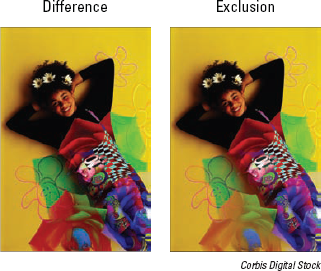
The Inverter blend modes invert your colors and tend to produce some radical effects, as shown in Figure 11-12.
Difference: Produces a negative effect according to the brightness values on the top layers. If the pixels on the top layer are black, no change occurs in the underlying layers. If the pixels on the top layer are white, the mode inverts the colors of the underlying layers.
Exclusion: Like Difference, but with less contrast and saturation. If the pixels on the top layer are black, no change occurs in the underlying layers. If the pixels on the top layer are white, this mode inverts the colors of the underlying layers. Medium colors blend to create shades of gray.
These blend modes use the HSL (hue, saturation, lightness) color model to mix colors, as shown in Figure 11-13.
Hue: Blends the luminance (brightness) and saturation (intensity of the color) of the underlying layers with the hue (color) of the top layer.
Saturation: Blends the luminance and hue of the underlying layers with the saturation of the top layer.
Color: Blends the luminance of the underlying layers with the saturation and hue of the top layer. This mode enables you to paint color while preserving the shadows, highlights, and details of the underlying layers.
Tip
The Color mode is a great tool for colorizing images. If you've ever admired those hand-tinted black-and-white photos used in greeting cards and posters, you can create the same effect fairly easily. First, make sure that your black-and-white image is in RGB (red, green, blue) mode so that it can accept color. Create a new layer on the Layers panel and set it to the Color blend mode. Grab the Brush tool (with a soft-edged tip), choose your desired color, and paint over your image. Adjust your opacity to less than 100 percent to create a softer effect.
Luminosity: The opposite of Color, this mode blends the hue and saturation of the underlying layers with the luminance of the top layer. This mode also preserves the shadows, highlights, and details from the top layer and mixes them with the colors of the underlying layers.

The awesome Photomerge features help you to create fabulous composites from multiple images. Whether it's creating the perfect shot of a group of friends or of your favorite vacation spot without passing cars and people, the Photomerge feature is the go-to tool to get it done. The following sections tell you how the Photomerge commands help to create the special type of composite image you need.
The Photomerge Panorama command enables you to combine multiple images into a single panoramic image. From skylines to mountain ranges, you can take several overlapping shots and stitch them together into one. To be successful at merging photos into a panorama, you need to start with good source files. First of all, make sure that when you shoot your photos, you overlap your individual images by 15 to 40 percent, but no more than 50 percent. Then, avoid using distortion lenses (such as fish-eye) and your camera's zoom setting. Also, try to keep the same exposure settings for even lighting. Lastly, try to stay in the same position and keep your camera at the same level for each photo. Using a tripod and rotating the head can help you get shots at the same camera level.
Follow these steps to create a Photomerge Panorama image:
Choose File
NewPhotomerge Panorama in Edit Full mode.In the first Photomerge dialog box, select your source files.
You can select Files or Folder from the Use drop-down list.
Click Add Open Files to use all open files, or click the Browse button and navigate to where your files or folder are located.
Choose your desired mode under Layout.
Here's a brief description of each mode:
Auto: Elements analyzes your images.
Perspective: If you shot your images with perspective or at extreme angles, this is your mode. Try this mode if you shot your images with a tripod.
Cylindrical: If you shot your images with a wide-angle lens or you have those 360-degree, full panoramic shots, this is a good mode.
Reposition Only: Elements doesn't take any distortion into account; it simply scans the images and positions them in the best position.
If you choose any of the preceding modes, Elements opens and automatically assembles the source files to create the composite panorama in the work area of the dialog box. If it looks good, skip to Step 7.
Elements alerts you if it can't automatically composite your source files. You then have to assemble the images manually.
Interactive Layout: This option opens the work area pane, as shown in Figure 11-14. Elements tries to align and stitch the images the best it can, but you may have to manually complete or adjust the panorama.
Tip
Note that with any of the modes, Elements leaves your merged image in layers. You'll also notice that a layer mask has been added to each layer to better blend your panoramic image. For more on layer masks, see Chapter 8.
If Elements hasn't already done so for you, drag the image thumbnails from the lightbox area (the small white area at the top) onto the work area with the Select Image tool (the arrow), or simply double-click the lightbox thumbnail to add it to the composition.
Arrange and position your images:
Select Image tool: Positions the images.
Rotate Image tool: Makes rotations.
Zoom and Move View tools: Helps view and navigate around your panorama.
Navigator view box: Zooms into and out of your composition when you drag the slider.
Snap to Image option: Enables overlapping images to automatically snap into place.
To adjust the Vanishing Point, first select the Perspective option in the Settings area and click your desired image with the Set Vanishing Point tool.
Elements changes the perspective of the composition. By default, Elements selects the center image as the vanishing point. If necessary, you can move the other images.
Tip
Note that when you select the Perspective setting, Elements links non–Vanishing Point images to the Vanishing Point image. To break the link, click the Normal Setting button or separate the images in the work area.
Click OK to create the panorama.
The file opens as a new, unsaved file in Elements. Note that you can also click the Save Composition button to save the file as a Photomerge Composition (
.pmg) file. We would avoid this, however, because the file format isn't very compatibility friendly.

We all know how hard it is to get a group of people to all look great in one shot. Well, Photomerge Group Shot lets you take multiple group photos and merge the best of them to get that perfect shot.
Here are the steps to create a Photomerge Group Shot image:
Select two or more photos from your Project Bin.
Choose File
NewPhotomerge Group Shot in any of the Edit modes.Take your best overall group shot and drag it from the Project Bin onto the Final window.
Select one of your other photos in the Project Bin to use as your Source image. Drag it to the Source window.
With the Pencil tool, draw a line around the portions of the Source photo you want to merge into your Final photo, as shown in Figure 11-15.
You can choose to show your pencil strokes and/or show your regions, which will be highlighted with an overlay.
Repeat Steps 4 through 5 with any remaining photos.
If your photos aren't aligned, you can use the Alignment tool under the Advanced Options.
With the Alignment tool, click your Source image and position the three target markers on three key locations. Do the same on the Final image and choose similar locations.
Click the Align Photos button.
As with Photomerge Panorama, the more alike in framing, size, and so on, that your source and final images are, the better the merged result.
If you make a mess of things, click the Reset button.
When you're satisfied with the result, click Done.
The file opens as a new file in Elements.

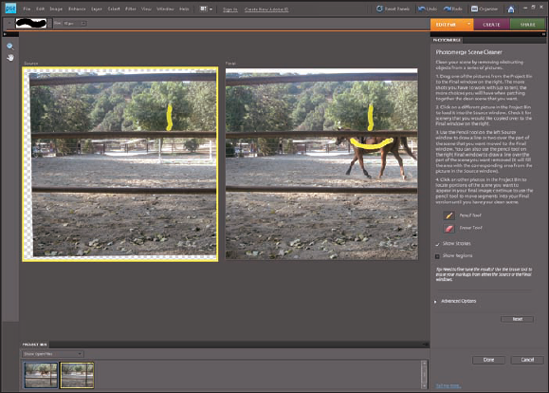
Photomerge Scene Cleaner (see Figure 11-16) sounds like a tool you might see in an episode of CSI to mop up a crime scene, but it isn't quite that gory. This recent addition to the family of Photomerge commands enables you to create the optimum image by allowing you to eliminate annoying distractions, such as cars, passersby, and so on.
To get the best Source images for a "clean scene," be sure to take multiple shots of your scene from the same angle and distance. It also works best when the elements you want to eliminate are moving.
Follow these steps to create a Photomerge Scene Cleaner composite:
Select two or more photos from your Project Bin.
Choose File
NewPhotomerge Scene Cleaner in any of the Edit modes.Elements attempts to auto-align your images the best it can.
Take your best overall shot of the scene and drag it from the Project Bin onto the Final window.
Select one of your other photos in the Project Bin to use as your Source image. Drag it to the Source window.
With the Pencil tool, draw a line around the elements in the Final photo that you want to be replaced by content from the Source photo.
Repeat Steps 4 and 5 with the remaining shots of the scene.
If your photos aren't aligned, you can use the Alignment tool under the Advanced Options.
With the Alignment tool, click your Source image and position the three target markers on three key locations.
Do the same on the Final image, choosing similar locations.
Click the Align Photos button, as shown in Figure 11-16.
Again, as with the other Photomerge commands, the more similar your starting Source images are (similar framing, similar angle), the better the merged result.
If you make a mess of things, click the Reset button.
When you're satisfied with the result, click Done.
Note
Sometimes you need to capture a shot that poses an exposure challenge — your foreground and background require different exposure settings. This dilemma often occurs in shots that are backlit. For example, you have a person in front of an indoor window in the day, or someone in front of a lit nighttime cityscape. With the new Photomerge Exposure, you can take shots with two different exposure settings and let the command blend them together for the perfect shot.
You can shoot your initial images using exposure bracketing (shooting at consecutive exposure camera settings) or with a flash and then without. Elements will be able to detect all of these camera settings. We recommend that you use a tripod, if possible, to keep your shots aligned. This will help the blending algorithm do its job.
Here's how to use this great new command:
Select two or more photos from your Project Bin.
Choose File
NewPhotomerge Exposure in any of the Edit modes.You can also perform this task in the Organizer, or in Adobe Bridge on the Mac. Just select any two images and choose the same command.
If you have done a good job keeping your shots aligned, leave the mode on Automatic.
Select the quickie Simple Blending option and Elements automatically blends the two images. Select the Smart Blending option to access sliders to adjust the Highlights, Shadows, and Saturation settings for finer tuning of the resulting images. If you muck things up, click the Reset button.
If you feel the need for even more control, click on the Manual mode tab.
In Manual mode, choose your first shot from the Project Bin and drag it to the Final window. If your other image isn't already the Source image, drag it from the Project Bin to the Source window.
With the Pencil tool, draw over the well-exposed areas you want to retain in the Source image. As you draw, your Final image will show the incorporation of those drawn areas, as shown in Figure 11-18.
If you mistakenly draw over something you don't want, grab the Eraser tool and erase the Pencil tool marks.
Choose to have your preview show strokes and/or regions.
You can further control the blending by dragging the Transparency slider.
Dragging to the right will blend less of the Source areas into the Final image. Check the Edge blending option to get an even better blend of the two images.
If your photos aren't aligning correctly, grab the Alignment Tool under Advanced Options.
With the Alignment tool, click your Source image and position the three target markers on three key locations.
Do the same on the Final image, choosing similar locations.
Click the Align Photos button.
Again, as with the other Photomerge commands, the more similar your starting source images are (similar framing, similar angle), the better the merged result.
Again, if you make a mess of things, click the Reset button.
When you're satisfied with the result, click Done.
The file opens as a new, layered file in Elements. The blended image will appear on Layer 1. The background will be your starting Final image. You can either flatten the layered file which will retain the appearance of Layer 1. Or you can double-click your Background to convert it to a layer and then delete it by dragging it to the trash icon in the Layers palette.