
Fixing images quickly without pain or hassle is probably one of the most desirable features you'll find in Elements and one that we're sure you'll embrace frequently. Whether you're an experienced photographer or an amateur shutterbug, cropping away unwanted background, tweaking the lighting or color of an image, and erasing away the minor blemishes of a loved one's face are all editing tasks you'll most likely tackle. With these simple image-makeover tools in Elements, these tasks are as easy as clicking a single button or making a few swipes with a brush.
Cropping a photo is probably one of the easiest things you can do to improve the composition of your photo. Getting rid of the unnecessary background around your subject creates a better focal point. Another dead giveaway of amateurish photography is crooked horizon lines. Not a problem. Elements gives you several ways to straighten those images after the fact. So, after your next photo shoot, launch the Elements editor and then crop and straighten your images before you show them off.
The most common way to crop a photo is by using the Crop tool. Simple, quick, and easy, this tool gets the job done. Here's how to use it:
Select the Crop tool from the Tools panel in either Edit Full or Edit Quick mode.
You can also press the C key. For details on the different workspaces, see Chapter 1. For full details on Edit Quick mode, see the section "Editing with Edit Quick," later in this chapter.
Specify your aspect ratio options on the Options bar.
Here are your choices:
No Restriction: Allows you to freely crop the image at any size.
Use Photo Ratio: Retains the original aspect ratio of the image when you crop.
Preset Sizes: Offers a variety of common photographic sizes. When you crop, your image then becomes that specific dimension.
Warning
When you crop an image, Elements retains the original resolution of the file. Therefore, to keep your image at the same resolution while simultaneously eliminating portions of your image, Elements must resample the file. Consequently, your image must have sufficient resolution so that the effects of the resampling aren't too noticeable. This is especially true if you're choosing a larger preset size. If all this talk about resolution and resampling is fuzzy, be sure to check out Chapter 3.
Width and Height: Enables you to specify a desired width and height to crop your image.
Drag around the portion of the image you want to retain and release the mouse button.
When you drag, a crop marquee bounding box appears. Don't worry if your cropping marquee isn't exactly correct. You can adjust it in Step 4.
The area outside the cropping marquee (called a shield) appears darker than the inside in order to better frame your image, as shown in Figure 9-1. If you want to change the color and opacity of the shield, or if you don't want it at all, change your Crop preferences by choosing Edit

Adjust the cropping marquee by dragging the handles of the crop marquee bounding box.
To move the entire marquee, position your mouse inside the marquee until you see a black arrowhead cursor and then drag.
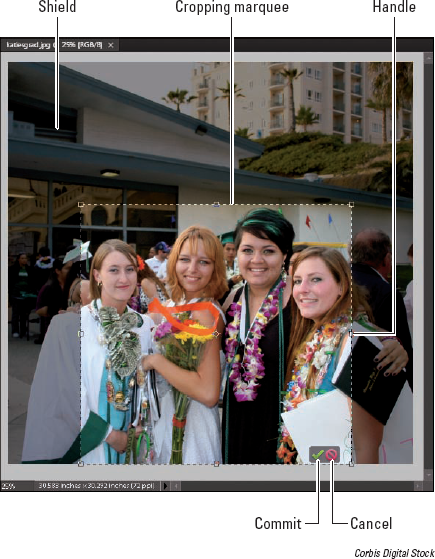
Figure 9-1. The area outside the crop marquee appears darker to allow for easy framing of your image. Corbis Digital Stock
Tip
If you move your mouse outside the marquee, your cursor changes to a curved arrow. Drag with this cursor to rotate the marquee. This action allows you to both rotate and crop your image simultaneously — handy for straightening a crooked image. Just be aware that rotation, unless it's in 90-degree increments, also resamples your image.
Double-click inside the cropping marquee.
You can also just press Enter or click the green Commit button next to the marquee. Elements then discards the area outside the marquee. To cancel your crop, click the red Cancel button.
There may be times when you just didn't quite get that horizon straight when you took a photo of the beach. Or maybe you scanned a photo and it wasn't quite centered in the middle of the scanning bed. It's not a big deal. Elements gives you several ways to straighten an image.
This tool enables you to specify a new straight edge, and it then rotates the image accordingly. Here's how to use the Straighten tool:
Select the Straighten tool from the Tools panel (or press the P key) only in Edit Full mode.
Specify your desired setting from the Canvas Options on the Options bar.
Here are your choices:
Grow or Shrink Canvas to Fit: Rotates the image and increases or decreases the size of the canvas to fit the image area.
Crop to Remove Background: Trims off background canvas outside the image area. This choice is helpful if you scan an image and white areas appear around your photo that you want removed.
Crop to Original Size: Rotates your image without trimming off any background canvas.
(Optional) Select Rotate All Layers.
If you have an image with layers and you want all of them rotated, select this option.
Draw a line in your image to represent the new straight edge.
Your image is then straightened and, if you chose either of the crop options in Step 2, also cropped.
Elements has five automatic lighting-, contrast-, and color-correction tools that can improve the appearance of your images with just one menu command. These commands are available in either Edit Full or Edit Quick mode, and they're all on the Enhance menu. For more on Edit Quick mode, see the section "Editing with Edit Quick," later in this chapter.
The advantage of these one-step correctors is that they're extremely easy to use. You don't need to have one iota of knowledge about color or contrast to use them. The downside to using them is that sometimes the result isn't as good as you could get via a manual color-correction method. And sometimes these correctors may even make your image look worse than before by giving you weird color shifts. But because these correctors are quick and easy, give them a try on an image that needs help. Usually, you don't want to use more than one of the auto fixes. If one doesn't work on your image, undo the fix and try another. If you still don't like the result, move on to one of the manual methods we describe in Chapter 10.
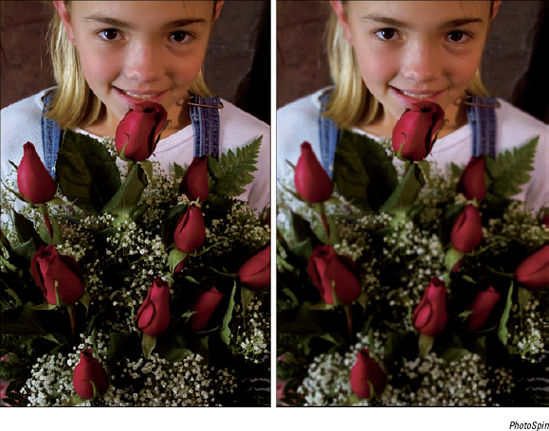
This all-in-one command is touted to adjust it all. It's designed to improve lighting, improve the details in shadow and highlight areas, and correct the color balance, as shown in Figure 9-2. The overexposed image on the left was improved quite nicely with the Auto Smart Fix command.
Tip
In Windows, the Auto Smart Fix command, as well as the Auto Color, Auto Levels, Auto Contrast, Auto Sharpen, and Auto Red Eye Fix, are also available in the Organizer (under the Fix pane), where you can apply the commands to several selected images simultaneously.

If the Auto Smart Fix was just too "auto" for you, you can crank it up a notch and try Adjust Smart Fix. This command is similar to Auto Smart Fix, but gives you a slider that allows you, not Elements, to control the amount of correction applied to the image.
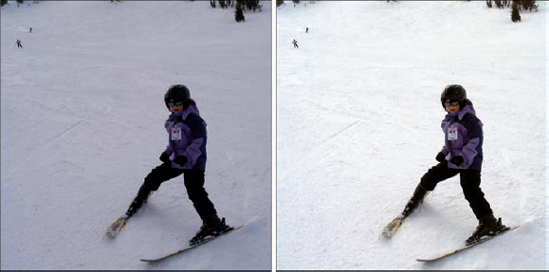
The Auto Levels command adjusts the overall contrast of an image. This command works best on images that have pretty good contrast (even range of tones and detail in the shadow, highlight, and midtone areas) to begin with and need just a minor amount of adjustment. Auto Levels works by mapping, or converting, the lightest and darkest pixels in your image to black and white, thereby making highlights appear lighter and shadows appear darker, as shown in Figure 9-3.
Warning
Although Auto Levels can improve your contrast, it may also produce an unwanted colorcast (a slight trace of color). If this happens, undo the command and try the Auto Contrast command instead. If that still doesn't improve the contrast, it's time to bring out the big guns. Try the Levels command we describe in Chapter 10.
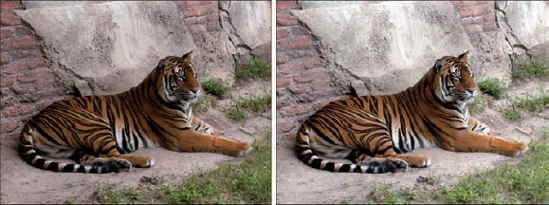
The Auto Contrast command is designed to adjust the overall contrast in an image without adjusting its color. This command may not do as good a job of improving contrast as the Auto Levels command, but it does a better job of retaining the color balance of an image. Auto Contrast usually doesn't cause the funky colorcasts that can occur when you're using Auto Levels. This command works great on images with a haze, as shown in Figure 9-4.

The Auto Color Correction command adjusts both the color and contrast of an image, based on the shadows, midtones, and highlights it finds in the image and a default set of values. These values adjust the amount of black and white pixels that Elements removes from the darkest and lightest areas of the image. You usually use this command to remove a colorcast or to balance the color in your image, as shown in Figure 9-5. Occasionally, this command can also be useful in correcting oversaturated or undersaturated colors.
Photos taken with a digital camera or scanned on a flatbed scanner often suffer from a case of overly soft focus. Sharpening gives the illusion of increased focus by increasing the contrast between pixels. Auto Sharpen attempts to improve the focus, as shown in Figure 9-6, without overdoing it. What happens when you oversharpen? Your images go from soft to grainy and noisy. Always make sharpening your last fix after you make all your other fixes and enhancements. For more precise sharpening, check out the Unsharp Mask and Adjust Sharpness features we cover in Chapter 10.
This command is self-explanatory. The Auto Red Eye Fix command automatically detects and eliminates red-eye in an image. Red-eye happens when a person or animal (where red-eye can also be yellow-, green-, or even blue-eye) looks directly into the flash.
Tip
If for some reason the Auto Red Eye Fix doesn't quite do the trick, you can always reach for the Red Eye Removal tool on the Tools panel. Here's how to remove red-eye manually:
Select the Red Eye Removal tool from the Tools panel.
Using the default settings, click the red portion of the eye in your image.
This one-click tool darkens the pupil while retaining the tonality and texture of the rest of the eye, as shown in Figure 9-7.
If you're unhappy with the fix, adjust one or both of these options:
Pupil Size: Use the slider to increase or decrease the size of the pupil.
Darken Pupil: Use the slider to darken or lighten the color of the pupil.

Tip
If you're trying to fix green-eye (or blue-eye) in animals, your best bet is to use the Color Replacement tool. See the section "Replacing One Color with Another," at the end of this chapter.
Edit Quick mode is a pared-down version of Edit Full mode that conveniently provides basic fixing tools and tosses in a few unique features, such as a before-and-after preview of your image.
Here's a step-by-step workflow that you can follow in Edit Quick mode to repair your photos:
Select one or more photos in the Organizer in Windows (Mac users can use Adobe Bridge. See Chapter 2 for more on Bridge), click Fix in the upper-right side of the application window, and then click the Edit Quick button on the panel below.
Or, if you're in Edit Full mode, select your desired image(s) from the Project Bin and then select the Edit Quick button (the orange button) in the upper-right area of the application window.
Note that you can also open images by simply choosing File
Specify your preview preference from the View pop-up menu at the bottom of the application window.
You can choose to view just your original image (Before Only), your fixed image (After Only), or both images side by side (Before & After) in either portrait (Vertical) or landscape (Horizontal) orientation, as shown in Figure 9-8.
Use the Zoom and Hand tools to magnify and navigate around your image. (See Chapter 5 for more on these tools.)
You can also specify the Zoom percentage by using the Zoom slider at the bottom right of the application window.
Choose your desired window view by selecting one of the following buttons located in the top-left corner of the application window: Actual Pixels, Fit Screen, the new Fill Screen (which zooms your image to fill your screen), or Print Size.
Crop your image by using the Crop tool on the Tools panel.
You can also use any of the methods we describe in the "Cropping and Straightening Images" section, earlier in this chapter, except for the Straighten tool, which is exclusive to Edit Full mode.
To rotate the image in 90-degree increments, click the Rotate Left or Rotate Right button at the bottom of the application window.
Apply any necessary auto fixes, such as Auto Smart Fix, Auto Levels, Auto Contrast, and Auto Color Correction.
All these commands are on the Enhance menu or in the Smart Fix, Lighting, Color, and Balance sections on the Quick Fix pane on the right side of the application window.
Each of these fixes is described in detail in the section "Employing One-Step Auto Fixes," earlier in this chapter. Remember that usually one of the fixes is enough. Don't stack them on top of each other. If one doesn't work, click the Reset button in the top-right of the image preview and try another. If you're not happy, go to Step 8. If you are happy, skip to Step 9.
If the auto fixes don't quite cut it, get more control by using the sliders available for Smart Fix, Levels, Contrast, and Color, located in the Quick Fix pane on the right of the application window.
Here's a brief description of each available adjustment:
Lighten Shadows: When you drag the slider to the right, lightens the darker areas of your image without adjusting the highlights.
Darken Highlights: When you drag the slider to the right, darkens the lighter areas of your image without adjusting the shadows.
Midtone Contrast: Adjusts the contrast of the middle (gray) values and leaves the highlights and shadows as they are.
Saturation: Adjusts the intensity of the colors.
Hue: Changes all colors in an image. Make a selection first to change the color of just one or more elements. Otherwise, use restraint with this adjustment.
Temperature: Adjusts the colors to make them warmer (red) or cooler (blue). This adjustment can be used to correct skin tones or to correct overly cool images (such as snowy winter photos) or overly warm images (such as photos shot at sunset or sunrise).
Tint: Adjusts the tint after you adjust temperature to make the color more green or magenta.
If you still don't get the results you need, move on to one of the more manual adjustments that we describe in Chapter 10.
Tip
Note that you can also apply fixes to just selected portions of your image. Edit Quick mode offers the Quick Selection tool for your selection tasks. For details on using this tool, see Chapter 7.
Add finishing fixes by using the remaining tools in the Tools panel.
Note
Note: All the tools that were previously located in the Touch Up pane have been relocated to the Tools panel. The Touch Up pane is no longer.
Here is a description of each tool:
Red Eye Removal tool: Try the Auto Red Eye Fix to remove red eye from your peoples' eyes. But if it doesn't work, try using the Red Eye Removal tool. This method is described in the section "Auto Red Eye Fix," earlier in this chapter.
Whiten Teeth: This fix does what it says — it whitens teeth. Be sure to choose an appropriate brush size from the Brushes drop-down panel before whitening. (For more on brush options, see Chapter 12.) Using a brush diameter that's larger than the area of the teeth also whitens/brightens whatever else it touches — lips, chin, and so on. Click the teeth. Note that this tool makes a selection and whitens simultaneously. After your initial click, your selection option converts from New Selection to Add to Selection in the Options bar. If you pick up too much in your dental selection, click the Subtract from Selection option and click the area you want to eliminate. When you're happy with the results of your whitening session, choose Select
Make Dull Skies Blue: Click or drag over areas of your sky that need brightening. Choosing a brush size and selection option is similar to using the Whiten Teeth fix, described in the preceding bullet. When you click your sky, it is selected and brightened at the same time. When you're done, choose Select
Black and White–High Contrast: This tool converts your image into a high-contrast grayscale image. The method and options are similar to those for the Whiten Teeth and Make Dull Skies Blue options, described in the preceding bullets. Figure 9-9 shows a color image converted into a grayscale image that looks like a vintage newspaper photo.
Tip
Note that you can find these same fixes (and many more) in Edit Full mode, under the Smart Brush and Detail Smart Brush tools. Check out Chapter 10 for the lowdown on these tools.
Note
Finally, sharpen your image either automatically (by clicking the Sharpen Auto button under Details in the Quick Fix pane) or manually (by dragging the slider on the Sharpen panel).
This fix should always be the last adjustment you make on your image.


Elements enables you to clone elements without the hassle of genetically engineering DNA. In fact, the Clone Stamp tool works by just taking sampled pixels from one area and copying, or cloning, them onto another area. The advantage of cloning, rather than making a selection and then copying and pasting, is that it's easier to realistically retain soft-edged elements, such as shadows, as shown in Figure 9-10.
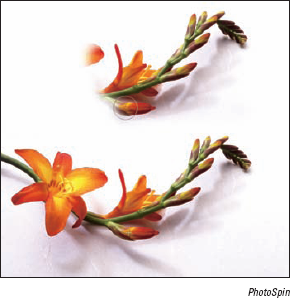
Figure 9-10. The Clone Stamp tool enables you to realistically duplicate soft-edged elements, such as shadows. PhotoSpin
The Clone Stamp doesn't stop there. You can also use this tool for fixing flaws, such as scratches, bruises, date/time stamp imprints from cameras and other minor imperfections. Although the birth of the healing tools (discussed in the following sections) has somewhat pushed the Clone Stamp tool out of the retouching arena, it can still do a good repair job in many instances.
Here's how to use the Clone Stamp tool:
Choose the Clone Stamp tool from the Tools panel in Edit Full mode.
On the Options bar, choose a brush from the Brush Preset drop-down list, and then use the brush as-is or adjust its size with the Size slider.
Keep in mind that the size of the brush you specify should be appropriate for what you're trying to clone or retouch. If you're cloning a large object, use a large brush. For repairing small flaws, use a small brush. Cloning with a soft-edged brush usually produces more natural results. For details on brushes, see Chapter 12.
Choose your desired Blend Mode and Opacity percentage.
For more on blend modes, see Chapter 11. To make your cloned image appear ghosted, use an opacity percentage of less than 100 percent.
Select or deselect the Aligned option.
With Aligned selected, the clone source moves when you move your cursor to a different location. If you want to clone multiple times from the same location, leave the Aligned option deselected.
Select or deselect the Sample All Layers option.
This option enables you to sample pixels from all visible layers for the clone. If this option is deselected, the Clone Stamp tool clones from only the active layer. Check out Chapter 8 for details about working with layers.
Click the double rectangle icon if you want to display an overlay.
Displaying an overlay can be helpful, when what you are cloning needs to be in alignment with the underlying image. Adjust the opacity for your overlay. If you select Auto Hide, when you release your mouse, you will see a ghosted preview of how your cloned pixels will appear on the image. While you are cloning, however, the overlay is hidden. Select Clipped to have the overlay contained only within the boundaries of your brush. We think that this makes it easier to more precisely clone what you want. Finally, select Invert to reverse the colors and tones in your overlay.
Alt-click (Option-click on the Macintosh) the area of your image that you want to clone to define the source of the clone.
Click or drag along the area where you want the clone to appear, as shown in Figure 9-11.
While you drag, Elements displays a crosshair cursor along with your Clone Stamp cursor. The crosshair is the source you're cloning from, and the Clone Stamp cursor is where the clone is being applied. While you move the mouse, the crosshair moves, as well, so you have a continuous reference to the area of your image that you're cloning. Watch the crosshair, or else you may clone something you don't want.
Note
If you're cloning an element, try to clone it without lifting your mouse. Also, when you're retouching a flaw, try not to overdo it. One or two clicks on each flaw is usually plenty. If you're heavy-handed with the Clone Stamp, you get a blotchy effect that's a telltale sign something has been retouched.
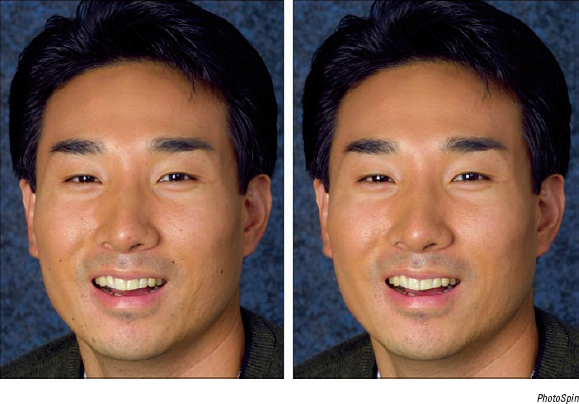
The Healing Brush tool is similar to the Clone Stamp tool in that you clone pixels from one area onto another area. But the Healing Brush is superior in that it takes into account the tonality (highlights, midtones, and shadows) of the flawed area. The Healing Brush clones by using the texture from the sampled area (the source) and then using the colors around the brush stroke while you paint over the flawed area (the destination). The highlights, midtones, and shadow areas remain intact, giving you a realistic and natural repair that isn't as blotchy or miscolored as the repair you get with the Clone Stamp tool.
Here are the steps to heal a photo:
Open an image in need of a makeover and select the Healing Brush tool from the Tools panel in Edit Full mode.
You can also heal between two images, but be sure that they have the same color mode: for example, both RGB (red, green, blue). We chose a guy who looks like he might like to lose a few years, as shown in Figure 9-12.
Specify a diameter and hardness for your brush tip from the Brush Picker drop-down panel on the Options bar.
You can also adjust the spacing, angle, and roundness. For details on these options, see Chapter 12. Don't be shy. Be sure to adjust the size of your brush, as needed. Using the appropriate brush size for the flaw you're retouching is critical to creating a realistic effect.
Choose your desired blend mode.
For most retouching jobs, you probably should leave the mode as Normal. Replace mode preserves textures, such as noise or film grain, around the edges of your strokes.
Choose one of these Source options:
Sampled: Uses the pixels from the image. You use this option for the majority of your repairs.
Pattern: Uses pixels from a pattern chosen from the Pattern Picker drop-down panel.
Select or deselect the Aligned option on the Options bar.
For most retouching tasks, you probably should leave Aligned selected. Here are the details on each option:
With Aligned selected: When you click or drag with the Healing Brush, Elements displays a crosshair along with the Healing Brush cursor. The crosshair represents the sampling point, also known as the source. When you move the Healing Brush tool, the crosshair also moves, providing a constant reference to the area you're sampling.
With Aligned deselected: Elements applies the source pixels from your initial sampling point, no matter how many times you stop and start dragging.
Select the Sample All Layers option to heal an image by using all visible layers.
If this option is deselected, you heal from only the active layer.
Tip
To ensure maximum editing flexibility later, select the Sample All Layers option and add a new, blank layer above the image you want to heal. When you heal the image, the pixels appear on the new layer and not on the image itself; so, you can adjust opacity and blend modes and make other adjustments to the healed layer.
Establish the sampling point by Alt-clicking (Option-clicking on the Mac).
Make sure to click the area of your image that you want to clone from. In our example, we clicked a smooth area of the forehead.
Release the Alt (Option on the Mac) key and click or drag over a flawed area of your image.
Keep an eye on the crosshair because that's the area you're healing from. We brushed over the wrinkles under and around the eyes and on the forehead. (Refer to Figure 9-12.) This guy never looked so good, and he experienced absolutely no recovery time.

Whereas the Healing Brush is designed to fix larger flawed areas, the Spot Healing Brush is great for smaller imperfections. The Spot Healing Brush doesn't require you to specify a sampling source. It automatically takes a sample from around the area to be retouched. It's quick, easy, and often effective. But it doesn't give you control over the sampling source, so keep an eye out for less-than-desirable fixes.
Here's how to quickly fix small flaws with the Spot Healing Brush tool:
Open your image and grab the Spot Healing Brush tool in Edit Full mode.
The moles on this guy's face, as shown in Figure 9-13, are no match for the Spot Healing Brush.
On the Options bar, click the Brush Preset Picker and select a desired diameter and hardness for your brush tip from the drop-down panel.
Select a brush that's a little larger than the flawed area you're fixing.
Choose a blend mode from the Options bar.
As with the Healing Brush, the most likely mode is Normal.
Choose a Type from the Options bar:
Proximity Match: Samples the pixels around the edge of the selection to fix the flawed area.
Create Texture: Uses all the pixels in the selection to create a texture to fix the flaw.
Tip
Try Proximity Match first, and if it doesn't work, undo it and try Create Texture.
Choose Sample All Layers to heal an image by using all visible layers.
If you leave this check box deselected, you heal from only the active layer.
Click or drag the area you want to fix.
We clicked the moles with the Spot Healing Brush. For the wrinkles around the eyes, we broke out the Healing Brush. We needed more control of the sampling source to achieve realistic results.
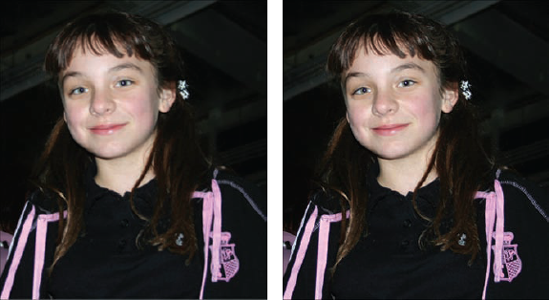
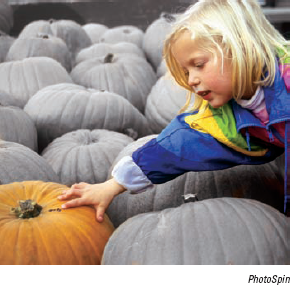
The techniques of dodging and burning originated in the darkroom, where photographers fixed negatives that had overly dark or light areas by adding or subtracting exposure, using holes and paddles as an enlarger made prints. The Dodge and Burn tools are even better than their analog ancestors because they're more flexible and much more precise. You can specify the size and softness of your tool by simply selecting from one of the many brush tips. You can also limit the correction to various tonal ranges in your image — shadows, midtones, or highlights. Finally, you can adjust the amount of correction that's applied by specifying an exposure percentage.
Note
Use these tools only on small areas, such as the girl's face shown in Figure 9-14, and in moderation. You can even make a selection prior to dodging and burning to ensure that the adjustment is only applied to your specific area. Also, keep in mind that you can't add detail that isn't there to begin with. If you try to lighten extremely dark shadows that contain little detail, you get gray areas. If you try to darken overly light highlights, you just end up with white blobs.

Follow these steps to dodge or burn an image:
Choose either the Dodge (to lighten) or Burn (to darken) tool from the Tools panel in Edit Full mode.
Press Shift+O to cycle through the Dodge, Burn, and Sponge tools.
Select a brush from the Brush Preset Picker drop-down panel and also adjust the brush size, if necessary.
Larger, softer brushes spread the dodging or burning effect over a larger area, making blending with the surrounding area easier.
From the Range pop-up list, select Shadows, Midtones, or Highlights.
Select Shadows to darken or lighten the darker areas of your image. Select Midtones to adjust the tones of average darkness. Select Highlights to make the light areas lighter or darker.
In Figure 9-14, the original image had mostly dark areas, so we dodged the shadows.
Choose the amount of correction you want to apply with each stroke by adjusting the Exposure setting on the Options bar.
Start with a lower percentage to better control the amount of darkening or lightening. Exposure is similar to the opacity setting that you use with the regular Brush tool. We used a setting of 10 percent.
Paint over the areas you want to lighten or darken.
If you don't like the results, press Ctrl+Z (

The Smudge tool, one of the focus tools, pushes your pixels around using the color that's under the cursor when you start to drag. Think of it as dragging a brush through wet paint. You can use this tool to create a variety of effects. When it's used to the extreme, you can create a warped effect. When it's used more subtly, you can soften the edges of objects in a more natural fashion than you can with the Blur tool. Or you can create images that take on a painterly effect, as shown in Figure 9-15. Keep an eye on your image while you paint, however, because you can start to eliminate detail and wreak havoc if you're not careful with the Smudge tool.
To use the Smudge tool, follow these steps:
Choose the Smudge tool from the Tools panel in Edit Full mode.
Press Shift+R to cycle through the Smudge, Blur, and Sharpen tools.
Select a brush from the Brushes Preset Picker drop-down panel.
Use a small brush for smudging tiny areas, such as edges. Larger brushes produce more extreme effects.
Select a blending mode from the Mode pop-up list.
Choose the strength of the smudging effect with the Strength slider or text box.
The lower the value, the lighter the effect.
If your image has multiple layers, select Sample All Layers to make Elements use pixels from all the visible layers when it produces the effect.
The smudge still appears on only the active layer, but the look is a bit different, depending on the colors of the underlying layers.
Use the Finger Painting option to begin the smudge by using the foreground color.
Rather than use the color under your cursor, this option smears your foreground color at the start of each stroke. If you want the best of both worlds, you can quickly switch into Finger Painting mode by pressing the Alt key while you drag. Release Alt to go back to Normal mode.
Paint over the areas you want to smudge.
Pay attention to your strokes because this tool can radically change your image. If you don't like the results, press Ctrl+Z (

The Blur tool can be used for both repair and more artistic endeavors. You can use the Blur tool to soften a small flaw or part of a rough edge. You can add a little blur to an element to make it appear as though it was moving when photographed. You can also blur portions of your image to emphasize the focal point, as shown in Figure 9-16, where we blurred everything except the girl's face. The Blur tool works by decreasing the contrast among adjacent pixels in the blurred area.
The mechanics of using the Blur tool and its options are similar to those of the Smudge tool, as we describe in the preceding section. When you use the Blur tool, be sure to use a small brush for smaller areas of blur.
If the Blur tool is yin, the Sharpen tool is yang. The Sharpen tool increases the contrast among adjacent pixels to give the illusion that things are sharper. This tool needs to be used with restraint, however. Sharpen can quickly give way to overly grainy and noisy images if you're not cautious.
Use a light hand and keep the areas you sharpen small. Sometimes, the eyes in a soft portrait can benefit from a little sharpening, as shown in Figure 9-17. You can also slightly sharpen an area to emphasize it against a less-than-sharp background.

Tip
To use the Sharpen tool, grab the tool from the Tools panel and follow the steps provided for the Smudge tool in the section "Smudging Away Rough Spots," earlier in this chapter. In addition, here are some tips for using the Sharpen tool:
Use a low value, around 25 percent or less.
Remember that you want to gradually sharpen your element to avoid the nasty, noisy grain that can occur from oversharpening.
Because sharpening increases contrast, if you use other contrast adjustments, such as Levels, you boost the contrast of the sharpened area even more.
Tip
If you need to sharpen your overall image, try choosing either Enhance
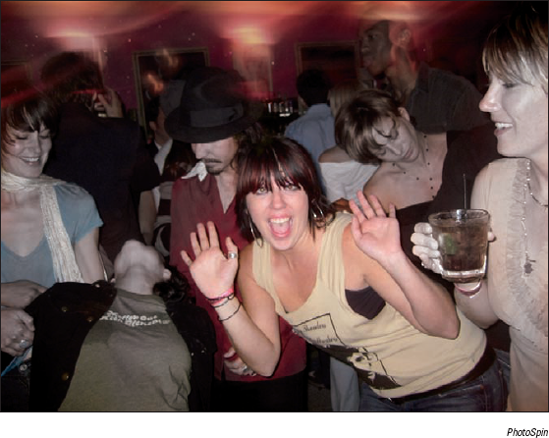
The Sponge tool soaks up color or squeezes it out. In more technical terms, this tool reduces or increases the intensity, or saturation, of color in both color and grayscale images. Yes, the Sponge tool also works in Grayscale mode by darkening or lightening the brightness value of those pixels.
Like with the Blur and Sharpen tools, you can use the Sponge tool to reduce or increase the saturation in selected areas in order to draw attention to or away from those areas.
Follow these steps to sponge color on or off your image:
Choose the Sponge tool from the Tools panel in Edit Full mode.
Press Shift+O to cycle through the Sponge, Dodge, and Burn tools.
Select a brush from the Brushes Preset Picker drop-down panel.
Use large, soft brushes to saturate or desaturate a larger area.
Choose either Desaturate or Saturate from the Mode pop-up list to decrease or increase color intensity, respectively.
Choose a flow rate with the Flow slider or text box.
The flow rate is the speed with which the saturation or desaturation effect builds while you paint.
Paint carefully over the areas you want to saturate or desaturate with color.
In the example shown in Figure 9-18, we saturated one of the women to make her more of a focal point and desaturated the others.
The Color Replacement tool allows you to replace the original color of an image with the foreground color. You can use this tool in a multitude of ways:
Colorize a grayscale image to create the look of a hand-painted photo.
Completely change the color of an element, or elements, in your image, as shown in Figure 9-19.
Eliminate red-eye (or yellow-eye in animals) if other, more automated methods don't work to your satisfaction.
What we particularly like about the Color Replacement tool is that it preserves all the tones in the image. The color that's applied isn't like the opaque paint that's applied when you paint with the Brush tool. When you're replacing color, the midtones, shadows, and highlights are retained. The Color Replacement tool works by first sampling the original colors in the image and then replacing those colors with the foreground color. By specifying different sampling methods, limits, and tolerance settings, you can control the range of colors that Elements replaces.
Follow these steps to replace existing color with your foreground color:
Select the Color Replacement tool from the Tools panel in Edit Full mode.
This tool shares a flyout menu with the Brush and Pencil tools. Press Shift+B to cycle through the tools.
Specify your desired brush tip diameter and hardness from the Brush Preset Picker drop-down panel.
Choose your desired blend mode.
Here's a brief rundown of each one:
Color: The default, this mode works well for most jobs. This mode works great for eliminating red-eye.
Hue: Similar to color, this mode is less intense and provides a subtler effect.
Saturation: This mode is the one to use to convert the color in your image to grayscale. Set your foreground color to Black on the Tools panel.
Luminosity: This mode, the opposite of Color, doesn't provide much of an effect.
Choose your Sampling method (represented by the icons):
Continuous: Samples and replaces color continuously while you drag your mouse.
Once: Replaces colors only in areas that contain the color you first sampled when you initially clicked.
Background Swatch: Replaces colors only in areas containing your current background color.
Select your Limits mode.
You have these options:
Contiguous: Replaces the color of adjacent pixels containing the sampled color.
Discontiguous: Replaces the color of the pixels containing the sampled color, whether or not they're adjacent.
Set your Tolerance percentage.
Tolerance refers to a range of color. The higher the value, the broader the range of color that's sampled, and vice versa.
Select the Anti-alias option.
Anti-aliasing slightly softens the edges of the sampled areas.
Click or drag your image.
The foreground color replaces the original colors of the sampled areas. In our example (refer to Figure 9-19), we used a black foreground color.
Tip
If you want to be very precise, make a selection before you replace your color. We did this with the girl in our figure so we could avoid "coloring outside the lines."