
When you first launch Photoshop Elements, you arrive at a Welcome screen. The Welcome screen offers to open different editing modes, help you start special Elements tasks, and sign you up for an Adobe Web-hosted service.
When it comes to editing a photograph, you find quite a collection of tools, panels, buttons, and options in the Photoshop Elements Edit mode. Just a quick glance at the Elements workspace when you enter Edit Full mode shows you some of the power that Elements offers with just a click of your mouse. With all the possibilities, navigating the Elements workspaces and engaging in an editing session can be intimidating. To ease your introduction to the many options for editing your pictures, we break them down for you in this chapter.

Elements has several work areas, and we start off by introducing you to the Welcome screen. Then, we move on to the mode you'll likely use frequently — Edit Full mode. In this mode, you can be creative with all the tools and features Photoshop Elements is known for, such as filters, drawing tools, layers, and more. We then introduce other work areas and tools you may not be as familiar with — Edit Quick mode for making common corrections to photos; Creation mode for collecting your photos into creations, such as calendars; and the Project Bin for navigating among all your open images.
Before you start working in Elements, you may find it helpful to know how to undo edits so that you can start over easily and find additional sources of help within Elements. We also explain one of the handiest ways to select tools and enter common commands: keyboard shortcuts.
Elements also has the Organizer (Windows) or Adobe Bridge (Macintosh), a powerful tool for acquiring your images and keeping them organized. The Organizer/Adobe Bridge includes features that help you view and search for images, too. We introduce the Organizer (Windows) and Adobe Bridge (Macintosh) in Part II.
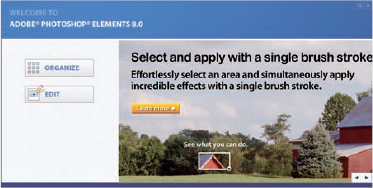
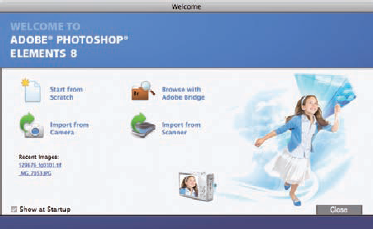
A great place to start in Elements is a central navigation area where you can choose what mode and activity you want to engage in. Well, that's exactly what Adobe provides you when you open Photoshop Elements. It's like the command center on the Starship Enterprise, except you won't find Spock asking the computer any questions. The Welcome screen is easy to navigate and intuitive, as you can see in Figure 1-1 (Windows) and Figure 1-2 (Macintosh).
Here's what you find on the Welcome screen:
Organize (Windows)/Browse with Adobe Bridge (Macintosh): Click the Organize button to open the Organizer in Windows or the Browse with Adobe Bridge button on the Macintosh, where you can manage your collections of pictures stored on your hard drive. We cover using the Organizer/Adobe Bridge and many of its great features in Part II.
Edit (Windows): If you need to edit a photo, click the Edit button to access options for using either the Quick Fix mode to do some quick editing tasks or Edit Full mode, in which you can do the extraordinary editing jobs.
Start from Scratch (Macintosh): Click this button to open Elements in Edit Full mode on the Macintosh.
Import from Camera (Macintosh): Click this button to import photos from a camera or card reader on the Macintosh. In Windows, you use a command in the Organizer to import photos, as we explain in Chapter 4.
Import from Scanner (Macintosh): Use this command to scan images and open them in Edit Full mode on the Macintosh. In Windows, you use a command in the Organizer to scan images as we explain in Chapter 4.
Learn More (Windows): Click the Learn More button to get help information from Adobe's Web site.
See What You Can Do (Windows): Click the icon below the text to see a demonstration of an editing task. You can change task topics by clicking the left and right arrows in the lower-right corner of the screen.
If you know what you want to do in Elements, go ahead and click the appropriate button. But if you enter one mode and then decide you want to do something in another mode, Elements provides you the freedom to easily change modes from within the different workspaces.
Note
You can always return to the Welcome screen after you enter any editing mode on Windows. At the top of the Elements window in all modes, a house icon appears, as shown in Figure 1-3. Click this icon to open the Welcome screen again. On the Macintosh, an icon appears for Launch Bridge instead of an icon for the Organizer.
Edit Full mode offers bundles of tools that you can use to edit your images, from correction tools for fixing color and clarity to filters, layers, and more for changing existing photos or creating entirely original images from scratch. But all these tools also make Edit Full mode complex.
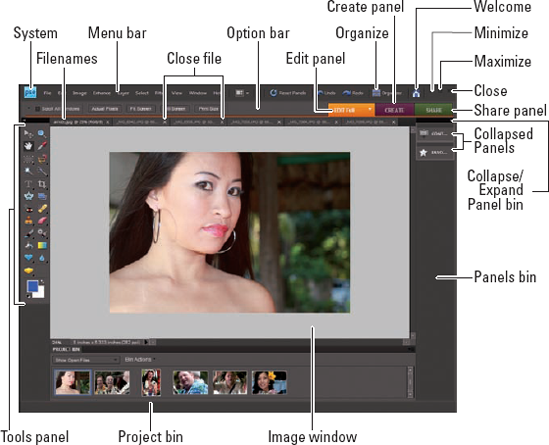
Figure 1-4 shows Elements in Edit Full mode, highlighting all the tools and features we discuss in the following sections.
You can move into Edit Full mode in a couple of ways:
From the initial Welcome screen: Click Edit and open a photo. Your Elements window appears in Edit Full mode, as shown in Figure 1-4. On the Macintosh, click the Start from Scratch icon.
From the Organizer/Bridge: Click a photo and choose Edit Photos from the Fix drop-down menu. The selected file opens in Edit Full mode. On the Macintosh, click a photo on Adobe Bridge; then press the Control key and click to open a context menu. From the menu choices, choose Open With

Tip
You can also open a context menu on a photo in the Organizer (right-click your mouse button to make this menu appear) and choose Edit with Photoshop Elements from the menu.
Not surprisingly, the image window's tools and features are most useful when an image is open in the window. To get an image into the image window (as shown in Figure 1-4), follow these steps:
Choose File
Open.The standard Open dialog box appears. It works like any ordinary Open dialog box you find in other applications.
Move around your hard drive by using methods you know to open folders and then select a picture.
If you haven't yet downloaded digital camera images or acquired scanned photos and want an image to experiment with, you can use an image found in your Pictures folder that was installed with your operating system.
After selecting a picture, click Open.
The photo opens in a new image window in Elements.
Note
You can open as many image windows in Elements as your computer memory can handle. When each new file is opened, a thumbnail image is added to the Project Bin at the bottom of the screen. (See Figure 1-4.)
Note
In Elements 8, you find a new design to the user interface. Notice in Figure 1-4 that filenames appear as tabs above the image window. To bring a photo forward, click the filename. To close a photo, click the X adjacent to the filename.
Here's a quick look at important items in the image window, as shown in Figure 1-5:
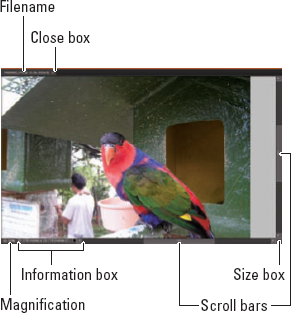
Filename: Appears above the image window for each file open in the Editor.
Close button: Click the X to the right of the filename to close the file.
Scroll bars: Become active when you zoom in on an image. You can click the scroll arrows, move the scroll bar, or grab the Hand tool in the Tools panel and drag within the window to move the image.
Magnification box: Shows you at a glance how much you have zoomed in or out.
Information box: Shows you a readout for a particular tidbit of information. You can choose what information you want to see in this area by selecting one of the options from the pop-up menu, which we discuss in more detail later in this section.
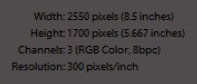
When you're working on an image in Elements, you always want to know the physical image size, the image resolution, and the color mode. (These terms are explained in more detail in Chapters 3 and 4.) Regardless of which menu option you select from the status bar, you can get a quick glimpse at these essential stats by clicking the Information box, which displays a pop-up menu like the one shown in Figure 1-6.
Size box: Enables you to resize the window. Move the cursor to the box, and a diagonal line with two opposing arrows appears. When the cursor changes, drag in or out to size the window smaller or larger, respectively.
You can also resize the window by dragging any corner in or out.
After you're familiar with the overall image window, we want to introduce you to the Information box's pop-up menu, which enables you to choose the type of information you want to view in the Information box. Click the right-pointing arrow to open the menu, as shown in Figure 1-7.
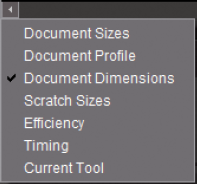
Figure 1-7. From the pop-up menu on the status bar, select commands that provide information about your file.
Here's the lowdown of the options you find on the pop-up menu:
Document Sizes: Shows you the saved file size.
Document Profile: Shows you the color profile used with the file. Understanding color profiles is important when printing files. Look to Chapters 2 and 14 for more information on using color profiles.
Document Dimensions: Which is selected in Figure 1-7, shows you the physical size in your default unit of measure, such as inches.
Scratch Sizes: Displays the amount of memory on your hard drive that's consumed by all documents open in Elements. For example, 20M/200M indicates that the open documents consume 20 megabytes and that a total of 200 megabytes are available for Elements to edit your images. When you add more content to a file, such as new layers, the first figure grows while the second figure remains static.
Efficiency: Indicates how many operations you're performing in RAM, as opposed to using your scratch disk. When the number is 100%, you're working in RAM. When the number drops below 100%, you're using the scratch disk. If you continually work below 100%, it's a good indication that you need to buy more RAM to increase your efficiency.
Timing: Indicates the time it took to complete the last operation.
Current Tool: Shows the name of the tool selected from the Tools panel.
Don't worry about trying to understand all these terms. The important thing to know is that you can visit the pop-up menu and change the items at will during your editing sessions.
Like just about every program you launch, Elements supports drop-down menus. The menus are logically constructed and identified to provide commands for working with your pictures (including many commands that you don't find supported in tools and on panels). A quick glimpse at the menu names gives you a hint of what might be contained in a given menu list.
Here are the ten different menus (eleven on a Mac):
Adobe Photoshop Elements 8 (Mac only): On the Macintosh, you find the Adobe Photoshop Elements 8 menu preceding the File menu. This menu provides you the Quit command used to exit Elements, and it provides access to Edit Full Preferences, as we explain in Chapter 2.
File: Just as you might suspect, the File menu contains commands for working with your picture as a file. You find commands on the menu for saving, opening, processing, importing, exporting, and printing. We cover saving files in Chapter 3 and printing or exporting for other output in Part V.
Edit: The old-fashioned Copy, Cut, and Paste commands are located on this menu. Additionally, you have some important application settings commands on the menu, including preferences (Windows), which we cover in more detail in Chapter 2.
Image: You use the Image menu most often when you want to effect changes to the entire image, such as changing a color mode or cropping, rotating, and resizing the image. For details about sizing and color modes, check out Chapter 3. For more about cropping and rotating images, flip to Chapter 9.
Enhance: Just the name of this menu should tell you what commands to expect here. This is where you go to change the appearance of an image, such as changing its brightness and contrast, adjusting its color and lighting, and doing some other smart fix-up work to improve its appearance. On the Enhance
Layer: As we describe in great detail in Chapter 8 (a whole chapter just about layers), most kinds of editing you do in Elements are best handled by using layers. Elements neatly tucks away most of the relevant commands associated with working in layers right in this menu.
Select: Of just about equal importance to layers are selections. Whereas the Image menu contains commands that are applied to the entire image, you can edit isolated areas of an image by using the commands on the Select menu. To isolate an area, you need to create a selection, as we explain in Chapter 7. This menu contains commands to help you with many essential tasks related to working with selections.
Filter: The Filter menu is where you find some professional photographic darkroom techniques, or you can completely leave the world of photography and explore the world of a fine artist. With tons of different filter commands, you can create some extraordinary effects. Find out all about filters in Chapter 11.
View: Zooming in and out of images, turning on a grid, exposing horizontal and vertical rulers, adding annotations, and checking out the print sizes of your pictures are handled on the View menu. Chapter 5 unearths secrets of the Zoom tool, rulers, and more.
Window: Elements supports a number of different panels, as we explain in the section "Playing with panels", later in this chapter. Elements has so many panels that keeping them all open at one time is impractical. Thanks to the Window menu, you can easily view and hide panels, reopen the Welcome window, tile and cascade open windows, and bring inactive windows to the foreground.
Help: We hope that you get all the help you need right here in this book; but just in case we miss something (or your neighbor has borrowed it, fine book that it is), you have some interactive help right at your mouse-tip on the Help menu. The menu also offers links to the Adobe Web site for more information and a little assistance, courtesy of the tutorials accessible from this menu. (Find a little more detail about accessing help in the section "Getting a Helping Hand," later in this chapter.)
Context menus are common to many programs, and Photoshop Elements is no exception. They're those little menus that appear when you right-click (Windows) or Control-click (Mac), offering commands and tools related to whatever area or tool you right-clicked. On Macintosh computers with two mouse buttons, you can right-click to open a context menu.
Tip
The context menus are your solution when you may be in doubt about where to find a command on a menu. You just right-click an item, and a shortcut menu opens. Before you become familiar with Photoshop Elements and struggle to find a menu command, always try to first open a context menu and look for the command you want on that menu.
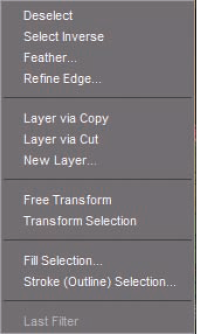
Because context menus provide commands respective to the tool you're using or the object or location you're clicking, the menu commands change according to what tool or feature you're using and where you click at the moment you open a context menu. For example, in Figure 1-8, you can see the context menu that appears after we create a selection marquee and right-click that marquee in the image window. Notice that the commands are all related to selections.
Note
Notice, in Figure 1-8, the Transform Selection command. Elements 8 enables you to modify selections using this command, as we explain in Chapter 7.
Elements provides a good number of panels for different purposes. The one that you'll find you use most is the Tools panel. In panel hierarchy terms, you typically first click a tool on the Tools panel, and then use another panel for additional tool options or use the Options bar (which we describe in the section "Selecting tool options in the Options bar," later in the chapter) for fine-tuning your tool instruments. More often than not, clicking a tool on the Tools panel is your first step in most editing operations.
Tip
By default, the Tools panel opens as a single row of tools down the left side of the Elements window. You can change the view to a double row of tools by clicking the right-pointing double chevron. Doing so shows all tools when you're working on smaller computer monitors.
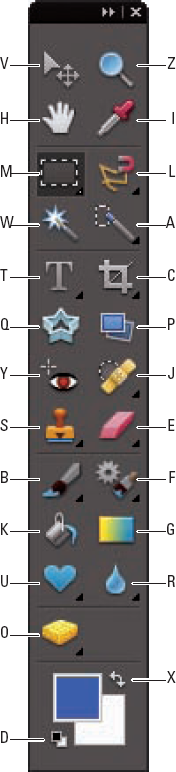
You can easily access tools in Elements by pressing shortcut keys on your keyboard. For a quick glance at the Tools panel and the keystrokes needed to access the tools, look over Figure 1-9.
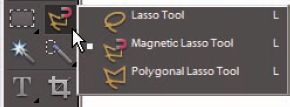
Notice on the Tools panel that several tools appear with a tiny arrowhead pointing right and downward in the lower-right corner of the tool. Whenever you see this arrowhead, remember that more tools are nested within that tool group. Click a tool with an arrowhead and hold down the mouse button, or for a faster response from Elements, just right-click a tool. A pop-up toolbar opens, as shown in Figure 1-10, that offers you more tool selections within that group.
To select tools within a tool group by using keystrokes, hold down the Shift key and strike the respective key (as shown in Figure 1-9) to access the tool. Keep the Shift key down and repeatedly press the shortcut key to step through all tools in a given group.
Tip
Whether you have to press the Shift key to select tools is controlled by a preference setting. To change the default setting so that you don't have to press Shift, choose Edit
Note
The shortcuts work for you at all times except when you're typing text with the cursor active inside a text block. Be certain to click the Tools panel to select a tool when you finish editing some text.
The tools are varied, and you may find that you don't use all the tools in the Tools panel in your workflow. Rather than describe the tool functions here, we address the tools in the rest of this book as they pertain to the respective Elements tasks.
When you click a tool on the Tools panel, the Options bar offers you choices specific to the selected tool. Figure 1-11 shows the options available when the Brush tool is selected.
Elements provides you with a bunch of panels that contain settings and options used to refine the tools you select on the Tools panel and tasks you perform to edit images. Assume for a moment that you want to let your creative juices loose and create a Picasso-esque painting — something that you can do easily in Photoshop Elements.
First, click the Brush tool and then click a color on the Color Swatches panel. On a new canvas, you begin to paint. When you want to change color, click again on the Color Swatches panel on a different color. This kind of interactivity between the Tools panel and another panel is something you frequently use in Elements.
Panels are accessed from either the Panels Bin or the Window menu. Many options on panels are intuitive. To become familiar with various panel options, just poke around a little, and most of the options will become familiar to you.
Tip
You can drag panels away from the Panel Bin and scatter them all over the Elements workspace. If you remove panels and want to return to all panels docked in the Panel Bin, click Reset Panels at the top of the Editor window.
By default, you find the panel buttons for Edit Full (while in Edit Full mode), Create, and Share with the panels expanded, as shown in Figure 1-12.
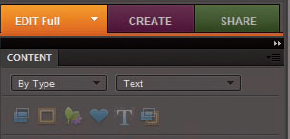
You can use these panels as we explain in the text that follows:
Edit Full: Gain quick access to editing tasks. From a drop-down menu, you can toggle editing modes. While you're in Edit Full mode, you see the button appearing as Edit Full. Open the drop-down menu and you find Edit Quick and Edit Guided. You can change editing modes by choosing one of the menu commands. If you change to Edit Quick, the tab name likewise changes to Edit Quick.
Create: Click this button to access options to create photo books, photo collages, and slide shows and order prints and greeting cards. Click More Options on the Create panel to access additional creation options.
Share: Click this button to access options that offer many different ways to share your photos with others. On the Share panel, you find options for creating an online album, sending photos via e-mail attachments, using photo and writing CDs and DVDs of photo collections and slide shows. Clicking More Options on the Share panel offers additional options for sharing photos.
Note
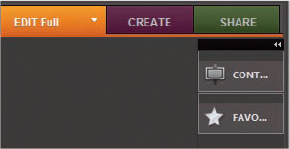
Click the right-pointing double chevron below the Share button, and the panels collapse to a view, as shown in Figure 1-13. You open a panel by clicking a button. However, when you need more working area for your photos, you can collapse the panels.
Tip
When the panels are collapsed, click the left-pointing chevrons to open the panels.
With all the settings you can use for any given tool, trying to figure out exactly where to select an option for the edit you want to make can become downright frustrating. To help simplify the process of using tools and selecting options for the tools, here's what you might do in your normal workflow:
Select a tool on the Tools panel.
Obviously, you need to know what task you want to perform, so selecting the proper tool to complete the task is important to know upfront.
Take a quick look at the Options bar.
Before moving to other option choices, be certain that you look over the choices on the Options bar. If you want to use a tool such as the Brush tool or the Clone Stamp tool, perhaps you want to make a decision about what size brush tip you want to use. This choice is specific to the selected tool and therefore appears as an Options bar choice.
Open a panel for more options.
If you want to use the Brush tool to apply some color to an image, for example, after you select the Brush tip on the Options bar, open the Color Swatches panel and select a color.
Open a drop-down menu.
Not all tools support a drop-down menu on the Options bar. When you see a down-pointing arrow, click the arrow to open a menu on which you can find more options for some tools.
Get some help.
When you hover your cursor over a tool, you see that tool described in blue text. Click the blue text, and your default Web browser opens, displaying a page on Adobe's Web site where help information and tips explain how to use the respective tool. You'll also find blue text on the More menu. The blue text alerts you to help information that can be shown in your Web browser.
When you're in Edit Full mode, which we discuss in preceding sections, you can apply any kind of edits to a picture, improve the picture's appearance, and apply all that Elements offers you. This mode is the richest editor in Elements, in terms of accessing all features. Because Elements has so many different kinds of editing opportunities, the program offers you other workspace views, tailored to the kinds of tasks people typically want to perform.
Edit Quick mode is designed to provide you with just those tools that you need to prepare a picture for its intended destination, whether it's printing, onscreen viewing, or one of the other organizing items. Use this mode to make your pictures look good. You don't find tools for adding text, painting with brushes, or applying gradients in Edit Quick mode. Rather, what you find is a completely different set of panels for balancing contrast and brightness, lighting, and sharpening, for example. This mode is like having a digital darkroom on your desktop, where you take care of perfecting an image like you would in analog photography darkrooms.
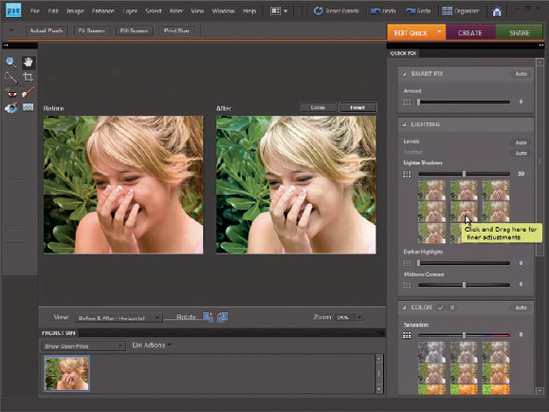
To enter Edit Quick mode while you're in Edit Full mode, click the Edit Full button to open the drop-down menu and choose Edit Quick; the view changes, as shown in Figure 1-14.
Here are several differences between Edit Full mode and Edit Quick mode:
Completely different sets of panels are docked in the Panels Bin. All the panels in Edit Quick mode are related to adjusting brightness controls, and they're designed to improve the overall appearance of your pictures. In addition, all the Windows menu commands for accessing panels are grayed out. While you work in Edit Quick mode, Elements insists on limiting your use of panels to just the ones docked in the Panels Bin. Moreover, you can't undock panels from the Panels Bin by dragging them out, as you can in other modes.
The Tools panel shrinks. Edit Quick mode offers only these tools on the Tools panel:
None of the other Elements tools is accessible while you work in this mode.
Multiple viewing options are available. Notice in Figure 1-14 that you see two views of the same image. The Before view on the left displays the unedited image. The After view shows you the results of changes you make with panel options and menu commands. You select different viewing modes from menu choices on the View drop-down menu below the image window.
If you want to return to Edit Full mode, open the drop-down menu where you see Edit Quick, and choose Edit Full.
To organize your pictures for display in a variety of different ways, begin by clicking the Create button. The panels in the Panels Bin change to support different creation options. Click one of the listed options for making a new creation or click the More Options button to select from additional options. In Figure 1-15, we clicked the Create button and then clicked the Photo Collage button to start a new creation for a photo collage. As you can see in Figure 1-15, the Panels Bin changed to reflect options available to us for creating our photo collage.
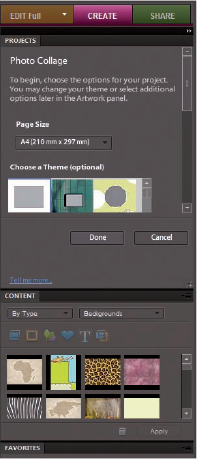
We cover each option available in the various creation panels in greater detail in Chapter 16
The Project Bin displays thumbnail views of all your open images. Regardless of whether you work in Edit Full or Edit Quick mode, you can immediately see a small image of all the pictures you have open at one time, as shown in Figure 1-16. You can also see thumbnail views of all the different views you create for a single picture. Find out all the details in the following sections.
If you want to rearrange the thumbnails in the Project Bin, click and drag horizontally to reorganize the order of the thumbnails.

What? Different views of the same picture, you say? Yes, indeed. You might create a new view when you want to zoom in on an area for some precise editing and then want to switch back to a wider view. Here's how you do it:
Double-click a thumbnail image in the Project Bin.
That photo appears in the image window as the active document.
Choose View
Note that <filename> is the name of the file in the image window.
Zoom to the new view.
A new view appears for the active document, and you see another thumbnail image added to the Project Bin.
Tip
To zoom quickly, click the Zoom tool and click a few times on the picture in the image window to zoom in to the photo.
Toggle views of the same image.
Double-click the original thumbnail to see the opening view; double-click the other thumbnail to see the zoomed view.
The Project Bin takes up a lot of room at the bottom of the image window, and you're not likely to want it open all the time while editing pictures. To temporarily hide the Project Bin, do one of the following:
Place the cursor over the separator bar between the image window and the Project Bin. When the cursor changes to two horizontal lines with vertical opposing arrowheads, drag down to collapse the Project Bin. When the Bin is collapsed, drag up the separator bar to open it.
Double-click the separator bar to hide the Project Bin.
Click the Hide Project Bin text at the bottom of the Project Bin.
Open a context menu by right-clicking and select Close at the top of the menu.
A nice feature in Elements is the Bin Actions menu at the top of the Project Bin. Click Bin Actions to start a new creation, share photos, print all the files open in the Bin, and save the Bin files as an album.
To the left of the Bin Actions menu, you'll find another feature for viewing files in Elements. The Show Open Files (shown by default on Windows only) is another drop-down menu that offers two options: the default option to show open files and another choice to show files from the Organizer. Choose Show Files from Organizer to add the files in your Organizer to the Project Bin.
Ever since Apple's Macintosh brought a window-like interface to the masses, the Undo command has been one of the most frequently used menu commands in every program developed. You make a change to your document, and if you don't like it, you simply choose Edit
In Elements, your options to undo your work provide you much more than reverting to the last view, as we explain in the following sections.
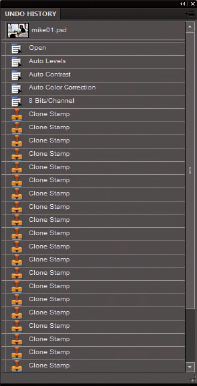
Elements takes the Undo command to new levels by offering you a panel on which all (well, almost all) your changes in an editing session are recorded and available for undoing at any step in an editing sequence.
Each edit you make is recorded on the Undo History panel. To open the panel, choose Window
Tip
If Elements slows down and you're moving along at a snail's pace, choose Edit
We said almost all steps are recorded because the number of steps the History panel can record is controlled by a preference setting that tops out at 1,000 steps. If you choose Edit
When you want to undo multiple edits, open the Undo History panel and click any item listed on the panel. Elements takes you to that last edit while scrubbing all edits that follow the selected item. If you want to bring back the edits, just click again on any step appearing grayed out on the panel to redo up to that level.
All your steps are listed on the Undo History panel as long as you remain in Elements and don't close the file. When the file is closed, all history information is lost.
While you work away in Elements, always plan on saving your work regularly. Each time you save in an editing session, the Undo History panel preserves the list of edits you made before the save and up to the maximum number of history states defined in the General preferences.
If you save, then perform more edits, and then want to return to the last saved version of your document, Elements provides you with a quick, efficient way to do so. If you choose Edit
When you choose Revert, Revert appears in the Undo History panel. You can eliminate the Revert command from the Undo History panel by right-clicking Revert on the Undo History panel and choosing Delete from the context menu that appears. This command returns you to the edits made after the last save.
You can reach for this book whenever you want some details about accomplishing a task while working in Elements. However, for those little annoying moments, and just in case some coffee stains blot out a few pages in this book, you may want to look for an alternative feature description from another source.
Rather than accumulate a library of Elements books, all you need to do is look within Elements to find valuable help information quickly and easily. If you're stuck on understanding a feature, ample help documents are only a mouse click away and can help you overcome some frustrating moments.
Your first stop in exploring the helpful information Elements provides is on the Help menu. On this menu, you can find several menu commands that offer information:
Photoshop Elements Help: Choose Help
For quick access to the Help document, type the text you want to search into the text box on the right side of the menu bar in Edit Full or Edit Quick mode.
Key Concepts: While you read this book, if we use a term that you don't completely understand, open the Photoshop Elements Key Concepts. A Web page opens in your default Web browser and provides many Web pages with definitions of terms and concepts.
Support: This menu command launches your default Web browser and takes you to the Adobe Web site, where you can find information about Elements, problems reported by users, and some work-around methods for getting a job done. Additional Web-assisted help information is available by clicking Photoshop Elements Online and Online Learning Resources. The vast collection of Web pages on Adobe's Web site offers you assistance, tips and techniques, and solutions to many problems that come with editing images. Be sure to spend some time browsing these Web pages.
Video Tutorials: Choose Help
Forum: Choose Help