
In This Chapter
Telling Photoshop where to work with selections
Masking for layer visibility and to protect parts of your image
Keeping your options open with adjustment layers
There you are, repainting the bedroom — all by yourself, saving money, being productive — and it's time to do the windows. Now, you probably don't want to paint over the glass, right? Just the frame, the sash, the sill, those little whatch-ya-call-its between the panes, right? (Okay, technically the dividers between the panes are called muntins.) There are several ways you can avoid painting the glass. You can use a little brush and paint very carefully. You can use a larger brush, paint faster, and scrape the excess from the glass afterward. You can grab the masking tape, protect the glass, and paint as sloppily as you like — when the tape comes off, the glass is paint-free.

Those are unbelievably similar to the choices that you have in Photoshop when you need to work on only a part of your image. You can zoom in and use tools, dragging the cursor over only those pixels that you want to change (just like using a tiny paintbrush). You can use the History Brush feature (which I introduce in Chapter 1) to restore parts of the image to the original state (like scraping the glass). You can isolate the area of the image you want to change with a selection (much like protecting the rest of the image with masking tape).
In this chapter, you read about getting ready to make changes to your image rather than actually making those changes. You can isolate groups of pixels in your image in a variety of ways. For example, you can select pixels that are in the same part of the image (regardless of color), or you can select pixels that are the same color (regardless of location in the image). This is power: the ability to tell Photoshop exactly which pixels you want to alter. After you make that selection, you can manipulate the pixels in a variety of ways — everything from making color and tonal adjustments to working with Photoshop's creative filters to simply copying them so you can paste them into another image.
I discuss "taping the glass" first by making selections and then by using masks — channels that actually store selection information. After that, I tell you about working with adjustment layers, which are special layers that help you apply certain color and tonal adjustments without actually changing any pixels in the image. An adjustment layer even lets you restrict the change to one or several layers in the image.
When you make a selection in your image, you're simply isolating some of the pixels, picking them (selecting them) so that you can do something to those pixels without doing it to all the pixels in your image. Photoshop shows you what part of the image is within the selection with a flashing dashed line. (Now that you're part of the Photoshop Inner Circle, you call that selection boundary the marching ants.)
Say, for example, that part of your image looks great, but part of the image looks, well, just plain wrong. Figure 8-1 is an excellent example.

By making a selection and applying an adjustment, I can make this image look much, much better. Of course, you might choose to make a different selection and apply a different adjustment, but you can see what I chose to do in the lower-left of Figure 8-2. By selecting the rails (in this case, with the Polygon Lasso tool, which I explain later in this chapter), I isolate those areas from the rest of the image, enabling me to change the color of those pixels without changing anything else. (Rather than selecting and darkening the rails to make them appear to be in front of a glow, I could have selected the lighter area and created a uniform sky color. But this is visually more interesting.)

The tonal and color adjustments that I discuss in Chapters 5 and 6 are often applied to an image as a whole. You can, however, apply them to specific areas of an image. Much of the rest of the work that you do in Photoshop is not global in nature, but rather is done to only restricted areas of your image. You use selections to do that restricting.
You can also use selections for a variety of other jobs in Photoshop. One of the most common is copying from one image and pasting into another. You can see one example in Figure 8-3. The subject of one image (upper left) is selected. You can see a close-up of the selection to the right. Choosing Edit
Note
Any pixel in your image can be selected, deselected, or partially selected. For example, if you have a selection and fill it with red, the selected pixels turn red, the deselected pixels don't change, and the partially selected pixels get a red tint. How much tint depends on the level of selection. (Photoshop generally uses 8-bit grayscale for selections, so there are 256 different levels of "selected.")

You need to keep in mind a couple of very important terms as you read about the various tools and commands with which you make selections. Both feathering and anti-aliasing make the edges of your selections softer by using partially transparent or differently colored pixels. That, in turn, helps blend whatever you're doing to that selection into the rest of the image.
Note
Don't forget that all pixels in your image are square, aligned in neat, orderly rows and columns. (That's the raster in raster artwork.) When you create a curve or diagonal in your artwork, the corners of the pixels stick out. Feathering and anti-aliasing disguise that ragged edge. You can also use feathering to create larger, softer selections with a faded edge. Generally speaking, use anti-aliasing to keep edges looking neat and use feathering to create a soft, faded selection.
Nothing illustrates the power of feathering quite like a simple black-on-white demonstration, as you see in Figure 8-4. In the upper-left, I made an unfeathered selection and filled it with black. To the upper-right, the filled selection is exactly the same size but has a 2-pixel feather. Below, I used a 15-pixel feather when making the selection.
Note
Note that there's feathering on both sides of the selection border. And don't be fooled by the amount that you enter in the Feather field on the Options bar — that's a general guideline, not a precise value. A 15-pixel feather for the Elliptical Marquee tool might give you 50 or 60 partially transparent pixels, half on either side of the selection border. Even a 1-pixel feather gives you a selection with several "soft" pixels on either side.

Anti-aliasing is similar to feathering in that it softens edges: It's designed to hide the corners of pixels along curves and in diagonal lines. You use anti-aliasing with type (as I explain in Chapter 13). You'll often find that anti-aliasing is all you need to keep the edges of your selections pretty; feathering isn't required. Anti-aliasing is a yes/no option, with no numeric field to worry about. Figure 8-5 compares a diagonal with no anti-aliasing, with anti-aliasing, and with a 1-pixel feather.

At 100 percent zoom (to the upper left), the first line looks bumpy along the edges (it has a case of the jaggies, you would complain to a friend or co-worker). The lower line looks soft and mushy, out of focus. And the middle line? To quote Goldilocks, "It's just right!" When zoomed to 600 percent, you can really see those jaggies and that softening. And in the middle, you see that the anti-aliasing uses light gray and mid-gray pixels interspersed along the edge among the black pixels. At 100 percent zoom (upper left), your eye is fooled into seeing a straight black edge.
Generally speaking, use anti-aliasing with just about every selection (other than rectangular or square), and use feathering when you want to really soften the edges to create a special effect.
Photoshop offers you nine tools whose whole purpose in life is to help you make selections. You also use those tools to alter your selections by adding to, subtracting from, and intersecting with an existing selection. The nine selection tools are divided into three groups:
Four marquee tools
Three lasso tools
The Quick Selection tool and the Magic Wand
You have four marquee selection tools, although you'll generally use only two of them. Figure 8-6 shows the marquee selection tools, along with each tool's Options bar configuration.
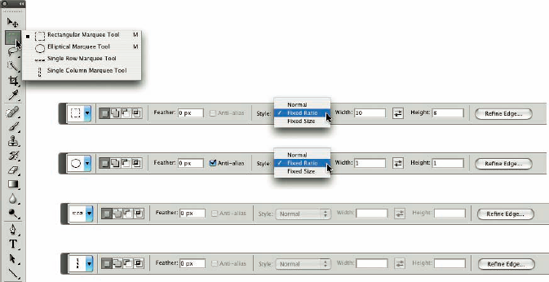
You drag the very useful Rectangular Marquee and Elliptical Marquee tools to make selections. Click and drag in any direction to make your selection. After you start dragging, hold down the Shift key (while still dragging) to constrain proportions. When you constrain the proportions of a selection, you create a square or circle rather than a rectangle or an ellipse. If you start dragging a selection and press the Option (Mac)/Alt (Windows) key, the selection centers itself on the point where you click. The Shift and Option/Alt keys can be used together. Holding down the Shift key before you click and drag adds the selection to any existing selection. Holding down the Option/Alt key before dragging subtracts the new selection from any existing selection.
The Single Row Marquee and Single Column Marquee tools are simply clicked at the point where you want a 1-pixel selection, running from side to side or from top to bottom. These tools create selections that extend the full width or full height of your image. You might use these tools to create a gridlike selection that you can fill with color. Or you might never use them at all.
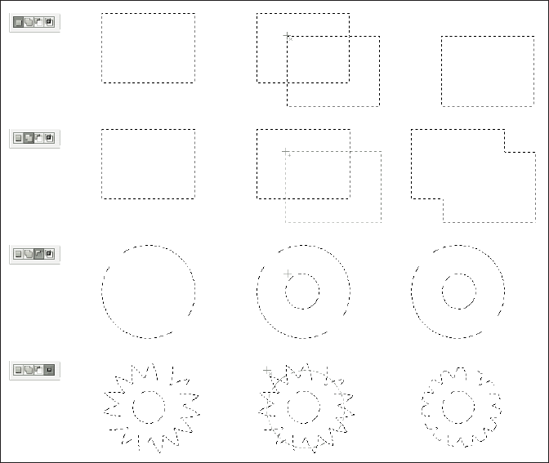
Take another glance at the Options bars in Figure 8-6. The four buttons to the left in the Options bar, which you can use with any of the tools, determine how the tool interacts with an existing selection.
New Selection: When you select the first button, any selection that you make replaces an active selection (deselecting any previous selection). If, with a selection tool, you click inside an active selection when the first option is active, you can drag that selection in your image without moving any pixels. When you haven't already made a selection, these tools always make a new selection, regardless of which button is active.
Add To: When you have an active selection and need to add to that selection, use the second button or simply press and hold down the Shift key while dragging.
Subtract From: When you have a selection and need to deselect part of it, use the third button. Say, for example, that you make a round selection and want to chop out the middle to make a donut shape. Click the third button and then drag within the original selection to deselect the donut hole.
Intersect With: You have a selection, but you want to keep only part of the selection. You could set your selection tool to subtract from the existing selection, or you could intersect with that original selection and deselect a number of areas at once.
Figure 8-7 presents a visual explanation of how all four buttons work. On the left, you see the selected option for the active marquee selection tool. Next is an original selection. In the third column, you see another selection being made (with the selection tool dragged from the lower right to the upper left). Finally, on the right, you see the result of combining the two selections.
In the bottommost example, you could do a whole series of subtractions from the existing selection to chop off the "points," but using the intersect option takes care of the job with a single drag.
Tip
While you're dragging a selection with the Rectangular Marquee or the Elliptical Marquee tool, you can hold down the mouse button and press and hold the spacebar to reposition the marquee. When you have it where you want it, release the spacebar and continue to drag.
Take another look at the four views of the Options bar shown earlier in Figure 8-6. Take note of these variations among them:
Anti-aliasing isn't available for the Rectangular Marquee tool. That's because all four edges of the selection will align perfectly with the edges of the pixels — no need to disguise corners of pixels. (You can, of course, soften the selection with feathering.)
Both the Rectangular Marquee and the Elliptical Marquee tools offer the options of Normal (unconstrained, just drag as necessary), Fixed Aspect Ratio (the relationship between width and height you specify in the Options bar is maintained as you drag), and Fixed Size (just click in the upper-left corner of your intended selection).
The Single Row Marquee and Single Column Marquee tools offer the four buttons to determine how the tool will interact with an existing selection and the Feather field. Although feathering a 1-pixel wide or tall selection seems a little strange. . .
Three lasso selection tools are available in Photoshop CS4. On the Options bar, all three of the lasso selection tools offer you the same basic features that you find in the marquee selection tools, as you can see in Figure 8-8. You can add to, subtract from, or intersect with an existing selection. You also have the feathering and anti-aliasing options available. The Magnetic Lasso tool offers three additional settings that help determine how it identifies edges as you drag.
Controlled selections
Lurking within the Options bar Style drop-down menu are two options worth noting: Fixed Aspect Ratio and Fixed Size. Using the Fixed Aspect Ratio option with the Rectangular Marquee or the Elliptical Marquee tool forces the selection to the height and width relationship that you specify in the Options bar. This is great for composing an image that you need at a specific size, say to fit in a standard picture frame. The selection tool won't resize the image for you, but you can make the selection and choose Image
The Fixed Size option changes the behavior of the tools. After you enter an exact width and height in the Options bar, position the cursor in the upper-left corner of the area that you want to select and click once — the selection is created to the lower right of that point. Don't worry about being exact because you can drag the selection marquee into position afterward. (You'll want to have the leftmost of the four buttons on the Options bar selected to reposition your selection.) And take a look at the button between the Width and Height fields on the Options bar: When you're using the Fixed Aspect Ratio or Fixed Size styles, click that button to swap the values in the two fields.

Figure 8-8. The basic options for the lasso selection tools match those for the marquee selection tools.
So what makes lasso tools different from a marquee tool? Read on to find out:
Lasso tool: The Lasso tool is a true freeform tool; that is, you click and drag it wherever you want the selection to go. You can drag around and return to the starting point, or you can release the mouse button anywhere, and your selection is finished along a straight line from that point to the spot where you start your selection. If you press and hold the Option/Alt key while dragging, you'll temporarily switch to the Polygon Lasso tool.
Polygon Lasso tool: Rather than dragging, you click-click-click to make straight selection segments, at any angle, for any distance. When you position the cursor directly over your starting point, a little circle appears to the lower right of the cursor to indicate that you're back to the start. Or simply double-click to finish the selection. If you press and hold the Option/Alt key while dragging, you'll temporarily switch to the regular Lasso tool, which lets you drag your selection any way you want. Using the Option/Alt key lets you switch back and forth between the freeform drag of the Lasso tool and the perfectly straight selection borders of the Polygon Lasso tool.
Magnetic Lasso tool: When you need to select around a subject that has good contrast with its background, the Magnetic Lasso tool can do a great job. The perfect candidate for this tool is a simple object on a very plain background. You can, however, use it with just about any image where the edges of the area you want to select differ substantially from the rest of the image. Click and drag the tool along the edge of your subject. If the tool misses the edge, back up and drag along the edge again. If the edge makes a sudden change in direction, click to add an anchor point. If the tool places an anchor point in the wrong spot, back up and then press Delete/Backspace to remove the point. (By the way, if you have a Wacom pressure-sensitive tablet hooked up, you can set the Magnetic Lasso tool to vary its width according to pen pressure. Use the button just to the right of the Frequency field on the Options bar.)
The Magnetic Lasso tool works by identifying the difference in color along the edges, using all available color channels. From the Options bar, use the Width field to tell the tool how wide of an area it can look in to find an edge. The Edge Contrast field tells the tool how much the edge must differ while searching. Use the Frequency field to choose the number of anchor points the tool sets while outlining the selection.
Consider the Quick Selection tool to be sort of a Magic-Wand-in-a-brush. You drag the tool through an area of color and, based on the color variations under the brush and the brush size, the tool automatically selects similar colors in the surrounding area. Keep in mind that you can adjust the brush size as you work by using the square bracket keys, [and]. (When working with a Wacom tablet, this tool works great with brush size set to pen pressure.) With just a little practice, you'll likely find the Quick Selection tool to be quite simple to use, even for rather complex selections (see Figure 8-9).

The Magic Wand tool selects pixels similar in color to the pixel on which you click with the tool. Like the other selection commands, you can add to, subtract from, or intersect with an existing selection, and you can select anti-aliasing. Tolerance determines how closely pixels must match your target color to be included in the selection. When you enable the Contiguous check box and then click a spot, only pixels connected to the spot by pixels of the same color are selected. The Sample All Layers option lets you make a selection of similarly colored pixels on every visible layer in your image, not just the currently active layer.
When you use a low Tolerance setting, you select only those pixels in the image that are very similar to the pixel on which you click. A high Tolerance setting gives you a much wider range of color, which might or might not be appropriate for the selection you're making.
If you look at the various pictures of the Options bar earlier in this chapter, you might notice the Refine Edge button to the right. Refine Edge (shown in Figure 8-10) helps you fine-tune your selections by adjusting the edges.
Here's what you need to know about each of the options in Refine Edge:
Radius: When you're trying to select an area with soft or fuzzy edges, increasing the Radius value can help better define the edge of the selected area of color.
Contrast: When soft or fuzzy edges of an area of color produce a speckling of unwanted color, increasing Contrast is in order. When you boost the Contrast value, Refine Edge tries to exclude pixels whose color varies too much from the area being selected.
Smooth: Sometimes the edge of a selected area is too jagged to use. Increasing the Smooth value a bit is like anti-aliasing the edge. Using higher values starts rounding off corners.
Feather: Like choosing Select

Contract/Expand: Rather than simply contracting or expanding the selection (as with Select

Tip
The row of buttons below Contract/Expand changes the preview in your image window. Let me suggest that you get used to swapping around the preview as you work. The left button shows you the selection border in your image. The second button gives you the same red overlay that you see when working in Quick Mask mode (discussed later in this chapter). The third and fourth buttons are great for previewing any light or dark artifacts along the edges. Use the button to the far right to get an excellent view of the softness (feathering) of your selection edge.
You have 17 menu commands at your service when selecting pixels in your artwork. Some, like those near the top of the Select menu, are rather simple and aptly named. See Figure 8-11 for a list of the Select commands. (The All Layers, Deselect Layers, and Similar Layers commands are not used to select pixels, but rather to change the activation of layers in the Layers panel.)
The commands near the top of the Select menu are features that you're likely to use regularly. (Okay, maybe not the Reselect command.) Memorizing their keyboard shortcuts and using them regularly is a timesaver.

In its own little group, right in the middle of the Select menu, is the incredibly powerful Color Range command. Rather than dragging the Quick Selection tool or Shift+clicking with the Magic Wand, you can select by color quickly and easily with the Color Range command. In Figure 8-12, I clicked and dragged through some orange areas in the image with the middle Eyedropper tool. You can also click once with the left eyedropper and use the other eyedroppers to add and subtract colors from the selection. The Fuzziness slider near the top of the dialog box determines how close a color must be to those through which you dragged to be included in the selection.
Here are a couple of ways that you can get a better look at your selection as you create it. In Figure 8-13, you see the options available from the Selection Preview menu. The Grayscale (upper left) and Black Matte (upper right) do a good job of showing that the background will be partially selected if you click OK. You can lower the Fuzziness or use the eyedropper on the right to click in those areas of the fence that shouldn't be selected. The White Matte (lower left) does an excellent job of showing that the tips of some leaves below the blooms will also be selected. (Ignore that and Option+drag/Alt+drag with the Lasso tool later to deselect that area.) Because of the color of this image's subject, the red Quick Mask preview (lower right) is almost worthless for this image, although it is often good with other images that don't have red and orange.
The pop-up menu at the top of the Color Range dialog box lets you pick among the RGB (red/green/blue) and CMY (cyan/magenta/yellow) colors, as well as the image's highlights, midtones, or shadows, and even any out-of-gamut colors in the image (colors that can't be reproduced within the selected color space). When you choose one of the presets from the top menu, the Fuzziness slider isn't available, limiting that feature's value.


The next group of commands in the Select menu actually holds six separate commands, including Refine Edge (discussed earlier in this chapter), and the five Modify commands, each of which has a single numeric field:
Border: Tucked away within the Modify submenu, the Border command creates a selection of your chosen width centered on the marching ants that you see as the original selection's edges. The resulting selection can be filled to create a border, or you may opt to delete the pixels within the border to clean up the edges of the selected area of color.
Smooth: When you click with the Magic Wand to make a selection of an area of color, you might see all kinds of tiny 1- or 2-pixel areas within the selection that are not selected. Perhaps those few pixels were just a bit out of the Tolerance range for the tool. No worry! Use the Smooth command and a 1- or 2-pixel radius to snatch up those stray, deselected pixels. The Smooth command can also eliminate jagged edges along the outside of your selection.
Expand: The Expand command moves the selection border outward a specified number of pixels. Be careful, though, because if your original selection includes sharp corners or points, using Expand rounds them off. (In the Paths panel, convert your selection to a path, scale the path, and convert the path back to a selection. See Chapter 11 for info on paths.)
Contract: The Contract command shrinks your selection by the amount specified.
Feather: Feathering, which I discuss earlier in this chapter, softens the edges of a selection. Normally when cutting and pasting a selection or moving a selection within an image, you want to feather a pixel or two.
As you make your way down the Select menu, you'll come across the Grow and Similar commands, which are somewhat like the Magic Wand with Contiguous (Grow) and without Contiguous (Similar) selected on the Options bar. (In fact, they use the Magic Wand's Tolerance setting.) Grow adds to your selection any adjacent pixels of the appropriate color, and Similar looks throughout the entire image for similarly colored pixels. Use Grow and Similar when your initial selection consists primarily of a single color. Using these commands with a selection that contains lots of different colors generally results in most of your image being selected.
As you work with selections, you might find times when the selection capability doesn't match your need. For example, the Elliptical Marquee tool can certainly make oval selections, but those ovals are either vertical or horizontal. What if you need an oval selection at an angle? That's where the Select
Here's what you see in Figure 8-14:
Top left: This is the original selection.
Top center: Click an anchor point on any side of the bounding box and drag to change the height or width of the selection.
Top right: Position the cursor outside the bounding box and drag to rotate.
Middle left: Drag any corner anchor point to manipulate the selection's width and height at the same time.
Middle center: Hold down the Shift key while dragging a corner anchor point to avoid distorting the selection while changing size.
Middle right: Hold down the Option/Alt key while dragging a corner anchor point, and you end up scaling the image based on that crosshair in the center of the bounding box. (You can drag that crosshair anywhere, even outside the bounding box, to change the point of transformation.) You can use the Shift key with Option/Alt, too.
Bottom left: Hold down the

Bottom center: Hold down the
Bottom right: If you

At the bottom of the Select menu, you see a pair of commands that you use to store your selections for future use and to actually reuse them. When you save a selection, you create an alpha channel in the image. The alpha channel, like a color channel, is a grayscale representation of the image. White areas in the alpha channel represent areas that are selected when the channel is loaded as a selection. Black areas in the channel show you deselected areas. Gray represents feathering and other partially selected pixels.
I discuss channels in greater depth in the next section of this chapter. While you're exploring selection commands, the key points to remember are that you can use the Save Selection command to save any selection as an alpha channel, and then later you can use the Load Selection command to reactivate the selection without having to re-create it from scratch.
In Photoshop, a mask is a channel (in the Channels panel) that stores information about a selection or about layer visibility. When you talk about selections saved as masks, you can refer to them as alpha channels. Any time you make a complex selection, consider saving it as an alpha channel, just in case. So what exactly counts as complex? That depends on how much time you have on your hands. If it takes me more than a minute or two to do anything in Photoshop, I want to save it. And what counts as just in case? You might need to return to the image at some later date to make changes, you might need to shut down for the day, or maybe you'll even (fingers crossed against!) have a crash. Save your selections, just in case. . .
Creating an alpha channel from a selection is as simple as choosing Select
When you need to work with a saved selection, choose Select
The Load Selection dialog box offers the same key features that you see for Save Selection. (Refer to Figure 8-15.) When loading a selection, you can add to, subtract from, or intersect with an active selection. You can also invert a selection when loading by selecting the Invert check box. Using that check box produces the same result as loading the selection and choosing Select
Alpha channels, like color channels, are grayscale representations. As such, you can edit them like you would any grayscale image. Click the channel in the Channels panel to make it active and visible. You see it in the image window as a grayscale (or black and white) representation of the saved selection. If you want to see the image while you work on the channel, click in the left column (the eyeball column) to the left of the RGB (or CMYK) channel. The alpha channel then appears as a red overlay on top of the image. Figure 8-16 shows you what the screen looks like with just the alpha channel visible (left) and how it appears when the alpha channel is active and the RGB channel is also visible. Also take a look at the difference in the Channels panel. See the eyeball column on the left?


Here are some of the things that you might want to do to an active alpha channel:
Blur the alpha channel. Blurring an alpha channel (Filter
Sharpen the alpha channel. Sharpening a saved selection (Filter
Paint in the alpha channel. Painting with the Brush tool using black, white, and gray in the channel changes the selection. Paint with white to add areas to the saved selection; paint with black to remove areas from the selection; paint with shades of gray to partially select areas of the image. You can edit an alpha channel with the Brush tool very precisely, adding and eliminating stray pixels, as well as creating precise edges.
Use Levels or Curves on the alpha channel. If the saved selection has feathering or other areas of partial selection (grays in the alpha channel), you can manipulate them with a Levels or Curves adjustment (from the Image
Apply one or more filters to an alpha channel. Use artistic filters on a saved selection to create special effects, such as borders and frames. Chapter 15 covers filters.
Okay, so you want to make a selection, save it as an alpha channel, make the alpha channel active, click the eyeball column to make the RGB channel visible so you can see what you're doing, paint in and apply filters to the alpha channel, make the RGB channel active, load the alpha channel as a selection, and, well, do something creative with it. Whew! How about an easier way to do the same thing?
With Photoshop's Quick Mask mode, you make a basic selection, press Q on the keyboard to enter Quick Mask mode, edit the selection as if it were a mask, and then press Q again. Heck, you don't even have to start with a selection! In Quick Mask mode, your mask appears on-screen as a red overlay, just like an alpha channel appears when the RGB channel is visible (as you can see in Figure 8-16). Paint, apply filters or adjustments, or make selections — anything you can do to a grayscale image, you can do in Quick Mask mode.
Tip
If you're more comfortable with the Brush tool than the Lasso tool, you might want to use Quick Mask mode to make all your selections. You might find it faster and easier to "paint" a selection in Quick Mask mode than to drag a selection with a lasso tool or use the selection commands. Enter Quick Mask mode, paint the mask, exit Quick Mask mode, and you have your selection. You can also enter and exit Quick Mask mode by clicking the button at the bottom of the Toolbox. Double-clicking the button opens the Quick Mask Options dialog box (as shown in Figure 8-17). You can reverse the behavior of the overlay, making it show selected areas instead of the deselected areas, and you can change the color and opacity of the overlay. (Hop back to Figure 8-13 to see how hard it is to see the edges of the orange blooms with the red overlay. Changing the overlay to, say, blue would solve that problem.)

Note
By default, you paint with black in Quick Mask mode over areas that you don't want selected, paint with white over areas that you do want selected, and paint with shades of gray over areas that you want partially selected.
When your image has multiple layers (as I discuss in Chapter 10), including Smart Objects, you can partially hide the content of the layer or Smart Object with layer masks. Layer masks and alpha channels have much in common: Layer masks are selections saved as channels, you can paint in the layer mask, you can apply filters and adjustment to the layer mask, and so on. Just keep in mind that a layer mask appears in the Channels panel only when you select its layer in the Layers panel. (In the Layers panel, you'll see the layer mask thumbnail to the right of the layer's thumbnail.) If you want to edit a layer mask, click its thumbnail in the Layers panel and then edit it as you would an alpha channel. Remember to click the layer thumbnail afterward to reactivate the layer itself.
The easiest way to add a layer mask is to make a selection of the pixels that you want visible on that layer and then click the Add Layer Mask button at the bottom of the Layers panel (third button from the left). You can also make a selection and choose Layer
Note
A layer named Background (in italics) in the Layers panel can't have any transparent areas, so you can't add a layer mask. Not a problem! Simply double-click the layer name in the Layers panel and rename the layer. That converts it to a regular layer, which would be more than happy to accept your layer mask.
Note
In the Layers panel, a layer mask is linked to the layer — that is, if you drag the layer, the mask moves right along with it. And, new in Photoshop CS4, a mask is automatically linked to a Smart Object. You can unlink/relink the mask and layer or Smart Object by clicking the icon/space between their thumbnails in the Layers panel.
A layer or Smart Object can also be masked with a vector path. (Paths are explained in Chapter 11.) Vector masks have very precise edges, and you can edit them as a path with the Direct Selection tool. A layer (other than a Background layer) can have both a regular pixel-based layer mask and a vector mask. To show up in your artwork, pixels on that layer must be within both the layer mask and the vector mask. When a layer has both a layer mask and a vector mask, the vector mask thumbnail appears to the right in the Layers panel.
Photoshop gives you the capability of making tonal and color adjustments that you can later refine, change, or delete. Most of the adjustment commands (discussed in Chapters 5 and 6) are available as adjustment layers. An adjustment layer applies the selected change to color or tonality just as the comparable command would, but using an adjustment layer offers a few major advantages:
Adjustable adjustments: You can reopen an adjustment layer's dialog box at any time to change the settings.
Reversible adjustments: You can delete an adjustment layer, removing the change from your image.
Hidden adjustments: Click the eyeball column to the left of the adjustment layer in the Layers panel to temporarily hide that change.
Tweakable adjustments: You can change the opacity and blending mode of adjustment layers to fine-tune the effect.
Limitable adjustments: You can add layer masks and vector masks to your adjustment layers to restrict their effect to only some of the pixels below. And you can later edit the masks as necessary.
Because of the added flexibility, you'll generally want to use adjustment layers rather than adjustment commands in your images. Of course, you still need the Image
Note
Photoshop CS4 introduces the Adjustments panel (to the left in Figure 8-18), a quick and easy way to add adjustment layers to your images. Open the panel, select a preset or, for a custom adjustment, click on the button for the type of adjustment layer you want to add. The Adjustment panel changes to a small version of that particular adjustment's dialog box, presenting you with the same options you have when using the Image
At the bottom of the panel are several buttons:
Add another adjustment layer: Click the left-pointing arrow and another adjustment layer will be added above the layer you just completed.
Toggle adjustment layer visibility: Click on the eyeball button to hide the current adjustment layer; click again to show it. Use this button to preview the adjustment as you work.
Reset adjustment: Click the curled arrow button toward the right to reset the current adjustment to the default settings.
Delete adjustment layer: Click the Trash icon to the far right at the bottom of the Adjustment panel to delete the current adjustment layer.
Tip
When working in the Adjustments panel,

You can also add an adjustment layer through the menu at the bottom of the Layers panel (click the fourth button from the left) and then move the cursor to the type of adjustment layer that you want to add (to the right in Figure 8-18) or through the Layer
The top three options in the menu that you open from the Layers panel are fill layers — layers completely filled with a color, gradient, or pattern. You can add a new empty layer and choose Edit
When your image has multiple layers and you want to apply an adjustment layer to only one layer, the new adjustment layer must be clipped — restricted to the one layer immediately below it in the Layers panel. (That's the layer that's active when you add the adjustment layer.) You can clip it to the layer below by Option+clicking/Alt+clicking the line between the two layers in the Layers panel (which is also how you unclip a pair of layers). When working in the Adjustments panel, click the button between the arrow and the eyeball in the lower-left to clip the new adjustment layer to the layer below. Figure 8-19 shows the difference between a clipped adjustment layer (left) and an unclipped adjustment layer (right). When unclipped, the adjustment is applied to all the layers below rather than to the one layer immediately below. When adding an adjustment layer through the Layers menu, select the option Use Previous Layer to Create Clipping Mask.

On the left side of Figure 8-19, the Hue/Saturation adjustment is applied only to the upper layer — the layer named Symbol. On the right, the adjustment layer isn't clipped, so it changes both the Symbol layer and the Background layer. By the way, the thumbnail in the Layers panel shows the Symbol layer's original copper color prior to the addition of the Hue/Saturation adjustment layer. Among the beauties of using adjustment layers is the joy you might feel when the client says, "Yup, you were right — let's go back to the original design."
In the Layers panel on the left in Figure 8-19, you can see the so-called "wedding rings" icon between the adjustment layer and the layer named Symbol immediately below. That's the icon that you see when Option+clicking/Alt+clicking to clip (or unclip) layers.
Tip
But what if you want an adjustment layer to change, say, three of the layers in your image? Create a layer group from the layers (click the New Group button at the bottom of the Layers panel and drag the layers into the Group icon in the panel), add the adjustment layer within the group, and change the layer group's blending mode from Pass Through to Normal at the top of the Layers panel. The adjustment layer, within the layer group and at the top of the layer group, is applied to all your layers in the group and only the layers in that group.
Note
Because they're layers, you can use a layer mask to apply the adjustment layer to only part of your layer. You may find it easier to make a selection of the area where you want the adjustment before selecting the adjustment layer — the mask will be automatically created from the selection.