In This Chapter
The Photoshop Filter menu includes more than 100 commands that you can use to fix, flatter, finesse, and freak out your photos. You can use most of the filters on most of your artwork and some of the filters on some of your artwork, and you probably won't ever use quite a few of the filters.
In this chapter, I start you off with a discussion of the new Smart Filters feature, something you should get used to using just about every time you apply a filter. Next, you get a look at what I call the "production" filters: namely, the key filters you use to improve or repair your images. Following that, I show you the basics of two of the most fun features in all of Photoshop: the Filter Gallery and Liquify. Not only are they fun, but you can use them to do wondrous things to your artwork. I wrap up the chapter with a look at several other key filters.
One of the most important concepts to keep in mind when working with filters are Smart Filters. When you apply a filter to a pixel layer, that's it — the pixels are changed. But, when you apply a filter to a Smart Object, you create a Smart Filter. With Smart Filters, you can apply one or more filters to a Smart Object and later change your mind about what settings — or even what filters — to use, without reverting to a saved copy of the file or using the History panel. Unlike adjustment layers, which are, in fact, separate layers in the image, Smart Filters work more like layer styles. They appear in the Layers panel below the layer to which they're applied and can be shown or hidden by clicking an eyeball icon (see Figure 15-1). And, like layer styles, you can reopen a Smart Filter by double-clicking it in the Layers panel.
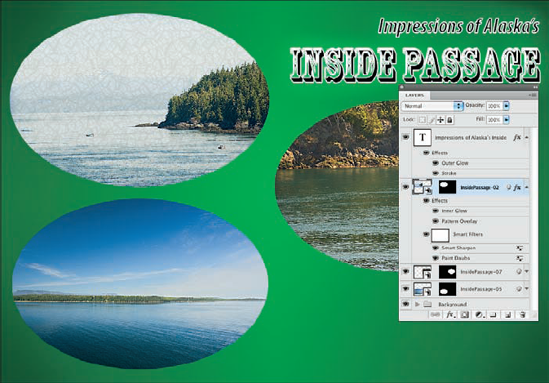
As you can see in Figure 15-1, the layer Inside Passage-02 (the active layer, highlighted in the Layers panel) has both layer effects and Smart Filters applied. The type layer above has only layer effects, whereas the other two Smart Objects, below in the Layers panel, have Smart Filters but no layer effects. Clicking the triangle to the far right of a layer name expands and collapses the list of effects and filters applied. Clicking the eyeball icon to the left of an item hides it without removing it. You can delete a Smart Filter by dragging it to the Trash icon (just as you can with layer effects), which removes its effect from the layer. To reopen a filter's dialog box to change settings, simply double-click the filter name in the Layers panel.
Note
Smart Filters can be applied only to Smart Objects (which are discussed in Chapter 10). Luckily, you can convert any pixel-based layer, even a background layer, to a Smart Object simply by selecting that layer in the Layers panel and choosing Layer
Because you can easily remove or change Smart Filters, they provide you with a special sort of creative license: the license to experiment and change your mind. Because they are nondestructive (they don't make permanent changes to the pixels in your image), you can use Smart Filters without fear of damaging your image. Of course that doesn't mean you shouldn't work on a copy of your beautiful photo — it's always better to safeguard the original image file and work on a duplicate.
Photoshop has several filters that you can use on just about any image to improve or finesse it. Most photos, for example, benefit from at least a little bit of sharpening to improve the detail in the image. In some cases, you want to decrease the visible detail in an image in areas to hide defects, or perhaps you want to blur a background to draw more attention to the subject of your shot. And Photoshop has a couple of filters that you'll find handy for correcting lens distortion and reducing noise (specks of red, green, and blue) in digital photos.
Note
Some filters aren't available for images in CMYK (cyan/magenta/yellow/black) color mode, and some aren't available when you're working in 16-bit color. All the filters are available for 8-bit RGB and grayscale images. (No filters are available for GIF or PNG-8 images, which use Indexed Color mode.) And keep in mind that you can apply filters to specific areas of an image by making a selection first. (See Chapter 8 for info on selections and masks.)
Tip
You can instantly reapply the last used filter exactly as it was applied with the keyboard shortcut
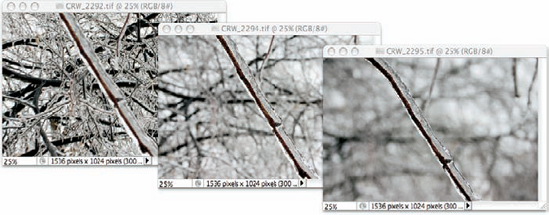
When looking at an image, your eye is naturally drawn to certain areas first. You generally look at bright areas before dark areas and areas of detail before smoother areas in the image. Compare, for example, the three photos in Figure 15-2 (which were taken using different focal lengths and lens apertures). Using Photoshop's sharpen and blur filters enables you to control the amount of detail throughout your image or in specific areas in order to control the areas to which you want to draw attention.
Photoshop offers five sharpen filters, three of which you can ignore. The Sharpen, Sharpen More, and Sharpen Edges filters have no user-definable settings and simply work in accordance with their names. Sure, they do a good job, but you don't have that all-important control over your images! Skip them in favor of the it-takes-some-work-but-it's-worth-it sharpening filters: Unsharp Mask and Smart Sharpen.
The Unsharp Mask filter is, indeed, a sharpening filter, despite the name (which comes from the blurry — unsharp — mask created from a copy of the image and used in the sharpening). As you can see in Figure 15-3, Unsharp Mask offers three sliders to adjust the appearance of your image.

In the upper left, you see the original image at 100% zoom. The middle image shows the sharpening at 100% zoom. To the right is a 300% zoom in the preview area of Unsharp Mask's dialog box.
Tip
Always evaluate your filters at 100% zoom even if you need to shrink the window to only a critical portion of the artwork. Zoomed in or zoomed out views might not accurately reflect the changes that you're making because the image isn't displayed with one screen pixel representing one image pixel. You can, of course, open a second view of the same image with the Window
Unsharp Mask works by identifying lines of strong contrast — the edges of elements within your image — and increases the contrast along those edges. Along the border of a dark area and a light area, Unsharp Mask uses a thin band of light and a thin band of dark to create a light and dark halo along the edges. That makes the edge appear much more defined. Here's how Unsharp Mask's sliders (as shown in Figure 15-4) work to control the effect.
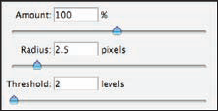
Amount: The Amount slider determines how much sharpening is actually applied by controlling the brightness and darkness of the halo. An amount of 50% is often suitable for small images that are already in pretty good shape. Use 100% for general photos. Use larger values, up to 500%, for special effects.
Radius: Use the Radius slider to determine the width of the halo. You typically need a value as low as 1 pixel for small images and perhaps as high as 7 for larger images that don't have a lot of tiny detail.
Threshold: The Threshold slider helps you avoid destroying your image by over-sharpening fine details. If the tiniest details in the image get wide, bright halos, they can look garish and unnatural. The higher the Threshold setting, the larger an area must be before sharpening is applied. Typical Threshold settings are 2 for a small image and 5 or 7 for a large image.
The Smart Sharpen filter provides you with an incredible amount of control over the sharpening process. Although it won't (quite) be able to give you a crisp image of that bank robber from the pixelated, blurry surveillance camera (that happens only on TV), it will help you improve just about any image. Those who photograph through microscopes and telescopes might find this filter particularly useful. However, remember that although you might improve an image, some blurs won't be removed by sharpening.
Figure 15-5 shows how well Smart Sharpen works with an appropriate image. (Note that the Preview box is unchecked in order to show the unsharpened original to the right.) In this image, the blurring is consistent throughout the subject of the shot, and there is a reasonable amount of blur. In Figure 15-5, you can see that when you select the Advanced radio button, you get a pair of new tabs in the dialog box: Shadow and Highlight. Use those tabs to control how strongly the effect is applied in the darker and lighter parts of the tonal range.

Smart Sharpen also enables you to specify any of three types of blurring that can be plaguing your image: Gaussian Blur (a uniform blur), Lens Blur (areas of blur beyond the focal distance of the lens), and Motion Blur (the subject or camera moving while the shot was taken). If you don't see distinct evidence of lens blur or motion blur, stick with Gaussian blur.
Note
When working with filters in Photoshop, make all of your final decisions with the preview (or the image itself) at 100% zoom. All other zoom factors can give you an idea of what changes you're making, but only at 100% zoom can you be assured that the preview is completely accurate.
As you can see in Figure 15-2, blurred areas in an image attract less attention than do the sharper parts of the photo. By making a selection, you can selectively apply Photoshop's blur filters. You can also use the blur filters to hide flaws in an image, including dust, noise, and unwanted little bits and pieces in the picture. You might also want to blur all or part of an image prior to using some of the artistic filters available in the Filter Gallery (which I discuss later in this chapter).
The Edit
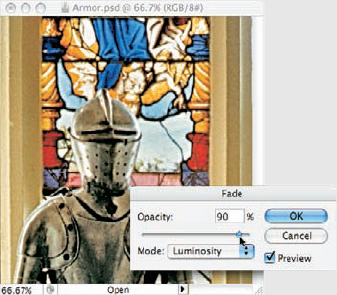
Immediately after applying just about any filter or adjustment command and after using many of Photoshop's tools, you can adjust the effect with the Fade command, found under the Edit menu. (Keep in mind that Fade is available only immediately after using a filter, adjustment, or tool. You can't even use the Save command in between.)
With Fade, you can reduce the opacity of the previous command or tool, thus reducing its impact on your image. You can also change the blending mode, which alters how the command or tool interacts with pixel colors prior to your change. Say, for example, you paint a black stroke with the Brush tool set to Normal and 100% opacity. Immediately afterward, you choose Edit Fade Brush. You can then pick a new blending mode and/or reduce the opacity setting, which changes the painted stroke to appear as if you'd selected the new settings in the Options bar before painting.
You can also apply the Unsharp Mask (or Smart Sharpen) filter and then choose Edit
Note that the Edit
Photoshop provides you with almost a dozen different blur filters. Although you'll eventually develop a special fondness for one or two blur filters, it's good to know how each of them works. Table 15-1 gives a quick overview of the available filters.
Table 15-1. The Workings of Photoshop Filters
What It Does | Tips on Using It | |
|---|---|---|
Average | This filter looks at each of the pixels in the selection, determines the average color value, and then assigns that color to all the pixels in the selection, producing an area of solid color. | Changing the opacity or blending mode with the Edit |
The Blur filter applies a slight blur throughout the image or selection. | Apply the Blur filter and then use the shortcut | |
Blur More is simply a stronger version of the basic Blur filter. | ||
The Box Blur filter blurs the image vertically and horizontally; you see the effect most noticeably in small highlights that tend to bloom into squares. | In the Box Blur dialog box, you control the filter with a Radius slider. | |
This filter produces a smoothly blurred version of your image without the distracting artifacts and lines you get by repeatedly applying the Blur More filter. | Get more control over the blurring effect by using the Radius slider, which lets you control the amount of blurring. | |
This filter simulates the effect in which the camera's zoom and aperture create a sharp foreground and a blurry background. | Use an alpha channel (a saved selection) to determine where and how strongly the filter is applied. For a look at the Lens Blur filter in action, see Figure 15-6. | |
This filter lets you choose any angle and a wide range of distances (measured in pixels) to suggest motion for all or part of an image. | Use it without a selection to produce the illusion that the camera (not the subject) was in motion. Make a selection and copy it to a new layer to blur just that part. | |
An incredibly powerful, yet incredibly flawed, tool that blurs in a spinning motion around a center point in your image or selection, or simulates zooming in on that point. | With no preview available, you have no idea what settings are appropriate for your image (and artistic vision) without trial and error. | |
Uses the Radius slider and one of the shapes from your Shapes picker as a pattern for the blur. | You can load additional shapes by using the small black triangle at the upper right of the shapes area. | |
Controls the blur by recognizing edges (areas of extreme difference along a line of pixels) and blurring within those areas. | Use Smart Blur in Normal mode to eliminate all fine detail in your image, use it again in Edge Only mode to trace edges in the image, and then use the shortcut | |
This filter goes beyond Smart Blur in preserving edges. Restricts the blur to large areas of similar color in the image, eliminating the fine detail. | Much like working with the Unsharp Mask filter, you use the Radius slider to determine the amount of change and the Threshold slider to exempt some areas of the image from the change. |

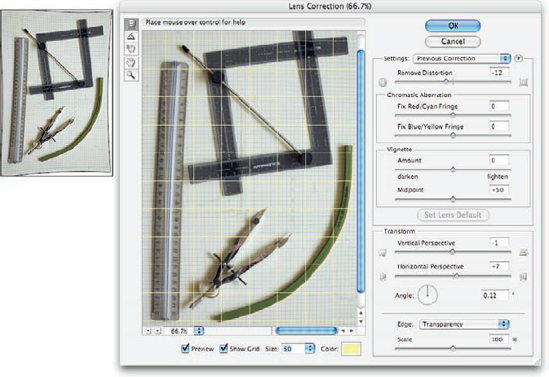
The Lens Correction filter (find it among the Distort filters) does a wonderful job of cleaning up pin cushioning and barrel distortion (the outer edges of your image appear to bend inward or outward, respectively). You'll see pin cushioning when shooting with a telephoto lens at its max zoom and barrel distortion at the lens's lower magnification. Both are most obvious when the photo has what should be straight lines at the edges. You can also use Lens Correction to adjust the vertical or horizontal plane of an image. In Figure 15-7, you see the Lens Correction window, a rather complex working environment.
Here's what you have at your disposal in the Lens Correction window:
In the upper-left corner of the window are five tools:
You can also find
Remove Distortion slider: The Remove Distortion slider is the heart of this filter. You use this to compensate for pin cushioning or barrel distortion in the image. Drag it back and forth until your image's vertical and horizontal lines are straight throughout the image.
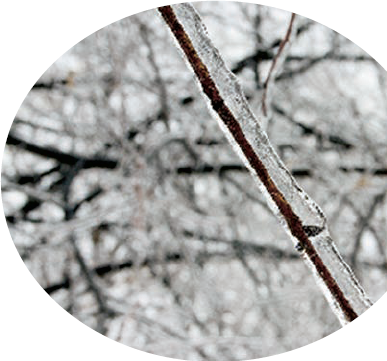
Chromatic Aberration sliders: Sometimes a photograph shows distorted color along fine angular lines, such as the branches of trees or latticework. You can minimize these colored halos or fringes with the Chromatic Aberration sliders. Generally speaking, you want to zoom in close on a specific area of detail to make the adjustment.
Vignette sliders: Drag the Amount slider to the left to add a dark vignette (fading along the outer edges of the image) or to the right for a white vignette. The Midpoint slider increases and decreases the amount of shadowing or highlight along the edges.
Transform controls: Use the Vertical Perspective and Horizontal Perspective sliders to make your image appear parallel to the viewer. Much like using the perspective crop option or the Edit

Zoom and grid: Click the minus and plus buttons in the lower-left corner to zoom out and in, or choose a preset zoom factor from the pop-up menu. Click and drag on the Size field's label (the actual word Size) to resize the grid. Click the color swatch to change the color from the default gray. (I liked bright yellow for the image in Figure 15-7.)
Saving and loading settings: From the Lens Correction window's menu (to the right of the Settings pop-up menu), you can save settings and load them later. Because you can name the settings, you can save a set for each of your lenses, at each of their zoom factors, and apply the same correction easily, time after time.
Digital noise — those annoying red, green, and blue specks in your image — can ruin an otherwise lovely picture. (To avoid noise, make sure that your camera is set to shoot at the lowest ISO setting possible.) Photoshop also has a filter for reducing (not necessarily eliminating) digital noise in your images. Found in the Filter

Tip
When you work with Raw images, do all your noise correction in the Camera Raw plug-in (see Chapter 7). For images in formats other than Raw, use the Reduce Noise filter.
Here are the steps that I recommend when you use the Reduce Noise filter:
Set the details sliders to 0 (zero).
In the Reduce Noise dialog box, drag the Preserve Details and Sharpen Details sliders all the way to the left. This eliminates any interference with the actual noise reduction.
Reduce Color Noise.
Use the Reduce Color Noise slider to minimize the red, green, and blue specks in your image. Drag the slider slowly to the right until the color noise is gone.
Adjust Sharpen Details.
Increase the Sharpen Details slider 1% at a time until the color noise returns; then back off 1%.
Adjust Preserve Details.
Drag the Preserve Details slider to the right until you have a good balance between image detail and any luminance noise (bright and dark specks) in the image.
If you see noise of one color considerably longer than the others when dragging the Reduce Color Noise slider, click the Advanced button near the top of the dialog box and work with each channel individually, according to its needs. Also note the Remove JPEG Artifact check box at the bottom of the window. If your image is suffering from JPEG compression problems, selecting that check box might help relieve the effects. (JPEG compression often results in visible borders between 8 × 8 pixel squares within your image.) Remember, too, that you can use the button to the right of the Settings pop-up menu to save your correction for future use — it will be added to the Setting menu.
You can apply and combine many (but not all) of Photoshop's creative filters by choosing Filter

Note
If Filter Gallery is grayed out and unavailable, head for the Image
The basic workflow goes like this: Adjust a filter, add a new filter to the stack, select the new filter in the middle pane, adjust the settings to the right, add a new filter to the stack, and so on. If you adjust your first filter settings and then click another filter in the middle column before adding another effect, you replace the first filter rather than adding to it. (If you Option/Alt+click a new filter, it will be added to the stack rather than replace the active filter in the stack.) Here's my step-by-step strategy for working in the Filter Gallery window:
Prepare your image before entering the Filter Gallery.
Many of Photoshop's creative filters work best when you prepare the image (or parts of the image) first. You have a couple of key filters that don't appear in Filter Gallery:
Smoothing detail: Because Photoshop's art-related filters can concentrate on details in your image, too much fine detail can make your filter effects crowded and cruddy. Before working with Ink Outlines, for example, try eliminating the tiny little bits in your image. You could try either Smart Blur or Surface Blur.
Adding detail: Many of Photoshop's filters don't do anything if the target area doesn't have some texture or detail with which to work. That's where the Add Noise filter comes in handy, adding dark and light specks to the smooth area. Use the Monochromatic and Gaussian options, with an Amount setting from 10% to 15%. After adding noise to the too-smooth area, consider using the Blur
Don't forget layers and blending modes.
Make a copy of your layer before entering the Filter Gallery so you can later mess around with layer blending modes and opacity to combine the filtered version with the original, which can soften or even enhance the effects you've applied.
Add to the stack before selecting filters.
You make your initial filter selection and adjustment. Then before you switch to a different filter in the middle pane of the window, you need to add a filter to the stack by clicking the New Effect Layer button in the lower-right corner (to the left of the Trash icon).
Play with the stacking order.
Drag filters up and down in the stack at the lower right to change their order.
The order in which the filters are applied often makes a huge difference in the final appearance of your image.
Use the eyeball column.
It's a good idea sometimes to hide one or more effects in the stack while you fine-tune a filter's settings.
Note
Filters are cumulative — changes that you make to one filter can themselves be changed by other filters in the stack.
Not all creative filters are available in the Filter Gallery. Remember that Photoshop has dozens of filters that are available only through the Filter menu, not through Filter Gallery.
Although the Lens Correction filter has added another powerful correction tool to your arsenal, you still want to sometimes fix a photograph's perspective or barrel distortion with Liquify. Perhaps. But with Lens Correction now available, Liquify can concentrate on its fun side.
I know of nothing in Photoshop that can bring a smile faster and more easily than creating some strange creature from a friend or loved one in Liquify. I will readily admit that the glow produced by the praise of an art critic is gratifying, but does it compare to, "More, Uncle Pete! Give me bigger ears!"? It would certainly be a disservice to the Liquify feature to overlook its powerful image-correction capabilities, so please remember that almost anything you can do to emphasize or enhance an attribute can be done in reverse to minimize that aspect of the image. Make someone short and wide? You can also make them tall and thin. Creating a bulging nose? Create a slim and pert nose. It's all possible with Liquify.
That having been said, examine Figure 15-10, which shows some rather dramatic changes. (But it should give you some idea of how useful Liquify can be for more subtle tasks, like trimming tummies, toning arms and legs, thinning noses, and other such work.)
Take a look at the tools arrayed along the left edge of the Liquify window. Here's what they do, starting at the top:
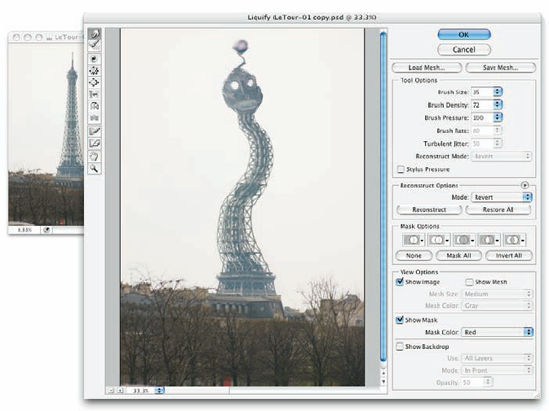
To the right in the Liquify window are a number of variables and options. Brush Size is the tool brush diameter; Brush Density is comparable with feathering (lower is softer); and Brush Pressure controls the strength of the active tool.
The Reconstruct Options let you restore or partially restore your image to the original appearance. The Reconstruct button is less like Step Backward or Undo and more like Fade. Rather than reversing the liquification steps you've already applied, it weakens them. The Mode pop-up menu offers several ways to control how strictly the image is reconstructed. The mode that you select is also used with the Reconstruct tool. (Revert is the most precise mode.) The Restore All button returns your image to its pre-Liquify appearance.
If you're working on only one layer of your image and that layer has a layer mask or transparent areas, or if you make a selection before entering the Liquify feature, you can use the buttons in the Mask Options area to create frozen areas (areas that are protected from change).
Near the bottom of the right side of the Liquify window (as you can see in Figure 15-10), you can see the View Options, which let you show and hide the mesh: the actual distortion you're creating. Note the mesh size and color options.
Photoshop has dozens of filters, creative and productive, that you access through the Filter menu rather than through the Filter Gallery. Some do strange and wonderful things to your selection or image, and some just do strange things that you might never need. You can find a description of each of the filters in Photoshop's Help, but a couple of them are worth a bit of attention here.
In the Filter
Clouds make lovely, unobtrusive backgrounds (as you see in Figure 15-12) that can be scaled and transformed to produce smoke or steam, and you can even create marbling effects from clouds. In the Filter