
Working with Actions and the Batch command
Scripting in Photoshop
Automating your work in Bridge
Generating multi-page PDFs and presentations
Generating Web galleries through Bridge
A lot of the work that you do in Photoshop is fun — experimenting with filters, applying creative adjustments, cloning over former in-laws, that sort of thing. A bunch of your work, though, is likely to be repetitive, mundane, and even downright boring. That's where automation comes in. If a task isn't fun to do, if you need to speed things up, or if you need to ensure that the exact same steps are taken time after time, automation is for you.
I begin the chapter with a look at Photoshop's Actions and the Batch command, which enable you to process many files automatically. Next, I give you a quick look at scripts, such as the very powerful Image Processor. Scripts are sort of little computer programs that you use to control your computer — Photoshop, other programs, your printer, or even an operating system itself. After that, I introduce automation through Bridge's Tools menu and show you the powerful Output panel. Bridge also enables you to generate PDF presentations, multi-page PDFs (including contact sheets and picture packages), and even Web galleries of your images.
In Photoshop, an Action is simply a recorded series of steps that you can play back on another image to replicate an effect or technique. To choose a wild example, say that every image in your new book about Photoshop needs to be submitted at a size of exactly 1,024 × 768 pixels at 300 ppi, regardless of content. Record an Action that uses the Image Size command to change resolution and then use the Canvas Size command to expand the image to 1,024 × 768 pixels. Use that Action (play the Action) on each image before submitting it. Better yet, wait until all the images for a chapter are ready and then use the Batch command to play the Action automatically on each of them!
Actions and the Batch command not only streamline repetitive tasks; they also ensure precision — that every one of those images will be exactly 1,024 × 768 pixels, each and every time. But Actions also have a creative side to them. The lower part of the Action panel's menu (see Figure 16-1) contains Action sets that you can load into the panel to produce frame and border effects, text effects, and more. (The content of your Actions panel menu might differ from what's shown in Figure 16-1.) You can also purchase collections of Actions from commercial sources.
To work with an Action, open an image, select the Action in the Actions panel, and then click the Play button at the bottom of the panel. As you can see in Figure 16-1, the three buttons to the left use the near-universal symbols for Stop, Record, and Play. The three to the right use the standard Adobe symbols indicating New Set, New Action, and Trash.
Any step in the Actions panel that doesn't have a check mark in the left column is skipped when you play the Action. Any step that has a symbol visible in the second column (the modal control column) pauses when you play the Action. Click in the second column when you want the Action to wait for you to do something. Perhaps you'll click in that column next to a Crop step so that you can adjust the Crop tool's bounding box. You might click in the second column next to an Image Size step so that you can input a specific size or choose a resampling algorithm. After you make a change or input a value for that step, press Return/Enter to continue playing the Action.
Tip
Notice the grayed-out Save Actions command in the panel's menu in Figure 16-1. Remember that you have to select a set of Actions in the panel, not an individual Action, to use the Save Actions command. If you want to save only one Action, create a new set and Option/Alt+drag the Action to that set to copy it. You can also create a printable text file (.txt) of your Actions set by holding down the
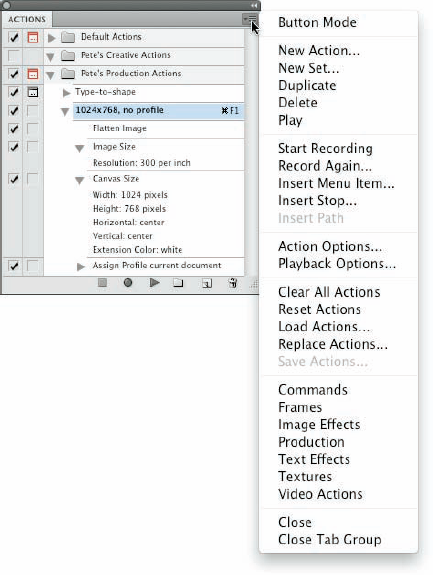
If you get hooked on Actions, you'll also want to try Button Mode in the Actions panel menu. Each Action appears in the panel as a color-coded button. You don't see the steps of the Action, so you don't know whether an individual step is being skipped and you can't change the modal control column, but you might like the color-coding to sort your Actions.
The real power of Actions comes to you when you record your own. Sure, the sets of Actions included with Photoshop are great, and the commercial packages of Actions have some good stuff too, but it's not your stuff. When you record your own Actions, you record the steps that work for your images, your workflow, and your artistic vision.
Actions can't float free in Photoshop's Actions panel: Each Action must be part of a set of Actions. Before beginning to record your Action, you can select an existing set or click the fourth button at the bottom of the panel to create a new set. When you have a set selected, you can then click the New Action button (second from right). Then, in the New Action dialog box (as shown in Figure 16-2), assign a name (and color-code for Button Mode and perhaps assign an F-key combination) and click the Record button. From that point forward, just about everything you do in Photoshop is recorded as part of the Action until you click the Stop button at the bottom of the Actions panel. No worries, though — you can always delete unwanted steps from a recorded Action by dragging them to the Trash icon at the bottom of the Actions panel. And if you want to change something in the Action, you can double-click a step and rerecord it.

Note
You can record most of Photoshop's commands and tools in an Action, but you can't control anything outside of Photoshop. (For that you need scripting, introduced later in this chapter.) You can't, for example, use an Action to print (controlling the printer's own print driver), copy a filename from the Mac Finder or Windows Explorer, or open Illustrator and select a path to add to your Photoshop document. Nor can you record the movement of the cursor in your Actions, which generally rules out recording painting tools.
Here are some tips about recording your own custom Actions:
Open a file first. Open the file in which you're going to work before you start recording the Action. Otherwise, the Open command becomes part of the Action, and the Action will play on that specific file every time you use it. You can, however, record the Open command within an Action to open a second file — perhaps to copy something from that file.
Record the Close command after Save As. When you record the Save As command in an Action, you're creating a new file on your hard drive. Follow the Save As command with the File

Use Percent as the unit of measure. If you need an element in your artwork to be in the same spot regardless of file size or shape (like a copyright notice in the lower-right corner), change the unit of measure to Percent in Photoshop's Preferences before recording the Action.
Record/insert menu commands. When you use a menu command while recording your Action, the actual values that you enter into the dialog box are recorded, too. If you'd rather select the values appropriate for each individual image (perhaps for the Unsharp Mask filter), insert the command rather than record it. When you reach that specific spot in your process, use the Actions panel menu command Insert Menu Item (refer to Figure 16-1). With the dialog box open, mouse to and select the appropriate menu command; then click OK to continue recording the Action. In Figure 16-3, you see the Insert Menu Item dialog box when first opened (before a command is selected) and after I used the mouse to select the Image Size command from Photoshop's Image menu.
Record multiple versions of a step, but activate one. Say you want to record an Action that does a lot of stuff to an image, including changing the pixel dimensions with the Image Size command. However, you want to use this Action with a variety of images that require two or three different final sizes. You can record as many Image Size commands as you want in that one Action — just remember to deselect the left column in the Actions panel next to each of the Image Size steps except the one you currently want to use. And you can record an Action within an Action, too. Just play the second Action while recording the first.
Insert a message or warning. Use the Actions panel menu command Insert Stop to send a message to anyone who plays your Action. The message could be something like "You must have a type layer active in the Layers panel before playing this Action" with buttons for Stop and Continue. Or you could phrase it more specifically: "If you have not selected a type layer in the Layers panel, click Stop. If a type layer is active in the Layers panel, click Continue." The more precise the message, the less confusion later. In Figure 16-4, you see the Record Stop dialog box, where you type your message when recording the Action (top), as well as a look at how the message appears when the Action is played back later (bottom).
Remember Conditional Mode Change and Fit Image. These two commands in the Automate menu are designed to be recorded in an Action that you might later use on a wide variety of images.
Conditional Mode Change is very handy when your Action (or final result) depends on the image being in a specific color mode. When you record Conditional Mode Change in an Action, every image, regardless of its original color mode, is converted to the target color mode (see Figure 16-5). Say, for example, that you need to apply a certain filter in an Action, but that filter is available only for RGB images. If you record Conditional Mode Change before running the filter, the Action will play properly.
Fit Image specifies a maximum width and height that the image being processed must not exceed, regardless of size or shape — great for batch-processing images for the Web. Fit Image maintains your images' aspect ratios (to avoid distortion) while ensuring that every image processed fits within the parameters you specify (see Figure 16-6). If you need all landscape-oriented images to be 800 × 600 pixels and all portrait-oriented images to be 600 × 800 pixels, enter 800 in both the width and the height fields.
Always record an Action from a copy of your image. Because the steps that you record in the Action are actually executed on the open file, record your Action using a copy of the original image. That way, if something goes wrong, your original image is protected.


Photoshop's File

You must remember three things when assigning filenames:
Include a variable. Something must change from filename to filename. Select one of the top nine items in the pop-up menu (some version of the document name or a serial number or a serial letter). It doesn't have to be in the first field, but one element of the filename must be different from file to file.
Don't use a period (.) in any field. You can type in any of the fields (except the last one you use), but for compatibility, stick with letters, numbers, underscores (
_), and hyphens (-).Warning
Absolutely do not use a period (.) in the filename. The only period that can be used in a filename is the one that's automatically added immediately before the file extension.
You have two other decisions of note in the Batch dialog box. When you elect to suppress any Open commands in the Action, you protect yourself from poorly recorded Actions that start by opening the image with which they were recorded. However, if the Action depends on the content of a second file, you don't want to override that Open command. Generally, you want to override any Save As commands recorded in the Action, relying instead on the decisions that you make in the Batch dialog box to determine the fate of the image.
You can use AppleScript (Mac), Visual Basic (Windows), and JavaScript (both) with Photoshop. Photoshop includes several very useful scripts in the File
Scripts are much more powerful than Photoshop's Actions because they can control elements outside of Photoshop itself. AppleScripts and Visual Basic scripts can even run multiple programs and play JavaScripts. If you're interested in scripting, go to the Photoshop folder on your hard drive and explore the content of the Scripting Guide folder. You can find plenty of information to get you started!
Tip
You can find more scripts on the Internet, including some at www.adobe.com/cfusion/exchange/index.cfm. Select Scripts from the Adobe Photoshop Download pop-up menu.

Figure 16-8. Among Photoshop's most powerful features is the ability to use scripts to automate your workflow.
If you shoot in Camera Raw format, perhaps the most useful of the pre-recorded scripts is Image Processor (see Figure 16-9). You can use Image Processor to batch-convert your Raw images to JPEG, PSD, or TIFF — and you can even resize the images automatically while converting! (And while Image Processor is designed to work with Raw files, you can actually convert any file format that Photoshop can open.)

Image Processor is much simpler than it appears:
Select the images to process. If the images are already open in Photoshop, great! If not, click the button and select a folder of images. If the source folder has subfolders and you want to process the images in those subfolders, select that option.
Choose a destination. You can save the files in the folder of origination, or you can click the button and select a different folder in which to save the processed images.
Warning
Do not click the Select Folder button and select the source folder. If you want to keep the processed images in the same folder as the unprocessed images, simply click on the Save in Same Location button. Photoshop is smart enough — most of the time — to recognize the source folder and avoid re-processing already-processed images in an endless loop, but don't risk it.
Select the file format and options. Each of the three file formats offers the option of resizing. JPEG offers options for Quality (the amount of compression — and associated image degradation) and to convert to sRGB (for the Web or e-mail). Maximizing compatibility for PSD files ensures the image can be seen and opened by other programs of the Creative Suite and earlier versions of Photoshop. TIFF's LZW compression can significantly reduce file size, without degrading the image at all.
At the bottom of the Image Processor dialog box, you also have the options to run an Action on the images as they're processed, to add your copyright information to the file's metadata (not on the image itself), and to embed the color profile in the image.
The first step in getting familiar with Adobe Bridge and its automation options is Bridge's Tools menu (see Figure 16-10). Note that if you have the Adobe Creative Suite installed, you'll also see other programs listed in addition to Photoshop.

Here's an overview of some of the tasks you can perform through the Tools menu:
Batch Rename. Rename a whole series of images in a single process! Select the image thumbnails or a folder of images in Bridge, open Batch Rename (see Figure 16-11), construct the new filenames, and click the Rename button.
When building the new file names, use the plus and minus buttons to the right to add or subtract each element. The various choices are shown in the box to the right in Figure 16-11. Each element will have one or two fields or pop-up menus to the right.
Warning
Absolutely do not use a period (.) in any text file of the new filename. The only period that can be used in a filename is the one that's automatically added immediately before the file extension. In the text fields, use only letters, numbers, underscores (
_), and hyphens (-). To use a period or any other symbol in the new filename risks making the file unrecognizable by Photoshop or any other program. (This means you, too, Mr. & Ms. MacUser!)Device Central. Used to create images for display on cell phones and other such smaller screens, Device Central can also be accessed through Photoshop's File
Work with metadata templates. Metadata, that useful information about an image stored with the image, often is repeated from file to file. You might, for example, add exactly the same copyright information to each and every image you shoot. Or you might return from a job or trip or vacation with gigabytes of images shot at the same location or of the same subject. Using metadata templates enables you to quickly and easily add metadata to a series of (or even folders of) images, in just a couple of clicks.
Manage Bridge's cache. The cache is where Bridge stores thumbnails and metadata of images with which it has already worked. Accessing the cache for a folder (rather than re-processing each image every time you open the folder) can save loads of time. However, sometimes the cache can get corrupted. Should you see, for example, thumbnails of images that have been moved or deleted, go to the Tools
Access automation in other programs. As you can see in Figure 16-10, Bridge's Tools menu also gives you access to a number of Photoshop's automations and scripts. (If you have Illustrator and/or InDesign installed, you'll have access to some of their features as well.)

Much of the functionality that once appeared in Photoshop's File

Portable Document Format (PDF), the native file format of Adobe Acrobat, has become an incredibly useful and near-universal format. It's hard to find a computer that doesn't have Adobe Reader (free software to open and view PDF files) or another program for viewing PDFs, and that helps make PDF a wonderful format for sharing or distributing your images.
In Bridge's Output panel, shown in Figure 16-13, you can quickly and easily create both on-screen presentations (complete with fancy transitions between images) and multi-page PDF documents (suitable for distribution and printing).

To create a PDF Presentation in Bridge, take the following steps:
Select the thumbnails of the images you want to include. You can click and then Shift+click to select a series of images or

Hint: You must select the images; you can't select only the folder. Bridge automatically skips any non-image files that are selected.
In the Document section, choose an appropriate size.
Choose one of the Web presets, shown in Figure 16-14, rather than a paper size. Adobe Reader can scale the presentation, so 800 × 600 pixels is a good choice unless you know the presentation will always be played back on a larger monitor. Choose your background color (black is an excellent choice) and determine whether you want to require a password to open the document or to make the presentation non-printable.
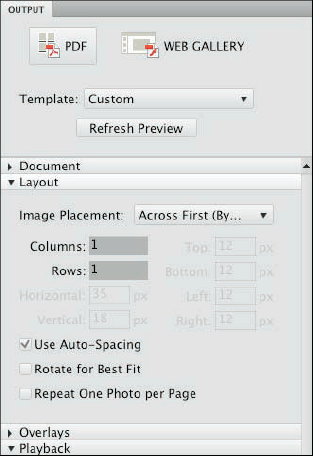
Choose a layout of one-by-one.
Unless you actually want more than one image displayed in each frame of the presentation, use a layout of one column and one row, as you see in Figure 16-15.
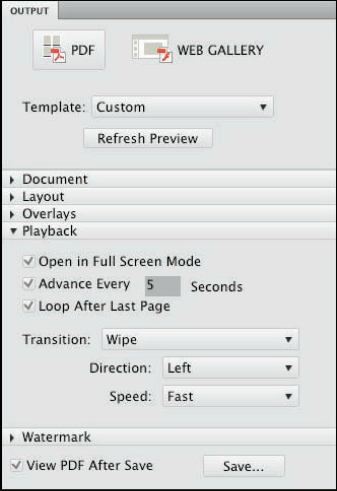
Choose your playback options.
You select whether you want the presentation to fill the screen, how long each frame will be displayed, whether the presentation plays once or continuously, and how it changes from frame to frame. Figure 16-16 shows the layout.
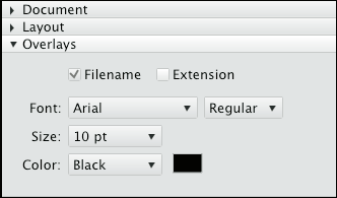
[Optional] Add the filename or a watermark to each frame.
In the Overlays section (shown later in this chapter in Figure 16-19), you can elect to add the filename (with or without the file extension) below each image, choosing the font, style, size, and color of your choice. You can also add a watermark, perhaps your copyright information at a reduced opacity, across the center of the image. You'll find that your options in the Watermark section (shown in Figure 16-20) include all the font choices, Opacity, and Foreground or Background. (Unless your images include transparency or reduced opacity, select Foreground.)
Preview your presentation.
Click the Refresh Preview button near the top (shown in Figures 16-14 through 16-16) to make sure you'll get want you want.
Save your presentation.
Way down at the bottom of this dialog box (and shown in Figure 16-16), you can choose to view the presentation (or not) when ready with the View PDF After Save option. Click the Save button, name the presentation (Bridge will automatically add the
.pdffile extension), choose a location in which to save, and click Save.

In the old Dark(room) Ages, photographers regularly made a record of which images were on which film strips by exposing those strips on a piece of photographic paper, thus creating a contact sheet. The contact sheet serves the same purpose as thumbnails or previews in Bridge or the Open dialog box or thumbnail images on a Web page — they show which image is which. Hard copy contact sheets are useful to present to a client. Bridge can automate the process for you in the Output panel by generating a PDF that contains small copies of each image in a folder. Here's the procedure:
Select the thumbnails of the images you want to include.
Hint: You must select the images; you can't select only the folder. Bridge automatically skips any non-image files that are selected.
Select an appropriate page size in the Document area.
Choose from among the presets or define a custom size. If the contact sheets will be printed, use a paper size, as you see in Figure 16-17. If they're intended only for on-screen display, select a size from the Web presets (shown in Figure 16-14). Elect to generate high-quality or low-quality thumbnails and pick a background color. (Black is beautiful and makes your images "snap," but also uses a lot more ink when printing.) You can also require a password to open the document or forbid printing the contact sheets.
Define your layout.
In the Layout section, you choose how many thumbnails in each row and column (Figure 16-18). You can choose to have the images added to the page row by row (the second image is to the right of the first) or column by column (the second image is directly below the first). You can also define the spacing between thumbnails, but the Use Auto-Spacing option is almost always a safe choice. You can also elect to auto-rotate images so that, regardless of orientation, all the images are the same size. Do not select Repeat One Photo per Page when generating contact sheets. (With that option selected, instead of contact sheets you'll have pages with multiple copies of one image).

Figure 16-18. Define the number of thumbnails and set the spacing (or use the convenient Auto-Spacing option).
Tip
If your folder is filled with portrait-oriented images, you can certainly have more columns than rows so that each image better fills the area allotted for it. For example, when printing 20 portrait images, using 5 columns and 4 rows produces larger printed images than using 4 columns and 5 rows.
Choose whether to use the filename as a caption.
In the Overlays section (shown in Figure 16-19), you can elect to use the filename as a caption, with or without the file extension. If you use this option, be sure not to choose a font size too large to fit within the space allocated for each thumbnail!
Add a watermark (or not).
You also have the option of adding a watermark (circled in red in Figure 16-20), but that's splashed across the middle of the page and might serve little purpose. If, however, you have an even number of rows and adequate spacing among thumbnails, you could consider sneaking in a line of information about the job or your copyright info.
Preview and save.
Click the Refresh Preview button (visible in Figure 16-20 to the upper-right) to get a look at what you're creating, make any changes necessary, and then click the Save button. You next see a dialog box in which you name the document (Bridge automatically adds the
.pdffile extension) and choose a location in which to save. Bridge creates a multi-page PDF, generating as many pages as necessary to hold all of the selected thumbnails.


Using Bridge's PDF-generation feature is also a great way to put multiple copies of an image on the same page for printing. Suppose you need to print a dozen copies of an image, each at 4 × 5 inches. Printing each on a separate sheet of paper takes 12 sheets (oh, the cost!) and 12 print cycles. Define a custom layout in Bridge's Output panel (as shown in Figure 16-21) to put four 4 × 5 images on a single page, and you use three sheets of paper and wait through only three print cycles. Um, let's see, which do you want to do?

In Bridge's Output panel, you can also generate galleries of your photos (see Figure 16-22). Create quick, yet elegant, stand-alone Web sites of your photos for posting on the Internet.

It takes only a few steps (okay, and a lot of experimentation) to create gorgeous galleries to display your photos just the way you want them to be seen. Here's what to do:
Select the thumbnails of the images you want to include.
Hint: You must select the images; you can't select only the folder. Bridge automatically skips any non-image files that are selected.
Select a template.
To the upper-right in Figure 16-22, you can see the Template menu. Choosing the template that's just right for you might take a number of experiments, but it's certainly worth exploring each of them, one at a time.
Fill out the Site Info.
This section is where you name the site, provide your contact info, and list the copyright notice (see Figure 16-23).
Choose colors for the gallery.
The options in this section vary, depending on the template selected. Figure 16-24 shows what choices you'll need to make when selecting the Standard template.
Fine-tune the appearance.
The content of the Appearance section (Figure 16-25) also varies, depending on the selected template.
Preview.
Click the Refresh Preview button (shown in the upper-right in Figure 16-22) to see the fruits of your decision-making process in steps 1–5. You can also preview in your Web browsers, which can show you any potential problems with complex templates in certain browsers. It's a great idea, too, to take the time to preview each of the templates, perhaps using the default color schemes and appearance settings, just to get a feel for them.
Tip
Bridge saves you time by only processing the first ten of the selected images when generating a preview. When you finally have the gallery looking juuuust right and click the Save button, all of the selected images are processed.
Generate the gallery.
Bridge offers you the option to save your gallery to your hard drive or to directly upload it to the host Web server. The Web server is a computer owned by your Internet Service Provider (ISP). (Most Internet service agreements these days include space on the servers for your personal home page.) Check with your ISP for specific upload instructions — the process varies quite a bit from ISP to ISP.


Tip
If you'd like to share a gallery with friends or clients but you don't have a Web server, save the gallery to your hard drive, send the entire content of the folder you choose as the destination, and instruct the recipient to open the file named index.html using a Web browser's File