
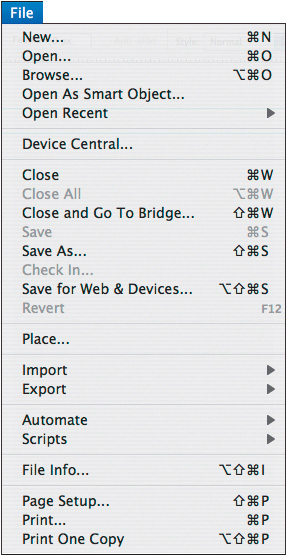
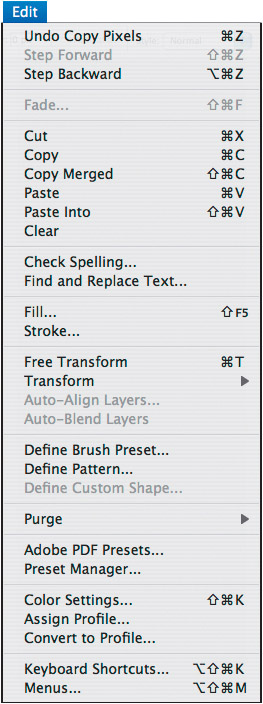
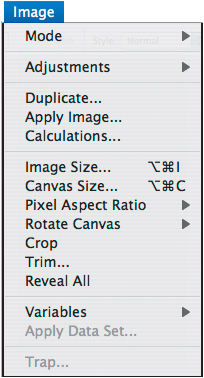
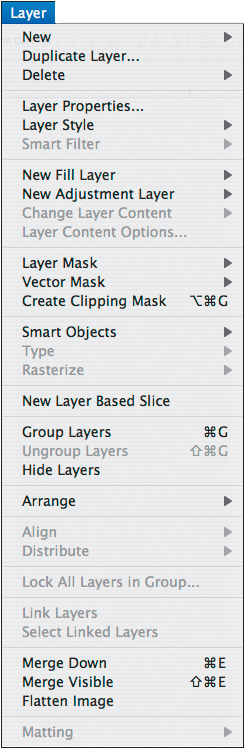
Chapter 1. Photoshop Interface
Styve Reineck © ShutterStock.com
IN THIS CHAPTER
Welcome to Photoshop! Using this chapter, you’ll launch Photoshop and become acquainted with the Photoshop interface—menus, tools, palettes, and lingo. You can read this chapter with or without glancing at (or fiddling with) the program features onscreen. Later, you can use it as a reference guide as you work. (Once you’re up and running in Photoshop, don’t forget to reread the “Working Smart” tips at the end of this chapter.)
To launch Photoshop in Windows:
In Windows 2000 or XP, click the Start button on the taskbar, choose All Programs, then click Adobe Photoshop CS3.
Open the C:Program FilesAdobeAdobe Photoshop CS3 folder in My Computer, then double-click Photoshop.exe.
Double-click a Photoshop file icon. ![]()
To launch Photoshop in the Mac OS:
Click the Photoshop icon ![]() in the Dock. (If you don’t have a Photoshop icon there yet, open the Adobe Photoshop CS3 folder in the Applications folder, then drag the Adobe Photoshop CS3 application icon into the Dock.)
in the Dock. (If you don’t have a Photoshop icon there yet, open the Adobe Photoshop CS3 folder in the Applications folder, then drag the Adobe Photoshop CS3 application icon into the Dock.)
Open the Adobe Photoshop CS3 folder in the Applications folder, then double-click the Adobe Photoshop CS3 application icon. ![]()
Double-click any Photoshop file icon (thumbnail).
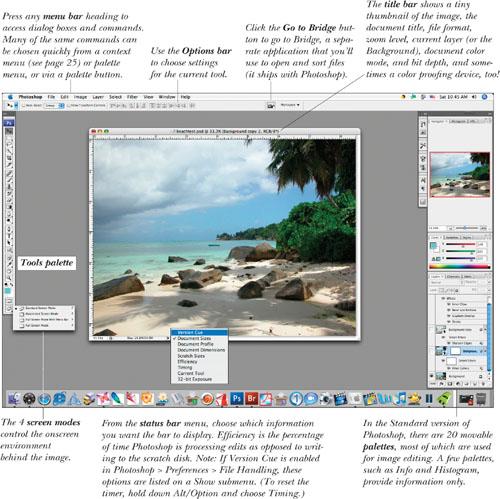
The Photoshop screen in the Mac OS
The Photoshop screen in Windows
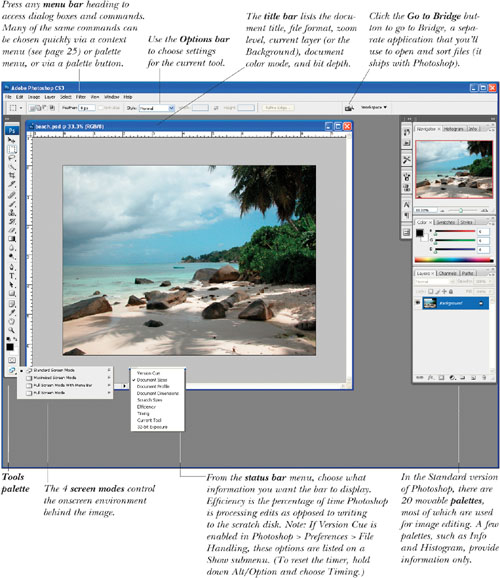
The menus


The Tools palette
Using the Tools palette
The Tools palette, illustrated on pages 7–9, contains 60 tools and a handful of buttons. Believe it or not, by the end of this book, you’ll be intimately—or at least marginally—familiar with most of them! To show the Tools palette if it’s hidden, choose Window > Tools.
To choose a tool, do one of the following:
• If the desired tool is visible on the Tools palette, click the icon.
• To cycle through related tools in the same slot, Alt-click/Option-click the visible one.
• Click the tiny arrowhead next to a tool icon to choose a related tool from a menu.
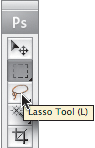
• For fast access with your cursor anywhere (except if you’re creating type), press the designated letter shortcut. The shortcuts are shown in the screen captures on the next three pages and in tool tips onscreen. A With Use Shift Key for Tool Switch unchecked in Preferences > General, simply press the designated letter to cycle through related tools in the same slot (for example, press “L” to cycle through the three Lasso tools). With the Use Shift Key for Tool Switch option checked, you have to press Shift plus the designated letter. (See, you’ve already learned your first Preference!)
A Use the tool tip to remind yourself of a tool name or shortcut.
To learn about the function of a tool as you’re using it, look at the bottom of the Info palette (see page 17). (If no tool information is listed, choose Palette Options from the Info palette menu, then check Show Tool Hints.) Tool tips and brief descriptions (hints) are also available for tools in some dialog boxes, such as Refine Edge and Print.
Before you start to use a tool you’ve selected, you need to choose settings for it from the Options bar at the top of your screen. For example, for the Brush tool, you’ll choose a brush tip, blending mode, opacity percentage, and other settings. If the Options bar is hidden, choose Window > Options. (Read more about the Options bar on page 9.)
Options bar settings remain in effect for each tool until you change them, reset that tool, or reset all tools. To reset the default settings for a tool, right-click/Control-click the tool thumbnail on the Options bar and choose Reset Tool from the context menu. B To reset all tools, choose Reset All Tools from the same menu.

B To access these commands, right-click/Control-click the thumbnail for the current tool on the Options bar.
In Preferences > Cursors, you can specify whether tool pointers look like their Tools palette icon or a crosshair or, for some tools, a circle the size of—or half the size of—the current brush diameter, with or without a crosshair (see page 388).
Tools on the Tools palette

A The upper part of the Tools palette
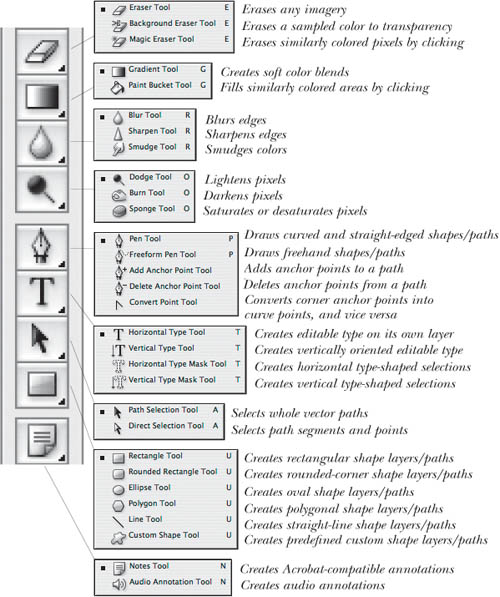
A The midsection of the Tools palette
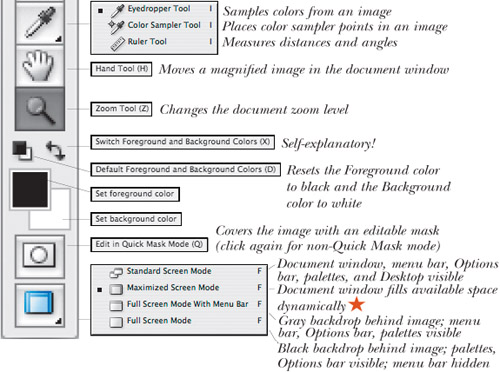
A The lower part of the Tools palette
The Options bar
You’ll use the Options bar to choose settings every time you switch tools—and sometimes even while using the same tool. B (If the bar is hidden, choose Window > Options.) Options bar features change dynamically depending on which tool is selected, but your choices remain in effect for each tool until you change them. You can drag the bar anywhere onscreen by its left edge.
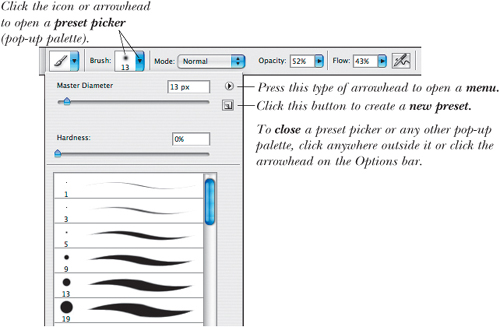
B Part of the Options bar, with the Brush tool chosen
You can change most numerical values in a palette or dialog box by dragging slightly to the left or right over the option name or icon—this is called a scrubby slider.C Examples include many values on the Options bar, Opacity and Fill on the Layers palette, Character and Paragraph palette features, and Input and Output levels in the Levels dialog box.
![]()
C A scrubby slider
To access a pop-up slider (e.g., to choose an Opacity percentage) click the arrowhead. To close a slider, click anywhere outside it or press Enter/Return. If you click an arrowhead to open a slider, you can press Esc to restore the last setting. To change a value incrementally, click in any field in a palette or dialog box, then press the up or down arrow key.
The palettes
Using the palettes ★
Most edits made in Photoshop require the use of one palette or another. Version CS3 introduces a clever new system for storing and accessing palettes so they’re easily expandable and collapsible and don’t intrude on the document window when you’re not using them. As expected, with enhanced flexibility, you also get greater complexity.
By default, some of the most commonly used palettes are grouped into vertical docks (dark gray areas) on the far right side A of your screen—except the Tools palette, which is on the left side. Each dock can hold as many or as few palettes or palette groups as you like. We’ll show you how to reconfigure the docks to suit your working style.
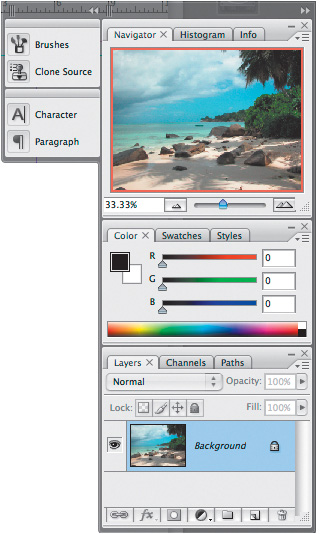
A There are two docks at the right edge of our screen: palettes in the left dock are collapsed to icons with names; palettes in the right dock are expanded and are organized into three groups.
Show/hide a palette: To show a palette, choose the palette name from the Window menu. The palette will display either in its default group and dock or in its last location. To bring a palette to the front of its group, click the tab (palette name). A few palettes can also be shown/hidden via keyboard shortcuts, which are listed on the Window menu.
Show/hide a palette (icon): Click the icon B or palette name. If Auto-Collapse Icon Palettes is checked in Preferences > Interface and you open a palette from an icon, it collapses back to the icon when you click away from it. With this preference unchecked, the palette stays expanded. To collapse it, click the collapse/expand button ![]() on the palette bar, palette tab, or palette icon.
on the palette bar, palette tab, or palette icon.
![]()
B Each palette has a unique icon. Try to memorize the ones you use most often.
Expand/collapse a palette (non-icon) or group vertically: Double-click the palette tab; or click the light gray bar (above the palette tabs); or click the palette or group minimize/maximize button. ![]()
Use a palette menu: Click the ![]() icon to open a menu for whichever palette is in the front of that particular group.
icon to open a menu for whichever palette is in the front of that particular group.
Close a palette or group: To close (but not collapse) a palette, click the close button ![]() on its tab, as in
on its tab, as in ![]() . To close a palette group, click the
. To close a palette group, click the ![]() on the gray bar. To close a group that’s an icon, expand the dock first by clicking the collapse/expand button.
on the gray bar. To close a group that’s an icon, expand the dock first by clicking the collapse/expand button. ![]() (To reopen a palette, use the Window menu.)
(To reopen a palette, use the Window menu.)
Collapse/expand a whole dock into icons with names: Click the collapse/expand button ![]() or the dark gray bar at the top of the dock. C To further collapse the dock to just icons (no names), drag the vertical edge of the dock inward horizontally (D, previous page); to expand it, do the reverse.
or the dark gray bar at the top of the dock. C To further collapse the dock to just icons (no names), drag the vertical edge of the dock inward horizontally (D, previous page); to expand it, do the reverse.
C We clicked the collapse/expand button to collapse the right dock to icons. The palette groups are preserved.
![]()
D We dragged the edge of the left dock inward to shrink that dock to just icons (no names).
Widen/narrow a dock and palettes (non-icon): Position the mouse over the vertical edge of the dock (![]() cursor), then drag sideways.
cursor), then drag sideways.
Lengthen or shorten a palette, group, or dock: Position the mouse over the dark gray line at the bottom of the palette or dock (![]() cursor), then drag upward or downward. Other palettes/groups in the same group or dock will scale accordingly.
cursor), then drag upward or downward. Other palettes/groups in the same group or dock will scale accordingly.
Move a palette to a different slot, same group: Drag the palette tab (name) horizontally.
Move a palette to a different group: Drag the palette tab over the bar of the desired group, and release when the blue drop zone border appears. A
A A blue drop zone border appears as we drag a palette into a different group.
Move a palette group upward/downward in a dock: Drag the gray bar, and release when the blue drop zone line appears in the desired location. B

B A blue horizontal drop zone bar appears as we move a palette group upward in the same dock.
Create a new dock: Drag a palette tab or gray bar sideways over the vertical edge of the dock, C and release when the blue vertical drop zone bar appears. Note: Depending on the current workspace settings, when you open a hidden palette from the Window menu, it may appear in a new dock.
C A blue vertical drop zone bar appears as we drag a palette out of its dock and create a new dock for it.
Make a palette or group freestanding: Drag the palette tab, icon, or group bar out of the dock. To move a freestanding group, drag the group bar.
Reconfigure a dock (icon): Use similar methods as for an expanded group. Drag the group bar over the edge of a dock to create a new dock; drag it between groups to restack it; or drag it over another gray bar to combine it with that group. The blue drop zone will indicate the new location for the palette or group.
• To reset the palettes to their default locations and show/hide state, choose Default Workspace from the Workspace menu on the Options bar. To reset just the palette locations, choose Window > Workspace > Reset Palette Locations.
• To create custom workspaces that remember palette locations and which palettes are showing or hidden, see pages 89–90.
• For any tool that uses a brush, you can click the Toggle Palette button ![]() on the Options bar to show/hide the Brushes palette. For the Type tool, this button opens the Character palette.
on the Options bar to show/hide the Brushes palette. For the Type tool, this button opens the Character palette.
• To learn more about showing/hiding palettes, see page 86.
The palettes illustrated
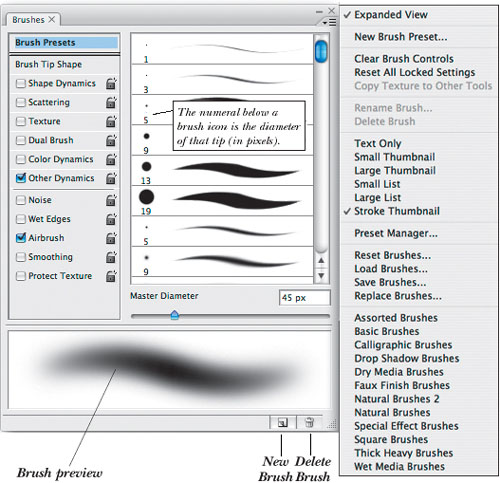
Brushes palette
You’ll use the Brushes palette to choose and customize brush tips for many tools, such as the Brush, Pencil, Clone Stamp, Pattern Stamp, History Brush, Art History Brush, Eraser, Blur, Sharpen, Smudge, Dodge, Burn, and Sponge. You can also use it to choose options for a graphics tablet and stylus. Click an options set on the left side of the palette to display options on the right. The preview at the bottom of the palette represents the current brush tip and settings.

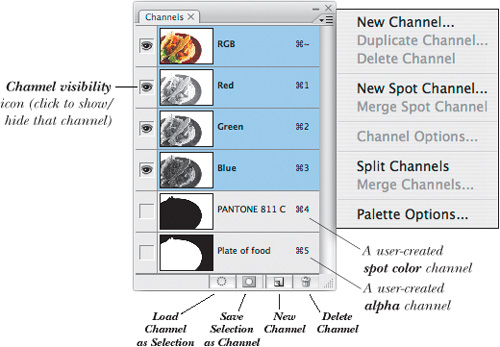
Channels palette
The Channels palette lists the color channels that make up an image. To display one of the channels by itself in the document window, click the channel name or use the keystroke listed on the palette. To redisplay the composite channel, such as RGB or CMYK, click the topmost channel on the palette, or press Ctrl-~/Cmd-~ (tilde).
You can also use this palette to save and load alpha channels (saved selections), and to create and store spot color channels, which commercial printers use to produce individual color plates for premixed inks.
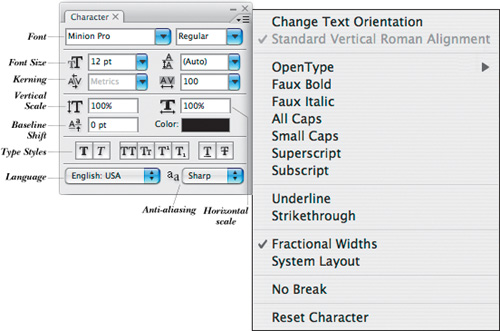
Character palette
You can choose attributes for any of the type tools via the Character palette, illustrated below, or from the Options bar. Open this palette from the Window menu, or by clicking the ![]() button on the Options bar when a type tool is selected.
button on the Options bar when a type tool is selected.
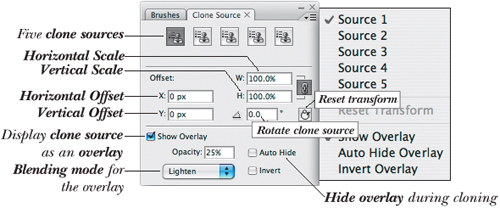
Clone Source palette ★
The Clone Source palette expands the power of the cloning tools. It lets you keep track of up to five different clone sources (represented by a row of source buttons at top of the palette), reassign new sources, clone repeatedly from the same source, and scale, rotate, or reposition source pixels before or as you clone them.
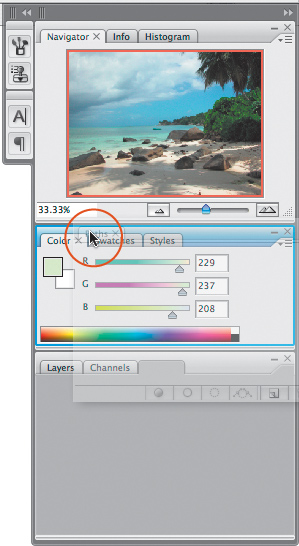
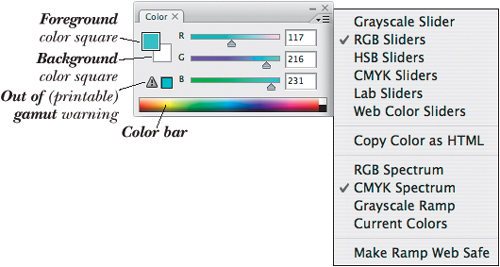
Color palette
The Color palette is but one of the vehicles for mixing colors in Photoshop. Choose a color model for the sliders or color bar from the palette menu, then mix a color using the sliders or quick-select a color by clicking the color bar. To open the Color Picker or Color Libraries dialog box, from which you can also choose colors, click once on the Foreground or Background color square if it’s already selected (has a black border), or double-click the square if it’s not selected. Colors are applied via painting and editing tools and via some commands, such as Canvas Size.
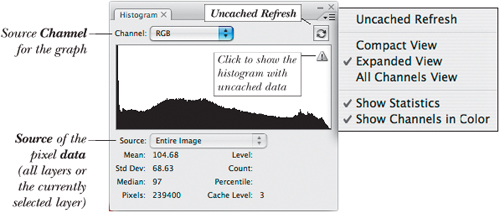
Histogram palette
While a file is being edited or while an adjustment dialog box is open, the Histogram palette diagrams either just the current light and dark (tonal) values of the image or both its current and modified light and dark values. This palette is for reference only, but it gives you important feedback.
Via the Channel menu, you can choose to have the palette display data about the composite channel (combined channels) or about just one channel. You can also expand the palette to display histograms for all the channels.
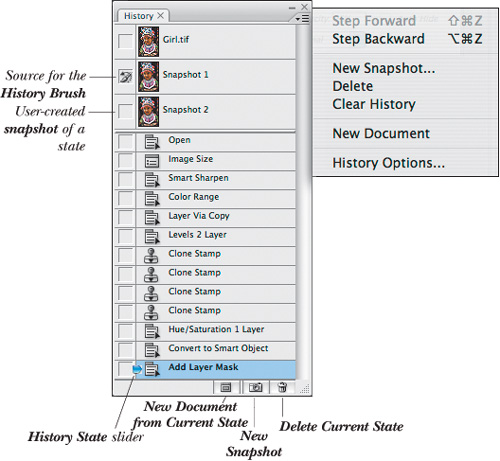
History palette
Using the History palette, you can reverse your editing steps in the current work session. Each brush stroke, filter application, or other image-editing command is listed as a separate state on the palette, with the bottommost state being the most recent. If you click a prior state, the document reverts to that stage of the editing process. In linear mode, the default mode for the palette, if you click an earlier state and resume image editing from that state (or delete that state), all subsequent (dimmed) states are discarded.
The New Snapshot command creates a state that stays on the palette until you close the image, regardless of the number of subsequent edits.
When you drag with the History Brush tool, the areas under your strokes are restored to the currently designated source state. The Art History Brush does the same thing, but in stylized strokes.
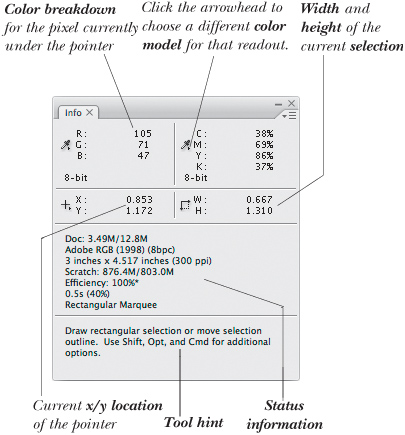
Info palette
The Info palette displays a color breakdown of the pixel under the pointer at its current location in the document window. While any color adjustment dialog box is open, the palette displays before and after color readouts. The Info palette also lists the current location of the pointer on the x/y axis.
Other information may display on the palette, depending on which tool is being used, such as the distance between points when you move a selection, draw a shape, or use the Ruler tool; the dimensions of a selection or crop marquee; or the width (W), height (H), angle (A), and horizontal skew (H) or vertical skew (V) of a layer, selection, or vector object as you transform it. The palette will also show readouts for up to four color samplers that you’ve placed in your document.
Press one of the tiny arrowheads to choose a color model for that readout (it can differ from the current document color mode). Or to do this via a dialog box, choose Palette Options from the palette menu, then in the Info Palette Options dialog box (shown below), change the mode for the First Color Readout and Second Color Readout. In the same dialog box, you can also change the Ruler Units for the palette (Mouse Coordinates); check which Status Information you want displayed in the lower part of the palette; and check Show Tool Hints to display interactive information about the current tool or edit.
• To choose a different unit of measurement for the Info palette and for the rulers in the document window, click the arrowhead on the Info palette for the X/Y readout.
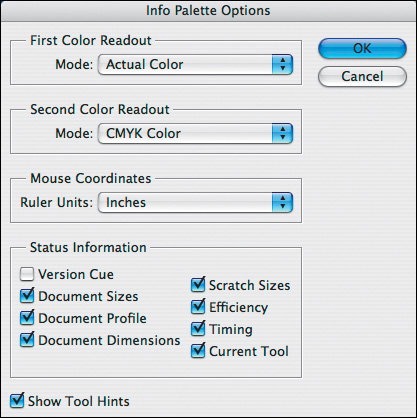
Use the Info Palette Options dialog box to choose preferences for the Info palette.
Layer Comps palette
When you create a layer comp (short for “composition”), it includes, collectively, the characteristics of the currently selected layer: visibility (which layers are showing or hidden), the position of imagery, and appearance (applied layer styles, including the layer blending mode). Creating layer comps is useful for deciding between several document versions or for presenting design variations to a client. For example, say you create several variations of a book cover. You make each version into a layer comp, say, with or without lettering, or with the lettering or background image in two different colors. When presenting the design to your client, instead of opening and closing separate files, you simply display each version sequentially within the same file by clicking the Apply Layer Comp icon on and off for each one on the Layer Comps palette.
Layer comps save with the document in which they’re created. Whereas histories affect all editing done to an image but can’t be saved, layer comps can be saved but let you display only layer options and settings.

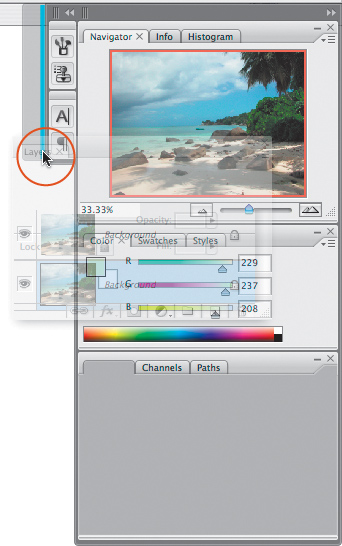
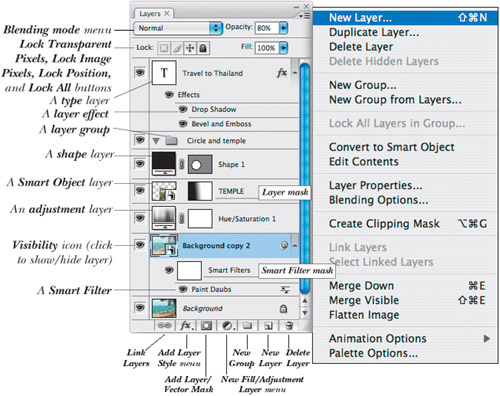
Layers palette
Every new image contains either a solid-color Background or a transparent layer, on top of which you can add layers of many types. Using the Layers palette, you can create, show/hide, duplicate, group, link, merge, flatten, delete, and restack layers; change the layer blending mode, opacity, and fill opacity; attach masks; and apply layer effects.
Only the currently selected layer can be edited. To select a layer, click the thumbnail or click next to (but not on) the layer name. The palette looks complex, but you’ll soon be using it all the time!
These are the type of layers that you can create, or that Photoshop creates automatically:
• Image layers.
• Fill and adjustment layers, to apply temporary color or tonal adjustments to underlying layers.
• Editable type layers, which are created automatically when you use the Horizontal Type or Vertical Type tool.
• Smart Object layers, which are created automatically when you bring an Illustrator vector file, another Photoshop file, or a Raw (digital camera) file into a Photoshop document via File > Place. Double-click a Smart Object layer, and the object reopens in its original application for editing; save and close it, and the object updates in Photoshop. Apply a filter to a Smart Object layer, and it becomes a Smart Filter, ★ which, like an adjustment layer, is editable and removable.
• Shape layers, which contain vector shapes.
Navigator palette
You can use the Navigator palette to move a magnified image in the document window or change the document zoom level—or if you prefer, you can accomplish the same tasks using tools and keyboard shortcuts.

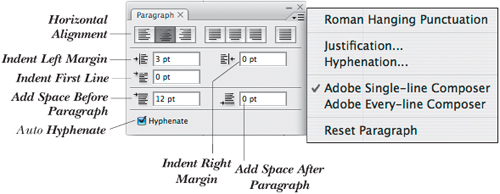
Paragraph palette
After creating paragraph type, you can use the Paragraph palette to apply attributes such as horizontal alignment, indentation, space before, space after, and auto hyphenation. Additional type formatting features are accesssed via the palette menu.
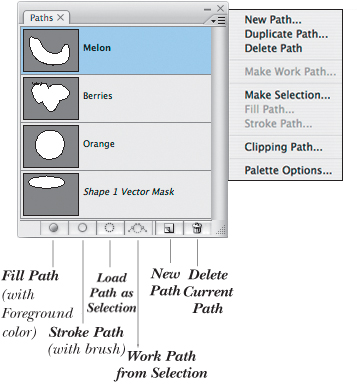
Paths palette
In addition to the bitmap image that serves as the foundation of your Photoshop document, you can also draw vector shapes, called paths, which consist of curved and straight-line segments connected by anchor points. You can use the Paths palette to save, activate, duplicate, apply a fill or stroke to, and delete paths, and to load paths as selections.
You can draw a path directly with a shape tool or the Pen tool, or you can create a selection and then convert the selection into a path. Conversely, to create a precisely drawn selection, you can draw a path and then convert it into a selection. Once a path is drawn, you can apply a color to its fill or stroke and you can reshape it by using the Pen tool or any of its relatives: the Add Anchor Point, Delete Anchor Point, and Convert Point tools.
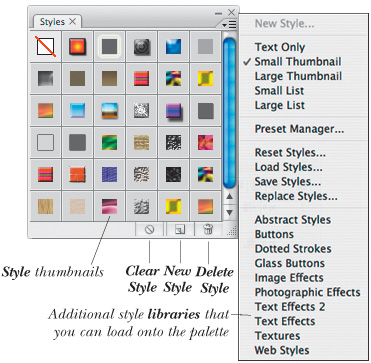
Styles palette
You can conveniently store a collection of layer settings—such as layer effects, opacity, blending mode, and fill opacity—as a style on the Styles palette. Once stored, styles can be applied to any layer with a click of the mouse. Custom style libraries can be loaded, appended, and saved via commands on the palette menu.
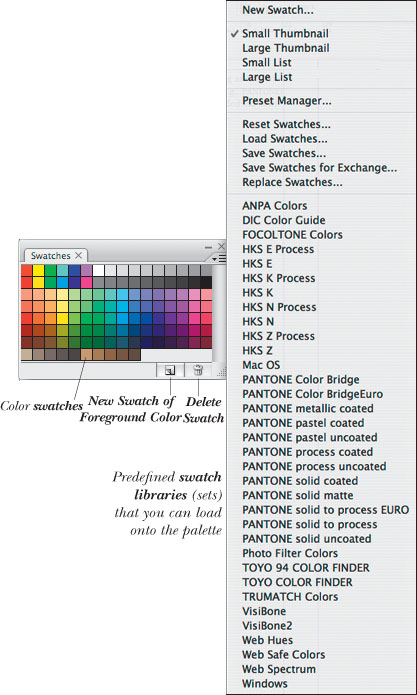
Swatches palette
The Swatches palette is used for storing and choosing colors. Custom swatch libraries (such as PANTONE) can be saved, loaded, and appended via commands on the palette menu.
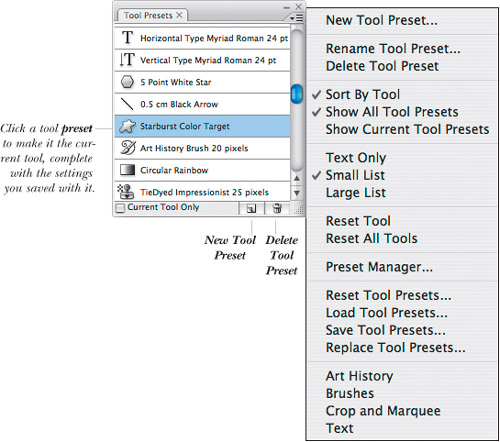
Tool Presets palette
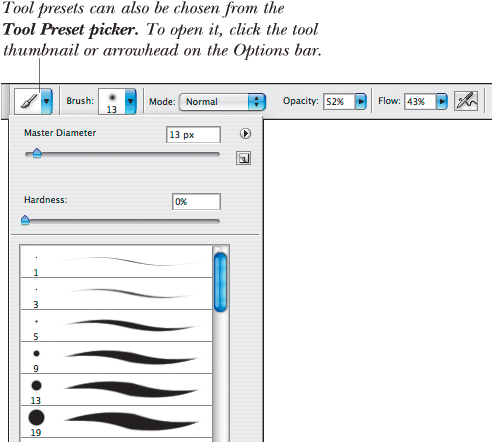
You can save and reuse tool settings just as you can any other type of preset. Say, for example, you frequently resize and crop images to a particular set of dimensions using the Crop tool. If you save a preset for the tool with those width, height, and resolution parameters, the next time you use the tool, instead of having to type in the numbers, all you have to do is click your Crop tool preset on either the Tool Presets palette or the Tool Preset picker (both shown below).
Using the Tool Presets palette, you can save, store, load, sort, rename, reset, and delete tool presets; the presets are available for all Photoshop files. To have the palette list the presets for the current tool only, check Current Tool Only, or uncheck this option to display the presets for all tools.
Mini-glossary
Adjustment and fill layers
Unlike a standard layer, an adjustment or fill layer doesn’t alter image pixels until you merge it with the underlying layer. They’re useful for trying out color and tonal adjustments, plus you can edit them at any time.
Blending mode
Menu options that control the color interaction between layers.
Brightness, hue, saturation
Brightness is the relative lightness of a color; the hue is the wavelength of light that gives a color its name (such as “red” or “blue”); and saturation is the purity of a color (how much gray it contains).
Histogram
A histogram is a graph of the current light and dark tonal values in an image. Learning how to read a histogram as you apply adjustment commands can help you judge their impact; the histogram updates as you edit your document.
Layer effect
To any layer, you can apply and choose settings for an assortment of editable and removable effects, such as Drop Shadow, Outer Glow, or Gradient Overlay.
Optimization
Optimization, the preparation of an image for Web output, involves choosing file format, color, and size parameters. If you divide an image into slices, you can then apply different optimization settings to each slice.
Pixels
Pixels, short for “picture elements,” are the building blocks that make up a digital image—the tiny individual dots that a digital camera uses to capture a scene or that a computer uses to display an image onscreen. When working in Photoshop and for Web output, you’ll need to be aware of the pixel dimensions, or total number of pixels, of an image. For print output, you’ll need to be aware of the resolution of your image—the number of pixels per unit of measure (usually per inch, or “pixels per inch”).
Preset
A preset is a swatch, brush, gradient, pattern, shape, contour, or style, or a collection of tool settings that you save and store for easy access.
Raw, Camera Raw
Digital cameras capture photos as raw image data; the Camera Raw dialog box in Photoshop lets you apply corrections to your Raw files before you convert and open them.
Selection
A selection is an area of an image that you isolate using a variety of methods; the unselected area is protected from editing. You can create a selection by using a selection tool (e.g., Lasso) or command (e.g., Color Range), by converting a path into a selection, or by loading an alpha channel as a selection. Selections are identified by a “marching ants” marquee. Areas of an image can also be protected by using a layer mask or Quick Mask, in which black or a color designates the protected pixels.
Smart Object, Smart Filter
A Smart Object layer is created manually when you convert one or more layers in an image into a Smart Object; or automatically when you place an Illustrator file, another Photoshop file, or a Camera Raw file into a Photoshop document. If you double-click a Smart Object layer to edit its contents in the original application, then save and close it, the object will update in the Photoshop file (that’s the “smart” part). Apply a filter to a Smart Object and it becomes a Smart Filter.★ Smart Filters can be modified, hidden, or removed at any time, and you can apply multiple Smart Filters to the same Smart Object.
Style
A style is an effect or combination of effects, plus Layers palette settings such as visibility, opacity, and blending mode, that you can save to, store in, and apply via the Styles palette.
Vector
In addition to pixel imagery, Photoshop gives you the tools to create mathematically defined vector paths, shapes, and editable type. Vector objects print at the printer resolution (crisp and sharp), not at the file resolution.
Working smart
Add these techniques to your repertoire gradually as you become familiar with them, and you’ll soon become a Photoshop wizard!
Undo
• To undo the last modification, choose Edit > Undo (Ctrl-Z/Cmd-Z). (Not every command or edit can be undone.)
• To undo multiple edits, click a prior state on the History palette, or use the History Brush tool to restore selective areas. Click the New Snapshot button at the bottom of the History palette periodically; then you can click a snapshot thumbnail at any time to revert to that version of your document.
Save time
• Use Bridge to search for, sort, open, move, copy, place, rename, and delete files, and to activate Automate commands for Photoshop.
• Create and save theme-oriented workspaces, complete with color-coded menu labels. Collapse the palettes you use least frequently to icons to preserve screen space.★
• Memorize the keyboard shortcuts for frequently used commands and tools. To learn the shortcuts for tools, use the tool tips onscreen or refer to pages 7–9 in this book. We list shortcuts in most of our instructions.
• Use scrubby sliders to change values quickly:Drag slightly to the left or right on the name or icon for an option that has a value field (such as “Opacity” on the Layers palette). With the pointer in a field, you can also change the value by pressing the up or down arrow key.
Stay flexible using layers
• Put image components (such as imagery and type) on separate layers. Merge layer pairs together periodically to conserve memory, and discard any layers you don’t need.
• Use adjustment layers and fill layers to try out tonal and color adjustments or apply color tints without permanently altering the underlying layer.
• Apply editable and removable layer effects.
Context Menus Make for Less Work
When you right-click/Control-click in the document window—depending on where you click and which tool happens to be selected—a list of context-sensitive commands pops up onscreen. A–B Some palette thumbnails, names, and features also have related context menus. C
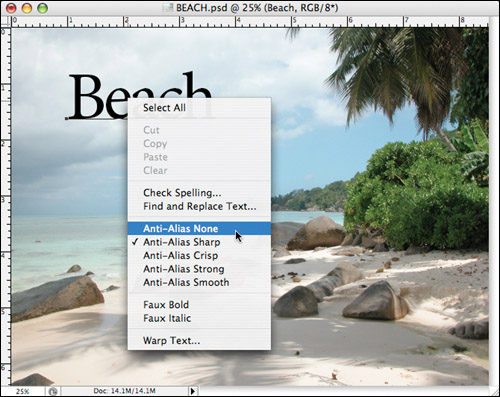
A The context menu for editable type

B The context menu for a selection
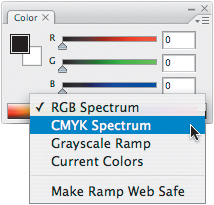
C The context menu for the color bar on the Color palette
In this book, our goal is to simplify your life. If a command is available on a context menu or can be executed quickly via a keyboard shortcut, we won’t ask you to take a slow boat to the menu bar.
• Place Camera Raw images or vector objects from Illustrator into Photoshop as Smart Objects for easy editing and updating.
• Apply filters as Smart Filters to Smart Object layers. Like adjustment layers, Smart Filters are editable and removable.
• Use layer comps to show off variations of a document to your clients without having to open and close separate files.
Save and reuse
• Save each collection of layer effects and Layers palette settings as a style in the Styles palette for use in any Photoshop file.
• Create and save presets for brushes, swatches, gradients, type, patterns, shapes, contours, styles—and tools—for use in any Photoshop file.
• Save custom color swatches, shapes, brushes, etc. in libraries for safekeeping and easy access.
• Save a selection to an alpha (grayscale) channel, then load it as a selection when needed.
Save memory
• Choose the Edit > Purge submenu commands periodically to regain RAM used for the Clipboard, the Undo command, the History palette, or All (of the above).
• Work with your document in RGB Color mode in order to access all the Photoshop commands. To proof the document onscreen (simulate CMYK Color mode), choose View > Proof Setup > Working CMYK. When you’re done editing the file, save a copy of it in the proper color mode and minimum resolution and dimensions for your target output device. Remember that vector layers, such as editable type and shapes, output at the printer resolution, not at the file resolution.