
Chapter 22. Type

IN THIS CHAPTER
Importing type from Adobe Illustrator as a Smart Object 349
Applying paragraph settings 355
Transforming the bounding box 356
Putting type in a spot color channel 362
We’ve never heard the phrase “A word is worth a thousand pictures,” but in Photoshop, where you can do such artful things with type, the line between pictures and words is blurred (sometimes literally!). In this chapter, you’ll learn how to create and select editable type and apply a host of character and paragraph attributes. You’ll also learn some fancy tricks, such as how to transform, warp, fade, and screen back type, and how to fill type with imagery.
Editable versus rasterized type
When you use the Horizontal Type tool or Vertical Type tool, a new layer appears and fully editable type appears instantly in the document window. You can easily change the attributes of editable type (such as the font, style, size, color, kerning, tracking, leading, alignment, and baseline shift), plus you can transform it, warp it, apply layer effects to it, change its blending mode, and change its opacity or fill percentage.
To apply other edits to type—such as filters, brush strokes, or the Fill command (to fill the type with a gradient or a pattern)—you have to rasterize the type layer first. And you can’t have your cake and eat it, too: once type is rasterized, you can’t edit its character attributes, such as the font, or edit its paragraph attributes, such as the alignment.
To apply typographic attributes, you’ll use the Character palette, A the Paragraph palette, and the all-purpose Options bar (shown on the next page).
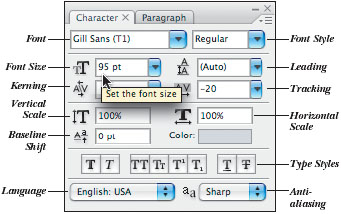
A Character palette attributes can be applied to individual characters or to all the type on a layer.
Creating editable type
Because editable type automatically appears on its own layer, it can be edited, moved, transformed, warped, restacked, or otherwise modified without affecting any other layers. You can be very casual about where you position editable type initially and about which typographic attributes you choose for it, because it’s so easy to move and edit.
To create an editable type layer:
- Choose the Horizontal Type tool or Vertical Type tool (T or Shift-T). A
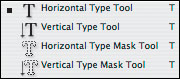
A To create editable type, choose the Horizontal Type tool or the Vertical Type tool. (The Type Mask tools create type-shaped selections.)
- Read the sidebar at right, then do either of the following:
To create point type, click to define an insertion point.
To create paragraph type, drag a marquee to define the bounding box for the text to fit into.
- On the Options bar, do the following:
Choose a font family.B A sample of each font displays on the menu.

B The Options bar for the Horizontal Type tool
Choose a font style.
Choose or enter a font size (you can use the scrubby slider).
Choose an anti-aliasing method: Sharp (sharpest), Crisp (somewhat sharp), Strong (heavier), or Smooth (smoothest). Photoshop will smooth the edges of the type by introducing partially transparent pixels along the edges of the characters. With anti-aliasing off (None), the edges of the type will be jagged. C–D

C Anti-aliasing off

D Anti-aliasing on
Click an alignment button to align point type relative to your original insertion point, or to align paragraph type to the left edge, right edge, or center of the bounding box (see page 355). A
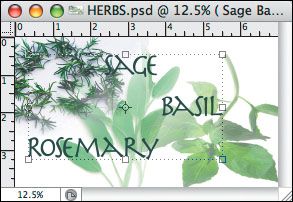
A The Alignment buttons control the position of paragraph type relative to its bounding box (or the position of point type relative to the insertion point). After typing each word shown above, we pressed Enter/Return to make each word into a separate paragraph, then aligned them Center, Right, and Left, respectively.
Click the type color swatch, then choose a color from the Color Picker, the Swatches palette, or the Color palette, or click a color in the document window.
- Type the desired text in the document window. If you’re creating point type, press Enter/Return where necessary, to create line breaks. For paragraph type, let the type wrap naturally to the edges of the bounding box.
- To accept the new text, press Enter on the keypad or click the
 button on the Options bar. (To cancel it, press Esc or click the
  button.) Each time you use the Horizontal or Vertical Type tool, Photoshop creates a new layer. B Later in this chapter, you’ll use the Character and Paragraph palettes to change the attributes of your type.
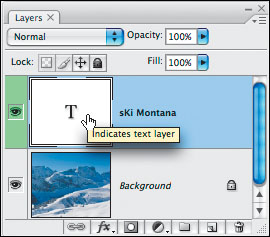
B Editable type layers always have a T in the thumbnail and are named automatically by the first word or two of the type they contain.
• See page 82 for an explanation of the missing fonts alert icon.
• You can right-click/Control-click an editable type layer name and choose a different anti-aliasing method from the context menu.
• You can turn font menu previewing on/off and change the preview size for the Font menu in Preferences > Type: Font Preview Size. The preview speed is improved in CS3.★
• Photoshop uses the vector outlines for a typeface when resizing editable type, when saving to the PDF and EPS formats, and when outputting to a PostScript printer. Editable type always outputs crisply at the printer resolution, not at the file resolution.
• If you create type in a Bitmap, Indexed Color, or Multichannel mode image, it will appear on the Background, not on a layer, and can’t be edited.
Selecting type
Before you can change the character or paragraph attributes of your type or make copy changes, you have to select the characters you want to edit. You can either edit all the type on a layer, or edit just a few characters or words.
To select type for editing or style changes:
- Do any of the following:
To highlight type characters for editing, click a type layer, choose the Horizontal Type tool
 or Vertical Type tool
  (T or Shift-T), click in the type to create an insertion point, then drag across characters or words to select them. A See also the sidebar at right.
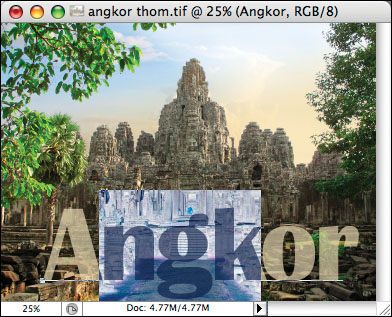
Connors Bros. © ShutterStock.com
To select all the type on the layer, with any tool selected, double-click the T icon on the Layers palette. All the text on that layer will become selected and the appropriate type tool will become selected automatically.
To change the attributes of all the type on the layer, such as the scale, tracking, leading, or style, or paragraph settings such as alignment or justification, just click the layer. (This doesn’t select a type tool.)
- After performing text edits or styling changes, to take the type tool out of edit mode and commit to your changes, do one of the following:
Click the
on the Options bar.Press Enter on the keypad.
Click any other tool.
Click a different layer.
(To cancel your editing changes before committing to them, click the
on the Options bar or press Esc.)• If you want to see the bounding box for a block of text, choose the Move tool (V), click the type layer on the Layers palette, and check Show Transform Controls on the Options bar. You can use the Move tool to move the type block in the document window.
Choose the Horizontal Type or Vertical Type tool, then do any of the following:

Converting type
To convert paragraph type to point type:
On the Layers palette, right-click/Control-click a type layer name and choose Convert to Point Text. A return will be added to the end of every line of type except the last. If the type object contains hidden (overflow) text, an alert dialog box will warn you that the hidden text will be deleted.
• We don’t know of a command in Photoshop that reveals hidden characters (paragraph returns and the like).
To convert point type to paragraph type:
On the Layers palette, right-click/Control-click a type layer name and choose Convert to Paragraph Text. To reshape the resulting bounding box, see page 356. Be sure to delete any unwanted hyphens that Photoshop may have inserted.
Importing type from Adobe Illustrator as a Smart Object
If you create type in Adobe Illustrator and then import it into Photoshop by using either method outlined below, it becomes a Smart Object layer in Photoshop, which means its contents can be quickly edited at any time in Illustrator, and your edits will appear in Photoshop.
Note: If the type you want to import has stroke attributes or layer effects that you want to keep editable, follow Method 1 below. If you follow Method 2, a type layer containing those attributes or effects will be rasterized.
To create “smart” type from Adobe Illustrator:
Method 1 (AI format)
- In Adobe Illustrator, make sure the type is on its own layer, then save the file in the Illustrator Document (.ai) format.
- Open a file in Photoshop, then do either of the following:
In Photoshop or Bridge, use File > Place to import the type file (see page 57).
Use Copy and Paste to paste a type object from Adobe Illustrator into the Photoshop file as a Smart Object.
A new Smart Object layer will appear on the Layers palette.
If you double-click the Smart Object layer thumbnail, an embedded file will open in Illustrator. If you edit it and then save and close the document, the type will update in the Photoshop document. Stroke attributes and layer effects will remain editable.
Method 2 (PSD format)
- To create a Smart Object layer that can be edited as a separate Photoshop file, in Illustrator, choose File > Export. The Export dialog box opens.
- Choose Format: Photoshop (.psd), then click Export. The Photoshop Export Options dialog box opens.
- Click Write Layers, check Preserve Text Editability, Maximum Editability, check Anti-alias, then click OK.
- Do either of the folowing:
Open a Photoshop file, then in Photoshop or Bridge use File > Place to place the type file.
Use File > Open to open the type file as a layered Photoshop file.
- If you double-click the new Smart Object layer thumbnail, an embedded Photoshop file will appear onscreen, with the editable type in a layer group. If you edit the file and then save and close it, the type will update in the original Photoshop document.
Note: If the Illustrator type contained layer effects, those elements will become separate rasterized image layers in the embedded Smart Object file and won’t be editable via the Layer Style dialog box. The type will also be rasterized if it contained a stroke.
• To learn more about Smart Object layers, see pages 302–304.
Styling type
To assign the same font size (point size) to all currently selected characters, use the Options bar or the Character palette.
To scale type by choosing a value:
- Do either of the following:
On the Layers palette, double-click a T icon, then select the characters or words you want to scale.
To scale all the characters on a layer, click the layer, but don’t select anything.
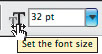
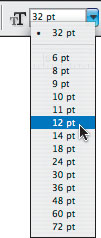
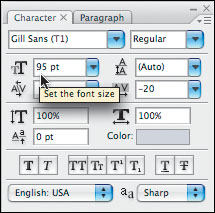
- Choose the Horizontal Type or Vertical Type tool; then, on the Options bar, use the Font Size icon as a scrubby slider (Alt-drag/Option-drag for finer increments), A or enter a value, or choose from the menu. B You can also change the font size via the Character palette. C
A On the Options bar, use the scrubby slider to change the font size of type...
B...or enter a font size value, or choose a preset size from the menu.
C You can also change the font size via the Font Size scrubby slider, field, or menu on the Character palette.
If the currently selected type characters are in more than one point size and you want to preserve their relative differences as you change their scale, use the Move tool.
To scale type using the Move tool:
- On the Layers palette, click a type layer.
- Choose the Move tool (V)
 and check Show Transform Controls on the Options bar to make the transform controls appear for the type layer.
 - Click any of the handles first, then do any of the following:
To scale just the height or width, drag a side handle.
To scale both the height and width, drag a corner handle.
To preserve the proportions of the characters as you scale them, Shift-drag a corner handle. D
D To preserve the proportions of type as you resize it interactively, Shift-drag a corner handle with the Move tool.
- To commit to the scale change, click the button on the Options bar or double-click the text block. (To cancel the scale change before committing to it, click the button on the Options bar or press Esc.)
• To change the Vertical Scale or Horizontal Scale via the Character palette, see the sidebar on page 354.
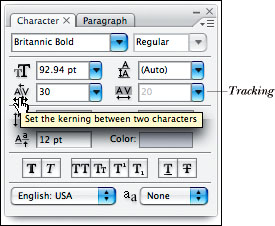
Kerning affects the spacing between a pair of text characters.
To apply kerning:
Method 1
- On the Layers palette, double-click a T icon.
- Click to create an insertion point between any two characters.
- Show the Character palette (see the sidebar), then do either of the following:
From the Kerning menu, choose Metrics to apply the kerning value built into the current font or Optical to let Photoshop control the kerning.
Use the Kerning icon ![]() as a scrubby slider; A or enter or choose a positive or negative kerning value. B
as a scrubby slider; A or enter or choose a positive or negative kerning value. B
A The Kerning and Tracking controls on the Character palette don’t have equivalents on the Options bar. To change either value quickly, use the scrubby slider (or shortcut).

B Use a negative kerning value (we chose –100) to close the gap between two characters.

Method 2
Choose a type tool, insert the cursor between two characters, then press Alt/Option plus the left or right arrow key. Add Ctrl/Cmd to the shortcut to apply kerning in a larger increment.
Tracking is like kerning, except that it affects multiple characters instead of a pair of characters.
To apply tracking:
- On the Layers palette, do either of the following:
To apply tracking to a whole layer, click the layer.
To apply tracking to part of a layer, double-click a T icon, then select some characters or words.
- Do either of the following:
On the Character palette, use the Tracking icon
 as a scrubby slider A or enter or choose a positive or negative tracking value. C
C On occasion, we might spread out a few words, as in the header in this illustration, but never a whole paragraph (horrors!)
If type is selected, you can press Alt/Option and the left or right arrow key. Add Ctrl/Cmd to the shortcut to apply tracking in a larger increment.
• To reset the tracking value of selected characters to 0, press Ctrl-Shift-Q/Cmd-Control-Shift-Q.
• If the palette is open but collapsed to an icon, click the ![]() icon.
icon.
• Choose the Horizontal Type tool or Vertical Type tool, then click the ![]() button on the Options bar.
button on the Options bar.
• Choose Window > Character.
For paragraph type, you can choose a Leading value to control the space that separates each line of text from the line above it. Although each character can have its own leading value (the highest value in a line controls the line), it’s simplest just to apply one leading value to either a whole line or a whole block of text.
To adjust leading in horizontal type:
- Do either of the following:
On the Layers palette, double-click the T icon for a type layer. Optional: Select a line or lines of text.
Click a type layer.
Note: Leading doesn’t change the spacing above the first line in a paragraph.
- Use the Leading icon
 as a scrubby slider A–C (Alt-drag/Option-drag for finer increments), or enter a value in the field (.01 to 5000 pt.), or choose a preset value from the menu. The leading will change from Auto to a numerical value. If you’re not sure what value to use, start with a number that’s a couple of points larger than the current font size, then readjust if needed.
• The Auto setting for leading is calculated as a percentage of the font size. Choose Justification from the Paragraph palette menu, and note the Auto Leading percentage (the default value is 120%). At the default value, for example, the leading for 30-point type is 36 points.
• To adjust the vertical spacing between characters in vertical type, highlight the characters you want to adjust, then change the Tracking (not the leading) value on the Character palette.

A The Leading area on the Character palette

Beat Glauser © ShutterStock.com

C A leading value of 70 pt. brings the bottom line of type closer to the top line.
Creating Presets for Your Type Tool
After styling your type, choose the Horizontal or Vertical Type tool, click the type layer, then click the Tool Preset picker thumbnail or arrowhead ![]() on the far left side of the Options bar. Click the New Tool Preset button,
on the far left side of the Options bar. Click the New Tool Preset button, ![]() then click OK. You can now choose this tool preset from either the Tool Preset picker or the Tool Presets palette any time you create type. It’s sort of like having a style sheet, because all your carefully chosen attributes are saved in the preset—but in this case you have to pick the preset before creating the type. Try creating different presets for your print and Web work.
then click OK. You can now choose this tool preset from either the Tool Preset picker or the Tool Presets palette any time you create type. It’s sort of like having a style sheet, because all your carefully chosen attributes are saved in the preset—but in this case you have to pick the preset before creating the type. Try creating different presets for your print and Web work.
To change the type style:
- To modify a whole type layer, click the layer; or double-click a T icon, then select the type you want to style.
- Click any style button on the Character palette A (you can use the tool tips to identify them).
• The Fractional Widths option on the Character palette menu allows Photoshop to use fractions of pixels for type spacing for optimal appearance (this applies to the entire layer). Be sure to keep this option checked unless you’re setting small type for Web output.
• The Reset Character option on the Character palette menu resets the palette and any selected type to the factory-default Character palette settings.
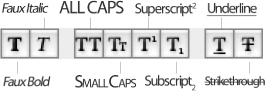
A The style buttons on the Character palette
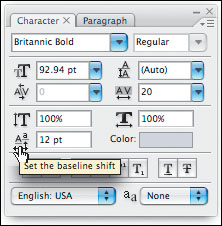
Use the baseline shift feature to raise or lower type characters from the baseline or a path by one point at a time.
To shift characters from the normal baseline:
- On the Layers palette, double-click a T icon, then select the characters or words you want to shift.
- On the Character palette, use the Baseline Shift icon
 as a scrubby slider (Alt-drag/Option-drag for finer increments), or enter a baseline shift value. B A positive value raises characters upward from the normal baseline or path; a negative value moves them downward. C–D
• To shift whole lines of type, use leading—not baseline shift. To shift a whole layer, drag it with the Move tool.
B Baseline Shift area, Character palette

C Baseline Shift 0

D Baseline Shift –7
Changing type orientation
You can change the orientation of type from horizontal to vertical, or vice versa.
When we need narrow or wide characters, we use a condensed or extended typeface, which has balanced proportions built into its design. That said, you’re welcome to play around with the scale features in Photoshop. First, click the type layer (or double-click the layer thumbnail then select some characters), then use the scrubby slider for Vertical Scale![]() or Horizontal Scale
or Horizontal Scale![]() (0–1000%). A
(0–1000%). A
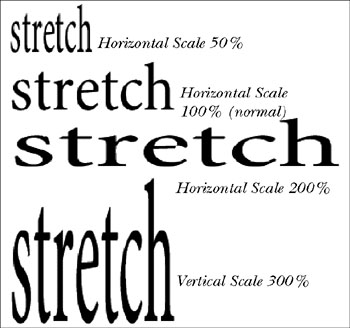
A Type can be scaled horizontally, vertically, or uniformly (both—and best!).
To change type orientation:
On the Layers palette, right-click/Control-click a type layer name and choose Horizontal or Vertical (the opposite of the current orientation).
On the Layers palette, double-click a type layer, B then, on the Options bar, click the Change Text Orientation button. ![]() C
C

B The original vertical type

C The same type after clicking the Change Text Orientation button on the Options bar
Note: After changing the type orientation, you may need to reposition the type or adjust the tracking.
• To rotate vertical type a different way, double-click the type layer thumbnail (and highlight the characters you want to rotate if you don’t want to rotate them all), then choose Standard Roman Vertical Alignment from the Character palette menu to uncheck the command. D This command isn’t available for horizontal type.

D The original vertical type after unchecking Standard Roman Vertical Alignment on the Character palette menu
Applying paragraph settings
For paragraph type, Photoshop offers a range of formatting options. You forego the manual control you have with point text while gaining sophisticated layout tools. Using the Paragraph palette, you can choose basic settings for justification, alignment, indents, and paragraph spacing. Note: For a layout that includes large blocks of text, you may find it easier to create imagery in Photoshop and add the type in a layout or Web page creation program.
To set paragraph alignment and justification for horizontal type:
- Do either of the following:
On the Layers palette, double-click a T icon, then click in a paragraph or select a series of paragraphs.
To modify all the type in a layer, click the layer, but don’t select anything.
- If the palette is open but collapsed to an icon, click the
 icon. If the Paragraph palette isn’t open, click the
  button on the Options bar, then click the Paragraph tab.
 - Click an alignment and/or justification button at the top of the palette:A
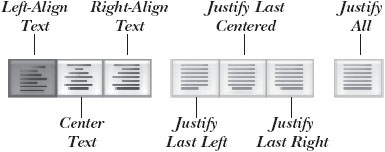
A The alignment and justification buttons at the top of the Paragraph palette, for horizontal type
The buttons in the first group—Left-Align Text, Center Text, and Right-Align Text—align type to an edge or the center of the type bounding box. B (These options can also be used on point type.)
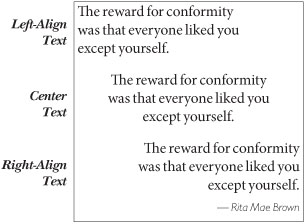
B Three paragraph alignment options
The buttons in the second group—Justify Last Left, Justify Last Centered, and Justify Last Right—justify the type, forcing all but the last line to fill the space between the margins.
The last button, Justify All, forces all the lines to fill the space, even the last line.
- Check Hyphenate at the bottom of the palette to enable automatic hyphenation. We always check this option for justified text to help minimize gaps between words.
• To change the alignment and/or justification for vertical type, the procedure is the same as described above, except the buttons are labeled Top Align Text, Center Text, and Bottom Align Text.
Transforming the bounding box
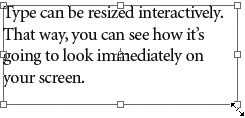
Follow these instructions to scale, rotate, or move the bounding box that holds paragraph type without scaling or distorting the characters inside it. The characters will reflow into the new shape.
To transform a type bounding box:
- On the Layers palette, double-click the T icon for paragraph type.
- Do one of the following:
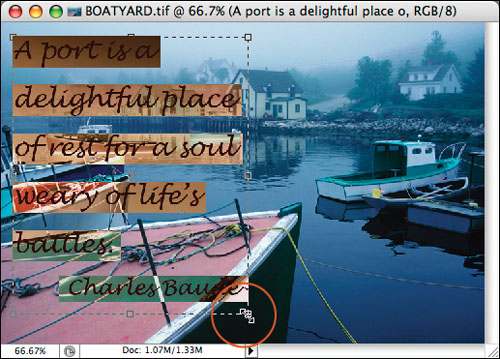
To scale the bounding box, position the cursor over a handle, pause, then drag. A (To preserve the proportions of the box, start dragging, then Shift-drag.) The type will reflow. B
© 2007 JupiterImages.com

B When we made the bounding box wider, the type reflowed into the new shape.
To rotate the box, position the cursor outside one of the corners of the box (you’ll see a curved, double-arrow pointer), then drag.
To move the whole type block, Ctrl-drag/Cmd-drag from inside the box (this is a temporary Move tool).
- To accept the transformation, press Enter on the keypad or click the button on the Options bar. (To cancel it, press Esc or click the button on the Options bar.)
• To align or distribute multiple type layers, see page 160.
Warping type
The Warp Text command, with its various style choices (arc, flag, arch, shell, wave, fish, etc.), transforms the bounding box that holds the type and distorts the type accordingly. Warped type remains fully editable!
To warp editable type:
- Do either of the following:
On the Layers palette, double-click a T icon, then click the Warp Text button
 on the Options bar.
Right-click/Control-click an editable type layer name and choose Warp Text.
- The Warp Text dialog box opens. A Move the dialog box, if necessary, so you can still see the type in the document window.
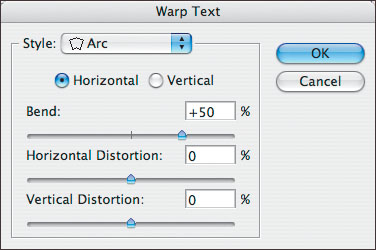
A When using the Warp Text dialog box, you can either accept the default settings for a preset Style or move the sliders.
- From the Style menu, choose a preset warp style.
- Click Horizontal or Vertical as the overall orientation for the distortion.
- Optional: Move any of the sliders—Bend, Horizontal Distortion, or Vertical Distortion—noting the changes in the document window.
- Click OK. B–E The Warp Text icon will appear in the layer thumbnail. You can reopen the Warp Text dialog box at any time by repeating step 1 (above), and then choose a different style or adjust the sliders. To undo a warp, choose Style: None.
• Once you move the sliders in the Warp Text dialog box, those settings will be applied to any other Style you choose. To reset the sliders to the default settings, hold down Alt/Option and click Reset.
• To scale or reshape warped type to make it fit into a specific area of a composition, click the warped type layer, choose the Move tool (V), check Show Transform Controls on the Options bar, then reshape the bounding box.

B Style: Arc
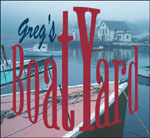
C Style: Shell Lower for “Greg’s,” Bulge for “Boat Yard”

D Style: Flag

E Style: Rise
Rasterizing type
To apply a filter or the Transform > Distort or Perspective command to type, or to draw strokes on type with a tool such as the Brush, you first have to convert it to pixels via the Rasterize Type command. Unfortunately, you can’t change the typographic attributes of type once it’s been rasterized.
To rasterize type into pixels:
- Optional: To preserve the editable type layer, duplicate it (Ctrl-J/Cmd-J) and keep the duplicate layer selected.
- Right-click/Control-click an editable type layer name and choose Rasterize Type. The layer thumbnail will update. Be creative!B
Filling type with imagery
Just to give you a few ideas, these are some of the ways that you can “fill” editable type with imagery:
• Use an editable type layer as the base layer in a clipping mask to clip the image layers above it. A–B You can edit (e.g., apply a filter) or reposition the image layers without affecting the type. To learn more about clipping masks, see page 296.

A In this image, the type is the base layer in a clipping mask.

B This image was created in the same way as the previous one, except in this case we also rasterized the type layer, then softened the edges via the Gaussian Blur filter to make it look more “snowy.”
• Apply the Pattern Overlay effect to an editable type layer (see page 316). C You can scale or reposition the pattern within the type while the Layer Style dialog box is open. To create a custom pattern, with the Rectangular Marquee tool, select part of an image to use as a pattern tile, choose Edit > Define Pattern, click OK, then choose your new pattern in the Pattern Overlay pane of the Layer Style dialog box.

C We applied the Pattern Overlay layer effect to the type layer—plus the Drop Shadow, Inner Shadow, Outer Glow, and Emboss effects! The image layer below the type layer contains a subtle pattern.
• Use a type selection in a layer mask (follow the instructions on the next page).D

D In this image, a type selection that we converted to a layer mask is masking a group of image layers. Each image layer, in turn, contains a gradient in its own layer mask, which is softening the transitions between layers (see pages 150–151).
To use type shapes as a layer mask:
- Create an editable type layer.
- Ctrl-click/Cmd-click the type layer thumbnail. A A selection will display in the document window.
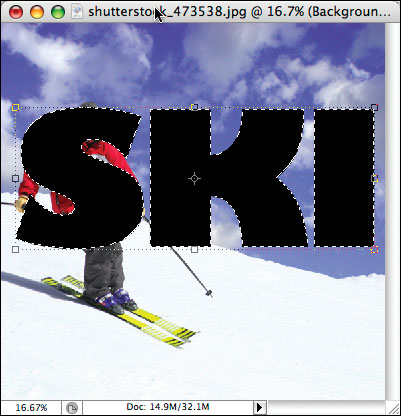
A Cmd-click the type layer thumbnail to create a selection from the type.
- Hide the type layer (click the visibility icon). B The selection marquee will still be visible.
B Hide the type layer—but don’t deselect!
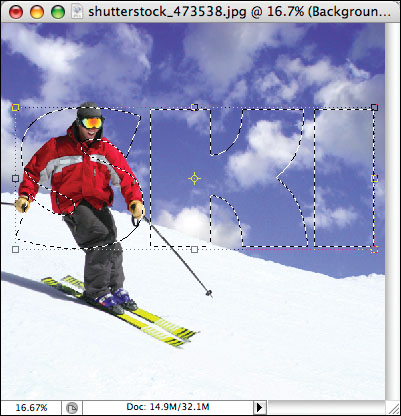
- Click the image layer that you want to add the mask to. Optional: If necessary, choose a selection tool and move the type selection. (Don’t use the Move tool for this, or you’ll remove image pixels from the current layer.)
- Do either of the following:
To reveal layer pixels within the selection area, click the Add Layer Mask button
 on the Layers palette. C–E
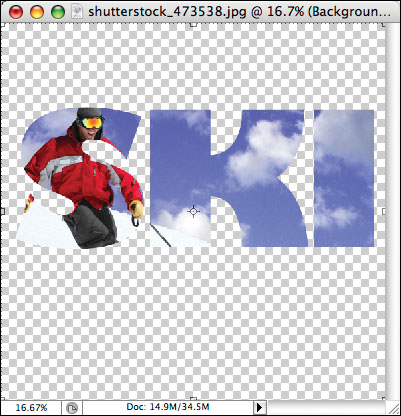
C To reveal layer imagery within the selection, click the Add Layer Mask button (it’s a “ski mask,” ha-ha).

D To provide a solid backdrop for the type shapes, we added a layer below the image layer, which we filled with white.
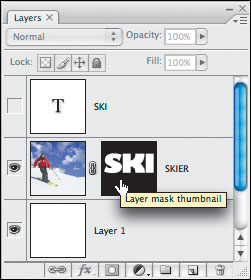
E The Layers palette for the image shown at left
To hide layer pixels within the selection area, Alt-click/Option-click the Add Layer Mask button on the Layers palette.
The type will display as white or black areas in the layer mask thumbnail.
• To toggle the mask function between hide and reveal, click the layer mask thumbnail, then press Ctrl-I/Cmd-I.
• To reposition the type shape within the layer mask, unlink the layer mask from the layer first by clicking the link icon; then drag with the Move tool in the document window (relink the layer and mask when you’re done).
Making type fade
In these instructions, you’ll apply a gradient to a layer mask to make it seem as though the type is fading away.
To make type fade:
- Click an editable or rasterized type layer.
- Click the Add Layer Mask button
 at the bottom of the Layers palette. A layer mask thumbnail will appear next to the layer name. Keep the layer mask thumbnail selected.
 - Choose the Gradient tool (G or Shift-G).

- On the Options bar:
Click the Gradient Preset picker arrowhead, then click the Foreground to Background preset in the picker (the first swatch in the default gradient library).
Click the Linear gradient button.
Choose Mode: Normal, and an Opacity of 100%.
- Make sure the layer mask thumbnail is still selected. In the document window, drag at least halfway across the type, from top to bottom or from left to right. The type layer mask will fill with a white-to-black gradient A and the type will be hidden where black is present in the layer mask. B
• To modify the type or the layer, click the type layer thumbnail; to modify the layer mask, click the layer mask thumbnail. For more about layer masks, see pages 292–295.
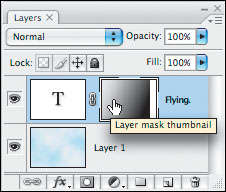
A A gradient in the layer mask is masking the type gradually.

B The type looks as if it’s fading into thin air.
Layer effects C can be applied to both editable and rasterized type layers. To open the Layer Style dialog box, double-click next to a layer name. If you browse through Chapter 20, you’ll see many examples of effects that we applied to type.

C We applied layer effects (Drop Shadow and Bevel) to the type shown in the previous figure to make it look three-dimensional.
Screening back type
In these instructions, you’ll use a Levels adjustment layer to screen back type (we prefer this method to using the Type Mask tools). A lightened version of the image will be visible within the type shapes.
To screen back type:
- Create a document that contains an image layer and an editable type layer (we recommend using a large point size in a bold or black style).
- On the Layers palette, Ctrl-click/Cmd-click the T icon, then hide the type layer.
- Optional: Reposition the selection by dragging it with a selection tool.
- From the New Fill/Adjustment Layer menu,
 choose Levels. The type will disappear from view temporarily.
 - In the Levels dialog box, A move the gray Input Levels (midtones) slider to the left to lighten the midtones in the type. You could also move the Input Levels highlights slider. Move the Output Levels shadows slider to the right to reduce the contrast in the type.

A The original document contains an image layer and an editable type layer.
- Click OK. B–C
• To swap the black and white areas in the mask (and lighten the image), click the adjustment layer mask thumbnail, then press Ctrl-I/Cmd-I.
• To reposition the mask on an adjustment layer, unlink it from the layer thumbnail, then drag it with the Move tool.
• You can apply layer effects to the adjustment layer (try it!).
• To screen back imagery behind type, see page 182.
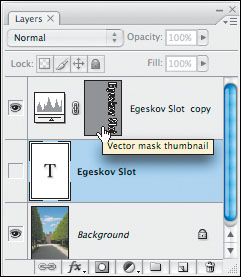
B A vector mask in the Levels adjustment layer is restricting the Levels effect to just the type shapes.

C The type is screened back. Only pixels within the character shapes are affected by the Levels adjustment layer.
Putting type in a spot color channel
To create type in a spot color channel:
- Follow the instructions on page 407 to create a spot color channel.
- Create editable type.
- On the Layers palette, Ctrl-click/Cmd-click the T icon to select the type shapes.
- Hide the type layer.
- On the Channels palette, click the new spot color channel.
- Choose Edit > Fill, choose Use: Black, Normal mode, choose an Opacity value that matches the tint (density) value of the spot color ink to be used on press, then click OK. The selection will fill with the color as specified in the spot color channel.
- Deselect (Ctrl-D/Cmd-D). A
• Use the Move tool to reposition the type shapes in the spot color channel.
• You can’t edit the text in a spot color channel—you have to start over. Fill the channel with White, 100% Opacity, edit the original type layer, then repeat the steps above.

A Now that our type shapes are in a spot color channel, the type can be output to a separate printing plate by a commercial printer.