Chapter 15. Camera Raw
IN THIS CHAPTER
Camera Raw: The basic steps 229
Using the Camera Raw tools 231
Using the Workflow options 233
Using the HSL/Grayscale tab 240
Saving and applying Camera Raw settings 243
Opening and saving Camera Raw files 245
Opening and placing photos as Smart Objects 246
The beauty of the Adobe Camera Raw plug-in is that it lets you apply corrections to your photos before you open them in Photoshop. In this chapter, in addition to learning how to open digital photos via the Camera Raw plug-in (“Camera Raw,” for short), you’ll also use the many tabs in Camera Raw to correct photos for exposure, color, and lighting deficiencies.
Why use Camera Raw?
Whereas amateur-level digital cameras store images in the JPEG or TIFF format, advanced amateur and pro models offer the option to save images as Raw files, which offers substantial advantages. For the JPEG or TIFF format, the camera also performs internal processing operations, such as sharpening, setting the white balance, and making color adjustments. With Raw files, you get only the raw information that the lens captured onto its digital sensor, so you have full control over subsequent image processing and correction. Each camera manufacturer creates its own version of a Raw file. (See our comparison of JPEG vs. Raw on page 227.)
The following are some key features of the Camera Raw plug-in:
• Camera Raw processes Raw files from most of the current camera manufacturers, as well as TIFF and JPEG files.
• Camera Raw offers powerful features for correcting deficiencies in your photos, such as exposure, color, tonal range, and noise, and you can monitor your adjustments via a large preview.
• For Raw files, Camera Raw edits (instructions) are saved in a “sidecar” file or the Camera Raw database and in the file’s metadata; for TIFFs and JPEGs, the instructions are saved in the file itself. In either case, when you open a file from Camera Raw into Photoshop, the instructions are applied to a copy of the file; the original digital files are preserved (like traditional film negatives).
• Camera Raw lets you convert photos to a few standard formats, such as PSD or TIFF. You can also save your files in any standard format after opening them in Photoshop.
Note: Don’t confuse Raw files from a camera with Photoshop Raw, which is available as a file type/format in File > Save/Save As.
More reasons to use Camera Raw
The Camera Raw plug-in offers some powerful and unique features that you won’t find in Photoshop. In case you’re not fully convinced, we’ll outline some compelling reasons for using the Camera Raw plug-in instead of opening your digital photos directly into Photoshop.
Raw preview: The only way to preview the actual Raw photo (not the JPEG version of a file) is via a Raw converter, such as Camera Raw.
Less destructive: Exposure, white balance, and color adjustments that you apply in Camera Raw cause less destruction to an image than adjustment commands in Photoshop. Remember, your goal is to preserve as much original data as possible.
16 bits per channel: To preserve the full tonal range of your Raw photo, you can use Camera Raw to convert it to 16 bits per channel. Starting with all the original data at the outset helps offset the data loss that image edits cause in Photoshop, and the end result is a better-quality image.
Tonal redistribution: A bonus feature of Camera Raw is that it fixes a “problem” inherent in all digital photos: the fact that the camera’s digital sensor records data in a linear fashion. A light value of 50% gray, for example, is recorded as a pixel value of 127 (midtone gray). The camera captures the full tonal range in about 6 discrete levels, or stops, but more pixels are used to record the lighter tones than the darker tones. In A, you can see that the graph for an original linear capture is straight.
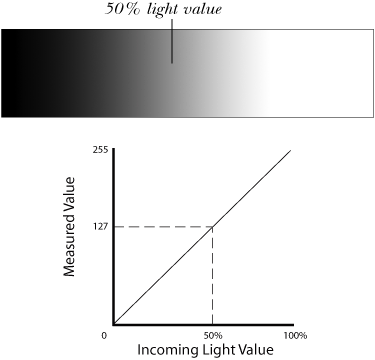
A The digital sensor in a camera captures tonal values in a linear fashion, from light to dark. The incoming data isn’t altered, so a graph of the linear capture shows a straight line. A light value of 50% is located in the center of the tonal range.
The human eye is more sensitive to lower levels of light than to brighter levels. That is, we’re more likely to notice a lack of detail in the shadows and less likely to discern details from extra pixels in the highlights. Camera Raw redistributes captured pixels into the midtone and shadow range to produce an image that more closely approximates human vision. The graph of this restribution is curved rather than straight. B Tonal adjustments in Photoshop cause posterization and a loss of detail when there is insufficient data in the shadow areas, so Camera Raw images are better able to weather such edits.
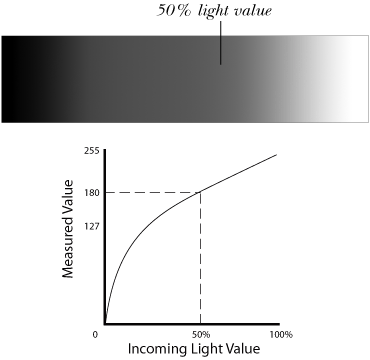
B Camera Raw performs tonal redistribution to shift data to the lower levels. Incoming data is altered, so the graph is now curved. The 50% light value is now shifted to the right of center (of the tonal range). There is now more detail in the lower levels, which is the range the human eye is more sensitive to.
capturing tonal values: a camera versus the human eye
Noise reduction: The noise reduction features in Camera Raw are simpler, less destructive, and more effective than related commands in Photoshop.
You’re halfway there: Camera Raw features that you’ll use to adjust the tonal and color balance in your photos are similar to adjustment commands (such as Levels, Curves, and Hue/Saturation) that you learned about in earlier chapters, so you’ll be able to build on your skills.
The skinny: To correct and enhance digital photos in preparation for work in Photoshop, Camera Raw is an ideal launching pad.
Raw, JPEG, or TIFF?
In addition to Raw files, photos that a camera saves as JPEG or TIFF can also be opened and edited in Camera Raw.★ We recommend shooting Raw photos whenever possible so you can take advantage of all the features the Camera Raw plug-in has to offer, but if your camera won’t let you create Raw photos or you acquire JPEGs or TIFFs from other sources, you can still use Camera Raw to process them. Except where noted, the instructions in this chapter apply to Raw, JPEG, and TIFF files.
Unfortunately, Camera Raw can’t correct deficiencies in JPEG and TIFF photos as fully it can in Raw photos, for several reasons. First, the camera reduces the tonal range of a photo to fit the 8-bits-per-channel depth of JPEGs and TIFFs. Second, color and tonal processing is applied to JPEGs and TIFFs by the camera (“in camera”). Camera Raw reinterprets this processed data, with less successful results than when it has access to the raw, unprocessed data. And finally, the editing instructions are saved in the files themselves (processing is applied to the original pixels), not in the sidecar or database file, as is the case with Raw.
Nonetheless, you can use the many outstanding correction and adjustment features in Camera Raw to improve your JPEG and TIFF photos.
Note: In this chapter, we focus only on processing Raw and JPEG files in Camera Raw—not TIFFs, and we mention the JPEG format in our steps only when a command behaves differently for JPEGs.
Getting JPEG and TIFF files into Camera Raw ★
To get your JPEGs and TIFFs to open directly into Camera Raw instead of Photoshop, you need to set the appropriate Preference:
In Bridge, if Prefer Adobe Camera Raw for JPEG and TIFF Files is checked in Preferences > Thumbnails and you click a JPEG or TIFF thumbnail, choosing File > Open in Camera Raw (or pressing Ctrl-R/Cmd-R) will open the file in Camera Raw. Make the desired adjustments in Camera Raw, then click Open Image to open the image into Photoshop, or click Done to close Camera Raw. In either case, if you made any adjustments in Camera Raw, a Camera Raw edit badge ![]() will display in the top right corner of the thumbnail in Bridge, and your adjustments will be reflected in both the thumbnail and the preview.
will display in the top right corner of the thumbnail in Bridge, and your adjustments will be reflected in both the thumbnail and the preview.
• Unfortunately, to make the Open in Camera Raw command work, and for the edit badges and adjustments to show up for JPEG file previews in Bridge, you have to force Bridge to regenerate all the thumbnails for the folder by choosing Tools > Cache > Purge Cache for Folder [current folder name]. Or to save time, you can move or copy any JPEGs that were edited in Camera Raw into a new folder in Bridge. Bridge will generate new thumbnails as you move or copy the files.
If you want to open a JPEG or TIFF directly into Photoshop (and the file hasn’t been edited in Camera Raw), press Ctrl-O/Cmd-O.
In Bridge, if the currently selected file has been edited in Camera Raw, the Metadata panel will have a Camera Raw category.
Who’s hosting Camera Raw?
In Bridge, choose Edit (Bridge, in the Mac OS) > Preferences (Ctrl-K/Cmd-K), then click General★ on the left side. If Double-Click Edits Camera Raw Settings in Bridge is checked and you double-click a Raw file thumbnail in Bridge, the file will open into the Camera Raw dialog box, hosted by Bridge.*
* With Bridge as the host for Camera Raw, the default button for exiting the dialog box is “Done”; with Photoshop as the host for Camera Raw, the default button is “Open Image.”
If Prefer Adobe Camera Raw for JPEG and TIFF Files is also checked in Bridge Preferences, a JPEG or TIFF file that you double-click will open in Camera Raw, hosted by Bridge. With the Double-Click Edits... preference unchecked, you can double-click the thumbnail for a Raw or edited JPEG file to open the file into Camera Raw, hosted by Photoshop.*
In Photoshop (or in Bridge, if you click a Raw thumbnail first), if you choose File > Open (Ctrl-O/Cmd-O), the Raw file will always open into Camera Raw, hosted by Photoshop.
Camera Raw: The basic steps
Before we get into the specific tabs in Camera Raw, we’ll outline the basic steps for using this plug-in, just by way of introduction.
To open a digital photo via the Camera Raw plug-in:
- Launch Bridge. Each digital camera model attaches a different extension to its Raw file names, such as .nef for Nikon, .crw or .cr2 for Canon, and .dcr for Kodak. If a file has been opened and edited previously in Camera Raw, it will have a badge
 in the top right corner of the thumbnail. To open a Raw photo in Camera Raw, double-click the thumbnail; or click it, then press Ctrl-R/Cmd-R. To open a JPEG into Camera Raw, make sure the appropriate preferences have been set first (see the previous page).
 - The Camera Raw dialog box opens. A An alert symbol displays in the upper right of the preview window while the image data is reading in, and disappears when it’s completed. Information about your photo (taken from the metadata the camera stores in the photo) is listed in the following locations: the camera model in the title bar at the top of the dialog box; the file name below the preview; and the camera settings used to take the photo (aperture, shutter speed, ISO sensitivity, and focal length) below the histogram on the right side. The color space/bit depth/dimensions/resolution link below the preview gets you to the Workflow Options dialog box.
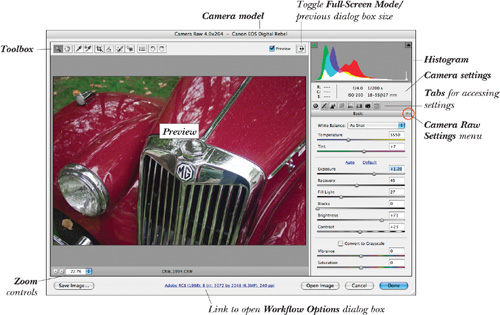
The image adjustment options are distributed among 8 tabs—Basic, Tone Curve, Detail, HSL/Grayscale, Split Toning, Lens Corrections, Camera Calibration, and Presets.★ You’ll use sliders in each tab to correct your photo (A–B, next page).
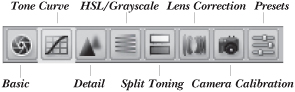
A Click the tab icons to access related settings.
B 4 of the 8 tabs in Camera Raw are illustrated here. We do most of our correction work in the Basic, Tone Curve, and HSL/Grayscale tabs.
Use the Basic tab to adjust the white balance and exposure (see pages 234–237).
Use the HSL/Grayscale tab to adjust colors individually (see pages 240–241).
Use the Tone Curve tab to fine tune the exposure (see pages 238–240).

Use the Detail tab to reduce noise (see page 242).
- When you’re satisfied with how the photo looks, click Open. Camera Raw will convert and open a copy of your image using your chosen settings, leaving the original data untouched.
Using the Camera Raw tools
To use the simple “one-click” tools:
In the toolbox in the upper left corner of the dialog box, A click the Zoom tool (Z), ![]() then click the image preview to zoom in or Alt-click/Option-click it to zoom out.
then click the image preview to zoom in or Alt-click/Option-click it to zoom out.
![]()
A The Camera Raw toolbox
From the Zoom Level menu below the image preview, choose a preset zoom percentage, or click the – or + zoom level button.
If the image preview is magnified, you can use the Hand tool (H)![]() to move it in the preview window.
to move it in the preview window.
• Double-click the Zoom tool to change the zoom level to 100%, or double-click the Hand tool to change the zoom level to Fit in View.
• You can also use the same shortcuts to zoom-click in and out as you would in the document window: Ctrl-Spacebar/Cmd-Spacebar and Ctrl-Alt-Spacebar/Cmd-Option-Spacebar.
For information about the White Balance tool, see page 234.
Choose the Color Sampler tool (S), ![]() then click in the image preview to place up to nine samplers. Readouts of the RGB components for the pixels below each sampler display below the toolbox, and update as you make color and tonal adjustments to the photo. To reposition a sampler, drag with the Color Sampler tool. To remove all samplers, click Clear Samplers.
then click in the image preview to place up to nine samplers. Readouts of the RGB components for the pixels below each sampler display below the toolbox, and update as you make color and tonal adjustments to the photo. To reposition a sampler, drag with the Color Sampler tool. To remove all samplers, click Clear Samplers.
Click the Open Preferences button ![]() (Ctrl-K/Cmd-K) ★ to open the Camera Raw Preferences dialog box.
(Ctrl-K/Cmd-K) ★ to open the Camera Raw Preferences dialog box.
Click the ![]() button (L) to rotate the photo 90° counterclockwise or the
button (L) to rotate the photo 90° counterclockwise or the ![]() button (R) to rotate it 90° clockwise. The rotation will preview in the dialog box.
button (R) to rotate it 90° clockwise. The rotation will preview in the dialog box.
Check Preview (P) to preview changes made in all the tabs; uncheck it to see changes made in all tabs except the current one (that is, to turn off the adjustments made in the currently displayed tab).
Click the Toggle Full Screen Mode button (F) ![]() to have the dialog box fill the entire screen;★ click it again to restore the previous dialog box size.
to have the dialog box fill the entire screen;★ click it again to restore the previous dialog box size.
You can change the function of a button or tool in the Camera Raw dialog box by holding down one of the following keys:
Using the Crop tool, you can control which portion of the Camera Raw image opens in Photoshop. You can readjust the crop marquee at any time, and it will remain available even after you click Save, Done, or Open. The Raw pixels are preserved.
To crop the image:
- Choose the Crop tool (C).

- Drag a marquee on the preview image. A The area within the marquee will import; areas below the gray shield won’t. To move the marquee, drag inside it; to resize it, drag a handle.
• To remove the crop marquee from the preview, with the Crop tool selected, press Esc.

© 2007 JupiterImages.com
To straighten out a crooked photo:
- Choose the Straighten tool (A).

- Drag across the preview along an edge in the photo that you want to align to the horizontal or vertical axis. B A crop marquee will display, aligned to the angle you drew. C When you open the image in Photoshop, that edge will be aligned with the document window.
B With the Straighten tool, drag across the preview along an edge that you want to align with the horizontal axis.
C The Straighten tool created a crop marquee around part of the photograph.
To touch up blemishes or imperfections: ★
- Choose the Retouch tool (B).

- Drag in the preview; a red and white target circle will display. D Drag inward or outward to scale the target circle to cover the blemish (the Radius slider will move accordingly). Release the mouse, and a green and white source circle will appear, linked to the target circle.

D With the Retouch tool, drag to scale the target circle over a blemish...
- Drag the source circle over an area to copy those pixels to the target circle. E

E ...then drag to position the linked source circle. Source pixels will copy to the target circle.
- From the Type menu, choose Heal to blend source pixels into the luminosity of the target pixels or Clone to perform an exact copy of the source pixels (pause to preview).
You can also drag the edge of either circle to resize them simultaneously, add more circle pairs to correct other blemishes, or reposition them at any time. They’ll remain available even after you click Save, Done, or Open; the original Raw pixels aren’t altered. To hide the circles, choose a different tool. To remove a pair, click inside a circle, then press Backspace/Delete; to remove all pairs, click Clear All.
• The Red Eye Removal tool (E)
 ★ works like the Red Eye tool in Photoshop (see page 286).
Using the Workflow options
The Workflow options let you change the color space, dimensions, bit depth, and resolution of a photo before opening it into Photoshop (the original digital file is unaltered).
To change a color space, dimensions, bit depth, and resolution:
- Follow step 1 on page 229 to open your photo into Camera Raw. At the bottom of the Camera Raw dialog box, click the underlined link that lists the color space, file dimensions, etc.★ The Workflow Options dialog box opens.
- From the Space menu, choose the color profile to be used for converting the Raw file to RGB: Adobe RGB (1998), ColorMatch RGB, ProPhoto RGB, or sRGB IEC61966-1 (“sRGB,” for short). In Chapter 2, you assigned Adobe RGB as the default color space for color management, so we recommend that choice.
- From the Depth menu, choose a color depth of 8 Bits/Channel or 16 Bits/Channel (see page 49). If you have a large hard drive and a fast system with a lot of RAM, go ahead and choose 16 Bits/Channel. With the extra pixels, more of the original tonal levels in your photo will be preserved as it’s edited in Photoshop.
- If you need to resize the image, from the Size menu, choose a preset size (in megapixels) that matches the proportions of your Raw image. (The default image size has no – or + after it.) Resampling will occur if you choose a larger size than the original. If a crop marquee is present, the crop size will be the default size. (Experts disagree on whether it’s better to resample an image in Camera Raw or in Photoshop. Until they reach a consensus, take your pick.)
- Enter a Resolution. This value affects only the print output size of the photo. (By way of example, a resolution of 240 to 300 would be appropriate for a 2000 × 3000 pixel image for printing on an inkjet printer or even on a commercial press.)
- Click OK. The new document info will be listed below the preview.
• To learn about the Open in Photoshop as Smart Objects option, see page 246.
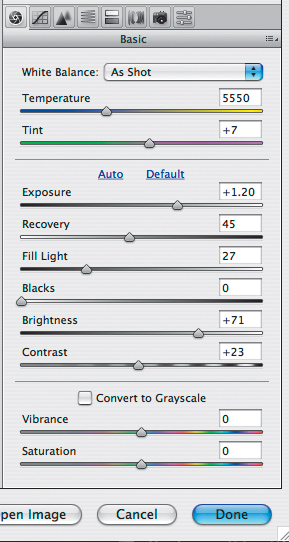
Using the Basic tab ★
As you use the Basic tab to perform white balance, exposure, and other tonal adjustments, keep your eye on the histogram so you can monitor changes in the distribution of tonal values in your photo. A The histogram graphs the red, green, and blue pixels in an image, superimposed upon one another at each tonal level. Shadow pixels are on the left, highlights are on the right, and the white areas indicate where all three colors are present.
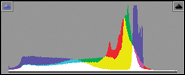
A The Camera Raw histogram charts the number of pixels at each tonal level in a photo for red, green, and blue. As in all the histograms you’ll find in Photoshop, shadow pixels are on the left and highlight pixels are on the right.
For the first round of adjustments, we recommend using the Basic sliders in the order in which they appear.
To apply white balance adjustments:
- Click the Basic tab
 (A, next page), and choose Fit in View as the zoom level for the preview.
A Use the Basic tab to apply white balance, exposure, and other adjustments.
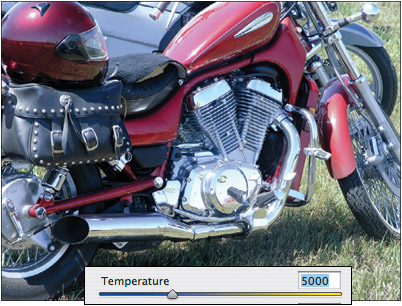
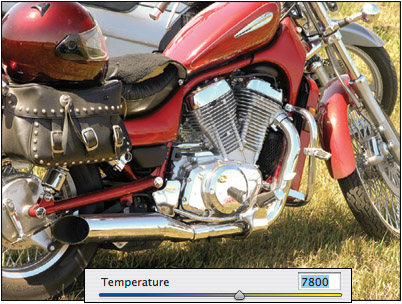
- You’ll adjust the white balance (color temperature) first, because this setting affects the overall photo. Unlike the color adjustment controls in Photoshop, these sliders cause minimal destruction to image pixels. Do either of the following:
From the White Balance menu, choose a preset setting that best describes the lighting conditions in which the photo was taken (for Raw files only). Choose As Shot at any time to restore the initial camera settings. B As soon as you move the Temperature or Tint slider, Custom becomes the menu listing.
Robert Kyllo © ShutterStock.com
To correct the color temperature more specifically, move the Temperature slider to the left to add blue (make the image cooler), C or to the right to add yellow (make the image warmer). D To fine-tune the temperature correction, drag the Tint slider slightly to the left (–) to add green or to the right (+) to add magenta.
C With the Temperature slider moved to the left, the overall temperature is cooler. The metal is noticeably blue and the light on the ground also looks cooler.
D With the Temperature slider moved to the right, the overall temperature is warmer. The metal is warmer and the ground is more yellow.
To learn about the other sliders in the Basic tab, see pages 236–237.
• To quickly adjust the white balance based on a sampled area, you could choose the White Balance tool (I),
 then click a grayish white area that contains some detail. However, since deciding which area to click on can be tricky, we use the Temperature and Tint sliders instead.
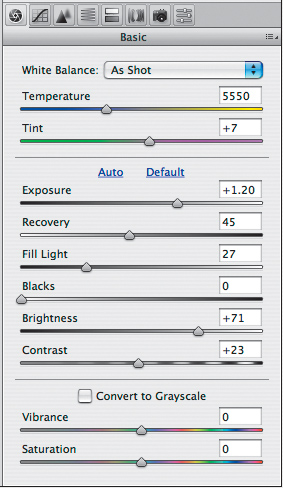
To make tonal adjustments: ★
- When Camera Raw first opens, the tonal sliders in the Basic tab—Exposure, Recovery, Fill Light, Blacks, Brightness, and Contrast—are set to their default values (the word Default is dimmed). You can click Auto to see which slider settings Camera Raw deems appropriate for your photo, but for even better results, we recommend making custom adjustments. Click Default to reset the above-mentioned sliders to their default settings, then follow the remaining steps.
- The histogram reflects the current Camera Raw settings and redraws as you change those settings. Study the graph to see if any highlight or shadow pixels are being pushed to the edge (clipped). Clipping occurs if the tonal range of a scene is wider than the range the camera can capture. Your goal will be to bring the pixels into the range of your chosen RGB color space, thereby minimizing clipping. (In our own setup, both the camera and Camera Raw are set for the Adobe RGB color space.)
- To minimize the clipping of highlight and shadow pixels, do the following:
In the top left corner of the histogram, click the Shadow Clipping Warning button (U) to display a representation of any shadow clipping in the preview; and in the top right corner, click the Highlight Clipping Warning button (O) to display any highlight clipping. A★ With the clipping warnings for reference (blue for shadows, red for highlights), your corrections will be better informed.

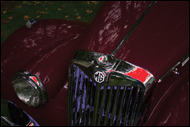
A Click either or both of the Clipping Warning buttons above the histogram (a white frame around a button means that warning is on). This is the histogram for the original photo, shown in A on the next page. Most of the pixels are clustered at the left edge on the graph, signifying that the image is underexposed.
Use the Exposure and Recovery sliders as a pair to improve highlight detail. Move the Exposure slider to the left and the Recovery slider well to the right until only a trace remains of the red highlight warning color.
Use the Blacks and Fill Light sliders as a pair to improve shadow detail. Move the Fill Light slider slightly to the right and the Blacks slider to the left until only a trace remains of the blue shadow warning color.
To minimize clipping another way, Alt-drag/Option-drag the Exposure and/or Recovery slider and release the mouse when small amounts of white (representing all three color channels) display in the black preview and Alt-drag/Option-drag the Blacks slider and release the mouse when small amounts of black display in the white preview. Color areas, if any, represent clipping in those channels.
- Use the Brightness slider to control detail in the midtones, and the Contrast slider to increase or decrease contrast.
To adjust the color saturation:
Use the Vibrance★ or Saturation sliders in the Basic tab to adjust the color saturation (to the right to increase saturation). Note that these sliders produce different results. The Saturation slider can cause oversaturation and highlight clipping (move it to the right, and your photo will start looking unnatural). The Vibrance slider, on the other hand, doesn’t cause oversaturation, so of course we prefer it. In fact, Vibrance goes so far as to prevent slightly oversaturated skin tones from becoming even redder.
• To adjust the saturation of individual colors, see pages 240–241.
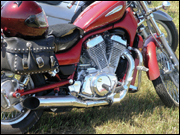
Correcting an Underexposed Photo
A The original photo is underexposed, as shown by the blue and red clipping warning colors in A on the previous page.
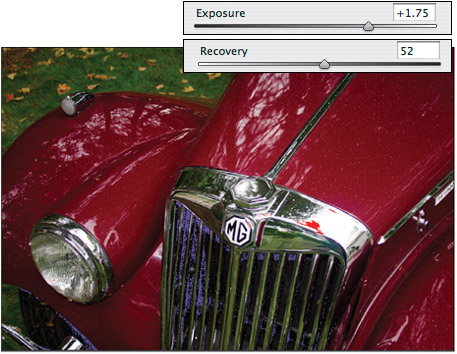
B We moved the Exposure slider to the right to lighten and recover detail in the highlights and midtones. We also moved the Recovery slider to recover some detail in the metal highlights, but we’ll leave some clipping because the specular lighlights on these bright, metallic surfaces are supposed to be pure white, without details.
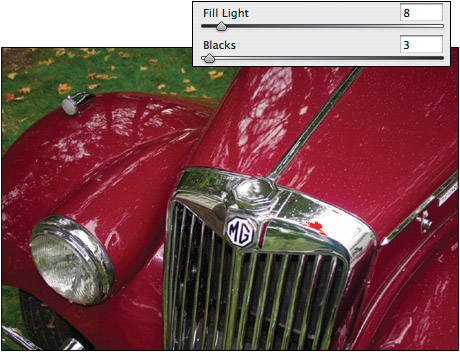
C We used the Fill Light and Blacks sliders to recover detail in the shadows (on the lower front area of the car and in the grass). The blue and red clipping warnings are now minimized.
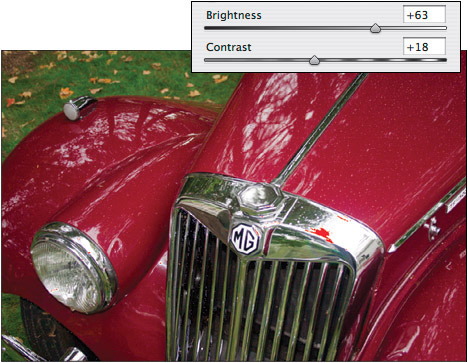
D We moved the Brightness slider to the right to recover more detail in the midtones and moved the Contrast slider to the right to increase contrast (and thereby intensify the shadows).

E Finally, we moved the Vibrance slider to the right to increase the color saturation. Now this classic MG really shines!
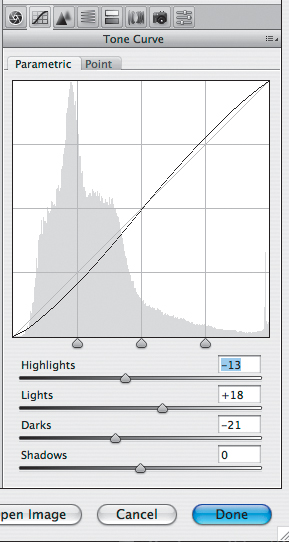
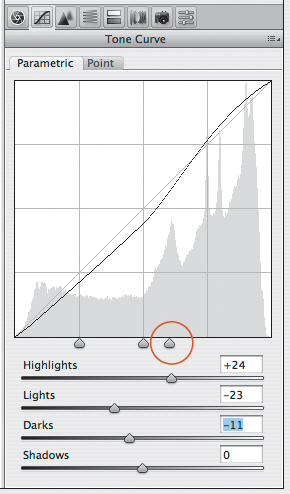
Using the Tone Curve tab ★
After making adjustments in the Basic tab, the next step is to use the Tone Curve tab to fine-tune a specific section of the tonal range (highlights, midtones, or shadows). You can adjust the curve in either of two ways: by manually placing points, employing the same techniques that you’d use in the Curves dialog box (see pages 210–213), or by using the parametric sliders. We’ll show you the latter method because we think it produces higherquality corrections. It offers a slider for each part of the tonal range (no need to guess which part of the curve to bend), and it protects against posterization by preventing you from misshaping the curve. The parametric curve and sliders were first introduced in Adobe Photoshop Lightroom, and they’re the adjustment method of the future.
To make tonal adjustments using the Parametric sliders:
- Click the Tone Curve tab,
 then click the nested Parametric tab. A–B Behind the curve is a static image of the current histogram.
Styve Reineck © ShutterStock.com
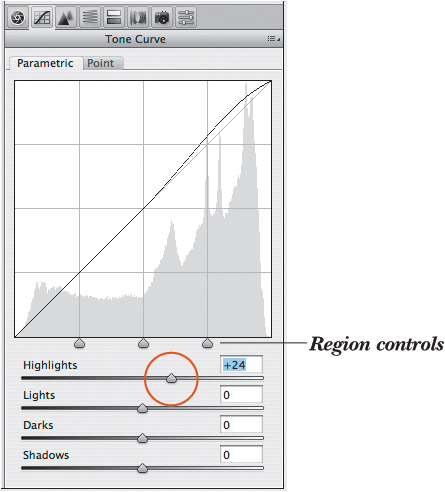
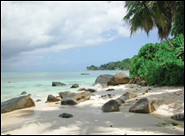
B In the Parametric tab of the Tone Curve tab, we lightened the Highlights (to +24), which raised the top of the curve.
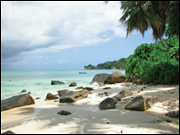
- Drag the Highlights, Lights, Darks, or Shadows slider to the right to lighten that tonal range (and thus raise the corresponding portion of the curve above the diagonal line)C or drag any slider to the left to darken that tonal range (and thus lower that portion of the curve below the diagonal line) (A–B, next page).
• We recommend using these sliders to adjust one or two sections of the tonal range (say, just the midtones and highlights or just the midtones and shadows), and moving no more than three sliders. Remember, you’re just fine-tuning the exposure.

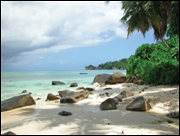
C Now the highlights are lighter, particularly in the clouds. We’ll darken the midtones next.
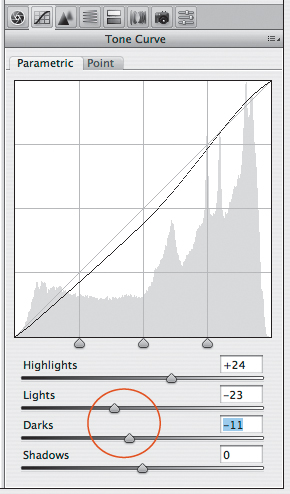
A We moved the Lights and Darks sliders to the left, which lowered the middle of the curve.
B The Lights and Darks adjustment darkened the midtones.
- After adjusting the sliders, move a region control (located below the graph) to expand or contract the range of any slider adjustment. The left region control affects the Shadows slider, the right region control affects the Highlights slider (C–F, next page), and the middle region control affects the Lights and Darks sliders (A–B, page 240). The more a control moves the curve away from the diagonal line, the more adjacent tonal ranges are affected; the more a control moves the curve closer to the diagonal line, the fewer adjacent tonal ranges are affected.
C We moved the right region control to the left, which raised the top and middle sections of the curve.
D The control adjustment expanded the effect of the lightened highlights to the midtones, which isn’t our aim.
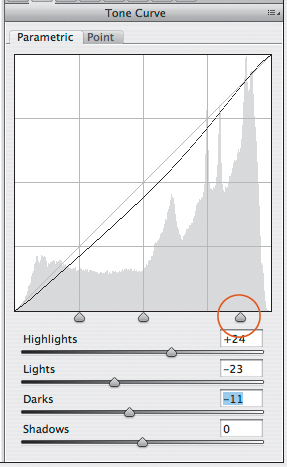
E We moved the right region control to the right, which lowered the top and middle of the curve.
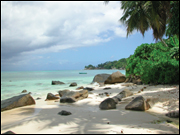
F The control adjustment narrowed the lightening effect of the Highlights slider to just the highlights and recovered details in the clouds.
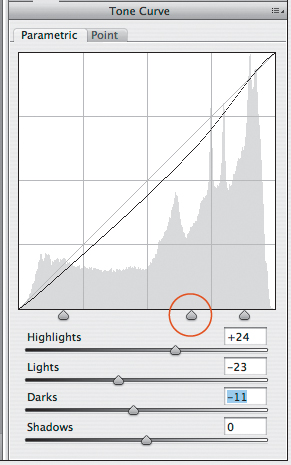
A Finally, moving the middle region control to the right lowered the middle of the curve slightly.
B The last control adjustment expanded the darkening effect of the Lights and Darks sliders and produced more contrast in the midtones. Now the exposure is just right.
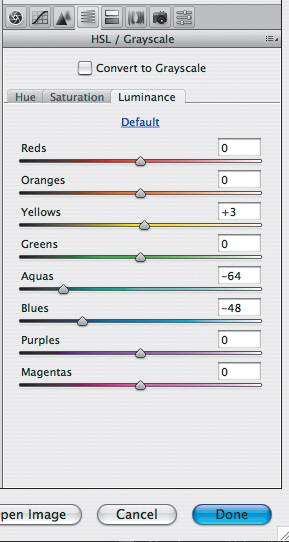
Using the HSL/Grayscale tab ★
In the HSL/Grayscale tab, you can adjust the hue, saturation, or luminance of colors individually. This tab is powerful!
To adjust individual colors:
- Click the HSL/Grayscale tab
 and choose Fit in View as the zoom level for the preview.
 - Click the nested Hue tab. Move a slider to shift that color toward its adjacent hues, as shown in the bar. For example, shifting the greens in a photo toward yellow makes the scene warmer; shifting greens toward aqua cools it down.
- Click the Saturation tab (A–C, next page). Move a slider to the left to desaturate a color (make it grayer) or to the right to make it more saturated (more pure). Try not to oversaturate colors, or your photo will look unnatural.
• To make a sky more vivid, increase the saturation of Blues and Aquas. For a warm sunset effect, increase the saturation of Yellows or Greens. To make the lighting gray and hazy, lessen the saturation of Yellows or Greens.
- Click the Luminance tab (D–E, next page). Move a slider to the left to make that color darker (add black) or to the right to make it lighter (add white). Don’t overlighten a color, or you’ll end up clipping the highlights.
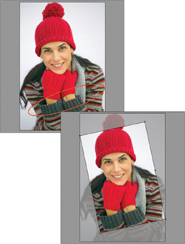
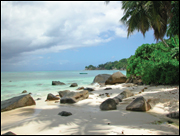
Applying HSL Adjustments to a Photo
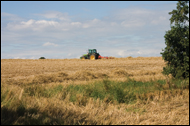
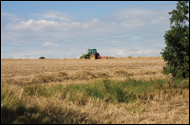
A In the original photo, the sky lacks contrast and the greens and yellows in the field are too overpowering.
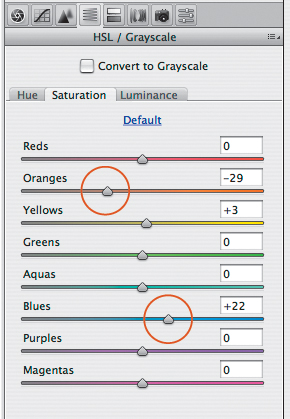
B Via the Saturation tab of the HSL/Grayscale tab, we lowered the saturation of Oranges and increased the saturation of Blues.
C Using the Saturation sliders, we lowered the intensity of oranges in the field and made the blues in the sky richer.
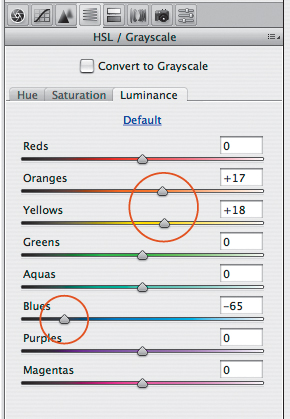
D Via the Luminance tab, we lightened the Oranges and Yellows and darkened the Blues.
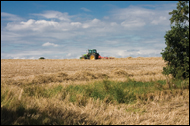
E Using the Luminance sliders, we were able to change the quality of light in the field from orange-yellow to a crisp, neutral light. We also darkened the blues in the sky. In summary, by desaturating the colors in the field and enriching the saturation and contrast in the sky, the photo is now richer and more balanced.
Using the Detail tab
Via sliders in the Detail tab, you can preview and adjust the sharpness of your photo, make smoothing adjustments, and reduce color noise. A
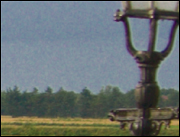
A In this photo, the sky and background are showing too much color noise.
To make smoothing adjustments and reduce color noise:
- Click the Detail tab
 B and choose a zoom level of 100%–200% for the preview.

B In the Detail tab, we moved the Luminance and Color sliders to the right.
- The Sharpening slider controls edge definition. We prefer to make as many adjustments as possible in Camera Raw, but in this case we recommend leaving the Sharpening slider at the default value of 25 and, if need be, using a sharpening filter in Photoshop instead—such as our current favorite, Smart Sharpen.
To forego sharpening your photo in Camera Raw but still preview the effect of sharpening, click the Open Preferences button
 on the toolbox, then in the Camera Raw Preferences dialog box, choose Apply Sharpening To: Preview Images Only. The words “(Preview Only)” will appear above the Amount slider.
 - All digital cameras produce some undesirable noise, such as visible artifacts and stray pixels. Budget cameras tend to produce the most noise, but noise can also result from using high ISO (light sensitivity) settings with high-end cameras in poorly lit scenes. Noise can become accentuated by image editing, so if possible, it should be removed before opening your photo into Photoshop. To reduce noise in the dark areas, move the Luminance (smoothing) slider (try a value between 10 and 15).
• The higher the Luminance value, the more you’ll need to sharpen the photo afterward in Photoshop.
- Finally, move the Color (noise reduction) slider to the right to eliminate color artifacts and random speckling from all the tonal levels of the photo. C These defects tend to be most noticeable on solid-color surfaces, especially in shadow areas. The default value is 25, but you can raise it to 40–60, depending on the type of photo you’re working with (figure, landscape, interior, etc.).
C Eliminating noise from the sky and background made those areas look smoother (as a final step, we’ll resharpen the photo in Photoshop).
Saving and applying Camera Raw settings
After carefully choosing custom settings for a photo in Camera Raw, it’s good to know that you can save those settings for future access. Once you save a collection of settings as a settings preset, it can then be applied it to other files (say, from the same photo session) that need the same or similar corrections. Your settings preset can be applied to a single image via Camera Raw, to multiple selected thumbnails via Bridge, or to multiple files via batch processing.
To save Camera Raw settings as a preset: ★
- With your corrected image open in Camera Raw, choose Save Settings from the Settings menu. The Save Settings dialog box opens. A
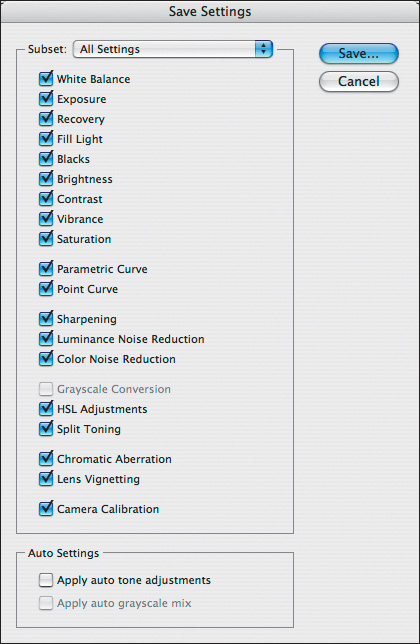
A In the Save Settings dialog box, specify which of your custom Camera Raw settings will be saved in a preset.
- Check which settings you want saved to the settings file; or to narrow the selection, choose a single settings category (tab name) from the Subset menu.
- Click Save. In the Save Settings dialog box, enter a name (preferably one that describes the type of settings being saved), keep the .xmp extension and leave the location as the Settings folder, and click Save.
- The saved settings preset can now be chosen in the Presets tab for any photo (see the next set of instructions).
You can apply a user-defined preset (saved collection of settings) to any photo in Camera Raw.
To choose a Camera Raw preset: ★
In Camera Raw, do either of the following:
Click the Presets tab, ![]() then click the preset you want to apply.
then click the preset you want to apply.
From the Apply Preset submenu on the Settings menu, choose the desired preset.
When you open multiple photos simultaneously into Camera Raw, the files are represented by thumbnails in a filmstrip panel on the left side of the dialog box. In theory, you could, say, open multiple files from the same photo shoot into Camera Raw, choose settings, then click Synchronize to apply those settings to all the photos. In practice, it’s unlikely that all the adjustments for one photo will work perfectly on the rest. The Synchronize option is useful, however, for applying settings incrementally. For example, you could apply some Basic adjustments to all your photos (perhaps white balance and exposure), then select smaller batches of thumbnails and make more targeted adjustments. In each case, you’ll click Synchronize to apply the changes to all the currently selected thumbnails.
To synchronize the Camera Raw settings of multiple files:
- In Bridge, select two or more Raw file thumbnails that were shot under the same lighting conditions and that need the same type of correction. Double-click one of the selected thumbnails.
- In Camera Raw, the filmstrip panel will display. A Click one of the thumbnails.
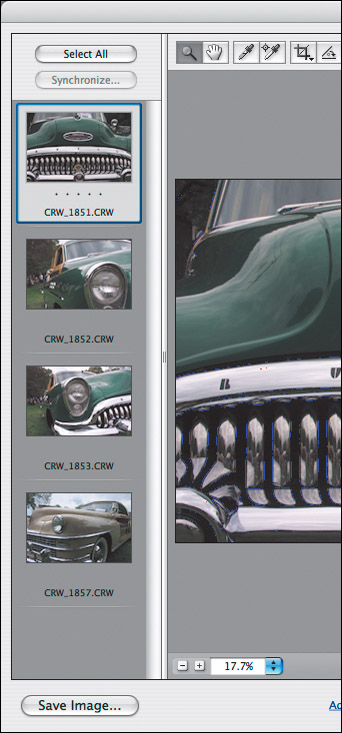
A If you open two or more Raw files simultaneously (whether via Bridge or via File > Open in Photoshop), image thumbnails will display in the filmstrip panel on the left side of the Camera Raw dialog box. Click the thumbnail for the photo you want to either apply corrections to or open.
- Make the necessary adjustments to the selected image, including cropping, if you want to crop all the images the same way.
- Click Select All at the top of the filmstrip panel or Ctrl-click/Cmd-click multiple thumbnails, then click Synchronize. The Synchronize dialog box opens. (This dialog box is very similar in appearance and layout to the Save Settings dialog box, which is shown on the previous page.)
- Either check the setting(s) you want to apply or choose a category from the Synchronize menu.
- Click OK to apply the current settings to all the selected thumbnails.
Opening and saving Camera Raw files
Still with us? Great! Finally, you get to open your Camera Raw file in Photoshop. (After reading this page, be sure to see our instructions for opening a Camera Raw file as a Smart Object layer on the next page.)
To open a Camera Raw file, saving settings:
When you’re done choosing settings in the Camera Raw dialog box, click Open to convert and open the corrected file in Photoshop. The current settings will be saved as instructions for converting the Raw or JPEG file without changing the original Raw or JPEG file itself.
Note: The settings for a Raw photo will be saved either as part of the internal Camera Raw database in your system or as a hidden sidecar .xmp file in the same folder as the Raw file. This internal file is different from any user-created settings file that you may have created via the Save Settings command on the settings menu.
• To close Camera Raw without opening your file, click Done; your current settings will still be saved as instructions for modifying the file.
You can also open a copy of a Camera Raw file without recording the settings into the metadata of the Raw file or into the actual JPEG file.
To open a copy of a Camera Raw file:
In the Camera Raw dialog box, hold down Alt/Option and click Open Copy. The file will be converted using the current settings and will open in Photoshop, but those settings won’t be recorded over any existing instructions in the Raw or JPEG file.
You can rename your photo files and convert them to the DNG (digital negative), JPEG, TIFF, or Photoshop format without having to open them in Photoshop.
To save a file via Camera Raw:
- In the Camera Raw dialog box, click Save Image. The Save Options dialog box opens.
- Choose a location, enter a file name, choose a format, then click Save.
• Via the Save Image button, you can save more than one version of a photo, each with a different set of adjustments (such as two different exposure adjustments). In this case, in the Save Options dialog box, simply change the file name.
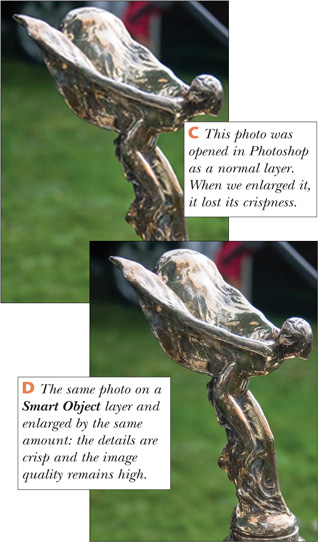
Opening and placing photos as Smart Objects
If you open or place a Camera Raw file into Photoshop as a Smart Object, you’ll have the option to readjust it at any time via Camera Raw. To learn more about Smart Objects, see pages 302–304.
To convert a Camera Raw file into a Smart Object: ★
Method 1 (open as a new document)
When you’re done applying your Camera Raw edits, hold down Shift and click Open Object. A new file will open in Photoshop, with the image on a Smart Object layer.
• To have Camera Raw open all files as Smart Objects, click the underlined link to open the Workflow Options dialog box, then check Open in Photoshop as Smart Objects; or uncheck to open your photos as non–Smart Object layers.
Method 2 (place into an existing document)
- Open a Photoshop document.
- In Bridge, click the thumbnail for a Raw or JPEG photo that was previously edited in Camera Raw.
- Choose File > Place > In Photoshop. The Camera Raw dialog box opens.
- Make any adjustments to the photo, if desired, then click OK. It will appear on its own layer in the currently active Photoshop document, within a transform box.
- Apply any scale or shape transformations, then press Enter/Return or double-click inside the transform box to accept the placed image. It’s now a Smart Object layer.
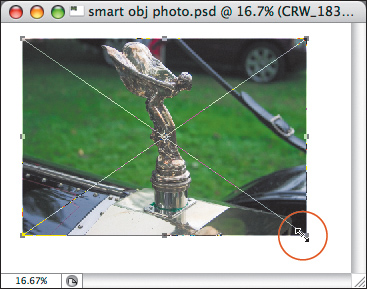
To edit a Smart Object photo:
- Double-click a Smart Object layer thumbnail to reopen an embedded copy of the photo into the Camera Raw dialog box. A

A To change the Camera Raw settings for a Smart Object image, double-click the layer thtumbnail.
- Make any desired adjustments, then click OK to apply your edits to the Smart Object layer. The original file won’t be affected by your edits.
• You can also scale a Smart Object layer at any time. Photoshop will use the pixel data from the original file to scale the image, so its quality won’t be diminished (that is, provided you don’t enlarge it beyond its original size). B–D
B To scale a Smart Object layer, choose the Move tool, then Shift-drag a corner handle of the transform box.