montage projects
essential skills
- Use Quick Mask mode, alpha channels and layer masks to create a simple montage.
- Use the Pen Tool to create a smooth-edged mask.
- Create a simple montage using layer blend modes.
- Merge or blend a graphic with a three-dimensional form using a displacement map.
- Use Refine Edge, channel masking and a blend mode for a perfect hair transplant.
- Replace a sky and manipulate the tonality and color for a seamless result.
- Create a composite image while preserving the subject’s original shadow.
- Replace the background behind a model while preserving the fine hair detail and the original shadow.

Layer masks – Project 1
A common task in professional digital image editing is to strip out the subject and place it against a new background – the simplest form of montage. The effectiveness of such a montage is often determined by whether the image looks authentic and not manipulated. In order to achieve this the digital photographer needs to modify the edge of any selection so that it is seamless against the new background. A crude or inappropriate selection technique will make the subject appear as if it has been cut out with garden shears and is floating above the new background. A few essential masking skills can turn the proverbial sow’s ear into the silk purse.

Part 1 – Changing the background
1. In a non-destructive professional workflow it is preferable to hide or mask the background pixels rather than delete them. In this project we are going to learn how to make an accurate selection in order to create a layer mask. When we move the subject to a new background we may then need to modify and refine the edge of the mask. Open the M1 start image and then select the majority of the background behind the subject using the Magic Wand Tool. Select the background with the Magic Wand Tool with the Tolerance set to 20 in the Options bar. It is quicker to select the background rather than the subject because there are less differences in tone or color. Select the ‘Contiguous’ option in the Options bar and click on the ‘Add to Selection’ icon or hold down the Shift key as you add the isolated areas between the legs and under the arms. The Magic Wand tool does not have a ‘Feather’ option so the resulting selection will have a hard edge.
Quick Selection Tool alternative
Switch the ‘Auto-Enhance’ option in the Options bar off. Make an initial selection by dragging the tool over an area of the background. Then hold down the Option/Alt key and make a series of strokes around the inside edge of the subject to define the areas you don’ t want to be included in the selection. The effect of these subtractive strokes will not be immediately obvious at this stage, as you are only helping to educate the tool as to which pixels you intend to exclude from any further selections. These are pre-emptive strokes that will help prevent the selection made by the Quick Selection Tool from leaking outside of the area you wish to select. After making the subtractive stroke continue to add to the original selection until most of the background has been selected. Hold down the Option/Alt key and stroke any areas of the subject with a small brush to subtract any areas that have been included in the selection by mistake. Perfect the selection using the ‘Quick Mask mode’ (see next step) as no one tool can easily select the entire subject in this image.

2. We can perfect the selection using the Quick Mask feature. Set the foreground and background colors to their default setting in the Tools panel (press the D key). Next click on the ‘Edit in Quick Mask Mode’ icon in the Tools panel. Double-clicking the icon will open up the ‘Quick Mask Options’. Click the color swatch to open the ‘Color Picker’ and select a color that contrasts with those found in the image you are working on. In this project it is appropriate to set the color to a saturated green with 50–70% Opacity.
3. The Quick Mask can be modified by painting directly into the mask or by making a selection and then filling the selection with either the foreground or background color. Editing the mask will change the resulting selection when we exit the Quick Mask feature. If the initial selection was made using the Magic Wand Tool it is important to paint into the Quick Mask with the brush set to maximum hardness and/or make selections with the feather radius set to 0 in the Options bar (this will ensure these modifications match the current edge quality created by using the Magic Wand or Quick Selection Tools). Painting or filling with black will add to the colored mask, while painting/filling with white will remove the mask color.
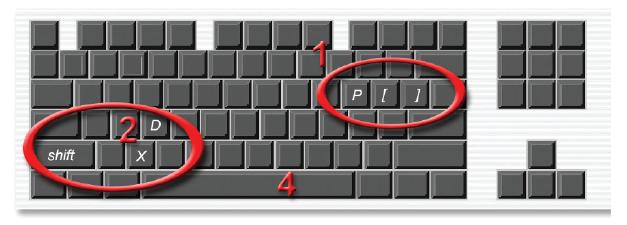
Useful shortcuts for masking work
1. Brush size and hardness
Using the square bracket keys to the right of the letter P on the keyboard will increase or decrease the size of the brush. Holding down the Shift key while depressing these keys will increase or decrease the hardness of the brush.
2. Foreground and background colors
Pressing the letter D on the keyboard will return the foreground and background colors to their default settings (black and white). Pressing the letter X will switch the foreground and background colors.
3. Fill with foreground or background color
Use the keyboard shortcut Command + Delete (Mac) or Ctrl + Backspace (PC) to fill a selection with the background color. Use the keyboard shortcut Option + Delete (Mac) or Alt + Backspace (PC) to fill a selection with the foreground color.
4. Zoom and Hand Tools
Use the keyboard shortcut Command + Spacebar (Mac) or Ctrl + Spacebar (PC) to access the Zoom Tool and the Spacebar by itself to drag the image around in its window.
5. Inverting the mask
Use the keyboard shortcut Command + I (Mac) or Ctrl + I (PC) to invert the mask if the mask is concealing the edge you are working on. The use of these shortcuts will make shorter work of creating accurate selections.

Modifying the mask using the Pen Tool
Making a path and then turning the path into a selection will create the smoothest edges and is often the easiest method for modifying the curved edges of a mask. Right-click after creating a path to access the ‘Make Selection’ option from the context menu. Choose a ‘Feather Radius’ of 0 pixels and then select OK. Fill the selection with Black to add to the mask or with White to remove a section of the mask (Edit > Fill).
Note > See ‘Selections from paths’ in the Selections chapter and Project 2 in this chapter to get more information on using the Pen Tool.

4. Next we need to remove any parts of the mask that are not required (these were areas of the background that were left out of the initial selection). Select the Brush Tool from the Tools panel and an appropriate hard-edged brush from the Options bar and be sure the brush opacity is set to 100%. The foreground and background colors can be switched when painting to subtract or add to the mask. Zoom in on areas of fine detail and reduce the size of the brush when accuracy is called for. When the painted mask is complete press on the letter Q on the keyboard or click on the ‘Edit in Standard Mode’ icon in the Tools panel.
Note > Adding an adjustment layer to temporarily brighten or darken an image may help you to paint an accurate mask against some edges that may otherwise be difficult to work with. Delete the adjustment layer when the painted mask is complete.

5. Go to Select > Inverse so that the subject rather than the background is selected. Click on the ‘Refine Edge’ button in the Options bar. If the button is not visible (due to the fact that a painting tool rather than a selection tool is selected) go to the Select menu and choose ‘Refine Edge’.
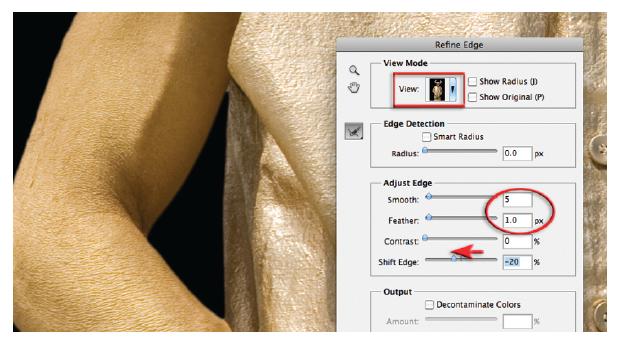
6. In the Refine Edge dialog box set the ‘Radius’ slider to zero (this slider does not need to be used as there are no soft edge transitions or fine detail around the edge of the subject that need to be modified or preserved). Choose the ‘On Black’ preview option from the View menu. Turn your attention to the Smooth slider and take the slider back to 0 and check the quality of the edges at 100% magnification (Command + Option + 0 on a Mac and Ctrl + Alt + 0 on a PC and then hold down the Spacebar to drag the image in the image window). Selections created using the Magic Wand or Quick Selection Tools can often be lumpy, and raising the Smooth slider will disguise this fault. Settings of Smooth: 5, Feather: 1.0 px Contrast 0 and Shift Edge of –20% should soften the edge nicely and hide most of the background surrounding the edge. Click the OK button when you are satisfied with the settings. If the edge is too lumpy for your liking there are steps we can take later after this step has been completed. The Refine Edge dialog box works globally (on the entire edge) so a few compromises may be required at this stage.
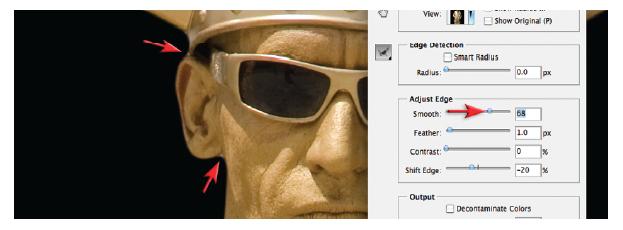
Note > Too much of a good thing results in webbed ears, i.e. if the Smooth slider is raised too high the corners of the selection will start to be ‘rounded off’, resulting in the old background showing through.

7. Save the selection as an ‘Alpha’ channel by going to the Channels panel and clicking on the ‘Save selection as channel’ icon. Now that the selection has been saved as an alpha channel save your work in progress (File > Save As). The selection can now be deselected (go to ‘Select > Deselect’ )and reselected at any time during the editing procedure.
Note > Change the name of the original file and save as a Photoshop or TIFF file. Photoshop and TIFF files will save the record of your selection as an Alpha channel. JPEG files cannot contain Alpha channels. Alpha channels can be used to establish ‘selection save points’ and can be reloaded as a selection at any time – even if the file has been closed and eopened.
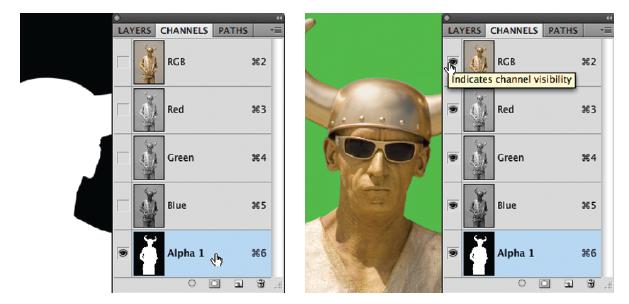
8. Click on the Alpha 1 channel to view the mask by itself or the ‘visibility’ or ‘eye’ icon to view the mask. Click on the RGB visibility icon to view the mask and image together. It is possible to continue working on the mask in this view as if you were in Quick Mask mode (the Alpha channel must be selected).
When edge contrast is poor the editing process usually requires a range of Photoshop’s selection and painting tools. The best workspace for this may still be the Quick Mask mode. The Quick Mask mode allows the user to contract and expand localized portions of the mask by first making a selection (or by creating a path and then converting the path into a selection) and then using the Maximum/Minimum filters or Levels technique (see Step 13 in this project). The user can also paint directly into the mask using any painting tools. None of these localized or painting options are available in the Refine Edge dialog box.

The layer mask is selected and the Refine Edge dialog box opened (Select > Refine Edge). Feedback as to the most appropriate settings to use in the Refine Edge dialog box may be compromised when the mask is not on the subject layer (the saxophone player). Although we can view the subject as an Overlay in the Refine Edge dialog box we are unable to edit this mask using the painting tools.
Most professionals have traditionally preferred to refine masks rather than selections. Some may think that the new Refine Edge dialog box will change this working practice as Refine Edge can also be applied to masks (go to Select > Refine Edge). Although modifications to the selection edge in the Refine Edge dialog box are a vast improvement on the Feather and Modify commands found in previous versions of Photoshop, when the Refine Edge is applied to a mask attached to a new background layer (placed above the subject layer) the user may be unable to determine the appropriate settings to use in order to acquire the best possible edge. Unlike Quick Mask there are only limited options to adjust edges of the selection using the Refine Radius Tool in the Refine Edge dialog (not all edges of an object may appear equally sharp or soft and require the same global adjustment). If you make a selection of a portion of the mask and then use Refine Edge the dialog box defaults to working the edge of the selection rather than the edge of the mask. If quality of the visual outcome, rather than speed, is the primary objective when editing an image, then Quick Mask still offers many advantages over the new Refine Edge dialog box.
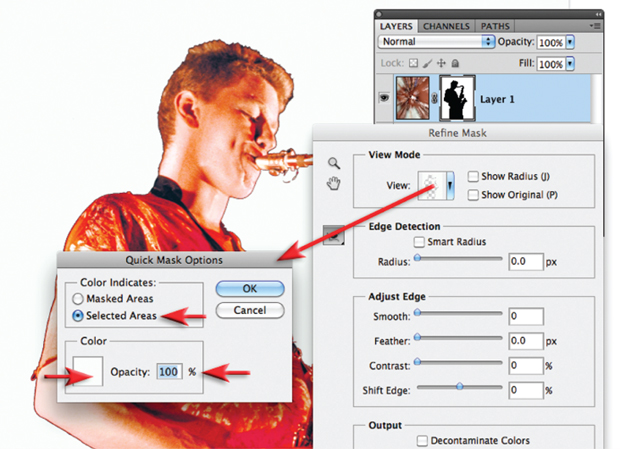
When using Refine Edge to work on a layer mask, the user may have to use a workaround in order to gain any useful feedback on the most appropriate settings to use. After the selection has been converted into a layer mask there may be no feedback when attempting to view the mask using the On White or On Black options. The user must either use the On Layers option from the View menu or Alt/Option click the Overlay view and set the mask color to 100% black or white to create a black or white matte. You will also need to switch the Quick Mask option from ‘Masked Areas’ to ‘Selected Areas’ so that the background instead of the subject is masked. When switching to Selected Areas in Quick Mask Options the Shift Edge slider then works in reverse.

Quick selections may not, by their very nature, be very accurate selections. Missing elements cannot be added from within the Refine Edge dialog box. In Quick Mask mode, however, a selection can be made and then filled with black or the missing elements can simply be painted in prior to using Refine Edge or editing the edge quality from within the Quick Mask mode itself.

9. Load the Alpha channel as a selection by holding down the Command key (Mac) or Ctrl key (PC) and clicking in the Alpha channel thumbnail. Before returning to the Layers panel, switch off the Alpha channel visibility and select the master RGB channels view at the top of the Channels panel.
Note > Leaving the Alpha channel as the active component in the Channels panel before returning to the Layers panel can create problems with some editing procedures, e.g. copying and pasting. If problems occur you may notice that the layer is grayed out in the Layers panel and the word ‘Alpha’ may appear in the title of the image window. If this occurs return to the Channels panel or use the keyboard shortcut listed on the RGB channel (Command/Ctrl + 2).
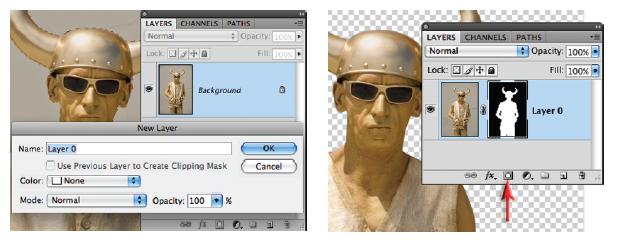
10. The pixels on a background layer cannot be masked until the layer has been converted to a normal (unlocked) layer. Double-click on the background layer to open the ‘New Layer’ dialog box. Just select OK if you do not want to rename it and then click on the ‘Add layer mask’ icon at the base of the Layers panel to add a mask that conceals the background pixels.
Note > It is important to note that although the background is no longer visible it has been masked and not removed permanently. The ‘masked’ and ‘selected’ areas are the reverse of each other. Areas that were not part of the original selection become the masked areas. Holding down the Alt/Option key as you select ‘Add layer mask’ reverses the layer mask so the selected areas become the masked areas.
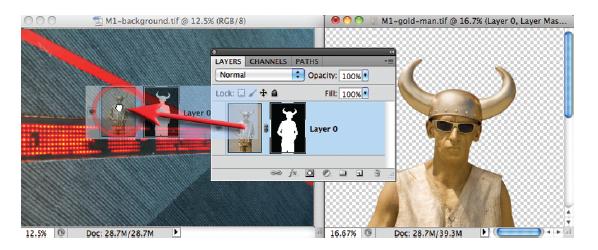
11. Open the M1 background file and position the new background image alongside the image of the gold man. Click and drag the thumbnail of the gold man in the Layers panel into the image window of the new background. Let go of the mouse button to create an image file with two layers (holding down the Shift key as you let go of the mouse button will ensure the new layer is centered). A border will appear momentarily around the host image before you let go of the mouse button to indicate that it will accept the new layer.
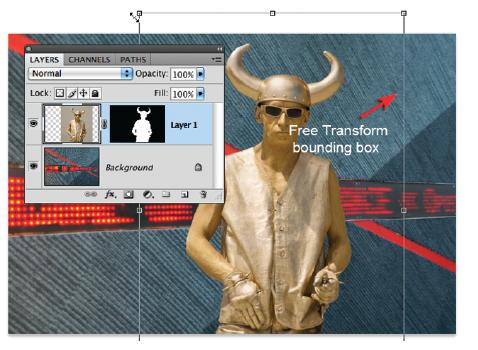
12. The image now comprises two individual layers and the layer mask you created. Select the top layer (your subject) and then go to ‘Edit > Free Transform’ (Command/Ctrl + T). Use the keyboard shortcut Command/Ctrl + 0 to shrink or reduce the image so that you can fit the Transform bounding box on the screen. Hold down the Shift key and drag a top corner handle to resize the image. Holding down the Shift key as you drag will constrain the proportions of the image in the bounding box. Dragging inside the bounding box will move the image. Use the arrow keys for fine adjustments. Press the ‘Commit’ icon in the Options bar or press the Return/Enter key to apply the transformation.

13. There are a number of ways we can modify the edge of a mask in localized areas if required (remember the Refine Edge command can only work on the entire edge). Make a selection of a portion of the edge where a light halo (the old background) may be apparent. If the selection crosses an edge be sure to use a small amount of feather (in the Options bar) so the changes to the edge do not result in a ridge. We can expand the mask and hide more of the background pixels by applying a Levels adjustment to the mask. Make sure the mask is the active component of the layer (click on it so that a second dark line appears around the thumbnail in the Layers panel). Go to Image > Adjustments > Levels and then in the Levels dialog box move the central gamma slider to the right to expand the mask. The edge of the mask can be made harder by moving the white and black point sliders in from the edges of the histogram.
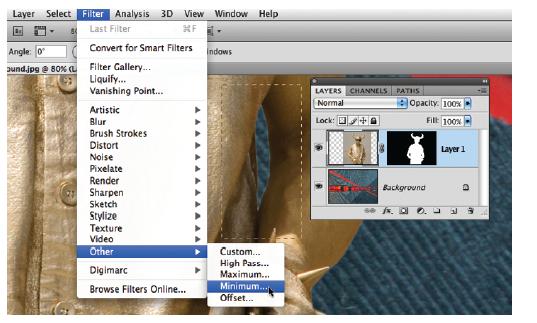
An alternative to using a Levels adjustment is to use the Minimum and Maximum filters to adjust the position of the edge of the mask. Go to ‘Filter > Other > Minimum’ to expand the mask (the Maximum filter contracts the edge of the mask by moving it in the opposite direction). Although not as controlled as having a gamma slider to move the edge, the advantage to this technique is that you can reapply the Minimum filter to other selected areas, after the initial application, very quickly by simply using the Command/Ctrl + F keyboard shortcut.

14. If you need to smooth out a section of the edge without smoothing the whole mask start by loading the layer mask as a selection (hold down the Command/Ctrl key and click on the layer mask thumbnail in the Layers panel). Select the Lasso Tool and select the ‘Intersect’ icon in the Options bar. Make a selection around the section you want to modify and then go to ‘Select > Modify > Smooth’. Choose a generous ‘Sample Radius’ setting of 15 or 20 for the arm in this project. Check that the layer mask is selected, then fill the modified selection with white. When finished select the ‘New Selection’ icon in the Options bar and then go to Select ’ Deselect.
Note > You can use the Blur Tool from the Tools panel on any edge in the Layer mask that appears too hard.

15. The next few steps will balance the color and tonality between the two image layers. Click on the bottom layer in the Layers panel and then choose a Hue/Saturation adjustment layer from the Adjustments panel. Select the ‘On-Image Tool’ in the Adjustments dialog. Next, hold down the Command key (Mac) or Ctrl key (PC) and then click and drag right on a red hue in the image window to adjust the reds in the image to yellows (approximately +45 on the Hue slider). Let go of the Command/Ctrl key (this will allow you to target the saturation rather than the hues) and then click and drag left on the background to desaturate the cyans in the image.

16. Select the top layer in the Layers panel and then select another Hue/Saturation adjustment layer from the ‘Create new fill or adjustment layer’ menu. In the Hue/Saturation dialog select the ‘Use Previous Layer to Create Clipping Mask’ icon. Creating a Clipping Mask between the adjustment layer and the layer below will restrict any changes to just this layer and leave the bottom layer unadjusted. Increase the Saturation to match the yellow stripes on the bottom layer.

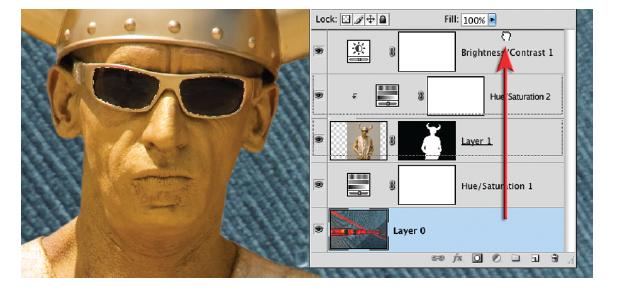
17. If you create an adjustment layer that is not part of the Clipping Mask it will affect all layers beneath it. In this project I have increased the Brightness and Contrast of both the image layers by creating a Brightness/Contrast adjustment layer at the top of the layers stack (the Brightness/Contrast adjustment feature is no longer destructive since CS3). Note how the Hue/Saturation adjustment layer is indented and the layer name ‘Layer 1 ’ is underlined to show that the two layers form part of a Clipping Mask.
Part 2 – Finishing touches
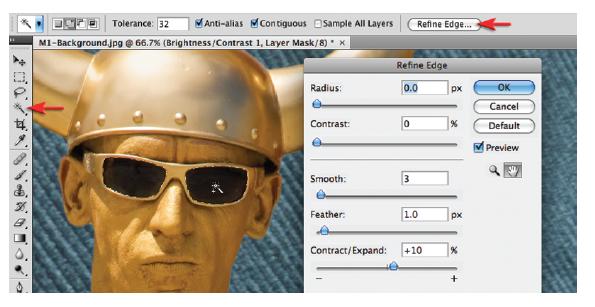
18. The next few steps will paste an interesting reflection in those very dark sunglasses. Choose the Magic Wand Tool from the Tools panel and set the Tolerance to 32 in the Options bar (its default value). Click on the ‘Add to selection’ icon in the Options bar and then click on each black lens in the sunglasses to select them both. Click on the ‘Refine Edge’ button in the Options bar and then choose values of ‘Smooth: 3, Feather: 1 and Contract/Expand: +10 ’ in the Refine Edge dialog box. Select ‘OK’ to apply the changes.
19. Double-click on the background layer and in the New Layer dialog box that opens select OK to unlock the layer and convert it to Layer 0. Hold down the Alt key (PC) or Option key (Mac). Click and drag the bottom layer in the Layers panel (Layer 0) to the top of the layers stack. This will copy the layer and place the copy layer on top. Be careful not to drop the layer below the Hue/Saturation 2 layer otherwise it will enter the Clipping Mask. Go to Edit > Undo if this happens and then repeat the process until the Layer 0 copy appears at the top of the layer stack.
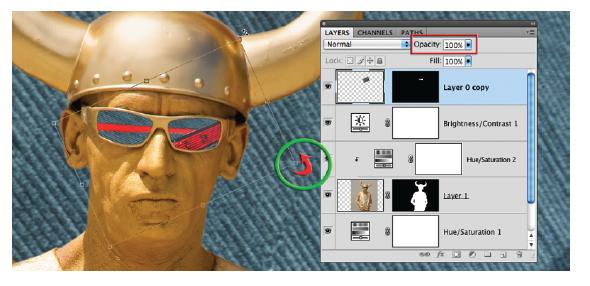
20. Add a layer mask to this copy layer and break the link between the two thumbnails in the Layers panel by clicking on it. This action will allow us to modify the position and size of the image layer but leave the layer mask pin-registered to the precise location of the glasses. Click on the image thumbnail (rather than the layer mask) to make this the active component of the layer. Select ‘Free Transform’ from the Edit menu and then scale and rotate the layer so that the red stripes appear in the lenses of the sunglasses (remember that Ctrl/Command + 0 fits the image and transform bounding box into the window). You have the option to lower the opacity of the layer in the Layers panel if required.

21. Hold down the Alt/Option key again and click and drag the Hue/Saturation 1 adjustment layer to the top of the layers stack. This action will copy the adjustment layer and change the red stripes to yellow but it will also affect the color of the golden Viking. To limit the changes to the reflections in the glasses, create a clipping group by holding down the Alt/Option key and clicking on the dividing line between the adjustment layer (Hue/Saturation 1 copy) and Layer 0 copy in the Layers panel (alternatively you can choose the ‘Create Clipping Mask’ command from the Layer menu).

22. To give a sense of distance between the subject and new background you can add a drop shadow to darken the background selectively. Click on Layer 1, to make it the active layer, and then go to Layer > Layer Style > Drop Shadow (these layer styles are also available from the ‘Add a layer style’ menu in the Layers panel).
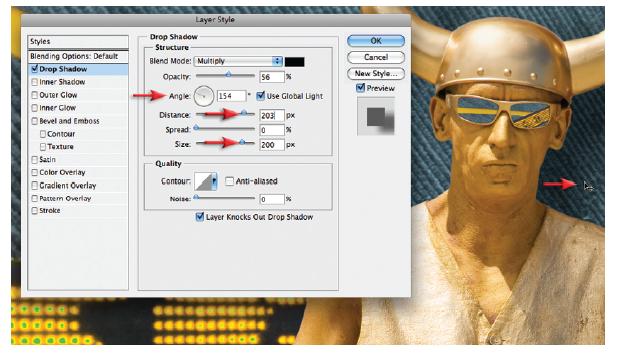
23. In the Layer Style dialog box increase the Distance and Size settings (around 200 px for each). Change the Angle so that the shadow is consistent with the direction of light that is falling on the golden Viking (around 150°) You can also click and drag in the image window to drag the shadow to the correct location. Lower the opacity of the shadow slightly and select OK to apply the changes.
The skills applied in this project are the professional techniques used to create the vast majority of high-quality montages where the viewer does not question the authenticity of the image.
Paths, masks and blend modes – Project 2
With the basic drawing skills covered in the Selections chapter we are ready to create a path that can be converted into a selection and then used as a layer mask. This project will see if you can create a path worthy of a Path Master (for the pen is sometimes mightier than the light sabre or magic wand). The resulting edge will be much smoother than an edge created with any of the selection tools. After an accurate path has been created we can use this to modify the subject and background separately.
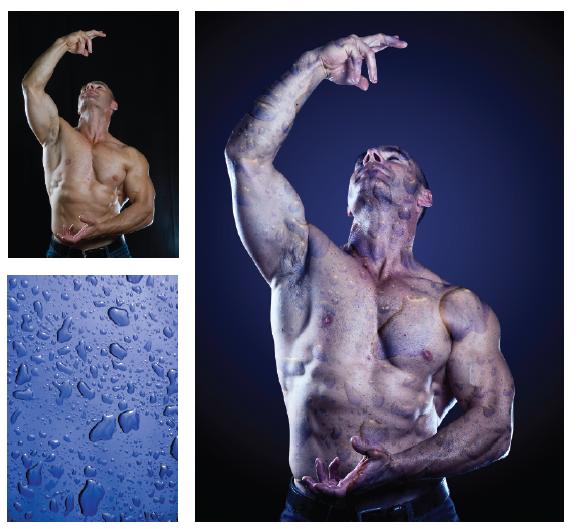
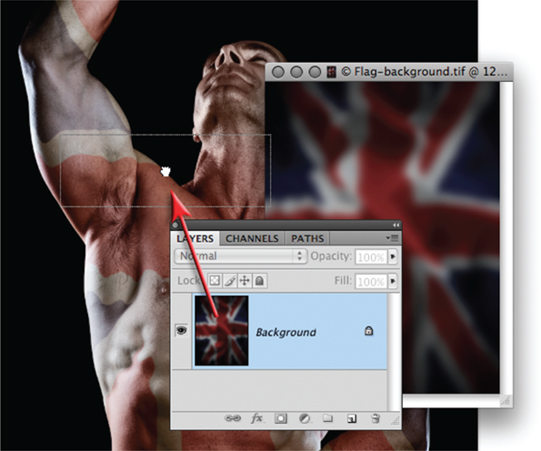
Photograph of body builder by Abhijit Chattaraj
In the montage above the image of the body has been blended with an image of raindrops on a car body. The texture blended takes on the shadows and highlights of the underlying form but does not wrap itself around the contours or shape of the three-dimensional form.

1. Select the Pen Tool in the Tools panel and the Paths option (rather than the Shape layers option) and the ‘Add to path area’ option in the Options bar.
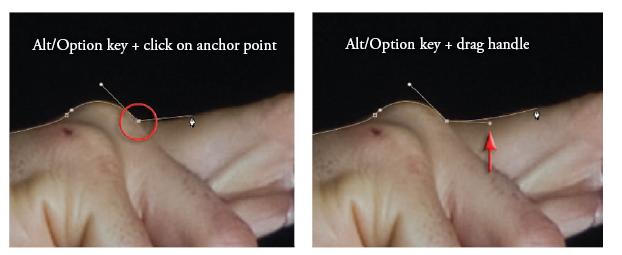
2. Zoom in using the keyboard shortcut Ctrl + Spacebar (PC) or Command + Spacebar (Mac) and work close. Drag the image around in the image window using the Spacebar key to access the Hand Tool. Make a path by clicking on the edge of the subject and dragging to modify the curves. If you encounter edges that are not well defined, work on the inside edge rather than the outer edge of the subject. Try to use as few anchor points as possible (see Selections, pages 181 – 185). Remember you can choose to cancel or move a direction line by holding down the Alt/Option key and clicking on either the last anchor point or its direction point before creating a new segment of the path.

3. You can backtrack at any time and Command + click (Mac) or Ctrl + click (PC) to select an anchor point to make it active again. Then hold down the Alt/Option key to adjust one of the direction lines or hold down the Control key (PC) or Command key (Mac) and click and drag an anchor point to reposition it. Moving the Pen Tool over a segment of the path already completed will give you the option to click and add an anchor point to the path. Moving the Pen Tool over a previous anchor point will enable you to click to delete the anchor points or drag out from the anchor point to add two new direction lines.
Note > Check that you have the ‘Auto Add/Delete’ option checked in the Options bar if the above is not happening for you. If you accidentally remove a direction line from an anchor point hold down the Alt/Option key and click and drag out from the anchor point to add new direction lines.

4. Where the blue jeans extend beyond the edge of the frame (at the bottom of the image window) place your anchor points outside of the image window rather than alongside the edge. Continue creating anchor points until you reach the point where you started drawing. When you click on the first anchor point you will close the path. Hold down the Alt/Option key as you click on the first point if the direction line on the first anchor points changes your last drawn curve.
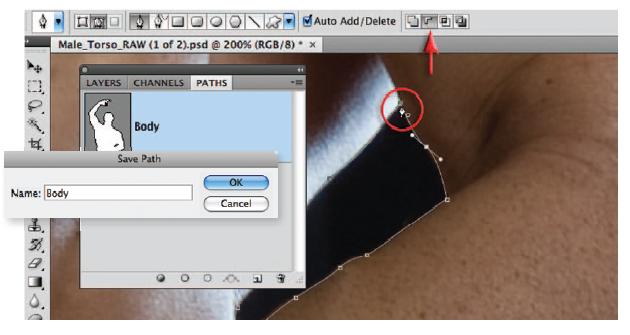
5. In the Paths panel double-click the Work Path. This will bring up the option to save the Work Path and ensure that it cannot be deleted accidentally. Name the pat ‘Body’ and click OK to save it. A saved path can be modified by first clicking on the path in the Paths panel, selecting the Pen Tool in the Tools panel and then selecting the ‘Add to’ or ‘Subtract from path area’ icon in the Options bar. Select the ‘Subtract from path area’ icon and proceed to remove the area of background under the man’s arm using the same pen techniques as before.
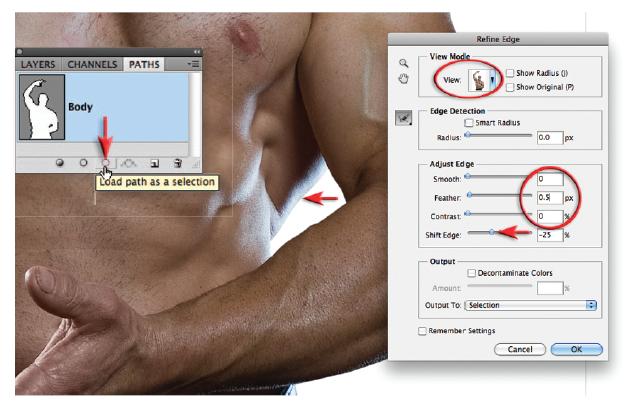
6. Load the path as a selection by clicking on the icon in the Paths panel. Go to Select > Refine Edge and set the Radius, Contrast and Smooth sliders to zero. Apply a 0.5–1 pixel feather. To test the effectiveness of the path it is best to preview the selection over a white background (from the View menu in the Refine Edge dialog). In order to remove the old black background that may just be visible against the edge of the body you will need to move the Shift Edge slider to the left slightly. Select OK to apply the changes.
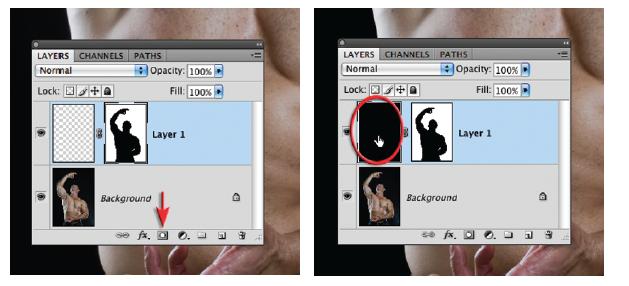
7. Click on the ‘Create a new layer’ icon in the Layers panel to create an empty new layer. Hold down the Alt/Option key and click on the ‘Add layer mask’ icon in the Layers panel. Then select the layer image and go to Edit > Fill and choose black as the contents. Select OK.
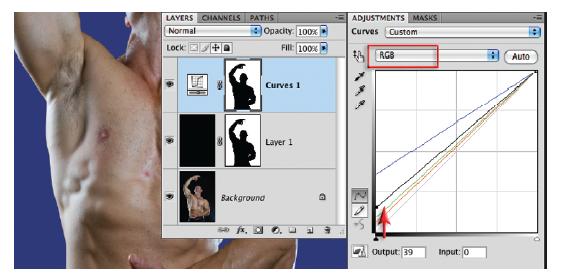
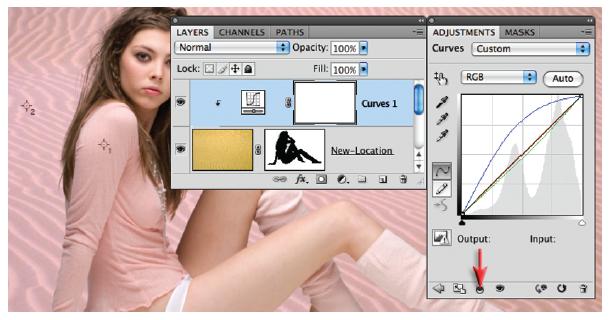
8. This step will create the effect of a backlight behind the subject that slowly fades to black in the corners of the image. Control-click (PC) or Command-click (Mac) on the layer mask to load the mask as a selection, click on the ‘Create new fill or adjustment layer’ icon in the Layers panel and choose a Curves adjustment layer. Select the Blue channel and click and drag the adjustment point sitting in the bottom left-hand corner of the diagonal line until the output value reads 90 or more. Repeat this process with the Red and Green channels but raise these only a little in order to desaturate the blue. In the master RGB channel raise the black point to raise the overall brightness of the color you have created.

9. Select the Gradient Tool in the Tools panel. Select the Foreground to Transparent and Radial Gradient options with black selected as the Foreground color, set the opacity to 100% and select the Reverse, Dither and Transparency options. Click and drag from a position in the center of the man’s body out past the top right-hand edge of the image window to create the backlight effect.
Blending the texture
Blending two images in the computer is similar to creating a double exposure in the camera or sandwiching negatives in the darkroom. Photoshop, however, allows a greater degree of control over the final outcome. This is achieved by controlling the specific blend mode, position and opacity of each layer. The use of ‘layer masks’ can shield any area of the image that needs to be protected from the blend mode. The blending technique enables the texture or pattern from one image to be merged with the form of a selected subject in another image.
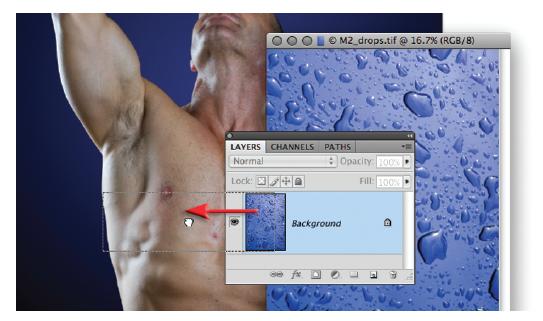
10. Open the drops image from the supporting DVD. Click and drag the layer thumbnail of this image into the body image. Hold down the Shift key as you let go of the drops thumbnail to center the image in the new window. Use the Move Tool to reposition the texture if required. Use the Free Transform command (Edit > Free Transform) if required to resize the texture image so that it covers the figure in the image.
Selecting appropriate images to blend
Select or create one image where a three-dimensional subject is modeled by light. Try photographing a part of the human body using a large or diffused light source at right angles to the camera. The image should ideally contain bright highlights, midtones and dark shadows. Select or create another image where the subject has an interesting texture or pattern. Try using a bold texture with an irregular pattern. The texture should ideally have a full tonal range with good contrast. A subtle or low-contrast texture may not be obvious when blended. Alt/Option-click the document sizes in the bottom left-hand corner of each image window to check that the image pixel dimensions (width and height) are similar. It is possible to blend a colored texture with a grayscale image. If the color of the texture is to be retained when it is moved into the grayscale image containing the form, the grayscale image must first be converted to RGB by going to ‘Image > Mode > RGB’.

11. Hold down the Alt/Option key and drag the layer mask from Layer 1 to Layer 2 to copy it. Invert the mask using the keyboard shortcut Command + I for a Mac or Ctrl + I for a PC. Set the blend mode of the drops layer (Layer 2) to Soft Light or Overlay. Experiment with adjusting the opacity of the layer using the Opacity control in the Layers panel.
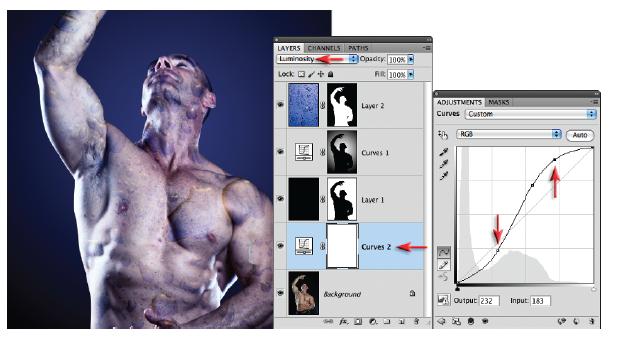
12. After experimenting with the opacity and blend mode of the top layer you can adjust the tonality of the underlying background layer to suit the blend. Select the background layer and select a Curves adjustment from the Adjustments panel. Expand the contrast of the underlying layer by creating an S-curve and set the mode of the adjustment layer to Luminosity if you do not want to increase the saturation levels.

Photography by Abhijit Chattaraj
Creating a displacement map
The layer ‘blend’ modes are an effective, but limited, way of merging or blending a pattern or graphic with a three-dimensional form. By using the blend modes the pattern or graphic can be modified to respect the color and tonality of the 3D form beneath it. The highlights and shadows that give the 3D form its shape can, however, be further utilized to wrap or bend the pattern or graphic so that it obeys the form’s perspective and sense of volume. This can be achieved by using the ‘Displace’ filter in conjunction with a ‘displacement map’. The ‘map’ defines the contours to which the graphic or pattern must conform. The final effect can be likened to ‘shrink-wrapping’ the graphic or pattern to the 3D form. Displacement requires the use of a PSD image file or ‘displacement map’ created from the layer containing the 3D form. This is used as the contour map to displace pixels of another layer (the pattern or graphic). The brightness level of each pixel in the map directs the filter to shift the corresponding pixel of the selected layer in a horizontal or vertical plane. The principle on which this technique works is that of ‘mountains and valleys’. Dark pixels in the map shift the graphic pixels down into the shaded valleys of the 3D form while the light pixels of the map raise the graphic pixels onto the illuminated peaks of the 3D form. The alternative to using a displacement map is to use the Liquify filter.

The limitation of the displacement technique is that the filter reads dark pixels in the image as being shaded and light pixels as being illuminated. This of course is not always the case. With this in mind the range of images that lend themselves to this technique is limited. A zebra would be a poor choice on which to wrap a flag while a nude illuminated with soft directional lighting would be a good choice. The image chosen for this project lends itself to the displacement technique. Directional light models the face. Tonal differences due to hue are limited. Note how the straight lines of the flag are distorted after the Displace filter has been applied. The first image looks as though the flag has been projected onto the fabric, while the second image shows the effect of the displacement filter – it appears as though it has been woven or printed onto the surface of the fabric.

13. Switch off the visibility of the top two layers (the drops and the backlight effect). In order to apply the Displace filter you must first create a grayscale image to become the displacement map. In the Channels panel locate the channel with the best tonal contrast between the shadows and the highlights (in this case the Blue layer). Duplicate this channel by dragging it to the New Layer icon at the base of the panel. Increase the contrast of this channel using the Brightness/ Contrast adjustment (Image > Adjustments > Brightness/Contrast). You can further enhance the hills and valleys by selecting the Dodge or Burn Tools from the Tools panel. Set the Exposure to 20% or lower when using these tools and then proceed to either lighten the hills or darken the valleys as you see fit. Remember this is a displacement map not a photograph.
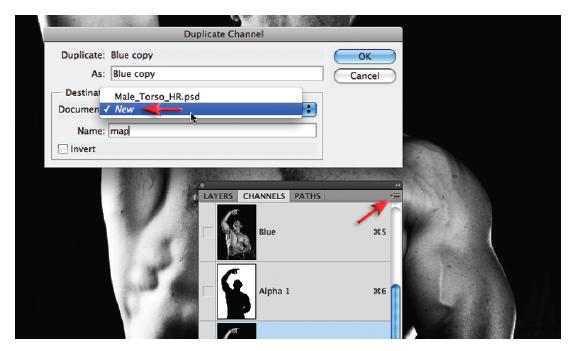
14. Export this channel to become the displacement map by choosing ‘Duplicate Channel’ from the Channels menu and then ‘Document > New’ from the Destination menu. When you select OK in the Duplicate Channel dialog box, a file with a single channel will open in Photoshop.
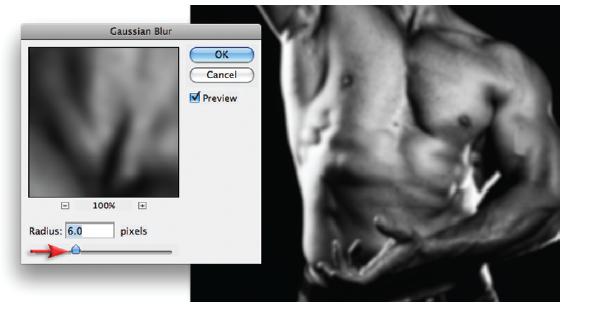
15. Apply ‘Gaussian Blur’ (Filter > Blur > Gaussian Blur) to the new file. Applying a higher Radius of Gaussian Blur (closer to a Radius of 10 pixels) will create a mask that produces a smooth-edged displacement (minor flaws in the skin will be ignored). Using a lower Radius of Gaussian Blur (1–4 pixels) will create a mask that produces a ragged-edge displacement (every minor flaw in the skin will lead to displaced pixels). Save this file as a Photoshop file (your ‘displacement map’ ) to the same location on your computer as the file you are working on. You will need to access this ‘map’ several times in order to optimize the displacement.

16. Open the flag image and drag the background layer thumbnail into the portrait image. Apply the ‘Free Transform’ from the Edit menu and drag the handles of the bounding box to achieve a ‘good fit’. Hit the Return/Enter key to apply the transformation and then set the Opacity of the layer to 100% and the mode to either Soft Light, Overlay or Multiply.

17. Choose ‘Filter > Distort > Displace’ and enter 20 – 30 in the Horizontal and Vertical Scale fields of the Displace dialog box. Select OK and then browse to the displacement map you created earlier. The displacement is then applied to the layer. The Displace filter shifts the pixels on the selected layer using a pixel value from the displacement map. Grayscale levels 0 and 255 are the maximum negative and positive shifts while level 128 (middle gray) produces no displacement.

18. Apply 1.5 pixels Gaussian Blur to the flag layer and then hold down the Alt/Option key and drag the layer mask thumbnail from the drops layer (Layer 2) to the flag layer (Layer 3) to copy it. Lower the opacity of the flag layer to strike a good balance between the graphic and the tonality of the body.
19. The tonality of the flag can be further optimized using adjustment layers that have been clipped to the flag layer. In this project a Curves adjustment was used to lower the brightness of the white tones in the flag and the saturation was reduced using a Hue/Saturation adjustment.

20. If you don’ t want the flag to appear on certain parts of the body you can paint with black into the layer mask. Use a soft brush at a reduced opacity if you want to fade the graphic in certain areas.
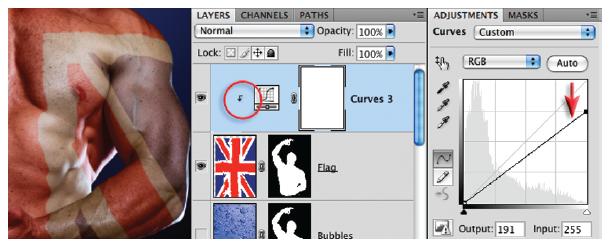
21. An alternative version of the composite image has been created by switching off the visibility of the Curves 1 layer that was creating the backlight effect. A new flag background (created using the same displacement technique) is pasted into the host image. A mask is copied from one of the underlying layers and inverted so that it only appears behind the subject. With so many alternative versions that are possible with just one layer mask (used many times) it is possible to keep track of them using the New Layer Comp panel.
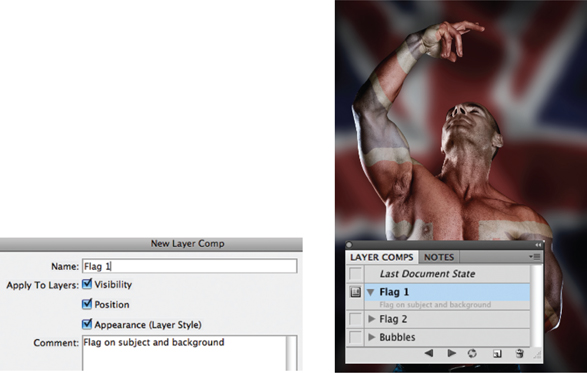
Each time you create a version you like you can keep a record of the layers that were contributing to the overall effect. The New Layer Comp dialog will keep track of not only which layers are visible but also their opacity and position. If any layer styles are applied it will also keep track of these. After the comps have been created it is then easy to switch between the versions.
Alternative approach using the ‘Liquify’ filter
An alternative approach to distorting the flag using the Displacement filter in ‘Project 2’ would be to use the ‘Liquify’ filter. Instead of using the ‘Blue copy’ channel to create a displacement map it can be used to ‘freeze’ an area of the image prior to selectively displacing the unfrozen pixels using the ‘Warp Tool’. This alternative method of displacing pixels on one layer, to reflect the contours of another layer, is made possible in the Liquify filter due to the option to see the visibility of additional layers other than the one you are working on.

To try this alternative approach just proceed as normal until you reach Step 17, then, instead of using a displacement map, click on the flag layer and go to Filter > Liquify. Check the ‘Show Backdrop’ option in the dialog box and select ‘background layer’ from the menu. Adjust the opacity to create the optimum environment for displacing the pixels. To selectively freeze the darker pixels in the image load the ‘Blue copy’ channel in the ‘Mask Options’. Select a brush size and pressure and then stroke the flag while observing the contours of the body to displace the lighter pixels. Select ‘Invert All’ in the ‘Mask Options’ so that you can displace the darker pixels.
Note > The Liquify filter cannot be applied to a Smart Object but the technique, although labor intensive, does offer the user a little more control over the displacement process. It is possible to save the distortions carried out in the Liquify filter as a ‘Mesh’. This Mesh is like a topographic landscape and can be loaded to distort subsequent graphics to the same topography to create a similar distortion.

Original photograph by Dan Stainsby
Extracting hair – Project 3
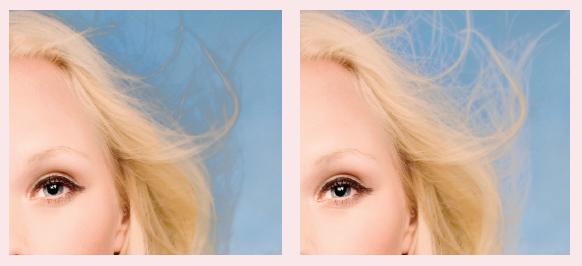
One of the most challenging montage or masking jobs in the profession of post-production editing used to be the hair lift. When the model had long flowing hair and the subject needed to change location many post-production artists would call in sick. If you got it wrong, just like a bad wig, it showed. Extract filters, Magic Erasers and Tragic Wands didn’ t get us close but we now have a new Refine Edge feature in CS5 that has eased the burden of this task and made the task easier than ever before. The first step to ensure guaranteed success should be completed before you even press the shutter on the camera. Your number one essential step for success is to first shoot your model against a featureless background that is either very dark or very light. The background must be sufficiently illuminated so that it is captured as white rather than gray or the light must be shielded from a dark backdrop so that it records as black. This important aspect of the initial image capture ensures that the resulting hair transplant is seamless and undetectable. The postproduction is now the easy bit – simply apply the correct sequence of editing steps for a perfect result. This is not brain surgery and there are no lengthy selection procedures required (the Refine Edge and Channels panel holds the secret to success).
Note > When masking hair that was captured against a black background the technique is basically the same as outlined in this project – just change the blend mode to Screen. See the Layer Blends chapter for additional information.

1. If you want to complete this step open the Raw file (M3_Hair.dng) instead of the JPEG or TIFF (the JPEG is ready to go). Select the White Balance Tool and click on the background in the image window to set the white balance. Raise the Exposure slider to +0.50 and then click on the Tone Curve tab. Raise the Highlights slider to +25 and make sure no tones are clipping (view the clipping warning in the histogram). These steps should render the background both neutral and bright.

2. To balance the exposure in this image (the shoulder is a little too bright) select the Graduated Filter and then adjust the Exposure slider to – 0.50. Drag a diagonal gradient from the bottom right-hand corner of the image to a position just higher than the bottom of the chin.
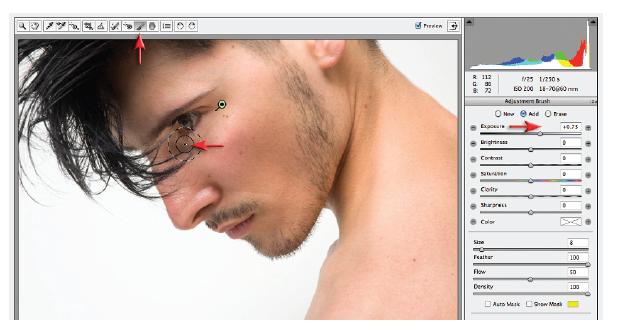
3. Select the Adjustment Brush and adjust the Exposure slider to +0.75. Make sure the Auto Mask option is not checked and then brush over the dark shadow around the eye to brighten this area. Once the adjustment is complete you are now ready to open the image as a Smart Object. Set this option in the Workflows Panel or simply hold down the Shift key to access the Open Object button.

4. Open the Background image for this project and then drag the Smart Object layer thumbnail in the Layers panel into the Background preview to create a multi-layered file with the Smart Object sitting above the background layer.
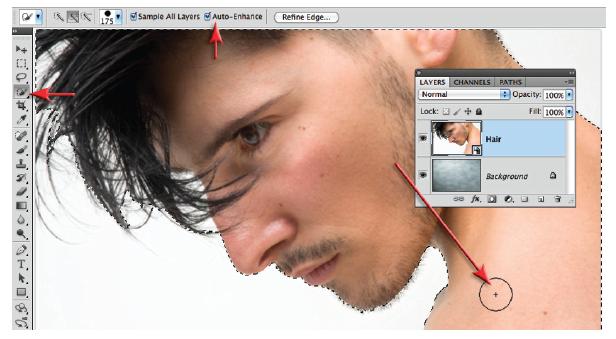
5. Choose the Quick Selection Tool from the Tools panel and select the Auto-Enhance option in the Options bar. Drag the Tool across the subject to make a rough selection of the subject and his hair. If you accidentally select some of the white background just hold down the Alt/Option key and drag across this area to subtract it from the initial selection.

6. Go to Select > Refine Edge and from the View Mode drop-down menu choose the On Layers option. This will give you the most accurate view when you refine the edge of your mask. Don’ t worry about any areas of white background that may appear in the preview window at this stage.

7. In order to create a more effective edge we will increase the Radius in the Edge Detection section of the dialog to a value of 70 pixels. We could use the Shift Edge slider to try to remove the white halo that will sit around the edge of your subject but the most effective way to do this is to use the new Decontaminate Colors feature. Check the Decontaminate Colors checkbox and raise the Amount slider to 80%. You should now have an appropriate edge quality with all traces of the old white background removed from the face and shoulder. If you forgot to use the Auto-Enhance feature when you made the initial selection you may need to raise the Smooth and Feather sliders slightly in the Adjust Edge section of the dialog.

8. To remove all traces of the white background from around the hair, select the Refine Radius Tool and paint over any areas where there may be hair. There is an Options bar for controlling the brush size and switching to the Erase Refinements Tool. After a painting action there will be a short delay while Photoshop decontaminates the colors (replaces the white background pixels with pixels of a more appropriate color) and rebuilds the preview. In the Output To menu, select the New Layer with Mask option and then select OK.

9. If you hold down the Shift key and click on the Layer mask on the copy layer to switch the mask off you will be able to observe what Photoshop has been trying to do in order to decontaminate the white pixels that surround the subject. Colors from the subject itself have flooded the background to ensure a seamless composite view. Note also how the visibility of the original layer has been switched off.
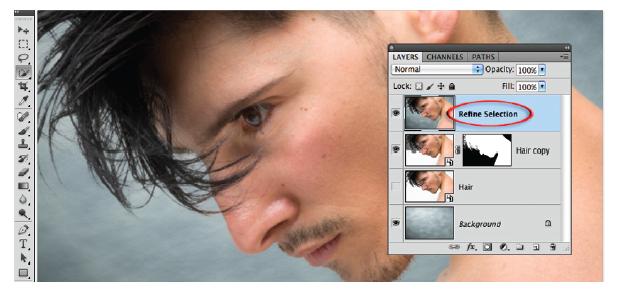
10. Merge the visible elements of this project to a new layer by holding down the modifier keys Ctrl + Alt + Shift (PC) or Command + Option + Shift (Mac) and then press the E key. Doubleclick on the name of this composite layer and rename the layer Refine Selection. We will use this composite layer to compare edge quality with an alternative technique that has always been the preferred techniques by post-production professionals. Hold down the shift key and click on this new Refine Selection layer and the layer below (Hair Copy) to select both of them. Place the layers into a group using the keyboard shortcut Ctrl + G (PC) or Command + G (Mac).

11. Switch off the visibility of the group and then go to the Channels panel. In the Channels panel drag the Blue channel (the one with the most contrast between the background and the skin tones) to the ‘Create new channel’ icon to duplicate it. Go to Image > Adjustments > Brightness/Contrast and then increase the contrast of the channel and lower the brightness to a point just before the background starts to visibly darken.

12. Select ‘Black’ as the foreground color and the ‘Brush Tool’ from the Tools panel. Choose a large hard-edged brush and 100% Opacity from the Options bar and set the mode to ‘Overlay’ (also in the Options bar). Painting in Overlay mode will preserve the white background and darken the rest of the pixels. Accuracy while painting in Overlay mode is not a concern when the background is white or is significantly lighter than the subject. Darken the body of the hair near the scalp but avoid the locks of hair that have white background showing through. Painting these individual strands of hair will thicken the hair and may lead to subsequent haloes appearing later in the montage process. Darken the skin on the chin, but not the stubble. The bright tones of the shoulders can be rendered black by repeatedly clicking the mouse in Overlay mode.
Note > If any of the white background has been darkened in the process of creating a black and white mask, switch the foreground color to ‘White’ and choose ‘Overlay’ in the Options bar. Paint to render any areas of gray background white.
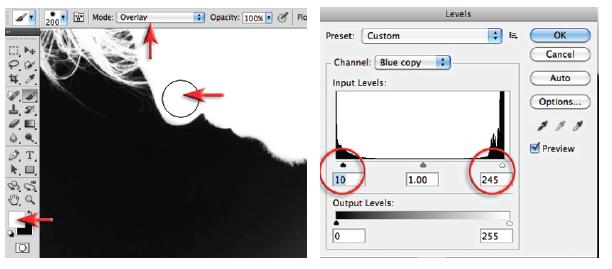
13. Invert the Channel to make it easier to see any tones that are not quite black. Paint with white in Overlay mode if you are working on an inverted channel. Go to Image > Adjustments > Levels and clip the shadow tones and highlight tones by 10 Levels at each end. Invert the mask again when the process is complete.

14. Select the RGB view in the Channels panel and then hold down the Command key (Mac) or Ctrl key (PC) and click on the Blue copy channel thumbnail to load the channel as a selection. Return to the Layers panel when the selection is active.
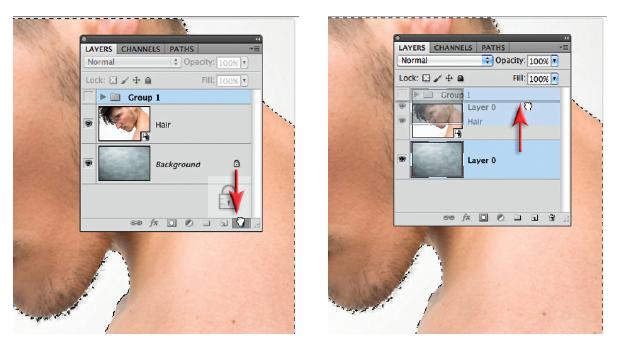
15. In the Layers panel drag the Lock icon on the background layer to the trash can at the base of the panel to unlock the layer. Drag the background layer higher so that it sits above the original smart object layer, but below the group you created in the previous step. When the background is above the smart object layer click on the Add layer mask icon at the base of the Layers panel.
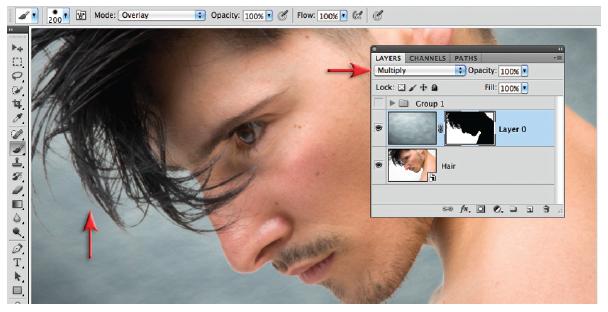
16. Set the blending mode for the layer to Multiply. Notice the difference in the quality of the strands of hair before and after you switch the blend mode to Multiply. Setting the blend mode of the adjustment layer to ‘Multiply’ will bring back all of the fine detail in the hair. The background will not be darkened by applying the ‘Multiply’ blend mode as white is a neutral color. The mask will, however require further refinement before the subtle detail in the fine strands of hair is preserved in all its glory.

17. Make sure the layer mask is the active component of the layer and then from the Select menu choose Refine Mask. Move the Shift Edge slider to the right to darken the fine strands of hair. Although the hair looks good, the harder edges of the body are not yet perfect. We will, however, not worry about these just at the moment as we will first compare the difference in hair quality between the two techniques outlined so far. The Output menu should read Layer Mask before you select OK.

18. Toggle the visibility of the Group on and off so that you can see the difference in quality between the two techniques. If you created a good channel mask you should notice that the manual technique, which uses the background layer above the subject, gives a slightly superior quality to the Refine Edge dialog technique where the background lies below the subject.

19. Although the hair quality is slightly superior in the manual technique the speed of the Refine Edge for masking hair is fast and reasonably effective. The quality of the other edges in the Refine Edge technique is also surprisingly good, e.g. the harder edges of the nose, lips and chest and also the softer edges of the chin and the back of the neck. Rather than struggle to compete with these edges using the manual technique click the Add layer mask icon at the base of the Layers panel to add a mask to the group. Select the Brush Tool from the Tools panel, set black as the foreground color and paint to mask the hair in the group approach to reveal the hair from the manual approach below.
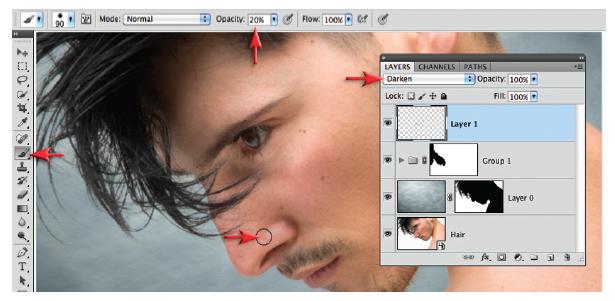
20. Click on the Create a new layer icon in the Layers panel and set the mode of this layer to Darken. The Eyedropper Tool must be set to All Layers in the Options bar before you can sample a visible color rather than one from the active layer. Then, with the Brush Tool selected, hold down the Option/Alt key and click on an area of warm colored skin to sample the color.
Masking hair captured against a black background
When masking hair that was shot against a black background, setting the layer with the levels adjustment to the Screen Blend mode is the secret to success. Note the difference between Normal mode and Screen Blend mode in the illustrations above.

You will need to invert the layer mask when using a model shot against a black background (Filter > Adjustments > Invert) before painting in Overlay mode as in Steps 12 and 13 of the Extracting hair project.
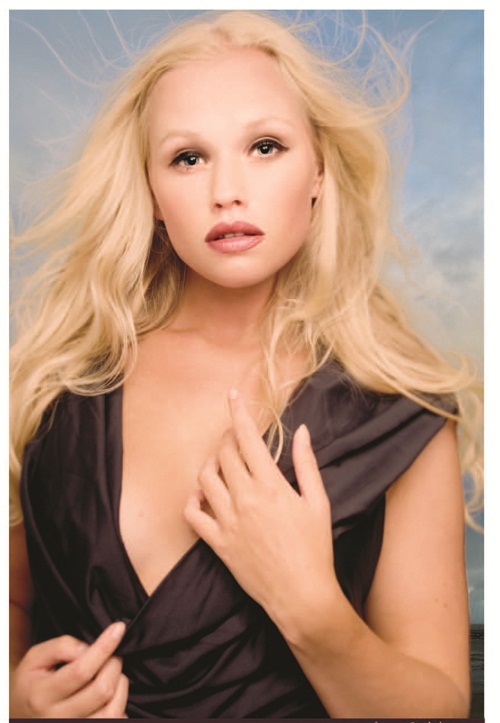
image courtesy of www.iStockphoto.com

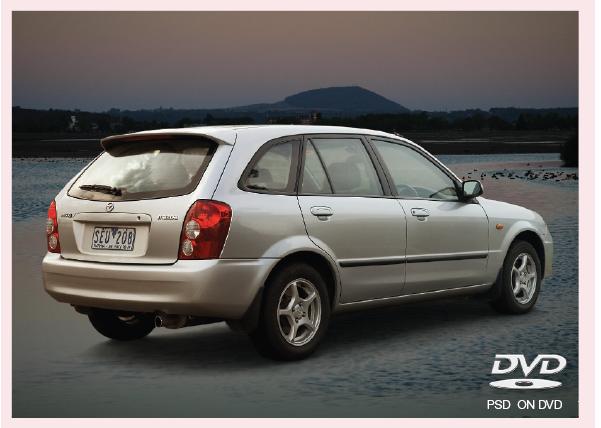
Original Venice image by Craig Shell (sky by Mark Galer)
Replacing a sky – Project 4
The sky is an essential ingredient of any memorable landscape image. Unfortunately it is not something the photographer can control unless we have limitless time and patience. The commercial photographer is often required to deliver the goods on a day that suits the client rather than the photographer and weather forecast. In these instances it is worth building a personal stock library of impressive skies that can be utilized to turn ordinary images with bland skies into impressive ones. A digital compact camera set to a low ISO is ideal for capturing these fleeting moments. The most useful skies to collect are the ones that include detail close to the horizon line, i.e. captured without interference from busy urban skylines, such as can be found at the beach or in the desert. A stock library of skies is included on the DVD to help you start, or add to, your own collection. In this project we explore how a sky can be adapted to fit the landscape so the montage is not immediately obvious.
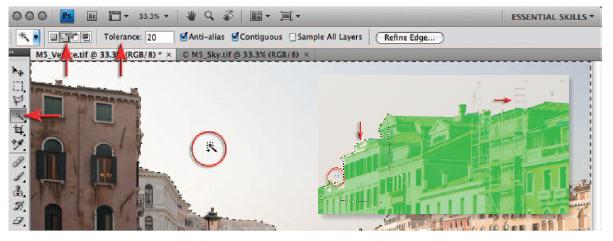
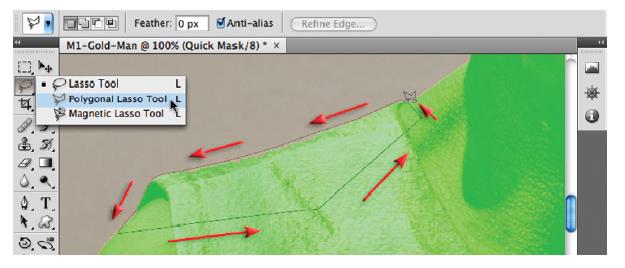
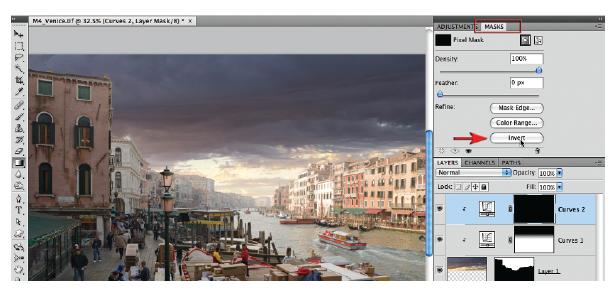
1. In this step we will make a selection and then optimize it in Quick Mask mode. Open the file named M4_Venice.tif. Select the Magic Wand Tool from the Tools panel and set the Tolerance to 20 in the Options bar. Select the Add to Selection icon in the Options bar or hold down the Shift key as you click multiple times to select all of the sky. Zoom in to 100% or ‘Actual Pixels’ and select Quick Mask mode from the Tools panel. Invert the mask if necessary using the keyboard shortcut Command or Ctrl + I so that the buildings rather than the sky are masked. Make a selection using the Polygonal Lasso Tool to select any tops of the buildings that are not currently masked (due to the overzealous nature of the Magic Wand). Exclude the scaffolding and the TV aerials from the selection using the Brush Tool. Fill this selection with black (if black is the foreground color in the Tools panel you may use the keyboard shortcut Alt/Option + Backspace/Delete). Exit Quick Mask mode when this work is finished (keyboard shortcut is to press the letter Q).If the buildings rather than the sky is selected go to Select > Inverse.
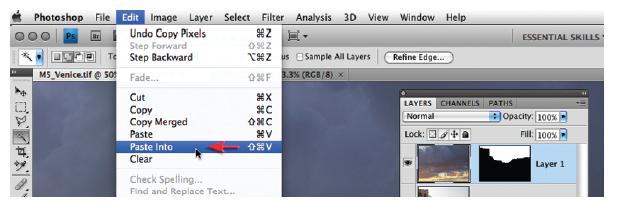
2. In this step the selection will be converted into a layer mask. Open the Sky image used in this project and from the Select menu choose All. From the Edit menu choose Copy. Return to the Venice image (the selection should still be active) and from the Edit menu choose Paste Into to convert the selection into a layer mask. Don’t be alarmed at how bad it looks at the moment, we have several more steps to go before things start to look OK. For the moment we must be content that the sky was captured at a similar time of day to the Venice image and the direction of light is also similar.
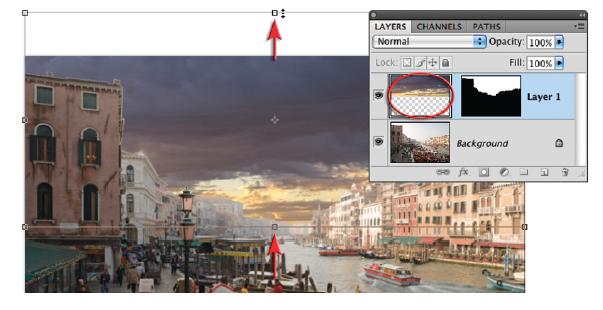
3. Make sure the image rather than the mask is the active component of the layer (the thumbnail will have a dark line around it if it is active) and then choose Free Transform from the Edit menu (Ctrl/Command + T). Click and drag inside the Transform bounding box to raise the sky into position. Click and drag on the top-center handle to further enhance the location and shape of the sky to fit the host image. Press the Enter/Return key to commit the transformation.
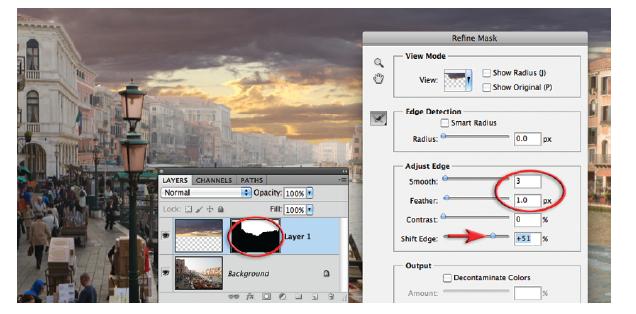
4. Click on the layer mask to make it active and then go to Select > Refine Edge. Choose a 1-pixel Feather and move the Shift Edge slider to the right until the light halo from around the majority of the buildings has disappeared. It is not possible to remove the halo around the buildings on the extreme left-hand side of the image without removing too much edge detail from the rest of the skyline. Use the levels adjustment technique (outlined in Project 1 of this chapter ) in combination with lasso tools to correct the haloes around the buildings on the left.

5. Select a Curves adjustment from the Adjustments panel. Clip the layer to the sky layer below by clicking the icon next to the visibility icon in the Curves panel. Create a curve that renders both the highlights and midtones of the sky very bright so that they match the tones of the distant buildings. Use the on-image adjustment tool and click twice to create two adjustment points on the Curve. Drag these higher to lighten the sky. Skies that have been captured in less humid conditions will always require this adjustment if they are to look at home in a location where there is reduced contrast together with lighter tones in the distant subject matter.
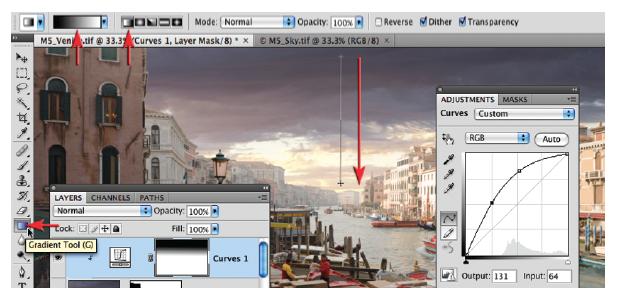
6. Select the Gradient Tool from the Tools panel. In the Options bar choose the Black, White and Linear Gradient options and an Opacity setting of 100%. Click and drag a gradient from the top of the image to a position just above the horizon line. Hold down the Shift key to constrain the gradient. This will give the sky depth and ensure the sky retains its drama above the buildings in the foreground.
7. Create a second Curves adjustment and clip this to the layer below (as in Step 5). The purpose of this second adjustment layer is to increase the intensity of the light on the left side of the image. This will help establish the light source that is bathing the buildings on the right side of the image in a warm afternoon glow and help establish a realistic effect. Fill the layer mask on the second Curves adjustment with black by clicking on the ‘Invert’ button in the Masks panel (as the adjustments are non-modal there is no need to close the adjustment).
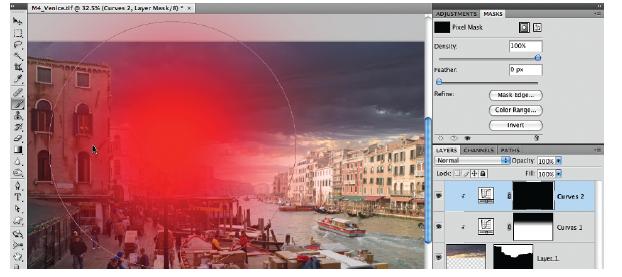
8. To punch a white hole in the mask select the Brush Tool from the Tools panel. Select a large soft-edged brush from the Options bar or hold down the keyboard shortcut keys to preview the size of the brush and hardness of the brush (OpenGL users only).
Note > If OpenGL is switched on in Preferences you can resize the brush by holding down the Alt key and right-clicking (PC) or hold down the Control + Option modifier keys (Mac) and then dragging to the left or right. To change the hardness of the brush, Shift + right-click + Alt (PC) or Control + Option + Command (Mac) and drag to the left or right.
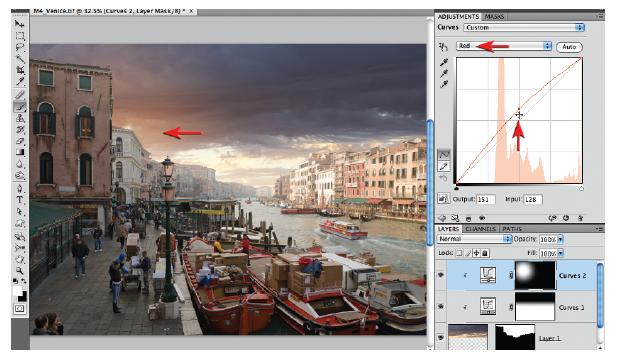
9. Increase the warmth by raising the red curve and lowering the blue curve and then raise the overall brightness using the RGB channel. Observe the effect above the foreground buildings on the left side of the image. Getting the color and tone is easy now that the mask is in place. Working on a mask with an adjustment panel open in prior to CS4 was not possible.

10. Duplicate the adjustment layer but do not add it to the clipping group. Fill the layer mask with black (set the Foreground and Background colors to their default setting and then use the keyboard shortcut, Ctrl + Backspace for a PC or Command + Delete for a Mac). With the Foreground color set to white paint at 50% opacity to increase the warmth of the waters in the canal.
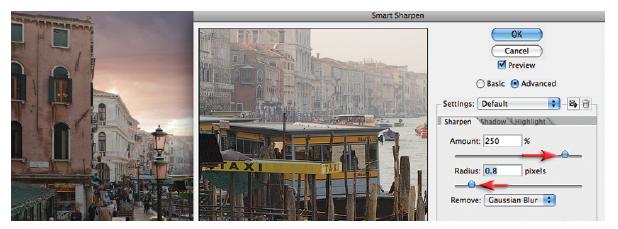
11. Click on the background layer and choose Convert Layer for Smart Filters. Go to Filter > Sharpen > Smart Sharpen. Sharpen the image and select OK. You can be generous with the sharpening as the opacity of the filter can be lowered or the settings modified at any point in the future in a completely non-destructive way.

12. Select the top layer (Curves 2) in the Layers panel and then click on the ‘Create a new layer’ icon in the Layers panel. Fill this layer with white and set the mode to Multiply. Go to Filter > Convert for Smart Filters. Go to Filter > Distort > Lens Correction. Go to the Vignette section of the dialog box and lower the Amount slider to – 100 and raise the Midpoint slider to +60 so that the vignette does not encroach too heavily on the buildings on the extreme righthand side of the image. Select OK to apply these changes. Adjust the opacity of the layer to make the vignette a little more subtle. The project is now complete and the scene carries all of the mood of an old Venetian painting courtesy of a dramatic sky.

Harley Davidson image by Scott Hirko (www.iStockphoto.com)
Studio and location composite – Project 5
In the Retouching Projects chapter we learned how to prepare an image captured in the studio for a composite project. These techniques will enable the original shadow to be introduced into the new location rather than having to create an artificial one. When the subject is introduced into the new location there will be some additional work that needs to be carried out in order to create a realistic end-result. Sometimes a subject cannot be introduced into a particular location because of inconsistencies in the capture technique. To ensure a successful end-result it usually makes sense to capture the studio subject to match the location rather than having to scour the environment to find a location with the appropriate lighting to match your studio subject.
Critical factors in the creation of a realistic montage are as follows:
- Continuity of vantage point (the camera angle to the subject and the background should be the same).
- Continuity of depth of field (if in doubt shoot both the subject and the background at a small aperture and reduce depth of field in post-production).
- Continuity of perspective. Keep the same relative distance from your subjects (zoom in rather than moving close to small objects).
- Continuity of lighting. The angle of light source to the subject and background and the quality of lighting (harsh or diffuse) should be the same.
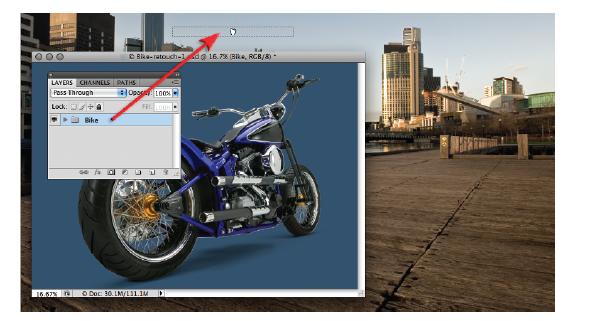
1. Open the M5 start image and your finished version of R6 image (or the finished R6 PSD image on the disk). Drag the Group that was created in Project 6 of the Retouching chapter into the host image. Double-click on the background layer and in the New Layer dialog rename the layer ‘location’ and select OK. In the Layers panel, drag the bike group so that it is below the location layer.
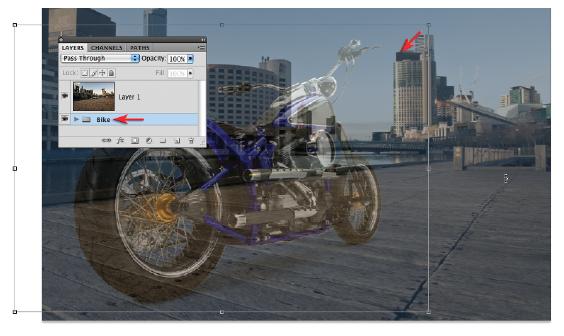
2. Lower the opacity of the location layer so that you can see the bike underneath. Select the Bike group and go to Edit > Free Transform. Hold down the Shift key and drag the corner handle of the Bike group to scale the bike proportionally and then click and drag inside the bounding box to reposition the bike in the bottom left-hand corner of the image (be careful not to double-click or you will commit the transformation before you are done). Press the Return/ Enter key to commit the transformation if you are satisfied with the scaling amount.
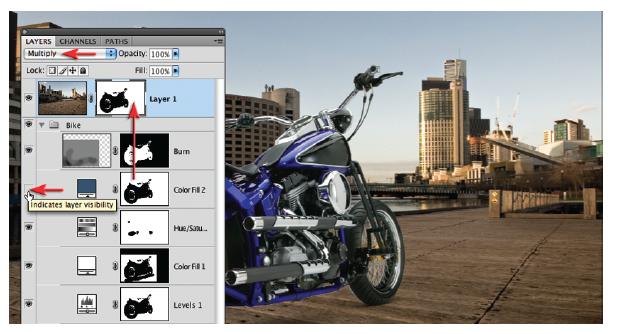
3. Open the group so that you can see the layers of the bike image. Hold down the Alt/Option key and drag the layer mask from the Color Fill 2 layer to the location layer to copy it. Switch off the visibility of the Color Fill 2 layer by clicking on the visibility icon. The bike should now be visible but without its shadow. Set the mode of the location layer to Multiply to reintroduce the shadow.
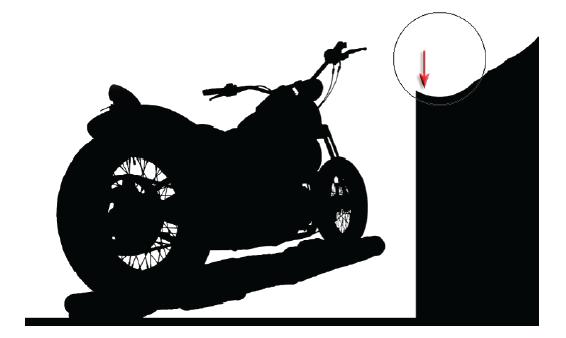
4. When a group of layers are scaled smaller the layer masks may acquire black edges that will need to be cleaned. In the illustration above this type of mask can create problems in the final image. To view the mask by itself hold down the Alt/Option key and click on the layer mask. To clean the mask select the Brush Tool and paint over the black edges as needed or make a selection using the Magic Wand Tool and fill with white.
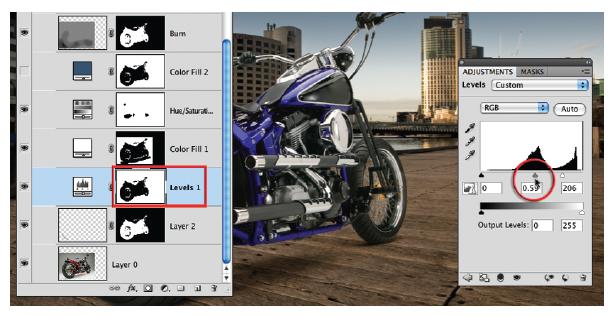
5. Select the layer mask of the location layer (Layer 1) and refine the edge so that no halo is visible. You will need to zoom in to 100% (Actual Pixels) to obtain an accurate view of the edge, i.e. a halo that may be apparent at 25% may not be visible when the file is magnified further, printed or flattened. Go to Select Refine Edge and move the Contract/Expand slider if required. You will not need to add any additional feather as the edge of the mask has already been blurred. If you need to remove a halo in a localized area of the image make a selection with the Lasso Tool and go to Image > Adjustments > Levels and move the central gamma slider to the left (see Project 1 in this chapter for extended guidelines to optimize the edge).
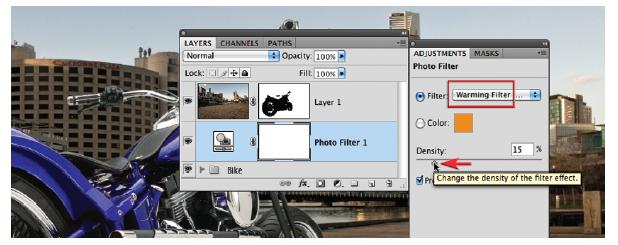
6. The white balance between the studio image and location image is unlikely to be the same and one of the images will need to be adjusted to match the other. In this image it was decided to retain the warm light of the location and warm the bike to match. This can be achieved with a number of different adjustments from the Adjustments panel. In the illustration above a Warming Filter from the Photo Filter adjustment was applied above the Bike group.
Note > If the Group is closed the Photo Filter will be placed above the group rather than inside the Bike group. It does not really matter where the Photo Filter is placed so long as it is below the location layer (Layer 1).
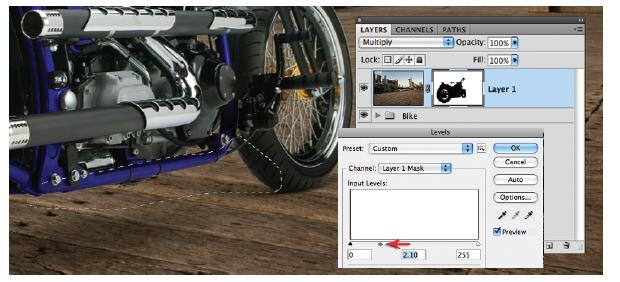
7. The density of the shadow can be adjusted to suit the new location by selecting the Levels 1 adjustment layer in the Bike group (this is the adjustment layer that was used to clip the background tones to white). Move the central gamma slider in the Levels panel (underneath the histogram) to the left or right to adjust the shadow so that it is consistent with the host image.

8. If we need to reduce the depth of field of a photographic montage it is best done in postproduction rather than in-camera. To create a depth map for the Lens Blur filter go to the Channels panel and create a new channel. Fill this channel with white (Edit > Fill). Switch on the visibility of the composite RGB channel so that you can see your image. Select the Gradient Tool from the Tools panel and select the Black, White and Linear options in the Options bar. Check that the Alpha 1 channel is selected and then drag a gradient from just in front of the wheel to the horizon line in the image. Select the composite RGB channel and switch off the visibility of this Alpha channel. More complex depth maps can be created by reviewing the Lens Blur project in the Advanced Retouching chapter.
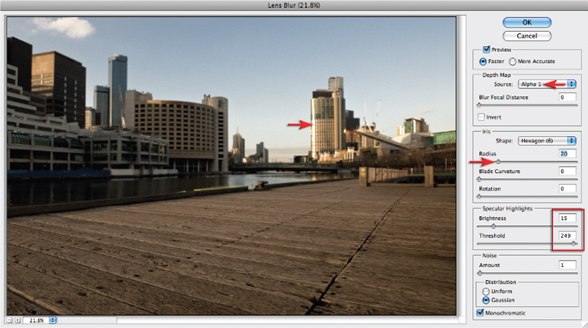
9. Duplicate Layer 1 in the Layers panel and then go to Filter > Blur > Lens Blur. Select the Alpha 1 depth map from the Source menu and raise the Radius slider to increase the blur. If you have any specular highlights in the image that you want to flare reduce the Threshold slider slightly and increase the Brightness slider to create a realistic effect. Select OK to apply the filter.
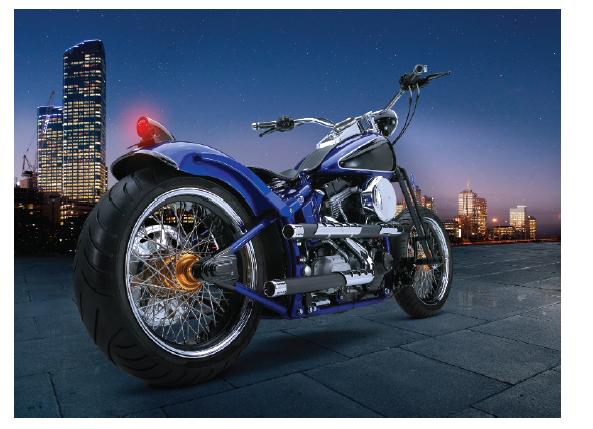
The bike can be moved to a variety of locations. In this alternative the bike has been moved to a location constructed from two images (foreground pavement and background nightscape). A cooling filter is applied and the lights are turned on to complete the picture.

The best technique for subtle shadows
The technique to preserve shadows provides those photographers burdened with a meticulous eye a useful way of retaining and transplanting subtle and complex shadows. Observe the subtle shadow cast by the leaf above that would be virtually impossible to recreate using any other technique. The primary reasons for not being able to use this technique are when the shadow falls over a surface with a different texture to the one in the new location, or the surface over which the shadow falls is particularly uneven or moves from a horizontal to a vertical plane over the length of the shadow.
Original images and concept by Jakub Kazmierczak
PERFORMANCE TIP
This technique for preserving shadows does not have to be restricted to objects sitting on a white background. The technique is just as effective when isolating the shadow of a much larger object captured in its natural surroundings. If, however, the subject has been captured on a textured or rough surface this surface quality will be transferred to the new background when using this technique. A surface quality mismatch can occur that can make the shadow look unnatural.
To ensure a shadow with a rough surface texture does not look out of place against the smooth surface of a new background you can apply a small amount of Gaussian Blur to soften the quality of the shadow. In the illustration on this page a colored Linear gradient in Overlay mode has also been used to warm up the cool colors evident in the panels of the car. The detail in the car windows has also been softened using a Gaussian Blur. These measures ensure the car is perfectly at home in its new surroundings Ceven if it is balancing on water!

Creating shadows
If it is not possible to preserve the original shadow, try to capture a second image of the subject from the direction of the light source. This second image will allow you to create a more accurate shadow than simply using the outline of the subject as seen from the camera angle. Start this technique by making a mask of your subject and place it on a layer above a new background you wish to use. Import the second image (captured from the direction of the light source) and position it between the subject layer and the background layer. Make a selection of the subject in this second image, create a new empty layer and then fill your selection with black. You can then hide or delete the layer that the selection was made from. Place your new shadow layer in Multiply mode. Lower the opacity of your shadow layer and apply the Gaussian Blur filter. Use the Free Transform command to distort and move the shadow into position.

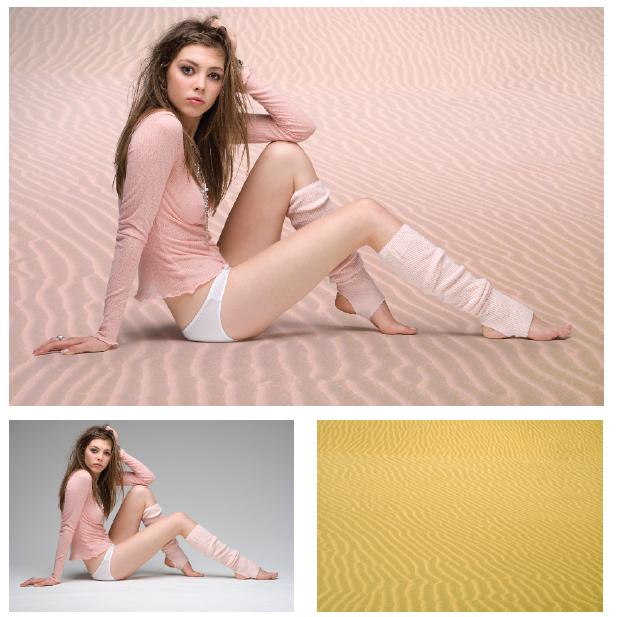
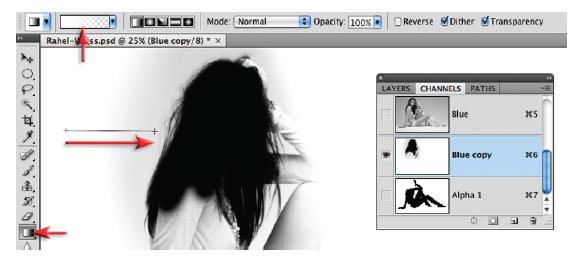
Studio photograph by Rahel Weiss
Replacing a studio background – Project 6
This project combines the skills learned from both the hair extraction project (Project 3) and the shadow preservation project in the Basic Retouching chapter. The purpose of this project is to demonstrate how the model’s fine hair and the original shadows from the studio backdrop (cyclorama or ‘cyc’ ) can be preserved after creating a composite image using a new location image. The ideal background color for extracting hair for composite image is level 255 white or level 0 black, but when the model is standing or sitting on the studio ‘cyc’ it may not always be possible to render the background absolute white or black due to the limitations of lighting and the size of the backdrop available. The techniques in this project show you how to work around these issues.

1. Open the Raw file in Adobe Camera Raw. Select the White Balance Tool and click on neutral tone in the image such as the white backdrop (the modeling lights of the studio flash used to capture this image confused the auto white balance setting in the camera). Then open the image in Photoshop. A JPEG image is supplied on the DVD with this step already completed. Go to the Channels panel to start the process of creating a mask. The following steps summarize the hair extraction techniques from Project 3. Find the channel with the highest contrast between the hair and the background by clicking on each one in turn. Duplicate the channel with the highest contrast by dragging it to the New Channel icon. Increase the contrast of the copy channel to further refine the mask. Use a Brightness/Contrast adjustment (Image > Adjustments > Brightness/Contrast) and raise the Contrast to +100 and the Brightness slider to a level just before you start to lose detail in the fine hairs.

2. Choose the Brush Tool, set the foreground color to black and set the mode to Overlay in the Options bar. Choose a soft-edged brush and be careful NOT to paint over fine strands of hair where the background is also visible. Move close to the edge of the hair but do not paint where any background is visible. Switch the mode of the Brush Tool back to Normal in the Options bar and paint with black to fill in any areas of white around the face. The first step of the mask is complete when the head and hair appears as a silhouette. The rest of the subject that has a more defined edge will be selected in the next step.

3. Create a path around the outline of the body excluding the hair (see Project 2). A finished path has been supplied with the tutorial image for your convenience. Hold down the Ctrl key (PC) or Command key (Mac) and click on the path you created to load the path as a selection. The edge of a vector path is not suitable for masking photographs. The path has to be converted to a selection so that the edge can be refined. Go to the Channels panel and click on the ‘Save selection as channel’ icon. You will now have a Blue copy channel and an Alpha 1 channel. The two of these channels will provide you with the mask you need to hide the studio backdrop. Choose Select > None.
4. The background of the Blue copy Alpha channel is still too light so must be modified further. Select the Gradient Tool and choose White as the foreground color and the Foreground to Transparent and Linear options in the Options bar. Set the Opacity to 100%. Drag a series of gradients from the bottom, left and right sides of the hair that fall short of the hair to lighten all of the tones surrounding the hair. The Gradient Tool is a useful way of introducing a smooth transition. Using the Brush Tool to lighten the background may introduce harsh edges that may be detected later so this approach should be avoided.
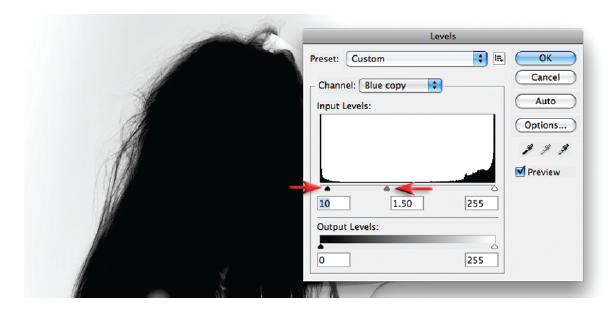
5. Darken any remaining gray tones by going to Image > Adjustments > Levels. Drag the central gamma slider beneath the histogram to the left. Do not go beyond 1.5 gamma so that you can preserve the fine detail in the hair. Drag the shadows slider to level 10 to clip any dark gray tones present in the body of the hair to black.

6. Click on RGB in the Channels panel. Open the M6_Sand image file and drag the background thumbnail from the Layers panel into your project image. Double click the name of the new layer and call it New-Location. In this example a fairly abstract location has been used, but you can use any location providing the vantage point or angle of view and lighting is consistent with the subject photographed in the studio. Make sure you are in the Channels panel. Hold down the Ctrl key (PC) or Command key (Mac) and click on the Blue copy channel first to load it as a selection. Now hold down the Alt/Option key as well as the Ctrl/ Command key and click on the Alpha 1 channel to add this to the selection. All of the area around the model should now be selected.
Note > The modifier keys control how a second Alpha channel is loaded as a selection (add, subtract or intersect). The order in which you load the channels may also make a difference to the resulting selection.

7. Go to the Layers panel and click on the ‘Add layer mask’ icon at the base of the Layers panel. Go to the blending options and choose Multiply from the menu. Using Multiply will improve the fine detail in the hair and restore the shadows to the image. The new location will appear darker due to the gray tone of the white studio background on the background layer. This will be rectified later

8. There should be no active selection now that it has been converted into a layer mask. Go to Select > Refine Edge (we are now refining the edges of the mask and not the selection). Select the On Layers preview option from the View mode in the Refine Mask dialog. Set the Radius, Smooth and Contrast sliders to zero. Raise the Feather slider to a setting between 0.5 and 2.0 pixels and raise the Shift Edge slider to hide any haloes that may appear around your subject. Zoom in to 100% and take a look at both the smooth edges and the hair to choose appropriate values for both of these sliders. Choose the Layer Mask option in the Output section of the Refine Mask dialog and then select OK.
9. Hold down the Alt/Option key and click on the layer mask to view the contents. Look for any holes in the mask that may have appeared as a result of using the Refine Edge command. Set the brush mode to Normal and paint with black if you see any areas of gray in the main body of the mask. Do not paint in the areas of fine detail at the edge of the mask. If you have any haloes along the sharp edges of the mask make a selection of the problem area with the Lasso Tool. Go to Image > Adjustments > Levels and move the gamma slider to the right or left to perfect this localized portion of the mask. Moving the black or white sliders towards the center will increase the contrast of the mask in this area and may help you to perfect the edge.
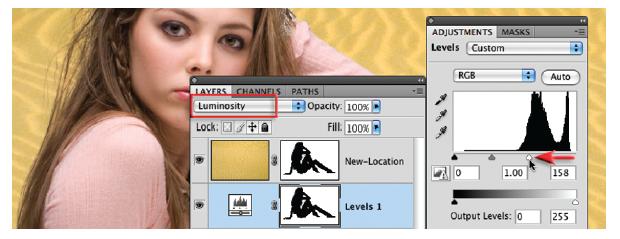
10. Hold down the Ctrl key (PC) or Command key (Mac) and click on the layer mask to load it as a selection. This selection will create its own mask when we create an adjustment layer. This will enable us to work on the tonality of the studio backdrop while protecting the tonality of the model. Select the background layer and create a Levels adjustment layer from the Adjustments panel. Set the mode of the adjustment layer to Luminosity. Drag the white input slider beneath the right side of the histogram to the left to clip the background tones to white. Stop dragging the slider when you notice it impacting on the fine detail in the hair. As the shadow tones are darker they should be some of the last tones that would be rendered white using this technique. If the shadow tones become too light move the middle gamma slider to the right. Select the Brush Tool in the Tools panel. Select Black as the foreground color and the Opacity as 50%. Paint over the cast shadows in the adjustment layer mask to restore the shadows to their original darkness.

11. Invariably the color and tone of the subject and the new location image will need to be matched for consistency of contrast and white point.In this project the color of the sand is matched to the clothing the model is wearing. In the Tools panel choose the ‘Color Sampler’ Tool (behind the Eyedropper Tool) and set the Sample Size to a 5 by 5 Average in the Options bar. Set the Second Color Readout to HSB in the Info panel options by clicking on the small triangle underneath the eyedropper. Click once on the clothing, take a note of the Brightness value, and then move the Color Sampler to the sand and take a second color sample of the sand that is approximately as bright as the clothing sample taken.
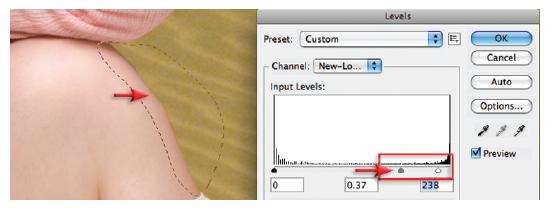
12. Select the New-Location layer and then choose a Curves adjustment layer from the adjustments panel. Go to each of the three RGB channels in turn and click anywhere on the curve to set an adjustment point. In the Input field in the Curves panel type in the value that appears in the first set of values in the #2 sample RGB information in the Info dialog (in the illustration above, level 106 that appears in the Info panel has been typed into the Input field in the Curves dialog). Each of the output values is then changed so that they are the same as the #1 color sample values. By matching the output values in the Curves dialog to the values of the first color sample point we have effectively made the color of the sand the same color as the clothing prior to adding this Curves adjustment layer. Ignore the fact that the model and the clothing have turned magenta at this point!
13. In the Curves panel click on the overlapping circles icon to clip the Curves adjustment layer to the sand layer. This restricts the color adjustments to just this layer and restores the original color of the model. To tidy the file you can remove the color samplers by holding down the Alt/Option key and the Shift key and click on each color sample target in turn to remove them.

14. Create a second Curves adjustment layer and clip it to the layers below. Raise the RGB curve so that the sand is much brighter than before. Drag a Black, White linear gradient into the adjustment layer mask so that the bottom half of the sand is shielded from this adjustment. Just replace the contents of the sand layer with another background to transport the model around the world.