bridge
essential skills
- Gain a working knowledge of Bridge.
- Understand how to change the contents and appearance of the workspace.
- Learn how to use Mini Bridge to access assets inside Photoshop.
- Download, sort, add keywords and process files from Bridge.
Introduction
For most photographers the world of digital has heralded a new era in picture taking. The apparent lack of cost (no film or processing charges) involved in the recording of each frame means that most of us are shooting more freely and more often than ever before. More pictures not only means more time processing, enhancing and printing them but also more time sorting, searching, naming, tagging and storing. In fact, recent studies of how photographers spend their time have shown that many spend 10–15% of their working day involved in just these types of management activities. For this reason many use specialized Digital Asset Management (DAM) systems or software to aid with this work. Though, for many image workers, asset management is the least stimulating part of their job, it is a key area where building skills will free up more time for those parts of the process that you enjoy the most – taking and processing pictures.
Bridge – the center for asset management
Over the last few revisions of Photoshop, Adobe has become increasingly more involved with including image management tools for the working photographer as part of the editing program. Initially this meant the inclusion of a File Browser which could be opened from inside Photoshop, but more recently a totally separate program called Bridge has replaced the standard file browser option. The application can be opened by itself via the program menu, or from within Photoshop with the File > Browse command or button on the Applications bar. In CS5 yet another option has become available with the release of Mini Bridge, a panelized version of Bridge that sits inside Photoshop.

Bridge is a ‘super browser’ tool that can be used for managing your image assets.
The fastest way to open a file from your picture library is to search for, and select, the file from within Bridge and then press Ctrl/Cmd + O or, if Photoshop is not the default program used for opening the file, select File > Open With > Photoshop. If you are opening a photo captured in a Raw file format, then the file will be displayed in Adobe Camera Raw (ACR) first and then transferred into Photoshop. If you select the File > Open With Camera Raw option then the picture will be displayed in the ACR workspace only and will be transferred to Photoshop only if you decide that this is the next step in your processing. Multi-selected files in the browser can also be opened in this way.
Keep in mind that Bridge is a separate stand-alone application from Photoshop, has its own memory management system and can be opened and used to organize and manage your photo files without needing to have Photoshop running at the same time.

Bridge can be opened in a variety of different ways: individually via the Start menu (1), from inside Photoshop using the dedicated button on the Application bar (2) or the File > Browse command (3). Mini Bridge can also be opened with the dedicated button on the Application Bar (4) or with the Browse In Bridge entry (5) in the File menu.

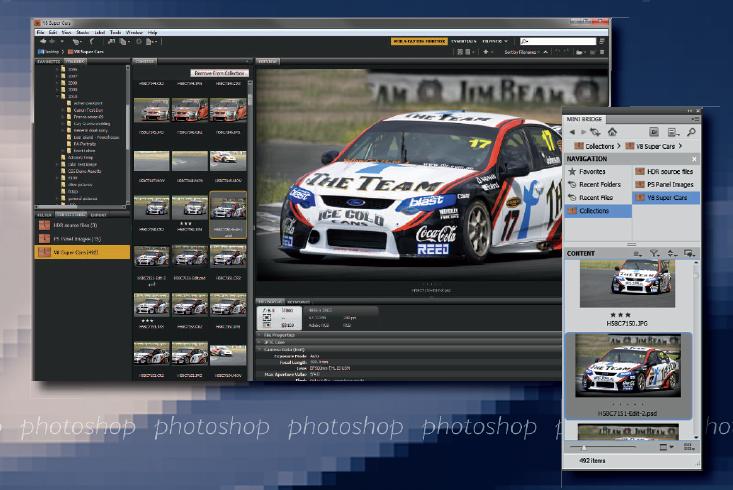
Bridge retains the interface introduced in CS4, three panel areas, side-by-side preview options, but introduces a new Output panel and a version of the program that sits inside Photoshop – Mini Bridge (right). The view shown above is a customized version of the ‘Essentials’ workspace options. Many different variations are possible, and can be saved, and selected from the Workspace Switcher in the options bar.
The CS5 version of Bridge
Bridge was first introduced a couple of versions ago; it has quickly become an important part of most photographers’ daily workflow. Rather than just being a file browser, Bridge also enables photographers to organize, navigate image assets, add metadata and labels, process Raw files and, in the version that ships with CS5, output your photos directly to web galleries and PDF-based presentations with saved user-templates, quickly change the name of multiple files with batch renaming and access your photos inside Photoshop with Mini Bridge, a panelized version of Bridge.
The interface has remained relatively the same as the previous release of the program. Bridge CS5 still retains the customizable layout options, most of which revolve around a three-panel setup (see above). The interface design, and its many variants, make the most of the wide-screen displays that many image makers are now using. A variety of panels can be displayed in any of the areas and the new Live Workspaces feature auto-save any changes you make to a task-specific workspace, so that if you switch to a different workspace and then back again during an editing session, your panels remain exactly where you left them.
Displayable panels in Bridge include:
- Folders panel – displays a folder-based view of your computer.
- Favorites panel – provides quick access to regularly used folders you select.
- Metadata panel – shows metadata information for the selected file.
- Keywords panel – use for adding new or existing keywords to single or multiple photos.
- Filter panel – provides sorting options for the files displayed in the Content panel.
- Preview panel – shows a preview of selected files or file. Includes the loupe option.
- Inspector panel – displays a variety of custom details controlled by options in the preferences.
- Collections panel – this panel was new for CS4 and displays all available saved and Smart collections.
- Export panel – houses different export modules that provide a fast track method of either saving your photos to another format or transferring them to a social networking or gallery website.

The layout and design of the Bridge interface is customizable by the user. You get to decide what information panels (1) are displayed and where they are placed. The final layout design can be saved and reused and is called a workspace. Several presaved workspaces (2) are supplied with Bridge so that you can quickly flick between screen layouts that suit different image management and editing tasks.
Setting up Bridge
Viewing options
As you can see, one of the real bonuses of Bridge is the multitude of ways that the interface can be displayed. So let’s look a little closer at the two different controls that alter the way that Bridge appears – Workspace and View.
Workspace controls the overall look of the Bridge window and is centered around the Window > Workspace menu. Panels can be opened, resized, swap positions, be grouped together and pushed and pulled around so that you create a work environment that really suits your needs and specific screen arrangements. It is even possible to stretch Bridge over two screens so that you can use one screen for previewing and the other for displaying metadata, favorites or content. You also have the option to run a synchronized second version of Bridge that displays an alternate view of the photos currently selected. This means that you can display thumbnails and metadata on one screen and a larger preview on another. To activate a second Bridge view go to Window > New Synchronized Window.
Once you are happy with the layout of the workspace use the Window > Workspace > New Workspace option to store your design. Alternatively you can select from a number of preset workspace designs located in the Window > Workspace menu.

Bridge contains a range of preset workspace options:
1. Essentials – displays all panels.
2. Filmstrip – Folders, Favorites, Filters, Preview and Collections panels.
3. Metadata – Favorites, Metadata and Filters panels.
4. Output – Folders, Favorites and Preview panels.
5. Keywords – Favorites, Keywords and Filters panels.
6. Preview – Folders, Favorites, Filter, Keywords and Collections panels.
7. Light Table – Just the content area is displayed.
8. Folders – Folders and Favorites panels.

The Workspace Switcher located on the options bar, stores the preset workspaces and any custom entries you have saved. You can change the position of any entry by dragging it to a new location on the bar.
Bridge CS5 introduces the concept of Live Workspaces which auto-save any changes you make to the workspace layout as you make them. This allows switching between workspaces and having them appear just as you left them. You can return a workspace to its original layout by selecting the Rest option from the Window > Workspace menu. Also for CS5 the number of entries displayed in the collapsible Workspace Switcher (located in the Options Bar) can be altered, and the position of each workspace can be rearranged. Just click-drag the entry to a new position.
Most View options are grouped under the View menu and essentially alter the way that Content area data or thumbnails are presented. Here you can choose to show the thumbnails by themselves with no other data (View > Show Thumbnail only) or with metadata details included (View > As Details).

The Slideshow feature provides the option for users to display their images in an automated presentation. After selecting the photos to include it is a simple matter of choosing View > Slideshow to start the presentation. Options for customizing the style of presentation can be found in the Slideshow Options dialog displayed by selecting the entry in the View menu (1).
Other ways to display your photos in Bridge
Slideshow – There is also an option to display the content thumbnails as an impromptu slideshow. With no images selected choose View > Slideshow to include all pictures in the content panel in the show. To display a few photos, multi-select the pictures first (hold down the Cmd/Ctrl key as you click on thumbnails), and then pick the Slideshow command. The overall slideshow options such as duration, transitions and caption content can be altered via the option settings (View > Slideshow Options).
In a variation of this type of slideshow display, CS5 also contains the ability to switch to a full screen view of the current selected image. By selecting View > Full Screen Preview or hitting the Spacebar, the Bridge workspace is replaced with a large preview of the selected image. While in the Full Screen Preview mode, a single click of the mouse will display a 100% view of the file. Click-dragging will move the magnified view around the picture. Pressing the Spacebar a second time reverts the display back to the Bridge workspace.

Multi-selecting images in the content space displays the photos in the Preview pane. Clicking onto the preview image displays a loupe designed to magnify a portion of the photo. Holding down the Ctrl/Cmd key allows the user to synchronize the loupe views of multiple photos as the device is dragged around the images.
Multi-image preview – In addition, Bridge also contains a couple of other view options. The first is the ability to display multiple pictures in the preview panel in a side-by-side manner. Simply multiselect several items in the content area to display them in the preview panel in this compare mode.
Loupe Tool – The second feature is the Loupe Tool, which acts like an interactive magnifier. The loupe size changes with the size of the displayed preview image and works best with a large preview image. To use, click the cursor on an area in the preview picture. By default a 100% preview of this picture part is then displayed, but you can change the degree of magnification of the loupe by clicking the + and − keys. Click and drag the cursor to move the loupe around the photo. When multiple photos are displayed in the Preview pane you can display extra loupe views by clicking onto each photo in turn. The loupes can then be dragged around each photo to check sharpness and subject details like ‘someone blinking’ in portrait images. Holding down the Ctrl/Cmd key while dragging a loupe will synchronize its movement with other display loupes. This technique is great for checking the same area of similar photos when trying to choose which images to keep and which to discard.

Bridge also contains a Review mode that displays images selected in the content panel in a 3D circle. Left and right arrow keys are used for navigating through the group.
Review Mode – The Review Mode (View > Review Mode) displays a set of images in a rotating web gallery-like display. The user can move from one image to another by clicking sideways arrow keys or by clicking the mouse on the forward and back arrows; unwanted pictures can be dropped from the display set using the down arrow key and the photos left after reviewing are automatically added to a new collection when returning to Bridge. Dropping images does not delete the photo, it does not remove it from content view; it does remove it from the multi-photo view that shows up in preview after you ‘Esc’ out of the review mode While in Review Mode you can add or change photo Labels and/or Ratings, and examine pictures closer using the Loupe Tool. This option was added to Bridge to help photographers quickly review their images, make choices about suitable photos that deserve more attention and then save these candidate images in the easily retrievable form of a Collection. When used in combination with the Collections pane, this workflow should make accessing key photos quicker than in previous version of Bridge.
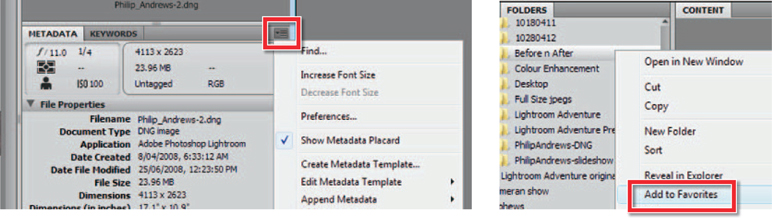
The content of some panels and the way that this information is displayed can be adjusted using either the flyout menus at the top right of the panels, right-click menu options for panel items or Bridge preference settings. Fly-out menu for the Metadata panel (left) and right-click menu for Favorite panel entries (right) are shown.
Custom panel display
Some panels also contain custom options that govern the type of information displayed and the way that it is presented in the panel. For both the Keyword and Metadata panels, these options are located in the fly-out menu accessed at the top right of the panel. You can add folders to the Favorites panel by right-clicking on them in the Folder panel and then choosing the Add to Favorites entry from the menu that appears. To remove listed folders rightclick the entry and choose the Remove from Favorites option.
The Inspector panel display and the types of data shown with thumbnails in the Content panel are controlled by settings in Preferences (Edit > Preferences).

Images with low quality, but fast to display, thumbnails are displayed with a black border (1). Create a higher quality thumbnail by selecting the option from the right-click menu.
Speedy thumbnail and preview generation
The images that you see in the Content and Preview panels are both based on thumbnails generated by Bridge. By default Bridge initially uses the thumbnails generated by your camera at the time of capture and then creates higher resolution images that will be used in the preview pane. Via the settings in Preferences the user has control over whether the thumbnails are built to a standard size or optimized specifically for your screen or monitor. Choose the Generate Monitor-Size previews option in the Advanced section of Bridge’s Preferences (Edit > Preferences). You can force the generation of high quality thumbnails manually for an individual image or groups of multi-selected photos by selecting the pictures in the Content pane and then choosing the Generate High Quality Thumbnail entry from the right-click menu. Images with low quality thumbnails are displayed in the content area with a black line border.

You can speed up the display of images by precaching the folders they are saved in using the Build and Export Cache option in the Edit > Preference > Cache menu. After selecting the entry you can then choose to build 100% previews for faster display and to export the cache, which helps with display on other machines.
Caching decisions
The cache is an allocated space on your hard drive that is used to store thumbnail and metadata information (Labels and Ratings) for the images displayed in the Content panel. Bridge uses this cache to speed up the display of thumbnails. The information in the cache is generally built the first time the contents of a specific folder are displayed. This process can take some time, especially if the folder contains many pictures. For this reason, there is also an option to build the cache of a selected folder in the background while you continue other work. Select the directory to be cached in the Folder panel and then choose Tools > Cache > Build and Export Cache. If for any reason you want to remove a previously created cache from a specific directory, then select the folder and choose the Tools > Cache > Purge Cache for Folder option.

The location of centralized cache files as well as the ability to store the cache in the same folder as the images is controlled by settings in the Cache section of the Preferences dialog.
The location of the cache impacts indirectly on performance for two reasons:
- Cache files can become quite large and it is important to ensure that the drive selected to house the cache has enough space to be able to adequately store the file.
- When image files are copied to another drive or location, a new cache has to be constructed when the folder is first viewed unless the cache is copied along with the picture files.
The settings contained in the Cache section of the Preferences dialog provide the option to select the place where the central cache is stored. Use this setting to ensure that the cache file is located on a drive with sufficient space. Also included here is an option for exporting cache files to folders whenever possible. Use this setting to employ a distributed cache system (rather than a centralized one), which enables image and cache files to be stored together in the same folder. If this folder is then moved, copied or written to a new location the cache will not have to be rebuilt for the photos to be displayed in Bridge. The cache should also be copied to CD, DVD or other locations that are locked. New changes will be written to the central location but, overall, browsing will be speeded up by the cache.
The preferences also contain additional controls for the number of items stored in the cache. More items means faster display but more disk space is required for cache storage. The dialog also includes a button for compacting the cache, which helps improve performance, and another for purging or deleting all cached thumbnails and previews. This option is useful if you are having problems with the consistency of quality of thumbnail and preview images.
Using Bridge
It is important to view Bridge as a key component in the photographer’s workflow. From the time that the photos are downloaded from the camera, through the selection, editing and processing stages and then onto archiving and, later, locating specific pictures, the application plays a pivotal role in all image management activities. Let’s look a little closer at each of these areas.

Bridge ships with the Adobe Photo Downloader utility designed to simplify the transfer of image files from camera or card reader to computer. When working with the Downloader you have a choice of two modes – Standard (1) and Advanced (2).

Transferring with the Adobe Photo Downloader
Step 1: Select the Get Photos from Camera option from the File menu inside Bridge or click the new Get Photos button in the Applications bar. Next you will see the new Adobe Photo Downloader dialog. The utility contains the option of either Standard or Advanced modes. The Advanced option not only provides thumbnail previews of the images stored on the camera or card, but the dialog also contains several features for sorting and managing files as they are downloaded. But let’s start simply, with the options in the Standard dialog.

Step 2 Standard mode: To start you need to select the source of the pictures (the location of the card reader or camera). In the Standard mode all pictures on the card will be selected ready for downloading. Next set the Import Settings. Browse for the folder where you want the photographs to be stored and if you want to use a subfolder select the way that this folder will be named from the Create Subfolder drop-down menu. To help with finding your pictures later it may be helpful to add a meaningful name, not the labels that are attached by the camera, to the beginning of each of the images. You can do this by selecting an option from the Rename File drop-down menu and adding any custom text needed. At the same time selecting the Preserve Current Filename in XMP option will ensure the image can be found at a later date using the original file name. There are also options to open Bridge after the transfer is complete and convert to DNG or save copies of the photos on the fly (great for backing up images). Clicking the Get Photos button will transfer your pictures to your hard drive – you can then organize the pictures in the Bridge workspace. For more choices during the download process you will need to switch to the Advanced mode.
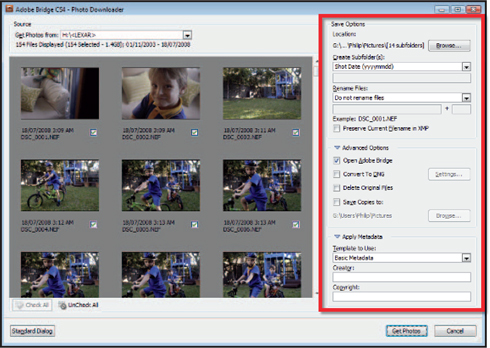
Step 3 Advanced mode: Selecting the Advanced Dialog button at the bottom left of the Standard mode window will display a larger Photo Downloader dialog with more options and a preview area showing a complete set of thumbnails of the photos stored on the camera or memory card. If for some reason you do not want to download all the images, then you will need to deselect the files to remain, by unchecking the tick box at the bottom righthand corner of the thumbnail. This version of the Photo Downloader has the same location for saving transferred files, rename, convert to DNG and copy files options that are in the Standard dialog. In addition, this mode also contains the ability to add metadata to the photos during the downloading process. You can also select a predefined metadata template (created with the File Info dialog in Bridge or Photoshop) from the drop-down menu or manually add in author and copyright details. Pressing the Get Photos button will start the download process.
Locating files
Files can be located by selecting the folder in which they are contained using either the Favorites or Folders panel or the Look In menu (top of the dialog). Alternatively, the Edit > Find command can be used to search for pictures based on filename, file size, keywords, date, rating, label, metadata or comment.

Locate specific pictures or create collections of photos using the sophisticated Find options in Bridge.
Filtering the files displayed
The options in the Filter panel provide an interactive way to find specific photos among the thousands of files that sit on photographers’ hard drives. The feature is housed in a panel of its own which displays a list of attributes such as file type, orientation, date of creation or capture, rating, labels, keywords and even aspect ratio. Clicking on a heading activates the filter and alters the Content display to show only those files that possess the selected attribute. Selecting a second Filter entry reduces the displayed content further. Using this approach, it is possible to reduce thousands of photos to a select few with several wellplaced clicks in the Filter panel. To remove all filters and view all items in a folder click the folder icon in the bottom right of the panel or Ctrl/Cmd Alt/Opt A. To continue using the filtration settings when navigating to other folders or directories press the Map Pin icon in the bottom left of the pane.

The Filter panel contains a selection offile attributes that can be selected as ready-made search criteria in order to quickly create a subset of photos. 1) Menu of Sort choices. 2) Remove or clear all filters. 3) Lock current filtration settings while browsing.
Stacking alike photos
One way to help organize pictures in your collection is to group photos of similar content together. Bridge contains a stacking option designed just for this purpose. After multi-selecting the pictures to include from those displayed in the content area, select Stacks > Group as Stack. All images will be collated under a single front photo like a stack of cards. The number of images included in the stack is indicated in the top left of the stack thumbnail. Stacks can be expanded or collapsed by clicking on this number (stacks expand downwards in workspaces where the thumbnails are arranged vertically).

Expand image stacks by clicking on the circled number in the top left of the thumbnail of the stacked photos (1). Collapse image stacks by clicking on the same circled number positioned on the first thumbnail in the series (2). Preview all images in a collapsed stack by selecting the front and back image (3). Select the front image only to display this picture in the Preview panel (4).
Selecting the top of the front image of a collapsed stack displays this picture only in the Preview panel. Clicking onto the frame of the bottom image in the collapsed stack (it will change color when selected) will display all stacked photos in the Preview panel. Options for ungrouping the photos in a stack or changing the picture used as the front image can be located in the Stacks menu.
Auto stacking options
Added to this manual stacking functionality is the ability for Bridge to automatically collect High Dynamic Range (HDR) sets and panoramas and collate the files as stacks and then process them in Photoshop. This functionality can be accessed in two ways, via an option in the Stacks menu (Stacks > Auto Stack Panorama/HDR) or by choosing Tools > Photoshop > Process Collections in Photoshop.

When building stacks Bridge uses the EXIF information stored with each picture to search groups of photos looking for images taken with less than an 18-second gap. Once located these images are grouped into those that have exposure differences of more than one stop; these are earmarked for processing as HDR source files, and those with similar exposure settings are marked as candidates for Photomerge processing. Next Bridge searches through the images a second time, but this time the program looks at the images themselves with Photoshop’s Auto Align feature. Sequential images that are assessed to overlap by at least 80% are assumed to be HDR candidates. Photos that overlap by no more than 80% are considered to be panorama source images and are stacked as such. Finally the stacked photos are transferred to Photoshop and either processed using the Merge to HDR or Photomerge features.
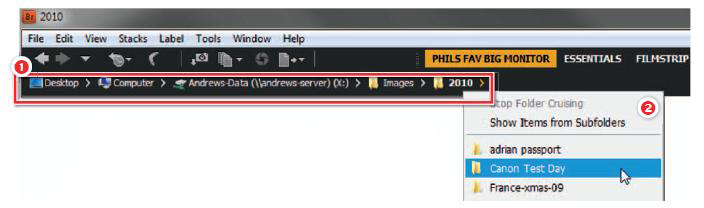
The Path bar sits below the Menu and Options bar and visually maps the folder structure for the current location (1). Clicking on the right sideways arrow at any point on the path will display the folders located in the displayed directory in a drop-down menu (2).
Always know where you are with the Path bar
Also new for the latest version of Bridge is the Path bar. Located just below the menu and shortcuts bar at the top of the Bridge workspace the bar provides a folder trail, working from parent directories on the left to child or subdirectories on the right. In its simplest form this bar visually displays the name and location of the folder currently selected, but this is not the end of the feature’s functionality. By clicking the sideways arrow after a folder entry a dropdown menu of all the subfolders for this directory will be displayed. Navigating to a different directory option is then just a matter of selecting the folder from the menu. Just like the other interface components in Bridge, the Path bar can be displayed or hidden by selecting its entry on the Window menu.
Using Bridge’s Collections
Collections are a way for photographers to group together images that relate to each other in some way. You might want to group all the photos of a particular subject, those taken for a single client or pictures captured with a specific camera and lens combination. Once created selecting the collection entry will then display all the photos contained within the group. The collections features in Bridge are now centered around the new Collections panel. Here you can view and manage existing collections and create new ones. If not displayed it can be selected from the Window menu.
Bridge uses two different collection types – Smart Collections and Standard Collections.
Collections
Standard Collections contain a selected group of images which represent a subset of all the photos in your collection and are related in some way – content, event, subject, photo, style, etc. The pictures contained in a collection are displayed when the collection entry is selected in the Collections panel. New collections can be created in several different ways:

- From the Collections panel – When the Collections panel is displayed, simply right-click on the panel area and choose the New Collection option from the pop-up menu. This will create a new entry in the panel that you can then name. To add images to the collection, select the photo or photos in the content area of Bridge and drag them over the collection entry in the panel.
- From Review Mode – A new collection can also be created from the results of selection editing using the new Review Mode. Start by selecting some images in the Content panel. Next choose the Review Mode option from the View menu or click Ctrl/Cmd + B. Flick between the images using the sideways arrows. When you come across a photo that you want to remove from the group press the down arrow key. Once you have only the images that you want in the group displayed, click the Create New Collection button at the bottom right of the Review Mode screen. You will be returned to the Bridge interface and a new entry will have been added to the Collections panel.

Smart Collections
Smart Collections are created by establishing a set of search criteria. The photos that meet the criteria automatically are added to the collection. These collections are dynamic in that each time the collection entry is selected a new search is conducted and any photos that match the criteria are added to the collection. In this way the contents of Smart Collections are always kept up to date automatically. Smart Collection entries are colored blue.
- From the Collections panel – Smart Collections can also be created by right-clicking on the Collections panel and choosing the New Smart Collection entry. A Find dialog will then be displayed in which you can set your search criteria. Clicking the Find button will execute the search and create a new Smart Collection entry.
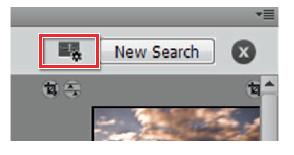
- As the result of a search – Another way to create a Smart Collection is to locate the images to include via a search. Select the Find option from the Edit menu. Using the settings in the Find dialog, establish a set of search criteria to help locate the required files. Click the Find button to execute the search. All images that match the search criteria will be displayed in the Content panel. To add these photos to a new collection press the Save as a Smart Collection button at the top right of the panel.
- Via a set of filters – The same functionality is available when you use the settings in the Filter panel to display a selection of images in the Content panel. When filters are being applied the Save as a Smart Collection button is displayed in the top right of the Content panel. Clicking the button will create a Smart Collection based on the current filter settings.
Collections can also be added as an entry in the Favorites panel. Simply right-click on the collection entry in the Collections panel and choose the Add to Favorites option from the menu. Collection entries can be removed from the panel by right-clicking on the entry and choosing the Delete option from the menu. Existing collections can also be renamed in the same way. The search criteria used in a Smart Collection can be adjusted by selecting the entry and then either clicking on the Edit button at the bottom left of the panel or by selecting the Edit entry from the right-click menu.

The Collections panel displays both Smart Collection (1) and Standard Collection (2) entries. There are options for creating new collections, renaming, deleting and adding collections to the Favorites panel in the right-click menu (3). Edit button (4). New Collections buttons (5). Delete Collection button (6).
Downloading pictures
For the last couple of releases Bridge has included the Adobe Photo Downloader (APD) utility. The downloader manages the transfer of files from a camera or a card reader to your computer. In doing so the transfer utility can also change file names, convert to Adobe’s Digital Negative format (DNG) on the fly, apply pre-saved metadata templates and even save copies of the files to a backup drive. This feature alone saves loads of time and effort for the working photographer over performing these tasks manually and for this reason should be your first point of call when downloading from your camera.
Labeling pictures
As you are probably realizing Bridge is more than just a file browser; it is also a utility that can be used for sorting and categorizing your photos. Using the options listed under the Label menu, individual or groups of photos can be rated (with a star rating) or labeled (with a colored label).
These tags can be used as a way to sort and display the best images from those taken at a large photoshoot or grouped together in a folder. Labels and ratings are applied by selecting (or multi-selecting) the thumbnail in the Bridge workspace and then choosing the tag from the Label menu. Shortcut keys can also be used to quickly attach tags to individually selected files one at a time.
In addition to adding the star ratings and the colored labels you can also mark photos as a reject (Label > Reject) and then have these photos hidden from view (View > Show Reject Files).

Labels or ratings are often used as a way of indicating the best images in a group of pictures taken in a single session. The photos displayed in the Content panel can be sorted according to their label or rating using the settings in the Filter panel.

Keywords are words that summarize the content of the photo. They are used extensively by photo libraries for cataloging multiple photos. Keywords can be created and applied in Bridge using the Keywords panel (1). Also in Bridge CS5 the keywords and metadata associated with individual images can be displayed using the new Keywords workspace (2).
Adding keywords
Along with labeling and rating photos for easy editing and display options, it is also possible to assign specific keywords that help describe the content of your images. The keywords are stored in the metadata of the photo and are used extensively not only by Bridge as a way of locating specific photos but also by photo libraries worldwide for cataloging.
Most keyword activity is centered around the Keywords panel in Bridge. Here you can create and apply keywords to images or groups of images. To help manage an ever growing list keywords can also be grouped into keyword sets. To apply a keyword to a photo, select the image first and then click on the check box next to the keyword or keyword set to add. Click on the check box again to remove a keyword. Buttons for creating keywords and sub-keywords as well as for deleting existing keywords can be found at the bottom of the panel. A search pane is also located here making the task of finding specific keywords a simple job. Use the Find feature to locate images that have a specific associated keyword.

The settings menu for the Keywords panel (1) contains options for adding and removing keywords as well as the ability to import and export keyword sets. The bottom left of the panel contains a search field (2) and the three buttons on the right are for creating keywords, sub-keywords and deleting keywords (3).
A summary of all the Assigned Keywords for a specific photo is displayed at the top of the panel. New keywords or keyword sets are created, and existing ones deleted, using the buttons at the bottom right of the panel. Keep in mind that the CS4 version of Bridge also has a special Keywords workspace (Window > Workspace > Keywords), that can also be used to display metadata and associated keywords for individual files in the Content panel.
Keywords are often used as the primary method for locating appropriate images in stock libraries. For this reason accurate allocation of keywords is an important task for photographers wanting to ensure that their images feature prominently in search results. Some libraries should supply a list of pre-compiled keywords that are used by photographers to categorize their photos. Working this way helps ensure consistency in approach. To add saved keyword lists to Bridge select the Import option from the Settings menu (top right of the Keywords panel) and choose the file in the browser dialog that is displayed. Similarly the keywords lists that you create can be exported and reused using the Export option in the Settings menu.
Introducing Mini Bridge
New for CS5 is the inclusion of Mini Bridge, a panelized version of Bridge that you can access from inside Photoshop CS5. Mini Bridge makes use of the Flash-based interface which also underpins many of the third-party panels that are available to instal in Photoshop.
To launch Mini Bridge just click on the Mini Bridge button in the menu bar of Photoshop CS5. When the panel first opens you might see a warning that Bridge is disconnected, just click the OK button to connect the panel by opening the Bridge in the background. If you are shown the Home screen then click the Browse Files button to display your assets in the panel.

You can resize the Mini Bridge display by dragging the panel’s edges and adjust the pods displayed, such as the Path bar, Navigation Pod, and Preview Pod, by choosing their entries from the menu accessed by clicking the Panel View button. Individual files can be located via the folder structure in the Path bar or with the entries in the Navigation pod. I prefer to create collections of working images in Bridge proper, which can then be accessed quickly and easily with Mini Bridge.
Images can be opened into Photoshop CS5 by double-clicking them in the Content Pod or dragging them from the Content Pod directly to the Photoshop CS5 window. Pressing the spacebar will display a selected image or video in Full Screen Preview mode. Other display options are available from the Preview menu at the bottom of the Content pod. The slider to the left of this menu adjusts the size of the Thumbnails and entries in the View menu, on the right, determine the type of content shown in the pod and how it is displayed.
You can also use Photoshop tools like Batch, Image Processor, Load files Into Photoshop Layers, Merge To HDR Pro, and Photomerge by first selecting the images in the Content Pod, then clicking the Tools button at the top of the Content Pod, and choosing the appropriate menu entry. Select which files are displayed and change their order with the Select, Filter, and Sort options, accessed in the title bar of the Content Pod.
Launch settings as well as options for controlling the appearance of Mini Bridge are housed in the Settings pane which can be displayed by clicking the Settings button on the Home pane.

The Mini Bridge Home pane (1) contains buttons to take you to the Settings pane (2) and to display your files (3).

The Mini Bridge display is very configurable allowing you to customize not only the content that is displayed but also the various pods that are integrated into the panel.

The title bar of the Content Pod contains the Select (1), Filter (2), Sort (3), and Tools (4) menus.
Tools used in Bridge
Although no real editing or enhancement options are available in Bridge, it is possible to use the browser as a starting point for many of the operations normally carried out in Photoshop. For instance, photos selected in the workspace can be batch renamed, printed, used to create a Photomerge panorama, compiled into a contact sheet or combined into a PDF-based presentation, all via options under the Tools menu or the Output workspace. Some of these choices will open Photoshop before completing the requested task whereas others are completed without leaving the browser workspace. The Lens Correction entry is new for CS5 and facilitates batch correction of images using the new correction technology in Photoshop and Merge to HDR has been replaced with Merge to HDR Pro which uses the new HDR system.

Bridge is a great starting place for many of the tools contained in the File > Automate menu in Photoshop as you can select the images to include before starting the editing feature from the Tools > Photoshop menu.
Processing Raw inside Bridge
One of the real bonuses of Bridge is the ability to open, edit and save Raw files from inside the browser workspace. There is now no need to open the files to process via Photoshop. All key enhancement steps can be handled directly from the browsing workspace by selecting (or multi-selecting) the files and then choosing File > Open in Camera Raw. All Raw processing is undertaken by the latest version of Adobe Camera Raw (ACR) which ships with Photoshop CS5 and both TIFF and JPEG files can also be processed with the feature as well.
Previous versions of Adobe Camera Raw were only able to enhance globally. That is, the changes they made to the picture were made to the whole of the image. Enhancing specific picture parts was strictly a task for Photoshop. Now ACR is capable of local correction or applying changes to just some of the picture, so more of the image enhancement tasks can occur in ACR and via Bridge. More details on localized correction can be found in the Raw Processing chapter.

Raw, TIFF and JPEG files can be processed with Adobe Camera Raw from inside Bridge without having to open Photoshop first.

To open a file directly into Photoshop you can right-click the thumbnail and choose Open With > Photoshop or, as long as the file type is associated with Photoshop, you can also double-click the photo inside the Content panel.
Processing in Photoshop
It is a simple matter to transfer photos from the Bridge workspace into Photoshop. You can either double-click a thumbnail or select the image and then choose Open With > Photoshop CS5 from the right-click menu. By default double-clicking Raw images will open them into the Adobe Camera Raw utility inside Photoshop, but this behavior can be changed to process the file inside Bridge by selecting the Automatically Open option in the JPEG and TIFF Handling section of the Camera Raw Settings (Edit > Camera Raw Settings) in Bridge.

First introduced in CS4 and improved for this release is the ability for Bridge to output selected files to a Flashbased Web Gallery or a PDF-based presentation. The style and type of output is controlled by the settings in the Output panel (1) and the presentation or website is previewed in the Output Preview panel (2)
Output to web or PDF presentation from Bridge
One of the big changes for Bridge in the last couple of revisions is the ability to output to web and PDF from inside the Browser. First introduced in CS4 the Output workspace (Workspace > Output) has been updated in this release. It now includes precise adjustment of the size and quality of images, ability to display filenames, and to save templates within the Web Gallery feature and text- and image-based watermark options when exporting PDF documents in this release.
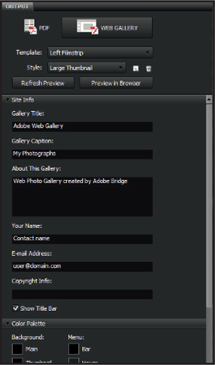
Once this workspace is selected, the right-hand panel is used to display the output options and settings in a format that will be familiar to many Lightroom or Photoshop Elements users. You can choose between creating a PDF document (presentation or print document) or a web gallery (mostly Flash-based) via the buttons at the top of the Output panel. Next the settings for the design and the information to be included are added via the various controls and text fields and the final design is previewed in the special Output Preview panel by clicking the Refresh Preview button.

The Output panel contains a range of options to control the creation of the final PDF document.
The PDF output option allows the user to create either screenbased presentations or PDF documents that are designed for printing. The feature ships with a range of predesigned output options listed in the Template drop-down menu (at the top of the output panel). Here you will find designs for documents as diverse as greeting cards, contact sheets, triptychs (three images to a page) and full page images. Selecting a template is a good starting point for designing your PDF document and the options in the next sections of the Output panel will help fine-tune or customize the design. The Document and Layout sections adjust the page size and the number and position of images upon it. The Overlay and Watermark sections contain options for the inclusion of text with the photos and now include the ability to use image-based watermarks. The Playback controls are used when the PDF will be used in a screen presentation format. With all the settings adjusted the selected images can be previewed in the design by clicking the Refresh Preview button at the top of the panel. Finally use the Save button to store the PDF document.
Web galleries
Also included as a Output option is the ability to produce a web gallery from the selected images in the Bridge Content panel. Yes it was possible to create a gallery inside Photoshop in previous versions of the software but in this panel allows the production to occur inside Bridge, the website can be previewed before creation and, once produced, the whole site can be uploaded via FTP directly to the web.
To start the process click the Web Gallery button at the top of the Output panel. Next pick the Template and then Style of gallery to create, add in the Site Info, adjust the Color Panel used and the Appearance settings before setting up the Create Gallery options. Finally, click the Save button to output the gallery to your own computer or press the Upload button to transfer the completed site to the web. There are better sizing controls and the ability to save gallery templates in CS5.
Similar controls are present in the Output panel for the production of web galleries.
Using Bridge to access the project resources
Use Bridge to access the project resources that are available on the supporting DVD. Access the DVD from the Favorites panel in Bridge. Double-click the Photoshop_CS5 DVD icon to access the chapter folders. Images can be opened directly from Bridge or alternatively a folder of images can be dragged from the Content panel in Bridge to a location on your hard drive if required.

Inside each chapter folder the resources are divided into the different file formats. The same images can be accessed as JPEG, TIFF or Raw files (.dng). The JPEG images are compressed versions (lower quality) but take up little hard drive space. The TIFF files are uncompressed and may contain saved selections that can be used to speed up the editing process in some projects.
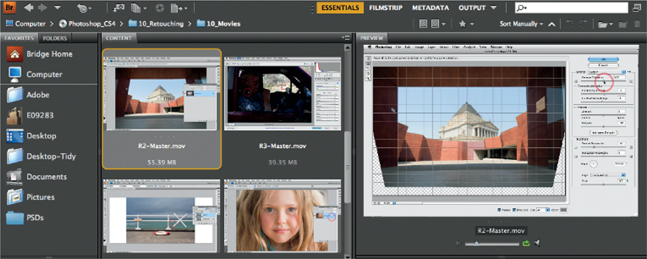
Most of the images are available as Raw files. These are required for many projects in the Advanced Retouching and Montage chapters, where some of the editing process is performed in the Adobe Camera Raw workspace (see Adobe Camera Raw). Each project in the ‘Imaging Projects’ module (last four chapters) is also supported by a movie. Movies can be watched in Bridge or can be opened directly in the QuickTime player (when installed) by double-clicking the movie file icon in the Content panel.

