layer blends

American Patriot - Duncan P Walke www.iStockphoto.com
essential skills
- Learn the practical applications of layer blend modes for image retouching and creative montage work.
- Develop skills using the following techniques:
– blend modes
– layers and channels
– layer masks.
Introduction
When an image, or part of an image, is placed on a separate layer above the background, creative decisions can be made as to how these layers interact with each other. Reducing the opacity of the top layer allows the underlying information to show through, but Photoshop has many other ways of mixing, combining or ‘blending’ the pixel values on different layers to achieve different visual outcomes. The different methods used by Photoshop to compare and adjust the hue, saturation and brightness of the pixels on the different layers are called ‘blend modes’. Blend modes can be assigned to the painting tools from the Options bar but they are more commonly assigned to an entire layer when editing a multi-layered document. The layer blend modes are accessed from the ‘blending mode’ pull-down menu in the top left-handcorner of the Layers panel.
The major groupings
The blend modes are arranged in family groups of related effects or variations on a theme. Many users simply sample all the different blend modes until they achieve the effect they are looking for. This, however, can be a time-consuming operation and a little more understanding of what is actually happening can ease the task of choosing an appropriate blend mode for the job in hand. A few of the blend modes are commonly used in the routine compositing tasks, while other shave very limited or specialized uses only. The five main groups of blend modes after Normal and Dissolve that are more commonly used for image-editing and montage work start with:
- Darken
- Lighten
- Overlay
- Difference
- Hue
More blend modes than a photographer needs
There are 27 blend modes (counting ‘Normal’ as a mode) but photographers will usually only rely on less than half of these modes on a regular basis in their image retouching and montage projects. There are a few modes (such as Darker Color and Lighter Color) that offer the photographer with few if any practical uses. This chapter will focus on the ‘essential’ modes and skip over, or omit, the non-essential modes. The essential blend modes for photo-editing are:
- Normal
- Darken
- Multiply
- Lighten
- Screen
- Overlay
- Soft Light
- Difference
- Luminosity
- Color
Opacity and Dissolve
At 100% opacity the pixels on the top layer obscure the pixels on the layers underneath. As the opacity is reduced the pixels underneath become visible. The Dissolve blend mode only works when the opacity of the layer is reduced. Random pixels are made transparent on the layer rather than reducing the transparency of all the pixels. The effect is very different to the reduced opacity of the ‘Normal’ blend mode and has commercial applications as a transition for fading one image into another, but the effect has very limited commercial applications for compositing and photomontage of stills image work.

Image 02_Opacity. The groups of blend modes are listed using the name of the dominant effect. The step wedge above shows ‘Normal’ at 100% and 50% opacity and the ‘Dissolve’ blend mode at 50% opacity.
The ‘Opacity’ control for each layer, although not strictly considered as a blend mode, is an important element of any composite work. Some of the blend modes are quite ‘aggressive’ in their resulting effect if applied at 100% opacity. Experimenting with some blend modes at a reduced opacity will often provide the required result.
Shortcuts
The blend modes can be applied to layers using keyboard shortcuts (so long as a painting tool is not selected). Hold down the Shift key and press the ‘+’ key to move down the list orthe ‘−’ key to move up the list. Alternatively, you can press the Alt/Option key and the Shift key and key in the letter code for a particular blend mode. If a tool in the painting group is selected (i.e. in use) the blend mode is applied to the tool rather than the layer. See Keyboard Shortcuts for more information.
The ‘Darken’ group
It’s not too hard to figure out what this group of blend modes have in common. Although Darken leads the grouping, Multiply is perhaps the most used blend mode in the group.

Image 03_Darken. The Darken mode can replace existing highlights while ignoring darker tones.
Darken
When the top layer is set to Darken mode Photoshop displays the darker pixels, regardless of whether they are on the layer set to the Darken mode or on the underlying layers. Pixels on the layer with the blend mode applied that are lighter than the underlying pixels in the same location will no longer be visible. This mode is invaluable when retouching portraits or removing halos from around subjects due to masking errors (see Project 6 – Surface Blur in the Advanced Retouching chapter).

Multiply is a useful blend mode when overall darkening is required.
Multiply
The ‘Multiply’ blend mode belongs to the ‘Darken’ family grouping. The brightness values of the pixels on the blend layer and underlying layer are multiplied to create darker tones. Only values that are multiplied with white (level 255) stay the same, i.e. do not become darker.

Image 04_Multiply. The Multiply mode is used to apply a dark edge to the image (white is neutral).
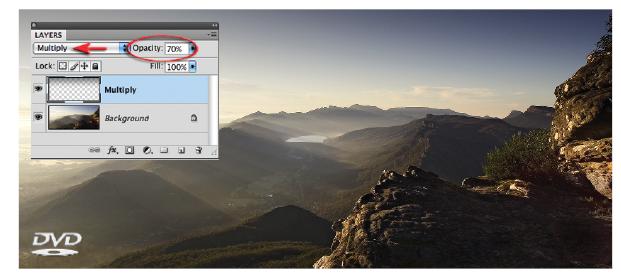
Image 05_Multiply. The Multiply blend mode is used to darken the sky in this landscape image.

Image 06_Multiply. The Multiply blend mode is used to darken the top half of the image. The layer is first duplicated and the Multiply mode set. A layer mask is added and a linear gradient in the layer mask shields the lower portion of the image from the effects of the blend mode.

Image 07_Multiply. The Multiply blend mode is the secret to success when masking hair that was first captured against a white background. The new background layer and layer mask are positioned above the portrait and the layer is then set to the multiply mode. Note the difference before and after the blend mode has been applied (see Montage Projects > Hair Extraction).
Image courtesy of Shari Gleeson

Color Burn, Linear Burn and Darker Color
Color Burn increases the underlying contrast while Linear Burn decreases the underlying brightness. These are difficult blend modes to find a use for at 100% opacity. Saturation can become excessive and overall brightness, now heavily influenced by the underlying color, can ‘fillin’ (become black). Darker Color is very similar to the Darken mode in that only the darker pixels remain visible. The difference between the two ‘darkening’ modes is how Photoshop assesses the brightness value – channel by channel (Darken) or combined channels (Darken Color).
The ‘Lighten’ group
The name of this group of blend modes is self-explanatory. If one of the modes in this group is applied to the top layer it usually results in a lighter outcome in some areas of the image. Although Lighten leads the grouping, Screen is perhaps the most used blend mode in the group.

Image 08_Lighten. Two exposures are combined to balance the bright ambient light and the comparatively dim interior lighting of a building. A second image is captured at night and placed on a layer above the daylight exposure. The layer is then set to the Lighten blend mode – original images by John Hay.
Lighten
When the top layer is set to Lighten mode Photoshop displays the lighter pixels, regardless of whether they are on the layer set to the Lighten mode or on the underlying layers. Pixels on the layer with the blend mode applied that are darker than the underlying pixels in the same location will no longer be visible. This blend mode is particularly useful for introducing highlights into the underexposed areas of an image. This technique can also be useful for replacing dark colored dust and scratches from light areas of continuous tone.

Image 9_Screen. Screen is useful when overall lightening is required.
Screen
The ‘Screen’ blend mode belongs to the ‘Lighten’ family grouping. The ‘inverse’ brightness values of the pixels on the blend layer and underlying layers are multiplied to create lighter tones (a brightness value of 80% is multiplied as if it was a value of 20%). Only the underlying values that are screened with black (level 0) on the upper layer stay the same (see Project 5 in the Advanced Retouching chapter).

Image 10_Screen. A background layer is duplicated and a Screen blend mode is applied to lighten all levels.

Image 11_Screen. The Screen mode can be used to apply a white border around an image.

Blondee Goddess – Katja Govorushchenko (www.iStockphoto.com)
Image 12_Screen. The Screen blend mode is useful when masking hair that was first captured against a black background (see Montage > Hair Extraction for more information about this technique).

Girl by Shelly Perry (www.iStockphoto.com)
Image 13_Screen. The Screen blend mode is particularly useful for quickly dropping in elements that were photographed against a black background such as smoke, bubbles, splashing or spurting water and fireworks. For transparent elements the lighting is usually positioned to one side or behind the subject matter to create the best effect.
Color Dodge, Linear Dodge and Lighter Color
Color Dodge decreases the underlying contrast while Linear Dodge increases the underlying brightness. This again is a difficult blend mode to find a use for at 100% opacity. Saturation can become excessive and overall brightness, heavily influenced by the underlying color, can blowout (become white). Lighter Color is very similar to the Lighten mode in that only the lighter pixels remain visible. The difference between the two ‘lightening’ modes is how Photoshop assesses the brightness value – channel by channel (Lighten) or combined channels (Lighter Color).
The ‘Overlay’ group
This is perhaps the most useful group of blend modes for photomontage work.

Image 14_Overlay. Applying the blend mode ‘Overlay’ to a texture or pattern layer will create an image where the form appears to be modeling the texture. Both the highlights and shadows of the underlying for mare respected.
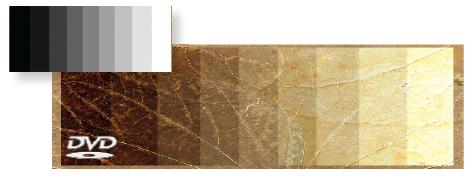
Image 15_Overlay. The ‘Overlay’ blend mode is useful for overlaying textures over 3D form.
Overlay
The Overlay blend mode uses a combination of the Multiply and Screen blend modes while preserving the highlight and shadow tones of the underlying image. The Overlay mode multiplies or screens the colors, depending on whether the base color is darker or lighter than a midtone. The effect is extremely useful when overlaying a texture or color over a form modeled by light and shade. Excessive increases in saturation may become evident when overlaying white and black. The ‘Soft’ and ‘Hard Light’ blend modes produce variations on this overlay theme.

Image 16_Overlay. A 50% Gray layer set to Overlay mode can be used to dodge and burn where increased localized contrast and saturation is required (such as dodging dark shadow tones).
A layer filled with 50% Gray is invisible in Overlay and Soft Light mode and, as a result, is commonly used as a ‘non-destructive’ dodging and burning layer (see Project 3 in the Retouching chapter for a more in-depth look at this skill).

Image 17_Soft Light. A 50% Gray layer set to Soft Light mode provides the most effective way to lighten or darken tones within an image. This is a more effective way than using Levels or Curves to change the luminance values. Using Levels or Curves to change localized luminance values always results in excessive shifts in Saturation and Hue values.
Soft and Hard Light – variations on a theme
The Soft and Hard Light blend modes are variations on the ‘Overlay’ theme. Photoshop describes the difference in terms of lighting (diffused or harsh spotlight). If the Overlay blend mode is causing highlights or shadows to become overly bright or dark or the increase in saturation is excessive then the Soft Light blend mode will often resolve the problem. The Hard Light, on the other hand, increases the contrast – but care must be taken when choosing this option as blending dark or light tones can tip the underlying tones to black (level 0) or white (255).
Difference and Exclusion
The Difference blend mode subtracts either the underlying color from the blend color or vice versa depending on which has the highest brightness value. This blend mode used to be useful for registering layers with the same content but this has now largely been replaced with the Auto-Align Layers for layers that are not Smart Objects. The Exclusion blend mode works in the same way except where the blend color is white. In this instance the underlying color is inverted.
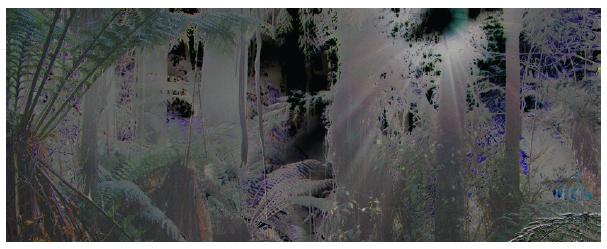
Image 18_Difference. The Difference mode is used to align two layers.

Image 19_Difference. Original image (Harmony) by Nicholas Monu ( www.iStockphoto.com).

The Difference mode can also be used to create a ‘solarized’ or ‘sabattier’ effect. Duplicate the layer and go to Image >Adjustments > Invert and then apply the Difference blend mode to the copy layer.
Hue, Saturation an Color
The Hue and Color blend modes are predominantly used for toning or tinting images while the Saturation blend mode offers more limited applications. Saturation precedes Color in the Modes menu but is discussed after Hue and Saturation in this section due to their inherent similarities. See Project 1 in the Advanced Retouching chapter to see how the color mode is used to reintroduce some of the original color back into an image that has been converted to black and white.
Hue
The ‘Hue’ blend mode modifies the image by using the hue value of the blend layer and the saturation value of the underlying layer. As a result the blend layer is invisible if you apply this blend mode to a fully desaturated image. Opacity levels of the blend layer can be explored to achieve the desired outcome.

Image 20_Hue-Color. Hue and Color blend modes.
Color
The ‘Color’ blend mode is useful for toning desaturated or tinting colored images. The brightness value of the base color is blended with the hue and saturation of the blend color.

Image 21_Hue.
Note > Color fills can be used to tint or tone images by setting them to Hue or Color mode. Photoshop’s Photo Filter layers perform a similar task but without the need to set the layer to the Hue or Color mode.
Saturation
The brightness or ‘luminance’ of the underlying pixels is retained but the saturation level is replaced with that of the blend layer’s saturation level.
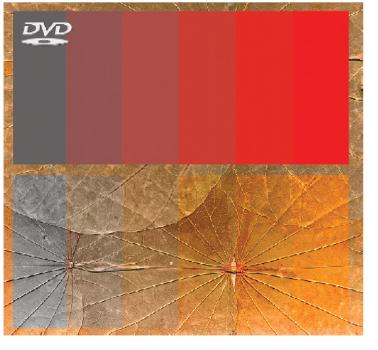
Image 22_Saturation.
Note > This blend mode has limited uses for traditional toning effects but can be used to locally desaturate colored images. To work with this blend mode try creating a new empty layer. Then either fill a selection with any desaturated tone or paint with black or white at a reduced opacity to gradually remove the color from the underlying image.

Image 23_Saturation. A Saturation layer is used to desaturate the underlying image.
Luminosity
Setting a layer to ‘Luminosity’ mode allows the Hue and Saturation values from the underlying layers to replace these on the Luminosity layer. The luminosity values within an RGB image have a number of very useful applications. The luminosity values can be extracted from an RGB image (from the Channels panel) and saved as an alpha channel, used as a layer mask or pasted as an independent layer above the background layer.

2

Image 24_Luminosity.
Creating a luminance channel
- In the Channels palette Command/Ctrl-click the master RGB channel to select the luminance values.
- Hold down the Option/Alt key and click on the ‘Save selection as channel’ icon to create an alpha channel. In the New Channel dialog select the Masked Areas option and select OK.
- Go to Select > Deselect.

A Curves adjustment layer can be switched to Luminosity mode to eliminate shifts in saturation when contrast is increased. The example above illustrates what happens when contrast is increased using a Curves layer in Luminance and Normal blend modes. Open up the file and try it!
