align and blend projects

Rory Gardiner–rorygardiner.com.au
essentíal skílls
- Create a fixed-position montage where different elements are combined to create an image where the lighting and action has been optimized.
- Create a wide panoramic image and correct parallax error.
- Create a vertical panorama and control the converging verticals to retain a realistic end-result.

Rory Gardiner–rorygardiner.com.au
Composite lighting and action – Project 1
The lighting of a studio set is often compromised by either limitations of time or the complexity of the lighting that is required for the creative outcome. Take, for instance, the example above, where the ideal lighting required for the liquid and the label is different. Perfect the lighting for one and the quality of the other is compromised. The solution is remarkably simple of course. Perfect the lighting for one at a time and then create a composite image in post-production. The drama is further enhanced by adding a splash, ripples and the perfect background. Prior to CS3, pin-registering each exposure in-camera using a sturdy tripod was an essential requirement for the success of this technique. Small differences in camera position (such as knocking the tripod between exposures) can now be corrected using the new Auto-Align Layers command.

1. Open the two bottle images and make a composite image by dragging the background thumbnail (in the Layers panel) from the label image into the beer image. Shift-click both layers to select them. Select Auto-Align Layers from the Edit menu and in the dialog box, select the Reposition option before selecting OK. Hold down the Ctrl key (PC) or Command key (Mac) and then click on the ‘Create a new layer’ icon at the base of the Layers panel to create an empty new layer below Layer 0. Fill this new layer with white (Edit > Fill).

2. Make one path around the bottle and another path around the labels using the Pen Tool (see the Selections chapter and Project 2 in this chapter). Hold down the Command key (Mac) or Ctrl key (PC) and click on a Path thumbnail to load it as a selection. In the Layers panel select the corresponding layer, e.g. the label path for the label layer and then click on the ‘Add layer mask’ icon at the base of the Layers panel. Apply a 1–pixel Gaussian Blur to each layer mask (Edit > Blur > Gaussian Blur). Select the top two layers and use the keyboard shortcut to load them into a group (Command or Ctrl + G) and name the group ‘Bottle’.

3. Open the Ripples and Background files. In Adobe Camera Raw, the Ripples file has had a +1.15 exposure increase and the Contrast slider has been raised to +75 so that the tones match the background image. Make a composite image from these two files by dragging the background thumbnail (in the Layers panel) from the ripples image into the background image. Drag the lock on the background layer of the background image to the trash in the Layers panel. Add a layer mask to the top layer (the ripples) and lower the Opacity to 50%. Select Layer 0 and go to Edit > Free Transform. Drag the bottom-center handle of the bounding box down to increase the height of this layer so that a clean background extends behind the ripples and commit the transformation (use the keyboard shortcut Ctrl + 0 (PC) or Command + 0 (Mac) to access the edges of the Transform bounding box).

4. Select the Gradient Tool and choose the Black, White and Linear options and set the Opacity to 100% (make sure the Reverse option is deselected). Select the layer mask and drag a short gradient to hide the top of the tray containing the ripples and create a smooth transition between the new background below. Set the Opacity of Layer 1 back to 100%.

5. Select the Brush Tool and black as the foreground color. Choose a large soft-edged brush (0% hardness) and lower the Opacity to around 50%. Paint over any remaining signs of the top of the tray to remove them from view. Several strokes of the brush my be required to complete this task.

6. If you would like to make the ripples more symmetrical, duplicate the ripples layer and then go to Edit > Transform > Flip Horizontal. Select the Gradient Tool again, choose Multiply as the mode and drag a gradient from the right side of the bottle to the left side of the bottle. Stamp the visible elements of all the layers into a new layer (Command + Option + Shift + E for a Mac and Ctrl + Alt + Shift + E for a PC). This composite layer will enable you to warp the ripples into better shape (Edit > Transform > Warp). Drag down on the base of the bounding box to create a better shape for the ripples before committing the transformation. The background should now be ready to accept the bottle that we prepared earlier. Hold down the Shift key and select the top and bottom layers in the Layers panel and then use the keyboard shortcut Ctrl or Command + G to load the layers into a group. Name the group ‘Background’.

7. Drag the bottle group into the background image and apply the Free Transform (Edit > Free Transform) so that you can move the bottle into position and scale if required. Zoom in and check the edge of the bottle against the new background at 100%. If required, refine the edge of the bottle mask in Layer 0 of the bottle group (Select > Refine Edge). Add the splash image to the composite file, lower the opacity of the layer and repeat the transformation process to position and scale the splash. Return the layer to 100% Opacity when finished.

8. To mask the white background behind the splash we will need to duplicate the splash layer and add a black layer mask to the first splash layer (hold down the Alt/Option key as you click the ‘Add a layer mask’ icon in the Layers panel). Double-click the top splash layer away from the name of the layer so that the Layer Style dialog opens (if you double-click near the name of the layer you will be given the option to rename the layer instead). In the Blending Options section of the dialog drag the white slider on the This Layer slider to 250. Hold down the Alt/Option key and drag the left side of the slider again to split the slider. Drag this left side of the slider to 175 to create a smooth transition that will render the white background mostly transparent.

9. Select OK to apply the Advanced Blending options and then add a layer mask to this layer. Select the Brush Tool and black as the foreground color. Lower the Opacity in the Options bar to 50% and start to mask any traces of the white background that may still be visible. On the right side of the image mask the splash so that it appears to be going around the bottle rather than in front of the bottle. Adjust the size and hardness of the brush as required.

10. The previous two steps will have hidden the white background but also rendered the brightest highlights on the water droplets transparent as well. If you want to replace these bright highlights select the layer mask on the layer below and choose white as the foreground color. Select a small soft-edged brush and 100% Opacity and paint in the image to reveal these bright highlights.
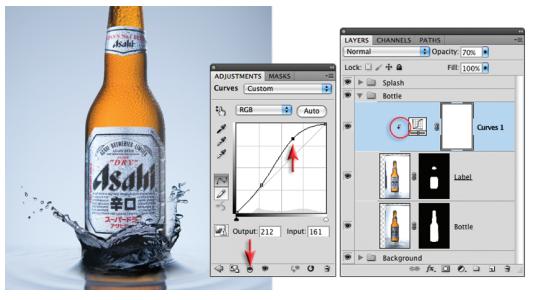
11. The final steps required in this project are to optimize the brightness and contrast of the bottle. Select the label layer in the Bottle group of layers and then create a Curves adjustment layer. Clip this Curves layer to the layer below and increase the brightness of the highlights while maintaining the tone of the black lettering.

12. Create a second Brightness/Contrast adjustment layer to modify the tonality of the bottle cap. Raise both the Brightness and Contrast sliders and then fill the layer mask with black. Select the Brush Tool and paint with white to paint in the adjustment on the bottle cap as required. Sharpen the completed image by selecting the Bottle group and the splash layer and converting for Smart Filters (Filter > Convert for Smart Filters). Apply either the Unsharp Mask or Smart Sharpen filter.

Haydn Cattach
Fixed position montage
The composite lighting technique used for Project 1 (the beer bottle) does not have to be confined to the studio. Working with the camera in a fixed position the photographer is free to light aspects of a large or complex scene with a single light source – one piece or frame at a time. Masking is relatively simple when most of the subject matter is not moving.

Photomerge – Project 2
Photomerge is capable of aligning and blending images without any signs of banding in smooth areas of transition. The new and improved Photomerge first made its appearance back in Photoshop CS3 and the stitching is usually seamless. This project, however, takes a look at how we can correct minor errors when things don’t quite match up. This is usually a result of using a wide-angle lens that includes a lot of foreground subject matter but without using a specialized tripod head to eliminate parallax error. The ease with which Photoshop can stitch these panoramas will be improved if you capture vertical images with a 50% overlap using manual exposure, manual focus and a manual White Balance setting (or process the images identically in Camera Raw). With a little know how, Photomerge is an excellent way of widening your horizons or competing with your best friend’s 60 Megapixel Hasselblad H4D.
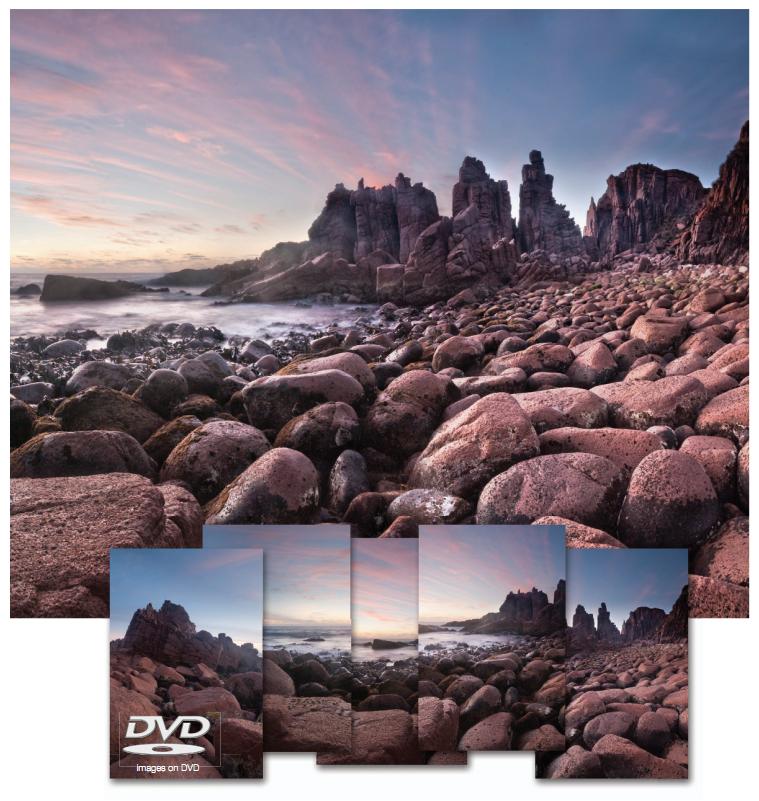
Note > The Raw files on the DVD have already been optimized for the reader for use in this project. No additional processing in Adobe Camera Raw is required. The information on this page highlights the work already carried out.
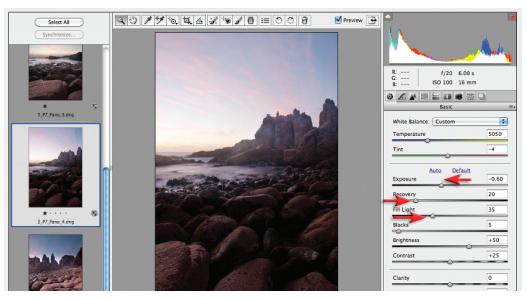
Lowering the Exposure slider and raising the Recovery slider has recovered the highlights, while raising the Fill Light slider lightened the shadow detail. If the subject brightness range or contrast of the scene had been any higher it would have been necessary to bracket the exposure for each of the component shots and then use Merge to HDR Pro to create an image with full detail for each of the five component images (see High Dynamic Range).
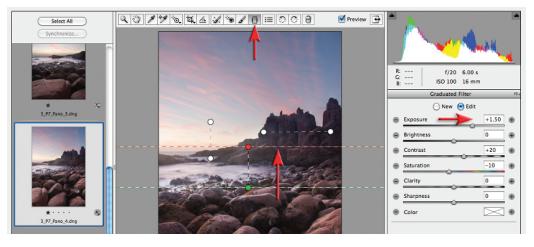
To balance the exposure the Raw files were further optimized using the Graduated Filter in ACR. The sky was darkened using one graduated filter and the Foreground was lightened using another. In some instances a third Graduated Filter was added to even the exposure from left to right.

1. Select and open the five project images (the JPEG or TIFF images on the DVD have already been processed from the Raw files). Go to File > Automate and choose Photomerge.
Note > The files for this project were captured on a 12 Megapixel DSLR using the Camera Raw file format and then scaled down to 6 Megapixel images to speed up the processing. If you have less than 2 Gigabytes of RAM on your computer you would be advised to do the same when stitching your own images or be prepared to be very patient.

2. In the Photomerge dialog box click on the Add Open Files button and select the Auto radio button in the Layout options. Select OK and let Photoshop do all of the work – and what a lot of work it has to do, aligning and blending all of these images.

3. Prior to Photoshop CS3 many more steps of manual techniques were required to circumnavigate the shortcomings of Photomerge – but as you can see from the results in this project we just about have perfection handed to us on a plate. Fantabulous! (I know that’s not in the dictionary but neither is Photomerge – yet.) If you have used the full-resolution images you probably had to go and make a cup of coffee while Photoshop put this one together (all 60 megapixels of it) and will now be considering downsampling your file – but wait, we have a couple of small glitches in this result.

Performance Tip 1
Now the only limitation you may run up against when handholding the camera, or placing the camera n a standard tripod head, is Photoshop’s ability to align and blend strong geometric lines that come close to the camera lens. If you have not used a specialized tripod head designed for professional panoramic stitching work, then the problem of aligning both foreground and distant subject matter is a big problem for any software (Photoshop handles it better than most). The camera should ideally be rotated around the nodal point of the lens to avoid something called parallax error. You will probably not encounter any problems with the new Photomerge feature unless you are working with strong lines in the immediate foreground.

Performance Tip 2
If you downsample before you flatten your file you will probably encounter hairline cracks after reducing the image size. The solution to this problem is to either flatten the file or stamp the visible content to a new layer (Ctrl/Command + Shift + Alt/Option and then type the letter E) before you reduce the size of the image.

If you hold down the Alt/Option key and click on each layer mask in turn you will notice that Photoshop uses hard-edged layer masks to hide or reveal the piece of the jigsaw puzzle that makes up the final panorama. The panorama has seamless joins because Photoshop has adjusted or ‘’blended’ the color and tonality of the pixels on each layer. Any pixels concealed by the layer masks have not been subjected to these color and tonal adjustments. This, in effect, means that the user cannot override which bit of each layer is visible as the hidden pixels have not been color–matched.

4. Merge the visible elements to new a new layer (Ctrl + Shift + Alt and then type the letter E on a PC or Command + Shift + Option and then type the letter E on a Mac). Crop away that which is surplus to requirements before flattening the file, be sure to leave the Width and Height fields blank. It is OK to leave a small area of transparency in the top right-hand corner of the image when cropping if this helps the composition as we can fix this using the techniques outlined in the next step. This is a big image (especially if you used the full-resolution files) so don’t be surprised if things are a little slower in computer land right now.

5. There is a small area of transparency at the top of the frame that will need cloning (I did not want to crop too tight at the top of the frame). Select the Clone Stamp tool from the Tools panel and then clone in some new sky from immediately below the transparent area. I have created an empty new layer to clone into and have checked the Sample All Layers option in the Options bar. Only when I am happy with the patch job will I select Merge Down from the Layers fly-out menu.

6. When stitching just two or three images Photomerge Panorama gets it right pretty much all of the time. When stitching much wider panoramas where there is a good deal of foreground detail you may find a couple of alignment errors. These images were captured using a wide-angle lens and the foreground rocks are just in front of the tripod. If I had used a specialized panorama tripod head the effects of parallax error would not be a problem. Photomerge in this instance, however, has met its match. The foreground rocks all match perfectly but that horizon line has a small break and is undulating. We can fix this. Zoom in to the horizon line, select the Rectangular Marquee tool and make a selection that just touches the horizon line at the lowest point. Make sure the feather option in the Options bar is set to 0. From the Select menu choose Inverse.
Note > The stitching errors may change depending on the resolution (pixel dimensions) of the files you choose for Photomerge to align and blend.
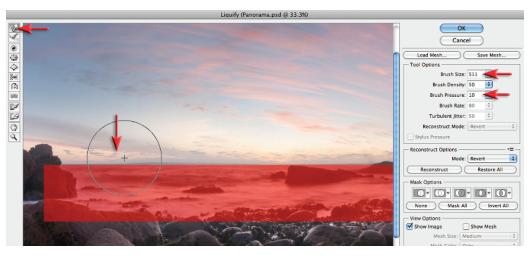
7. Go to Filter > Liquify. Choose the Warp Tool to nudge the horizon line down towards the red frozen area (created from the selection you made in the last step). Increase the size of the brush to 500 pixels and decrease the Brush Pressure to a lowly 10 pixels. When using the Warp tool just click and drag to push the pixels into alignment. When the horizon line is sitting on top of the red rectangle click OK to apply the changes to the image.

8. Pushing the pixels down onto the selection in Liquify will create an unnaturally hard edge to the horizon. This can be fixed by selecting the Blur tool in the Tools panel and a Strength setting of 50% in the Options bar. Zoom in so you can see the effects of your painting and then paint along the edge to soften it.

9. If you find a physical break in the horizon line or on the rocks either side of it you can create a patch to hide the awkward break. Use the Rectangular Marquee Tool with a Feather radius of 10 pixels and make a small selection just next to the break. Choose Copy and then Paste from the Edit menu to put the patch onto its own layer. Then go to Edit > Free Transform. You can now slide and rotate the patch into position. Hold down the Ctrl key (PC) or Command key (Mac) and pull any of the bounding box handles to distort the shape of the patch so that you can achieve a seamless fix.
Note > An alternative to this technique would be to use the Clone Stamp Tool and clone to an empty new layer (see Project 4 from the Retouching chapter).

10. Click on the Add layer mask icon at the base of the Layers panel. Select the Brush Tool from the Tools panel and set the foreground color to black. Set the Brush hardness low and then mask any areas of the patch that may be affecting the rocks. You may need to zoom in to check that your work does not leave any brush strokes.

11.If the Patch does not match the color of the tones then you can create an empty new layer and set the mode of this layer to Color. Select the Brush tool in the Tools panel, hold down the Alt or Option key and click on a more appropriate color to load this into the Foreground Color Swatch in the Tools panel. Then paint over the area that needs adjusting to further perfect the patched area.
Note > If the Foreground Color does not change when you hold down the Alt/Option key and click in the image window make sure the Eyedropper Tool options are set to All Layers from the Sample pull-down menu in the Options bar.

12. To create a Faux HDR (High Dynamic Range) effect that enhances localized contrast, go to Image > Duplicate and check the Duplicate Merged Layers Only option in the Duplicate Image dialog. It is not possible to apply the HDR Toning Adjustment to a multi-layered file so we will apply the toning to a flattened duplicate version of this file and then reimport the layer.
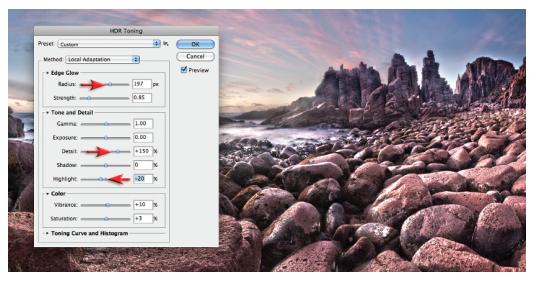
13. In order to apply the HDR Toning the image Photoshop has to temporarily convert the image into a 32 Bits/Channel file (hence the reason we have a single layer). Go to Image > Adjustments and select HDR Toning. When the HDR Toning dialog opens expand the Tone and Detail section and raise the Detail slider to + 150. You may need to decrease the Highlight slider to restore the highlight detail in the image and raise the Radius slider in the Edge Glow section to make a smoother transition between the rocks and sky. Adjust the Vibrance and Saturation sliders to taste and select OK.

14. This Faux HDR effect may look a little bit too edgy for most photographers. We can, however, dial in just the right amount of the effect after we have placed this file as a layer above the multi-layered file. Hold down the Shift key and drag the layer thumbnail from the duplicate image (the HDR Toned image) into the panorama image.

15. Lower the opacity of this new layer until you achieve a good balance between the panorama image and the HDR toned image.
Note > The bottom five layers holding the original component images and layer masks are no longer required and can be deleted before saving the master Photoshop file.

Perspective or Cylindrical
When we select Auto in the Layout section of the Photomerge dialog, Photoshop elected to use the Cylindrical option. This option is usually preferable and is usually selected by Auto when you are stitching wide panoramas. When stitching two or three images together you may find that Photoshop decides to use the Perspective option or you can choose this option to override the Cylindrical option if it is chosen by Auto. The Perspective option creates a bow-tie effect when stitching three images and is useful for creating a realistic perspective with straight horizon lines. When this option is used for more than three images, however, the distortion required to create the effect tends to be extreme for the images on the edge of the panorama and cannot, therefore, be considered as a usable option.


Auto-Align for pin-registering images
The Auto Align feature is an invaluable tool for photographers who need to be able to pin-register images that have been captured hand-held. This is, however, only recommended for those photographers who use a custom or manual white balance rather than auto white balance in-camera. In the illustration above the boy is blinking in one image and the dog is looking away in the second. The images were captured a split second apart but the best elements of each image can be combined to create one image even though the camera was hand-held. The two images have been combined by dragging the background layer from one file onto the image window of the other (hold down the Shift key as you let go of the mouse button). Dropping the Opacity of the top layer reveals the misalignment even though the boy was still.

Select both layers in the Layers panel. From the Edit menu choose Auto-Align Layers. Now select only the top layer and click on the ‘Add a layer mask’ icon in the Layers panel. Choose the Brush Tool in the Tools panel and paint with black into the mask to shield any of the pixels you do not want to see on this layer. Painting over the boy’s head will reveal the head with the open eyes on the layer below. You will need to crop the image to finish your project. If you can see the value of this technique then you will quickly realize that taking multiple shots the next time you are presented with a group (or even just one man and his best friend) ensures the decisive moment is history (sorry Henri).

Aligning images with moving content
When creating a panorama with moving subject matter the information in the images may change in the region of the 50% overlap as subjects move out of, or into, the frame. The difference in content forces Photoshop to mask around the moving subject matter during the blending process (to avoid cutting subjects in two). This is not always successful as Photoshop finds it difficult to distinguish between different subjects when they overlap. In the illustration above Photoshop has successfully blended images where the subject matter is very different in the region of the overlap. Photoshop has completely ignored the moving bicycle in the resulting blend.

We cannot paint into the layer masks of these layers to adjust visible content after the blend is complete as the differences in tone and color between these two images are significant due to the auto exposure and auto white balance used. In the illustration above (top image) I have switched off the layer mask to illustrate how the colors that have been blended do not extend beyond the hard-edged layer mask (the mask is only used to define visible content). To prevent Photoshop from using content in a blend we need to hide it by adding a layer mask and painting into this mask prior to blending (there is no need to be too precise about the painting). Painting in both layers in the area of transition, however, could result in transparency when the layers are blended.

After repeating the blending process we can see that we have now prioritized the bicycle instead of the pedestrians in the region of the overlap. We have, however, created new problems as Photoshop cannot distinguish between the rear end of the bicycle and a nearby pedestrian as the objects overlap. If we undo and add a little more paint into that mask before blending again we can finally resolve the problem in this region. If we turn our attention to the No Parking sign and parked bicycle in front of the restaurant sign we will see that all is not yet fixed. Going backwards and forwards like this can be time-consuming if we have a large number of high-resolution files to be blended each time. Avoid problems with editing by shooting in manual white balance and manual exposure (color and tone on the individual layers will be consistent). This allow us to fix up minor errors by painting into the mask, safe in the knowledge that the color and tone will not change.
Vertical panoramas – Project 3
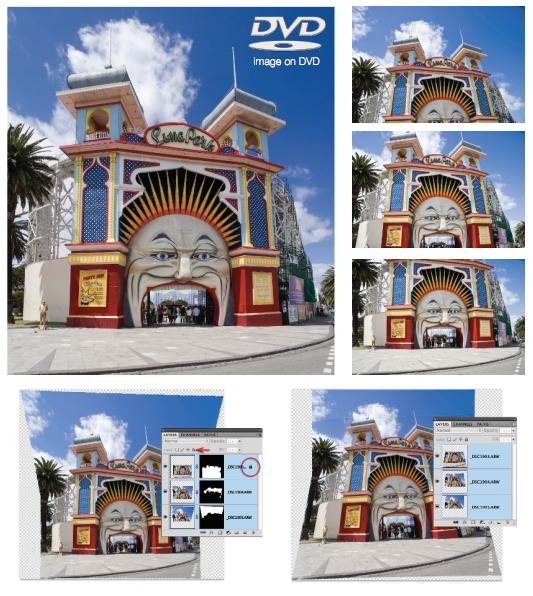
In the image above if I had moved any further back there would have been power lines, telephone lines and tram lines between me and the front of this old theme park. Capturing a building so close will inevitably lead to aggressive converging verticals due to a combination of the wide-angle lens and the angle of view required to capture the top of the structure. If you allow the Photomerge to take control of the stitching you will end up with the result above left. Capture images using the horizontal (landscape) format for a vertical panorama. You can then achieve a more professional result by intercepting the automated process by aligning and blending the images as separate tasks, rather than using the automated Photomerge feature.

1. Optimize the color and tonality of the Raw files in Adobe Camera Raw and then choose Select All and Synchronize before opening. Go to File > Scripts > Load Files into Stack. Select the Open files but do not select the Attempt to Automatically Align Source Images option in the dialog. When the files have been loaded into one image select the layer with the subject matter that is closest to the ground (the one with the least amount of converging verticals). Go to the Lock options in the Layers panel and click on the ‘Lock all’ icon to lock this layer. This action will force Photoshop to respect the perspective of this layer (the other layers will be forced to adopt the perspective of this layer when we align the images). Select all three layers in the Layers panel (Shift-click the top and bottom layers).

2. Go to File > Edit > Auto-Align Layers. In the dialog select the Perspective option and also select the Lens Correction options. Select OK to process the layers. After the images have been Auto Aligned make sure all three layers are still selected and then go to Edit > Auto-Blend Layers. Select the Panorama and Seamless Tones and Colors options and select OK to process the layers. In the Layers panel select only the top layer and unlock this layer before proceeding with the next step.

3. Select all three layers in the Layers panel again and then go to Filter > Convert for Smart Filters. Select the Crop Tool and crop the image to remove the transparency that surrounds this composite image. If you look at the image closely you will notice that there is a small amount of barrel distortion in this image (the sides of the building balloon or bow out). This defect cannot be accurately fixed using the Lens Correction filter as the distortions are not central to the cropped image. We can, however, use the Warp feature but first we need to create a perspective grid that we can work with. Click on the ‘Create a new layer’ icon to create an empty new layer.

4. Go to Filter > Vanishing Point and select the Render Grids to Photoshop in the options. Using the Create Plane Tool click in each corner of the entrance to create a perspective plane. Zoom in to make sure you do this accurately. Select OK to export this grid back to Photoshop.

5. The grid is not very dark but can be made more prominent by going to Filter > Other > Minimum. Choose 1 pixel and select OK. From the Image > Adjustments menu choose Levels and drag the shadows slider underneath the histogram to the right to darken the grid.

6. Now we can set about correcting the perspective of all three layers at the same time (one of the advantages of working with layers nested inside a Smart Object). Click on the Smart Object in the Layers panel and go to Edit > Transform > Warp. The barrel distortion can be very accurately fixed by dragging the four corner handles of the Warp grid outwards and tucking the sides in until they align with the grid. Zoom in to ensure you have fixed the problem accurately. Go to Edit > Transform > Distort and then drag the top two corner handles out to reduce the extent of the converging verticals. The verticals of the building cannot be aligned to the sides of the image or vertical guides otherwise the shape of the building at the top appears misshapen. Click on the Commit Transform option in the Options bar and hide or delete the grid layer you have used as a reference grid.

Exported grids
Grids exported from Vanishing Point can help the photographer capture additional elements that must conform to the perspective of the first image. The layer containing the grid can be dragged onto subsequent images to ensure 100% accuracy.

