workflow

Sam Everton
essential skills
- Examine different professional workflows.
- Capture high-quality digital images for image editing.
- Gain control over the color, tonality and sharpness of a digital image.
- Duplicate, optimize and save image files for print, presentation and for web.
Introduction
Over the last few years the way that photographers manage, edit and present their images has changed. Now we have more choices about the workflow that we use when optimizing our images for specific outcomes. In recognition of these changes this chapter will look at current professional workflow practice and the capture, editing and enhancing steps it involves.
Options for capture
When it comes to decisions about capture, if camera equipment considerations are put to one side, it boils down to a choice of shooting format. Do we shoot in JPEG or Raw?
This decision not only impacts on issues such as how many shots will fit on a memory card, but more importantly, it determines the nature of the photographer’s workflow as well as the degree of control that he or she has over the adjustments made to the image.
In this book we unashamedly promote a Smart Raw Workflow which is based firmly on the idea that there is a direct relationship with the quality of the final image produced, and being able to perform as much editing/enhancing as possible on the virgin pixels that exited the camera as a Raw file.

The ‘Convert then edit’ approach is the most popular workflow currently used by Raw shooting photographers. The Raw file is downloaded from the camera and the first task in the process is to convert the file to a type that is more readily supported by Photoshop, such as TIFF or PSD.
Processing your photos
Photos captured in JPEG do not require any intermediate processing before the images can be edited in programs like Photoshop. Raw images, on the other hand, need to be processed using a special Raw enabled utility such as Adobe Camera Raw (ACR) initially before further Photoshop based editing is possible. In the process often the file is converted from its Raw state to a file format that can be easily edited and enhanced in Photoshop. Despite the fact that programs designed specifically for working with Raw files such as ACR are becoming more and more sophisticated and feature rich most photographers still convert their Raw photos and move them to Photoshop for further processing.
Gradually this approach of ‘convert and then edit’ for Raw files is changing. With the increasing abilities of ACR, along with the Smart Object technology found in Photoshop, Raw shooters can put off the file conversion process while still taking advantage of the majority of the feature set of Photoshop. Keeping your photos in a Raw state maintains the flexibility of the format and is the basis of many non-destructive editing techniques designed for high-quality production. See Chapter 4 for more specific details on Raw processing.

In contrast to the previous way of working, a ‘Full Raw Workflow’ approach maintains the Raw file throughout the whole digital imaging process. This completely non-destructive workflow is the way of the future for Raw shooters and it is growing in support, with special editing and enhancement techniques for Photoshop and Bridge users now being promoted.
Editing and enhancing
Once the captured image is in a usable form the next step is to edit or enhance the photo. Digital shooters have much more control over their images in this editing and enhancement phase than was ever possible when working with historical darkroom methods. This is largely thanks to the host of tools, features and commands available in programs such as Photoshop, Bridge and Adobe Camera Raw.
In this phase of the workflow the digital photograph can be enhanced and edited in many ways, including changes to color, brightness, contrast and sharpness (see Foundation Project 1). In addition it is also possible to make more substantial changes such as retouching marks and dust spots, montaging several photos together, and adding text and special effects to the photo.
Producing your pictures
Even these days, many precious pictures end up as prints. Sometimes the prints are kept in an album, on other occasions they are hung on a wall, or they may just be simply passed from friend to friend or photographer to client, but gradually other production outcomes are becoming easier to use and therefore more popular.
Now you can just as easily produce a web gallery, photo book or multimedia slideshow as output a bunch of 6 × 4 inch prints. On the whole, the same software that is used for editing and enhancing digital photos also contains the ability to output pictures in a range of different forms. The latest version of Bridge, for instance, is able to produce high-quality PDF slideshows as well as polished Flash-based websites directly from inside the program.
Sharing your imagery
For many photographers having their images seen is one of the key reasons they capture pictures in the first place. With so many ways of producing your photos there are now a host of different ways of sharing your images. Modern image makers are no longer limited by distance or geographic borders. With the ability to easily produce web galleries, attach photos to e-mails or create High Definition slideshows, the whole world is truly a smaller place.
A few key concepts before we start…
Raw – the ultimate ‘capture’ and ‘processing’ format
Until recently, Raw files were viewed as a capture-only format with the first step in any workflow being the conversion of the picture to another file type so that editing, enhancing and output tasks could be performed. I say recently because with the latest release of products such as Adobe Camera Raw, Photoshop and Bridge it is no longer necessary to change file formats to move your pictures further through the production workflow.
Photoshop and Bridge are now sufficiently Raw-aware to allow the user to edit, enhance, print and even produce contact sheets, PDF presentations and web galleries all from Raw originals. Yes, sometimes the files are converted as part of the production process for these outcomes, but I can live with the intermediary step of conversion if it means that my precious pictures stay in the Raw format for more of the production workflow. With a little trickery associated with Photoshop’s Smart Object technology it is now even possible to edit individual pictures inside a standard Photoshop document without having to convert the file first, thus maintaining the untouched capture pixels throughout the editing process.
Differences between Raw and other formats
Raw files differ from other file types in that some of the options that are fixed during the processing of formats such as TIFF or JPEG can be adjusted and changed losslessly with a Raw format. In this way you can think of Raw files as having three distinct sections:
- Camera Data, usually called the EXIF or metadata, including things such as camera model, shutter speed and aperture details, most of which cannot be changed.
- Image Data which, though recorded by the camera, can be changed in a Raw editor and the settings chosen here directly affect how the picture will be processed. Changeable options include color space, white balance, saturation, distribution of image tones (contrast) and application of sharpness.
- The Image itself. This is the data drawn directly from the sensor sites in your camera in a non-interpolated form (Bayer pattern form). For most Raw cameras, this image data is captured in either 12–or 14-bit per pixel color depth. This color depth provides substantially more colors and tones to work with when editing and enhancing than the standard 8-bit JPEG or TIFF camera file.

The importance of DNG
No discussion about Raw files is complete without mentioning the importance of Adobe’s Digital Negative format or DNG. As we have mentioned (and will see throughout the book) capturing in Raw has many advantages for photographers, offering them greater control over the tone and color in their files, but there is only one standard available for the Raw files. One problem is that each camera manufacturer has their own flavor of the file format.

Raw files can be converted to the DNG format either at time of import via the Photo Downloader, when saving from Adobe Camera Raw or batches of images converted via the free DNG converter utility.
Adobe developed the DNG or Digital Negative format to help promote a common Raw format that can be used for archival as well as editing and enhancement purposes. As well as including output DNG options in Photoshop, Lightroom and Photoshop Elements, Adobe provides a free DNG converter that can change proprietary Camera Raw formats to DNG. The converter can be downloaded from www.adobe.com. Also files imported into Bridge with the Adobe Photo Downloader can be automatically converted to DNG on the fly (during the transfer process).
In addition to providing a common Raw file format, the DNG specification also includes a lossless compression option which, when considering the size of some Raw files, helps to reduce the space taken up by the thousands of images that photographers accumulate. The specification includes the ability to embed the original proprietary capture file (e.g. .nef, .crw, .arw etc.) if required. Also all development settings applied to the photo are self-contained within the DNG file instead of being stored in an extra file (called a sidecar file) that is linked with the original Raw file.
Synchronizing development settings
Archiving is one reason to switch to using the DNG format but by far the most important reason to use DNG is that it makes the synchronizing of development settings between Raw enabled editing programs such as Adobe Camera Raw and Photoshop Lightroom easier.
Preparing your system to use Raw files
One of the difficulties when working with Raw files is that sometimes the computer’s operating system is unable to display thumbnails of the images when viewing the contents of folders or directories. When using Windows XP it was necessary to install Microsoft’s Raw Image Thumbnailer and Viewer utility before the operating system was able to recognize, and display, Raw files. The system was slow and most users reverted to employing Bridge as the main way they viewed their files.
Now Windows users are migrating to the Windows 7 or Vista operating system. Recognizing that Raw files are a key component of the photographer’s workflow, Microsoft has taken a different approach to the problem in its latest operating system offering. In creating a more ‘Raw aware’ operating system, Microsoft has made use of a structure where the various camera manufacturers supply their own CODECs (Compression Decompression drivers) to be used with their particular type of Raw files inside Windows 7 or Vista.
In this approach the user has to install the CODEC for the camera that he or she uses before they are able to view their images in the system folders or directories. This process is also needed to view thumbnails of your DNG files as well. Though a little troublesome to start with, as you need to install CODECS for all the cameras you use or have used in the past, this approach will hopefully ‘future proof’ the operating system’s support for Raw files. Supporting the latest camera, or Raw file type, is a simple upgrade installation of the latest CODEC from the manufacturer. Use the following steps as a guide for Raw enabling your own Windows 7 or Vista machine.
Locate the CODEC – Step A
Start by searching the internet, or your camera manufacturer’s support site, for the specific Windows 7 or Vista CODEC that supports your Raw files. Once located, download, and in some cases extract or decompress, the files to your desktop ready for installation.

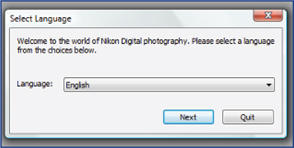
Follow the instructions – Step B
Next follow the install instructions. Here I am installing the Nikon Raw CODEC for Vista. As part of the process, the user is required to input location and language selections.
Reboot the computer – Step C
As the CODEC forms part of the file processing functions of the operating system it may be necessary to reboot (turn off and turn back on again) your computer after installing the software.

Test the install – Step D
After rebooting check to see that the CODEC is functioning correctly by displaying an Icon View of an image folder that you know contains Raw files. You should see a series of thumbnails representing your image files.

What about Mac machines?
The ability to display thumbnails of Raw files in the Macintosh operating system is driven mainly by the Preview and iPhoto utilities. Ensuring that these programs are always up to date will help guarantee that the latest camera formats are supported by the system and thumbnails and previews are displayed in the computer’s browser windows.
The need for enhancement
Every digital capture or scanned image should be enhanced further so that it may be viewed in its optimum state for the intended output device. Whether images are destined to be viewed in print or via a monitor screen, the image usually needs to be resized, cropped, retouched, color-corrected, sharpened and saved in an appropriate file format. The original capture will usually possess pixel dimensions that do not exactly match the requirements of the output device. In order for this to be corrected the user must address the issues of ‘Image Size’, ‘Resampling’ and ‘Cropping’.
To end up with high-quality output you must start with the optimum levels of information that the capture device is capable of providing. The factors that greatly enhance final quality are:
- A ‘subject brightness range’ that does not exceed the exposure latitude of the capture device (the contrast is not too high for the image sensor).
- Using a low ISO setting to capture the original subject.
- The availability of 16 bits per channel scanning or the camera Raw file format.
Optimizing image quality
In the next section of this chapter we will step our way through a typical digital capture workflow using Raw files. We will focus on the standard adjustments made to all images when optimum quality is required without using any advanced techniques. Standard image adjustments usually include the process of optimizing the color, tonality and sharpness of the image. With the exception of dust or blemish removal, these adjustments are applied globally (to all the pixels). Most of the adjustments in this chapter are ‘objective’ rather than ‘subjective’ adjustments and are tackled as a logical progression of tasks. Automated features are available for some of these tasks but these do not ensure optimum quality is achieved for all images. The chapter uses a ‘hands-on’ project to guide you through the steps required to achieve optimum quality.
Save, save and save
First, good working habits will prevent the frustration and the heartache that are often associated with the inevitable ‘crash’ (all computers crash or ‘freeze’ periodically). As you work on an image file you should get into the habit of saving the work in progress and not wait until the image editing is complete. It is recommended that you use the ‘Save As’ command and continually rename the file as an updated version. The Photoshop (PSD) file format should be used for all work in progress. Before the computer is shut down, the files should be saved to a removable storage device or burnt to a CD/DVD. In short, save often, save different versions and save backups. Also when working with programs that make use of Library or Catalog structure such as the system used in Lightroom, be sure to back-up this database as well.
Stepping back
Digital image editing allows the user to make mistakes. There are several ways of undoing a mistake before resorting to the ‘Revert’ command from the File menu or opening a previously saved version. Photoshop allows the user to jump to the previous state via the Edit > Undo command (Command/ Ctrl + Z). The user can ‘Step Backward’ through several changes by using the keyboard shortcut Ctrl + Alt + Z (PC) or Command + Option + Z (Mac). Alternatively, ‘Histories’ allows access to any previous state in the History palette without going through a linear sequence of undos.
Advantages and disadvantages of 16-bit editing
When the highest quality images are required there are major advantages to be gained by starting off the editing process in ‘16 Bits/Channel’ mode. In 16 bits per channel there are trillions, instead of millions, of possible values for each pixel. Spikes or comb lines, that are quick to occur while editing in 8 bits per channel, rarely occur when editing in 16 bits per channel mode. Thankfully, cameras capable of Raw capture record their images in either 12 or 14 bits per channel (which are then saved in a 16 bits per channel file) which means that Raw shooters get the advantages of high-bit capture inherently.
The disadvantages of editing in 16 bits per channel are:
- Not all digital cameras are capable of saving in the Raw format.
- The size of file is doubled when compared to an 8 bits per channel image of the same output size and resolution.
- Some editing features (including many filters) do not work in 16 bits per channel mode.
- Only a small selection of file formats support the use of 16 bits per channel.

Comb lines that appear in the histogram will usually disappear if editing in a 16 bits per channel file.
Choosing your bit depth
It is preferable to make all major changes in tonality or color to the Raw file in Adobe Camera Raw (ACR). This ensures that the enhancement steps are performed on high-bit data. Using a Smart workflow involving embedded Raw files the decisions about depth and space can be further delayed as we have the option of re-opening the file in ACR and adjusting the color and tone at 12 or 14 bits and changing the gamut to accommodate a larger or small gamut output device. Non-Raw images can be converted from 8-bit (Image > Mode > 16 Bits/Channel) or captured in 16-bit (the preferred choice). Most scanners now support 16 bits per channel image capture with many referring to the mode as 48-bit RGB scanning. Some offer 14 bits per channel scanning but deliver a 48-bit image to Photoshop. Remember, you need twice as many megabytes as the equivalent 8-bit image, e.g. if you typically capture 13.2 megabytes for an 8 × 10 @ 240 ppi you will require 26.4 megabytes when scanning in 16 bits per channel.
Note > Photoshop also supports 32 Bits/Channel editing which is primarily used for editing images with a high dynamic range (see Montage Projects – High Dynamic Range).
Foundation Project 1
Follow the eleven steps over the following pages in order to learn how to create one image optimized for print and one image optimized for web viewing from the same image file.
Image capture – Step 1
Capture a vertical portrait image using soft lighting (low-contrast diffused sunlight or window lighting would be ideal). The image selected should have detail in both the highlights and shadows and should have a range of colors and tones. An image with high contrast and missing detail in the highlights or shadows is not suitable for testing the effectiveness of the capture or output device. An example file for this project is located on the book’s DVD.
Pro’s Tips for Best Capture
To achieve optimum image quality ensure as many of the following steps as possible are carried out.
- RSet the camera’s ISO setting to no more than double the base level ISO of the sensor (typically 100 or 200 ISO for most digital cameras). Alternatively use a low ISO film, e.g. 100 ISO.
- Avoid using either the minimum or maximum apertures on the camera lens.
- Mount the camera on a sturdy tripod and switch off any image stabilization, steady-shot or vibration reduction settings.
- Use a remote shutter release or self-timer to release the shutter.
- Ensure accurate exposure metering and setting of the camera’s shutter speed and aperture.
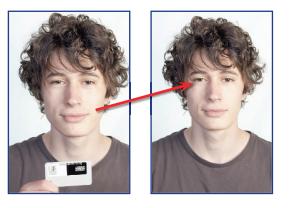
- Match the camera’s white balance setting for the light source that is illuminating the subject. If need be, use a custom white balance setting in mixed lighting to ensure cast-free capture. For best results though, you should create a custom white balance setting for your location and lighting setup using a photographer’s gray card, or a white balance reference card, such as WhiBal or X-rite’s ColorChecker Passport. Consult the camera manual to see how you can create a custom white balance. Then capture a ‘reference’ image using this custom white balance setting (hold the photographers gray card or a white balance reference card just below the face and angled towards the dominant light source.
Important > Do not photograph in a location where vibrant or bright colors are close to your subject (this could result in a strong color cast).
- Check the lens aperture is stopped down (but not to f/22) and the ISO is low (no more than double the base ISO of the sensor – the base ISO of a DSLR camera is usually 100 or 200 ISO).
- Check image is sharp and shutter speed is 1/60 second or faster (mount your camera on a tripod and use a remote release, timed release or ‘tethered capture’ – see below for details).
Note > If your shutter speed is slower than 1/60 second, check your aperture is not stopped down excessively. Your aperture must, however, be stopped down at least one full stop from maximum aperture. Note that most cameras adjust aperture settings in half or one-third stop increments. One adjustment of the command/ control dial is therefore not one full stop. Choose a brighter location if required. Using shutter speeds slower than 1/60 second can result subject blur.
- Check for overexposure (clipping) or underexposure on the camera’s LCD panel (using the histogram). If shadows are pressed against the left hand wall of the histogram use a reflector, or diffuse the light source to reduce subject brightness range or choose an alternative location or time of day.
- Create an additional portrait image that does not contain the gray card or white balance reference but uses the same custom white balance setting as the reference image.
Digital capture via a digital camera
Images can be transferred directly to the computer from a digital camera or from a card reader if the card has been removed from the camera. Images are usually saved on the camera’s storage media as JPEG or Raw files. If using the JPEG file format to capture images you should choose the high or maximum quality setting whenever possible to select low levels of image sharpening, saturation and contrast in the camera’s settings to ensure optimum quality and editing flexibility in the image-editing software. If the camera has the option to choose Adobe RGB instead of sRGB as the color space this should also be selected if one of the final images is destined for print. For best results we suggest to always capture in Raw.
Tethered Image Capture
Many DSLR cameras now offer the option of capturing Raw photos while the camera is connected to a computer. Some photographers would never need, nor see the benefits of, shooting in this fashion; for their chosen area of speciality the added burden of dragging around a laptop computer as well as all their camera gear is a complication that they can well do without. However, for studio, product, architectural, commercial and even some landscape photography the ability to preview, and even process, the photos captured almost immediately on a large screen ensures better results.

The utility software that comes bundled with most midto high-end DSLR cameras and medium format camera backs does an admirable job of providing the required software link between camera and computer. The physical connection is generally provided via a USB or Firewire connection, although some models can now connect wirelessly using a pretty standard setup. The ‘remote capture’ software supplied by the camera companies ranges from something as simple as a dialog containing a shutter release button right up to a full control panel that allows focus, metering, drive and exposure control right from your desktop. Once on the desktop the files can be imported into Bridge and even displayed in Adobe Camera Raw.
Lightroom 3 provides a tethered solution
Lightroom 3 also provides a tethered shooting solution and at the time of release provided support for recent Canon and Nikon models. So if you are using a combined workflow that brings together the management, processing and presentation abilities with the editing power of Photoshop then you can take advantage of this new feature.

Tethered shooting advantages
There are several advantages for viewing pictures in this type of setup:
- You can review images on a larger, higher resolution camera LCD screen at the time of shooting either via the remote capture software or after downloading into Bridge,
- Critical exposures can be checked closely using histograms derived from the full high-bit Raw image data rather than a processed JPEG, as is the case with most back of camera histograms, and
- It is possible to quickly apply some post-capture processing to the images when in Bridge to display the style of the treatment that will be applied to the final photos. This is a great way to show a client how the images will look seconds after they are shot.
Use the following steps to set up for tethered shooting:
Install camera drivers – Step A
Before connecting the camera ensure that you have installed any camera drivers that were supplied with the unit. These small pieces of software ensure clear communication between the camera and computer and are usually installed along with other utility programs such as a dedicated browser (e.g. Nikon View, Canon’s ZoomBrowser/ImageBrowser or Sony’s Image Data Suite) and camerabased Raw conversion software (e.g. Nikon Capture, Canon’s Digital Photo Professional or Sony’s Remote Camera Control). Follow any on-screen installation instructions and, if necessary, reboot the computer to initialize the new drivers.
Connect the camera – Step B
The next step is to connect the camera to the computer via the USB/Firewire cable or wireless network. Make sure that your camera is switched off, and the computer is on, when plugging in the cables. For the best connection and the least chance of trouble it is a good idea to connect the camera directly to a computer USB/Firewire port rather than a hub.
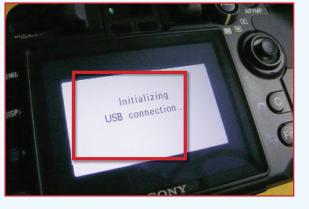
Check the connection – Step C
With the cables securely fastened, switch the camera on and, if needed, change to the PC connection mode. Most cameras have two connection modes – one that uses the camera as a card reader (often called ‘Mass Storage’ mode) and another that connects the device as a camera (generally referred to as ‘PTP’ mode but sometimes also called Remote PC mode). The remote capture software or tethering utility will work with one of these modes only. Most cameras no longer require a change from whatever mode is selected by default, but check with your camera manual just in case. If the drivers are installed correctly the computer should report that the camera has been found and the connection is now active and a connection symbol (such as PC) will be displayed on the camera. If the computer can’t find the camera try reinstalling the drivers and, if all else fails, consult the troubleshooting section in the manual. To ensure a continuous connection use fully charged batteries or an AC adaptor.
Start the remote shooting software – Step D
FOR CAMERA-BASED SOFTWARE: With the connection established you can now start the remote capture software (e.g. Nikon Capture Camera Control, Canon’s Digital Photo Professional or Sony’s Remote Camera Control). With some models the action of connecting the camera will automatically activate the software. In other cases it will be necessary to start the software and wait for the program to locate the attached camera. Most versions of these utilities provide more than just a means of releasing the shutter from the computer and instantly (well nearly, it does take a couple of seconds to transfer big capture files) viewing captured photos. The utilities contain options to set most camera functions including items such as shutter speed, ISO, aperture, capture format, contrast, saturation and white balance controls.

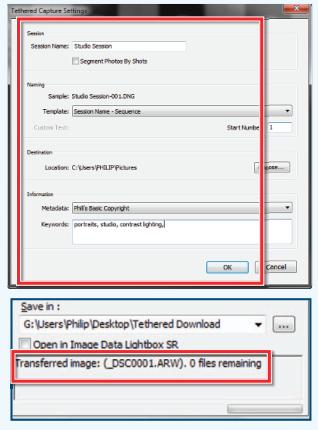
FOR LIGHTROOM 3 USERS: With the connection between camera and computer established, Lightroom users need to adjust some basic settings before starting to shoot. To do this you need to launch Lightroom 3 and choose File > Tethered Capture > Start Tethered Capture. This will display the Tethered Capture Settings dialog box. Add a name for the shooting session and then choose a naming scheme for individual photos from the options in the drop-down list. Next click the Choose button in the Destination section to navigate to the folder that you want to use to save the captured files. Select the metadata to be recorded with each photo from the entries in the drop-down menu. You can easily create a custom entry by clicking the New option and adding the required details before saving this set of values as a new preset. Finally, type any keywords that you want added to the photos (separated by a comma) in the box at the bottom of the dialog. Click OK to save the settings and display the Tethered Capture widget.

Guidelines for setting download options
With all these settings to play with, where do you start? Start by adjusting the download options found in the remote capture software. The four big settings are:
- Where the files are to be transferred to,
- How they are to be labeled,
- What metadata is to be added to the files during this process, and
- What happens to the file once it is transferred.
It is a good idea to create a new folder or directory for each shooting session and to select this folder as the place to download the captured files. Now choose a naming scheme that provides enough information to allow easy searching later. This may mean a title that includes date and name of shoot, a shooting session, or subject as well as a sequence number. In terms of additional metadata at the very least you should always attach a copyright statement as well as any pertinent keywords that describe the subject. If these last options aren’t available with your software then keywords can be added, and filenames changed, using the features in Bridge. Finally, you need to choose what happens to the captured files. Most users will want to transfer the pictures directly to a preview utility such as one of the browser programs, or alternatively, if you want to process the photo on the spot, you could pass the file directly to a Raw converter. One way of achieving this automatically is to set the download folder you have nominated to the Hot or Watched folder for Lightroom’s Auto Import function.
Note > This part of the process is handled automatically for Lightroom 3 users who are employing the tethered shooting option in the program.

Compose, focus and release the shutter – Step E
Now to the nuts and bolts of the capture. Most remote capture systems don’t offer a live preview feature so composing and framing is still a through the viewfinder and lens event. Some photographers adopt a shoot and review policy, preferring to capture a couple of test images and review these full size on their computer screens to check composition, focus and even exposure. Once you are happy with all your settings, release the shutter and automatically the file is captured and transferred from camera to computer.

Disconnecting the camera – Step F
Before turning the camera off or disconnecting the cable make sure that any transfer of information or images is complete. Interrupting the transfer at this point will mean that you lose files. Mac users can drag the camera volume from the desktop to the trash. It may be necessary to choose a menu option in the remote capture software to stop the tethering process. In Lightroom 3, you simply close Tethered Capture widget or choose the Stop Tethered Capture option from the File > Tethered menu. Next, Windows users should click the Safely Remove Hardware icon in the system tray (bottom right of the screen) and select Safely Remove Mass Storage Device from the pop-up menu that appears.
Downloading files – Step 2
For all photographers apart from those using a tethered shooting setup the very next step after capture is transferring the photos to your desktop machine. For this workflow we will assume that Bridge will be the center of all image management and that the Adobe Photo Downloader (APD) will be used for transferring files. You could just as easily use a system-based ‘copy’ or ‘move’ function, but APD contains inbuilt features that make the process easier and relieve you of some tasks such as renaming that you would normally have to undertake manually.
In the last chapter we looked at the basic steps involved in using APD to transfer your images so we won’t repeat them here, but instead we’ll concentrate on the other options that you may want to use to fine-tune your downloads. Most are accessed by clicking on the Advanced Dialog button in the APD dialog (see opposite for details).
Note > For Lightroom 3 users many of these options are covered when initially setting up the Tethered Capture session.
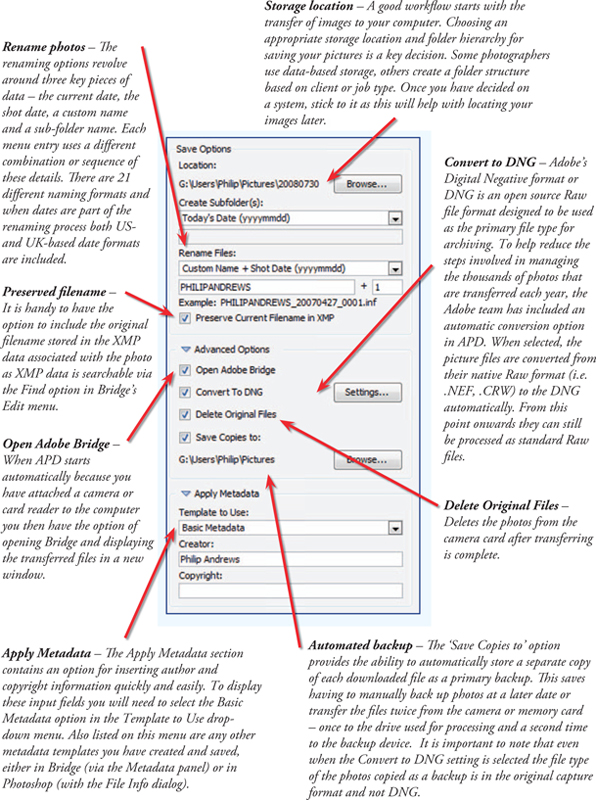
Image management – Step 3
Now I know that you are eager to get editing but a largely overlooked step in any good professional workflow is image management, sometimes called DAM (Digital Asset Management). Directly after downloading is a good time to start to manage your files. A little discipline shown at this point will save time later. As we saw in the last chapter Bridge is not just a tool for viewing your photos, it is a key technology in the managing, sorting and enhancing of those files. And this pivotal role is never more evident than when one is managing Raw files. So the next step is to add keywords to your images and then select the best photos from the group and label these with ratings.
Add keywords
Keywords are single-word descriptions of the content of image files. Most photo libraries use keywords as part of the way they locate images with specific content. The words are stored in the metadata associated with the picture. Users can allocate, edit and create new keywords (and keyword categories) using the Keywords panel in the Bridge browser and File Info dialog box in Photoshop.
New keywords (categories or sets of keywords) and sub-keywords can be added to the Keywords panel by clicking the New Sub-Keyword and New Keyword buttons at the bottom of the panel. Unwanted sets or keywords can be removed by selecting first and then clicking the Delete button. Unknown keywords imported with newly downloaded or edited pictures are stored in the panel under the Other Keywords set.

Rate and label files
One of the many ways you can organize the Raw files displayed in the Bridge workspace is by attributing a label to the picture. In CS5 the labels option is supplied in two forms – a color tag, called a Label, or star rating, called a Rating. Either or both label types can be applied to any picture. The Label tag can then be used to sort or locate individual pictures from groups of photos.

Image processing steps
The next steps are concerned with basic processing and optimizing of your photos. With the growing use of Raw files as the basis of professional capture these changes will be made to several Raw files using Adobe Camera Raw (ACR). Make sure that the ACR plug-in is the latest available by selecting Help > Updates in Bridge. In previous editions of this book we have used Photoshop for these steps; this is still possible, but would generally require the Raw file to be converted to a non-Raw format before any enhancements could be applied. The example files foundations project 1.dng, foundations project 2.dng and foundations project 3.dng located on the book’s DVD can be used to practice these steps in the absence of your own images.

Note > For readers using non-Raw formats (Jpeg and Tiff) we suggest that you still use Adobe Camera Raw as there are very real advantages to adjusting your files with the utility and it is possible to display the images in ACR by selecting the Open in Camera Raw option from the rightclick menu when selecting thumbnails in the Content panel in Bridge.

Rotating and cropping an image – Step 4
The easiest way to open a file, or files, into ACR is by selecting the image(s), right-clicking (Mac:-Ctrl Clicking) on one of the thumbnails in Bridge and then selecting Open in Camera Raw. Working with ACR in Bridge allows for faster Raw processing as the conversions take place without the need to share computer resources with Photoshop at the same time. The selected images will be displayed on the left of the dialog as thumbnails. Click onto the thumbnail containing the reference card to select the photo for editing and display it in the main workspace.
Next, if you need to you can rotate the image using either of the two Rotate buttons at the top of the workspace. If you are the lucky owner of a recent camera model then chances are the picture will automatically rotate to its correct orientation. This is thanks to a small piece of metadata supplied by the camera and stored in the picture file that indicates which way is up.
Pro’s tip: The preferences for Bridge can be adjusted so that double-clicking a thumbnail of a Raw picture will automatically open the file in Camera Raw in the Bridge workspace. If this option is not selected, then double-clicking will open the file in ACR in the Photoshop workspace.

You can fine-tune the rotation of the picture with the Straighten Tool. After selecting the tool click and drag a straight line along an edge in the photo that is meant to be horizontal or vertical. Upon releasing the mouse button ACR automatically creates a crop marquee around the photo. You will notice that the marquee is rotated so that the edges are parallel to the line that was drawn with the Straighten Tool. When you exit ACR by saving or opening (into Photoshop) the picture, the rotated crop is applied.
The crop tool in ACR can be used for basic cropping tasks as well as for cropping to a specific format. The feature works just like the regular Crop Tool in Photoshop proper, just select and then click and drag to draw a marquee around the picture parts that you want to retain. The side and corner handles on the marquee can be used to adjust the size and shape of the selected area. The crop is applied upon exiting the ACR dialog.
Custom Crop
Predefined crop formats are available from the menu accessed by clicking and holding the Crop Tool button. Also included is a Custom option where you can design your own crops to suit specific print or other outcome requirements.

In this instance, we will crop the picture to fit a standard 6:4 format, so select choose the Custom option from the Crop menu, input the 6 to 4 ratio, choose inches from the drop-down menu and then drag a vertical crop marquee around the image. Select any other tool from the ACR toolbar to apply the crop.


Note > Keep in mind that any crops you make with ACR are reversible. Just open the file back into ACR and select the Crop Tool and then hit the Esc key to remove the current crop.
Perfecting the crop
Once you have a cropping marquee located on your image you can resize the marquee with the corner handles. The marquee can be click-dragged to reposition and if the image is still a little crooked you can rotate the cropping marquee by moving the mouse cursor to a position just outside a corner handle of the cropping marquee. A curved arrow should appear, allowing you to drag the image straight. In ACR you just need to move the cursor outside the crop marquee to see the curved arrow.
Before completing the crop, you should check the entire image edge to see if there are any remaining border pixels that are not part of the image. Press Ctrl/Cmd + 0 to see all the image in the workspace and Ctrl/Cmd + to zoom in, or Ctrl/Cmd – to zoom out. Holding down the Spacebar activates the Hand Tool so that you can quickly move the window if the image is larger than the workspace. Press the ‘Return/Enter’ key on the keyboard or select another tool to complete the cropping action. Alternatively press the ‘Esc’ key on the keyboard to cancel the crop.
Color adjustments – Step 5
Unlike other capture formats (TIFF, JPEG) the white balance settings are not fixed in a Raw file. This fact provides much greater control over the colors in the photo than when such settings are fixed. ACR contains three different ways to balance the hues in your photo:
Preset changes
You can opt to stay with the settings used at the time of shooting (‘As Shot’) or select from a range of light source-specific values in the White Balance drop-down menu of ACR. For best results, try to match the setting used with the type of lighting that was present in the scene at the time of capture. Or choose the Auto option to get ACR to determine a setting based on the individual image currently displayed.

Manual adjustments
If none of the preset White Balance options perfectly matches the lighting in your photo then you will need to fine-tune your results with the Temperature and Tint sliders (located just below the Presets drop-down menu). The Temperature slider settings equate to the color of light in degrees kelvin – so daylight will be 5500 and tungsten light 2800. It is a blue to yellow scale, so moving the slider to the left will make the image cooler (more blue) and to the right warmer (more yellow). In contrast the Tint slider is a green to magenta scale. Moving the slider left will add more green to the image and to the right more magenta.

The White Balance Tool
Another quick way to balance the light in your picture is to choose the White Balance Tool and then click onto a part of the picture that is supposed to be neutral gray or white. This approach is perfect in our situation as we have included a reference card in the image. When you click on the gray card (or other neutrals that are in the photo) ACR will automatically set the Temperature and Tint sliders so that the selected picture part becomes a neutral gray and in the process the rest of the image will be balanced. So in the example photo use the White Balance Tool to create a custom white balance setting in ACR by clicking on the gray card or white balance reference. If your custom white balance created in camera was accurate you should not see a big change. If the color temperature changes more than 200° kelvin then your custom white balance in camera is not accurate. This may require a re-shoot.

Note > For best results when not working with a reference card select lighter tones with the tool, ensure that the area contains detail, and is not a blown or a specular highlight (reflected light source with no details).

Both the Vibrance and Saturation sliders control the strength of the colors in your photos.
Other ACR color controls
As well as options for adjusting the white balance in a photo, Adobe Camera Raw also contains two sliders that are concerned with controlling the strength of the hues in your pictures – Vibrance and Saturation.
Vibrance
The Vibrance slider, like the Saturation control, increases the vividness of the colors in photos but applies the changes selectively to only those hues that are desaturated in the first place. This means that the slider targets the more pastel tones and doesn’t boost those colors that are already rich and vibrant. In addition, the Vibrance slider tends to safeguard Caucasian skin tones when it is applied.
Saturation
In contrast the Saturation slider increases the saturation, or vividness, of all the colors in a photo irrespective of their original value. These factors make the Vibrance slider perfect when working with portraits or photos where selective adjustment is needed. The Saturation slider, on the other hand, is very useful for bumping the color of the whole photo up a few notches. Moving the slider all the way to the left creates a grayscale image devoid of color, but don’t be tempted to create monochromes in this way as ACR contains more appropriate controls for this process. See the Raw Processing chapter for more details about ACR-based grayscale conversions.
Note > Adobe Camera Raw contains a variety of other color controls that are capable of adjusting specific color ranges. These and other more sophisticated ACR features are discussed in the next chapter – Raw Processing.
Tonal adjustments – Step 6
The starting point to adjust the tonal qualities of EVERY image is the six slider controls (Exposure, Recovery, Fill Light, Blacks, Brightness and Contrast) in the Basic pane of ACR (or the ‘Levels’ dialog box in Photoshop). It is important to perform tonal adjustments with reference to some objective feedback about the nature of the changes you are making. For this reason the Histograms located at the top right of the ACR workspace (or inside the Levels dialog) should always be consulted when enhancing your photos. Features like Brightness/ Contrast, that don’t include this objective feedback, should never be used.

(1) Shadows. (2) Midtones. (3) Highlights. (4) Clipped Highlight Areas.
Histograms
Essentially the histogram is a graph of the pixels in your photo. The horizontal axis of the histogram displays the brightness values from left (darkest) to right (lightest). The vertical axis of the histogram shows how much of the image is found at any particular brightness level. If the subject contrast or ‘brightness range’ exceeds the latitude of the capture device or the exposure is either too high or too low, then tonality will be ‘clipped’ (shadow or highlight detail will be lost and no amount of adjustment will recover it). ACR’s histogram also displays the information of each channel (red, green, blue) that make-up the photos as colored parts of the graph and include clipping warning features in the top corners of the dialog.
During the capture stage it is often possible to check how the capture device is handling or interpreting the tonality and color of the subject. This useful information can often be displayed as a ‘histogram’ on the LCD screen of high-quality digital cameras, on the screen of a tethered computer, or in the scanning software during the scanning process. The histogram displayed shows the brightness range of the subject in relation to the latitude or ‘dynamic range’ of your capture device’s image sensor. Most digital camera sensors have a dynamic range similar to color transparency film (around five stops) when capturing in JPEG or TIFF. This may be expanded beyond seven stops when the Raw data is processed manually.
When capturing using a tethered workflow, the accuracy of the histogram is increased in that you are able to view, and base your exposure decisions on, a graph of the captured Raw file (displayed in ACR) rather than a processed JPEG as is the case for many back of camera LCD histograms.
Note > You should attempt to modify the brightness, contrast and color balance at the capture stage to obtain the best possible histogram before editing begins in the software.
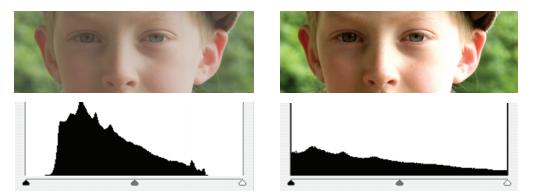
Optimizing tonality
In a good histogram, one where a broad tonal range with full detail in the shadows and highlights is present, the information will extend all the way from the left to the right side of the histogram. The histogram on the left (below) indicates missing information in the highlights (right side of histogram) indicating overexposure. The histogram on the right indicates a small amount of ‘clipping’ or loss of information in the shadows (left side of histogram) or underexposure.

(ACR histograms indicating image is either too light (left) or too dark (right).
Brightness
If the digital file is too light a tall peak will be seen to rise on the right side (level 255) of the histogram. If the digital file is too dark a tall peak will be seen to rise on the left side (level 0) of the histogram.
Solution: Decrease or increase the exposure/brightness in the capture device.
Levels histograms indicating image either has too much contrast or not enough.
Contrast
If the contrast is too low the histogram will not extend to meet the sliders at either end. If the contrast is too high a tall peak will be evident at both extremes of the histogram.
Solution: Increase or decrease the contrast of the light source used to light the subject or the contrast setting of the capture device. Using diffused lighting rather than direct sunlight or using fill flash and/or reflectors will ensure that you start with an image with full detail.

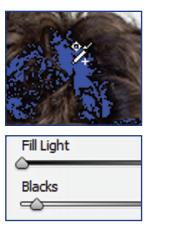
Previewing clipping
One of the critical areas of image adjustment is ensuring that any changes to tone or color don’t clip captured details in either the shadow or highlight areas of the photo. In ACR the preview image in conjunction with the histogram form a key partnership in providing this clipping feedback to the user when they are making changes to the photo. By activating the highlight and shadow clipping warnings in the histogram (click on the upwards-facing arrows in the top left, for shadows, or top right, for highlights of the histogram), areas being clipped are displayed in the preview image. Clipped shadow details are displayed in blue and clipped highlights in red. As well as the warning in the preview image, the actual clip warning arrows in the histogram area reflect the color of the channels (red, green, blue or combinations thereof ) being clipped. If details for more than one channel are being clipped then the arrow turns white. If no details are being clipped then the arrow is black.
Optimizing a histogram after capture
The final histogram should show that pixels have been allocated to most, if not all, of the 256 levels. If the histogram indicates large gaps between the ends of the histogram and the sliders (indicating either a low-contrast scan or low-contrast subject photographed in flat lighting) the subject or original image should usually be recaptured a second time. In situations when this is not possible use the following ACR controls to adjust the look of the histogram and therefore the tones in the photo.
Setting the white point
To start, adjust the white point with the Exposure slider. Moving the slider to the right lightens the photo and to the left darkens it. The settings for the slider are in f-stop increments (or EVs), with a +1.00 setting being equivalent to increasing exposure by 1 f-stop. Use this slider to place or set the white tones. Your aim is to lighten the highlights in the photo without clipping (converting the pixels to pure white) them. To do this interactively, hold down Alt/ Option while moving the slider. This action previews the photo with the pixels being clipped against a black background. Move the slider back and forth until highlights with detail start to clip; the aim is to lighten the highlights where you want to preserve detail without clipping and losing that detail.

Note > An alternative to holding down the Alt/Opt key is to keep an eye on the clipping warning triangles at the top of the histogram. When they are black no clipping is occurring, when colored the channel containing these pixels is being clipped and when white multiple channels are being clipped. Clicking the warning triangles (so that they are surrounded by a white rectangle) activates the clipping warning in the preview without the need to hold down the Alt/Opt key.
Adjusting the blacks (shadows)
The Blacks slider (previously Shadows) performs a similar function with the shadow areas of the image. Again the aim is to darken these tones but not to convert (or clip) delicate details to pure black. Just as with the Exposure slider, the Alt/Option key can be pressed or the clipping warning triangles consulted, while making Blacks adjustments to preview the pixels being clipped.

The Recovery slider is designed as a fine control for the highlight tones in your photo.
Tweaking problem areas
When a photograph is overexposed, one of the consequences can be that the lighter tones in the image lose detail and are converted to pure white. As we have seen, this process is called clipping. Digital images are created with details from three color channels (red, green, blue). In situations of slight overexposure, when only one channel is clipped, it is possible to recreate the lost detail with the highlight information from the other two (non-clipped) channels. The Recovery slider attempts to recreate lost highlight details in such cases. Moving the slider to the right progressively increases the degree of highlight recovery. The Fill Light slider is used to lighten the darker tones in a picture without affecting the middle to highlight values. Use this control to brighten backlit subjects or boost shadow details. The beauty of this control is that the changes it makes do not generally impact on mid to highlight values.
Brightness changes
The next control, moving from top to bottom of the ACR dialog, is the Brightness slider. At first glance the changes you make with this feature may appear to be very similar to those produced with the Exposure slider but there is an important difference. Yes it is true that moving the slider to the right lightens the whole image, but rather than adjusting all pixels the same amount the feature makes major changes in the midtone areas and smaller jumps in the highlights. In so doing the Brightness slider is less likely to clip the highlights (or shadows) as the feature compresses the highlights as it lightens the photo. This is why it is important to set white and black points first with the Exposure and Blacks sliders before fine-tuning the image with the Brightness control. That said, always make sure that your clipping warnings are activated when making tonal changes as this will mean that any clipping that occurs as a result of your adjustments will be clearly displayed in the preview.
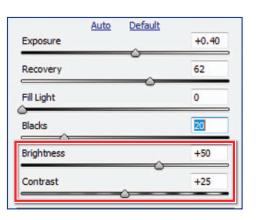
Increasing/decreasing contrast
The last tonal control in the dialog, and the last to be applied to the photo, is the Contrast slider. The feature concentrates on the midtones in the photo, with movements of the slider to the right increasing the midtone contrast and to the left producing a lower contrast image. Like the Brightness slider, Contrast changes are best applied after setting the white and black points of the image with the Exposure and Blacks sliders.
More sophisticated tonal control
When the overall tonality has been optimized using either the sliders in ACR, or the Levels feature in Photoshop, the midtone contrast and appearance of the details in the shadow and highlight areas may require further work. One of the limitations of Photoshop’s Levels adjustment feature is that it cannot focus its attention on only the shadows or the highlights, e.g. when the slider is moved to the left both the highlights and the shadows are made brighter. More control is available with the four key tonal sliders in ACR (Exposure, Recovery, Fill Light and Blacks) where specific attention can be paid to these areas.
The Curves feature in ACR has two different modes for adjusting how the tones in your images are spread between black and white. The Point mode (immediate right) works in a similar way to the curves feature in Photoshop whereas the Parametric mode (far right) provides four sliders that can be used to tweak specific tonal ranges.

More targeted adjustments can be achieved using the Curves adjustment features found in both ACR (Tone Curve tab) and Photoshop (Image > Adjustments > Curves). Curves allows the user to target tones within the image and move them independently of other tones within the image, e.g. the user can decide to make only the darker tones lighter while preserving the value of both the midtones and the highlights. It is also possible with a powerful editing feature such as Curves to move the shadows in one direction and the highlights in another. In this way the contrast of the image could be increased without losing valuable detail in either the shadows or the highlights. Slightly different approaches are taken with the feature in ACR and Photoshop. See ‘Advanced Retouching – Projects 1 and 2’ for more information on using Curves in Photoshop. Adobe Camera Raw provides two different Curve modes – Parametric and Point.
Parametric: This version of the ACR Curves feature provides four slider controls (Highlights, Lights, Darks and Shadows) as the means to adjust the shape of the curve. The slider controls tend to offer a fast way to manipulate different parts of the curve.
Point: The Point mode works in a similar way to Curves in Photoshop. Control points can be added to the different parts of the curve. These points can then be pushed and pulled to change the curve shape. Points can also be used to anchor specific tonal values so that they don’t change while altering other parts of the curve. Holding down the Ctrl/Cmd key allows the user to place a control point on the curve by clicking on a specific part of the preview image. Using the Color Sample Tool it is also possible to add a sample entry by clicking on a part of the photo. This displays RGB values of the selected point at the top of the ACR dialog.

The shape of the curve determines how the tones are distributed within the photo. To produce the following standard enhancements replicate the curve shapes you see here by click-dragging points on the curve or using the sliders in Parametric mode.
(1) Lighten midtones.
(2) Darken midtones.
(3) Lighten highlights but watch out for possible clipping as seen here.
(4) Darken highlights.
(5) Lighten shadows.
(6) Darken shadows but again be careful not to clip as is the case in this example.
(7) Decrease contrast.
(8) Increase contrast.
(9) Default or Linear curve.
Note > In practice it is not a good idea to move the white and black points in Curves after they have been accurately established using the Blacks and Exposure sliders.

Target ing key values
To ensure highlights do not ‘blow out’ and the shadows do not print too dark it is possible to target, or set specific tonal values, for the highlight and shadow tones within the image using the Color Sample Tool in ACR or the eyedroppers (found in Photoshop’s Levels and Curves dialog boxes). The tones that should be targeted are the lightest and darkest areas in the image with detail. The default settings of these eyedroppers are set to 0 (black) and 255 (white). These settings are only useful for targeting the white paper or black film edge. After establishing the darkest and lightest tones that will print using a step wedge (see ‘Digital Printing’) these target levels can be used as a guide with the Color Sample Tool display or assigned to the Photoshop eyedroppers.
Here we will use some generic values. When using ACR look for maximum RGB values around 250 for highlights and close to 5 for shadows. Make sure that you ignore specular highlights when adjusting highlight areas. These areas are generally reflections of light sources and can have a value of 255 as they typically contain no texture. Now unless you are targeting a neutral tone, the three color values will be different; make sure that the highest, for highlights, and lowest, for shadows, are close to these targets (in Photoshop we use a Brightness setting, taken from the HSB readout, of between 4 and 8 for shadows and 92 and 99 for highlights).
Setting target values in Adobe Camera Raw
To help with keeping an eye on how changes are affecting key parts of the picture, ACR has a special Color Sample Tool which can be used to display the RGB values of these picture parts. Use the following steps to use the Color Sample Tool:
- Start by selecting the tool from the toolbar at the top of the workspace. Now move the tool around the image until you find the darkest part of the photo. To help with this process, turn on the clipping warnings and temporarily drag the Black slider to the right until you start to see clipping occur in the preview. The parts of the picture where the clipping is first noticeable will be the darkest part of the image.
- Click the Color Sample Tool on this picture part. Notice that a small crosshairs icon has been placed on the picture and an entry area is now displayed below the toolbar and a new RGB entry is present. Now adjust the Black and/or Fill Light sliders until the RGB display shows 5 as the lowest of the values.
- With the highlight clipping warning selected, drag the Exposure slider to the right until the preview shows a part of the photo that is being clipped. Place a second Color Sample Tool on this part of the photo. Using the Exposure and Recovery sliders adjust the picture part until the highest of the three values is around 250.

Note > Because the ACR Color Sample Tool displays RGB values, the targeted clipping areas might not necessarily be the blackest or whitest parts of the picture.
Cleaning an image – Step 7
The primary tools for removing blemishes, dust and scratches are the Spot Removal brush in Adobe Camera Raw and the ‘Clone Stamp Tool’, the ‘Healing Brush Tool’ and the ‘Spot Healing Brush Tool’ in Photoshop. The process for using ACR’s Spot Removal tool borrows from both the Clone Stamp and Spot Healing Brush Tools in Photoshop.
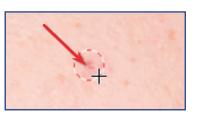
The tool contains two components: a circle that indicates the target of the retouching, which is generally placed over the mark to remove, and a circle to select the source area that will be used as a reference for the color, tone and texture that will be painted over the mark. Sound familiar? It should – this is how the Clone Stamp Tool works. The difference is that with ACR’s Spot Removal tool, the target area is selected first by click-dragging the cursor to the size of the mark. ACR then automatically searches for a suitable source point in the nearby pixels.

For ease of recognition the target circle is colored red and the source circle is a green hue. Both circles are linked with a straight line to indicate which source belongs to which target. For the majority of the time ACR does a pretty good job of selecting a source point, but there will be occasions when you may want to choose your own. This is a simple matter of click- dragging the source circle to a new location. The same technique can be used for moving the target circle. To change the target size use the Radius slider in the side bar at the right of the dialog. Holding down the Alt/Option key while clicking on the target circle deletes or cuts the retouching entry.
To Heal or Clone
The tool works in two modes – Heal and Clone. The Heal mode uses the technology found in the Spot Healing Brush to help match texture and tone of the source area to the target surrounds.

The Clone option gives more weighting to the specific qualities of the source area when ovepainting the mark.
1. Start the process by ensuring that the preview window is enlarged to at least 100%. Select the magnification level from the pop-up menu on the bottom left of the dialog. Viewing the image zoomed in helps guarantee accuracy when specifying both target and source areas and presents a more precise preview of the results. Switch to the Hand Tool using the H keyboard shortcut, to click-drag the preview area around the photo. You can switch back to the Retouch Tool by pressing the letter B key.
2. Now drag the preview until you locate an area to be retouched. Select the Spot Removal tool from the ACR toolbar at the top of the dialog. By default the tool draws from the center, so move the pointer over the middle of the mark and click-drag the circle until it encompasses the blemish. This action sets the red target circle or the area to be retouched.
3. Unlike the situation with the Clone Stamp or Healing Brush Tools there is no need to select the sample area separately. Adobe Camera Raw automatically searches the surrounds of the target area for a likely source and draws a corresponding circle attached with a single straight line. The source circle is colored green to distinguish it from the red target circle. If the source circle has been positioned incorrectly or is providing less than acceptable results in the target area then simply click-drag the circle to a new location.

4. Once the target and source have been positioned, the retouching entry can be modified in a couple of different ways. The size of the target circle can be adjusted by clicking onto the circle and then changing the Radius setting in the tool’s options contained in the right panel of the dialog (use the up and down arrows for 1 pixel changes). The mode used for retouching can be switched between Heal (the technology used by the Spot Healing Brush) and Clone (which simulates the way that the Clone Stamp Tool functions) using the drop- down menu also contained here. The Opacity option can be used to let more of the spot details below show through the correction.

5. Individual retouching entries can be removed or deleted altogether by cutting the entry. With the Spot Removal tool selected, hold down the Alt/Opt key while positioning the cursor over either the source or target circles of the retouching entry. The cursor will switch shapes to a pair of scissors (see aside). Clicking the mouse button will then delete the entry.

6. Once you have positioned and adjusted all retouching entries for a given image you can preview the results, without the target and source circles, by deselecting the Show Overlay setting in the tool’s options. To re-display the circles, reselect the option.
7. As all retouching entries created in Adobe Camera Raw are non-destructive they can be removed at any time, even if the file has been saved and reopened. To remove all retouching entries for the current image, select the Clear All button in the Retouch Tool options bar.
Sharpening an image – Step 8
Sharpening the image is the last step of the editing process. Many images benefit from some sharpening even if they were captured with sharp focus. The sliders in Adobe Camera Raw’s Detail pane and Photoshop’s ‘Unsharp Mask’ and the ‘Smart Sharpen’ filters from the ‘Sharpen’ group of filters are the most sophisticated and controllable of the sharpening filters. They are used to sharpen the edges by increasing the contrast where different tones meet. The pixels along the edge on the lighter side are made lighter and the pixels along the edge on the darker side are made darker.
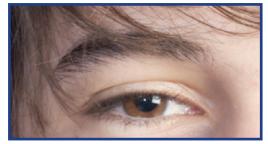
BEFORE SHARPENING
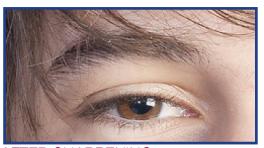
AFTER SHARPENING
In the latest versions of ACR the sharpening controls have been increased to four from a single slider a couple of versions ago. Where originally users were only able to control the Amount of sharpening, now it is possible to manipulate how the effect is applied. Sharpening effects are controlled via the following sliders – Amount, Radius, Detail and Masking.
The Amount slider controls the strength of the sharpening effect. Move the slider to the right for stronger sharpening, to the left for more subtle effects. The Radius slider determines the number of pixels from an edge that will be changed in the sharpening process. The Detail slider is used to increase the local contrast around edge parts of the picture. An increase makes the picture’s details appear sharper. The Masking control channels the sharpening effect through an edge locating mask.

Both the Detail and Masking sliders are used to target the sharpening more precisely in the image. Increasing the Detail value will raise the local contrast around smaller picture parts.
Reducing the value will decrease the appearance of haloes around these areas. Moving the Masking slider to the right gradually isolates the edges until the sharpening is only being applied through the most contrasty sections of the photograph.

Previewing sharpening effects
With the preview at 100% magnification, holding down the Alt/Opt key will display different previews for each of the Sharpening sliders. The preview for the Amount slider shows the sharpening applied to the luminosity of the image. Both Radius and Detail sliders preview the value of the slider and the Masking option displays the mask being used for restricting where the sharpening is being applied. Remember the black areas of the mask restrict the sharpening and the light areas allow the sharpening to be applied.

Setting Workflow Options – Step 9
The section below the main preview window in ACR contains the Workflow Options settings. Here you can adjust the color depth (8 or 16 bits per channel), the color space (ICC profile), the image size (maintain capture dimensions for the picture or size up or down) and the image resolution (pixels per inch or pixels per centimeter). It is here that you adapt image characteristics to suit different outcomes. You can resize images to suit screen dimensions and also adjust the resolution of the file to match the dpi of the monitor or upsize a photo, select an appropriate ICC profile and depth for a poster print. With these options set you can then move onto deciding how to output the file.
For the project images, set the space to Adobe RGB, Depth 16 Bits/Channel, Resolution 240 ppi and Matte Paper Standard in the ‘Sharpen for’ section of the Workflow Options dialog.

Multiple photos can be selected in Bridge and passed to ACR for speedier processing.
Applying changes to multiple files – Step 10
We now have an idea about the types of changes that are regularly applied to images in order to optimize them. Although there are not many steps, applying them to a number of images could be a time-consuming task. This is especially true when shooting Raw as there are extra processing options available with this format than if you capture in TIFF or JPEG. For this reason there are several ‘batch’ processing features available in Bridge and ACR that can help speed up the enhancement of groups of photos.
Quality versus quantity
Now some of you might already be thinking to yourselves that any type of processing applied to a series of images rather than individual pictures will have to be less than optimal for each picture, and you would be right. But because of the nature of non-destructive editing and enhancing techniques that we are advocating here it is possible to apply some generic enhancement settings to groups of images quickly and then ‘drill down’ to each individual photo to apply the fine-tuning. This way of working is often used by photographers who take multiple images under the same lighting conditions or in the same environment.
General, overall adjustments are made to all the photos before working through each photo to fine-tune the results. And while we are talking of speeding up our photo workflow don’t forget that other parts of the process such as adding metadata and outputting photos to a specific format, size and ICC profile can also be handled by batch processing. Let’s see how we can apply the changes made to the first image to the others photographed at the same time.
Multi-select and Open In Camera Raw
As well as being able to process files one at a time, Adobe Camera Raw is capable of queueing multiple Raw files and working on this either in sequence or in sets of pictures. After several Raw photos are selected inside Bridge and then opened into ACR (File > Open in Camera Raw), you will notice the pictures are listed on the left side of the dialog. The same scenario occurs when selecting multiple pictures in the File > Open dialog from inside Photoshop. Once loaded into ACR, the files can be worked on individually by selecting each thumbnail in turn, making the necessary changes, and then moving to the next picture in the list.
Synchronized processing
But there is a more efficient way to process multiple files. Start with a group of images either taken under the same conditions with similar subject matter, or that you are wanting to process in a similar way (e.g. convert to grayscale and then sepia tone) open in Adobe Camera Raw. Now pick one of the photos that best represents the characteristics of the group (in the project files we used the image with the reference card) and proceed to make the corrections to color, tone and sharpness.

When complete, pick the Select All button at the top of the queue section of the dialog to pick all queued photos, or multi-select a subset of photos and then push the Synchronize button. The Synchronize dialog will be displayed, listing all the ACR controls that can be copied from the initial photo to the rest of the group. Select, or deselect, the controls as desired, and then click OK. Automatically the settings are synchronized across all the selected photos.
For the project images, this technique allows us to apply the enhancement changes made to the reference photo (the one containing the white balance card) across the other photos taken in that same studio session.
But don’t forget to fine tune
The synchronization of development settings provides a good starting point for the enhancement process; all that now remains is to flick through each individual image and double-check that the settings are working for that specific photo. If need be, the settings can be fine-tuned to better suit any image.

In the case of the example images, the crop should be applied manually for each photo and slight changes made to highlight areas to account for small changes in lighting.
Note > Another way to select a subset of images from those displayed on the left of the workspace in ACR is to rate the pictures you want to apply common settings to and then select these photos with the Select Rated button (hold down the Alt/Opt key). With the Alt/Opt key still depressed, clicking the Synchronize button will synchronize using the last settings without displaying the Synchronize dialog.
Outputting processed files – Step 11
Now to the business end of the optimization task – outputting the file. When working with Raw files in Adobe Camera Raw you have more options at this point than if you were enhancing the photos in Photoshop. There is no longer a need to convert the picture from its Raw state in order to save the changes you have made. These alterations can be either
- stored with the Raw file,
- applied to the file and the photo then saved as a non-Raw format such as TIF or PSD,
- applied to the photo which is then passed to Photoshop, or
- the Raw file can be embedded as a Smart Object in a new Photoshop document.
Opening into Photoshop
The most basic option is to process the Raw file according to the settings and adjustments selected and then open the picture into the editing workspace of Photoshop. To do this click the Open Image button at the bottom right of the dialog. Select this route if you intend to edit or enhance the image beyond the changes made during the conversion. This option will maintain the Raw file in Bridge and create a new Photoshop document of the converted (no longer Raw-based) photo.

Saving the processed Raw file
There is also the ability to save converted Raw files from inside the ACR dialog via the Save button. This action opens the Save Options dialog which contains settings for inputting

file names, choosing file types and extensions as well as file type-specific characteristics such as compression. Opt for this approach for fast processing of multiple files without the need to open them in Photoshop.
Applying the Raw conversion settings
ACR also allows the user to apply the current settings to the Raw photo without opening the picture into Photoshop. Just click the Done button. The great thing about working this way is that the settings are applied to the file losslessly. The photo remains in the Raw format. No changes are made to the underlying pixels, only to the instructions that are used to process the Raw file. When next the file is opened, the applied settings will show up in the ACR dialog ready for fine-tuning, or even changing completely.

When the ACR dialog is closed the thumbnail for the photo is updated in Bridge to reflect the changes. If adjustment settings have been applied to the photo, then a small settings icon is placed in the top right-hand corner of the thumbnail. When a picture has been cropped, a crop icon is displayed as well.

Creating a Smart Object
If you are wanting to continue working with your unconverted Raw file inside Photoshop then you will need to embed the file in a Smart Object layer within a Photoshop document. Unlike the earlier versions of ACR where this process had to be accomplished manually, it is now possible to embed the file using a single button inside ACR. While holding down the Shift key, press the Open Object button. This action automatically creates a new Photoshop document and embeds the Raw file in a Smart Object layer. Alternatively you can set this as a default option in the workflow options dialog box.


For the purposes of the project, select the portrait file without the reference card and open the file into Photoshop as a Smart Object.
Outputting more than one enhanced file
The same output options apply when working with multiple photos in ACR. Once all the settings have been applied, the images can be saved, opened, copied or opened as objects just like any other files. When more than one picture is selected from the queue grouping, the output button titles automatically change to plural to account for the fact that multiple photos will be saved, opened, copied, etc.


Saving, duplicating and resizing for web – Step 12
With the newly created Photoshop document open, go to the ‘File’ menu and select ‘Save As’. Name the file, select ‘Photoshop’ as the file format and select the destination ‘Where’ the file is being saved. Check the ‘Embed Color Profile’ box and click ‘Save’.
Keep the file name short using only the standard characters from the alphabet. Use a dash or underscore to separate words rather than leaving a space and always add or ‘append’ your file name after a full stop with the appropriate three- or four-letter file extension (.psd). This will ensure your files can be read by all and can be safely uploaded to web servers if required. Always keep a backup of your work on a remote storage device if possible.
Resize for web page viewing
Duplicate your file by going to ‘Image > Duplicate’. Rename the file and select OK. Go to ‘Image > Image Size’. Check the ‘Constrain Proportions’ and ‘Resample Image’ boxes. Type in 600 pixels in the ‘Height’ box (anything larger may not fully display in a browser window of a monitor set to 1024 × 68 pixels without the viewer having to use the scroll or navigation bars). Use the Bicubic Sharper option when reducing the file size for optimum quality.

Note > Internet browsers do not respect the resolution and document size assigned to the image by image-editing software – image size is dictated by the resolution of the individual viewer’s monitor. Two images that have the same pixel dimensions but different resolutions will appear the same size when displayed in a web browser. A typical screen resolution is often stated as being 72 ppi but actual monitor resolutions vary enormously.
JPEG format options
After resizing you should set the image size on screen to 100% or ‘Actual Pixels’ from the View menu (this is the size of the image as it will appear in a web browser on a monitor of the same resolution).
Go to ‘File’ menu and select ‘Save As’. Select JPEG from the Format menu. Label the file with a short name with no gaps or punctuation marks (use an underscore if you have to separate two words) and finally ensure the file carries the extension .jpg (e.g. portrait_one.jpg). Click ‘OK’ and select a compression/quality setting from the ‘JPEG Options’ dialog box. With the Preview box checked you can check to see if there is excessive or minimal loss of quality at different compression/quality settings in the main image window.

Choose a compression setting that will balance quality with file size (download time). High compression (low quality) leads to image artifacts, lowering the overall quality of the image. There is usually no need to zoom in to see the image artifacts as most browsers and screen presentation software do not allow this option.
Note > Double-clicking the Zoom Tool in the Tools palette will set the image to actual pixels or 100% magnification.
Image Options: The quality difference on screen at 100% between the High and Maximum quality settings may not be easily discernible. The savings in file size can, however, be enormous, thereby enabling much faster uploading and downloading via the Internet.
Format Options: Selecting the ‘Progressive’ option from the Format Options enables the image to be displayed in increasing degrees of sharpness as it is downloading to a web page, rather than waiting to be fully downloaded before being displayed by the web browser.
Size: The open file size is not changed by saving the file in the JPEG file format as this is dictated by the total number of pixels in the file. The closed file size is of interest when using the JPEG Options dialog box as it is this size that dictates the speed at which the file can be uploaded and downloaded via the Internet. The quality and size of the file is a balancing act if speed is an issue due to slow modem speeds.
Save for Web & Devices
The Save for Web & Devices command from the File menu offers the user an alternative, all- in-one, option for resizing, optimizing and previewing the image prior to saving the file in the JPEG format. Access the Save for Web & Devices feature from the File menu. Click on the 2-up tab to see a before and after version of your image. Click on the second image and, from the ‘Preview Menu’, choose Internet Standard sRGB from the listed options: Monitor Color, Legacy Macintosh (No Color Management), Internet Standard sRGB (No Color Management) or Use Document Profile. This will enable you to anticipate how your image may be viewed in software that cannot read the ICC profile that Photoshop normally embeds as part of the color management process, e.g. most web browsers.

To adjust the color or tone prior to saving as a JPEG exit the Save for Web feature and go to View > Proof Setup and then choose Internet Standard sRGB option. With the Proof Setup switched on, adjustments may be required to both image brightness and saturation in order to return the appearance of the image to ‘normal’. Brightness should be controlled via the ‘Gamma’ slider in the ‘Levels’ adjustment feature and color saturation via the ‘Hue/Saturation’ adjustment feature.
Capture and enhance workflow overview
- Capture an image with sufficient pixels for the intended output device.
- Download or transfer files.
- Rate and add keywords to files.
- Resize and crop the image.
- Adjust the color.
- Tweak the tonality.
- Clean the image.
- Sharpen the photo.
- Apply the processing and output the picture.
