
15. Saving and Printing Images
In This Chapter
Setting Preferences for Saving Files
Formatting and Saving Multiple Images
Displaying and Printing Images
For most of the book so far, we’ve stuck to working with photos in the Editor and the Organizer, with a brief foray into creating Web-friendly versions of images. But there are times when you want to save images in other file formats or prepare them for printing.
In this chapter, I’ll begin with a discussion of formatting options and then move on to other considerations for saving your image files and outputting them to paper.
I’ll look at how to format and save multiple images (known as batch processing) and then look at tools you can use to lay out, organize, and catalog your image files. In addition, I’ll look closely at the steps necessary to get the best prints from your digital images, whether you’re printing them at home or uploading your files to an online photo service.
Saving Files
As you work on an image in the Editor, it’s good practice to save the file to your hard drive regularly. When you save a file, you can choose from a number of file formats.
If you’re interested in posting images to the Web, you can choose the Save for Web option. Saving your images for the Web involves its own set of unique operations; these are covered in detail in Chapter 14.
To save a file
From the File menu, choose Save, or press Ctrl+S/Command-S.
To save a file in a new format or to a specific location
1. From the File menu, choose Save As, or press Ctrl+Shift+S/Command-Shift-S. The Save As dialog appears ![]() .
.

![]() The Save As dialog includes several options beyond just naming the new file.
The Save As dialog includes several options beyond just naming the new file.
2. Choose a destination for the file by browsing to a location.
3. In the Save As field, type a name for the file.
4. Click the box for Include in Elements Organizer to make sure the version shows up in your library.
5. If you want to save the file in a different format, choose one from the Format drop-down menu.
If you’re not sure which format to use, choose either the native Photoshop format (PSD), which is the best all-purpose format, or the JPEG format, which works especially well with digital photos. When saving an image as a JPEG file, choose the highest quality setting possible. (Also see “Understanding File Formats” a couple pages ahead.)
To guard against that, Elements offers the ability to save the file in a version set when you perform a Save As operation. You’re saving a new copy, but it’s linked to the original image in the Organizer as a revision ![]() ; otherwise, the edited version would appear as a completely separate image. Click the expansion arrow icon to the right of the image to view or hide the version set.
; otherwise, the edited version would appear as a completely separate image. Click the expansion arrow icon to the right of the image to view or hide the version set.

![]() A version set tracks image edits.
A version set tracks image edits.
6. If you want to be sure not to alter your original file, select the As a Copy option to save a duplicate. This selection protects your original file from changes as you edit the duplicate.
7. To include color profile information, make sure the Embed Color Profile box is selected. For more information on managing color in your images, see Chapter 8.
8. When you’ve finished entering your settings, click Save.
Depending on the format you chose, you may be prompted to set other options, such as with JPEG files ![]() .
.
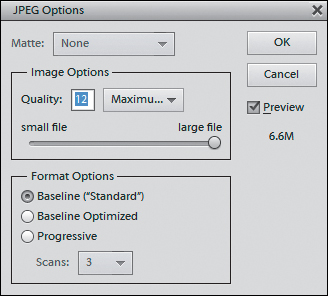
![]() Each image format has its own specific settings, such as those shown in this dialog for saving a JPEG file.
Each image format has its own specific settings, such as those shown in this dialog for saving a JPEG file.
Saving using the As a Copy option is a good idea if you’re experimenting with various changes and want to ensure that you keep your original version intact. It’s also handy if you want to save an image in more than one file format, which is useful if you want to save a high-quality copy for printing and keep a smaller-sized file to email to friends.
Photoshop Elements allows you to customize how files are saved. From the Edit menu, choose Preferences > Saving Files. See “Setting Preferences for Saving Files,” later in this chapter.
Understanding File Formats
Photoshop Elements lets you save an image in many different file formats, from the native, information-rich Photoshop format to optimized formats for the Web, such as GIF and JPEG. Among these is an extremely specialized collection of formats (PCX, PICT Resource, Pixar, PNG, Raw, Scitex CT, and Targa) you’ll rarely need to use and won’t be discussed here. What follows are descriptions of the most common file formats.
Photoshop
Photoshop (PSD) is the native file format of Photoshop Elements, meaning that the saved file will include information for any and all of Elements’ features, including layers, styles, effects, typography, and filters. As its name implies, any file saved in the PSD format can be opened not only in Photoshop Elements, but also in Adobe Photoshop. Conversely, any Photoshop file saved in its native format can be opened in Photoshop Elements. However, Photoshop Elements doesn’t support all the features available in Photoshop, so although you can open any file saved in the PSD format, some of Photoshop’s more advanced features (such as layer sets) won’t be accessible to you within Photoshop Elements.
A good approach is to save every photo you’re working on in the native Photoshop format and then, when you’ve finished editing, save a copy in whatever format is appropriate for that image’s intended use or destination. That way, you always have the original, full-featured image file to return to if you want to make changes or just save in a different format.
JPEG and GIF
The two major Web file formats (JPEG and GIF) are covered in detail in Chapter 14, so I’ll look at them just briefly here. Of particular note is the fact that you can use the Save As command to save an image as a GIF or JPEG file, with virtually all of the same file options as in the Save for Web dialog—so the obvious question is: Why use one saving method over the other when saving for the Web?
The Save for Web dialog offers several features the individual GIF and JPEG Save As command dialogs don’t. For one, Save for Web provides a wonderful before-and-after preview area.
No less valuable is the flexibility you have to change and view different optimization formats on the fly. An image just doesn’t appear the way you expected in GIF? Try JPEG. Additionally, with the click of a button, you can open and preview your optimized image in any browser present on your system.
Photoshop PDF
Portable Document Format (PDF) is the perfect vehicle for sharing images across platforms or for importing them into a variety of graphics and page layout programs. PDF is also one of only three file formats (native Photoshop and TIFF are the other two) that support an image file’s layers; layer qualities (like transparency) are preserved when you place a PDF into another application like Adobe Illustrator or InDesign. The real beauty of this format is that a PDF file can be opened and viewed by anyone using Adobe’s free Acrobat Reader software. PDF offers two compression schemes for controlling file size: ZIP and JPEG ![]() .
.
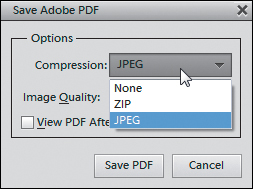
![]() When you save your work as a PDF file, you can apply JPEG or ZIP compression.
When you save your work as a PDF file, you can apply JPEG or ZIP compression.
TIFF
Tagged Image File Format (TIFF) is a workhorse among the file formats. The format was designed to be platform independent, so TIFF files display and print equally well from both Windows and Macintosh machines. Additionally, any TIFF file created on one platform can be transferred to the other and placed in almost any graphics or page layout program.
You can optimize TIFF files to save room on your hard drive using one of three compression schemes, or you can save them with no compression at all ![]() . Of the three compression options, LZW is the one supported by the largest number of applications and programs.
. Of the three compression options, LZW is the one supported by the largest number of applications and programs.

![]() Although the TIFF format offers several compression schemes, LZW is usually the most reliable.
Although the TIFF format offers several compression schemes, LZW is usually the most reliable.
The Pixel Order option should be left at the default of Interleaved. The Byte Order option encodes information in the file to determine whether it will be used on a Windows or Macintosh platform. On rare occasions, TIFF files saved with the Macintosh option don’t transfer cleanly to Windows machines. But since the Mac has no problem with files saved with the IBM PC byte order, I recommend you stick with this option.
Checking the Save Image Pyramid checkbox saves your image in different tiers of resolution, but since not many applications support the Image Pyramid format, leave this box unchecked.
Checking the Save Transparency checkbox ensures transparency will be maintained if you place your image into another application like Illustrator or InDesign.
If your image contains layers, choose from two Layer Compression schemes, or choose to discard the layers altogether and save a copy of your image file.
Setting Preferences for Saving Files
The Saving Files portion of the Preferences dialog provides a number of ways to control how Elements manages your saved files.
To set the Saving Files preferences
1. From the Edit menu, choose Preferences > Saving Files. The Preferences dialog opens with the Saving Files window active ![]() .
.

![]() The Saving Files pane of the Preferences dialog.
The Saving Files pane of the Preferences dialog.
2. From the On First Save drop-down menu, you can choose when you want to be prompted with the Save As dialog ![]() .
.

![]() The On First Save drop-down menu lets you control when the Save As dialog appears.
The On First Save drop-down menu lets you control when the Save As dialog appears.
3. From the Image Previews drop-down menu, choose an option to either save or not save a preview with the file.
4. From the File Extension drop-down menu, choose whether file extensions should be upper or lower case ![]() .
.

![]() Use the File Extension drop-down menu to determine how you want filename extensions displayed.
Use the File Extension drop-down menu to determine how you want filename extensions displayed.
5. In the File Compatibility portion of the dialog, set the Maximize PSD File Compatibility drop-down menu to Always. This gives you the maximum number of compatibility options.
6. If you’re pre-processing Raw files in another program, deselect the Prefer Adobe Camera Raw for Supported Raw Files option.
7. To assign your own color profile to images, select the Ignore Camera Data (EXIF) profiles checkbox.
8. In the text field labeled Recent file list contains, enter a number from 1 to 30.
9. Click OK to close the dialog and apply your preferences settings.
Adding Personalized File Information in the Editor
With any Photoshop Elements file open, choose File Info from the File menu to open the File Info dialog ![]() . Within this dialog, you can add personalized information specific to any file, including title, author, description, and copyright information. Although most of the information entered here is accessible only by opening the dialog from within Photoshop Elements, some of it does have practical uses both inside and outside the application. Entries from the Document Title, Author, Description, and Copyright Notice text fields can be included when you create a Picture Package discussed later in this chapter.
. Within this dialog, you can add personalized information specific to any file, including title, author, description, and copyright information. Although most of the information entered here is accessible only by opening the dialog from within Photoshop Elements, some of it does have practical uses both inside and outside the application. Entries from the Document Title, Author, Description, and Copyright Notice text fields can be included when you create a Picture Package discussed later in this chapter.

![]() Use the File Info dialog to add title, copyright, and other information to any specific file.
Use the File Info dialog to add title, copyright, and other information to any specific file.
Also, the Description field can be included with any saved image (see “Setting more printing options” later in this chapter). And if you select Copyrighted from the Copyright Status drop-down menu, a copyright symbol appears in the Image Window title bar, alerting anyone who receives a copy of your file that it’s copyright protected ![]() .
.

![]() When a file is assigned copyright status in the File Info dialog, a copyright symbol appears next to the filename at the top of the image window.
When a file is assigned copyright status in the File Info dialog, a copyright symbol appears next to the filename at the top of the image window.
The File Info dialog is useful for retrieving information, too. Many digital cameras include EXIF annotations (such as date and time, resolution, exposure time, and f-stop settings) for each digital photo. To access this information, click the Camera Data tab. Any EXIF information imported with the photo from your digital camera is displayed ![]() . You can use this information to note settings from your more successful photos—a handy reference for future outings. You can also view EXIF annotations in the Information panel in the Organizer.
. You can use this information to note settings from your more successful photos—a handy reference for future outings. You can also view EXIF annotations in the Information panel in the Organizer.
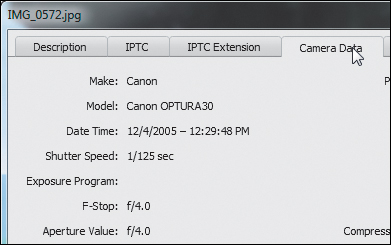
![]() The File Info dialog displays EXIF information included with photos imported from digital cameras.
The File Info dialog displays EXIF information included with photos imported from digital cameras.
Formatting and Saving Multiple Images
You’ve just finished a prolific day of shooting pictures, and as a first step to sorting through all those images, you’d like to convert them to Elements’ native Photoshop format and then change their resolution to 150 dpi. You could, of course, convert them individually, but the Process Multiple Files command can do all that tedious, repetitive work for you.
To batch process multiple files
1. From the File menu, choose Process Multiple Files to open the dialog of the same name.
2. From the Process Files From drop-down menu ![]() , do one of the following:
, do one of the following:

![]() You can save groups of files from a number of different sources.
You can save groups of files from a number of different sources.
• To select images within a folder on your hard drive, choose Folder, click the Browse button, and then locate and select the folder containing the images you want to convert ![]() . If you spot folders within the folder you select that also contain files you want to convert, click the Include All Subfolders checkbox in the Process Multiple Files dialog.
. If you spot folders within the folder you select that also contain files you want to convert, click the Include All Subfolders checkbox in the Process Multiple Files dialog.

![]() Select a folder containing all the images you want to convert at one time.
Select a folder containing all the images you want to convert at one time.
• To select images stored in a digital camera, scanner, or PDF, choose Import; then select the appropriate source from the From drop-down menu. The choices in the From drop-down menu will vary depending on the hardware connected to your computer.
• To select files that are currently open within Photoshop Elements, choose Opened Files.
3. Click the Destination Browse button; then locate and select a folder to save your converted files.
In the Browse for Folder dialog that appears, you’re also offered the option of creating a new folder for your converted files.
4. If you want to add a file-naming structure to your collection of converted images, select the Rename Files checkbox; then select naming options from the two drop-down menus ![]() .
.

![]() Choose from a number of file-naming options to arrange your images in consecutive order.
Choose from a number of file-naming options to arrange your images in consecutive order.
Refer to the Example text (located below the Rename Files checkbox) to see how the renaming changes will affect your filenames.
5. Select the Compatibility checkboxes for whichever platforms you want your filenames to be compatible with.
A good approach is to select all three of these, just to be on the safe side.
6. If you want to change either the physical dimensions of your image or its resolution, click the Resize Images checkbox, then do one or both of the following:
• To convert all of your images to a specific size, first select a unit of measure from the units drop-down menu, then enter the width or height in the appropriate text field, making sure that the Constrain Proportions checkbox is selected ![]() .
.

![]() You can resize entire groups of images to the same width or height dimensions.
You can resize entire groups of images to the same width or height dimensions.
• From the Resolution drop-down menu, choose a resolution in dots per inch (dpi) to change the resolution of all your images ![]() .
.

![]() Choose a resolution to apply to all of the files in your selected group.
Choose a resolution to apply to all of the files in your selected group.
The resolution setting in this dialog is in dots per inch (print resolution) rather than pixels per inch (screen resolution), so changing just the resolution here will do nothing to alter your image, or change its file size. It changes only the dimensions of the final printed image and has no effect on the size it displays onscreen.
7. From the Convert Files to drop-down menu, choose the desired format type ![]() .
.

![]() Choose a formatting option to apply to all the files in your selected group.
Choose a formatting option to apply to all the files in your selected group.
8. Click OK to close the dialog and start the batch process. The selected files are opened, converted in turn, and then saved to the folder you’ve chosen.
If you’ve chosen one of the import options, an additional series of dialogs appears, guiding you through the selection of images to import.
Using a little simple math can help you convert pixel dimensions to inches. Multiply the resolution you’ve selected by the number of inches (of either height or width) that you want your final image to be. For example, if you’ve selected a resolution of 72 dpi, and you want the width of your images to be 4 inches; simply multiply 72 by 4, then enter the total (288) in the width text field.
Displaying and Printing Images
When it comes to printing and resolution, it helps to keep a few basic details in mind to avoid confusion.
You know that image resolution is described in pixels per inch, or ppi. Print resolution, however, is usually described by the number of dots per inch, or dpi, a printer is capable of printing. If you want to print a high-quality flyer or photo, you may want to use an image resolution as high as 300 pixels per inch, so that a maximum amount of image information is sent to the printer.
(For more details on adjusting image size, see “Changing Image Size and Resolution” in Chapter 14.)
To resize an image for printing
1. From the Image menu, choose Resize > Image Size.
2. To maintain the current width-to-height ratio, check that the Constrain Proportions option is selected.
3. Uncheck the Resample Image box.
4. Choose a unit of measure (or a percentage) and then enter new values for the width or height in the Document Size portion of the dialog ![]() .
.
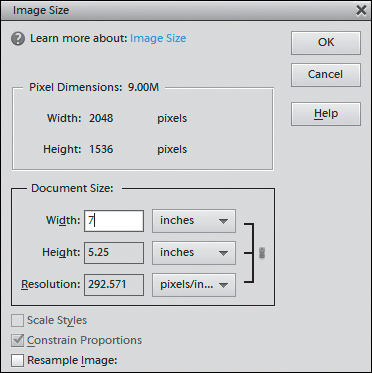
![]() Enter new width and height values to change an image’s print size.
Enter new width and height values to change an image’s print size.
In the Document Size portion of the dialog, the resolution value changes accordingly. For instance, if you enter width and height values of half the original image size, the resolution value will double, and the image will print clearer and sharper. That’s because you’re compressing the same number of pixels into a smaller space. So, when scaled at 50 percent, an image 4 inches wide with a resolution of 150 pixels per inch (ppi) will print at 2 inches wide and at a resolution of 300 ppi.
5. Click OK to complete the change.
The image’s print size will be changed, but since it still contains the same number of pixels, it will appear to be unchanged on your screen. You can, however, view a preview of the final print size onscreen:
• From the View menu, choose Print Size. The image is resized on your screen to approximate its final, printed size ![]() .
.
![]() An image can be viewed at an approximation of its final print size, even when its resolution differs from the computer’s display.
An image can be viewed at an approximation of its final print size, even when its resolution differs from the computer’s display.
• From the View menu, choose Actual Pixels, or press Ctrl+1/Command-1 to return the display size to 100 percent.
To return the dialog to its original settings, press Alt/Option to change the Cancel button to Reset, then click Reset.
Printing an Image
Whether you’re printing final photos for clients or just some snapshots for family, you can print to a local printer from within Photoshop Elements.
To print an image
1. Do one of the following:
• In the Organizer, select the photos you would like to print.
• In the Editor, open the files you want, or select them in the Photo Bin.
2. Click the Create drop-down menu in the upper-right corner of the window.
3. Choose Photo Prints.
4. From the options that appear, click the Local Printer button. The Print dialog opens ![]() .
.

![]() The Photoshop Elements Print dialog.
The Photoshop Elements Print dialog.
5. Select a printer and optionally adjust settings specific to it from the Select Printer and Select Paper Size options.
6. Click the Select Print Size drop-down menu and choose the size at which the image will print ![]() . The page preview reflects the page size in proportion to the image you want to print.
. The page preview reflects the page size in proportion to the image you want to print.
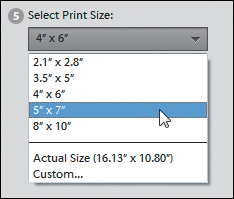
![]() Choose the size the photo will be on the printed page.
Choose the size the photo will be on the printed page.
Choosing Custom opens the More Options dialog (see the opposite page).
7. Specify the number of copies of each page to print.
8. Click the Print button to send the job to the printer.
Setting more printing options
Elements offers optional print settings for adding more information to your prints. They can be helpful when printing drafts or outputting images for other projects.
To set more printing options
1. Before you print, click the More Options button and, in the dialog that appears ![]() , do one of the following:
, do one of the following:

![]() The More Options print dialog.
The More Options print dialog.
• In the Photo Details area, click the checkboxes to display an image’s date, caption, or file name. If a document title or description has been entered for the image in the File Info dialog, it will be represented in the page preview as gray bars. (See the sidebar “Adding Personalized File Information in the Editor” earlier in this chapter.)
• In the Border area, click the Thickness checkbox and specify a width for a line if you want one ![]() . Click the small color swatch to the right to select the border’s color. You can also set a background color for the page.
. Click the small color swatch to the right to select the border’s color. You can also set a background color for the page.

![]() Select a measurement unit and size for your border.
Select a measurement unit and size for your border.
• If you’re making transfers for t-shirts, click the Flip Image checkbox under Iron-on Transfer to invert the image horizontally. (If your printer’s driver has an invert image option, make sure that’s not selected—otherwise, the image will flip back to its original orientation when printed.)
• Under Trim Guidelines, click the Print Crop Marks button if you want to include crop marks ![]() .
.

![]() Crop marks positioned at the corners.
Crop marks positioned at the corners.
2. Click the Apply button to view the changes in the preview without leaving the More Options dialog. Or, click OK to return to the Print dialog.
Creating a Contact Sheet
You may have lots of photos downloaded from your digital camera, but with unhelpful filenames like 102-0246_IMG.JPG, organizing and sorting them can be a difficult task. And although the Organizer lets you view and sort through your images, sometimes it’s nice to have a printed hard copy to study and mark up. In traditional photography, contact sheets are created from film negatives and provide a photographer or designer with a collection of convenient thumbnail images organized neatly on a single sheet of film or paper.
The steps for creating a contact sheet are slightly different depending on whether you’re using Elements under Windows or Mac OS X, so I’m covering them separately.
To make a contact sheet (Windows)
1. Do one of the following:
• In the Organizer, select the photos you would like to include.
• In the Editor, open the files you want, or select them in the Photo Bin.
2. Click the Create drop-down menu in the upper-right corner of the window and choose Photo Prints.
3. Choose Contact Sheet ![]() . The Prints dialog opens.
. The Prints dialog opens.

![]() The option to create a contact sheet is found within the Photo Prints category.
The option to create a contact sheet is found within the Photo Prints category.
4. Specify the printer, and optionally select printer settings and paper size.
5. If you want to add more images to the contact sheet, click the Add button in the lower-left corner of the Print Photos dialog ![]() . Otherwise skip to Step 10.
. Otherwise skip to Step 10.

![]() Add more photos to the contact sheet.
Add more photos to the contact sheet.
The Add Media dialog opens ![]() .
.

![]() The Add Media dialog lets you bring in photos you hadn’t previously included.
The Add Media dialog lets you bring in photos you hadn’t previously included.
6. Select from one of the following options (in both the Basic and Advanced areas); note that you can restrict the search using just one criterion:
• All Media displays every photo you’ve imported into the Organizer.
• Media from the Grid displays all of the photos currently visible in the Organizer’s Browser window.
• Album displays photos that you’ve organized into a single photo album.
• Keyword Tag displays photos to which you’ve assigned one specific attribute tag.
• The People, Places, and Events drop-down menus let you choose these specific criteria.
7. If you choose any of the Advanced options, choose an item from the respective drop-down menu.
The Add Media dialog updates to display all photos from the option you selected in the Add Media From area.
8. Click to select the photos you want to include on your contact sheet, and then click Done.
The preview window in the center of the Print Photos dialog now includes all the photos you have selected.
9. Click the arrows to the right of the Columns text field to designate the number of columns per page your photo thumbnails will occupy ![]() .
.

![]() Control the number of thumbnails that appear on each page of your contact sheet.
Control the number of thumbnails that appear on each page of your contact sheet.
10. Click More Options to select the type of text information you would like to have appear below each photo thumbnail.
11. Click Print to send the completed contact sheet to your printer.
To make a contact sheet (Mac)
1. Do one of the following:
• In the Organizer, select the photos you would like to include.
• In the Editor, open the files you want, or select them in the Photo Bin.
2. Click the Create drop-down menu in the upper-right corner of the window and choose Photo Prints.
3. From the options that appear, click the Contact Sheet button ![]() .
.

![]() Create a contact sheet from within the Photo Prints category.
Create a contact sheet from within the Photo Prints category.
If you’re in the Organizer, the software alerts you that the feature is handled by the Editor; click Yes to continue and open the files there.
Otherwise, the Contact Sheet dialog opens ![]() .
.

![]() Set up printing options in the Contact Sheet dialog.
Set up printing options in the Contact Sheet dialog.
4. From the drop-down menu in the Source Images area, choose Current open documents. (You can alternately choose Folder and specify a folder of images on your hard disk.)
5. Specify the paper size, printing resolution, and color mode of the printer you’re using.
6. In the Thumbnails pane, choose how the photos will be arranged on the page by specifying the number of columns and rows, and choosing a sort order. You can also control the spacing between images or leave it set to Auto-Spacing.
7. If you want each image to be labeled with its filename, mark the Use Filename As Caption checkbox and specify a font and size for the text.
8. Click OK.
Elements builds the contact sheet before your eyes (it actually runs a script that opens each image, resizes it, and places it in a new document). After a short time, the contact sheet is assembled and ready for printing ![]() .
.

![]() The contact sheet is assembled and ready for printing.
The contact sheet is assembled and ready for printing.
Creating a Picture Package
Photoshop Elements’ Picture Package creates a page with multiple copies of the same image, just like the kind you’d receive from a professional photographer’s studio.
The steps to make a picture package differ slightly under Windows and Mac OS X, so I’m listing them separately.
To create a picture package (Windows)
1. Do one of the following:
• In the Organizer, select the photo you would like to print.
• In the Editor, open the file you want, or select it in the Photo Bin.
2. Click the Create drop-down menu in the upper-right corner of the window and choose Photo Prints.
3. From the options that appear, click the Picture Package button. The Picture Package dialog opens ![]() .
.

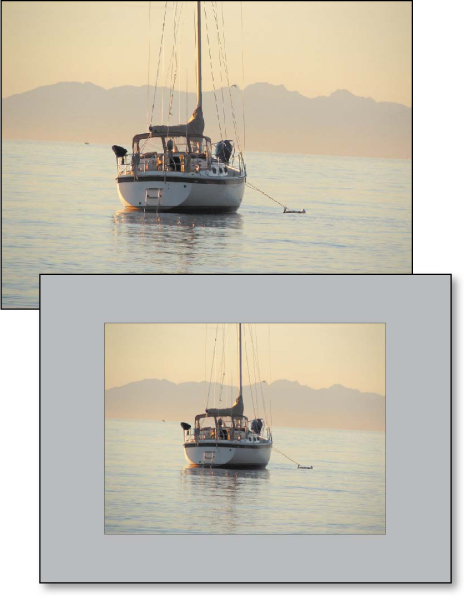
![]() A picture package creates pages that you can print and cut out for framing.
A picture package creates pages that you can print and cut out for framing.
4. From the Select a Layout drop-down menu, choose the layout and dimensions for your picture package.
5. Click the Fill Page With First Photo checkbox to include as many copies of the image as will fit ![]() .
.
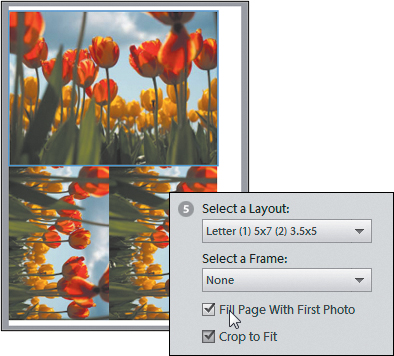
![]() Mark the Fill Page With First Photo option to group the prints onto the page.
Mark the Fill Page With First Photo option to group the prints onto the page.
6. Click Print to send your completed picture package to the printer.
To create a picture package (Mac)
1. Do one of the following:
• In the Organizer, select the photo you would like to print.
• In the Editor, open the file you want, or select it in the Photo Bin.
2. Click the Create drop-down menu in the upper-right corner of the window and choose Photo Prints.
3. From the options that appear, click the Picture Package button.
If you’re in the Organizer, the software alerts you that the feature is handled by the Editor; click Yes to continue and open the files there.
Otherwise, the Picture Package dialog opens ![]() .
.

![]() The Mac interface for creating a picture package.
The Mac interface for creating a picture package.
4. From the drop-down menu in the Source Images area, choose Frontmost Document if it’s not already selected. (You can alternately specify a file or folder on your hard disk.)
5. In the Document pane, use the Layout drop-down menu to determine how the images are arranged, which you can preview in the Layout pane.
6. To customize the layout, click the Edit Layout button and fine-tune the appearance of the page ![]() . Click Save to apply the changes.
. Click Save to apply the changes.

![]() Edit the layout of the picture package page.
Edit the layout of the picture package page.
7. Click OK. Elements builds the picture package in a new file ![]() .
.

![]() The finished picture package.
The finished picture package.
Ordering Prints
In the past, you’d shoot a roll of film, take it to a photo developer, and after a few days (or a few hours) you’d have prints of all your images. Now, you can order prints directly from within Photoshop Elements—and order just the images you want, rather than everything shot on the roll.
To order prints
1. In the Organizer, select one or more photos to print. Or, in the Editor, choose open image files in the Photo Bin.
2. Click the Create drop-down menu in the upper-right corner of the window and choose Photo Prints.
3. Click the Order Prints from Shutterfly button ![]() . Elements prepares the images and then brings up an order dialog.
. Elements prepares the images and then brings up an order dialog.

![]() Create a photo prints order.
Create a photo prints order.
4. Enter your login information if you already have an account with the vendor; otherwise, you can sign up for a new account within the order screen.
5. A single 4 × 6 print is selected for each image. Change quantities for any of your photos by editing the number fields ![]() .
.
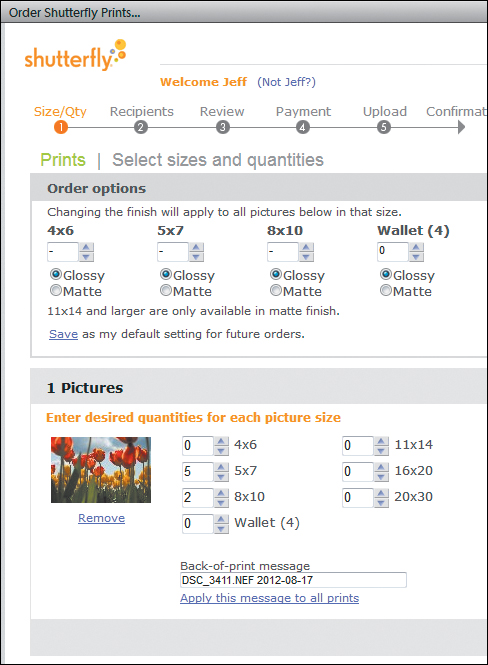
![]() The Review Order screen lists the photos you’ve chosen along with other ordering options.
The Review Order screen lists the photos you’ve chosen along with other ordering options.
6. Click Next to specify recipients for the order.
7. Click Next to review the order.
8. Click Next to enter your credit card information and billing address, and then click the service’s Place Order button.
The images are uploaded, printed on photo paper, and mailed in a few days.