
1. Editing Photos in 5 Easy Steps
In This Chapter
You’re going to encounter a lot of powerful, in-depth information about how to use Photoshop Elements in this book’s 400-plus pages. But who wants to sit and devour the whole thing while a memory card full of photos is waiting to be explored?
If you’re anxious to get started with Elements, the steps outlined in this short chapter will improve nearly all of your digital photos. Then, when you’re ready to fiddle with settings sliders and really take advantage of what Elements has to offer, continue exploring the rest of the book.
1. Import and Open Images
Photoshop Elements is really made up of two programs that work together—the Organizer and the Editor—and as a result, you can open a photo for editing in two ways. The Organizer stores your entire photo library and lets you apply metadata such as keyword tags. When you want to make adjustments to an image, you send it to the Editor. If you want to edit a photo independently of the Organizer, you can open the file directly from within the Editor.
Make sure your camera is connected to your computer, or the camera’s memory card is plugged into a card reader.
To import into the Organizer
1. Open Photoshop Elements and, in the Welcome screen, click the Organize button to open the Organizer.
2. Click the Import button at the top left of the window and choose From Camera or Card Reader (or press Ctrl+G/Command-G). The Photo Downloader application launches.
3. Choose your camera or memory card from the Get Photos from drop-down menu (if it’s not already selected) ![]() .
.

![]() Use the Photo Downloader to import pictures into the Elements Organizer.
Use the Photo Downloader to import pictures into the Elements Organizer.
4. Click the Get Media button to download the selected images to your computer.
5. After the images have been imported, click the one you want to edit and then open it in the Editor by right-clicking and choosing Edit with Photoshop Elements Editor; or, in the task bar, click the Editor button ![]() .
.

![]() Open the image in the Editor using the contextual menu (top) or the task bar (bottom).
Open the image in the Editor using the contextual menu (top) or the task bar (bottom).
To open a photo directly in the Editor
1. Open Photoshop Elements and, in the Welcome screen, click the Edit button to open the Editor.
2. Choose File > Open.
3. In the Open dialog, navigate to the image file you wish to edit and select it.
4. Click the Open button to open the file.
To import into iPhoto (Mac)
1. If you use iPhoto on the Mac to organize your photo library, launch iPhoto.
2. Click the camera or memory card name in the sidebar, listed under Devices.
3. Type a name in the Event Name field ![]() ; one way iPhoto organizes the library is by grouping images into Events based on when the photos were imported.
; one way iPhoto organizes the library is by grouping images into Events based on when the photos were imported.

![]() Select a device and type an Event Name in iPhoto on the Mac.
Select a device and type an Event Name in iPhoto on the Mac.
4. Click the Import All button, or select the photos you want and click the Import Selected button.
5. When the import process is finished, click the Keep Photos button in the dialog that asks if you wish to remove or keep the pictures you just imported.
6. To be able to edit photos in Elements instead of using iPhoto’s editing tools, you need to do this step just once: Go to iPhoto > Preferences, click the Advanced button, and in the drop-down menu for Edit Photos, choose In application ![]() . Locate Elements on your disk and click Open.
. Locate Elements on your disk and click Open.
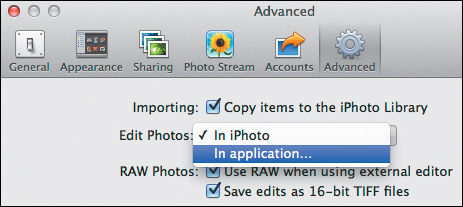
![]() iPhoto can hand off editing duties to an external application like Elements.
iPhoto can hand off editing duties to an external application like Elements.
7. Select a photo to edit and then either click the Edit button or right-click and choose Edit in External Editor ![]() .
.

![]() Choose to edit in Elements instead of using iPhoto’s editing tools.
Choose to edit in Elements instead of using iPhoto’s editing tools.
Photos shot in raw format first open in Adobe Camera Raw before reaching the Editor. See Chapter 10 to learn more about working with raw photos.
2. Crop and Rotate
The composition of a photo is often just as important as what appears within the frame. If you’re not happy with the image’s original framing, or you want to excise distracting elements like tree branches from the edges, recompose the shot using the Crop tool.
Another common correction is to adjust a photo’s rotation. Unless you set up the shot on a sturdy tripod, it’s not uncommon to get shots that are slightly tilted. Don’t worry, Elements offers easy fixes.
To crop a photo
1. With the image open in the Editor, choose the Crop tool ![]() (or press the C key).
(or press the C key).

![]() The Crop tool
The Crop tool
2. Click and drag across the image to define a selection representing the boundaries of the visible area ![]() . Don’t worry about being precise at first.
. Don’t worry about being precise at first.

![]() Drag to define the image’s new dimensions after cropping.
Drag to define the image’s new dimensions after cropping.
3. Instead of drawing a freeform rectangle, you can constrain the selection to match preset aspect ratios, such as common photo sizes or the photo’s original dimensions. Choose an option from the Aspect Ratio drop-down menu in the Tool Options bar ![]() .
.
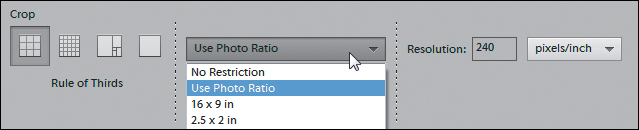
![]() Set a crop ratio using the controls in the Tool Options bar.
Set a crop ratio using the controls in the Tool Options bar.
4. Click the Commit button ![]() or press Enter or Return to apply the crop.
or press Enter or Return to apply the crop.
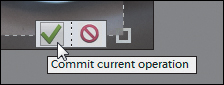
![]() The Commit button appears at the bottom of the crop area.
The Commit button appears at the bottom of the crop area.
You can also enter specific sizes for the width and height of the crop, as well as the image’s pixel resolution. See Chapter 4 to learn more.
To rotate a photo
In the Quick Edit mode, click the Rotate button on the task bar to turn the entire image counter-clockwise in 90-degree increments. Click and hold the tool to reveal a clockwise tool.
In the Expert edit mode, choose Image > Rotate and choose from the following options ![]() .
.
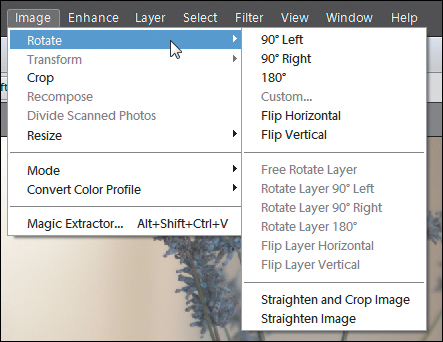
![]() Elements’ rotation options
Elements’ rotation options
• Choose one of the first three items in the list to turn the entire image in 90-degree increments, such as when you shot a photo in portrait (tall) orientation but the image file was imported with a landscape (wide) orientation.
• To rotate just the active layer, choose one of the layer options further down the menu.
To straighten a photo
There are a few ways to nudge the rotation and straighten an image, but the easiest is to use the Straighten tool:
1. Click the Straighten tool in the Tools panel ![]() .
.
![]() The Straighten tool
The Straighten tool
2. In the Tool Options bar, choose how the straightened image will appear. The default is Grow or Shrink Canvas to Fit, but I prefer to use Remove Background for a cleaner result.
3. Drag a horizontal line that compensates for the amount the picture is rotated. This approach is easier if you have a well-defined horizon line, but in this example, I’m drawing the line perpendicular to the vertical wall corners in the background ![]() . The image straightens.
. The image straightens.

![]() Drag as if you’re defining a “horizon line.”
Drag as if you’re defining a “horizon line.”
If you’re cropping the image, save time and straighten it before you apply the crop. Drag just outside a corner of the selection to rotate the image and then commit the change.
The Straighten and Crop and Straighten options in the Image > Rotate menu direct Elements to do the straightening for you. My experience with this command is mixed, so I prefer to do the straightening myself.
3. Adjust Lighting and Color
Almost every photo needs a little lighting and color adjustment, whether it’s lightening shadows or punching up the saturation slightly to make colors pop. Elements is awash in color and lighting adjustment choices, but this is where I start.
Quick Fixes
One of the appeals of Photoshop Elements is its Quick Fix adjustments. You don’t need to be a digital imaging expert—you may just want to correct a few shots with the least amount of fuss. See Chapter 5 for more information.
To apply quick fixes
1. Open a photo in the Editor.
2. Click the Quick heading ![]() to reveal the Quick Edit options (if it’s not already selected).
to reveal the Quick Edit options (if it’s not already selected).

![]() The Quick Fix edits handle many common corrections.
The Quick Fix edits handle many common corrections.
3. Click an attribute (such as Smart Fix) and drag the slider to make the adjustment. Or, click a preset from the grid; positioning your mouse pointer over a thumbnail previews the change, and clicking it applies the adjustment ![]() .
.
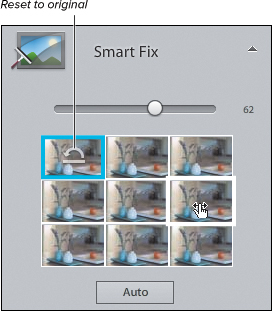
![]() Reveal a grid of settings presets and see how they affect the image.
Reveal a grid of settings presets and see how they affect the image.
You can also drag within a preset in the grid to make incremental adjustments.
4. If you don’t like the effect, click the thumbnail that contains the reset icon to return to the original state.
Manual Adjustments
If you’d rather handle the details yourself, turn to manual corrections. I prefer to use adjustment layers in the Expert environment, which let you apply corrections without changing any of the original pixels in your image. Other controls, such as those found in the Enhance menu, are less flexible.
To apply an adjustment layer
1. Click the Expert button to switch to that editor.
2. Click the Layers button in the task bar to reveal the Layers panel.
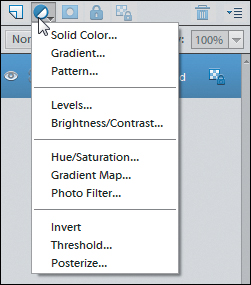
3. In the Layers panel, click the Create New Fill or Adjustment Layer button ![]() and choose one of the options. A new adjustment layer is created, and a panel containing options appears.
and choose one of the options. A new adjustment layer is created, and a panel containing options appears.
![]() Add an adjustment layer to make edits that don’t interfere with the image’s original pixels.
Add an adjustment layer to make edits that don’t interfere with the image’s original pixels.
4. Manipulate the controls in the panel to alter the look of the image ![]() .
.

![]() The Adjustments panel includes settings specific to the adjustment layer you’re on.
The Adjustments panel includes settings specific to the adjustment layer you’re on.
For example, to increase the saturation of a flat image, add a Hue/Saturation adjustment layer and, in the Hue/Saturation panel, increase the value of the Saturation slider.
4. Apply Corrections
In many cases, you’ll probably be finished editing a photo after the previous step. Sometimes, though, you’ll want to perform a little correction to remove dust spots, crumbs, or other distracting blemishes. The Spot Healing Brush smartly fixes areas like that without any fuss.
Of course, Elements includes an arsenal of correcting tools, enabling you to not only repair small areas but to also take the best parts of several photos and merge them together, or even remove people or objects from a scene entirely. Chapter 9 covers all of those options.
To repair areas using the Spot Healing Brush
1. In either the Quick or Expert edit environment, choose the Spot Healing Brush from the Tools panel, or press J.
2. In the Tool Options bar, specify a brush size for the tool ![]() that roughly matches the area you want to repair.
that roughly matches the area you want to repair.

![]() Adjust the Size slider of the Spot Healing Brush to define how large an area to correct.
Adjust the Size slider of the Spot Healing Brush to define how large an area to correct.
3. Click once on the area to apply the brush’s healing properties ![]() .
.

![]() The Spot Healing Brush really does fix blemishes with one click.
The Spot Healing Brush really does fix blemishes with one click.
4. If the area wasn’t repaired to your satisfaction, try clicking it one more time. Elements examines nearby pixels to determine how best to fill the area you’re fixing, and sometimes the first pass may not be exactly what you’re looking for.
For finer detail work and more control, you may want to break out the Stamp tool for making repairs. See Chapter 9.
5. Save the Photo
Now the photo looks more like what you had in mind when you were shooting it. When you’re finished making adjustments, save the image back to the Organizer or to a location on your hard disk.
To save the photo
1. Choose File > Save or press Ctrl+S/Command-S. Or, choose File > Save As (Ctrl+Shift+S/Command-Shift-S) to save a new copy of the file.
2. In the Save dialog that appears, select a location on your hard disk (if you want to move it to a new location) ![]() .
.
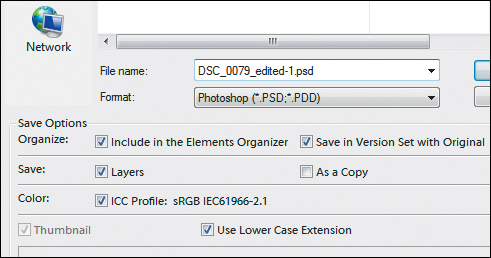
![]() Save the file so you can edit it later.
Save the file so you can edit it later.
3. Type a name for the file in the File name field (or the Save As field, on the Mac).
4. Choose a file format from the Format drop-down menu; use the native Photo-shop format (PSD) to retain any layers you applied.
5. Enable the Include in the Elements Organizer checkbox to make the edited file appear in the Organizer.
To group the edited version with the original, mark the Save in Version Set with Original box.
6. Click the Save button.