Chapter 2. The Creative Process

Some of the best conversations we’ve ever had about images and creativity have taken place when we were nowhere near a computer. Thinking and talking about photography, art, the creative process, and ideas for new images during a brisk walk with a fellow photographer or over dinner with friends and colleagues is a different experience than having a similar conversation when you’re seated in front of the brightly illuminated screen with all of its distractions. We enjoy the back and forth with our peers as we talk about how ideas and images come together to create new meanings and new visual possibilities. Often, these conversations include detailed discussions of Adobe Photoshop techniques as we share ideas on the best way to approach a particular imaging challenge or create a successful vision of a concept. What takes place during these gatherings is an important aspect of our creative process and one that we encourage you to seek out and make a part of your creative life: Enjoy all of the nuances of the image-making process wherever you are, even if you are not in front of a computer or don’t have a camera in your hands.
The most important creative tool you have is in your head. Photoshop can never come up with an idea or create a compelling image on its own. As Katrin likes to tell her students, “A keyboard shortcut for quality doesn’t exist.” But Photoshop can be a conduit for your imagination, a tool to help you realize the vision you have for an image. Activating and enhancing that conduit so you can work with more confidence and greater skill is one of this book’s goals. Before we get into the nuts and bolts of Photoshop techniques for masking and compositing, we’ll take a brief look at the image-making journey and take a look at some considerations when developing an imaging strategy.
In this chapter, you’ll explore some of the key components of the creative process, including:
• Inspiration; where to find it and how to encourage it
• Brainstorming and concept development
• Personal projects and series
• Planning for photographs
• Preparing the image files
The Image-making Journey
Before you start digging into image pixels, it’s a good idea to have a plan. The primary foundation of our Photoshop strategy is to work flexibly and nondestructively. We never apply changes directly to the background layer because it is the original image data, and altering the background layer does not allow for future modifications, fine-tuning, or reinterpretations. Layers, adjustment layers, layer masks, and alpha channels in Photoshop offer you tremendous flexibility for working nondestructively (as long as you don’t flatten the layered master file). In addition to a nondestructive editing workflow in Photoshop, it’s also a good idea to ensure that you have backed up your working files, which can include saving copies of different iterations of the file. Although we’ve never regretted having too many layers or file backups, we’ve always regretted not having an image backed up when we needed it or when the client wanted a change made.
Inspiration
Where do you get your inspiration? What activities most often lead to the generation of new ideas? What conditions are the most conducive for engaging your creativity? Answering these relevant questions will help you identify the types of situations that are most likely to encourage and support your creativity. Understanding your own creative process is one of the first steps to being able to engage it more consciously instead of just waiting and hoping for ideas or inspiration.
Katrin often comes up with her best ideas while on a morning run. Others get their inspiration from rummaging through a flea market to find objects and images to create. Still others turn to literature, poetry, their family history, or dreams. Pay attention to what triggers an idea or flips your creative switch: Is it a quiet afternoon spent gardening, or would you rather page through magazines, go for a walk, or visit museums?
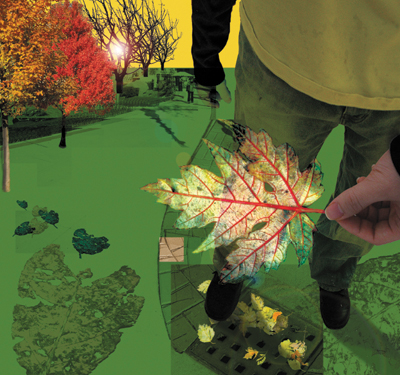
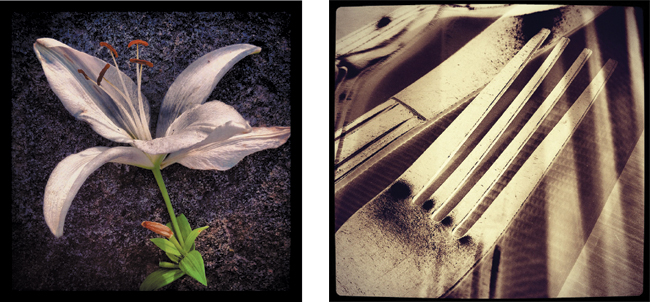
At the School of Visual Arts in New York City, Katrin gave one of her classes an assignment called “free inspiration.” The students had to find three objects they did not pay for and create images that portrayed those subjects in a respectful manner. Many students found interesting objects on the streets of Manhattan, which they used to create very beautiful images (FIGURE 2.1). So if trash and fallen leaves inspire college freshmen, just think about what you can use for inspiration. Nurture the subjects or pastimes that inspire you; they are your personal wellspring of ideas and insights.
© Seung Hyung Lee
Figure 2.1. Starting with a found leaf, one student created a fascinating environment to show to the viewer.
Gather, Collect, and Snap
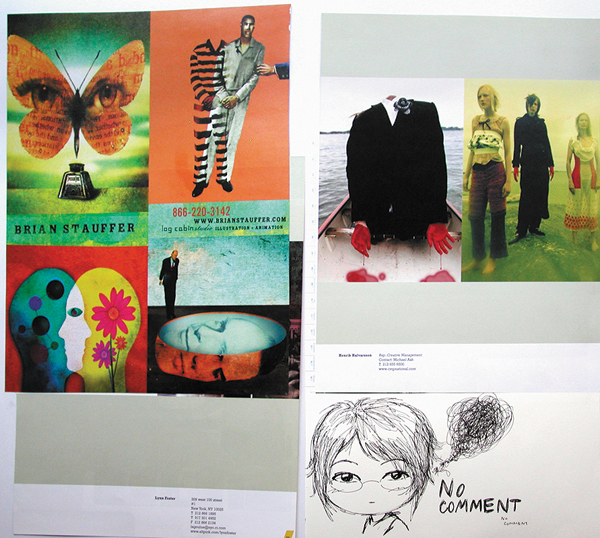
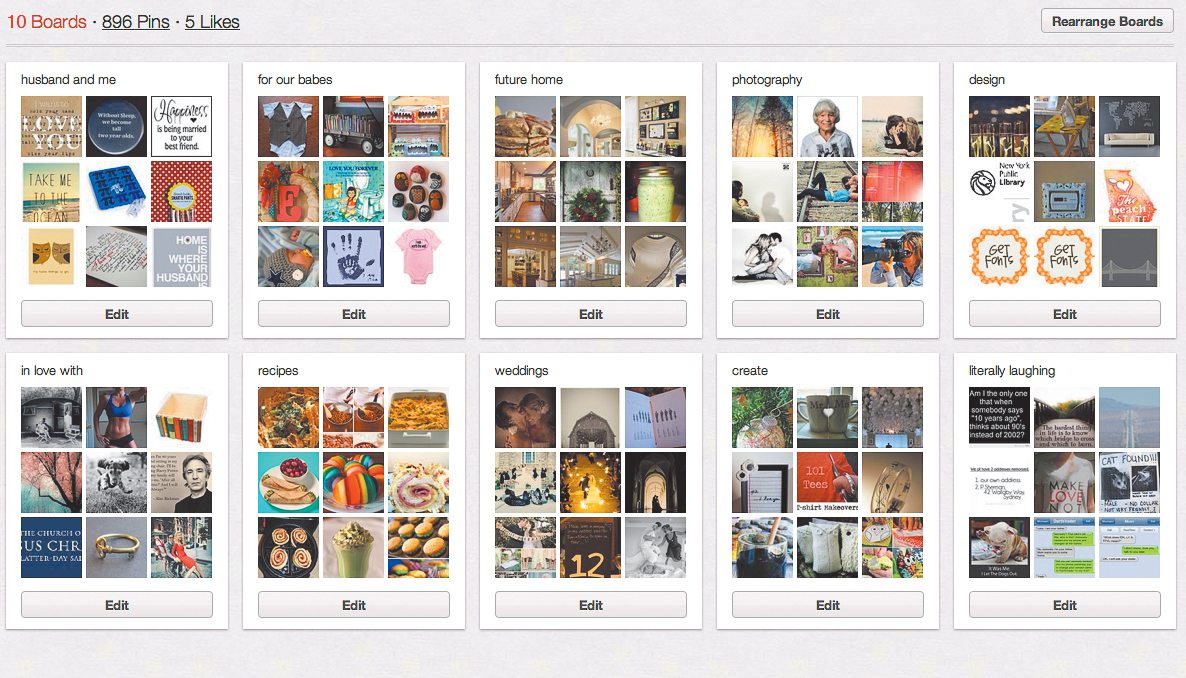
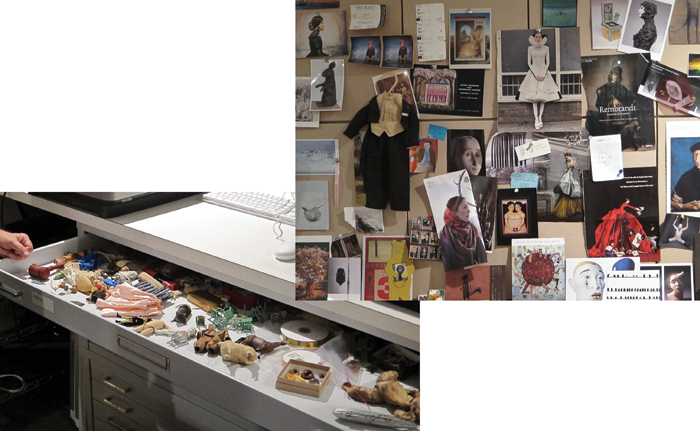
As you page through magazines, tear out the images, words, advertisements, and articles that catch your eye. Collect these in a large artist’s notebook (FIGURE 2.2), sort them into file folders, or tack them onto a large bulletin board. You can also use the same approach in the online world by taking screen shots of images that inspire you, keeping them in a folder, and using that folder as a digital scrapbook of ideas and inspiration. The website Pinterest (www.pinterest.com) makes this process easy by offering the ability to create online “pin boards” where you can collect the interesting things you find on the Internet (FIGURE 2.3). We’re always looking and collecting. Often, we don’t even know why we are drawn to an image, a scrap of paper, or a unique object. It may be the color, the focus, the light, the texture, or other concepts it might represent; it doesn’t matter. Allowing your eye and mind to let go will produce a wealth of ideas and inspiration (FIGURE 2.4).
Figure 2.2. A student’s idea notebook with pictures, sketches, and notes.
© Jenna Miller
Figure 2.3. Online pin boards such as Pinterest.com allow you to gather interesting things you find online and present them in a visual way, much like an actual bulletin board.
© KE
Figure 2.4. Maggie Taylor has several drawers in her studio that are filled with objects she collected to use in her collages. A large bulletin board displays images and other bits of ephemera that provide creative inspiration.
We try not to leave home without a camera because we never know what texture, play of light, or interesting scene will catch our eye. These days the camera that we have with us all the time is most likely an iPhone, but we’ll also sometimes use compact digital cameras, or even our DSLRs, which provide a higher-resolution file and more refined control over the exposure. It’s important to have a camera with you at all times, because it is your passport into the photographic realm. Use it to collect ideas for future images or for photographing stock images, textures, background scenes, or interesting elements for future composites. The photographic opportunities that present themselves while waiting for a flight (FIGURE 2.5 and FIGURE 2.6), while walking to the dentist, or in between business appointments are often surprising, and depending on the type of work you do, may result in being some of your best images. As New York photographer Jay Maisel says, “I always carry a camera with me, because it makes it much easier to take photographs.”
© SD
Figure 2.5. The original image of a display of old planes at the San Francisco Airport.
© SD
Figure 2.6. The U.S. Navy trainer plane from the airport display as an element in a collage about flight.
Observe
Similar to collecting and snapping, take the time to relish looking, gazing, and really seeing the world. What you see can often become the inspiration for a new image. Notice how the sunlight shining through a glass of juice bends into intriguing shapes (FIGURE 2.7). Katrin’s student Lisette Range was inspired by the photo in Figure 2.7 to create the composite shown in FIGURE 2.8. Observing nature and the ever-changing world of light, as well as studying and appreciating the work of other artists will make you a better visual artist.
Figure 2.7. Notice how the light is transformed as it shines through the glass of red juice.
© Lisette Range
Figure 2.8. The initial image of the light shining through the glass was the inspiration for this composite.
Brainstorming and Concept Development
It’s time to turn off the TV, log out of Facebook, Twitter, and Google+; quit the web browser; and quiet the voice in your mind that keeps saying, “That idea is stupid,” or “Who are you kidding?” or “I don’t have any ideas.” Just let yourself imagine the unimaginable. As photographer Duane Michals once said, “Trust that little voice in your head that says ‘Wouldn’t it be interesting if...’; And then do it.” Who says pigs can’t fly? The only rule in creative brainstorming is that negative words, such as no, impossible, and stupid, are not allowed.
When developing a concept, some people like to write about it. Although it may seem odd to use words to work with a purely visual idea, writing down what you’re thinking or seeing gets it out of your head and onto paper. It makes it tangible. And through the act of writing, you may find the clarity you are looking for. The immediate back and forth and give and take of conversation can also be useful. Some people like to discuss ideas and inspiration with their partners, friends, or like-minded creative people. Talking and brainstorming are well-known techniques for triggering a chain reaction where one thing leads to another, and before you know it, you have several new concepts and possible paths that have been generated from the initial idea seed. Just let yourself go, and you’ll be surprised at the ideas, images, and solutions that develop. Stop making excuses for a concept or finding flaws in an idea. Work through it. While you’re working through it, solutions or better ideas may become clear to you.
Browse through your image collection and try to imagine how photos, or elements in photos, might work when combined with other images. Look for pairings that might create interesting juxtapositions or strange and surreal scenes. Thinking about images in this way will help you to imagine possible composites.
Doodle and Sketch
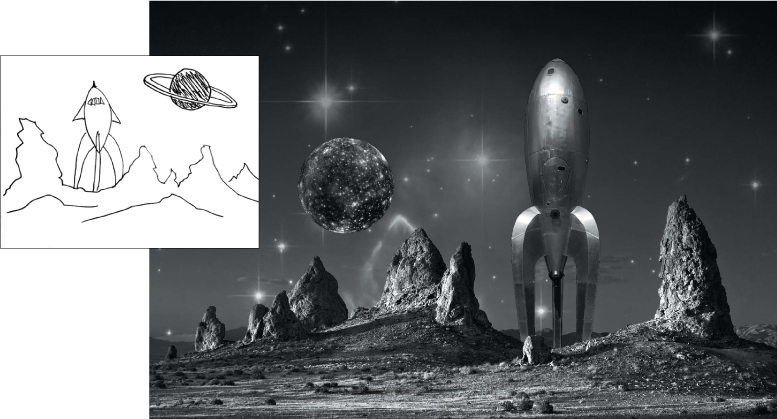
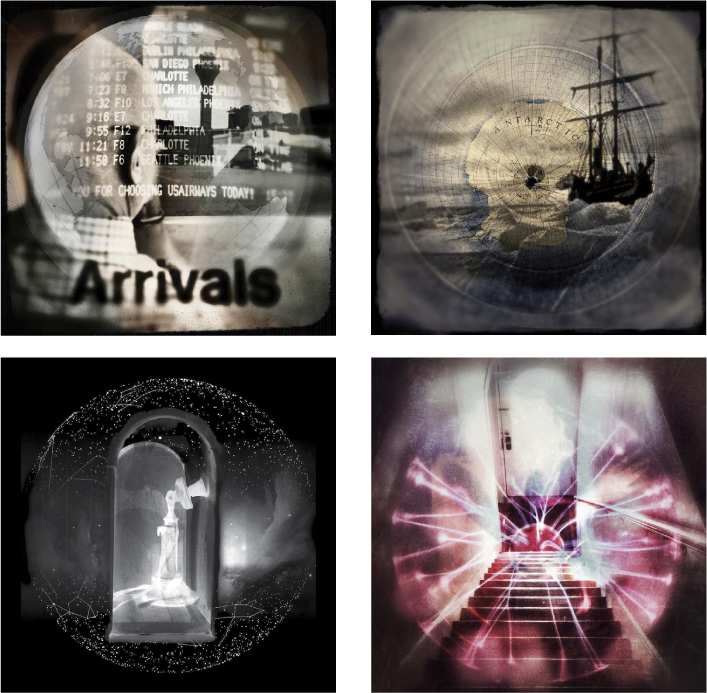
Grab a pencil and paper—yes, the actual materials you can hold in your hands—and start doodling and sketching. Making a quick drawing is a great way to create a visual note of an idea for an image (FIGURE 2.9). If you’re working on an ongoing project, sketches can provide you with a source of possible ideas for moving the series forward. In addition to traditional drawings made with pencil and paper, photos captured on your camera phone can also serve as visual notes and offer a quick creativity fix (FIGURE 2.10). In addition, you can create digital “sketches” using sketching or drawing apps for the iPad or other tablets. Seán uses his iPhone and photo apps that allow for the use of layers, layer masks, and blend modes to create composites from more than one image directly on the phone (FIGURE 2.11). Although these iPhone composites are not usually intended as sketches for larger images, he has made a few collages on the phone that did serve as the initial idea spark for a later version that was made using higher-resolution files and assembled in Photoshop.
Figure 2.9. A sketch of a rocket ship on a desolate planet eventually resulted in a black-and-white composite. Learn more about the rocket in this image at www.raygungothicrocket.com.
© KE
Figure 2.10. We love our iPhones and use them often as a photo sketchbook for a quick creativity fix.
Figure 2.11. Seán created these multi-image composites entirely on the iPhone with a variety of photo apps. Although the images were made at different times over the course of several months, a circular motif is apparent!
As you make your sketches and doodles, think about scale, position, shape, lighting, textures, and color (we’ll discuss these in Chapters 4 and 5). If you feel dry or uninspired, open your idea book or folder of images, or browse your online Pinterest collections and scan through the images and idea snippets you’ve gathered. Often, an image you added to the collection a few years ago will resonate with you more now than it did in the past and trigger a new idea.
We are not advocating that you copy someone else’s images or ideas in any way, because that is a violation of international copyright laws. But you can use them as inspiration and idea “kindling,” and a way to help you find your own creative path.
Personal Projects and Series
Artists often create their art within the structure of a series of related pieces. This way of working is a natural fit for photography because the camera is ideally suited for presenting a subject or story through multiple images. Ideas can be more fully explored by viewing related scenes or concepts through the “lens” of different photos, enabling you to show a variety of aspects of a subject and create a richer and more nuanced portrayal of it.
The benefits of working on a series are many, especially for new photographers who are still finding their voice and style. A series establishes a framework for thinking about and making new images, as well as providing a sense of direction and a creative path to follow. Working on a series can challenge your technical skills and nudge you out of your comfort zone, pushing you to explore new creative ground (FIGURE 2.12).
© SD
Figure 2.12. “The Inside Outside” is a series that explores the simultaneous interior and exterior views created by window reflections. The blending of two semitransparent scenes results in a real-life collage with no Photoshop required!
Having a long-term series that is personally significant to you can also be an important component in your growth as a photographer. It is a place to return to, a creative home base where you know the terrain and have already spent time making photographs. Working on a long-term series is a bit like having a good friend you’ve known for many years; even after a considerable time apart, you can always get together and pick up the conversation right away.
The flash project
In contrast to a long-term photographic series is what Seán calls a “flash project.” The name refers to the fast and sudden nature of the project, often occurring unexpectedly and over a relatively short span of time. Flash projects can provide a refreshing change of pace from a series that unfolds over longer periods of time. They can also serve as transitional works that occupy the time between other projects and may even become a springboard to a major body of work.
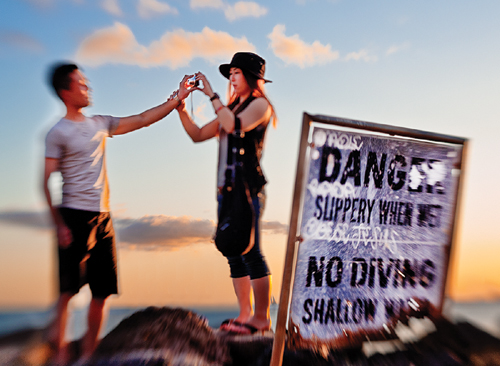
Flash projects provide a great opportunity to explore a different visual direction in your work. The short nature of a flash project gives you free rein to branch out creatively without a lengthy investment of time (FIGURE 2.13). Although some flash projects happen spontaneously, others can be planned, keeping in mind that the goal is that you will only spend a short amount of time on it. In addition, the scope of the subject matter should be limited to what you can easily cover in the designated time span. And even if a flash project never ends up in your portfolio book or on your website, it can still provide valuable grist for your creative mill and can add to the nuance and visual texture of future photographs. Sometimes the experience of making images is more rewarding and creatively significant than the actual images.
© SD
Figure 2.13. In “Move Your Head, So I Can See Diamond Head,” a vacationing couple sets up an arm’s length self-portrait. This photo is from a flash project made with a Lensbaby focusing on the tourist and beach culture of Waikiki Beach.
In search of meaning
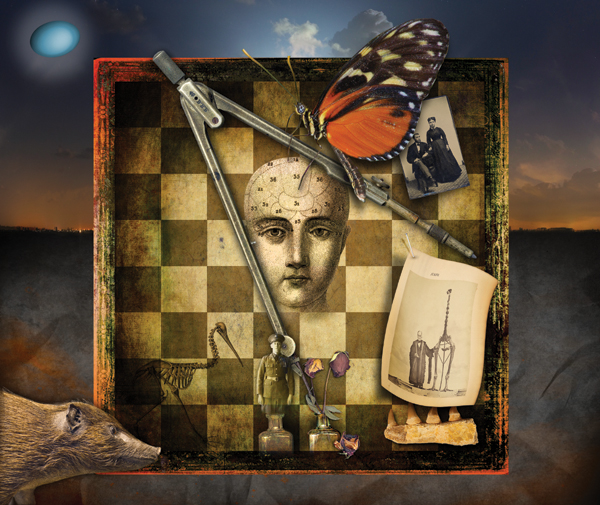
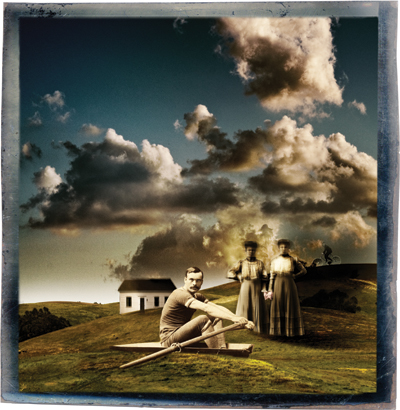
As photographers, we like to know what our images are about. For some photographs and series, that’s easy, but for others, the meaning may not be as clear, even to the photographer. Several years ago, Seán began working on a series without even realizing it. The first few photos shared only a similar color treatment, but something else also made them work together. He had no idea what this unifying element was; he just knew that they fit well together. The pace of this project turned out to be quite slow, because not knowing what the series was about made it difficult to plan new images. Every once in a while he would come across a scene or a fleeting moment that he just knew would work for “the series” (FIGURE 2.14). The title of the series, as well as the realization of the underlying concepts that were being explored, finally came from the title of one of the images: “A Measure of Longing” (FIGURE 2.15). It was a little over a year after beginning the project before he understood what the series was about: a meditation on a life journey and some of the common and universal themes that are experienced along the way. You can see the entire series at www.seanduggan.com/longing.
© SD
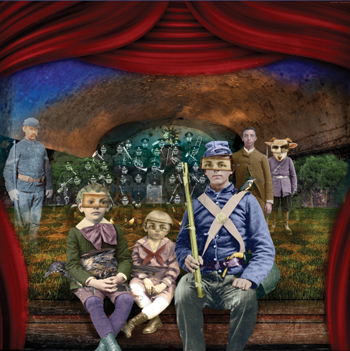
Figure 2.14. “The Narrator” is the opening image in the series “A Measure of Longing.” It sets the stage (literally) and suggests the narrative framework of a story being told.
© SD
Figure 2.15. “A Measure of Longing” is the image that helped clarify many of the underlying concepts and ideas in the series of the same name.
One of the most important things Seán learned from this long-term project was that it’s perfectly OK to work on a series of images that you know is meant to be a series and that you know belong together, even if you don’t have a firm idea as to what it’s about. Don’t worry; you’ll figure it out. Just keep working on it. Keep exploring. One day enough pieces will be in place, and the meaning of the series will become clear.
Proof of Concept
Some photos are spontaneous, whereas others are planned out, developing from the seed of an idea in your mind. Ideas for images, especially composites, generally look great in the mind’s eye, but we’ve all experienced the reality of those ideas turning out to be (much) less than stellar when we actually create them. We’ve learned that doing a low-resolution, proof-of-concept run-through of a composite image often helps us develop an idea, plan the image, revise the concept, or even sometimes not pursue the project at all. In a way this is simply an extension of the doodle-and-sketch approach, only instead of a sketch, you use Photoshop to create a rough draft of the idea.
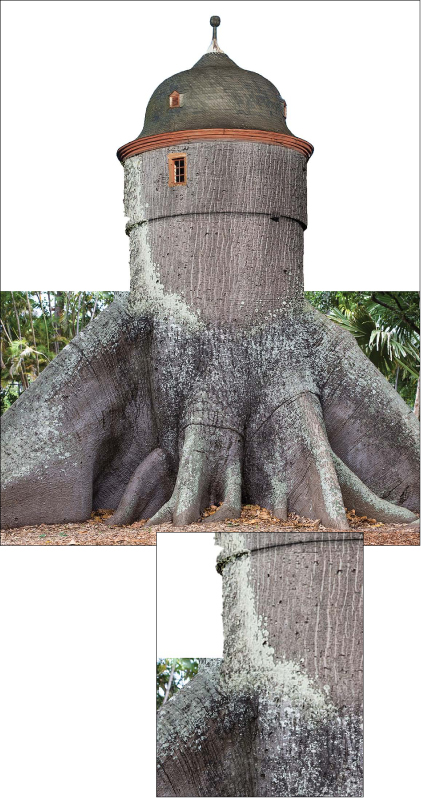
By doing a rough (proof-of-concept) draft, you practice with the image to determine whether the idea has legs. During the proof-of-concept stage, you’ll also see what elements are missing, learn how image components need to be photographed, figure out which models need to be cast, and decide whether you need to go back to step one to refine the overall concept. Take it from us, skipping the proof-of-concept step for an intricate composite is like going to a foreign country without a map, guide, or local currency. Take the time to make low-resolution, proof-of-concept files, and you’ll be able to approach the final image with much greater confidence because you’ll know where you need to go. In other words, you’ll know how to photograph a subject or whether an existing image you were considering has enough resolution, or how much time and effort might be required to create a complex mask. The initial collage might be quick and dirty with funky selection edges and stand-in images that need to be rephotographed, but if it helps advance the idea to another level, it’s time well spent. The example shown in FIGURE 2.16 confirmed for Seán that his idea of adding a tower to the tree would work, but it also revealed that when the tree trunk photo he was considering for the top of the image was scaled larger, it did not have enough resolution to match the sharper, higher-quality image of the base of the tree.
Figure 2.16. A quick composite rough draft can confirm that a concept is worth pursuing, as well as reveal potential problems with the images you may be considering.
Plan and Photograph
Once you’ve developed a concept and have determined that the idea holds water, it’s time to move on to the next phase of the process: turning the concept and rough drafts into a finished, high-resolution image. For some projects, the images may already exist in your photo archive; for others, you may need to plan the shots and create the photos, or collect and scan the image elements. We address planning for photography and the many considerations involved when taking pictures to use in composites in more detail in Chapters 3, 4, and 5. Once again, it makes a lot of sense to carry a camera with you whenever possible. If you spend the time gathering a collection of your own sky images that you can use, you won’t have to buy stock images of clouds or skies and worry about an image release or paying the copyright holder. So take pictures of interesting textures, shadows, reflections, buildings, and landscapes. Using a camera that generates higher-resolution files is a good idea for use in composites that will be reproduced at large sizes. And if you photograph a person so that the person is recognizable, you’ll need a model release to use the image for commercial purposes. Even if you don’t plan on using the image commercially, if there’s any chance it might be published, it’s always a good idea to have a standard model release signed by the model or the model’s guardian. See www.asmp.org for additional information and useful forms for photographers.
For convenience on the go, several apps are available that allow you to create a photo release directly on your smart phone where it can be signed by the person you’ve photographed. The app will send a copy of the release to that person’s email address. This is great for those times when you may not have the printed model release forms with you.
Images from magazines, books, or stock image catalogs are protected by international copyright laws. You cannot scan or rephotograph them to use in your composites without express permission from the copyright holder. To play it safe, if you didn’t create the original image or image element and it’s less than 75 years old, assume that you can’t use it for commercial purposes. Use only copyright-free stock images or your own photographs, drawings, and images, or images for which you have secured the necessary license and permissions.
Digitize, Organize, and Back Up
If you’re using film images from your photo archive or if your collage incorporates works on paper—such as old letters, passports, or vintage family snap-shots—digitizing these items for the composite is the first step after the idea phase. Making scans at the correct size and resolution for the final composite size is the best way to convert flat analog items into digital form. But if you don’t have a scanner, it may be possible to copy photographs with a good digital camera. For film originals, you’ll get the best quality by scanning the original negative or slide. This requires a scanner that is designed to scan negatives.
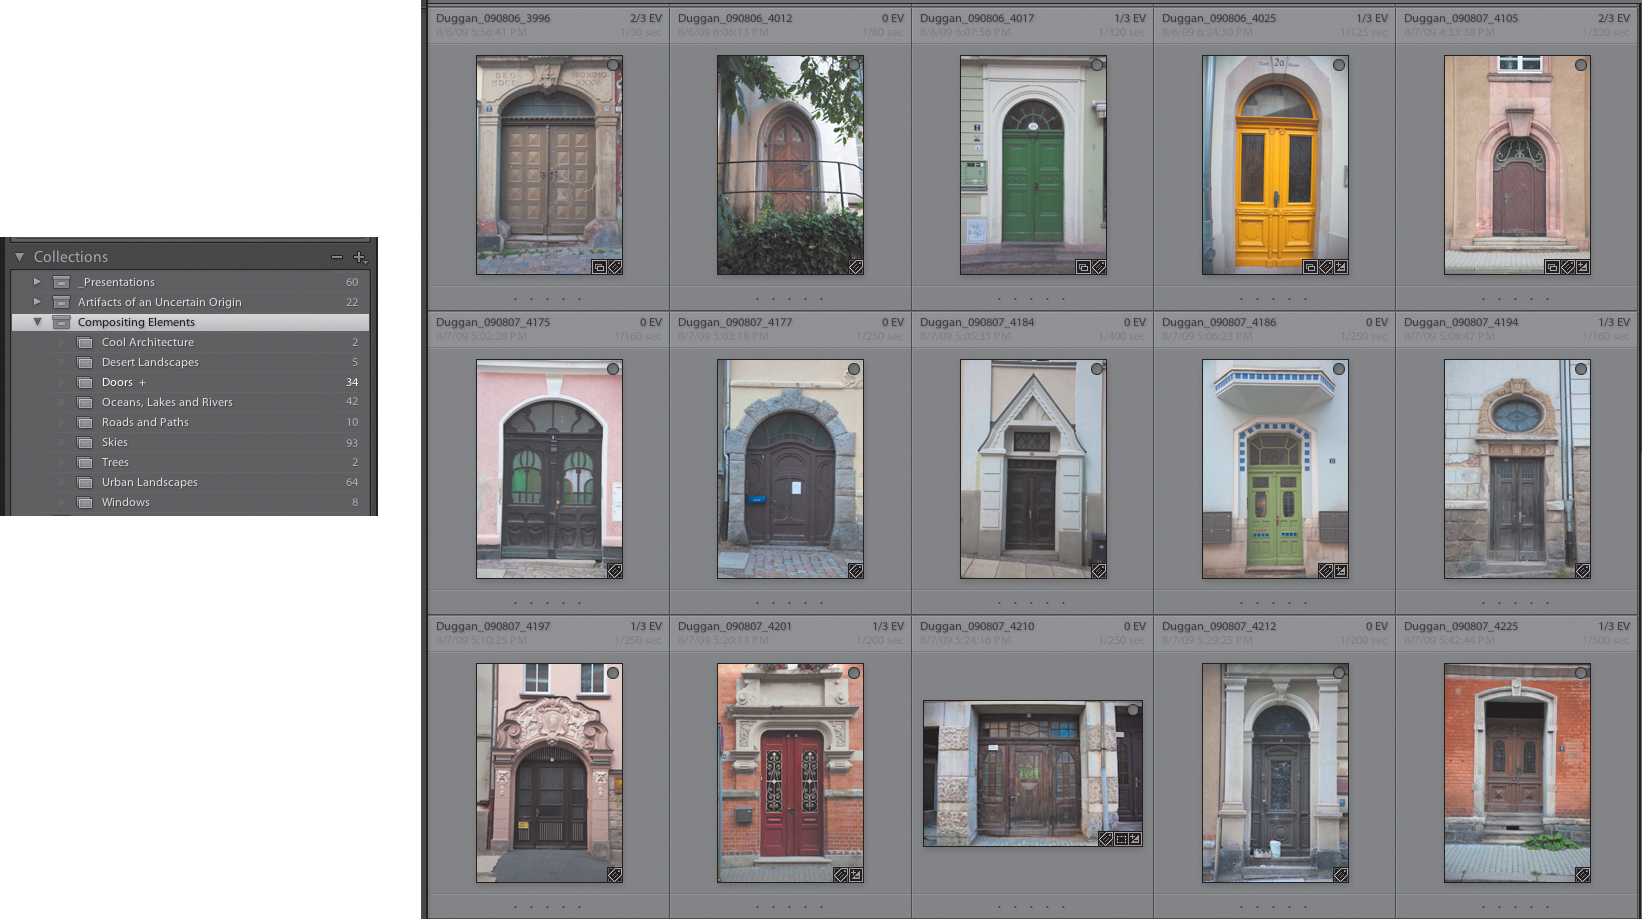
Once you’ve decided on the images that you’ll use in your compositing project, it’s a good idea to organize them so that you can find and view all of the component parts easily and at the same time. If you use Adobe Bridge or Lightroom, you can create a Collection for each project. With a Collection, the different component images can be viewed in one place, even if the original images are filed in several different folders. You can also use keywords to tag an image as part of a specific project (i.e., client name, project name, or job number) or to tag an image simply based on image content that you want to be able to find quickly. You’re likely to amass quite a lot of photos of subject matter or themes that you return to often. Therefore, consider making a Collection of your favorites of a subject that you use frequently. FIGURE 2.21 shows a small sampling of the many images of doors that Seán has in his image archive.
© SD
Figure 2.21. Lightroom Collections are an excellent way to organize images by subject so you can quickly find them when you need them.
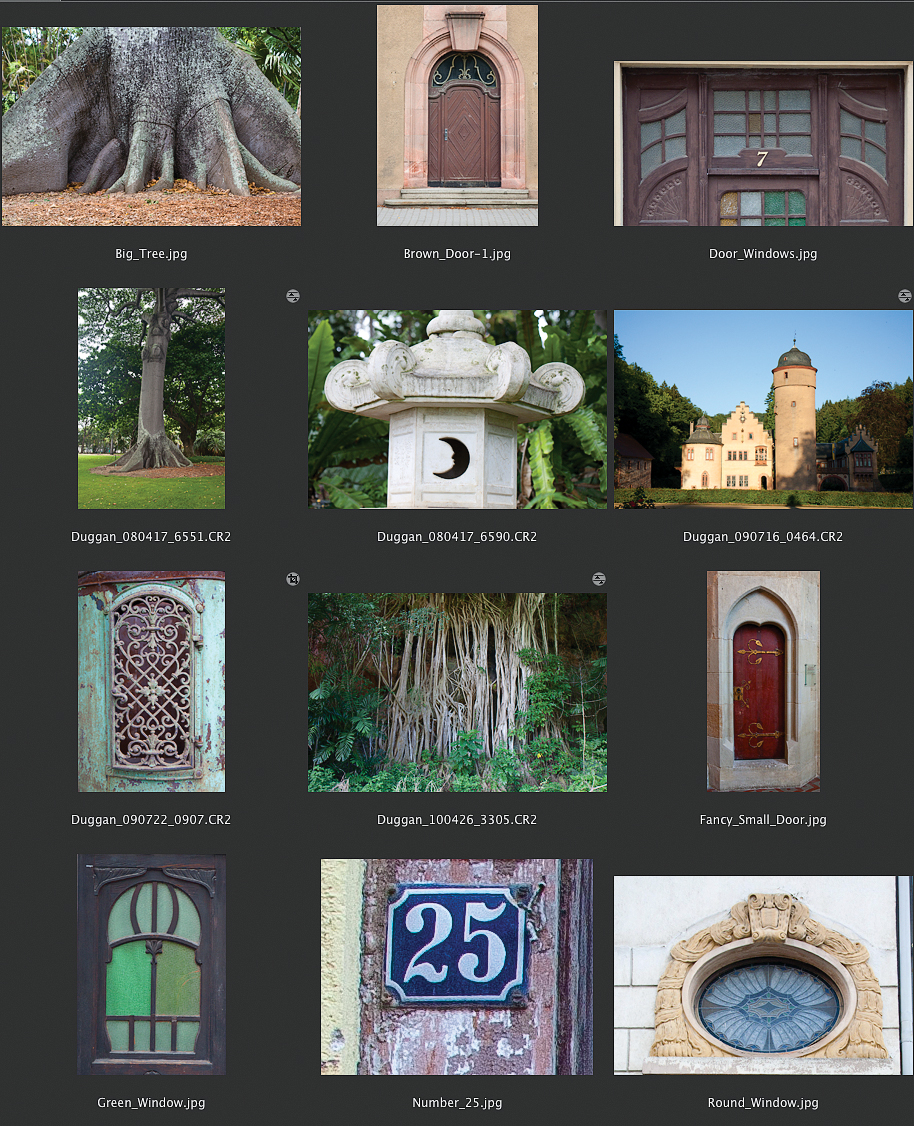
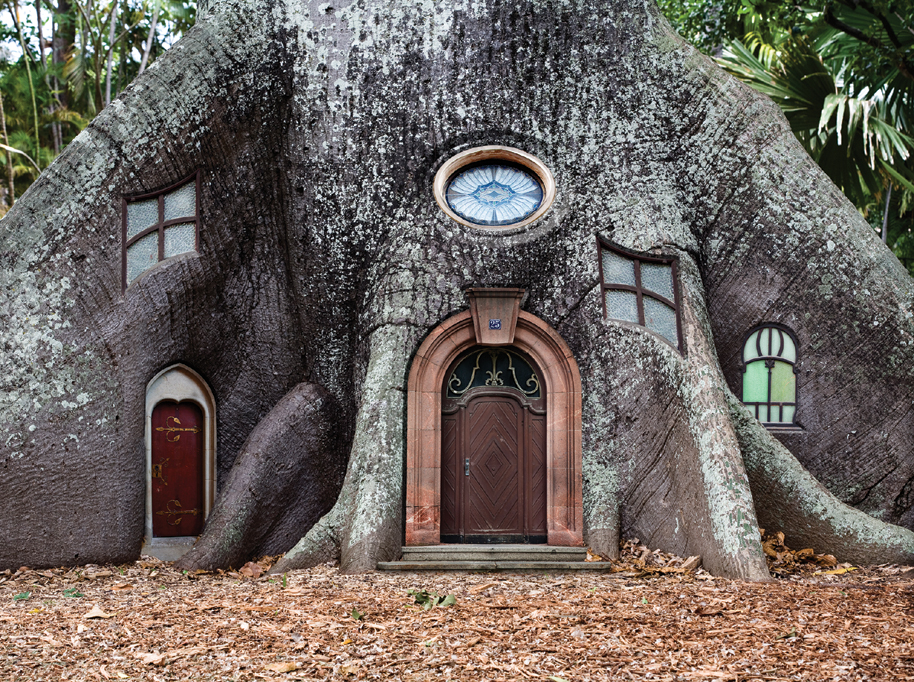
For some workflows, it may make more sense to create a dedicated folder for each compositing project. Within that folder, you can add subfolders for original files (or copies of the originals), WIP (work in progress), and final versions (FIGURE 2.22). The originals folder should contain scans, stock images, and digital camera files. When you open a file and modify it in any way, you should then save a new working version to the WIP folder. All layered files that are pertinent to that project should also be kept in the WIP folder. The final folder should contain the final flattened version of the image. By creating a simple folder hierarchy, you can quickly find the images and files you need. After making the scans or gathering the images you need for a composite project, you should also ensure that the files are backed up to additional external hard drives, burned to a DVD, or uploaded to an online archive service. This will protect you from having to start over from scratch in the event of a hard drive crash. During the project, make sure that you regularly back up to an external hard drive. At the end of the project, burn two sets of DVDs or copy the files to two different hard drives: one for the archive in your studio and the other for offsite storage in a safe location.
© SD
Figure 2.22. A folder of original images for a tree house composite and the work in progress layered file.
Preparing the Files
When you have the files for your composite all in one place and ready to go, you may be tempted to dive right in and start putting the images together. After all, that’s the most exciting part of the process, seeing your idea take shape in Photoshop as the different elements of the collage are brought together to form a completely new image. Before the fun begins, however, we recommend attending to some basic file preparation tasks to ensure that each image is in prime condition before you begin the composite.
Clean Up and Color Correct
When preparing your files, you should first remove any dust, damage, or other unwanted artifacts. This can include digital sensor dust spots, dust from the scanning process, scratches on film negatives, or damage to printed snapshots and documents. For raw files with sensor dust spots, those are best dealt with in the raw processing using either Adobe Camera Raw or Lightroom. When you have the file open in Photoshop, use the Clone Stamp and Healing Brush tools for additional spotting or removal of small cracks and other damage. For the most flexibility when retouching in Photoshop, create a new, empty layer and set the Clone Stamp or Healing Brush Sample menu to Current and Below in the Options bar. This will allow you to keep any retouching work on a separate layer so that the changes are nondestructive.
Global tonal and color correction should also be applied to any image that will be used in the composite. The goal is to make the image look as good as possible before adding it to the collage. For raw files, all global corrections are best applied in Camera Raw or Lightroom. In Photoshop use adjustment layers to apply tonal and color modifications so that the modifications are not permanent and can be changed if needed. The purpose of color adjustments at this stage should be for the individual image. Do not try to make adjustments at this point in an attempt to get the photo to match other images that it will be composited with later. Additional adjustments can be made once the image is placed as a layer in the master composite file. One of the dead giveaways of poor compositing is an image in which the different elements have color or tonal qualities (i.e., brightness and contrast) that do not match. So, taking some time in the initial phase of image creation and file preparation will pay off later many times over. Additionally, the time you spend cleaning up a file gives you the chance to become familiar with the file and plan how to approach making the selection or mask that is required to blend it convincingly into the composite.
Select and Mask
With image cleanup and color correction out of the way, you can finally dive into making selections and masks. Whether you make the selections in the working version of a component file or whether you have that file placed as a layer in the main composite is up to you. Katrin often takes the time to isolate the individual elements before combining them. The process of selecting fine detail or drawing a precise path provides her with the opportunity to become familiar with the image. Seán likes to create very rough and loose selections of an object, and then do the final masking in the main composite file. For image “parts” that may be used again in other projects, he creates and then saves an accurate path or alpha channel with the file, allowing him to quickly select the object the next time he needs it. Jim is a Pen tool fanatic and meticulously creates precise Pen tool paths to isolate image elements before compositing.
If you’ve spent more than a few minutes making a selection or if you know that you’ll need to reassess it later, we suggest you save the selection as an alpha channel so you can easily access it in the future. When you have an active selection, choose Select > Save Selection to save the selection as an alpha channel with the file to avoid having to make the same selection repeatedly. Selections and alpha channels are addressed in great detail in Chapters 6, 7, and 10.
Composite and Refine
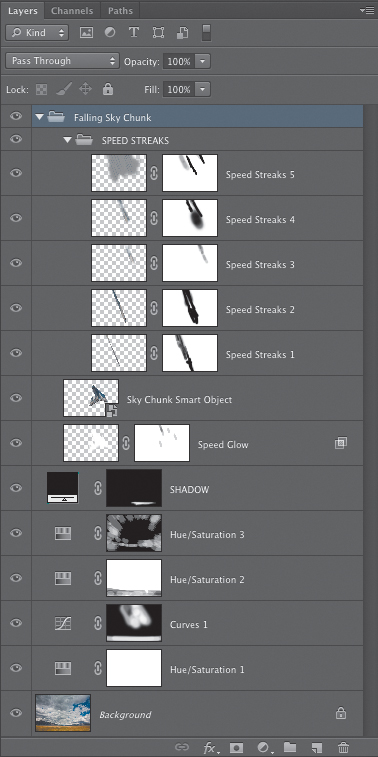
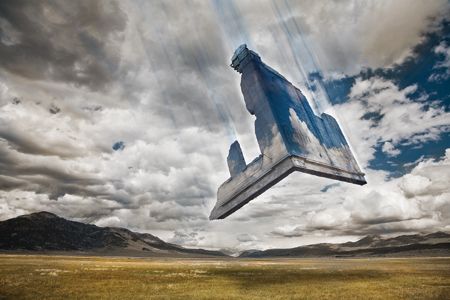
Let the fun begin! As we discuss in Chapter 13, there are many approaches to making image composites. When we’re working on a project, we never flatten the file or merge layers, as shown in FIGURE 2.23. The primary reason for this approach is that we want to keep the file in a flexible state so that we can easily fine-tune and perfect the various parts of the composite. If the layers are flattened, we cannot do this. Additionally, we never know when a specific layer will have a tidbit of useful information or a layer mask that might be needed elsewhere.
© SD
Figure 2.23. “The Sky Is Falling” and its Layers panel. Seán made this composite from three images. The section of the falling sky is a separate composite that was created in another file and then added to the landscape image.
When the basic composite is done, it’s time to move into the refinement stage. To refine the image, we usually do the following: Take a break, and if necessary, get a second opinion. Taking a break for a few hours or coming back to an image the next day lets you see the image with fresh eyes. Asking for a second opinion is a must, especially if there is something you are unsure of about the image. When you show the image to others, ask them what they like about the image, and more important, what they don’t like. It’s important to find someone who has a good eye and is willing to discuss the image without having to protect your feelings. After all, it’s an image, not a marriage proposal!
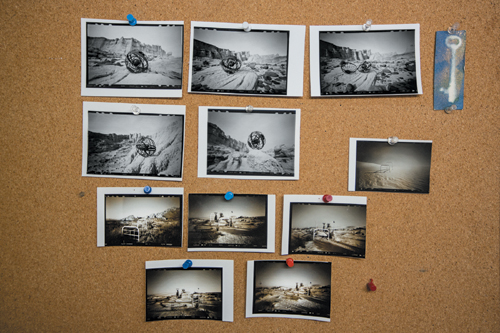
Finally, make a work print so that you can see the image clearly. We find that evaluating a print instead of looking at the image on the computer screen is a vital step in our review of it. Sometimes you’re so used to looking at the image onscreen that it’s difficult to get a sense of the entire scene and easier to miss glaring errors. Making the print gives you an object to look at, live with for a few days, and learn from. If making multiple work prints is an option for you, tack them onto a wall or a bulletin board and view them in your workspace for several days. As you study the images, they will “tell” you what changes need to be made. Go ahead and make notations directly on these prints so that when you return to the computer, you can fix and refine the details efficiently. This image refinement approach works well for any photographic project, not just composites (FIGURE 2.24).
© SD
Figure 2.24. Work prints tacked to a wall or a bulletin board can help you determine what needs to be changed or perfected during the refinement process.
Of course, you’ll adapt this creative process to fit your own working style. As you work, steps will blend together, and the process will become more familiar. Just make sure you give yourself the time, space, and opportunity to work and a frame of mind that is open to being delighted and fascinated by image creation. One of our favorite quotes from Jerry Uelsmann nicely sums up this process: “If I have an ultimate goal, it’s to amaze myself.”
Closing Thoughts
Understanding the different stages of the creative process and identifying the conditions that help to maximize your own creativity are important parts of the image-making journey. Becoming more familiar with the different parts of this path will help you recognize what works best for your own style of generating ideas and putting those ideas into tangible form. The next step is to consider the many variables that come into play when you actively begin planning to shoot your photographs so you can create the images that live in your imagination.

