
Chapter 4
Drawing The Environment
In this chapter you are going to learn how to render a background to your game. The background sets the tone and the environment for the game. For Star Fighter, the environment is going to be a background of stars, planets, space ships, and debris. You are going to use OpenGL to set the background into the game and render it to the screen.
Given that a single background is pretty impressive, two backgrounds must be twice as impressive. Well, not quite – but two backgrounds that run at different speeds give your game a visual depth that can be very interesting. You will be adding a second layer of background to your game that will scroll at a faster speed than the first.
Later in the chapter, you will take a break from the game setting and work on making your game run at 60 frames per second. While many devices may not be able to run a fully completed game at a full 60 frames per second, it is the goal of most game developers.
No matter how good your game is, it will serve no purpose if the player cannot access it. Therefore, in this chapter you will also modify your main menu to be able to launch the game when the player selects the start option.
By this point in the book you should have a working splash screen that fades into the main menu of the game and some looping background music. This is a big accomplishment; however the code will more complicated in this chapter. Again, feel free to skip around the chapter, but realize that most of the examples will be cumulative in that they will all build in previous examples.
Finally, in this chapter, you be introduced to a good deal of OpenGL. I do realize that most casual Android developers may not have had too extensive of an exposure to OpenGL. I will try to give as much background and instructions in OpenGL as you proceed through the chapter.
With that said, let’s jump right into drawing the background of the game.
Rendering the Background
In the previous chapter, you used Android’s ImageView to display a bitmap as the splash screen of your game. This is an acceptable solution for a splash screen and a main menu. But there is too much overhead and not enough flexibility in this process to use it for the graphics of the game. If you were to somehow find a way to use this process to display your game graphics, the game would run very slow, if it could load at all.
To quickly draw the background of this game to the screen, you need a tool that is both lightweight and flexible. Luckily, Android has an implementation of just such a tool: OpenGL ES. OpenGL ES is the OpenGL standard for Embedded Systems (I will just refer to it as OpenGL in this book for the ease of the discussion). It has been on Android, in various forms, from the first SDK releases. OpenGL offers a useful, flexible, and fairly established way to work with game graphics.
In the beginning, the implementation of OpenGL on Android was very buggy and not as feature rich as some other systems. However, as more Android versions have come out, the implementations of OpenGL have gotten more solid. This is not to say that there are not still —you will learn about at least one important OpenGL bug in this chapter.
You will be creating a fairly complicated two-layer, repeating, scrolling background for Star Fighter. Specifically, you will have a larger background image that is scrolling (and repeating) that is partially overlaid with a second scrolling image moving at a faster rate. This will give the background a complex look that has a 3-D effect. Figure 4–1 shows what the finished backgrounds will look like.
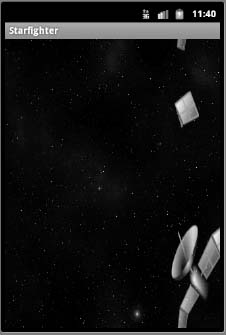
Figure 4–1. The finished backgrounds
To begin, you need a new activity to run your game. This activity will be launched when the player clicks on the Start button that you created in your main menu in the previous chapter.
Creating the Creating the Creating the
The game activity is the Android activity that will be launched when you start your actual game, at least the part of the game that the player will actually be playing (as opposed to the splash screen or main menu). While the splash screen and menu may seem like parts of the game, for this chapter’s purposes, you are separating them out based on function.
You have created several key features of the game to this point, but you have yet to write any of the code that will power the game play. That is going to change now. You are going to create the activity that will run the game play of Star Fighter.
Create a new class in your main package named SFGame.java. After the class is created, open it in Eclipse. It should look like this:
package com.proandroidgames;


public class SFGame {


}
NOTE: Keep in mind that if you have not followed this book in order, the code that you see here may differ from yours because you may have created your base with a different package or class name.
Modify your SFGame class to extend Activity, and include any unimplemented methods.
package com.proandroidgames;


import android.app.Activity;

import android.os.Bundle;


public class SFGame extends Activity {


    @Override

    public void onCreate(Bundle savedInstanceState) {

        super.onCreate(savedInstanceState);

        setContentView();

    }


}
TIP: At this point, you should follow the directions in the previous chapter to associate the SFGameActivity with the StarFighter project using the AndroidManifest.
Save this file as it is. It cannot do much now. In fact, it is barely a shell of an activity, and if you were to run it now, you would be lucky to get a blank screen, but you would most likely receive a nice syntax error.
You need to build a view that the SFGame activity can display. The view will make the calls that display the game to the screen. The SFGame activity is the view’s conduit to get to the screen.
Let’s talk a little about what is going to happen next.
Creating a Game View
In Chapter 3, you used a premade Android view called an ImageView to display the splash screen and the main menu for your game. This is an acceptable method for displaying static graphics. However, you are created a limit pushing game here. A view with as much overhead and as limited of a function set as the ImageView simply will not give you the flexibility that you need to create a game. Therefore, you need to look elsewhere for you graphic rendering tools.
Android comes with just the right tool for the job, OpenGL. You will use OpenGL to display and manipulate the game graphics. It gives you the power and the flexibility that you need to quickly display 2D and 3D graphics and is perfect for the kind of game you are writing now.
If you have done any Android development in the past, you may have used the canvas to draw to the screen. OpenGL has its own type of canvas that you need to use to display OpenGL graphics to the screen. The GLSurfaceView will allow you the ability to display your games graphics to the screen.
To this point, you have created the SFGame activity, but you now need something for it to display. Let’s create a new class named SFGameView:
package com.proandroidgames;


public class SFGameView{


}
Now, modify this class to extend GLSurfaceView.
package com.proandroidgames;


import android.opengl.GLSurfaceView;


public class SFGameView extends GLSurfaceView {


}
With the class that extends the GLSurfaceView created, you can add a reference to it in your SFGame activity. In the previous chapter, you set the value for setContentView() in your StarFighter activity to a layout. As of right now, the setContentView() value for the SFGame activity is not set, or it is set to a default main layout. However, you can set this value to a GLSurfaceView. Setting the SFGamesetContentView() to the SFGameView that you just created will let you begin to work with and display OpenGL.
Open the SFGame activity, and create an instance of the SFGameViewGLSurfaceView that you just created.
package com.proandroidgames;


import android.app.Activity;

import android.os.Bundle;


public class SFGame extends Activity {


         private SFGameView gameView;


           @Override

           public void onCreate(Bundle savedInstanceState) {

           super.onCreate(savedInstanceState);

           setContentView();

    }

}
Now, instantiate the SFGameView, and set the setContentView() to the new instance.
package com.proandroidgames;


import android.app.Activity;

import android.os.Bundle;


public class SFGame extends Activity {

    private SFGameView gameView;


    @Override

    public void onCreate(Bundle savedInstanceState) {

        super.onCreate(savedInstanceState);

        gameView = new SFGameView(this);

        setContentView(gameView);

    }

}
This is enough code to display the game using the SFGameView. However, you do want to think ahead here and consider things that can happen to your game as the player is using it. If you put in some extra time now, you can avoid some very painful headaches very simply.
Using onResume() and onPause()
One of the most common things that can happen is that the player can interrupt the game by giving another Activity focus. This can happen either intentionally—if the player starts another activity and gives it focus—or unintentionally—if the player receives a phone call during the game. Either situation can wreak havoc on your game if not handled properly. Surprisingly enough, these two situations are fairly easy to code for.
Android provides a couple of handlers just for situations where your activity could be interrupted. If your activity loses focus to another, whether intentionally or not, Android will send a pause event to your activity. When your activity becomes the active one again, Android will send it a resume event.
The Activity class can implement onPause() and onResume() to deal with these situations. Simply override these in your SFGame activity as follows:
package com.proandroidgames;


import android.app.Activity;

import android.os.Bundle;


public class SFGame extends Activity {


    private SFGameView gameView;


    @Override

    public void onCreate(Bundle savedInstanceState) {

        super.onCreate(savedInstanceState);

        gameView = new SFGameView(this);

        setContentView(gameView);

    }

  @Override

    protected void onResume() {


    }


    @Override

    protected void onPause() {


    }


}
Now, you can add some code that will pause and resume your game activity as necessary.
package com.proandroidgames;


import android.app.Activity;

import android.os.Bundle;


public class SFGame extends Activity {

    private SFGameView gameView;


    @Override

    public void onCreate(Bundle savedInstanceState) {

        super.onCreate(savedInstanceState);

        gameView = new SFGameView(this);

        setContentView(gameView);

    }

    @Override

    protected void onResume() {

       super.onResume();

       gameView.onResume();
    }


    @Override

    protected void onPause() {

       super.onPause();

        gameView.onPause();

    }


}
NOTE: The onResume() and onPause() functions refer to the pausing of the activity execution itself, not the pausing of the game. Pausing the game is handled separately.
Save your SFGame class once again. You now have an activity that displays a GLSurfaceView. You need to create something for the SFGameView to display through the SFGame activity. What you need to create is a GLSurfaceView renderer.
Creating a Renderer
The GLSurfaceView that you created, SFGameView, is only a view for displaying OpenGL through. The GLSurfaceView needs the assistance of a renderer to do the heavy lifting. Theoretically, you could incorporate the renderer into the GLSurfaceView. However, I prefer having a clean separation of the code to give some distinction between the functions; it makes troubleshooting a little easier.
Create a new class in your StarFighter package called SFGameRenderer.
package com.proandroidgames;


public class SFGameRenderer{


}
Now you need to implement the GLSurfaceView’s renderer.
package com.proandroidgames;


import android.opengl.GLSurfaceView.Renderer;


public class SFGameRenderer implements Renderer{


}

Be sure to add in the unimplemented methods:

package com.proandroidgames;


import javax.microedition.khronos.egl.EGLConfig;

import javax.microedition.khronos.opengles.GL10;


import android.opengl.GLSurfaceView.Renderer;


public class SFGameRenderer implements Renderer{
       @Override

       public void onDrawFrame(GL10 gl) {

              // TODO Auto-generated method stub


       }


       @Override

       public void onSurfaceChanged(GL10 gl, int width, int height) {


       }


       @Override

       public void onSurfaceCreated(GL10 gl, EGLConfig config) {


       }

}
The function of these methods should be fairly self-explanatory. The onDrawFrame() method is called when the renderer is draws a frame to the screen. The onSurfaceChanged() method is called when the size of the view has changed, even at the time of the initial change. Finally, the onSurfaceCreated() method is called when the GLSurface is created.
Let’s start coding them in the order that they are called. First up is onSurfaceCreated().
Creating your OpenGL Surface
In onSurfaceCreated(), you are going to initialize your OpenGL and load your textures.
TIP: In OpenGL parlance, a texture can also be an image, like your background. You will get to this later in the chapter, but technically, you will be using the background image for this game as a texture that is applied to two flat triangles and displayed.
The first step is to enable the 2-D texture mapping capabilities of OpenGL
package com.proandroidgames;


import javax.microedition.khronos.egl.EGLConfig;

import javax.microedition.khronos.opengles.GL10;

import android.opengl.GLSurfaceView.Renderer;


public class SFGameRenderer implements Renderer{

        @Override

        public void onDrawFrame(GL10 gl) {

        }

        @Override

        public void onSurfaceChanged(GL10 gl, int width, int height) {

        }


        @Override
        public void onSurfaceCreated(GL10 gl, EGLConfig config) {

              gl.glEnable(GL10.GL_TEXTURE_2D);

        }

}
Notice that the onSurfaceCreated() takes an instance of OpenGL (GL10 gl) as a parameter. This instance will be passed in to the method by the GLSurfaceView when the renderer is called. You do not have to worry about creating an instance of GL10 for this process; it will be done for you automatically.
Next, you want to tell OpenGL to test the depth of all of the objects in your surface. This will need some explaining. Even though you are creating a 2-D game, you will need to think in 3-D terms.
Imagine that the OpenGL environment is a stage. Everything that you want to draw in your game is an actor on this stage. Now, imagine that you are filming the actors as they move around on the stage. The resulting movie is a 2-D representation of what is happening. If one actor moves in front of another actor, that actor will not be visible on the film. However, if you are watching these actors live in a theater, depending on where you are sitting you may still be able to see the actor in the back.
This is the same idea that OpenGL is working under. Even though you are making a 2-D game, OpenGL is going to treat everything as if it were a 3-D object in 3-D space. In fact, one of the only differences to developing in 2-D and 3-D in OpenGL is how you tell OpenGL to render the final scene. Therefore, you need to be mindful of where your objects are placed in the 3-D space to make sure they render properly as a 2-D game. By enabling OpenGL depth testing next, you give OpenGL a means by which to text your textures and determine how they should be rendered.
package com.proandroidgames;


import javax.microedition.khronos.egl.EGLConfig;

import javax.microedition.khronos.opengles.GL10;

import android.opengl.GLSurfaceView.Renderer;


public class SFGameRenderer implements Renderer{

        @Override

        public void onDrawFrame(GL10 gl) {

        }

        @Override

        public void onSurfaceChanged(GL10 gl, int width, int height) {

        }


        @Override

        public void onSurfaceCreated(GL10 gl, EGLConfig config) {

              gl.glEnable(GL10.GL_TEXTURE_2D);

                gl.glClearDepthf(1.0f);

               gl.glEnable(GL10.GL_DEPTH_TEST);

               gl.glDepthFunc(GL10.GL_LEQUAL);


        }

}
The two last lines of code that you will add to this method concern blending. You don’t have to be too concerned about this right now, because you really won’t notice the effects of this code until much later in this chapter. All of the images that you are going to draw in your game are going to have areas that should be transparent. These two lines of code will set OpenGL’s blending feature to create transparency.
 package com.proandroidgames;


import javax.microedition.khronos.egl.EGLConfig;

import javax.microedition.khronos.opengles.GL10;

import android.opengl.GLSurfaceView.Renderer;


public class SFGameRenderer implements Renderer{

        @Override

        public void onDrawFrame(GL10 gl) {

        }

        @Override

        public void onSurfaceChanged(GL10 gl, int width, int height) {

        }


        @Override

        public void onSurfaceCreated(GL10 gl, EGLConfig config) {

              gl.glEnable(GL10.GL_TEXTURE_2D);

                gl.glClearDepthf(1.0f);

               gl.glEnable(GL10.GL_DEPTH_TEST);

               gl.glDepthFunc(GL10.GL_LEQUAL);


               gl.glEnable(GL10.GL_BLEND);

        gl.glBlendFunc(GL10.GL_ONE, GL10.GL_ONE);

         }

}
Loading Game Textures
The next thing you should do in the onSurfaceCreated() method is load your textures. However, that is going to be a somewhat involved process, and you will tackle it in the next section. For now, put a comment in the code to indicate that you are coming back to it, and let’s move on to onSurfaceChanged().
NOTE: All of the textures you add throughout the game will be added in the onSurfaceCreated() method.
public class SFGameRenderer implements Renderer{

        @Override

        public void onDrawFrame(GL10 gl) {

        }

        @Override

        public void onSurfaceChanged(GL10 gl, int width, int height) {

        }


        @Override

        public void onSurfaceCreated(GL10 gl, EGLConfig config) {
              gl.glEnable(GL10.GL_TEXTURE_2D);

               gl.glClearDepthf(1.0f);

              gl.glEnable(GL10.GL_DEPTH_TEST);

              gl.glDepthFunc(GL10.GL_LEQUAL);


              gl.glEnable(GL10.GL_BLEND);

               gl.glBlendFunc(GL10.GL_ONE, GL10.GL_ONE);


              //TODO Add texture loading for background image

        }

}
The onSurfacedChanged() method is going to handle all of the setup needed to display your images. Every time the screen is resized, the orientation is changed, and on the initial startup, this method is called.
You need to set up glViewport() and call the rendering routine to complete onSurfacedChanged().
The glViewport() method takes four parameters. The first two parameters are the x and y coordinates of the lower left-hand corner of the screen. Typically, these values will be (0,0) because the lower left corner of the screen will be where the x and y axes meet—the 0 coordinate of each. The next two parameters of the glViewport() method are the width and the height of your viewport. Unless you want your game to be smaller than the device’s screen, these should be set to the width and the height of the device.
public class SFGameRenderer implements Renderer{

        @Override

        public void onDrawFrame(GL10 gl) {

        }

        @Override

        public void onSurfaceChanged(GL10 gl, int width, int height) {


              gl.glViewport(0, 0, width,height);

        }


...


}
Notice that the calling surface, in this case SFGameView, sends in width and height parameters to the onSurfacedChanged() method. You can just set the width and the height of the glViewport() to the corresponding width and height sent in by SFGameView.
NOTE: The width and height sent in by SFGameView will represent the width and height of the device minus the notification bar at the top of the screen.
If the glViewport() represents the lens through which your scene is filmed, the glOrthof() is the image processor. With the view port set, all you have to do now is use glOrth0f() to render the surface.
Rendering the Surface
To access glOrthof() you need to put OpenGL into projection matrix mode. OpenGL has different matrix modes that let you access different parts of the engine. Throughout this book, you will access most if not all of them. This is the first one you will work with. Projection matrix mode gives you access to the way in which your scene is rendered.
To access projection matrix mode you need to set glMatrixMode() to GL_PROJECTION.
public class SFGameRenderer implements Renderer{

        @Override

        public void onDrawFrame(GL10 gl) {

        }


...


        @Override

        public void onSurfaceCreated(GL10 gl, EGLConfig config) {

              gl.glEnable(GL10.GL_TEXTURE_2D);

              gl.glClearDepthf(1.0f);

              gl.glEnable(GL10.GL_DEPTH_TEST);

              gl.glDepthFunc(GL10.GL_LEQUAL);


              gl.glEnable(GL10.GL_BLEND);

               gl.glBlendFunc(GL10.GL_ONE, GL10.GL_ONE);


              //TODO Add texture loading for background image

        }

}
Now that OpenGL is in projection matrix mode, you need to load the current identity. Think of the identity as the default state of OpenGL.
public class SFGameRenderer implements Renderer{

        @Override

        public void onDrawFrame(GL10 gl) {

        }


...


        @Override

        public void onSurfaceCreated(GL10 gl, EGLConfig config) {

              gl.glEnable(GL10.GL_TEXTURE_2D);

              gl.glClearDepthf(1.0f);

              gl.glEnable(GL10.GL_DEPTH_TEST);

              gl.glDepthFunc(GL10.GL_LEQUAL);

               gl.glEnable(GL10.GL_BLEND);

                gl.glBlendFunc(GL10.GL_ONE, GL10.GL_ONE);


              //TODO Add texture loading for background image

        }

}
With the identity is loaded, you can set up glOrthof(), which will set up an orthogonal, two-dimensional rendering of your scene. This call takes six parameters, each of which defines a clipping plane.
The clipping planes indicate to the renderer where to stop rendering. In other words, any images that fall outside of the clipping planes will not be picked up by glOrthof(). The six clipping planes are the left, right, bottom, top, near, and far. These represent points on the x, y, and z axes.
public class SFGameRenderer implements Renderer{

        @Override

        public void onDrawFrame(GL10 gl) {

        }

        @Override

        public void onSurfaceChanged(GL10 gl, int width, int height) {


              gl.glViewport(0, 0, width,height);


              gl.glMatrixMode(GL10.GL_PROJECTION);

              gl.glLoadIdentity();

              gl.glOrthof(0f, 1f, 0f, 1f, -1f, 1f);


        }


        @Override

        public void onSurfaceCreated(GL10 gl, EGLConfig config) {

              gl.glEnable(GL10.GL_TEXTURE_2D);

              gl.glClearDepthf(1.0f);

              gl.glEnable(GL10.GL_DEPTH_TEST);

              gl.glDepthFunc(GL10.GL_LEQUAL);


               gl.glEnable(GL10.GL_BLEND);

                gl.glBlendFunc(GL10.GL_ONE, GL10.GL_ONE);


              //TODO Add texture loading for background image

        }

}
That is all you have to do to set up the rendering and projection of your game. Go ahead and save SFGameRenderer; you will come back to onDrawFrame() later in this chapter.
With the onSurfaceCreated() and onSurfaceChanged() methods set up, you can go back to that comment that you added to onSurfaceCreated(). In the next section of this chapter, you are going to load your background image as a texture and call it from onSurfaceCreated().
Loading an Image Using OpenGL
Images in OpenGL are loaded as textures. This is to say that an image, any image that you want to display using OpenGL, is really treated as a texture that is being applied to a 3-D object.
For this game, you are creating 2-D graphics, but OpenGL is going to treat them as 3-D objects. Therefore, you will be building squares and triangles to map your images onto. Once your images are mapped as textures onto these flat shapes, you can send them into the renderer. It really sounds more complicated than it is.
Let’s start by copying a file into Eclipse to use as the background. The image that I used is called backgroundstars.png and is shown in Figure 4–2.

Figure 4–2. The background image
If you are using a Motorola Droid model phone, there’s is a bug in OpenGL that extends back to at least the Froyo version of Android. Luckily though, there is a workaround.
I personally have a Droid X and have seen this bug for myself. If you load an image as a texture using OpenGL on a Droid, you may end up seeing nothing but a white box where the image should be. The bug has to do with the size and placement of the image in your Android package.
For most normal installations of Android, the images can be placed in any of the res/drawable-[density] folders and be any dimension. In the last chapter, you placed a few images of differing size dimensions into the res/drawable-hdpi folder, and hopefully, you had no problems displaying them.
To avoid this dreaded Droid white box bug follow these two steps. First, create a new drawable folder under your res called drawable-nopi. Older versions of Android came with this folder installed; I can only assume that something on the Droid phones is still referencing it. All of the images that you want to display using OpenGL should now be placed in this new res/drawable-nopi folder.
Second, you must ensure that your images are a derivative of 256 · 256 (a power of 2). The image for the background (see Figure 4–1) is 256 · 256 pixels. However, I have found that 128 · 128 and 64 · 64 work as well. Hopefully, this bug will be fixed in future versions of the Droid phones or the Android software.
That being said, take the image that you are using for your background, and copy it into your respective res/drawable folder. You can now reference it using the R.java file.
Now, create a new class, SFBackground. This new class file will be called to load the image as a texture and return it back to the renderer.
package com.proandroidgames;


public class SFBackground {


}
You are going to call the SFBackground.loadTexture() method from the SFGameRenderer to load up the background to OpenGL. But first you need to build the constructor. The constructor for the SFBackground class is going to set up all of the variables that you will need to interact with OpenGL.
You will need an array to hold the mapping coordinates of your texture, an array to hold the coordinates of your vertices, and an array to hold the indices of the vertices. You will also be creating an array of pointers to your textures.
NOTE: In this class, you will only be loading one texture into the class, but in future chapters, you will be loading multiple textures into one class. Therefore, in an effort to make the code as generic as possible, you will use the same structure for most of the texture loading classes.
package com.proandroidgames;


public class SFBackground {

        private int[] textures = new int[1];


        private float vertices[] = {

                           0.0f, 0.0f, 0.0f,

                           1.0f, 0.0f, 0.0f,

                           1.0f, 1.0f, 0.0f,

                           0.0f, 1.0f, 0.0f,

                      };

        private float texture[] = {

                           0.0f, 0.0f,

                           1.0f, 0f,

                           1, 1.0f,

                           0f, 1f,

                     };

        private byte indices[] = {

                           0,1,2,

                            0,2,3,

                     };

        public SFBackground() {


        }

}
In the next section you will add the arrays that will build polygons to hold your texture.
Vertices, Textures, and Indices . . . Oh My!
Let’s briefly discuss what the vertex, texture, and index values represent. The vertices[] array lists a series of points. Each row here represents the x, y, and z value of a corner of a square. In this case, you are making a square that is the full size of the screen. This will ensure that the image covers the entire background area.
The texture[] array represents where the corners of the image (i.e., texture) will line up with the corners of the square you created. Again, in this case, you want the texture to cover the entire square, which in turn is covering the entire background. The textures[] array hold a pointer to each texture that you are loading onto your shape. You are hard coding this to 1, because you will be loading only one background image onto this shape.
Finally, the indices[] array holds the definition for the face of the square. The face of the square is broken into two triangles. The values in this array are the corners of those triangles in counter-clockwise order. Notice that one line (two points) overlap (0 and 2). Figure 4–3 illustrates this concept.
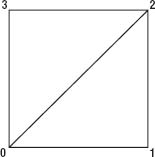
Figure 4–3. Labeled index points
Now, create some buffers that we can hold these arrays in. The buffers can then be loaded into OpenGL.
package com.proandroidgames;


import java.nio.ByteBuffer;

import java.nio.FloatBuffer;


public class SFBackground {


        private FloatBuffer vertexBuffer;

        private FloatBuffer textureBuffer;

        private ByteBuffer indexBuffer;


        private int[] textures = new int[1];


        private float vertices[] = {

                           0.0f, 0.0f, 0.0f,

                           1.0f, 0.0f, 0.0f,

                           1.0f, 1.0f, 0.0f,

                           0.0f, 1.0f, 0.0f,
                      };

        private float texture[] = {

                           0.0f, 0.0f,

                           1.0f, 0.0f,

                           1.0, 1.0f,

                           0.0f, 1.of,

                      };

        private byte indices[] = {

                           0,1,2,

                           0,2,3,

                     };

        public SFBackground() {


        }


}
In the constructor for the SFBackground class, you are going to populate the appropriate buffers with the appropriate arrays.
package com.proandroidgames;


import java.nio.ByteOrder;

import java.nio.ByteBuffer;

import java.nio.FloatBuffer;


public class SFBackground {


        private FloatBuffer vertexBuffer;

        private FloatBuffer textureBuffer;

        private ByteBuffer indexBuffer;


        private int[] textures = new int[1];


        private float vertices[] = {

                           0.0f, 0.0f, 0.0f,

                           1.0f, 0.0f, 0.0f,

                           1.0f, 1.0f, 0.0f,

                           0.0f, 1.0f, 0.0f,

                      };

        private float texture[] = {

                           0.0f, 0.0f,

                           1.0f, 0.0f,

                           1.0, 1.0f,

                           0.0f, 1.of,

                      };

        private byte indices[] = {

                           0,1,2,

                           0,2,3,

                     };


        public SFBackground() {


              ByteBuffer byteBuf = ByteBuffer.allocateDirect(vertices.length * 4);

              byteBuf.order(ByteOrder.nativeOrder());

              vertexBuffer = byteBuf.asFloatBuffer();

              vertexBuffer.put(vertices);
              vertexBuffer.position(0);


              byteBuf = ByteBuffer.allocateDirect(texture.length * 4);

              byteBuf.order(ByteOrder.nativeOrder());

              textureBuffer = byteBuf.asFloatBuffer();

              textureBuffer.put(texture);

              textureBuffer.position(0);


              indexBuffer = ByteBuffer.allocateDirect(indices.length);

              indexBuffer.put(indices);

              indexBuffer.position(0);


        }


}
The code here should be self-explanatory. You are creating a ByteBuffer with the values of the vertex and texture arrays. Notice that the number of values in each of these arrays is multiplied by 4 to allocate space in the ByteBuffer. This is because the values in the arrays are floats, and floats are four times the size of bytes. The index array is integers and it can be loaded directly into the indexBuffer.
Creating the loadTexture() Method
Next, you need to create the loadTexture() method. The loadTexture() method will take in an image pointer and then load the image into a stream. The stream will then be loaded as a texture into OpenGL. During the drawing process you will map this texture onto the vertices.
package com.proandroidgames;


import javax.microedition.khronos.opengles.GL10;


import java.nio.ByteBuffer;

import java.nio.ByteOrder;

import java.nio.FloatBuffer;

import android.content.Context;

import android.graphics.Bitmap;

import android.graphics.BitmapFactory;

import android.opengl.GLUtils;

import java.io.IOException;

import java.io.InputStream;


public class SFBackground {


...


        public SFBackground() {


...


        }

        public void loadTexture(GL10 gl,int texture, Context context) {
               InputStream imagestream = context.getResources().openRawResource(texture);

               Bitmap bitmap = null;

               try {


                       bitmap = BitmapFactory.decodeStream(imagestream);


               }catch(Exception e){


               }finally {

                  //Always clear and close

                  try {

                         imagestream.close();

                         imagestream = null;

                  } catch (IOException e) {

                 }

              }


              gl.glGenTextures(1, textures, 0);

              gl.glBindTexture(GL10.GL_TEXTURE_2D, textures[0]);


               gl.glTexParameterf(GL10.GL_TEXTURE_2D, GL10.GL_TEXTURE_MIN_FILTER,

GL10.GL_NEAREST);

              gl.glTexParameterf(GL10.GL_TEXTURE_2D, GL10.GL_TEXTURE_MAG_FILTER,

GL10.GL_LINEAR);


              gl.glTexParameterf(GL10.GL_TEXTURE_2D, GL10.GL_TEXTURE_WRAP_S,

GL10.GL_REPEAT);

              gl.glTexParameterf(GL10.GL_TEXTURE_2D, GL10.GL_TEXTURE_WRAP_T,

GL10.GL_REPEAT);


              GLUtils.texImage2D(GL10.GL_TEXTURE_2D, 0, bitmap, 0);


              bitmap.recycle();

           }


}
The first part of loadTexture() is pretty easy. It takes in the pointer and loads the resulting image into a bitmap stream. The stream is then closed.
The second part of loadTexture(), however, is fairly heavy in OpenGL. The first line generates a texture pointer, which is structured like a dictionary.
gl.glGenTextures(1, textures, 0);
The first parameter is the number of texture names that you need generated. When it comes time to bind the textures to a set of vertices, you will call them out of OpenGL by name. Here, you are only loading one texture, so you only need one texture name generated. The second parameter is the array of ints that you created to hold the number for each texture. Again, there is only one value in this array right now. Finally, the last parameter holds the offset for the pointer into the array. Since your array is zero-based, the offset is 0.
The second line binds the texture into OpenGL.
If you were loading two textures together, you would have two each of these first two lines: one to load the first image and one to load the second.
The next two lines deal with how OpenGL is to map the texture onto the vertices. You want the mapping to take place quickly but produce sharpened pixels.
gl.glTexParameterf(GL10.GL_TEXTURE_2D, GL10.GL_TEXTURE_MIN_FILTER, GL10.GL_NEAREST);

gl.glTexParameterf(GL10.GL_TEXTURE_2D, GL10.GL_TEXTURE_MAG_FILTER, GL10.GL_LINEAR);
The following two lines are important.Star Fighter is a scrolling shooter game, so the background should continuously scroll to give the illusion that the playable character is flying through space. Obviously, the image you are using for the background is finite. Therefore, to create the illusion that your player is flying through the endless vastness of space, the image must repeat ad infinitum. Luckily, OpenGL can handle this for you.
gl.glTexParameterf(GL10.GL_TEXTURE_2D, GL10.GL_TEXTURE_WRAP_S, GL10.GL_REPEAT);

gl.glTexParameterf(GL10.GL_TEXTURE_2D, GL10.GL_TEXTURE_WRAP_T, GL10.GL_REPEAT);
In these two lines, you are telling OpenGL to continuously repeat your background texture in the S and T directions. Right now, your vertices are the size of the screen, and the initial background texture will be mapped directly on top of it. When it comes time to scroll the background (in the next section of this chapter), you will actually be moving the texture on the vertices rather than moving the vertices. By moving the textures, you allow OpenGL to repeat the texture for you, to cover vertex that is exposed when you move the texture. It is a very handy feature of OpenGL, especially in game development.
Finally, in the last two line of the loadTexture() method, you associate the bitmap input stream that you created with the first texture. The bitmap stream is then recycled.
GLUtils.texImage2D(GL10.GL_TEXTURE_2D, 0, bitmap, 0);

bitmap.recycle();
Mapping Your Texture
The last piece of code you need to write to complete your SFBackground class is the method that will draw the texture onto the vertices.
package com.proandroidgames;


import javax.microedition.khronos.opengles.GL10;


import java.nio.ByteBuffer;

import java.nio.ByteOrder;

import java.nio.FloatBuffer;

import android.content.Context;

import android.graphics.Bitmap;

import android.graphics.BitmapFactory;

import android.opengl.GLUtils;

import java.io.IOException;

import java.io.InputStream;


public class SFBackground {
...


        public void draw(GL10 gl) {


              gl.glBindTexture(GL10.GL_TEXTURE_2D, textures[0]);


              gl.glFrontFace(GL10.GL_CCW);

              gl.glEnable(GL10.GL_CULL_FACE);

              gl.glCullFace(GL10.GL_BACK);


              gl.glEnableClientState(GL10.GL_VERTEX_ARRAY);

              gl.glEnableClientState(GL10.GL_TEXTURE_COORD_ARRAY);


              gl.glVertexPointer(3, GL10.GL_FLOAT, 0, vertexBuffer);

              gl.glTexCoordPointer(2, GL10.GL_FLOAT, 0, textureBuffer);


               gl.glDrawElements(GL10.GL_TRIANGLES, indices.length,

GL10.GL_UNSIGNED_BYTE, indexBuffer);


              gl.glDisableClientState(GL10.GL_VERTEX_ARRAY);

              gl.glDisableClientState(GL10.GL_TEXTURE_COORD_ARRAY);

              gl.glDisable(GL10.GL_CULL_FACE);


        }


        public SFBackground() {


...


}

        public void loadTexture(GL10 gl,int texture, Context context) {

              InputStream imagestream = context.getResources().openRawResource(texture);

              Bitmap bitmap = null;

              try {


                  bitmap = BitmapFactory.decodeStream(imagestream);


              }catch(Exception e){


              }finally {


                 try {

                         imagestream.close();

                         imagestream = null;

                 } catch (IOException e) {

                 }

              }


              gl.glGenTextures(1, textures, 0);

              gl.glBindTexture(GL10.GL_TEXTURE_2D, textures[0]);


               gl.glTexParameterf(GL10.GL_TEXTURE_2D, GL10.GL_TEXTURE_MIN_FILTER,

GL10.GL_NEAREST);
              gl.glTexParameterf(GL10.GL_TEXTURE_2D, GL10.GL_TEXTURE_MAG_FILTER,

GL10.GL_LINEAR);


              gl.glTexParameterf(GL10.GL_TEXTURE_2D, GL10.GL_TEXTURE_WRAP_S,

GL10.GL_REPEAT);

              gl.glTexParameterf(GL10.GL_TEXTURE_2D, GL10.GL_TEXTURE_WRAP_T,

GL10.GL_REPEAT);


              GLUtils.texImage2D(GL10.GL_TEXTURE_2D, 0, bitmap, 0);


              bitmap.recycle();

           }


}
The draw() method is going to be called every time you want to draw the background, as opposed to the loadTexture() method, which will be called only when you initialize the game.
This first line of this method binds the texture to your target. Think of it as putting a bullet in the chamber of a gun; the texture is loaded up and ready to be used.
gl.glBindTexture(GL10.GL_TEXTURE_2D, textures[0]);
The next three lines in the draw() method tell OpenGL to enable culling and basically ignore any vertices that are not on the front face. Since you are rendering the game in a 2-D orthogonal view, you don’t want OpenGL to spend precious processor time dealing with vertices that the player will never see. Right now, all of your vertices are front facing, but this is good code to have in there anyway.
gl.glFrontFace(GL10.GL_CCW);

gl.glEnable(GL10.GL_CULL_FACE);

gl.glCullFace(GL10.GL_BACK);
The next four lines enable the vertex and texture states and loads the vertices and texture buffers into OpenGL.
gl.glEnableClientState(GL10.GL_VERTEX_ARRAY);

gl.glEnableClientState(GL10.GL_TEXTURE_COORD_ARRAY);

gl.glVertexPointer(3, GL10.GL_FLOAT, 0, vertexBuffer);

gl.glTexCoordPointer(2, GL10.GL_FLOAT, 0, textureBuffer);
Finally, the texture is drawn onto the vertices, and all of the states that were enabled are disabled.
gl.glDrawElements(GL10.GL_TRIANGLES, indices.length, GL10.GL_UNSIGNED_BYTE,

indexBuffer);

gl.glDisableClientState(GL10.GL_VERTEX_ARRAY);

gl.glDisableClientState(GL10.GL_TEXTURE_COORD_ARRAY);

gl.glDisable(GL10.GL_CULL_FACE);
Your SFBackground class is now complete and ready to be called by the SFGameRenderer. Save the SFBackground.java file and reopen SFGameRenderer.
Calling loadTexture() and draw()
You need to add in the appropriate calls to both the loadTexture() and the draw() methods of SFBackground. The loadTexture() method will be called from the onSurfaceCreated() method of SFGameRenderer.
Because the loadTexture() method of SFBackground takes an image pointer as a parameter, you need to add a new constant to the SFEngine. Open SFEngine and add the following constant to point to the backgroundstars.png file that you added to the drawable folder.
package com.proandroidgames;


import android.app.Activity;

import android.content.Intent;

import android.os.Bundle;

import android.view.View;

import android.view.View.OnClickListener;

import android.widget.ImageButton;

package com.proandroidgames;


import android.content.Context;

import android.content.Intent;

import android.view.View;


public class SFEngine {

        /*Constants that will be used in the game*/

        public static final int GAME_THREAD_DELAY = 4000;

        public static final int MENU_BUTTON_ALPHA = 0;

        public static final boolean HAPTIC_BUTTON_FEEDBACK = true;

        public static final int SPLASH_SCREEN_MUSIC = R.raw.warfieldedit;

        public static final int R_VOLUME = 100;

        public static final int L_VOLUME = 100;

        public static final boolean LOOP_BACKGROUND_MUSIC = true;

        public static Context context;

        public static Thread musicThread;

        public static final int BACKGROUND_LAYER_ONE = R.drawable.backgroundstars;


        /*Kill game and exit*/

        public boolean onExit(View v) {

        try

        {

                Intent bgmusic = new Intent(context, sfmusic.class);

                context.stopService(bgmusic);

                musicThread.stop();

                return true;

        }catch(Exception e){

                return false;

        }


        }


}
You will now call the loadTexture() method of the SFBackground class and pass it this constant. This will load the background stars image as a texture into OpenGL.
Save SFEngine, and go back to SFGameRenderer. You will now instantiate a new SFBackground and call its loadTexture() method from onSurfaceCreated(). It is best to instantiate the new SFBackground where it can be accessed throughout the class. You will be making several calls to SFBackground in this class.
package com.proandroidgames;


import javax.microedition.khronos.egl.EGLConfig;

import javax.microedition.khronos.opengles.GL10;


import android.opengl.GLSurfaceView.Renderer;


public class SFGameRenderer implements Renderer{


        private SFBackground background = new SFBackground();


        @Override

        public void onDrawFrame(GL10 gl) {


        }


        @Override

        public void onSurfaceChanged(GL10 gl, int width, int height) {

                gl.glViewport(0, 0, width,height);


                gl.glMatrixMode(GL10.GL_PROJECTION);

                gl.glLoadIdentity();


                gl.glOrthof(0f, 1f, 0f, 1f, -1f, 1f);


        }


        @Override

        public void onSurfaceCreated(GL10 gl, EGLConfig config) {


              gl.glEnable(GL10.GL_TEXTURE_2D);

              gl.glClearDepthf(1.0f);

              gl.glEnable(GL10.GL_DEPTH_TEST);

              gl.glDepthFunc(GL10.GL_LEQUAL);


              gl.glEnable(GL10.GL_BLEND);

              gl.glBlendFunc(GL10.GL_ONE, GL10.GL_ONE);


               background.loadTexture(gl,SFEngine.BACKGROUND_LAYER_ONE, SFEngine.context);


        }


}
At this point, if you called the draw() method of SFBackground you would have a static image of the star field. However, a static background is not what you are going for in this game. Star Fighter has the main playable character racing through space to fight the enemy, and to simulate that race through space, the background needs to scroll. In the next section, you are going create a method that will scroll the background as though you are flying through the star field.
Scrolling the Background
Compared to what you have accomplished thus far in this chapter, writing the method to scroll the background is going to be very easy. In SFGameRenderer, create a new method named scrollBackground1().
You also need a new float named bgScroll1. This float will keep track of how much the background has scrolled when you are not in the method. Since you need the value to persist outside of the scrollBackground1() method, create it where the class has access to it.
NOTE: You are naming this method scrollBackground1() because, later in this chapter, you will be creating a scrollBackground2() that will scroll a second layer of the background.
package com.proandroidgames;


import javax.microedition.khronos.egl.EGLConfig;

import javax.microedition.khronos.opengles.GL10;


import android.opengl.GLSurfaceView.Renderer;


public class SFGameRenderer implements Renderer{

        private SFBackground background = new SFBackground();


        private float bgScroll1;


        @Override

        public void onDrawFrame(GL10 gl) {

                // TODO Auto-generated method stub

                }


        private void scrollBackground1(GL10 gl){


        }


        @Override

        public void onSurfaceChanged(GL10 gl, int width, int height) {

                // TODO Auto-generated method stub


                gl.glViewport(0, 0, width,height);


                gl.glMatrixMode(GL10.GL_PROJECTION);

                gl.glLoadIdentity();


                gl.glOrthof(0f, 1f, 0f, 1f, -1f, 1f);


        }
        @Override

        public void onSurfaceCreated(GL10 gl, EGLConfig config) {

                // TODO Auto-generated method stub


              gl.glEnable(GL10.GL_TEXTURE_2D);

              gl.glClearDepthf(1.0f);

              gl.glEnable(GL10.GL_DEPTH_TEST);

              gl.glDepthFunc(GL10.GL_LEQUAL);


              gl.glEnable(GL10.GL_BLEND);

              gl.glBlendFunc(GL10.GL_ONE, GL10.GL_ONE);


               background.loadTexture(gl,SFEngine.BACKGROUND_LAYER_ONE, SFEngine.context);


        }


}
The first thing you are going to do in this method is test to ensure that the value of bgScroll1 will not exceed the largest possible value for a float and throw an exception. The chances of bgScroll1 going that high are very slim, especially when you see what we will be incrementing it by. However, it is always better to play things safe.
Test that bgScroll1 is not equal to the largest size for a float. If bgScroll1 is the maximum size for a float, set it to zero.
package com.proandroidgames;


import javax.microedition.khronos.egl.EGLConfig;

import javax.microedition.khronos.opengles.GL10;


import android.opengl.GLSurfaceView.Renderer;


public class SFGameRenderer implements Renderer{

        private SFBackground background = new SFBackground();


        private float bgScroll1;


        @Override

        public void onDrawFrame(GL10 gl) {

                // TODO Auto-generated method stub

                }


        private void scrollBackground1(GL10 gl){

                if (bgScroll1 == Float.MAX_VALUE){

                        bgScroll1 = 0f;

                }


        }


...


}
Earlier in this chapter, we discussed two of the matrix modes of OpenGL: texture and projection. You have to put OpenGL in texture matrix mode to scroll the texture on the vertices.
NOTE: Remember you are actually moving the texture on the vertices here. You are not moving the vertices.
Because you are not moving the vertices, you need to ensure that they are in the correct place and that nothing moved unintentionally. Why? This is one of the tricky parts of learning OpenGL.
OpenGL Matrices
Setting OpenGL to texture matrix mode, or even model view matrix mode (used to move and scale the vertices) will give you access to all of the textures and all of the vertices respectively in OpenGL at that time. This means that when you put OpenGL into texture matrix mode and move a texture 1 unit on the x axis, you are actually moving all of the textures you have within OpenGL at that moment 1 unit on the x axis.
This situation could be problematic in a game where you could have any number of items all moving and scaling at different rates and directions at any given time. However, if OpenGL works with all of the textures at once and all of the vertices at once, how do you move individual items separately?
This may sound confusing right now, but there is a logical way to work around the situation.
All of the matrix modes are kept on a stack. The process is to push the mode off of the stack (in this case, texture matrix mode). Once the mode is off of the stack, you move all of the textures and redraw only the textures that you want effected by that particular movement. You then pop the texture back on the stack and repeat the process for the next texture that you want to move.
You have to be careful to reset the matrix mode back to its default state before you begin working with it, or it will have the last value you set it to. For example, let’s say you have texture A and texture B. You want to move texture A 1 unit on the x axis and 1 unit on the y axis. You want to move texture B just 1 unit on the x axis. You push the texture matrix off of the stack and move it 1 unit each on the x and y axes. You then draw texture A and pop the matrix back on the stack. That was easy.
Now, you move on to texture B. You push the matrix off the stack and move the matrix 1 unit on the x axis. However, the matrix is already set to (1,1) because the last operation that you did on texture A was to move the texture matrix 1 unit on each axis. So you inadvertently end up moving texture B 2 units on the x axis and 1 unit on the y axis. Therefore, you need to reset the matrix to its default state after you push it off the stack to make sure that you start with the default units. Resetting the matrix is accomplished using the glLoadIdentity() call.
The OpenGL operation that you will be performing to scroll your background is glTranslatef(). The glTranslatef() method takes three parameters, the values x, y, and z. It will adjust the current matrix according to the values provided. You are going to store the value that you are scrolling your background by in a constant. Add the following constant to SFEngine.
public static float SCROLL_BACKGROUND_1 = .002f;
Save SFEngine and move back to SFGameRenderer. Your first step in scrolling the background texture is to push the model matrix mode off the stack and reset it, just in case any moving there done in the future affects the model mode. Then you are going to push the texture matrix off the stack and do your scrolling.
Add the following lines to the scrollBackground1() method:
               gl.glMatrixMode(GL10.GL_MODELVIEW);

                gl.glLoadIdentity();

                gl.glPushMatrix();

                gl.glScalef(1f, 1f, 1f);

                gl.glTranslatef(0f, 0f, 0f);

package com.proandroidgames;


import javax.microedition.khronos.egl.EGLConfig;

import javax.microedition.khronos.opengles.GL10;


import android.opengl.GLSurfaceView.Renderer;


public class SFGameRenderer implements Renderer{

        private SFBackground background = new SFBackground();


        private float bgScroll1;


        @Override

        public void onDrawFrame(GL10 gl) {

                // TODO Auto-generated method stub

                }


        private void scrollBackground1(GL10 gl){

                if (bgScroll1 == Float.MAX_VALUE){

                        bgScroll1 = 0f;

                }

                /*This code just resets the scale and translate of the

                  Model matrix mode, we are not moving it*/

               gl.glMatrixMode(GL10.GL_MODELVIEW);

                gl.glLoadIdentity();

                gl.glPushMatrix();

                gl.glScalef(1f, 1f, 1f);

                gl.glTranslatef(0f, 0f, 0f);

        }


        @Override

        public void onSurfaceChanged(GL10 gl, int width, int height) {

                // TODO Auto-generated method stub


                gl.glViewport(0, 0, width,height);
                gl.glMatrixMode(GL10.GL_PROJECTION);

                gl.glLoadIdentity();


                gl.glOrthof(0f, 1f, 0f, 1f, -1f, 1f);


        }


        @Override

        public void onSurfaceCreated(GL10 gl, EGLConfig config) {

                // TODO Auto-generated method stub


              gl.glEnable(GL10.GL_TEXTURE_2D);

              gl.glClearDepthf(1.0f);

              gl.glEnable(GL10.GL_DEPTH_TEST);

              gl.glDepthFunc(GL10.GL_LEQUAL);


              gl.glEnable(GL10.GL_BLEND);

              gl.glBlendFunc(GL10.GL_ONE, GL10.GL_ONE);


               background.loadTexture(gl,SFEngine.BACKGROUND_LAYER_ONE, SFEngine.context);


        }


}
Again, this code is more housekeeping than anything at this point.
Transforming the Texture
Now, you are going to load up the texture matrix mode and perform your scrolling. You are going to adjust the y axis by the value in bgScroll1. The result of this is that the background will move along the y axis by the amount in bgScroll1.
package com.proandroidgames;


import javax.microedition.khronos.egl.EGLConfig;

import javax.microedition.khronos.opengles.GL10;


import android.opengl.GLSurfaceView.Renderer;


public class SFGameRenderer implements Renderer{

        private SFBackground background = new SFBackground();

        private float bgScroll1;


        @Override

        public void onDrawFrame(GL10 gl) {

                // TODO Auto-generated method stub


        }

        private void scrollBackground1(GL10 gl){

                if (bgScroll1 == Float.MAX_VALUE){

                        bgScroll1 = 0f;

                }

                    gl.glMatrixMode(GL10.GL_MODELVIEW);

            gl.glLoadIdentity();
            gl.glPushMatrix();

            gl.glScalef(1f, 1f, 1f);

            gl.glTranslatef(0f, 0f, 0f);


            gl.glMatrixMode(GL10.GL_TEXTURE);

            gl.glLoadIdentity();

            gl.glTranslatef(0.0f, bgScroll1, 0.0f);  //scrolling the texture


        }


        @Override

        public void onSurfaceChanged(GL10 gl, int width, int height) {

                // TODO Auto-generated method stub


                gl.glViewport(0, 0, width,height);


                gl.glMatrixMode(GL10.GL_PROJECTION);

                gl.glLoadIdentity();


                gl.glOrthof(0f, 1f, 0f, 1f, -1f, 1f);


        }


        @Override

        public void onSurfaceCreated(GL10 gl, EGLConfig config) {

                // TODO Auto-generated method stub


                  gl.glEnable(GL10.GL_TEXTURE_2D);

              gl.glClearDepthf(1.0f);

              gl.glEnable(GL10.GL_DEPTH_TEST);

              gl.glDepthFunc(GL10.GL_LEQUAL);


              gl.glEnable(GL10.GL_BLEND);

              gl.glBlendFunc(GL10.GL_ONE, GL10.GL_ONE);


               background.loadTexture(gl,SFEngine.BACKGROUND_LAYER_ONE, SFEngine.context);


        }


}
The final things that you need to do in scrollBackground1() is to draw the background by calling the draw() method of the SFBackground, pop the matrix back on the stack, and increment bgScroll1.
package com.proandroidgames;


import javax.microedition.khronos.egl.EGLConfig;

import javax.microedition.khronos.opengles.GL10;


import android.opengl.GLSurfaceView.Renderer;


public class SFGameRenderer implements Renderer{

        private SFBackground background = new SFBackground();

        private float bgScroll1;
        @Override

        public void onDrawFrame(GL10 gl) {

                // TODO Auto-generated method stub


        }

        private void scrollBackground1(GL10 gl){

                if (bgScroll1 == Float.MAX_VALUE){

                        bgScroll1 = 0f;

                }


            gl.glMatrixMode(GL10.GL_MODELVIEW);

            gl.glLoadIdentity();

            gl.glPushMatrix();

            gl.glScalef(1f, 1f, 1f);

            gl.glTranslatef(0f, 0f, 0f);


            gl.glMatrixMode(GL10.GL_TEXTURE);

            gl.glLoadIdentity();

            gl.glTranslatef(0.0f, bgScroll1, 0.0f);


            background.draw(gl);

            gl.glPopMatrix();

            bgScroll1 +=  SFEngine.SCROLL_BACKGROUND_1;

            gl.glLoadIdentity();


        }


        @Override

        public void onSurfaceChanged(GL10 gl, int width, int height) {

                // TODO Auto-generated method stub


                gl.glViewport(0, 0, width,height);


                gl.glMatrixMode(GL10.GL_PROJECTION);

                gl.glLoadIdentity();


                gl.glOrthof(0f, 1f, 0f, 1f, -1f, 1f);


        }


        @Override

        public void onSurfaceCreated(GL10 gl, EGLConfig config) {

                // TODO Auto-generated method stub


              gl.glEnable(GL10.GL_TEXTURE_2D);

              gl.glClearDepthf(1.0f);

              gl.glEnable(GL10.GL_DEPTH_TEST);

              gl.glDepthFunc(GL10.GL_LEQUAL);


              gl.glEnable(GL10.GL_BLEND);

              gl.glBlendFunc(GL10.GL_ONE, GL10.GL_ONE);


               background.loadTexture(gl,SFEngine.BACKGROUND_LAYER_ONE, SFEngine.context);


        }
}
That small method is all you need to be able to scroll the background of your game. Just to recap what the method does:
- It resets the model matrix to make sure it has not been inadvertently moved.
- It loads the texture matrix and moves it along the y axis by the value in
SCROLL_BACKGROUND_1. - It draws the background and pops the matrix back on the stack.
This scrolling will give you a nice moving star field that your player’s ship can fly through. Try running your game now, and take a look at how the background scrolls. It is also a good time to do some debugging if there are any problems, before you move on to more complicated code. However, especially by today’s gaming standards, the current background is fairly plain. You need to do something to give it a little oomph.
In the next section, you are going to add a second layer to the background. This will give the background of your game some depth, even for a 2-D game. If you have seen any two-layer side-scrolling game, like Super Mario Brothers, you should have noticed that the two layers scroll at different rates. You will give your game this two-layer, two-speed scrolling effect in the following section.
Adding a Second Layer
At this point, you have initialized OpenGL, loaded your background image as a texture, and created a method to scroll that texture down the background of the game. Now, it is time to create a second layer of the background. This second layer is going to be very easy to create, especially in comparison to the benefits that you will get back from it in the look of your game.
Much of the implementation of the second layer is actually already done; you just need to create a new scrolling function, add a couple of new constants, and instantiate a new copy of your SFBackground.
First, add a new image to your res/drawable folder. The image that I have used is called debris.png.
NOTE: Because you have just done most of this work for the first layer of the background, I will not be going into as much detail as in the previous section of this chapter.
With the image having been placed in your res/drawable folder, you can add two more constants to the SFEngine. The first is a pointer to the new image file that can be passed to the loadTexture() method of SFBackground, and the second a float that will hold the scroll value for the second layer of the background. This float constant is the key part in the second layer of the background because it will make the second layer scroll faster than the first – giving your game some added depth.
Add the following constants to your SFEngine.
public static float SCROLL_BACKGROUND_2  = .007f;

public static final int BACKGROUND_LAYER_TWO = R.drawable.debris;
Notice that the SCROLL_BACKGROUND_2 is set to a higher (decimal) value than SCROLL_BACKGROUND_1. Having a larger value will mean that the y axis is incremented greater and thus the second layer of the background will seem to move faster than the first. If the second layer scrolls faster than the first, the illusion will be that the background has depth.
Next, go back to your SFGameRenderer and instantiate a new copy of SFBackground called background2. Notice that you are reusing the SFBackground class. This reuse is part of the difference between game engine code and game-specific code. Because the SFBackground was built to be general, to load and draw whatever image was passed to it as a texture, it is part of the engine and can be reused for any of our background layers.
Because you are instantiating a new copy of SFBackground, you should also create a new float called bgScroll2. This float will keep track of the cumulative scrolling factor of the second layer of the background as opposed to the scrolling of the first layer of the background, which is held in the bgScroll1 float.
package com.proandroidgames;


import javax.microedition.khronos.egl.EGLConfig;

import javax.microedition.khronos.opengles.GL10;


import android.opengl.GLSurfaceView.Renderer;


public class SFGameRenderer implements Renderer{

        private SFBackground background = new SFBackground();

        private SFBackground background2 = new SFBackground();

        private float bgScroll1;

        private float bgScroll2;

        @Override

        public void onDrawFrame(GL10 gl) {

                // TODO Auto-generated method stub


        }

        private void scrollBackground1(GL10 gl){

                if (bgScroll1 == Float.MAX_VALUE){

                        bgScroll1 = 0f;

                }


            gl.glMatrixMode(GL10.GL_MODELVIEW);

            gl.glLoadIdentity();

            gl.glPushMatrix();

            gl.glScalef(1f, 1f, 1f);

            gl.glTranslatef(0f, 0f, 0f);


            gl.glMatrixMode(GL10.GL_TEXTURE);

            gl.glLoadIdentity();

            gl.glTranslatef(0.0f, bgScroll1, 0.0f);
            background.draw(gl);

            gl.glPopMatrix();

            bgScroll1 +=  SFEngine.SCROLL_BACKGROUND_1;

            gl.glLoadIdentity();


        }


        @Override

        public void onSurfaceChanged(GL10 gl, int width, int height) {

                // TODO Auto-generated method stub


                gl.glViewport(0, 0, width,height);


                gl.glMatrixMode(GL10.GL_PROJECTION);

                gl.glLoadIdentity();


                gl.glOrthof(0f, 1f, 0f, 1f, -1f, 1f);


        }


        @Override

        public void onSurfaceCreated(GL10 gl, EGLConfig config) {

                // TODO Auto-generated method stub


              gl.glEnable(GL10.GL_TEXTURE_2D);

              gl.glClearDepthf(1.0f);

              gl.glEnable(GL10.GL_DEPTH_TEST);

              gl.glDepthFunc(GL10.GL_LEQUAL);


              gl.glEnable(GL10.GL_BLEND);

              gl.glBlendFunc(GL10.GL_ONE, GL10.GL_ONE);


               background.loadTexture(gl,SFEngine.BACKGROUND_LAYER_ONE, SFEngine.context);


        }


}
Loading a Second Texture
Now that you have the copy of SFBackground instantiated for the second layer, you can load the texture for it. You are going to call the same loadTexture() method that you called for the first layer of the background. You will make the call the loadTexture() for the second layer of the background right after you make the call for the first in the onSurfaceCreated() method of the SFGameRenderer.
package com.proandroidgames;


import javax.microedition.khronos.egl.EGLConfig;

import javax.microedition.khronos.opengles.GL10;


import android.opengl.GLSurfaceView.Renderer;
public class SFGameRenderer implements Renderer{

        private SFBackground background = new SFBackground();

        private SFBackground background2 = new SFBackground();

        private float bgScroll1;

        private float bgScroll2;


...


        @Override

        public void onSurfaceCreated(GL10 gl, EGLConfig config) {

                // TODO Auto-generated method stub


              gl.glEnable(GL10.GL_TEXTURE_2D);

              gl.glClearDepthf(1.0f);

              gl.glEnable(GL10.GL_DEPTH_TEST);

              gl.glDepthFunc(GL10.GL_LEQUAL);


              gl.glEnable(GL10.GL_BLEND);

              gl.glBlendFunc(GL10.GL_ONE, GL10.GL_ONE);


               background.loadTexture(gl,SFEngine.BACKGROUND_LAYER_ONE, SFEngine.context);

               background2.loadTexture(gl,SFEngine.BACKGROUND_LAYER_TWO, SFEngine.context);


        }


}
Be sure that when you call the loadTexture() method for the second layer of the background that you pass it the correct image pointer. Earlier, you created a new constant in the SFEngine called BACKGROUND_LAYER_TWO with a pointer to a new image; this is the pointer that you should be passing to the loadTexture() method of background2.
You now have a new layer of the background instantiated, and you are loading a texture into it. Next, you need to write a new method to control the scrolling.
Scrolling Layer Two
You are going to do something a little different in this scrolling method than in the scrolling method for the first layer of the background. Because the second layer of the background is just smaller images that should not dominate the overall look of the background, you are going to resize the vertices in the model matrix view so that the second-layer texture's vertices are half the width of the screen. Then, you will move the vertices along the x axis, so the image appears to be half off the screen to the right-hand side.
Create a new method in your SFGameRenderer called scrollBackground2(). You should also insert the same test that you had in scrollBackground1() to make sure that bgScroll2 has not exceeded the maximum size of a float.
package com.proandroidgames;


import javax.microedition.khronos.egl.EGLConfig;

import javax.microedition.khronos.opengles.GL10;


import android.opengl.GLSurfaceView.Renderer;


public class SFGameRenderer implements Renderer{

        private SFBackground background = new SFBackground();

        private SFBackground background2 = new SFBackground();

        private float bgScroll1;

        private float bgScroll2;


        @Override

        public void onDrawFrame(GL10 gl) {

                // TODO Auto-generated method stub


        }

        private void scrollBackground1(GL10 gl){

                if (bgScroll1 == Float.MAX_VALUE){

                        bgScroll1 = 0f;

                }


            gl.glMatrixMode(GL10.GL_MODELVIEW);

            gl.glLoadIdentity();

            gl.glPushMatrix();

            gl.glScalef(1f, 1f, 1f);

            gl.glTranslatef(0f, 0f, 0f);


            gl.glMatrixMode(GL10.GL_TEXTURE);

            gl.glLoadIdentity();

            gl.glTranslatef(0.0f,bgScroll1, 0.0f);


            background.draw(gl);

            gl.glPopMatrix();

            bgScroll1 +=  SFEngine.SCROLL_BACKGROUND_1;

            gl.glLoadIdentity();


        }


        private void scrollBackground2(GL10 gl){

                if (bgScroll2 == Float.MAX_VALUE){

                        bgScroll2 = 0f;

                }


        }


        ...


}
Working with the Matrices
Here is where the code for scrollBackground2() is going to change a little. In scrollBackground1(), you added some housekeeping code to make sure that the model matrix had not changed and reset it to a default value. In scrollBackground2(), you are going to perform two transformations on the model matrix. First, you are going to scale the model matrix on the x axis so that it is half the size of the screen. Then you are going to move the model matrix on the x axis so that it is half off the right hand side of the screen.
Because you are performing these actions on the model matrix and not the texture matrix, you will be transforming the vertices and not the texture applied to it. That is, while visually you will see the texture shrink and move to the side of the screen, you are actually shrinking and moving the vertices, not the texture.
You will set the x value of the glScale() method to .5 to shrink the vertices by half on the x axis. Be careful to understand that setting the axis to .5 does not mean you want to add .5 units to it. All of the values are multiplied. Therefore, by setting the x of glScale() to .5, you are telling OpenGL to multiple the current value of x by .5, thus (in your case) shrinking the x axis by half.
 package com.proandroidgames;


import javax.microedition.khronos.egl.EGLConfig;

import javax.microedition.khronos.opengles.GL10;


import android.opengl.GLSurfaceView.Renderer;


public class SFGameRenderer implements Renderer{

        private SFBackground background = new SFBackground();

        private SFBackground background2 = new SFBackground();

        private float bgScroll1;

        private float bgScroll2;


        @Override

        public void onDrawFrame(GL10 gl) {

                // TODO Auto-generated method stub


        }

        private void scrollBackground1(GL10 gl){

                if (bgScroll1 == Float.MAX_VALUE){

                        bgScroll1 = 0f;

                }


            gl.glMatrixMode(GL10.GL_MODELVIEW);

            gl.glLoadIdentity();

            gl.glPushMatrix();

            gl.glScalef(1f, 1f, 1f);

            gl.glTranslatef(0f, 0f, 0f);


            gl.glMatrixMode(GL10.GL_TEXTURE);

            gl.glLoadIdentity();

            gl.glTranslatef(0.0f,bgScroll1, 0.0f);
background.draw(gl);
gl.glPopMatrix();
bgScroll1 += SFEngine.SCROLL_BACKGROUND_1;
gl.glLoadIdentity();
}
private void scrollBackground2(GL10 gl){
if (bgScroll2 == Float.MAX_VALUE){
bgScroll2 = 0f;
}
gl.glMatrixMode(GL10.GL_MODELVIEW);
gl.glLoadIdentity();
gl.glPushMatrix();
gl.glScalef(.5f, 1f, 1f);
gl.glTranslatef(1.5f, 0f, 0f);
}
@Override
public void onSurfaceChanged(GL10 gl, int width, int height) {
// TODO Auto-generated method stub
gl.glViewport(0, 0, width,height);
gl.glMatrixMode(GL10.GL_PROJECTION);
gl.glLoadIdentity();
gl.glOrthof(0f, 1f, 0f, 1f, -1f, 1f);
}
@Override
public void onSurfaceCreated(GL10 gl, EGLConfig config) {
// TODO Auto-generated method stub
gl.glEnable(GL10.GL_TEXTURE_2D);
gl.glClearDepthf(1.0f);
gl.glEnable(GL10.GL_DEPTH_TEST);
gl.glDepthFunc(GL10.GL_LEQUAL);
gl.glEnable(GL10.GL_BLEND);
gl.glBlendFunc(GL10.GL_ONE, GL10.GL_ONE);
background.loadTexture(gl,SFEngine.BACKGROUND_LAYER_ONE, SFEngine.context);
background2.loadTexture(gl,SFEngine.BACKGROUND_LAYER_TWO, SFEngine.context);
}
}
Notice the difference between scrollBackground1() and scrollBackground2(). Because scrollBackground2() works directly with the model matrix, you want to make sure that the you have the code in place in scrollBackground1() to reset this. Otherwise, your star field background will end up being transformed by half and pushed to the right-hand side of the screen.
Finishing the scrollBackground2() Method
The remainder of the scrollBackground2() method is the same as scrollBackground1(). You need to move the background texture along the y axis by the value in bgScroll2 and then increment that value by SCROLL_BACKGROUND_2.
package com.proandroidgames;


import javax.microedition.khronos.egl.EGLConfig;

import javax.microedition.khronos.opengles.GL10;


import android.opengl.GLSurfaceView.Renderer;


public class SFGameRenderer implements Renderer{

        private SFBackground background = new SFBackground();

        private SFBackground background2 = new SFBackground();

        private float bgScroll1;

        private float bgScroll2;


        @Override

        public void onDrawFrame(GL10 gl) {

                // TODO Auto-generated method stub


        }

        private void scrollBackground1(GL10 gl){

                if (bgScroll1 == Float.MAX_VALUE){

                        bgScroll1 = 0f;

                }


            gl.glMatrixMode(GL10.GL_MODELVIEW);

            gl.glLoadIdentity();

            gl.glPushMatrix();

            gl.glScalef(1f, 1f, 1f);

            gl.glTranslatef(0f, 0f, 0f);


            gl.glMatrixMode(GL10.GL_TEXTURE);

            gl.glLoadIdentity();

            gl.glTranslatef(0.0f,bgScroll1, 0.0f);


            background.draw(gl);

            gl.glPopMatrix();

            bgScroll1 +=  SFEngine.SCROLL_BACKGROUND_1;

            gl.glLoadIdentity();


        }

        private void scrollBackground2(GL10 gl){

                if (bgScroll2 == Float.MAX_VALUE){

                        bgScroll2 = 0f;

                }


            gl.glMatrixMode(GL10.GL_MODELVIEW);
gl.glLoadIdentity();
gl.glPushMatrix();
gl.glScalef(.5f, 1f, 1f);
gl.glTranslatef(1.5f, 0f, 0f);
gl.glMatrixMode(GL10.GL_TEXTURE);
gl.glLoadIdentity();
gl.glTranslatef( 0.0f,bgScroll2, 0.0f);
background2.draw(gl);
gl.glPopMatrix();
bgScroll2 += SFEngine.SCROLL_BACKGROUND_2;
gl.glLoadIdentity();
}
@Override
public void onSurfaceChanged(GL10 gl, int width, int height) {
// TODO Auto-generated method stub
gl.glViewport(0, 0, width,height);
gl.glMatrixMode(GL10.GL_PROJECTION);
gl.glLoadIdentity();
gl.glOrthof(0f, 1f, 0f, 1f, -1f, 1f);
}
@Override
public void onSurfaceCreated(GL10 gl, EGLConfig config) {
// TODO Auto-generated method stub
gl.glEnable(GL10.GL_TEXTURE_2D);
gl.glClearDepthf(1.0f);
gl.glEnable(GL10.GL_DEPTH_TEST);
gl.glDepthFunc(GL10.GL_LEQUAL);
gl.glEnable(GL10.GL_BLEND);
gl.glBlendFunc(GL10.GL_ONE, GL10.GL_ONE);
background.loadTexture(gl,SFEngine.BACKGROUND_LAYER_ONE, SFEngine.context);
background2.loadTexture(gl,SFEngine.BACKGROUND_LAYER_TWO, SFEngine.context);
}
}
You have done a lot of coding thus far in this chapter, and you have a fairly complete environment in which your player can experience the game. However, one very important part of SFGameRenderer is left to code; the onDrawFrame() method. This method will not only control the scrolling (and ultimately the drawing) of your backgrounds, it will also control the frame rate at which your game runs.
Running at 60 Frames per Second
The holy grail of game run speeds is 60 frames per second. Your game should run at, or as close as possible to, 60 frames per second to have a smooth game play experience. In this section of the chapter, you are going to write a quick thread pausing routine that will ensure your games runs around 60 frames per second.
The good thing about using a GLSurfaceView renderer as the main launching point of your game (SFGameRenderer) is that it is already threaded for you. Unless you explicitly set it otherwise, the onDrawFrame() method is called continuously. You do not need to worry about manually setting up any extra threads for the game execution or calling the game methods in a loop. When you set up the SFGameRenderer as the main view of the activity, a threading action is executed that will continuously call the onDrawFrame() method of SFGameRenderer.
Therefore, you need to marshal how this method runs in order to limit it to running just 60 times in one second.
You can put a quick pausing routine in the onDrawFrame() that will put the thread to sleep for a specific amount of time. The amount of time that you want to put the thread to sleep will be one second divided by 60. You will store this value in a constant in the SFEngine.
public class SFEngine {
/*Constants that will be used in the game*/
public static final int GAME_THREAD_DELAY = 4000;
public static final int MENU_BUTTON_ALPHA = 0;
public static final boolean HAPTIC_BUTTON_FEEDBACK = true;
public static final int SPLASH_SCREEN_MUSIC = R.raw.warfieldedit;
public static final int R_VOLUME = 100;
public static final int L_VOLUME = 100;
public static final boolean LOOP_BACKGROUND_MUSIC = true;
public static final int GAME_THREAD_FPS_SLEEP = (1000/60);
public static Context context;
public static Thread musicThread;
public static Display display;
public static float SCROLL_BACKGROUND_1 = .002f;
public static float SCROLL_BACKGROUND_2 = .007f;
public static final int BACKGROUND_LAYER_ONE = R.drawable.backgroundstars;
public static final int BACKGROUND_LAYER_TWO = R.drawable.debris;
/*Kill game and exit*/
public boolean onExit(View v) {
try
{
Intent bgmusic = new Intent(context, sfmusic.class);
context.stopService(bgmusic);
musicThread.stop();
return true;
}catch(Exception e){
return false;
} }
}
TIP: In Chapter 5, you will have the option of modifying this formula slightly. As you add more objects to it, you will want to take into account the amount of time OpenGL needs to render your game. For right now, this formula should be just fine.
Pausing the Game Loop
Now that the constant is created, you can set up the pausing routine in the onDrawFrame() method. At the top of the method, insert Thread.sleep().
package com.proandroidgames;
import javax.microedition.khronos.egl.EGLConfig;
import javax.microedition.khronos.opengles.GL10;
import android.opengl.GLSurfaceView.Renderer;
public class SFGameRenderer implements Renderer{
private SFBackground background = new SFBackground();
private SFBackground background2 = new SFBackground();
private float bgScroll1;
private float bgScroll2;
@Override
public void onDrawFrame(GL10 gl) {
// TODO Auto-generated method stub
try {
Thread.sleep(SFEngine.GAME_THREAD_FPS_SLEEP);
} catch (InterruptedException e) {
// TODO Auto-generated catch block
e.printStackTrace();
}
}
private void scrollBackground1(GL10 gl){
if (bgScroll1 == Float.MAX_VALUE){
bgScroll1 = 0f;
}
gl.glMatrixMode(GL10.GL_MODELVIEW);
gl.glLoadIdentity();
gl.glPushMatrix();
gl.glScalef(1f, 1f, 1f);
gl.glTranslatef(0f, 0f, 0f);
gl.glMatrixMode(GL10.GL_TEXTURE);
gl.glLoadIdentity();
gl.glTranslatef(0.0f,bgScroll1, 0.0f); background.draw(gl);
gl.glPopMatrix();
bgScroll1 += SFEngine.SCROLL_BACKGROUND_1;
gl.glLoadIdentity();
}
private void scrollBackground2(GL10 gl){
if (bgScroll2 == Float.MAX_VALUE){
bgScroll2 = 0f;
}
gl.glMatrixMode(GL10.GL_MODELVIEW);
            gl.glLoadIdentity();

            gl.glPushMatrix();

            gl.glScalef(.5f, 1f, 1f);

            gl.glTranslatef(1.5f, 0f, 0f);


            gl.glMatrixMode(GL10.GL_TEXTURE);

            gl.glLoadIdentity();

            gl.glTranslatef( 0.0f,bgScroll2, 0.0f);


            background2.draw(gl);

            gl.glPopMatrix();

            bgScroll2 +=  SFEngine.SCROLL_BACKGROUND_2;

            gl.glLoadIdentity();

        }

        @Override

        public void onSurfaceChanged(GL10 gl, int width, int height) {

                // TODO Auto-generated method stub


                gl.glViewport(0, 0, width,height);


                gl.glMatrixMode(GL10.GL_PROJECTION);

                gl.glLoadIdentity();


                gl.glOrthof(0f, 1f, 0f, 1f, -1f, 1f);


        }


        @Override

        public void onSurfaceCreated(GL10 gl, EGLConfig config) {

                // TODO Auto-generated method stub


              gl.glEnable(GL10.GL_TEXTURE_2D);

              gl.glClearDepthf(1.0f);

              gl.glEnable(GL10.GL_DEPTH_TEST);

              gl.glDepthFunc(GL10.GL_LEQUAL);


              gl.glEnable(GL10.GL_BLEND);

              gl.glBlendFunc(GL10.GL_ONE, GL10.GL_ONE);


               background.loadTexture(gl,SFEngine.BACKGROUND_LAYER_ONE, SFEngine.context);

              background2.loadTexture(gl,SFEngine.BACKGROUND_LAYER_TWO, SFEngine.context);


        }


}
Now, anything that you place after the try. . .catch containing the Thread.sleep() will only run 60 times per second. You are going to use this onDrawFrame() with the pausing routine as your game loop. Everything that you need to call to place into your game you will do from here.
Clearing the OpenGL Buffers
The first step in your game loop is to clear the OpenGL buffers. This will prepare OpenGL for all of the rendering and transforming that you are about to do.
@Override
public void onDrawFrame(GL10 gl) {
// TODO Auto-generated method stub
try {
Thread.sleep(SFEngine.GAME_THREAD_FPS_SLEEP);
} catch (InterruptedException e) {
// TODO Auto-generated catch block
e.printStackTrace();
}
gl.glClear(GL10.GL_COLOR_BUFFER_BIT | GL10.GL_DEPTH_BUFFER_BIT);
}
Once the buffers have been cleared, you can call the two scrolling methods that you created in the last section of this chapter. These two methods will move and draw the two layers of the background appropriately.
@Override
public void onDrawFrame(GL10 gl) {
// TODO Auto-generated method stub
try {
Thread.sleep(SFEngine.GAME_THREAD_FPS_SLEEP);
} catch (InterruptedException e) {
// TODO Auto-generated catch block
e.printStackTrace();
}
gl.glClear(GL10.GL_COLOR_BUFFER_BIT | GL10.GL_DEPTH_BUFFER_BIT);
scrollBackground1(gl);
scrollBackground2(gl);
}
Finally, you are going to call the transparency blending function of OpenGL. This OpenGL function will make sure everything that you are supposed to be able to see through is transparent. Without this function, you will not see through the vertices around your texture.
@Override
public void onDrawFrame(GL10 gl) { // TODO Auto-generated method stub
try {
Thread.sleep(SFEngine.GAME_THREAD_FPS_SLEEP);
} catch (InterruptedException e) {
// TODO Auto-generated catch block
e.printStackTrace();
}
gl.glClear(GL10.GL_COLOR_BUFFER_BIT | GL10.GL_DEPTH_BUFFER_BIT);
scrollBackground1(gl);
scrollBackground2(gl);
//All other game drawing will be called here
gl.glEnable(GL10.GL_BLEND);
gl.glBlendFunc(GL10.GL_ONE, GL10.GL_ONE);
}
Congratulations! You just successfully used OpenGL to create a two-layer, dual-speed scrolling background. Your last step before you can run your game is to wire up the Start button from the main menu to call the SFGame activity.
Modify the Main Menu
Open the SFMainMenu file that you created in the last chapter. In Chapter 3, you created an onClickListener() for the start button. You are going to add a new intent to this method for the SFGame activity. Adding this activity to the onClickListener() will start your game activity when the player clicks (or touches) the Start button on the main menu.
start.setOnClickListener(new OnClickListener(){
@Override
public void onClick(View v) {
/** Start Game!!!! */
Intent game = new Intent(getApplicationContext(),SFGame.class);
SFMainMenu.this.startActivity(game);
        }


});
You can compile and run your code. You should see the splash screen fade into the main menu. If you click the Start button on the main menu, you should be launched into your game where you will see the two layers of your background scroll by at different speeds to the sounds of your background music.
Click the back menu button on your device to return to the main menu, and click the exit button to exit the game and kill the threads.
CAUTION: Keep in mind that you have not yet put in some important housekeeping code. For example, if you were to just leave the focus of the game, the threads would continue to run (so too the music). You will add in code to take care of this later in this book. For now, when you are testing your game, make sure you kill the threads by clicking the exit button.
Summary
In this chapter, you learned several key skills that a game developer needs to add backgrounds to your games. Specifically, you should now have a basic understanding of the following:
- Creating a
GLSurfaceinstance - Creating a renderer
- Initializing OpenGL
- Loading a texture from an image
- Modifying the OpenGL matrices
- Pushing and popping a matrix
- Using
glScale()andglTranslatef()to move textures and vertices - Marshalling a renderer using
Thread.sleep()
In the next chapter, you will add your first playable character to the game.