
Chapter 2
Development Tools in Practice
In the first chapter of the book we presented a broad coverage of the Android platform from both a theoretical and practical viewpoint. You had the opportunity to learn about the overall architecture and components of the platform. You also had the chance to test drive the tools that ship with the Android software development kit (SDK) by creating a skeleton Android project from the command line and stepping through the development lifecycle all the way to installation of the application on the Android emulator.
We also included an introduction to the three major noncommercial Java integrated development environments (IDEs), Eclipse, NetBeans, and Intellij IDEA Community Edition, showed you how to equip them with Android development capabilities via freely available plugins.
This chapter has a dual goal: first, it aims to leave you with a firm grasp of how to use the Android SDK development tools for real Android development projects. Second, and no less important, it will provide an introduction to the structure and components of Android projects and the Android application programming interface (API).
We will cover the creation of a capable Android development environment with nothing but the Android SDK command line and graphical user interface (GUI) tools plus a stock programmer's text editor. As part of this discussion, we will present a project containing reusable code sections and techniques that also give us the chance to demonstrate specific SDK tools and Android API features.
Finally, we will import the example project into the Eclipse integrated development environment (IDE) in order to demonstrate how to take advantage of some of the Android productivity features of Eclipse with the Android Development Tools (ADT) plugin.
Coding with the SDK and a Programmer's Editor
It is entirely feasible to do serious Android development using the Android SDK in combination with a programmer's editor. This approach requires minimal setup overhead and is worth becoming familiar with for the sole reason of enriching your understanding of core Android development. This will help you to understand what your IDE of choice is doing behind the scenes and empower you to dig right in to debugging tasks without an IDE.
As an example, we have often saved time by diving straight to the root cause of an Android application crash during debugging simply by issuing the following Android Debug Bridge command in a terminal window:
adb logcat
Thereafter repeating the same steps that caused the runtime failure in the application and watching the logging output as it is streamed to the logcat terminal often makes the real problem (such as a missing permission in the application manifest file) clearly evident.
For further information on the adb tool, and as a general approach to learning the core ADK utilities and programs, we suggest running the adb help command. Reviewing the official Android developer site for, in this case, the Android Debug Bridge is also recommended.1
NOTE ON DEVELOPMENT OPERATING SYSTEMS: We use a mixture of Ubuntu GNU/Linux, Apple Mac OS X, and Microsoft Windows development systems. The code listings, screen captures and commands we demonstrate generally apply to all platforms. We will draw attention to any notable exceptions.
Development Environment Dependencies
Before we proceed, we need to review some dependencies and ensure that we can run the necessary Android SDK utilities and commands on our development system.
Ensure that Development Kit Locations Are on the Path
For doing serious work with the Android SDK, always ensure that the appropriate binaries and tools (<Java JDK/bin>, <Android SDK/tools>, <Android SDK/platform-tools>, and <Ant/bin>) are on the system path. We covered the subject of path setup and issues in some depth in the first chapter of this book. Please refer to that chapter for more information if necessary.
______________
Preparing an Android Virtual Device (AVD)
To be able to run our test project for this chapter we will need an Android Virtual Device. It is probably ideal that this AVD is not cluttered with previous debugging applications and leftover user data.
We can either reuse the HelloAndroidSdkAVD we created in the first chapter or create a new one. The AVD should be configured with at least Android 2.3 (API Level 9) compatibility like the one depicted in Figure 2–1. I chose to create a fresh AVD and give it the more meaningful name of android23api9_hvga_32mb for easier reference.

Figure 2–1. Preparing a new Android Virtual Device (AVD)
Creating (and Deleting) an AVD from the Command Line
The Android SDK also supports the creation of AVDs from the command line.2 So we could also have made our new AVD using the following terminal command:
android create avd -n android23api9_hvga_32mb -t android-9 -s HVGA -c 32M
If you want to get rid of the AVD for some reason, simply use the following command:
android delete avd -n android23api9_hvga_32mb
______________
BE CAREFUL! The android delete terminal command does not ask for confirmation of the requested operation. So this makes it really easy to accidentally purge an AVD you might still need. Make sure to keep backups of development AVDs that contain useful test data.
AVD File and Image Locations
AVD configuration and image files are created on your development computer under the .android directory in your home folder. Depending on your system, the default locations are as shown in Table 2–1.
These locations can be overridden by using the –p switch on the android create avd command as in the next example command on Linux / Mac OS X:
android create avd -n avd23api9 -t android-9 -c 32M -p mydroiddev/avds/avd23api9
Or on Windows:
android create avd -n avd23api9 -t android-9 -c 32M -p C:mydroiddevavdsavd23api9
Table 2–1. Default AVD Locations by Operating System Platform
| Platform | Default Android Virtual Device Location |
| Linux and Mac OS X | ~/.android/avd/ |
| Windows XP | C:Documents and Settings<user>.androidavd |
| Windows Vista | C:Users<user>.androidavd |
As always, more information is available on the Android Developers web site.3
Frequently Used Android Development Kit Tools
Becoming comfortable with using the Android SDK tools from the terminal command line will add a lot of value to your Android development efforts. The various IDEs and their Android plugins come packed with a lot of functionality. These features are often standard out-of-the-box Android SDK tools in a repackaged or embedded form. Familiarity with the core tools will enrich your understanding of your IDE of choice as well as allow you to drop down to these tools when the IDE implementation falls short.
There are a handful of tools that will prove themselves useful on a daily basis. Launching some tools brings up GUIs from which other core functionality can be reached conveniently via menus. Table 2–2 provides a list of commands that will allow a developer to perform the majority of Android development tasks in combination with a code editor.
______________
Table 2–2. Indispensable Android SDK Development Tool Commands
| Android SDK Development Tool | Linux/Mac OS X | Windows |
| Android SDK and AVD Manager | android |
android.bat |
| Dalvik Debug Monitor | ddms |
ddms.bat |
| Ant Compile | ant compile |
ant.bat compile |
| Ant Clean | ant clean |
ant.bat clean |
| Ant Build Debug | ant debug |
ant.bat debug |
| Ant Build Install | ant install |
ant.bat install |
| Ant Build Uninstall | ant uninstall |
ant.bat uninstall |
NOTE: All ant commands must be run in your Android application project root directory where the ant build.xml file should reside. The android create project command generates a build.xml file containing the relevant ant build actions and targets.
Working with the Android Tools and a Code Editor
The purpose of this section is to give you an idea of what is possible using the frequently used Android tools from the previous section, plus a code editor that is configured to invoke these tools directly from its own user interface.
Selecting a Code Editor
For our demonstration, we have decided to use the Geany4 programmer's editor. It was selected because it suited our intentions in this instance particularly well, not because we are suggesting that it should become your editor of choice. The main aspects that made it applicable for demonstrating the goals of this section are as follows:
- It is a GUI that can easily and clearly be presented in a book.
- It is freely and easily obtainable for many operating systems for readers who want to try the examples.
- It supports the grouping of files into projects with user customizable build commands.
______________
References for Editor Alternatives
Before we go on, we thought it would be appropriate to list some references for other editor environments that some readers will certainly know and might even be using as their preferred choice. We fully understand that the subject of the programmer's code editor can spark very animated discussions and should be treated with sensitivity.
So here is a short and by no means definitive list of editors and editing environments that can be well suited to Android development:
- Emacs and Android-Mode: The GNU Emacs manual describes it as “the extensible, customizable, self-documenting, real-time display editor.” Emacs is open source and runs on almost all known platforms.
- Emacs home:
http://www.gnu.org/software/emacs/ - Java-Mode:
http://sourceforge.net/projects/jdee/ - Android-Mode:
https://github.com/remvee/android-mode - Using Emacs for Android Development:
http://blog.fmaj7.me/?p=18
- Emacs home:
- Eclim, Vim with Eclipse: Vim is a highly configurable text editor built to enable efficient text editing. It is an improved version of the vi editor distributed with most UNIX systems.Vim is open source and runs on almost all known platforms.
- Vim home:
http://www.vim.org/ - Eclim Eclipse for Vim:
http://eclim.org/index.html - Using Vim + Eclim for Android Development:
http://jyro.blogspot.com/2009/05/android-development-with-vim-eclim.html
- Vim home:
- jEdit:jEdit is a mature programmer's text editor with hundreds (counting the time developing plugins) of person-years of development behind it. It is open source and written in Java, so it runs on Mac OS X, OS/2, UNIX, VMS, and Windows.
- jEdit home:
http://www.jedit.org/
- jEdit home:
- TextMate: TextMate is a powerful, general-purpose GUI text editor for Mac OS X that is very popular with programmers and technology professionals. It is highly configurable and focuses on productive automation. It is currently only available for Mac OS X and is a proprietary, commercial product.
- TextMate home:
http://www.macromates.com/
- TextMate home:
- Bluefish: Bluefish is a powerful editor targeted toward programmers and webdesigners, with many options to write web sites, scripts, and programming code. It is released under the GNU GPL license and runs on most operating systems including Linux, FreeBSD, MacOSX, OpenBSD, Solaris, and Windows.
- Bluefish home:
http://bluefish.openoffice.nl/
- Bluefish home:
Working with Geany
Releases of Geany are either available from your system package distribution site or can be downloaded as source code,5 installers, or third-party packages.6 It is also available in a portable7 format that can be installed on a USB stick.
Geany has the following important characteristics that we list here because we believe they apply as practical considerations to whichever editor or editors you decide to use instead:
- Cross-platform (Linux, Windows, Mac OS X, *BSD, Solaris, and so on)
- Opensource and easily built from source code
- Small and fast, allowing rapid use also on constrained systems
- Good documentation set
- Active project with frequent releases and a supportive community
- Code syntax coloring, completion, and symbol navigation tree
- Organization of code folders into projects with build commands
- Configurable menu tools based on external commands
- Extensible architecture and a stable set of core plugins
AN IMPORTANT NOTE ON CODE EDITORS: You are clearly free to use any programming editor of your choice. Indeed, many good development text editors available in the open-source and commercial markets have the characteristics and features we have outlined.
______________
Configuring the Editor for Android Work
Ideally, we want to be able to conveniently invoke the Android SDK tool commands listed in Table 2–2 from the user interface of our editor. Geany supports this customization through a concept called Build Commands that results in new application menu entries. Indeed, this is one of the characteristics we listed previously and one of the reasons why we chose it for this section.
Most good open-source and commercial code editors support this feature in some fashion and to some extent. Our goal is to simply introduce this concept of external tool commands as an alternative to a full-blown IDE, not to focus too much on the specific editor at hand.
Whether you decide to use Geany or another equivalent editor, we recommend researching the relevant documentation. Geany's manual is also posted on the official web site.8
The ability to customize the Geany build commands is available from the Set Build Commands menu item on the Build menu. This opens the Project Properties dialog on the Build tab, as shown in Figure 2–2.
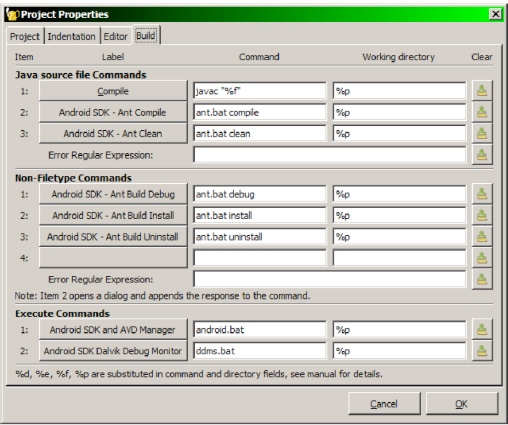
Figure 2–2. Android SDK Build commands for Geany code editor on Windows
______________
The Project Properties dialog Build tab depicted in Figure 2–2 is for Geany on a Windows development system.
Incidentally, the %p substitution symbol is Geany-specific and is substituted at invocation time with the current project directory as a working directory for the command. More information on substitutions is available in the user manual.9
The equivalent configuration and Android SDK tool commands for a Linux development system are shown in Figure 2–3.

Figure 2–3. Android SDK Build commands for Geany code editor on Linux
Configuring Geany in this fashion results in a Geany Build Menu similar to that shown in Figure 2–4.
______________
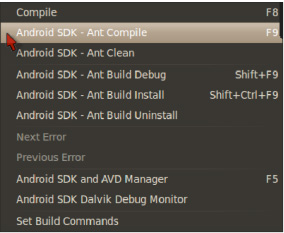
Figure 2–4. Android SDK commands on Geany code editor Build menu
We now have the Android SDK development tools conveniently at hand directly in the user interface of the tool. This essentially converts our code editor into a very lean but functional mini–Android development IDE.
The Example Application Project
The example project we present in this section is not meant to be a useful application in itself. It has a dual purpose: to serve as a container for reusable bits of code and as a vehicle for demonstrating the use of several development tools that ship with the Android SDK.
We will first present the full source code of relevant sections of the project and then take a step-by-step approach to work through a grab bag of small reusable code chunks. These code pieces cover the kinds of things we generally want to know how to do as soon as possible when learning a new development platform. Quickly composing such code snippets allows us to rapidly create small, quick-and-dirty, but functional prototype applications. The project code will cover areas such as the following.
- Fixed text labels that communicate instructions, application help, or other usage information to the user
- Editable text fields that gather user input, data modifications, and deletions for application processing
- Conditionally active or inactive buttons that trigger code actions and afford the user the opportunity to control application functionality
- Mouse and Keyboard Event listeners on buttons and text fields that trap user input actions and alter application state accordingly
- Extracting Views and String values from application layout files and string tables at runtime
- Storing and loading basic application data to and from simple, “flat” text files
- Flexible runtime logging that traces application behavior for debugging, production problem resolution, accountability, security and other purposes
- Notifications and alarms that keep the user and the system up to date with application state and functioning or elicit user decision-making actions
- Creation and layout of user interface controls using static XML files during application build
- Programmatic, or dynamic, creation and layout of user interface controls at runtime in code
- Creation and interaction with application menus
Generating the Foundation Android Project
The first step to developing a new Android application with the core tools is to generate the base project folder structure and files. This was covered in the first chapter of this book, but we will provide the required knowledge for this section here.
Since we called our project MyAndroidSdkAppProject in the first chapter, and we are dealing with an assortment of generic Android SDK features, we will simply call the project for this section MyAndroidSdkAppProject2.
Open your terminal (command-line console) in a parent folder of your choice and then issue the following command on your platform shell (cmd.exe, bash, etc):
android create project

--target "android-9"

--name MyAndroidSdkApp2

--path ./MyAndroidSdkAppProject2

--activity MyAndroidSdkAppActivity2

--package com.example.myandroid
Note that we have added line breaks to the command for convenient reading. Please refer to the first chapter for more information on the android create project command. The official documentation is available on the Android developer web site.10 For more background information, also try issuing the following command:
android -h create
This will list some useful help and usage information to the terminal console window.
______________
The Android Project Directory Structure
Theandroid create project command generates a project directory structure and files that can immediately be compiled with Ant from the project root directory using the ant compile command. A debugging release of the application can also be directly built using ant debug.
If you have decided to use the Geany editor according to our earlier discussion, you can create a Geany project using the MyAndroidSdkAppProject2 directory as the base directory for the project. Having done this, you can then configure the project build commands according to our previous instructions. It will then be possible to invoke the Ant Build Debug command from the Build menu. We will cover this in further detail.
Should you prefer not to use the editor for this section, you can also just run the build from a terminal session on the command line instead.
After a successful debug build, the directory structure and content of the project folder should appear similar to that listed in Listing 2–1. This is the standard layout of an Android SDK Ant-based project so it is prudent to become familiar with it. We will not delve into detailed discussion of each element here. The relevant information is conveniently accessible from the official Android Developers web page.11
We will be covering appropriate segments of an Android project directory as we work through the code projects in this chapter and the rest of the book.
Listing 2–1. Basic Android Create Project Directory Structure
MyAndroidSdkAppProject2

|   AndroidManifest.xml

|   build.properties

|   build.xml

|   default.properties

|   local.properties

|   proguard.cfg

+---bin

|   |   classes.dex

|   |   MyAndroidSdkApp2-debug-unaligned.apk

|   |   MyAndroidSdkApp2-debug.apk

|   |   MyAndroidSdkApp2.ap_

|   ---classescomexamplemyandroid

|               MyAndroidSdkAppActivity2.class

|                       R$attr.class

|                       R$drawable.class

|                       R$layout.class

|                       R$string.class

|                       R.class

+---gencomexamplemyandroid

|                       R.java

+---libs

+---res

|   +---drawable-hdpi
|   |       icon.png

|   +---drawable-ldpi

|   |       icon.png

|   +---drawable-mdpi

|   |       icon.png

|   +---layout

|   |       main.xml

|   ---values

|           strings.xml

---srccomexamplemyandroid

                MyAndroidSdkAppActivity2.java
______________
You have already seen the application that was generated for us in action. If you refer to the “Android SDK Test Drive” sections of Chapter 1, you will find an image of it running in the Android emulator (refer to Figure 1–10). The only difference should be that it now says MyAndroidSdkAppProject2 instead of MyAndroidSdkAppProject.
Preparing to Run the Example Application
In the following sections, we will be covering the source code for the example application while running through the application workflow in the Android emulator. This will help you understand what the code does in practice.
Starting a Debugging Session
To begin the debugging session we need to launch both the Dalvik Debug Monitor (DDMS) and the Android emulator with our AVD. We can do this from the terminal command line with the following commands.
On Linux/Mac OS X:
emulator -avd android23api9_hvga_32mb&

ddms &
On Windows:
start emulator -avd android23api9_hvga_32mb

start ddms
Clearly, we also can use the convenient shortcuts we set up on the Geany editor menu as depicted in Figure 2–5.

Figure 2–5. Starting the DDMS from the Geany customized Build menu
To launch the emulator with our AVD, we first start the Android SDK and AVD Manager. When the Manager application user interface is open, select android23api9_hvga_32mb from the AVD Name list and then click the Start button. The DDMS application can be launched directly from the menu entry.
During the loading of the Android emulator, the DDMS should appear as in Figure 2–6. The emulator instance is selected, and DVM events are listed on the Log tab.

Figure 2–6. Android DDMS with loading emulator instance selected
The emulator should now be visible as in Figure 2–7. Note that for convenience we have switched the orientation to Landscape using the CTRL+F12 keyboard sequence.

Figure 2–7. Android emulator instance in Landscape view mode
NOTE: We will leave the emulator and the Android Debug Bridge (ADB) running in the background while doing development using the same AVD. Unless we need to switch AVDs, there should generally be no need to restart these tools for each recompilation, rebuild, or reinstall of the application debug package (MyAndroidSdkApp2-debug.apk).
Replacing the Default Generated Code
We need to replace the code for the following three files in the project folder, /MyAndroidSdkAppProject2, with our own12 versions:
- The application main layout file: We will be adding new GUI controls
/res/layout/main.xml - The default strings table file: To show how to read string resources
/res/values/strings.xml - The main activity class code file: New Java demonstration code
/src/com/example/myandroid/MyAndroidSdkAppActivity2.java
______________
12 The book example source code and listings are available as download archives from the Apress web site.
You are free to edit the existing generated files or simply overwrite them with the files from the code listings of this book. We will discuss the files in detail later on.
Building and Installing the Project Example Code
We now want to build and deploy the new code to the AVD in one step (Figure 2–8).

Figure 2–8. Build and install from the Geany customized Build menu
We can either do this from the Geany custom menu as before or execute the command directly from the terminal in the root project directory as follows. This command should work from Linux, Mac OS X, and Windows:
ant install
If you click the Application Launcher icon of the emulator, you should now see MyAndroidSdkAppActivity2 among the application icons.
Creating a Log Filter for the Application in the DDMS
To make things easier during debugging, the Dalvik Debug Monitor (DDMS) application offers the ability to create application filters based on custom criteria. We can create a new log filter by clicking the button with the large green cross (marked in Figure 2–9). One of the criteria is called the Log Tag. Fill in the Filter Name and Log Tag text fields with MyAndroidSdkAppActivity2.

Figure 2–9. Creating a new log filter based on the application Log Tag
The following segment of code is an extract from Listing 2-8:
public class MyAndroidSdkAppActivity2 extends Activity

{

    /** TAG for debug logging purposes - used as a filter in DDMS */

    private static final String TAG = "MyAndroidSdkAppActivity2";


[--code omitted--]
It shows the main entry point for the main application class that inherits the Android Activity class. All Android applications that interact with the end user have to extend this class. The central role of the Activity class is well explained on the Android Developers web site.13
For the moment, we are mainly interested in the Log Tag. In this code segment, we have declared the code necessary to implement and later use an application Log Tag. More information on the Log14 class and debugging tasks15 are available on the official Developers site.
You will soon see how to use this tag in your code.
NOTE: It is highly recommended to always implement and use the Android Log API during development and debugging of your own code.
As shown in Figure 2–10, you should now be able to see a new tab for the application log filter in the DDMS user interface.
______________
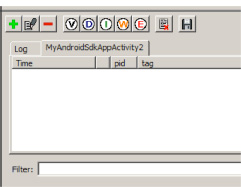
Figure 2–10. A new log filter in DDMS based on the application Log Tag
Running the Example Application
Now that we have built and deployed our code, and we have a convenient log filter in place, we can proceed to launch the application in the emulator. Be sure to keep the DDMS open on your desktop with the MyAndroidSdkAppActivity2 log filter tab active.
Figure 2–11 depicts the initial screen of the application after startup. Note that for convenience we have again switched the orientation to Landscape using the CTRL+F12 keyboard sequence. Once we start testing the application, it will make more sense to switch back to Portrait orientation.

Figure 2–11. The MyAndroidSdkAppActivity2 Application in the emulator
The logging activity of the first time launch of the application code is visible in Figure 2–12. For interest, our application code looks for a private file on startup. If it does not find it, it logs the exception and proceeds. These exception log entries are visible in Figure 2–12.
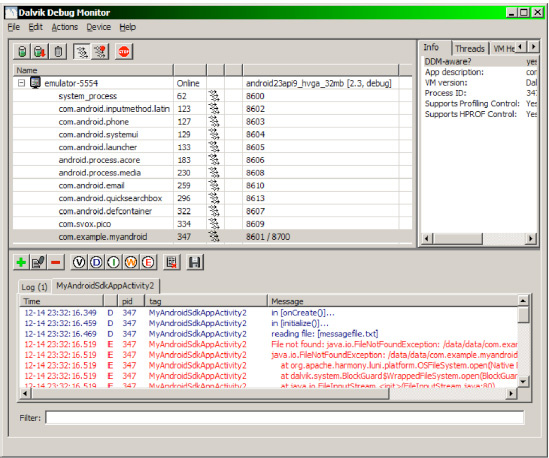
Figure 2–12. The MyAndroidSdkAppActivity2 application log filter and output in DDMS
What Does the Demo Application Do?
As shown in Figure 2–11, the initial screen of the application after startup is fairly simple on the surface. It presents five basic visible GUI controls:
- A fixed text view that acts as a label with a hello message. We will not spend time on this control since it is very straightforward.
- An enabled button with the text
“Silly Exit Button”. When clicked, this button will cause the application to seemingly close. We will discuss this in more detail in a coming section. Suffice it to say that we called it“Silly”since Android applications, or activities, do not normally need specific exit support. The platform already has facilities for this. - An initially disabled button called
“Save Message”, which allows the user to save any text entered into the editable text field below. This text will appear the next time the application is launched. It also pops up an Android toast message when pressed. - An editable text field initially filled with the text
“Please enter a message and save it.”When edited with contents, it will trigger code that will enable the previously disabledSaveandMakerbuttons. If the text message is left blank the buttons will be disabled. - An initially disabled button called
“Button Maker Button”. When this button is enabled as described previously, it will dynamically create another button below it each time it is pressed. This code will be used to demonstrate the creation of GUI controls at runtime. The created buttons will also have data tags and event handlers attached to them at creation time. These will invoke routines that implement a mix of Android notification mechanisms (toasts, alerts, and system notifications).
We suggest you play around with the application to get a feel for it before diving into the code discussions below.
Here follows a sequence of screen captures and comments of the application demonstration features in action.
Figure 2–13 shows the application after opening for the first time. Note that some of the buttons are not enabled.
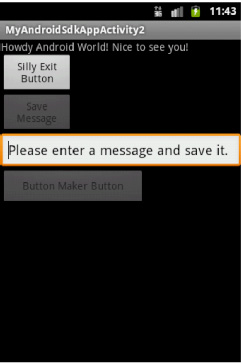
Figure 2–13. The MyAndroidSdkAppActivity2 Application after first-time launch
Figure 2–14 shows the application after entering a text message. The previously disabled buttons have now been activated.

Figure 2–14. The MyAndroidSdkAppActivity2 Application after entering a new text message
Figure 2–15 depicts the application after clicking on Save Message. If the application is closed and reopened, this text message will be reloaded from a private application file.

Figure 2–15. The MyAndroidSdkAppActivity2 Application shows a toast after saving the new text message
Figure 2–16 shows the application after clicking the Button Maker Button three times.
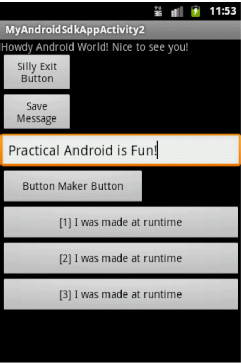
Figure 2–16. The Application with new buttons after pressing the Button Maker Button three times
Figure 2–17 shows that clicking the first created button raises an OK alert dialog.
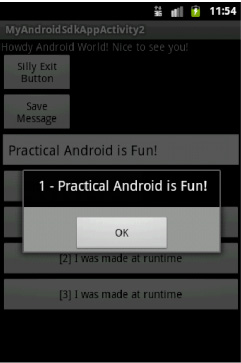
Figure 2–17. MyAndroidSdkAppActivity2 Dynamic Button 1 shows an alert
Figure 2–18 shows that clicking the second created button raises an Android toast. Note that the label text for each dynamic button is also changed as it is pressed.
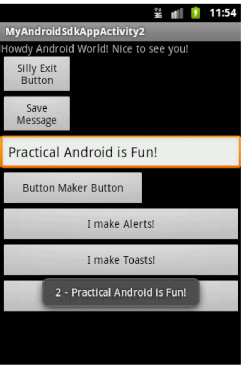
Figure 2–18. MyAndroidSdkAppActivity2 Dynamic Button 2 shows a toast
Figure 2–19 shows that clicking the third button creates an Android system notification. System Notifications are normally reserved for Android services or other background applications, but here we have decided to demonstrate how to create one in an interactive manner.
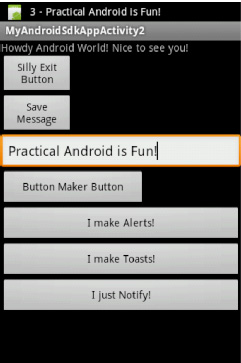
Figure 2–19. MyAndroidSdkAppActivity2 Dynamic Button 3 creates a notification
Figure 2–20 shows the opened notification in Landscape orientation. Clicking Clear should dismiss it.
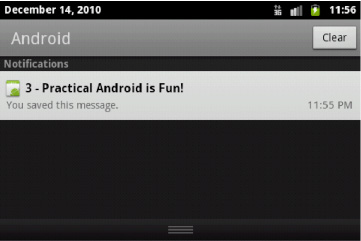
Figure 2–20. MyAndroidSdkAppActivity2 Dynamic Button 3 system notification
Note that the demonstration application consistently carries the custom text message through to all the user notification types.
If we close and reopen the application (see Figure 2–21), the user interface is now aware that a message was previously persisted, and all buttons are consequently also available for use.
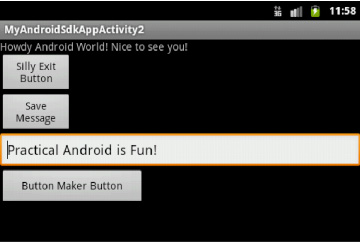
Figure 2–21. Application after reopening and automatic reloading of persisted text message
Figure 2–22 shows the demonstration menu group with a menu item highlighted.

Figure 2–22. Application demonstrating menu groups after pressing the F2 MENU key
Figure 2–23 shows a toast based on the menu item that was selected.

Figure 2–23. Application showing a toast after selecting a menu item
That concludes our tour of the example application. You should now have a good enough understanding of the interactions of the application to dive into the project files and source code.
A Walk through the Core Application Files
As mentioned earlier, we have replaced the following first three files of the generated application with our own. We will discuss each of these files in overview.
- Application main layout:
/res/layout/main.xml - Default strings table:
/res/values/strings.xml - Activity:
src/com/example/myandroid/MyAndroidSdkAppActivity2.java
Even though we have not altered it, we will also discuss the Application Manifest file.
- Android Manifest file:
/AndroidManifest.xml
The Application Manifest File
We will start with the Android Manifest file. One basic aspect that is vital to understand when developing Android software is the process by which the Android runtime finds the startup class in an Android application package.
The keys to this process lie within the application manifest. If we review Listing 2–2, we can follow the process described as follows based on the contents of our example manifest file.
Listing 2–2. The Generated Application Manifest File: AndroidManifest.xml
<?xml version="1.0" encoding="utf-8"?>

<manifest xmlns:android="http://schemas.android.com/apk/res/android"

      package="com.example.myandroid"

      android:versionCode="1"

      android:versionName="1.0">

    <application android:label="@string/app_name" android:icon="@drawable/icon">

        <activity android:name="MyAndroidSdkAppActivity2"

                  android:label="@string/app_name">

            <intent-filter>

                <action android:name="android.intent.action.MAIN" />

                <category android:name="android.intent.category.LAUNCHER" />

            </intent-filter>

        </activity>

    </application>

</manifest>
From the manifest the Android runtime will look up the name within the activity tag that wraps a MAINaction and a category of LAUNCHER. It then takes this name and appends it to the package tag value specified in the manifest tag. The full name of the startup class in this case will then be com.example.myandroid.MyAndroidSdkAppActivity2.
The Application Main Layout File
As mentioned elsewhere, the original layout file that was generated by the android create project command is presented in Listing 2–3 for reference only. We replaced it with the one in Listing 2–4.
Listing 2–3. The Original Generated Application Layout File: main.xml
<?xml version="1.0" encoding="utf-8"?>

<LinearLayout xmlns:android="http://schemas.android.com/apk/res/android"

    android:orientation="vertical"

    android:layout_width="fill_parent"

    android:layout_height="fill_parent"

    >

<TextView

    android:layout_width="fill_parent"

    android:layout_height="wrap_content"

    android:text="Hello World, MyAndroidSdkAppActivity2"

    />

</LinearLayout>
Android GUIs and the Role of the View Class
Before we go any farther, it is worth covering some background surrounding activities, layouts, views, and how Android GUIs are built up. There are some core Android GUI concepts, their relationships, and their roles that will underpin all our GUI work as Android developers. The essence of these concepts can be summarized as follows:
- Activities: All Android application screens or forms are instances of the
Activityclass or descendants thereof. Activities are the foundation of Android applications with a user interface. In contrast, background or long-running applications like services are not derived from theActivityclass, but rather from the invisible AndroidServiceclass. An activity normally takes on a visible appearance by being assigned a specificLayoutclass instance. - Layouts: The
Layoutclass forms the unseen container for all visible controls in an activity screen or form. Layouts are built on theViewGroupclass and can be specified declaratively in an XML layout file or created programmatically in the runtime code of the application. - View Groups: The
ViewGroupclass is a container class and a direct subclass of theViewclass. It also serves as the base class for allLayoutclasses includingLinearLayout,RelativeLayout,AbsoluteLayout,FrameLayout, and other composites. - Views: The
Viewclass is the base class for theViewGroupclass and the root for all user interface components, controls, or widgets in the Android GUI world. TheViewclass handles all on-screen drawing and event processing. This class is the root GUI class and is second to only one other class in the inheritance hierarchy,java.lang.Object. In order to create your own, highly specialized and distinguishing user interfaces, you will generally implement your own directViewdescendant classes and base your interfaces on them.
The previous background should now serve as a basis for understanding the user interface aspects of our example application better.
The Layout for the Example Code
The layout file for the example application (see Listing 2–4) declares the five View controls initially visible in the application's activity.
Listing 2–4. The Project Example Application Layout File: main.xml
<?xml version="1.0" encoding="utf-8"?>

<LinearLayout xmlns:android="http://schemas.android.com/apk/res/android"

    android:id="@+id/layout_main"

    android:orientation="vertical"

    android:layout_width="fill_parent"

    android:layout_height="fill_parent">

    <TextView
        android:layout_width="fill_parent"

        android:layout_height="wrap_content"

        android:text="Howdy Android World! Nice to see you!"

    />

    <Button

        android:id="@+id/cmd_silly_exit_button"

        android:layout_width="96px"

        android:layout_height="wrap_content"

        android:text="Silly Exit Button"

    />

    <Button

        android:id="@+id/cmd_save_message"

        android:layout_width="96px"

        android:layout_height="wrap_content"

        android:text="Save Message"

    />

    <EditText

        android:id="@+id/txt_toast"

        android:layout_width="fill_parent"

        android:layout_height="wrap_content" >

    </EditText>

    <Button

        android:id="@+id/cmd_make_button"

        android:layout_width="192px"

        android:layout_height="wrap_content"

        android:text="Button Maker Button"

    />

</LinearLayout>
A subtle but important addition to the layout file is the bold line of XML code:
android:id="@+id/layout_main"
The original layout did not contain this line. We added it for the purpose of demonstrating how to get access to the id of the root LinearLayout ViewGroup instance. If we browse forward to Listing 2–8, our replacement MyAndroidSdkAppActivity2.java source file, we can find the following code:
private ViewGroup vwgMainLayout = null;

[--code omitted--]

vwgMainLayout  = (ViewGroup)findViewById(R.id.layout_main);
These code segments demonstrate how to get a reference to the main activity layout. This is then used later to add controls dynamically to the ViewGroup layout instead of declaring them in the XML layout file before build time. See Listing 2–11 for more on this.
The findViewById(int id) method is the standard Android API for retrieving a handle to a View instance that was created by the Android platform from declarations in a Layout file. We will see it in almost all Android application code. It takes as an argument the id of the View that was declared in an XML layout file.
These ids are generated by the Android SDK from the application's resource XML files during build time. The R.java Java class source code file is generated (in the gendirectory) based on the XML resource files declared in the project structure. Here follows an extract from the R.java file with the relevant R.id.layout_main id highlighted in bold:
[--code omitted--]

public static final class id {

    public static final int cmd_make_button=0x7f050004;

    public static final int cmd_save_message=0x7f050002;

    public static final int cmd_silly_exit_button=0x7f050001;

    public static final int layout_main=0x7f050000;

    public static final int txt_message=0x7f050003;

}

public static final class layout {

    public static final int main=0x7f030000;


[--code omitted--]
DO NOT EDIT R.JAVA: TheR.java class file serves as a list (index) of all application resources identified by a unique build time–generated reference. It should never be edited by hand.
The Default String Table File
The String table is a container for string resources, which are generic software development artifacts used to minimize the impact of changes in the international aspects of applications, among others. In general, these aspects do not directly affect the logic of the compiled application, and the latter should ideally not be affected when the former needs to vary.
For example, when an application user interface needs to support a new natural language B, as well as an existing language A, string resources can be the answer for retrieval of the correct language values based on locale. Embedding (or “hard-coding”) both sets of values in the application code is not a sustainable alternative. This becomes especially relevant when a potential support requirement for a third language C might be just around the corner.
The example application demonstrates how to extract values from the String table, strings.xml (see Listing 2–6), using the Android API getString() method call as in the following code extract from Listing 2–9:
    public void initialize()

    {


[--code omitted--]


        /** get string values from the default string table */


        message_def  = getString(R.string.default_message);

        label_toasts = getString(R.string.label_toasts);

        label_alerts = getString(R.string.label_alerts);

        label_notify = getString(R.string.label_notify);


[--code omitted--]
More information on Android string resources can be found online at the Android Developers web site.16
Listing 2–5 presents the original String table.
Listing 2–5. The Original Generated Application String Table File: strings.xml
<?xml version="1.0" encoding="utf-8"?>

<resources>

    <string name="app_name">MyAndroidSdkAppActivity2</string>

</resources>
Listing 2–6 shows the replacement String table.
Listing 2–6. The Project Example Application Replacement String Table File: strings.xml
<?xml version="1.0" encoding="utf-8"?>

<resources>

    <string name="app_name">MyAndroidSdkAppActivity2</string>

    <string name="default_message">Please enter a message and save it.</string>

    <string name="label_toasts">I make Toasts!</string>

    <string name="label_alerts">I make Alerts!</string>

    <string name="label_notify">I just Notify!</string>

</resources>
The Main Activity Java Source File
As earlier, we will first present the generated Android Activity class source file shown in Listing 2–7 and then provide the full code listing of our chapter project replacement example in segments from Listing 2–8 onward.
Listing 2–7. The Original Generated Application Main Activity Java File: MyAndroidSdkAppActivity2.java
package com.example.myandroid;


import android.app.Activity;

import android.os.Bundle;


public class MyAndroidSdkAppActivity2 extends Activity


{

    /** Called when the activity is first created. */

    @Override

    public void onCreate(Bundle savedInstanceState)

    {

        super.onCreate(savedInstanceState);

        setContentView(R.layout.main);

    }

}
Our replacement MyAndroidSdkAppActivity2.java source file (see Listing 2–8) is fairly long and extensive. It also covers several distinct technical areas of Android programming. We will systematically work through code segments from the full source code file as extracts in the chapter “How to” sections that follow. We strongly suggest that you build and work through the code project with us to get the best from the discussion.
______________
Listing 2–8. The Application Main Activity Java Source File: MyAndroidSdkAppActivity2.java (Partial)
package com.example.myandroid;


import android.app.Activity;

import android.app.AlertDialog;

import android.app.Notification;

import android.app.NotificationManager;

import android.content.Intent;

import android.app.PendingIntent;

import android.os.Bundle;

import android.util.Log;

import android.content.Context;

import android.view.View;

import android.view.ViewGroup;

import android.view.ViewGroup.LayoutParams;

import android.view.KeyEvent;

import android.view.Menu;

import android.view.MenuItem;

import android.widget.LinearLayout;

import android.widget.Button;

import android.widget.EditText;

import android.widget.Toast;

import java.lang.Runtime;

import java.lang.CharSequence;

import java.lang.Integer;

import java.lang.Object;

import java.io.BufferedReader;

import java.io.File;

import java.io.InputStream;

import java.io.InputStreamReader;

import java.io.OutputStream;

import java.io.OutputStreamWriter;


public class MyAndroidSdkAppActivity2 extends Activity


{

    /** TAG for debug logging purposes - used as a filter in DDMS */

    private static final String TAG = "MyAndroidSdkAppActivity2";


    /** our message text file - used to store arbitrary bits of text */

    private static final String MESSAGEFILE = "messagefile.txt";


    /** handles to our static controls in the XML layout */

    private Button       cmdSilly      = null;

    private Button       cmdMaker      = null;

    private Button       cmdSave       = null;

    private EditText     txtMessage    = null;

    private CharSequence message_def   = null;

    private CharSequence message       = null;

    private String       label_toasts  = null;

    private String       label_alerts  = null;

    private String       label_notify  = null;


    /** handles to our dynamic controls created programmatically */

    private ViewGroup    vwgMainLayout = null;
    private static final int MAKE_MAX  = 3;

    private int          countMade     = 0;

    private Button       cmdMade       = null;


    /** Called when the activity is first created. */

    @Override

    public void onCreate(Bundle savedInstanceState)

    {

        Log.d(TAG, "in [onCreate()]...");


        super.onCreate(savedInstanceState);

        // set the main layout

        setContentView(R.layout.main);

        // also get a programmable handle to the main layout

        vwgMainLayout  = (ViewGroup)findViewById(R.id.layout_main);

        initialize(); // our init method

    }

[--code omitted--]
Android Coding How to
In this section we will break down the example application source code into segments that demonstrate distinct coding techniques. We will be doing this in a “how-to” format.
The goal is to clarify the overall code structure and to create a small reference of reusable code snippets for common Android programming tasks.
Using the Android Log API
Since application logging is something that applies to all code, the first aspect we want to cover in this how-to section is about using the built-in Android Log API.
We want to remind you that reference reading on the Log API is available on the official Android Developers site.17 There is also good coverage of Android debugging techniques on the site.18
Log API Methods and Styles
The Android API includes a standard logging class simply called Log, which supports several static methods that allow the programmer to implement logging facilities in a program at several levels. The most commonly used of these levels and methods are listed in Table 2–3. You will see some of these levels and methods used throughout the demonstration project source code.
______________
Table 2–3. Android Log API Levels and Methods
| Logging Level | Log API Static Method | Overloaded Method with Exception Argument |
| Verbose | Log.v(String tag, String msg) |
Log.v(String tag, String msg, Throwable tr) |
| Debug | Log.d(String tag, String msg) |
Log.d(String tag, String msg, Throwable tr) |
| Information | Log.i(String tag, String msg) |
Log.i(String tag, String msg, Throwable tr) |
| Warning | Log.w(String tag, String msg) |
Log.w(String tag, String msg, Throwable tr) |
| Error | Log.e(String tag, String msg) |
Log.e(String tag, String msg, Throwable tr) |
Some aspects of logging in Android code were covered during an earlier section that showed how to create log filters in the DDMS. We also presented a snippet of code there which is worth reviewing again. It shows the declaration for the Log Tag:
public class MyAndroidSdkAppActivity2 extends Activity

{

    /** TAG for debug logging purposes - used as a filter in DDMS */

    private static final String TAG = "MyAndroidSdkAppActivity2";
In general, we use a logging call style similar to the following snippet for standard debug tracing:
    public void onCreate(Bundle savedInstanceState)

    {

        Log.d(TAG, "in [onCreate()]...");
For logging exceptions we use the following type of call:
        catch (Throwable t) {

            Log.e(TAG, "File write failed: " + t.toString(), t);

            throw t; /** other unexpected exception - rethrow it */

        }
As we will show next, the effects of such logging calls can be graphically viewed using the ample logging tools provided by the Android SDK.
Android SDK Log Viewers
Besides log filters, the DDMS menu system (see Figure 2–24) shows another way to view the Android log. Select Device ![]()
Run logcat to do this.

Figure 2–24. Starting logcat from the DDMS menus
Figure 2–25 shows the resulting logcat remote window after opening it from the DDMS menu system.
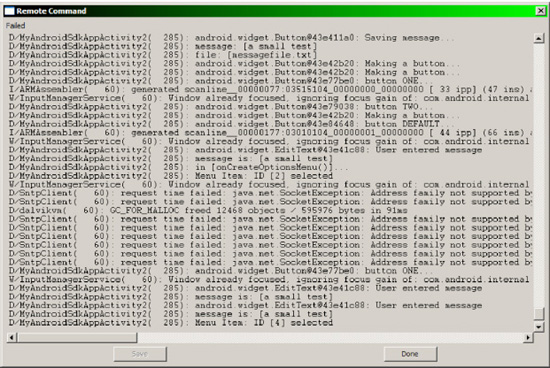
Figure 2–25. Running logcat from the DDMS menus
We can also issue adb logcat from a separate terminal window to track log entries as they are written. Figure 2–26 depicts logcat open on a Windows development computer.

Figure 2–26. Running adb logcat on the Windows command line
Centralizing Application GUI Initialization Code
Listing 2–9 presents a centralized method in which all GUI control and supporting element setup for the application is performed. This is not so much a specific technique as it is a good programming practice. It has the advantage that it reduces noise and clutter in the onCreate() method.
The method, initialize(), is invoked at the end of the Activity onCreate() method. It is responsible for delegating to the set of how-to methods you will see later. These methods implement the lower level Android API functionality that the example project attempts to demonstrate.
Listing 2–9. MyAndroidSdkAppActivity2.java : GUI Setup Grouped Within an Initialize() Method
    public void initialize()

    {

        Log.d(TAG, "in [initialize()]...");


        /** get string values from the default string table */

        message_def  = getString(R.string.default_message);

        label_toasts = getString(R.string.label_toasts);

        label_alerts = getString(R.string.label_alerts);

        label_notify = getString(R.string.label_notify);


        cmdSilly = (Button)findViewById(R.id.cmd_silly_exit_button);

        cmdSilly.setOnClickListener(

            new Button.OnClickListener() {

                public void onClick (View v){

                    Log.d(TAG, v.toString() + ": Leaving activity...");

                    Runtime.getRuntime().exit(0);

                }

            }

        );


        cmdSave = (Button)findViewById(R.id.cmd_save_message);

        cmdSave.setOnClickListener(

            new Button.OnClickListener() {

                public void onClick (View v) {

                    Log.d(TAG, v.toString() + ": Saving message...");

                    message = txtMessage.getText();

                    Log.d(TAG, "message: [" + message + "]");

                    Log.d(TAG, "file: [" + MESSAGEFILE + "]");

                    writeMessageFile(message);

                    makeToast("[" + message + "] is now saved");

                }

            }

        );


        txtMessage = (EditText)findViewById(R.id.txt_message);

        txtMessage.setOnKeyListener(new View.OnKeyListener() {

            public boolean onKey(View v, int keyCode, KeyEvent event) {

                final int action = event.getAction();

                boolean ret = false; // we are not consuming the event by default

                if (keyCode == KeyEvent.KEYCODE_MENU) { // ignore menu key

                    Log.d(TAG, v.toString() + ": User pressed the MENU key");

                }
else {
Log.d(TAG, v.toString() + ": User worked in the message");
message = txtMessage.getText();
setButtonsEnabled();
}
return ret;
}
});
cmdMaker = (Button)findViewById(R.id.cmd_make_button);
cmdMaker.setOnClickListener(
new Button.OnClickListener() {
public void onClick (View v) {
Log.d(TAG, v.toString() + ": Making a button...");
makeWideButton( "I was made at runtime");
}
}
);
Log.d(TAG, "reading file: [" + MESSAGEFILE + "]");
message = readMessageFile();
txtMessage.setText(message);
Log.d(TAG, "retrieved: [" + message + "]");
setButtonsEnabled();
if (0 == message.length()) { // only show default message if empty
txtMessage.setText(message_def);
}
}
Exiting an Application Activity
The top button you see when you open the application is a button called “Silly Exit Button”. The reason for this name stems from the fact that, by design, Android applications should not, in theory and in practice, need “Exit” buttons or any other such mechanisms. Normally a device user will simply abandon the current application and directly go off to another application as needed. The Android platform already supports mechanisms for doing this such as Back, Home, and so on.
Be that as it may, it is interesting to note how such functionality can be achieved. It might also be useful in certain circumstances where there is a need to achieve the same result programmatically without user initiation.
The following segment of code is extracted from Listing 2–9 and shows the implementation of this button:
        cmdSilly = (Button)findViewById(R.id.cmd_silly_exit_button);

        cmdSilly.setOnClickListener(

            new Button.OnClickListener() {

                public void onClick (View v){

                    Log.d(TAG, v.toString() + ": Leaving activity...");

                    Runtime.getRuntime().exit(0);

                }

            }

        );
As highlighted by the code in bold, the effect of an Exit is achieved by asking the JVM runtime implementation, in this case the DVM, to shut itself down.
Enabling and Disabling Buttons (and other Views)
Until the user has actually entered a text message or activated the text area to accept the default message already there, some of the buttons on the activity will remain inactive (or disabled).
The method shown in Listing 2–10, setButtonsEnabled(), is responsible for centrally checking the state of the text message and enabling or disabling the relevant buttons accordingly. It uses the setEnabled() method of the subject View instances. In this case, these subjects are Button instances. The Android Button class is descended from the View class and thus supports the setEnabled() method. We pass the boolean false or true depending on whether to disable or enable the target control instance respectively.
Listing 2–10. MyAndroidSdkAppActivity2.java: Button Availability State Control Is Centralized
    public void setButtonsEnabled()

    {

        if (0 == message.length()) {

            Log.d(TAG, "message is EMPTY");

            cmdMaker.setEnabled(false);

            cmdSave.setEnabled(false);

        }

        else {

            Log.d(TAG, "message is: [" + message + "]");

            cmdMaker.setEnabled(true);

            cmdSave.setEnabled(true);

        }

    }
When studying this method it is worth also reviewing and keeping in mind the following snippet from the initialize() method in Listing 2–9:
        txtMessage = (EditText)findViewById(R.id.txt_message);

        txtMessage.setOnKeyListener(new View.OnKeyListener() {

            public boolean onKey(View v, int keyCode, KeyEvent event) {

                final int action = event.getAction();

                boolean ret = false; // we are not consuming the event by default

                if (keyCode == KeyEvent.KEYCODE_MENU) { // ignore menu key

                    Log.d(TAG, v.toString() + ": User pressed the MENU key");

                }

                else {

                    Log.d(TAG, v.toString() + ": User worked in the message");

                    message = txtMessage.getText();

                    setButtonsEnabled();

                }

                return ret;

            }

        });
The preceding code implements a View OnKeyListener for the message text field. As the user interacts with the message EditText field using the keyboard, it delegates control to the setButtonsEnabled() method. This ensures that the state of availability of the buttons is constantly kept synchronized with whether the user has actually entered or accepted any text in the message field.
Creating Controls Dynamically (at Runtime in Code)
One of the techniques we wanted to demonstrate in the example code was how to create a GUI control programmatically. In Listing 2–11, we present this by implementing a helper method makeWideButton() that creates instances of the Button class in the particular sense.
These techniques can also be used in the general sense for other GUI controls since Buttons are descended from the View class, and all other Android GUI artifacts have the View class as their root. The method on the layout container class (ViewGroup) that adds the subject GUI control (View) to itself is predictably called addView() and takes a View instance as its primary argument.
Listing 2–11. MyAndroidSdkAppActivity2.java:- Dynamic View (Button) Control Creation
    /**

     * class to demonstrate tagging an Android View instance with user data

     * */

    public class MyButtonTagData {

        public Integer myUserId = 0;

        public CharSequence myUserData = "--empty--";

        public MyButtonTagData(Integer id, CharSequence data) {

            this.myUserId   = id;

            this.myUserData = data;

        }

    }


    public void makeWideButton(CharSequence label)

    {

        countMade++;

        if (MAKE_MAX >= countMade) {

            cmdMade = new Button(this);

            cmdMade.setText("[" + countMade + "] " + label);

            cmdMade.setTag( /** attach our structure instance to the control */

                newMyButtonTagData(new Integer(countMade), label_notify)

            );

            cmdMade.setOnClickListener(

                new Button.OnClickListener() {

                    public void onClick (View v) {

                        MyButtonTagData tagdata = (MyButtonTagData)v.getTag();

                        Integer tag = tagdata.myUserId;

                        switch (tag.intValue()) {

                            case 1:

                                ((Button)v).setText(label_alerts);

                                Log.d(TAG, v.toString() + ": button ONE...");

                                showOkAlertDialog(tag + " - " + message);

                                break;

                            case 2:

                                ((Button)v).setText(label_toasts);

                                Log.d(TAG, v.toString() + ": button TWO...");
makeToast(tag + " - " + message);
break;
default:
((Button)v).setText(tagdata.myUserData);
Log.d(TAG, v.toString() + ": button DEFAULT...");
showNotification(tag + " - " + message);
break;
}
}
}
);
LayoutParams parms = new LayoutParams(
LayoutParams.MATCH_PARENT, LayoutParams.WRAP_CONTENT);
vwgMainLayout.addView(cmdMade, parms);
}
}
If we review Listing 2–8, our replacement MyAndroidSdkAppActivity2.java source file, we can find the following code:
private ViewGroup vwgMainLayout = null;

[--code omitted--]

vwgMainLayout  = (ViewGroup)findViewById(R.id.layout_main);
This shows us retrieving a reference to the main activity layout. This is required to serve as the target upon which to call the addView()method as per the implementation of makeWideButton() in Listing 2–11.
It is also worth noting the LayoutParams class instance (parms), which we create to set some attributes for the dynamically created ButtonView instance(cmdMade). The method addView()will use this parms instance as its second argument upon adding the button to the main layout instance (vwgMainLayout). These attributes are normally declaratively controlled from an XML layout file but we wanted to demonstrate how to do this with Java code.
Another detail worth drawing attention to is the setTag() method call. The signatures for this method are as follows:
void setTag(int key, Object tag): Sets a tag associated with the current view instance and a key.void setTag(Object tag): Sets the tag associated with the current view instance.
We use the first form to attach a reference to an arbitrary class called MyButtonTagData for demonstration purposes and then retrieve it later using the getTag() method. In this fashion, tags can be used to store data that is associated with a view without having to create separate data structures.
Making an Android Toast
Listing 2–12 presents the code we use in the example application to raise all the Android toast notifications. We want to point you to the official online documentation for the Toast class19 and the tutorial on creating Android toasts.20 The code for our bare-bones toast requirement is quite straightforward and intuitive.
Listing 2–12. MyAndroidSdkAppActivity2.java: Making a Toast
    public void makeToast(CharSequence message)

    {

        Toast.makeText(

            this,

            message,

            Toast.LENGTH_SHORT).show();

    }
NOTE: Having forgotten to call the show() method when making toasts have often caught us by surprise. This appears to be a common mistake, so be on the lookout for it when your toasts won’t show.
Showing an Android Alert Dialog
Listing 2–13 presents the code we use in the example application to create and show the Android OK alert dialogs. The alert dialog builder is a powerful mechanism with a lot of flexibility. We recommend that you have a look at the Android Developers site reference for the AlertDialog.Builder class21 and the tutorial on creating dialogs.22 Again, the code is straightforward and self-explanatory.
Listing 2–13. MyAndroidSdkAppActivity2.java: Showing a Basic Alert Dialog
    public void showOkAlertDialog(CharSequence message)

    {

        new AlertDialog.Builder(this)

          .setMessage(message)

          .setPositiveButton("OK", null)

          .show();

    }
__________
Creating and Showing an Android System Notification
Android system notifications are normally used by background applications without a user interface, Android servicesin particular. We will not cover Android services here but wanted to demonstrate how notifications work (see Listing 2–14).
Listing 2–14. MyAndroidSdkAppActivity2.java: Creating and Showing a System Notification
    public void showNotification(CharSequence message)

    {

        final int notifyRef = 1;

        final int notifyIcon = R.drawable.icon;

        final long notifyWhen = System.currentTimeMillis();

        final String notifyService = Context.NOTIFICATION_SERVICE;


        NotificationManager notifyManager = (NotificationManager)

            getSystemService(notifyService);


        Notification notification = new Notification(

            notifyIcon, message, notifyWhen);


        Context context = getApplicationContext();

        CharSequence notifyTitle = message;

        CharSequence notifyText = "You saved this message.";


        Intent notifyIntent = new Intent(

            this, MyAndroidSdkAppActivity2.class);

        PendingIntent contentIntent = PendingIntent.getActivity(

            this, 0, notifyIntent, 0);

        notification.setLatestEventInfo(

            context, notifyTitle, notifyText, contentIntent);


        notifyManager.notify(notifyRef, notification);

    }
A key step in creating system notifications is getting a handle on the Android notification service. This handle is an instance of the NotificationManager class and is the engine behind the creation and triggering of notifications.
The notification is then instantiated from the Notification class and populated with an icon integer handle, our message character buffer, and a timestamp in milliseconds for the notification.
We then fill out the notification with the current application Context, a custom title and text, and an Intent instance to launch when we click the notification in expanded form. Of course, we could have added the title and text as arguments to our method signature, but we will only use it in one call in our example code and it is a simple matter to make it more generic. The focus is on demonstrating the concepts involved.
Using a Private Application File
The two wrapper methods shown in Listing 2–15 take care of storing and retrieving the custom string message we entered. They do this by calling our Android private application file helper methods presented in Listing 2–16. Note that here we catch and handle any exceptions that were bubbled up by our general file helper methods in a manner visible to the user (with a toast).
Listing 2–15. MyAndroidSdkAppActivity2.java: Loading and Storing a Demonstration Text Message in a File
    /**

     * application specific wrapper to read a message that might be in a file

     * */

    public String readMessageFile()

    {

        String ret_str = "";

        try {

            ret_str = stringFromPrivateApplicationFile(MESSAGEFILE);

        }

        catch (Throwable t) {

            makeToast("Message read failed: " + t.toString());

        }

        return ret_str;

    }


    /**

     * application specific wrapper to write a message to a file

     * */

    public void writeMessageFile(CharSequence message)

    {

        try {

            stringToPrivateApplicationFile(MESSAGEFILE, message.toString());

        }

        catch (Throwable t) {

            makeToast("Message write failed: " + t.toString());

        }

    }
The two methods in Listing 2–16 encapsulate the generic functionality of storing and loading string data to and from what are known as private application files.
Listing 2–16. MyAndroidSdkAppActivity2.java: Reading from and Writing to a Private Android Application File
    /**

     * general method to read a string from a private application file

     * */

    public String stringFromPrivateApplicationFile(String name)

        throws java.lang.Throwable

    {

        String ret_str = "";

        try {

            InputStream is = openFileInput(name);

            if (null != is) {

                InputStreamReader   tmp_isr = new InputStreamReader(is);

                BufferedReader      tmp_rdr = new BufferedReader(tmp_isr);

                String              tmp_str = "";
StringBuilder tmp_buf = new StringBuilder();
while ( (tmp_str = tmp_rdr.readLine()) != null) {
tmp_buf.append(tmp_str);
}
is.close();
ret_str = tmp_buf.toString();
}
}
catch (java.io.FileNotFoundException e) {
/** file has not been created - log this */
Log.e(TAG, "File not found: " + e.toString(), e);
}
catch (Throwable t) {
Log.e(TAG, "File read failed: " + t.toString(), t);
throw t; /** other unexpected exception - rethrow it */
}
return ret_str;
}
/**
* general method to write a string to a private application file
* */
public void stringToPrivateApplicationFile(String name, String data)
throws java.lang.Throwable
{
try {
OutputStreamWriter tmp_osw = new OutputStreamWriter(
openFileOutput(name, Context.MODE_PRIVATE));
tmp_osw.write(data);
tmp_osw.close();
}
catch (Throwable t) {
Log.e(TAG, "File write failed: " + t.toString(), t);
throw t; /** other unexpected exception - rethrow it */
}
}
NOTE: These helper methods, in the spirit of being generic and reusable, do not make exceptions visible to the end user. This would limit the scope of their applicability. Instead, exceptions are logged and propagated to calling client code for handling.
Browsing the Device File System with the DDMS File Explorer
The Android SDK tools enable us to browse the file system of the Android device or emulator that we are using for development. Figure 2–27 shows a way to access this functionality graphically from the DDMS. Open Device ![]() File Explorer from the DDMS menu system.
File Explorer from the DDMS menu system.
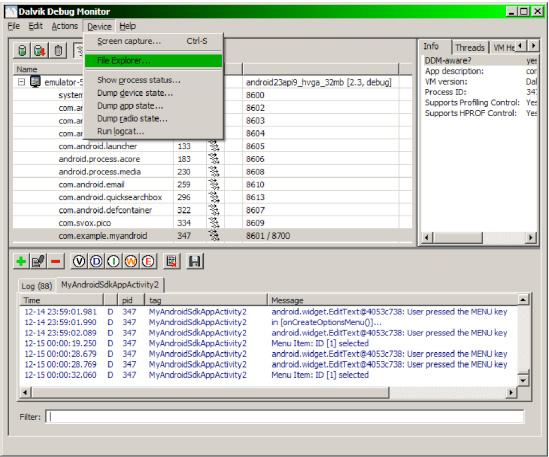
Figure 2–27. Opening the File Explorer from the DDMS menu system
Figure 2–28 shows the File Explorer browsing the data subdirectories for the example application. You can clearly see the demonstration message file.

Figure 2–28. The File Explorer window with a view on the file system and the example message file
The File Explorer also allows us to push and pull files to and from the device or emulator.
Navigating the Device File System with the ADB Shell
In addition to graphically navigating the device file system, the Android SDK tools also allow us to run a remote shell on an attached device, whether the device is an AVD emulated instance or an actual physical device.
The SDK utility that supports this functionality is the ADB. To see how this works, issue the following commands in a terminal command-line window:
adb -e shell

# cd /data/data/com.example.myandroid/files/

# ls

# cat messagefile.txt
The output of running this session on Windows can be seen in Figure 2–29. The preceding commands are compatible with Linux, Mac OS X, and Windows systems. In fact, it might be worth a mention that the # (hash) prompt belongs to the remote Linux shell on the device, not the local host system.

Figure 2–29. Navigating the file system and the ADB shell
For clarity, a transcript of this session for Windows follows here:
C:>adb -e shell

# cd /data/data/com.example.myandroid/files/

cd /data/data/com.example.myandroid/files/

# ls

messagefile.txt

# cat messagefile.txt

Practical Android is Fun!

#
Making Menus
Per Listing 2–17, Android activity menus are mainly created by overriding two methods on the Activity class: onCreateOptionsMenu() and onOptionsItemSelected().
The onCreateOptionsMenu() method is invoked with the activity’s default root menu item as an argument. This can then be used to add additional menu groups and menu items. We should always return true from this method if the menu structure is to be visible, or else return false.
The onOptionsItemSelected()method takes care of menu actions that are triggered by events as the user selects menu items. When we handle a known application menu item in our menu event code, we should always return true from this method. For all other (perhaps unknown) menu items, we should delegate the return processing to the base class’ implementation of this method.
Listing 2–17. MyAndroidSdkAppActivity2.java: Creating Menus and Responding to Menu Selection Events
    /**

     * how to make a menu - implement onCreateOptionsMenu()

     * */

    @Override

    public boolean onCreateOptionsMenu(Menu menu)

    {

        // always first delegate to the base class in case of system menus

        super.onCreateOptionsMenu(menu);


        /** our 1st demo menu grouping - menu sub-item titles should be

         * read from the strings table rather than embedded in app code */

        final int mnu_grp1 = 1;

        menu.add(mnu_grp1, 1, 1, "My Menu Item 1-1");

        menu.add(mnu_grp1, 2, 2, "My Menu Item 1-2");


        // our 2nd demo menu grouping

        final int mnu_grp2 = 2;

        menu.add(mnu_grp2, 3, 3,"My Menu Item 2-1");

        menu.add(mnu_grp2, 4, 4,"My Menu Item 2-2");


        return true; // true for a visible menu, false for an invisible one

    }


    /**

     * how to respond to a menu - implement onOptionsItemSelected()

     * */

    @Override

    public boolean onOptionsItemSelected(MenuItem item)

    {

        final int mnu_id = item.getItemId();

        Log.d(TAG, "Menu Item: ID [" + mnu_id + "] selected");

        switch(mnu_id) {

            case 1: // our own items

            case 2:

            case 3:

            case 4:

                makeToast("Menu [" + mnu_id + "] " + message);

                return true; // true when we have handled al our own items

            default: // not our items

                Log.d(TAG, "Menu Item: UNKNOWN ID selected");

                return super.onOptionsItemSelected(item); // pass item id up

        }

    }
Migrating the Example Application to Eclipse/ADT
Now that you are comfortable with the Android SDK tools and the inner workings of our example project, we will complete the chapter by stepping through a migration of the project to an Eclipse/ADT (Android Development Tools) environment.
Make a Copy of the Project
To keep things simple, we will make a copy of the project folder, /MyAndroidSdkAppProject2, and its contents to a new directory called /MyAndroidSdkAppProject2_Eclipse without altering anything. You are free to do this in any way you wish.
NOTE: The project files for the book examples are available for download from the Apress book web site.
Open Eclipse with the ADT Plugin Installed
We will need a fully functioning Eclipse installation with the ADT plugin correctly installed. Setting this up was covered in the first chapter of the book. Please refer to that section of the book if necessary.
Create a New Android Project from the Copy of the Project
Use the Eclipse menu sequence File ![]() New
New ![]() Android Project. The dialog shown in Figure 2–30 should be visible.
Android Project. The dialog shown in Figure 2–30 should be visible.
Now ensure that the Create project from existing source radio button is selected and enter the project name as MyAndroidSdkAppProject2_Eclipse.
Use the Browse button to navigate to the location where we made our /MyAndroidSdkAppProject2_Eclipse copy of the project earlier.
Select the Android 2.3 Build Target. If this build target does not appear in the list it means that ADT was not properly set up according to the instructions in the first chapter. Please refer to Chapter 1 for troubleshooting.
Now click the Finish button to import the project into the Eclipse workspace.

Figure 2–30. New Eclipse/ADT Android project from existing sources
Once the project has been imported, perform a Refresh and Build Project in the IDE.
Create and Test a New Run Configuration for the Project
Use the Eclipse menu sequence Run ![]() Run Configurations. The dialog depicted in Figure 2–31 should be now be visible.
Run Configurations. The dialog depicted in Figure 2–31 should be now be visible.
Set up the configuration accordingly and name it to your preference. We used the name MyAndroidSdkAppProject2_Eclipse.
Now click the Run button and verify that the application behaves as it is supposed to from previous experience outside Eclipse.
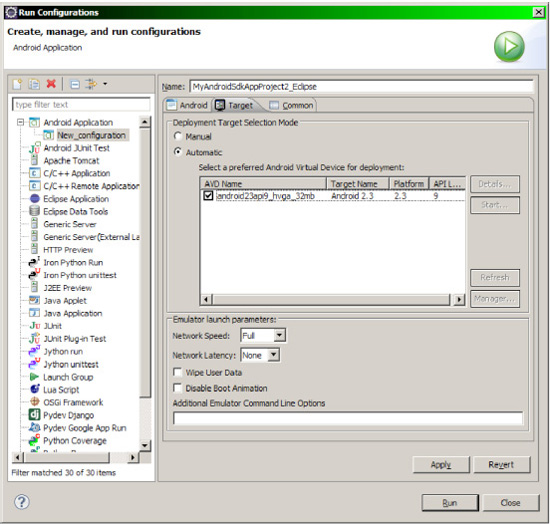
Figure 2–31. Create a new run configuration for the project
Deploying to a Real Device
We can test with a real device by attaching it to our development computer via USB. Normally it is as simple as plugging in the device and ensuring that your phone has the USB Debugging setting turned on.
NOTE: If you are developing on Windows, the USB Driver Package for Windows should have been selected and installed as part of the initial Android SDK setup.
Follow the instructions on the “Developing on a Device”23 page of the Android Developers site for full background and troubleshooting, if necessary, for your platform.
__________
Once the device is connected, switch the Automatic setting on the Target tab of the Run Configuration to Manual, click Apply, and then click Run.
The Eclipse ADT plugin should now present an Android Device Chooser dialog as shown in Figure 2–32 and Figure 2–33.
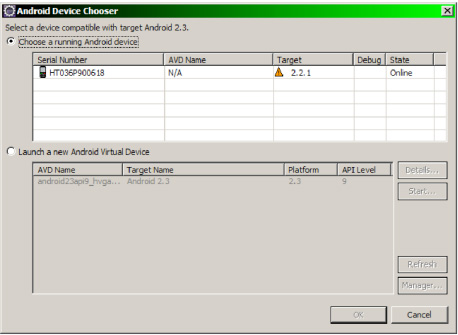
Figure 2–32. The Eclipse/ADT Android Device Chooser dialog with running device selected
Your physical device should appear as a valid target along with a list of AVD targets.
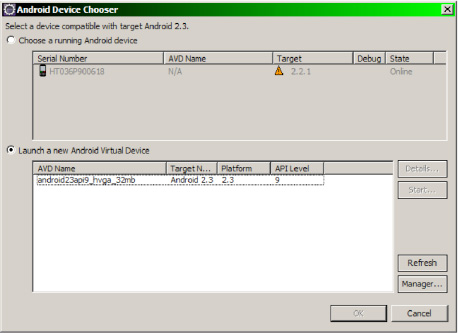
Figure 2–33. The Eclipse/ADT Android Device Chooser dialog with AVD selected
If you select the Choose a running Android device option, the example application should be installed and opened on your phone. You can then test the known functionality.
Creating a Signed APK Package of the Example Application
We will now present the steps necessary to export a signed and certificated APK package of an application using Eclipse/ADT. The ADT plugin provides by far the most convenient way for performing this otherwise tedious task:
- Open the application
Android Manifesttab and click theUse the Export Wizardlink in the Exporting section. See Figure 2–34.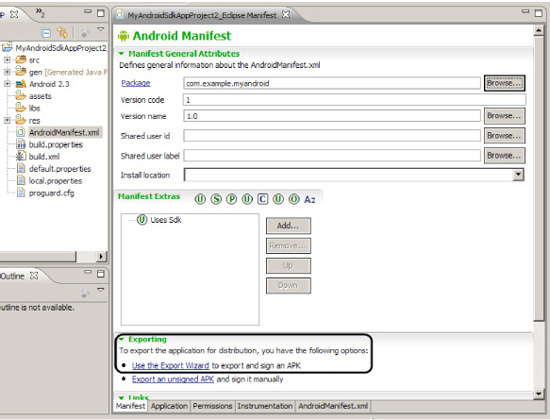
Figure 2–34. Export and sign an APK
- The
Project Checksdialog should appear. Click theNextbutton. See Figure 2–35.
Figure 2–35. Eclipse/ADT Wizard for exporting a signed APK: project verification
- Now the
Keystore selectiondialog should appear. SelectCreate(unless you already have a keystore) and click theNextbutton when you are done with all the required input fields. Make sure you record the password you selected for the keystore. If this is lost, you will need to create a new keystore from scratch. See Figure 2–36.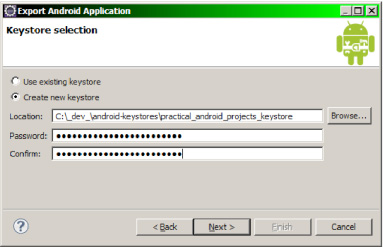
Figure 2–36. Eclipse/ADT Wizard for exporting a signed APK: keystore creation
- Per Figure 2–37, we should now be prompted for the configuration of a keystore
Alias. Follow the same procedure as in the previous step. Take care to select aValidity(duration) period that makes sense. Click theNextbutton when you are done.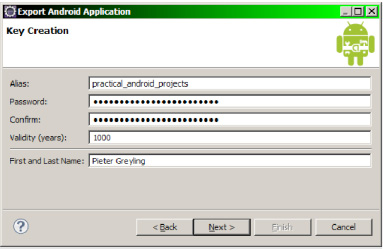
Figure 2–37. Eclipse/ADT Wizard for exporting a signed APK: alias creation
- As depicted in Figure 2–38, we should now be on the last step:
Destination and key/certificate checks. This verifies our selections and allows us to pick a destination folder for the final signed APK file. Click theFinishbutton when done.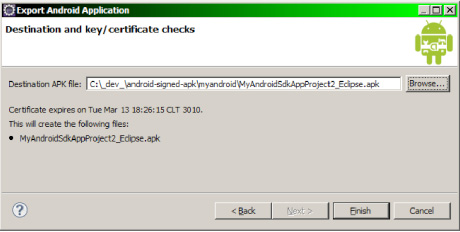
Figure 2–38. Eclipse/ADT Wizard for exporting a signed APK: checking and saving the APK file
The certificated APK file can now be deployed to your users.
That completes our migration of the chapter example project to the Eclipse/ADK development environment. You should now be sufficiently comfortable with the spectrum of Android development tools to be able to make full use of an IDE such as Eclipse to boost your productivity significantly.
Summary
In this chapter, you learned how to create and use a fully functional Android development environment using a selection of out-of-the-box Android SDK tools and an open-source programming text editor. In addition, the work was based on a practical demonstration project with several reusable code sections as its subject matter.
This was followed by walking through a migration of the example project to the Eclipse IDE by importing the source code using the Eclipse/ADT plugin wizards. This allowed us to demonstrate taking advantage of some of the Android-specific development features of the Eclipse ADT plugin while building on the understanding of the core toolset covered during the earlier part of the chapter.