
Chapter 4
Embedding Lua in Android Applications
In this chapter we will show you how to embed the Lua programming language into your Android applications. We will do this using the Kahlua2 implementation of Lua. Kahlua2 is a native port of the Lua programming language to the Java Virtual Machine (JVM). This implementation of Lua is written in the Java programming language and as such makes it very practical for us to host Lua in an Android Java application.
In Chapter 3 of this book, we covered the subject of hosting, or embedding, a programming language interpreter engine as a guest module in an application. There we presented a practical project that embedded the CocoaBASIC language engine into an Android application. This application was designed to run scripts and programs interactively using the BASIC programming language.
You might ask yourself what is different about this chapter. Why are we showing you how to run scripting code from your applications when we have already demonstrated this in a previous chapter? And why have we picked another programming language to do so?
The fundamental difference is that we will now take the integration of the host and guest runtimes to the next step. In this chapter, we will treat the concept of script code calling back into code implemented in our Android application.
Not only will our application implement code to run scripts but it will also implement code to allow those very same scripts to call into methods implemented within our application. Since such methods have access to the Android platform, our scripts can gain equal access to Android functionality as long as we take care to follow the proper protocols.
In addition, this chapter will build on these concepts to show you how easy it is to create a startup script that can configure your own Android applications.
Introducing Lua and Kahlua2
The Lua web site describes Lua as follows:
“Lua is a powerful, fast, lightweight, embeddable scripting language. Lua combines simple procedural syntax with powerful data description constructs based on associative arrays and extensible semantics. Lua is dynamically typed, runs by interpreting bytecode for a register-based virtual machine, and has automatic memory management with incremental garbage collection, making it ideal for configuration, scripting, and rapid prototyping. Lua is free open-source software, distributed under a very liberal license (the well-known MIT license). It may be used for any purpose, including commercial purposes, at absolutely no cost. Lua is designed, implemented, and maintained by a team at PUC-Rio, the Pontifical Catholic University of Rio de Janeiro in Brazil. "Lua" (pronounced LOO-ah) means "Moon" in Portuguese.”
As such, Lua is an excellent choice as an embedded scripting language with which you can allow your users to leverage and extend your applications with custom scripts.
Quoting from the Kahlua1 site:
“Kahlua is a Virtual Machine together with a standard library, all implemented in Java. It tries to emulate Lua as much as possible, while still reusing as much as possible from Java.”
Kahlua is then an equally good choice for embedding the Lua language into your Java applications.
Lua Resources
For more background on the Lua programming language, you can consult the following online resources:
- The Programming Language Lua:
- Lua Documentation:
- Lua 5.1 Online Reference Manual:
- Programming in Lua (first edition):
______________________
Kahlua2 Resources
Material about Kahlua and Kahlua2 is available from the following links:
- Kahlua Home:
- Kahlua2 Home:
- Kahlua2 Documentation:
- Using the Kahlua2 J2SE runtime platform:
- Kahlua2 on Android:
- Differences between Kahlua2 and Lua 5.1:
Using Kahlua2 in Your Android Java Applications
This chapter presents the following code projects. They can be downloaded from the book web site as part of the resources for this chapter:
- Kahlua2 (
kahlua2): This is the original Kahlua2 open-source code from Kristofer Karlsson2 as hosted on the Kahlua2 GitHub site.3 The project format supports the IntelliJ IDEA integrated development environment (IDE), but can easily be imported and built in other IDEs. - Kahlua2 Android Interpreter (
kahlua2interpreter): This is the code from the Kahlua2 contrib subfolder. We provide it as a separate project that can be built from the command line using Ant as well as using the IntelliJ IDEA IDE. It is a bare-bones Android Lua interpreter application that demonstrates the essentials of hosting the Kahlua2 framework on Android. - KahluaDroid (
kahluadroid): KahluaDroid is the main project of this chapter. It demonstrates how to embed the Kahlua2 runtime in your own Android applications. This project takes us to the next level by making use of Kahlua2 functionality to allow calling Android application programming interface (API) functions from Lua scripts. It also shows how to implement a simple application startup script infrastructure which supports running Lua code that can configure the Android application when the main Activity is created.
Working through these projects should give you a good understanding of what can be achieved by extending your Android applications with a scripting engine such as Kahlua2.
______________________
Development Environment Configuration
As a quick reference, Table 4-1 lists some development environment configuration settings that we find useful for working with the Android software development kit (SDK). It also repeats from previous chapters the command needed to create a compatible Android Virtual Device (AVD) for running the code.
Table 4-1. Development Environment Configuration Quick Reference
| Item | Value or Command |
| PATH | <Android SDK Directory>/tools |
| PATH | <Android SDK Directory>/platform-tools |
| PATH | <Apache Ant Directory>/bin |
| Create an AVD | android create avd -n android23api9_hvga_32mb -t android-9 -c 32M |
The Kahlua2 Project
In order to be able to embed the Kahlua2 Lua runtime into our applications we will need the runtime library files. These dependencies are embedded into our hosting applications as Java archives (jar files). We will show you how to build these runtime libraries from the Kahlua2 source code. This will enable us to stay up to date with Kahlua2 changes and help us to understand the process from end-to-end.
Setting up the Kahlua2 Runtime Files Project
To build the Kahlua2 dependency packages, first download the sample project archives from the book web site. Assuming that we have unpacked the chapter sample code, the Kahlua2 project file directory should appear similar to that shown below:
+---kahlua2

|   +---.idea

|   |   +---copyright

|   |   ---libraries

|   +---cldc11

|   |   ---src

|   +---contrib

|   |   +---androidinterpreter

|   |   |   +---gen

|   |   |   +---res

|   |   |   |   +---layout

|   |   |   |   ---values

|   |   |   ---src

|   |   |       ---se

|   |   |           ---krka

|   |   |               ---kahlua

|   |   |                   ---android

|   |   +---j2me-lib

|   |   +---midlet

|   |   |   ---src

|   |   +---midlet-interpreter

|   |   |   ---src

|   |   ---midlet-minimal

|   |       ---src

|   +---core

|   |   +---resources

|   |   ---src

|   +---core-dep

|   +---docs

|   +---interpreter

|   |   +---lib

|   |   +---resources

|   |   +---src

|   |   ---test

|   +---j2se

|   |   +---resources

|   |   +---src

|   |   ---test

|   +---javadoc

|   |   ---src

|   +---lib

|   +---testsuite

|   |   +---lua

|   |   +---src

|   |   +---test

|   |   ---util

|   ---webstart
Building from the Console
Open a terminal (command-line) window in the kahlua2 directory and issue the following command:
ant packageThis should build the project resulting in output similar to the following:
kahlua2> ant package

Buildfile: ...kahlua2uild.xml

[--output omitted--]

setup:

    [mkdir] Created dir: ...kahlua2inclassescore

    [mkdir] Created dir: ...kahlua2inclassesj2se

    [mkdir] Created dir: ...kahlua2kahlua2inclassesinterpreter

    [mkdir] Created dir: ...kahlua2inclassescldc11

    [mkdir] Created dir: ...kahlua2incore-src-replaced

[--output omitted--]

package:

      [jar] Building jar: ...kahlua2inkahlua-5.1_2.0.0-core.jar

      [jar] Building jar: ...kahlua2inkahlua-5.1_2.0.0-cldc11.jar

      [jar] Building jar: ...kahlua2inkahlua-5.1_2.0.0-j2se.jar

      [jar] Building jar: ...kahlua2inkahlua-5.1_2.0.0-interpreter.jar


BUILD SUCCESSFUL

Total time: 2 seconds
Building from an IDE
The Kahlua2 project, as downloaded from its home site, includes support for the IntelliJ IDEA IDE. It can also be imported into other IDEs such as Eclipse. Figure 4–1 shows the Kahlua2 project Ant build.xml file and the package step in the Ant Build view of this IDE.
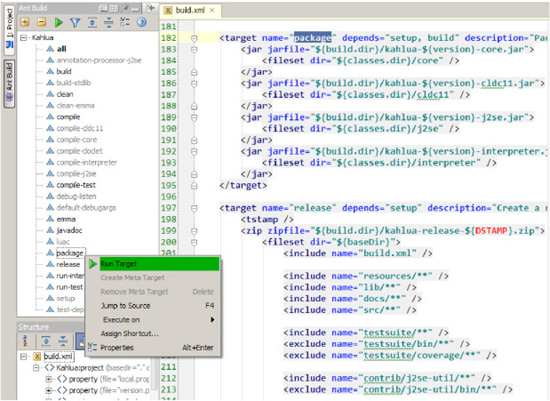
Figure 4–1. Kahlua2 Ant Build and run package target step
This allows us to issue the build step command directly from the IDE instead of running it in a terminal session. The results are identical.
The Kahlua2 Runtime Libraries
You will notice in Listing 4–2 that we highlighted two of the Java archive files in bold:
kahlua2inkahlua-5.1_2.0.0-core.jar

kahlua2inkahlua-5.1_2.0.0-j2se.jar
These library files contain the implementation of the core Kahlua2 language plus a supporting JVM platform, in this case a J2SE-compatible runtime. Kahlua2 also runs on other Java mobile platforms such as CLDC.4 For more information on Java Micro Edition5 (J2ME) and CLDC, see the official online documentation.6
______________________
4 Connected Limited Device Configuration
We will be using the Kahlua2 J2SE platform for our Android work since it is currently the one that is most compatible with the Android platform.
The Kahlua2 Android Interpreter Project
Looking at Listing 4–1, the Kahlua2 project folder, notice that the project includes a subproject under the contrib folder called androidinterpreter. Here is an extract from the listing:
+---kahlua2

|   +---.idea

|   +---cldc11

|   +---contrib

|   |   +---androidinterpreter
For convenience, we decided to demonstrate the functionality of this interpreter project in a separately prepared project we called kahlua2interpreter. The main reason for this is to add support for building the project using the latest Android SDK Tools as well as allowing us to import it into an IDE without polluting the original code base.
Setting up the Project
In order to demonstrate and understand the interpreter project properly, we will cover the essentials of how we set it up here. The process is common enough when working with Android projects to justify a review.
NOTE: You do not have to perform all these steps. The downloadable project code we provide for the chapter already has everything you need to get it building and running immediately from both the terminal command line and the IDE.
As the first step of setting up the Android interpreter project for this chapter, we used the following Android SDK Tools command to create a baseline Android project directory structure:
android create project --target "android-9"

     --name Kahlua2Interpreter

     --path ./kahlua2interpreter

     --activity Kahlua2Interpreter

     --package se.krka.kahlua.android
We then copied the Kahlua2 runtime archives we built earlier into the libs subdirectory and also copied the main Java source file, renamed from KahluaInterpreter.java to Kahlua2Interpreter.java, into the src folder. The source code references for the KahluaInterpreter class were also changed to Kahlua2Interpreter.
To preserve credit, and since we are not adding any functionality to the code for this iteration, we made sure to keep the package name, se.krka.kahlua.android, the same as that created by the original author7 of the Kahlua28 project.
Building from the Console
As mentioned before, the downloadable project code we provide for the chapter already has everything you need to get it building and running immediately from both the terminal command line and the IDE.
This can be verified by running the following compile command in a terminal window in the kahlua2interpreter project root directory:
ant compile
This is followed by the following build command:
ant debug
In both cases, the result should be a BUILD SUCCESSFUL status and in the case of the latter should end up listing something similar to the following:
kahlua2interpreter>ant debug

Buildfile: ...kahlua2interpreteruild.xml

    [setup] Android SDK Tools Revision 8

    [setup] Project Target: Android 2.3

    [setup] API level: 9

[--output omitted--]

-package-debug-sign:

[apkbuilder] Creating Kahlua2Interpreter-debug-unaligned.apk and signing it with a

 debug key...

debug:

     [echo] Running zip align on final apk...

     [echo] Debug Package: ...kahlua2interpreterinKahlua2Interpreter-debug.apk


BUILD SUCCESSFUL

Total time: 4 seconds
Building from an IDE
As the final step to confirm that all our changes worked correctly, we imported the project into the Eclipse IDE and set up the Kahlua2 runtime library archives (kahlua-5.x.x-core/j2se.jar), as shown in Figure 4–2. You may, of course, choose to import the code into another IDE or environment.
______________________

Figure 4–2. Kahlua2 runtime libraries in the Kahlua2Interpreter Eclipse project
With this, we can build and debug the project directly from the Eclipse IDE.
Running the Kahlua2 Android Interpreter
Now that we have built the Kahlua2 source distribution, let's run it and enter the following code:
from = "Kahlua2!"

print("Hello Android from "..from)
Figure 4–3 shows the application after entering the code.

Figure 4–3. The Kahlua2 Android interpreter―Hello World
Clicking the Run button should present the image in Figure 4–4. It shows the output from the Lua printfunction.
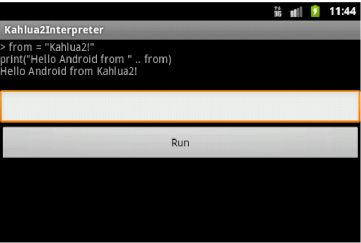
Figure 4–4. The Kahlua2 Android interpreter
Understanding the Basics of Embedding Kahlua2
Listing 4–1 shows the implementation for the Kahlua2 Android interpreter constructor. The code is from the main Activity of the application and encapsulates the steps necessary to create an embedded Kahlua2 runtime environment with which to run our Lua scripts.
Listing 4–1. Kahlua2Interpreter.java (partial)
[--code omitted--]

import se.krka.kahlua.converter.KahluaConverterManager;

import se.krka.kahlua.integration.LuaCaller;

import se.krka.kahlua.integration.LuaReturn;

import se.krka.kahlua.integration.annotations.LuaMethod;

import se.krka.kahlua.integration.expose.LuaJavaClassExposer;

import se.krka.kahlua.j2se.J2SEPlatform;

import se.krka.kahlua.luaj.compiler.LuaCompiler;

import se.krka.kahlua.vm.KahluaTable;

import se.krka.kahlua.vm.KahluaThread;

import se.krka.kahlua.vm.KahluaUtil;

import se.krka.kahlua.vm.LuaClosure;

import se.krka.kahlua.vm.Platform;


[--code omitted--]


private final Platform platform;

private final KahluaTable env;

private final KahluaConverterManager manager;

private final LuaJavaClassExposer exposer;

private final LuaCaller caller;

private final KahluaThread thread;


[--code omitted--]
public Kahlua2Interpreter() {

    platform = new J2SEPlatform();

    env = platform.newEnvironment();

    manager = new KahluaConverterManager();

    KahluaTable java = platform.newTable();

    env.rawset("Java", java);

    exposer = new LuaJavaClassExposer(manager, platform, env, java);

    exposer.exposeGlobalFunctions(this);

    caller = new LuaCaller(manager);

    thread = new KahluaThread(new PrintStream(new OutputStream() {

        @Override

        public void write(int i) throws IOException {

            buffer.append(Character.toString((char) i));

        }

    }), platform, env);

}


[--code omitted--]
The KahluaDroidapplication project that we will see later also uses this boilerplate code. In order to have a basic understanding of the operations in Listing 4–1, we will go through the essentials of executing Lua code with Kahlua2 here. The Kahlua2 blog web site9 has good information available, and we encourage you to refer to it.
Kahlua2 requires a platform to run its environment within. The Kahlua2 J2SE platform10 implementation is currently the most compatible with the Android runtime. A platform instance is created with the J2SEPlatform constructor as follows:
platform = new J2SEPlatform();
Having set up a platform instance, the platform.newEnvironment call creates a new environment table filled with runtime library functions using the following snippet of code:
env = platform.newEnvironment();
This environment is essentially a global namespace in which the Kahlua2 runtime data structures and supporting runtime library code items live. For reference, a source code extract from the implementation of the J2SEPlatformnewEnvironment method can be seen in Listing 4–2.
Listing 4–2. J2SEPlatform.java (partial)
[--code omitted--]


package se.krka.kahlua.j2se;


[--code omitted--]


public class J2SEPlatform implements Platform {

        private static J2SEPlatform INSTANCE = new J2SEPlatform();
        public static J2SEPlatform getInstance() {

                return INSTANCE;

        }


[--code omitted--]


    @Override

    public KahluaTable newTable() {

        return new KahluaTableImpl(new ConcurrentHashMap<Object, Object>());

    }


    @Override

    public KahluaTable newEnvironment() {

        KahluaTable env = newTable();


        env.rawset("_G", env);

        env.rawset("_VERSION", Version.VERSION + " (J2SE)");


        MathLib.register(this, env);

        BaseLib.register(env);

        RandomLib.register(this, env);

        UserdataArray.register(this, env);

        StringLib.register(this, env);

        CoroutineLib.register(this, env);

        OsLib.register(this, env);

        TableLib.register(this, env);

        LuaCompiler.register(env);


        KahluaThread workerThread = setupWorkerThread(env);

        KahluaUtil.setupLibrary(env, workerThread, "/stdlib");


[--code omitted--]


        return env;

    }


[--code omitted--]
______________________
As you can see, the following runtime support libraries are registered within this global environment: MathLib, BaseLib, RandomLib, UserdataArray, StringLib, CoroutineLib, OsLib, TableLib, and LuaCompiler. The J2SEPlatform.java class can be inspected in more detail as part of the Kahlua2 project source code.
NOTE: The KahluaDroid project that we present later is based on the same core code, so it is worth making a mental note of this section in case you need to refer to it. We will not cover these implementation details again under that project.
Let's go back to Listing 4–1 and the following code:
manager = new KahluaConverterManager();
The KahluaConverterManager supports data type conversion operations. Since Kahlua supports fewer data types (String, Double, Boolean, KahluaTable) than Java, this class does the work of automatic conversion between the two languages.
We also create a new Kahlua2 table instance with the J2SEPlatformnewTable method as follows:
KahluaTable java = platform.newTable();

env.rawset("Java", java);
This instance will be required to expose our Java class methods to the Kahlua2 runtime as part of the following code:
exposer = new LuaJavaClassExposer(manager, platform, env, java);

exposer.exposeGlobalFunctions(this);
The LuaJavaClassExposer class exposes global methods of the given class referred to with the exposeGlobalFunctions call to the Kahlua2 script engine. As you will see in more detail later, with a little extra work this will allow us to call these methods as global Lua functions directly from our Kahlua2 scripts.
Last but not least, our code will need a thread to run on, along with some way of communicating results back to the hosting (or client) environment. This is achieved via the following code:
                thread = new KahluaThread(new PrintStream(new OutputStream() {

                        @Override

                        public void write(int i) throws IOException {

                                buffer.append(Character.toString((char) i));

                        }

                }), platform, env);
The KahluaThread instance is made aware of the runtime platform and the current environment plus has the ability to feed back results via an overridden write method on a PrintStreaminstance reference.
The KahluaDroid Project
The main project of this chapter is the KahluaDroid application. This is a Java Android application that embeds the Kahlua2 runtime and also allows Lua scripts executing in that runtime to call back into code in the KahluaDroid application. It builds upon the previous Kahlua Interpreter project and makes use of the tools provided by the Kahlua2 infrastructure in order to provide closer interaction between the worlds of Android and Lua.
NOTE: The KahluaDroid project is compatible with both Eclipse and IntelliJ IDEA Community Edition, so using any or both of these IDEs should work fine. Importing the projects into a NetBeans IDE environment or any other IDE of your choice should also present no problems. We will not cover how to do this here.
Running the KahluaDroid Application
Let us now run KahluaDroid using the emulator with a compatible AVD, as specified before. This will allow us to exercise the behavior of the KahluaDroid application interactively. At the same time, we will also study the elements of the application that implement its behavior and characteristics.
The Application User Interface Controls
When the application has finished loading, it should present us with the Activity depicted in Figure 4–5.
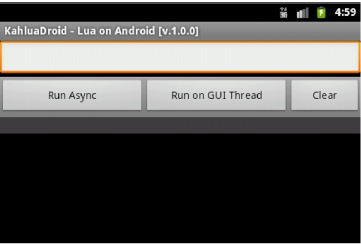
Figure 4–5. KahluaDroid main activity screen
The main screen consists of an entry field, followed by three buttons and an output field. Per Listing 4–3, the main application layout resource file, these user interface controls are as follows:
- Code Input Text Field (
edittext_input): Here is where we enter our Lua code. - Run Code Asynchronously Button (
button_run_async): Clicking this button will run the Lua code on the background using an implementation of the Android AsyncTask class. - Run Code Synchronously (on GUI Thread) Button (
button_run_sync): Clicking this button will run the Lua code on the main thread, allowing for full interaction with the user interface foreground. - Clear Button(
button_clear): Causes the contents of the input text field to be deleted. - Results Output Field (
textview_output): Displays both the input code and the results from code execution.
Listing 4–3, the main application layout resource file, declares the user interface controls that make up the main application interface.
Listing 4–3. KahluaDroid Main Layout Resource―main.xml
<?xml version="1.0" encoding="utf-8"?>

<ScrollView xmlns:android="http://schemas.android.com/apk/res/android"

            android:id="@+id/scrollview_main"

            android:layout_width="fill_parent"

            android:layout_height="fill_parent"

            android:fillViewport="true">

  <LinearLayout android:orientation="vertical"

                android:layout_width="fill_parent"

                android:layout_height="fill_parent"

                android:id="@+id/linearlayout_main">

    <EditText android:layout_height="wrap_content"

              android:layout_width="fill_parent"

              android:id="@+id/edittext_input"></EditText>

    <LinearLayout android:layout_width="fill_parent"

                  android:layout_height="wrap_content"

                  android:background="@android:drawable/bottom_bar"

                  android:gravity="center_vertical">

      <Button android:id="@+id/button_run_async"

              android:layout_width="0dip"

              android:layout_weight="2.0"

              android:layout_height="wrap_content"

              android:text="@string/button_run_async_text_wait"></Button>

      <Button android:id="@+id/button_run_sync"

              android:layout_width="0dip"

              android:layout_weight="2.0"

              android:layout_height="wrap_content"

              android:text="@string/button_run_sync_text_wait"></Button>

      <Button android:id="@+id/button_clear"

              android:layout_width="0dip"

              android:layout_weight="1.0"

              android:layout_height="wrap_content"

              android:text="@string/button_clear_text"></Button>

    </LinearLayout>

    <TextView android:layout_height="wrap_content"

              android:layout_width="fill_parent"

              android:id="@+id/textview_output"></TextView>

  </LinearLayout>

</ScrollView>
Entering and Running Lua Code
Since we created KahluaDroid in order to demonstrate how to host Lua code in a standard Java Android application, we will immediately enter and run some code to get a feel for the application.
Enter the following code into the input text field:
local droidinfo = android_version()

print("This is Android:
" .. droidinfo)
THE ANDROID_VERSION FUNCTION: The android_version function you see in the Lua code is not part of the Kahlua2 runtime. It is actually part of our Android Java code. You will see how we implemented this function later in the chapter.
The application appearance should now be similar to what is shown in Figure 4–6.

Figure 4–6. Entering Lua Code on the KahluaDroid Main Activity Screen
Now click the Run Async button.
The expected result should be similar to that portrayed in Figure 4–7.

Figure 4–7. Running Lua code on the KahluaDroid main activity screen
The application has forwarded the Lua code we entered to the embedded Kahlua2 scripting engine. This ran the code and fed back a printable result stream to the application via the output stream that it uses to communicate computation results to its clients.
Recall that we went into some depth regarding the implementation details of this earlier in the chapter under the “Understanding the Basics of Embedding Kahlua2” section.
The Application Menu
As mentioned earlier, the KahluaDroid application also implements a menu. This menu is portrayed in Figure 4–8.
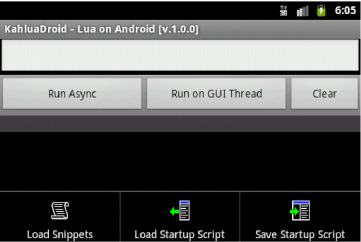
Figure 4–8. KahluaDroid application menu
The menu consists of the following menu items:
- Load Snippets (
menu_itm_snippets_load): This item triggers the loading a small file of Lua code snippets into the input text field. From there, selected sections of these items can be copied and used for getting started with trying the application. - Load Startup Script (
menu_itm_startup_script_load): This menu item loads the contents of a user-defined startup file into the input text field. From there, it can be edited and resaved. - Save Startup Script (
menu_itm_startup_script_save): This item saves the contents of the input text field as a startup script. This script will be executed the next time the application is launched. To be exact; the next time that the application Activity'sonCreatemethod is invoked.
These items are identified in Listing 4–4, the menu layout resource file.
Listing 4–4. KahluaDroid Main Menu Resource–kahluadroid_main_menu.xml
<?xml version="1.0" encoding="utf-8"?>

<menu xmlns:android="http://schemas.android.com/apk/res/android">

    <item

            android:id="@+id/menu_itm_snippets_load"

            android:icon="@drawable/mnu_load_snippets"

            android:title="@string/menu_snippets_load">

    </item>

    <item
            android:id="@+id/menu_itm_startup_script_load"

            android:icon="@drawable/mnu_startup_script_load"

            android:title="@string/menu_startup_script_load">

    </item>

    <item

            android:id="@+id/menu_itm_startup_script_save"

            android:icon="@drawable/mnu_startup_script_save"

            android:title="@string/menu_startup_script_save">

    </item>

</menu>
By now, the contents of both the menu layout Listing 4–4 and the creation and event handling implementations in Listing 4–5 should be familiar.
Listing 4–5. Menu Implementation Methods in KahluaDroid.java (partial)
[--code omitted--]


    /**

     * Implement our application menu using an XML menu layout and the ADK MenuInflater.

     */

    @Override

    public boolean onCreateOptionsMenu(Menu menu)

    {

        // always first delegate to the base class in case of system menus

        super.onCreateOptionsMenu(menu);

        MenuInflater inflater = getMenuInflater();

        inflater.inflate(R.menu.kahluadroid_main_menu, menu);

        // true for a visible menu, false for an invisible one

        return true;

    }


    /**

     * Respond to our application menu events.

     */

    @Override

    public boolean onOptionsItemSelected(MenuItem item)

    {

        final int mnu_id = item.getItemId();

        switch (mnu_id) {

            case R.id.menu_itm_snippets_load:

                loadSnippetsAssetFile();

                return true;

            case R.id.menu_itm_startup_script_load:

                loadStartupScript();

                return true;

            case R.id.menu_itm_startup_script_save:

                saveStartupScript();

                return true;

            default: // not our items

                return super.onOptionsItemSelected(item); // pass item id up

        }

    }


[--code omitted--]
The Application Strings Table
The KahluaDroid application code uses the strings table resource extensively. It is presented in Listing 4–6 for reference if you are trying to follow all the code using only the text of the book.
Listing 4–6. KahluaDroid Main String Table Resource–strings.xml
<?xml version="1.0" encoding="utf-8"?>

<resources>

  <string name="app_name">KahluaDroid</string>

  <string name="app_version">1.0.0</string>

  <string name="app_desc">KahluaDroid - Lua on Android</string>

  <string name="file_name_snippets">program_templates/lua_snippets.lua</string>

  <string name="file_name_startup_script">kahluadroid_startup.lua</string>

  <string name="button_run_async_text_wait">Run Async</string>

  <string name="button_run_async_text_busy">Running Async...</string>

  <string name="button_run_sync_text_wait">Run on GUI Thread</string>

  <string name="button_run_sync_text_busy">Running Sync...</string>

  <string name="button_clear_text">Clear</string>

  <string name="menu_snippets_load">Load Snippets</string>

  <string name="menu_startup_script_load">Load Startup Script</string>

  <string name="menu_startup_script_save">Save Startup Script</string>

</resources>
The Application Initialization Code
Listing 4–7 shows the startup and initialization code for KahluaDroid. This should be self-explanatory based upon what we have covered so far.
Listing 4–7. KahluaDroid Startup and Initialization Implementation in KahluaDroid.java (partial)
package com.pietergreyling.android.kahluadroid;


[--code omitted--]


public class KahluaDroid extends Activity

{

    protected static final String          TAG      = "KahluaDroid";

    protected String                       APP_TITLE;

    protected String                       STARTUP_SCRIPT_CODE;


    /**

     * Kahlua reference variables

     */

    protected final Platform               _platform;

    protected final KahluaTable            _env;

    protected final KahluaConverterManager _manager;

    protected final LuaJavaClassExposer    _exposer;

    protected final LuaCaller              _caller;

    protected final KahluaThread           _thread;


    /**

     * GUI reference variables

     */

    protected EditText                     _txtInput;
    protected TextView                     _txtOutput;

    protected Button                       _cmdRunAsync;

    protected Button                       _cmdRunSync;

    protected Button                       _cmdClear;

    protected final StringBuffer           _buffer  = new StringBuffer();


    public KahluaDroid()

    {

        _platform = new J2SEPlatform();

        _env = _platform.newEnvironment();

        _manager = new KahluaConverterManager();

        KahluaTable java = _platform.newTable();

        _env.rawset("Java", java);

        _exposer = new LuaJavaClassExposer(_manager, _platform, _env, java);

        _exposer.exposeGlobalFunctions(this);

        _caller = new LuaCaller(_manager);

        _thread = new KahluaThread(new PrintStream(new OutputStream()

        {

            @Override

            public void write(int i) throws IOException

            {

                _buffer.append(Character.toString((char) i));

            }

        }), _platform, _env);

    }


    @Override

    public void onCreate(Bundle savedInstanceState)

    {

        Log.d(TAG, "onCreate(): ...");

        super.onCreate(savedInstanceState);

        setContentView(R.layout.main);

        initialize();

        runStartupScript();

    }


    /**

     * Sets up Activity user interface controls and resources.

     */

    protected void initialize()

    {

        APP_TITLE = getString(R.string.app_desc) + " [v."

                + getString(R.string.app_version) + "]";

        setTitle(APP_TITLE);

        _txtInput = (EditText) findViewById(R.id.edittext_input);

        _txtInput.setTextSize(TextSize.NORMAL);

        _txtInput.setTypeface(Typeface.MONOSPACE);
        _cmdRunAsync = (Button) findViewById(R.id.button_run_async);

        _cmdRunAsync.setOnClickListener(new View.OnClickListener()

        {

            public void onClick(View view)

            {

                executeAsync();

            }

        });


        _cmdRunSync = (Button) findViewById(R.id.button_run_sync);

        _cmdRunSync.setOnClickListener(new View.OnClickListener()

        {

            public void onClick(View view)

            {

                executeSync();

            }

        });


        _cmdClear = (Button) findViewById(R.id.button_clear);

        _cmdClear.setOnClickListener(new View.OnClickListener()

        {

            public void onClick(View view)

            {

                _txtInput.getText().clear();

            }

        });


        _txtOutput = (TextView) findViewById(R.id.textview_output);

        _txtOutput.setTextSize(TextSize.NORMAL);

        _txtOutput.setTypeface(Typeface.MONOSPACE);

        _txtOutput.setTextColor(Color.GREEN);

        _txtOutput.setBackgroundColor(Color.DKGRAY);

    }


[--code omitted--]
Running Lua Code On or Off the Main GUI Thread
On the KahluaDroid main activity screen there is a button named Run Async and one next to it called Run on GUI Thread. These buttons provide us with the ability to decide whether we want to execute the Lua code on a separate (asynchronous) background thread or on the main thread of the application. All graphical user interface (GUI) interaction is also running on the main thread, so it is important to understand the distinction and possible consequences.
In Chapter 3, where we covered running BASIC scripts with CocoaDroid, we discussed threading in the Android context and the Android AsyncTask class infrastructure. If you have not read that chapter, we recommend it as background for this section since the KahluaDroid implementation of threading follows the same principles and practices.
Thus, assuming that you have background knowledge of Android threading concepts we will have a cursory look at the implementation behind the Run buttons here and leave you to peruse the code.
NOTE: We will not delve into Android handlers, binding, and thread pools here since our project threading implementations more than suffices for our purposes. One can go far by avoiding multithreading complications using keep-it-simple design disciplines and implementing a subclass of AsyncTask if necessary. It is also worth remembering that while the Android platform supports multithreading, it is by no means a server platform.
Executing Background Code with AsyncTask
When your scripts are designed to stay within the thread space of the Kahlua2 runtime and will not interact with the Android GUI in any way, use the KahluaDroid executeAsync method to push your Lua code. This provides the additional benefit of avoiding potential blocking of the user interface while background work might be taking place on the main application thread. The implementation is shown in Listing 4–8.
Listing 4–8. Asynchronous Threading Implementation in KahluaDroid.java (partial)
[--code omitted--]


    protected void executeAsync()

    {

        // prepend source to output

        final String source = _txtInput.getText().toString();

        Log.d(TAG, "executeAsync(): " + source);

        String oldoutput = (_txtOutput.getText()).toString();

        String newoutput = ("> " + source + "
") + oldoutput;

        _txtOutput.setText(newoutput);

        // run the code asynchronously

        KahluaAsyncTask task = new KahluaAsyncTask();

        task.execute(source);

    }


[--code omitted--]
Listing 4–9 presents the implementation of the KahluaAsyncTask class. This is derived from the Android AsyncTask class and provides developers with the recommended approach for running background Android code on a thread separated from the main application GUI thread. As mentioned before, we have covered this to some length in Chapter 3. The Android Developers web site also has good coverage of Android threading11 and the AsyncTask class12.
Listing 4–9. KahluaAsyncTask Class Implementation in KahluaDroid.java (partial)
[--code omitted--]


    private class KahluaAsyncTask extends AsyncTask<String, Void, Void>

    {

        @Override

        protected void onPreExecute()

        {

            _cmdRunAsync.setEnabled(false);

            _cmdRunAsync.setText(getString(R.string.button_run_async_text_busy));

            _txtInput.getText().clear();

            flush();

        }


        @Override

        protected Void doInBackground(String... strings)
        {

            // flush();

            String source = strings[0];

            try

            {

                LuaClosure closure = LuaCompiler.loadstring(source, null, _env);

                LuaReturn result = _caller.protectedCall(_thread, closure);

                if (result.isSuccess())

                {

                    for (Object o : result)

                    {

                        _buffer.append(KahluaUtil.tostring(o, _thread) + "
");

                    }

                }

                else

                {

                    _buffer.append(result.getErrorString() + "
");

                    _buffer.append(result.getLuaStackTrace() + "
");

                }

            }

            catch (Exception e)

            {

                _buffer.append(e.getMessage() + "
");

            }

            return null;

        }


        @Override

        protected void onPostExecute(Void result)

        {

            flush();

            _cmdRunAsync.setText(getString(R.string.button_run_async_text_wait));

            _cmdRunAsync.setEnabled(true);

        }


        private void flush()

        {

            // output.append(_buffer.toString());

            // prepend _buffer to output

            String oldoutput = (_txtOutput.getText()).toString();

            String newoutput = _buffer.toString() + oldoutput;

            _txtOutput.setText(newoutput);

            _buffer.setLength(0);

        }

    };


[--code omitted--]
______________________
Executing UI Code on the Main Thread
If your scripts have side effects such as interaction with Android user interface elements, use the KahluaDroid executeSync method. This will allow your code to influence the GUI without crashing. The implementation is shown in Listing 4–10.
Listing 4–10. Synchronous Threading Implementation Methods in KahluaDroid.java (partial)
[--code omitted--]


    protected void executeSync()

    {

        // prepend source to output

        final String source = _txtInput.getText().toString();

        Log.d(TAG, "executeSync(): " + source);

        String oldoutput = (_txtOutput.getText()).toString();

        String newoutput = ("> " + source + "
") + oldoutput;

        _txtOutput.setText(newoutput);

        _cmdRunSync.setText(getString(R.string.button_run_sync_text_busy));

        executeSync(source);

    }


    protected void executeSync(String source)

    {

        try

        {

            LuaClosure closure = LuaCompiler.loadstring(source, null, _env);

            LuaReturn result = _caller.protectedCall(_thread, closure);

            if (result.isSuccess())

            {

                for (Object o : result)

                {

                    _buffer.append(KahluaUtil.tostring(o, _thread) + "
");

                }

            }

            else

            {

                _buffer.append(result.getErrorString() + "
");

                _buffer.append(result.getLuaStackTrace() + "
");

            }

        }

        catch (Exception e)

        {

            _buffer.append(e.getMessage() + "
");

        }

        finally {

            flushSync();

            _cmdRunSync.setText(getString(R.string.button_run_sync_text_wait));

        }

    }


    private void flushSync()

    {

        String oldoutput = (_txtOutput.getText()).toString();

        String newoutput = _buffer.toString() + oldoutput;

        _txtOutput.setText(newoutput);

        _buffer.setLength(0);

    }


[--code omitted--]
Exposing Android Application Methods to Kahlua2
Kahlua2 enables the implementation of Lua callable global functions by decorating compatible methods within your Java class with the @LuaMethod annotation.
We covered the background earlier with our treatment of the LuaJavaClassExposer class. To recap, this class exposes global methods of the given class referred to with the exposeGlobalFunctions call to the Kahlua2 script engine. This enables the Kahlua2 runtime to call back to methods of the given class.
Scope does not allow for us to review the full details behind this here, but the code is available within the Kahlua2 project of this chapter.
Sharing Data between Java and Lua
Listing 4–11 provides a listing of a method pair we implemented to demonstrate how to set and get variable values in the Lua environment. This effectively allows us to share variable values between the Android Java application and the Lua environment table.
Listing 4–11. Lua Environment Variable Manipulation Methods in KahluaDroid.java (partial)
[--code omitted--]


    @LuaMethod(global = true)

    public void lua_setvar(CharSequence varname, CharSequence value)

    {

        _env.rawset(varname, value);

    }


    @LuaMethod(global = true)

    public String lua_getvar(CharSequence varname)

    {

        String value = (String)_env.rawget(varname);

        return value;

    }


[--code omitted--]
Modifying the Android application GUI from Lua
Listing 4–12 shows a set of methods that manipulate the GUI of our Android application in some way or other. The implementation of an application startup script later in this chapter will use these methods to demonstrate the alteration of visual aspects of an Android application from within Lua script code.
Listing 4–12. Android GUI Manipulation Methods in KahluaDroid.java (partial)
[--code omitted--]


    @LuaMethod(global = true)

    public void app_settextsize()

    {
        Double size = (Double)_env.rawget("text_size");

        app_settextsize(size);
    }


    @LuaMethod(global = true)

    public void app_settextsize(Double size)

    {

        switch (size.intValue()) {

            case 1:

                _txtInput.setTextSize(TextSize.SMALL);

                _txtOutput.setTextSize(TextSize.SMALL);

                break;

            case 2:

                _txtInput.setTextSize(TextSize.NORMAL);

                _txtOutput.setTextSize(TextSize.NORMAL);

                break;

            case 3:

                _txtInput.setTextSize(TextSize.LARGE);

                _txtOutput.setTextSize(TextSize.LARGE);

                break;

            default:

                _txtInput.setTextSize(TextSize.NORMAL);

                _txtOutput.setTextSize(TextSize.NORMAL);

        }

    }


    @LuaMethod(global = true)

    public void app_settextcolor()

    {

        Double color = (Double)_env.rawget("text_color");

        app_settextcolor(color);

    }


    @LuaMethod(global = true)

    public void app_settextcolor(Double color)

    {

        switch (color.intValue()) {

            case 1:

                _txtOutput.setTextColor(Color.BLACK);

                _txtOutput.setBackgroundColor(Color.WHITE);

                break;

            case 2:

                _txtOutput.setTextColor(Color.GREEN);

                _txtOutput.setBackgroundColor(Color.DKGRAY);

                break;

            case 3:

                _txtOutput.setTextColor(Color.LTGRAY);

                _txtOutput.setBackgroundColor(Color.BLUE);

                break;

            default:

                _txtOutput.setTextColor(Color.GREEN);

                _txtOutput.setBackgroundColor(Color.DKGRAY);

        }

    }


[--code omitted--]
Implementing a Small Lua Callable Android Runtime
Listing 4–13 presents the implementation of a small Lua callable Android runtime. This is a loose set of Android-related operations that we are making accessible from Lua scripts. Again, we will show how we call these methods as Lua functions later.
Listing 4–13. Lua Callable Android Runtime Methods in KahluaDroid.java (partial)
[--code omitted--]

    @LuaMethod(global = true)

    public void android_alert(CharSequence message)

    {

        new AlertDialog.Builder(this)

            .setTitle(getString(R.string.app_name))

            .setMessage(message)

            .setPositiveButton("OK", null).show();

    }
    @LuaMethod(global = true)

    public void android_alert(CharSequence message, CharSequence title)

    {

        new AlertDialog.Builder(this).setTitle(title).setMessage(message)

                .setPositiveButton("OK", null).show();

    }


    @LuaMethod(global = true)

    public void android_toast(CharSequence message)

    {

        Toast.makeText(this, message, Toast.LENGTH_SHORT).show();

    }


    @LuaMethod(global = true)

    public void android_notify(

            CharSequence title,

            CharSequence tickerText,

            CharSequence message)

    {

        showNotification(

                getApplicationContext(),

                KahluaDroid.class,

                tickerText,

                title,

                message,

                R.drawable.icon_practical_andy_blue);

    }


    @LuaMethod(global = true)

    public String android_version()

    {

        String full_version =

            String.format("[v:%s.%s][sdk: %s][codename: %s]",

                    VERSION.RELEASE,

                    VERSION.INCREMENTAL,

                    VERSION.SDK_INT,

                    VERSION.CODENAME);

        return full_version;

    }


    @LuaMethod(global = true)

    public String android_release()

    {

        String release = String.format("%s", VERSION.RELEASE);

        return release;

    }


    @LuaMethod(global = true)

    public String android_sdk()

    {

        String sdk_level = String.format("%s", VERSION.SDK_INT);

        return sdk_level;

    }


[--code omitted--]
Calling Application Methods as Lua Functions
Having seen the implementation of Lua script-callable methods in our main KahluaDroid class, let us have a look at how to use them. We have provided a few small Lua code samples in the form of a Lua snippets file.
The KahluaDroid Lua Snippets
Under the assets folder of the application source code, you should find the program_templates/lua_snippets.lua code file.
This is the asset file that gets loaded by the Load Snippets (Figure 4–9) menu item.
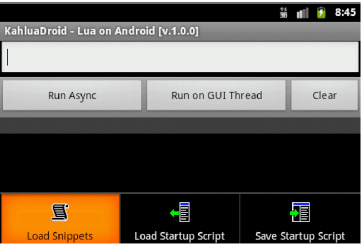
Figure 4–9. KahluaDroid Load Snippets Menu
Figure 4–10 depicts the Activity after loading the snippets file into the input text field.
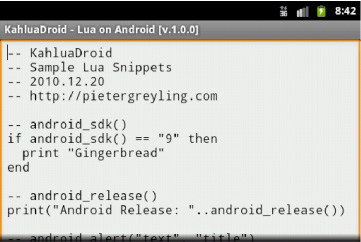
Figure 4–10. KahluaDroid loaded snippets
The full content of the snippets file is in Listing 4–14.
Listing 4–14. KahluaDroid Lua Code Snippets Asset File–lua_snippets.lua
-- KahluaDroid

-- Sample Lua Snippets

-- 2010.12.20

-- http://pietergreyling.com


-- android_sdk()

if android_sdk() == "9" then

  print "Gingerbread"

end


-- android_release()

print("Android Release: "..android_release())


-- android_alert("text", "title")


android_alert(

  "Run me on the GUI thread!",

  "Android Alert")


-- android_toast()

android_toast("Run me on the GUI thread!")


-- android_notify(

--   title, tickerText, message)

android_notify(

  "KahluaDroid Notification",

  "KahluaDroid message waiting...",

  "Thanks for reading this message.")


-- app_settextsize() / app_settextcolor()

app_settextsize(1)  -- small

app_settextcolor(3) -- grey on blue

app_settextsize(2)  -- normal

app_settextcolor(2) -- green on dkgrey

app_settextsize(3)  -- large
app_settextcolor(1) -- black on white


-- lua runtime lib: os

print(os.date())


-- lua runtime lib: math

print(math.sin(3))


-- tables

a={}; a["num"]=12345; print("n="..a["num"])


-- functions

function func(a)

  print("-- func: "..a)

end

func ("test argument")


-- random number generation

local r = newrandom()

r:random() -- 0 to 1

r:random(max) -- 1 to max

r:random(min, max) -- min to max

-- seeds with hashcode of object

r:seed(obj)


---[[

local r = newrandom()

for i=1,6 do

  print("dice "..i.." rolled "..r:random(6))

end

--]]


-- Sample Startup Script

msg1 = "Startup script complete.
"

msg2 = "KahluaDroid ready..."

app_settextsize(1)  -- small

app_settextcolor(3) -- grey on blue

print(msg1..msg2)

android_toast(msg1..msg2)
Implementing an Application Startup Script
Startup scripts are a common way to configure applications of all types, from personal productivity applications on the desktop to back-end number crunching server applications. Knowing what we have learned so far in this chapter, we can now effectively implement a basic startup script infrastructure for our Android applications.
Saving Lua Code as a Startup Script
To create a small startup script, we will copy some code from the Lua snippets file that we have prepared for this project.
Open the snippets using the Load Snippets menu, as addressed earlier. We will pick the following code (see Listing 4–14):
-- Sample Startup Script

msg1 = "Startup script complete.
"

msg2 = "KahluaDroid ready..."

app_settextsize(1)  -- small

app_settextcolor(3) -- grey on blue

print(msg1..msg2)

android_toast(msg1..msg2)
Copy the section as shown in Figure 4–11.
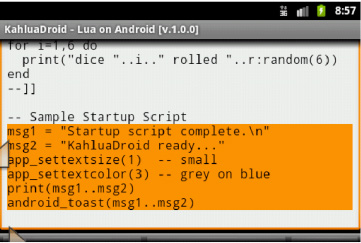
Figure 4–11. Copying the KahluaDroid startup script from the Lua snippets
Now paste the selection into the input text field, as shown in Figure 4–12.
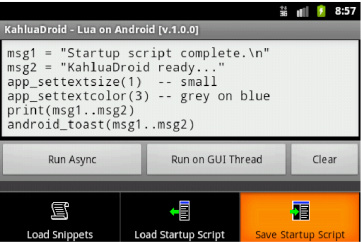
Figure 4–12. Pasting the KahluaDroid startup script code
Use the Save Startup Script menu item to save the code to the startup file. This should result in a toast message similar to that shown in Figure 4–13.
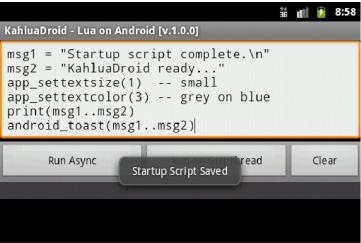
Figure 4–13. Saving the KahluaDroid startup script
Running the Application with the Startup Script
When we relaunch the application after saving the startup script, you should see a result similar to that depicted in Figure 4–14. The text size will be smaller, and the output text background will be blue with a gray foreground.
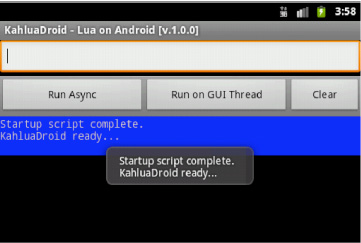
Figure 4–14. Running the KahluaDroid startup script on application launch
The startup script load implementation is shown in Listing 4–15.
Listing 4–15. Startup Script Implementation-KahluaDroid.java (partial)/CommonAndroidCodeLibrary.java (partial)
[--code omitted--]


    protected void runStartupScript()

    {

        try

        {

            STARTUP_SCRIPT_CODE = readStartupScript();

            Log.d(TAG,
                    "runStartupScript(): STARTUP_SCRIPT_CODE:
" +

                    STARTUP_SCRIPT_CODE);

            executeSync(STARTUP_SCRIPT_CODE);

        }

        catch (Throwable t)

        {

            Log.e(TAG, "runStartupScript(): FAILED!", t);

            STARTUP_SCRIPT_CODE = "";
        }

    }


[--code omitted--]


    protected String readStartupScript()

    {

        String buffer = "";

        try {

            buffer = stringFromPrivateApplicationFile(this,

                    getString(R.string.file_name_startup_script));

            return buffer;

        }

        catch (Throwable t) {

            Log.e(TAG, "readStartupScript(): NO STARTUP SCRIPT!", t);

            //showOkAlertDialog(this, t.toString(), "Read Startup Script");

            return "";

        }

    }


[--code omitted--]


    /**

     * Reads a private application file into a String and returns the String.

     *

     * @param context

     * @param name

     * @return

     * @throws java.lang.Throwable

     */

    public static String stringFromPrivateApplicationFile(Context context, String name)

            throws java.lang.Throwable

    {

        String ret_str = "";

        InputStream is = context.openFileInput(name);

        InputStreamReader tmp_isr = new InputStreamReader(is);

        BufferedReader tmp_rdr = new BufferedReader(tmp_isr);

        String tmp_str = "";

        StringBuilder tmp_buf = new StringBuilder();

        while ((tmp_str = tmp_rdr.readLine()) != null) {

            tmp_buf.append(tmp_str);

            tmp_buf.append(_newline); // readLine drops newlines, put them back

        }

        is.close();

        if(0 < tmp_buf.length()) { // brutally remove the inevitable newline at end

            tmp_buf.setLength(tmp_buf.length() - 1);

        }

        ret_str = tmp_buf.toString();

        return ret_str;

    }


[--code omitted--]
As you will notice, the startup script code is run synchronously on the main application thread using the executeSync method since this also allows it to relatively safely cause side-effects that influence the state of the user interface.
Using Lua Comment Blocks in the Startup Script
When working and testing the code in a startup script, it is useful to have a handy way of quickly activating and deactivating blocks of code. A simple technique with which to achieve this is by using the Lua comment block syntax.
In Lua, line comments start with a double hyphen (--) at any point in a line and runs until the end of the line:
-- This is a Lua line comment and starts with a double-hyphen (--).

-- Such comments only run to the end of the line that they are on.
Lua also offers multiline or block comments that start with --[[and run until a matching ]].
--[[ Multi-line strings and comments

     use double square brackets. ]]
A common trick, when we want to disable a piece of code, is to write the following:
--[[

print("commented")         nothing (a comment)

--]]
Now, if we add a single hyphen to the first line, the code is in again:
---[[

print("uncommented")       uncommented

--]]
In the first case, the -- in the last line is still inside the block comment. In the second case, the ---[[ does not start a block comment, but a line comment instead. This leaves the print("uncommented") outside comments and thus active. The last line then forms a separate comment, as it starts with --.
This makes it easy to test and save startup script code with KahluaDroid. Simply enclose sections of code in block comments and enable and disable the sections with a single change at the top of the block. This way, you can store pieces of code and not worry about losing any work you might want to retest or apply later.
Figure 4–15 displays a block comment in effect.
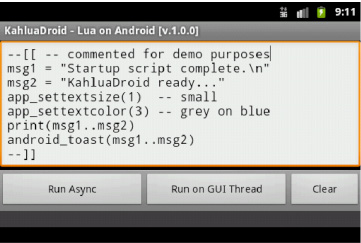
Figure 4–15. KahluaDroid startup script block commented
Figure 4–16 displays the same block of code uncommented.
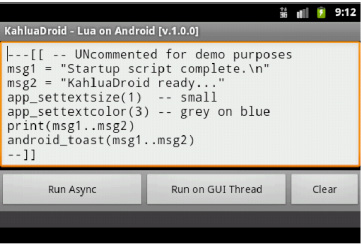
Figure 4–16. KahluaDroid startup script block uncommented
Accessing the Startup Script from the DDMS File Explorer
Android application files on the emulator can also be accessed by using the Android SDK Dalvik Debug Monitor (DDMS) File Explorer. Although we demonstrated this in previous chapters, we do so here again (see Figure 4–17).
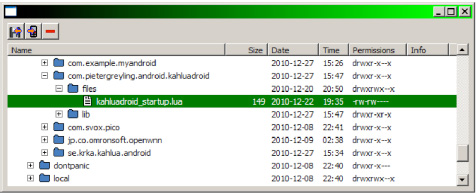
Figure 4–17. The KahluaDroid Startup Script in the DDMS File Explorer
Removing a Broken Startup Script
Sometimes we make mistakes in our code. In the case of our startup script, such malfunctioning code might cause moments during which our application cannot launch properly or even refuses to start at all. This can present a “Catch-22” scenario in which we are cannot use the application to fix the problem. Since the application then does not start, or does so in an unpredictable state, we cannot reload the startup script in order to edit the code of the script and fix it.
It might be obvious, but the Android platform comes with functionality to manage applications and clear corresponding application data. This can be accessed from the Settings main menu using the Manage apps menu item. (See Figure 4–18.)

Figure 4–18. Clearing KahluaDroid application data
Summary
This chapter showed you the basics of how to use the Lua programming language to extend your own Java-based Android applications.
We chose the Kahlua2 implementation of Lua since it has a native Java code base and was designed to run on mobile devices.
We demonstrated how it is possible to call methods implemented in our Android classes from Lua scripts.
In the next chapter, we will finalize our study of scripting on the Android platform by giving you an introduction to the Scripting Layer for Android (SL4A). SL4A is a platform that enables the running of multiple scripting engines on an Android device.
Our scripting implementations of the last two chapters have run within the processes of our Java Android applications. The design of SL4A currently differs in that scripting engines run in their own Android processes and communicate to an Android RPC server application via a JSON RPC bridge. This Java Android server application then makes Android API calls by proxy on behalf of the scripting engine.