
Chapter 3
Roll Your Own Android Scripting Environment
A device running Android is by definition a full-blown computing platform.
Considering this, it’s not a giant leap of the imagination to wonder about the feasibility of entering programming code directly on the device and having this code execute immediately without any intervening compilation, build, and deployment cycle. In other words, can an Android device work as a handheld, onboard environment for writing and running small scripts and programs?
Perhaps you’ve found yourself wanting the convenience of tinkering on your phone with a small algorithm or piece of code logic while on the bus, train or plane. Ideally, you’d be able to do this in an iterative manner so that each bit of logic can be run instantly, resulting in immediate feedback.
Maybe you’ve wished for the ability to customize and configure the behavior of a favorite application by attaching bits of instantly runnable code to well-defined user modifiable points in the software. These sections of code could then be invoked at runtime and, based on the input, would change the way the application performed its tasks.
In these scenarios, our application would effectively become the host for a guest programming-language interpreter. Assuming that the interpreter is component-based, it could, in theory, be plugged into host applications of widely varying design and functional purpose.
In general, such dynamic and interpretive programming activities are known as scripting, and they fall within the realm of scripting languages, interpreters, and domain specific languages (DSLs). The sequence of actions that read the code to be executed and finally end up with a result is also commonly called “evaluation”; hence the frequent existence of methods or functions called “eval” in the implementation code of such environments.
As we’ve learned so far, the Android OS is by design a flexible, componentized, configurable, and pluggable open source operating platform. Thus, it makes sense to expect we can implement our own scripting environment for our handheld Android device.
In this chapter we will show you how to do just that. We will build our own scripting environment that uses an embedded interpreter to evaluate small scripts and programs written in the BASIC programming language. This interpreter, or engine, was originally written over a decade ago to demonstrate the flexibility and capabilities of Java and the JVM, as well as to show how to implement such a scripting engine using just Java. It is called Cocoa-BASIC and is fully implemented in the Java programming language, making it a good candidate for integration into a standard Android Java-based application.
We assume here that you, as a developer who knows Java, will understand enough of the BASIC language constructs and syntax to follow along. The COCOA programming documentation that we’ll refer to also covers the syntax elements and functions supported by the Cocoa-BASIC implementation.
First we’ll run through some architectural and design considerations in order to give context and meaning to the practical implementation. We will then demonstrate the BASIC interpreter running in a standard or classic Java AWT (Abstract Window Toolkit) desktop GUI configuration as it was originally conceived. Next we’ll cover porting the interpreter to the Android platform where we embed the engine into an Android Activity that acts as the host application for the interpreter. Not only is this application a controller for the interpreter, it also has some basic features that make it a convenient environment for using the interpreter.
This will essentially create a no-frills but complete onboard environment that will enable you to write and run small BASIC scripts and programs directly on your Android device. This implementation will not be an industrial-strength programming tool, but it will certainly provide the foundation and understanding necessary for building one.
Along the way, the project will also allow us to gain further insights into the function and potential of the Android development platform.
Designing a Scripting Environment
Before we dive in, let’s have a short planning session and think through the core architectural and design concepts relevant to making our own scripting environment.
The Components of a Scripting System
A scripting system can consist of several components and these can be arranged in a number of configurations.
Seen from a very high level, you’ll generally find three components overall, two of which are the main building blocks:
- The Application: The logical container and owner of our functionality and features. In summary, the application is what a particular piece of software is all about. It embodies the purpose of the software. No matter how many hidden, self-contained bits and pieces of other software are running behind the scenes, from the user’s perspective the application is the sum total of the software.
- The Interpreter: The engine that processes the script code and evaluates it to end up with some result.
These two logical components can both be implemented to be run in either of two roles:
- The Host: Also known as the controller or the client, this is the part of the application the user will see and interact with. It makes calls or requests to the guest via some form of interface, such as IPC, sockets, files, I/O streams etc. In essence, the host is extended by the guest.
- The Guest: Also known as the provider or the server, generally this component will not be seen by the user since it is embedded within the host. It services the host with responses to its requests via an interface such as local or remote method calls, sockets, files, I/O streams, etc.
The third part of the picture is not strictly a design component but rather the unavoidable basis upon which the scripting system functions:
- The Platform: The operating system or virtual machine, which can be viewed as one of the building blocks even though it is not strictly a direct structural component of the architecture. Our application code should generally interface only with the operating platform via a well-known and officially published set of platform APIs. In our case, these will be the Android APIs that are published and documented in the Android SDK.
The Component Roles in a Scripting System
As part of the foundation for our interpreter environment design, we will quickly summarize and clarify the possible roles of the guest and host components.
Extending the Application by Embedding the Interpreter
In this scenario, the application performs the role of host for the interpreter. As depicted in Figure 3–1, the interpreter is embedded within the overall application and hidden from the direct view of the end user. The application might present some kind of interface for directing the functioning of the interpreter engine, but always acts as the final controller in this configuration.
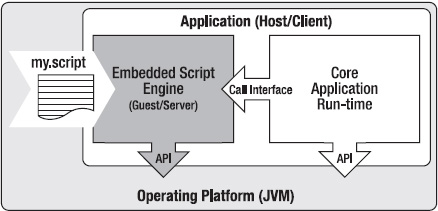
Figure 3–1. Embedding scripting architecture
As you will see, we will use this design for our scripting environment implementation.
Extending the Interpreter by Embedding the Application
Even though we will not be using this design approach, we will cover it for the sake of completeness. As shown in Figure 3–2, the roles have now been reversed and the scripting engine itself becomes the primary usage interface for the application. In essence, it becomes the application.
This is a common configuration where the application services an end-user base consisting of skilled or specialist users with technical know-how and advanced requirements.
For instance, the application could be an interactive domain-specific command-line or console terminal shell that allows direct execution of script commands by its users. These script commands then invoke application-specific core functionality from business libraries wrapped as modules embedded within the script environment.
Database engines often ship with such applications that allow the interpretation and execution of backend database administration or data-query commands interactively from a shell.
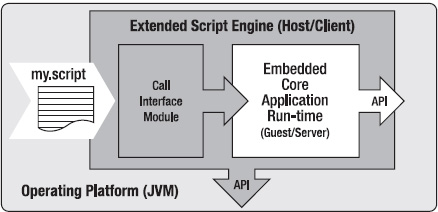
Figure 3–2. Extending scripting architecture
It is worth mentioning that it’s often useful to apply a cross-over or mix-and-match approach that melds these two design strategies. This can be the case in scenarios where we implement a shell-like scripting interpreter in a graphical toolkit environment. In other words, this can be desirable when the interpreter is lightly wrapped in a thin GUI shell that may be significantly more code-intensive than if the interface were a lean console shell.
Designing for Resource-Constrained Systems
Operating systems such as Android are designed to execute on resource-constrained hardware. As such, these platforms do not take kindly to lax application response times. When these become extreme and regular enough, they certainly affect the perception and popularity of the application with its intended end users.
In fact, the Android system enforces and encourages responsive user interface applications by applying timeouts on long-running application processes, particularly GUI code. The system does this mostly to avoid a state known as ANR, or Application Not Responding, which generally results in the Android system presenting the user with an ANR Dialog as shown in Figure 3–3. This dialog is something we want to avoid as a matter of course when we develop Android applications.
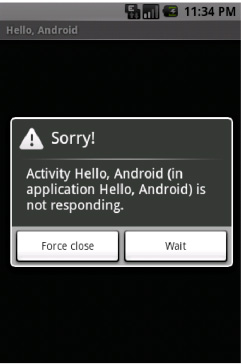
Figure 3–3. The Android “Application Not Responding” dialog
What does all of this imply for our onboard interpreter design? It means that our script can’t just go off and leave the application’s user interface to its own devices. Such behavior will very likely hang of freeze the user interface while it waits for the script interpreter process to rejoin the application.
More information and guidelines on this subject can be found on the Android Developers “Designing for Responsiveness” web site.1
Multi-Threading for Background Code
Whenever we predict—or even just have a suspicion, however vague—that our scripting code might at times take a relatively long time to execute, it is always a good idea to consider using asynchronous processing via threads. This is especially appropriate when our script interpreter engine is being hosted in an end-user application with a single-threaded graphical user interface.
GUI frameworks commonly execute on a single main application thread, and it is imperative that this thread is not in any way choked or blocked into unresponsive behavior. When the application defers to performing background work, such as network access or database queries running on the main GUI thread, this can result in a user interface that no longer responds to GUI events for intermittent periods of time—or worse.
The Android operating environment is no exception when it comes to its user interface toolkit threading model. By default, Android applications are run by the system on a single thread called main. This is also known as the UI thread, and it is the thread that is responsible for dealing with the user interface and interacting with the UI components of the Android platform.
You’ll find more information regarding threading on the Android Developers Application Fundamentals web page under the “Processes and Threads” heading.2
As a final word on threading here, we will mention that in our scripting environment implementation, we will also demonstrate running the interpreter engine on a separate thread using the recommended Android asynchronous processing pattern.
Programming with BASIC
Some readers may wonder about our choice of the BASIC programming language for this chapter. It may come as a surprise to learn that selecting BASIC for the essential “roll your own” aspects of the chapter was, in fact, a no-brainer.
This is due to the history, design, popularity, and, indeed, the very nature of BASIC. It fairly concisely wraps up fundamental and core programming constructs and concepts in a small language that is easy to learn. Most of its relatively few core statements and function names are short and easy to remember. Notably, they are also easy to type on a device with a small keyboard and screen.
These attributes and the language’s approachability for a potentially large audience of users make it a very appropriate choice for running on popular and highly mobile small devices.
A BASIC Backgrounder
The BASIC programming language was designed to be easy to teach and easy to learn. Unlike many other languages that were created for the same reason, BASIC can claim a huge number of programmers who were introduced to programming with the language and used it as their first coding environment.
WHAT IS BASIC? BASIC is an acronym that stands for “Beginner’s All-purpose Symbolic Instruction Code.” It was originally created in 1964 by the computer scientists Kemeny and Kurtz. The main purpose was to teach programming skills to those who weren’t scientists or mathematicians, who produced most software applications at the time. There was growing demand for software applications and it was felt that the pool of programming talent could be significantly extended through the introduction of a new generation of high-level programming languages such as BASIC.
BASIC is also unique in that many of its implementations are interpreters. This significantly tightens the feedback loop between the programmer and the development system. Such an iterative programming environment leads to rapid prototyping of systems and a highly accelerated learning pace.
It therefore comes as no surprise that most modern scripting languages follow the same interpretive route and should concede this as one of the main reasons for their rapid growth and adoption by the programming community.
Cocoa—A BASIC Interpreter for Java
For this project, we selected the Cocoa-BASIC interpreter for Java. It was originally created in 1996 by Chuck McManis and featured in a series of articles for JavaWorld3 entitled “How to build an interpreter in Java.”4 These articles are still available on the JavaWorld web site at the time of this writing and some of the pages are included in the code download archives as part of the documentation.
The source code and documentation for Cocoa BASIC are downloadable and free for learning and noncommercial purposes from the Cocoa home page.5
__________
COCOA-BASIC IS NOT OPEN SOURCE: Please note that Cocoa-BASIC is not published under an open source license. The author has kindly given permission for us to use the Cocoa-BASIC code for the chapter project, and you are free to explore and use it for learning although it remains copyrighted.
More programming documentation for Cocoa-BASIC is available in the code distribution download and on the reference web site.6
Outlining the Code Projects for This Chapter
This chapter presents two code projects. Both can be downloaded from the book web site as part of the resources for this chapter:
- Cocoa-BASIC AWT (
cocoa-basic-awt): This is the original Java AWT-based hosting code. It is directly based on the code that can be downloaded from the Cocoa-BASIC home web site. We have collected and organized the code into packages with only the relevant source files and dependencies actually needed by the interpreter and the AWT GUI host application. The project is in the form of an IntelliJ IDEA IDE project but can easily be imported and built in other IDEs. - CocoaDroid (
cocoadroid): This is the full implementation of our Android-based onboard scripting environment that embeds the BASIC interpreter engine. It is also in the form of an IntelliJ IDEA IDE project.
We will go through the functioning, source code, and relevant resources of these two projects in detail during the remainder of this chapter.
The Cocoa-BASIC AWT Project
Before we dive into the Java AWT desktop GUI version of the scripting environment, let’s take a quick look at the overall design paradigm of the application. We will meet these design aspects and component classes again in the Android application implementation, so it’s worth covering this material now.
Understanding the Cocoa-BASIC AWT Application Design
Building on our earlier overall logical architecture and design diagrams, we present a similar depiction relevant to the AWT-based Java desktop host application in Figure 3–4.

Figure 3–4. Cocoa-BASIC AWT embedded scripting architecture
We have added slightly more detail relating to the main classes for the script engine and the core application. As you can see, the key actors in terms of classes are:
- The Application
BASIC: The startup application class that contains the Javamainmethod. It instantiates the two main classes of the GUI application (ConsoleWindow) and the interpreter (CommandInterpreter) and hooks up their mechanism of communication: one instance each ofInputStreamandOutputStreamderived classes, which, in this case, isDataInputStreamfor interpreter input andPrintStreamfor output.ConsoleWindow: This class manages the user interface. It is the View of the application. It also embeds an instance of theKeyboardBufferclass, which manages the lower-level aspects of the Input- and OutputStream communications with theCommandInterpreterclass instance.KeyboardBuffer: This class manages the interaction between the commands typed via the keyboard and the resulting output received from the interpreter.
- The Interpreter
CommandInterpreter: The class that encapsulates the script engine. All host application interaction and communication with the script interpreter occurs through this class.Program: The backend class that wraps an executable unit of code that can be logically described as a “program.”
We will look at the source code for these classes shortly. First let’s step through what the application actually does and see what it looks like when it runs.
Running the Cocoa-BASIC AWT Desktop Application
We are not going to go into the details of building and running the application from the IDE. We assume you are proficient enough with Java development tasks to be able to do this on your own.
Assuming we’ve built the project according to the downloadable book sample code project, the condensed project file directory should be similar to the one in Listing 3–1.
Listing 3–1. The Cocoa-BASIC AWT Condensed Project Folder
cocoa-basic-awt

+---cocoa

|   +---basic

|   |       BASIC.java

|   |       CommandInterpreter.java

|   |       Program.java

|   |       ...

|   +---dlib

|   |       ConsoleWindow.java

|   |       KeyboardBuffer.java

|   ---util

|   |       ...

+---out

|   +---artifacts

|   |       atest1.bas

|   |       atest2.bas

|   |       cocoa-basic-awt.jar

|   |       ...

---test-scripts

    |       ...
Take note of the location of the cocoa-basic-awt.jar file. We will start the application by issuing the following command from the terminal where the jar file resides:
java -jar cocoa-basic-awt.jarThis should start the application with the main window displayed as in Figure 3–5.
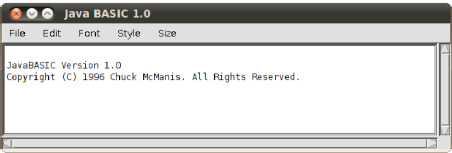
Figure 3–5. Cocoa-BASIC AWT main window
This displays a small application banner. To actually run any code, we select File ![]()
New from the menu as in Figure 3–6.
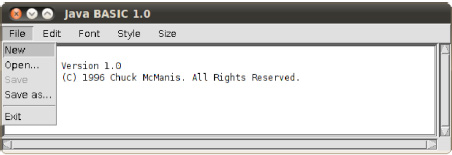
Figure 3–6. Opening a new Cocoa-BASIC AWT buffer
This should present the new window buffer in Figure 3–7.

Figure 3–7. Running code in a new buffer
Enter some code as per Figure 3–7 and Listing 3–2 into the window text buffer to exercise the interpreter. Don’t type the “>>” characters; they are for clarity only. The expected interpreter response is indicated by the absence of these characters.
Listing 3–2. Simple BASIC Test Code
>> let a$ = "we will make this work on android too…"

>> print a$

we will make this work on android too…
Assume that we have, for testing convenience, placed our cocoa-basic-awt.jar file and the atest2.bas BASIC test code file in certain folders, as follows.
On Linux and Mac OS X:
/home/<user>/cocoa-basic-awt/And on Windows:
C:\_dev_cocoa-basic-awtNow we run the application as before and enter the following commands into a new file buffer. The expected interpreter response is also listed in the transcripts.
On Linux and Mac OS X (see Figure 3–8):
>> load "/home/<user>/cocoa-basic-awt/atest2.bas"

File loaded.

Ready.
Figure 3–8. Loading a program‘s source code file in a new buffer (Linux/Mac OS X)
And on Windows (see Figure 3–9):
C:\_dev_cocoa-basic-awt

>> load "C:\_dev_cocoa-basic-awt\atest2.bas"

File loaded.

Ready.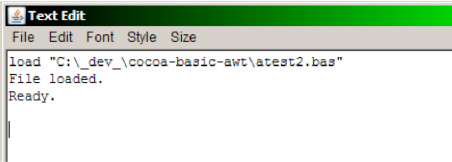
Figure 3–9. Loading a program‘s source code file in a new buffer (Windows)
Now open a new file buffer, type the list command and press Enter. The loaded program should be listed in the buffer as in Figure 3–10.
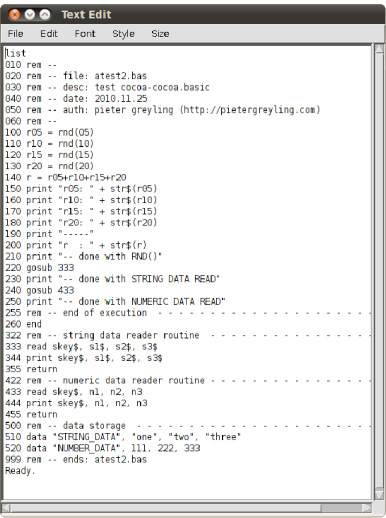
Figure 3–10. Listing a source code file in a new buffer
Again, open a new file buffer, type the run command, and press the Enter key. The loaded program should be executed by the BASIC interpreter, producing the output listed in the buffer as shown in Figure 3–11.
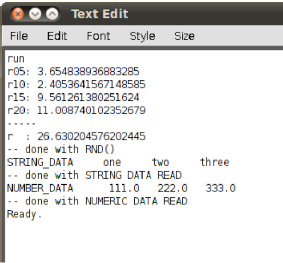
Figure 3–11. Running a loaded program
This concludes our demonstration of the application.
Reviewing the Cocoa-BASIC AWT Source Code
Now that we understand the flow of the application a little better, let’s take a look at some of the source code. Please refer back to the architecture overview diagrams earlier in this chapter for a conceptual refresher if necessary.
Listing 3–3 shows the source code of the main Java startup file for this application, BASIC.java. Code of interest is highlighted in bold.
Listing 3–3. The Cocoa-BASIC AWT BASIC .java Startup Class
package cocoa.basic;


import java.io.*;

import cocoa.dlib.*;


public class BASIC {

    public static void main(String args[]) {

        char data[] = new char[256];

        ConsoleWindow cw = new ConsoleWindow("Java BASIC 1.0");


        CommandInterpreter ci = new CommandInterpreter(cw.DataInputStream(),

                                                       cw.PrintStream());

        try

        {

            ci.start();

        }

        catch (Exception e)

        {
            System.out.println("Caught an Exception :");

            e.printStackTrace();

            try

            {

                System.out.println("Press enter to continue.");

                int c = System.in.read();

            }

            catch (IOException xx)

            {

                /* pass */

            }

        }

    }

}
As explained earlier, it is important to note that the stream instances, InputStream and OutputStream, of the two classes, CommandInterpreter and ConsoleWindow, are hooked together upon instantiation via the CommandInterpreter class constructor.
ConsoleWindow cw = new ConsoleWindow("Java BASIC 1.0");

        CommandInterpreter ci = new CommandInterpreter(cw.DataInputStream(),

                                                       cw.PrintStream());
This causes input into the console window to be streamed into the interpreter, and output from the interpreter to be printed to the console window via the print stream.
Listing 3–4 shows a segment of source code from the CommandInterpreter class. Again, code of interest is highlighted in bold. As we can see, the constructor ensures that there are always input and output stream instances available.
Listing 3–4. I/O Streams and the CommandInterpreter Class (partial)
package cocoa.basic;


import java.io.*;


/**

 * This class is an "interactive" BASIC environment. You can think of it as

 * BASIC debug mode. Using the streams you passed in to create the object, it

 * hosts an interactive session allowing the user to enter BASIC programs, run

 * them, save them, and load them.

 */

public class CommandInterpreter

{

    private DataInputStream inStream;

    private PrintStream outStream;


    final static String commands[] = {

            "new", "run", "list", "cat", "del", "resume",

            "bye", "save", "load", "dump", "cont",

    };


[--code omitted--]

    /**

     * Create a new command interpreter attached to the passed

     * in streams.

     */

    public CommandInterpreter(InputStream in, OutputStream out)

    {

        if (in instanceof DataInputStream)

        {
            inStream = (DataInputStream) in;

        }

        else

        {

            inStream = new DataInputStream(in);

        }

        if (out instanceof PrintStream)

        {

            outStream = (PrintStream) out;

        }

        else

        {

            outStream = new PrintStream(out);

        }

    }


[--code omitted--]
NOTE: We will not be going into the details of the BASIC language interpreter implementation. This is outside the scope of this chapter since this is an Android programming book, not a computer language implementation book. We are focused on the Android platform and the Android programming techniques that make an application such as this possible. As mentioned before, the full source code is available as organized projects for your perusal and study.
Let’s move on to the feature project of this chapter, CocoaDroid, our onboard BASIC interpreter and scripting application.
The CocoaDroid Project
To begin the coverage of this project, we present a short table of dependencies (Table 3–1) to serve as a reminder of what to check before running the application in an emulator on our development system. Then, as with the previous project, we take a quick look at the conceptual architecture of the application.
A Preflight Checklist
Table 3–1 lists some configuration items you’ll need to take care of in order to test the project. Of course, you are free to set up your configuration to your own liking, but these dependency items should generally be checked in any case.
AVD ANDROID PLATFORM LEVEL: The dependency list in Table 3–1 assumes that the Android platform API Level android-9 has been installed on your system. This is for Android 2.3, the latest version at the time of this writing. Be sure you know which platform you are creating your AVD for. At the time of this writing, CocoaDroid was built for running on the Android 2.2 (Froyo) and the Android 2.3 (Gingerbread) platforms.
We will not be covering how to run the project on the emulator in any depth here because we assume you’ve been brought up to speed by reading our first two chapters of this book. Table 3–1 is meant to be simply a convenient reminder.
Table 3–1. CocoaDroid Project Debugging Dependency Checklist
| Item | Value or Command |
| PATH | <Android SDK Directory>/tools |
| PATH | <Android SDK Directory>/platform-tools |
| Create an AVD | android create avd -n android23api9_hvga_32mb -t android-9 -c 32M |
| List AVDs | android list avd |
| Delete an AVD | android delete avd -n android23api9_hvga_32mb |
Understanding the CocoaDroid Application Design
It is a good idea to have a mental map of how our application’s main components fit together, so let’s take a look at the conceptual architecture diagram in Figure 3–12.

Figure 3–12. CocoaDroid Embedded Scripting Architecture
As you can see, the overall logical design of the application remains very similar to that of the earlier Java AWT version.
The main actors in terms of classes are:
- The Application
CocoaDroidActivity: The main entry point of the application. The Cocoa-BASIC interpreter will be embedded in theCocoaDroidActivityAndroid Activity, which will set up an InputStream and an OutputStream, create an instance of a CommandInterpreter, and pass in references to the two stream instances. These streams will be used to direct communication back and forth between theCocoaDroidActivityand theCommandInterpreterinstances. Note further down that our particular flavor of this class is a subclass calledCocoaDroidCommandInterpreter. Figure 3–12 still depicts the name of the parent class since logically nothing has really changed in the conceptual design.CommonAndroidCodeLibrary: This class services the application with several common operations. They are loosely organized as a set of static methods.
- The Interpreter
CocoaDroidCommandInterpreter: The class that encapsulates the script engine. All host application interaction and communication with the script interpreter occurs through this class. In the case of the CocoaDroid application, we created a subclass ofCommandInterpretercalledCocoaDroidCommandInterpreterthat has been altered slightly to fit an Android Activity based environment better.Program: The backend class that wraps an executable unit of code that can be logically described as a “program.” It remains exactly as before in the AWT desktop-based project.
We will review some application source code as we go along, but first let’s see what the application looks like.
Running the CocoaDroid Android Application
Building and running the application with the IDE and the Android emulator is, once again, assumed to be within the proficiency and skill set of the reader. We will not cover those steps here.
When we’ve built our application and installed it to an emulator or a physical device, we should see the CocoaDroid application icon on the Application Launcher, as per Figure 3–13.

Figure 3–13. The CocoaDroid application launcher
The Elements of the CocoaDroid Main Activity Screen
When we launch the application, we should see the “CocoaDroid – BASIC for Android” startup Activity as shown in Figure 3–14.

Figure 3–14. The CocoaDroid main Activity screen on startup
The application prints a startup banner and a ready message. This means that CocoaDroid is now prepared to accept and evaluate strings or listings of commands and statements in the BASIC programming language.
The CocoaDroid application main Activity screen is organized with the following elements:
- The Input (or Code) Text Field: An Input entry field for the interpreter and programming language commands. This is an instance of the Android
EditTextView class. - The Toolbar: A tool layout with four buttons. The first button is an instance of the
ImageButtonView class and the others are standardButtoninstances. They are arranged within an embeddedLinearLayoutinstance.Run(the black box with the green arrow). This initiates the creation of an interpreter instance and pushes the code in the input text field onto an input stream. This stream feeds into the interpreterCocoaDroidCommandInterpreterinstance. The interpreter evaluates this code and streams the result back via an output stream from which it is pulled and placed into the output text field.Load.This button loads text that was previously saved to two persistent scratch files, one each for input and output, using theSavebutton. The feature allows you to keep a single record of the last input and output session text values.Save.This button saves the text currently in the input and output text fields, which can then be reloaded with theLoadbutton. It keeps only a single session record at a time, overwriting the previous input and output scratch files with the new values.- Clear. This button clears the input and output text field values in order to present a clean working area. The output of the last execution run is not lost but pushed onto the top of the history list (described shortly).
- The Output (or Results) Text Field: An output field that lists the result of the interpreter evaluation. This is also an instance of the Android
EditTextView class, so its contents can be manipulated. - The History List: A list of previous interpreter output results that scroll downward from the second-most recent to the earliest. Each evaluation result is added to the top of this list when it is replaced by the output of a new interpreter run. This list is an instance of
ListView. - The Main Menu:CocoaDroid also has an Android application menu that is not immediately visible. It provides the user with a few more features and is portrayed in Figure 3–15.
Load Samples. The CocoaDroid application package ships with a file containing small snippets of BASIC code that you can copy and paste into the input text filed to use as a basis for your own programs. The file is stored internally as a raw resource file asset. We will cover this in more detail later.Load Work. Besides letting you store a copy of an input/output session, CocoaDroid also lets you save a buffer of text we call Work to an application text file. This menu item retrieves the data currently saved and populates the input text field with it when selected.Save Work. This menu item saves the current contents of the input text field and writes it to a private application file as described in theLoad Worksection.About CocoaDroid. When this menu item is selected, a short notice banner is printed by the CocoaDroid interpreter to the output results text field. For the sake of demonstration and technical value, we decided to use Cocoa-BASIC code itself to write this message. We will cover this in more detail later.
The Main XML Layout Resource
We have introduced and explained the main user interface controls of the CocoaDroid application. The content of Listing 3–5, the main XML layout resource file, shows the UI Toolkit types and attributes for the user interface.
Listing 3–5. main.xml
<?xml version="1.0" encoding="utf-8"?>

<ScrollView xmlns:android="http://schemas.android.com/apk/res/android"

            android:id="@+id/scroll_view_main"

            android:layout_width="fill_parent"

            android:layout_height="fill_parent"

            android:fillViewport="true"

        >

    <LinearLayout xmlns:android="http://schemas.android.com/apk/res/android"

                  android:orientation="vertical"

                  android:layout_width="fill_parent"

                  android:layout_height="fill_parent"

            >

        <EditText

                android:id="@+id/txt_input"

                android:layout_width="fill_parent"

                android:layout_height="wrap_content"

                android:scrollbars="vertical">

        </EditText>

        <LinearLayout

                android:layout_width="fill_parent"

                android:layout_height="wrap_content"

                android:background="@android:drawable/bottom_bar"

                android:gravity="center_vertical">
            <ImageButton

                    android:id="@+id/cmd_enter"

                    android:src="@drawable/btn_run"

                    android:layout_width="0dip"

                    android:layout_weight="2.0"

                    android:layout_height="wrap_content"/>

            <Button

                    android:id="@+id/cmd_load_scratch"

                    android:layout_width="0dip"

                    android:layout_weight="1.0"

                    android:layout_height="wrap_content"

                    android:text="Load"/>

        <Button

                    android:id="@+id/cmd_save_scratch"

                    android:layout_width="0dip"

                    android:layout_weight="1.0"

                    android:layout_height="wrap_content"

                    android:text="Save"/>

            <Button

                    android:id="@+id/cmd_clear"

                    android:layout_width="0dip"

                    android:layout_weight="1.0"

                    android:layout_height="wrap_content"

                    android:text="Clear"/>

        </LinearLayout>

        <EditText

                android:id="@+id/txt_output"

                android:layout_width="fill_parent"

                android:layout_height="wrap_content"

                android:scrollbars="vertical">

        </EditText>

        <ListView

                android:id="@+id/lst_output"

                android:layout_width="fill_parent"

                android:layout_height="fill_parent"

                />

    </LinearLayout>

</ScrollView>
The Application Activity Class
To get a better idea of the user interface implementation from the Java code perspective, Listing 3–6 shows a partial representation of the application Activity class source file.
Listing 3–6. CocoaDroidActivity.java (partial)
public class CocoaDroidActivity extends Activity implements View.OnClickListener

{

    protected static final String TAG = "CocoaDroidActivity";


    protected EditText _txtInput = null;

    protected EditText _txtOutput = null;

    protected ImageButton _cmdEnter = null;

    protected Button _cmdLoadScratch = null;

    protected Button _cmdSaveScratch = null;
    protected Button _cmdClear = null;

    protected ListView _outputListView = null;

    OutputStringArrayAdapter _outputArrayAdapter = null;

    ArrayList<String> _outputArrayList = new ArrayList<String>();

    // The input and output streams that form the communications

    // channels with the Cocoa-BASIC interpreter

    protected ByteArrayInputStream _inputStream = null;

    protected ByteArrayOutputStream _outputStream = null;

    // The embedded Cocoa-BASIC interpreter instance reference

    protected CocoaDroidCommandInterpreter _commandInterpreter = null;


    /**

     * Called when the activity is first created.

     */

    @Override

    public void onCreate(Bundle savedInstanceState)

    {

        Log.d(TAG, "onCreate(): ...");

        super.onCreate(savedInstanceState);

        setContentView(R.layout.main);

        initialize();

    }


    /**

     * Sets up Activity user interface controls and resources.

     */

    protected void initialize()

    {

        // set a custom title from the strings table

        setTitle(getString(R.string.app_desc));


        // get a handle on and configure the input and text fields

        _txtInput = (EditText) findViewById(R.id.txt_input);

        _txtInput.setTextSize(TextSize.NORMAL);

        _txtInput.setTypeface(Typeface.MONOSPACE);

        _txtOutput = (EditText) findViewById(R.id.txt_output);

        _txtOutput.setTextSize(TextSize.NORMAL);

        _txtOutput.setTypeface(Typeface.MONOSPACE);

        _txtOutput.setTextColor(Color.GREEN);

        _txtOutput.setBackgroundColor(Color.DKGRAY);


        // get a handle on the enter command button and its event handler

        _cmdEnter = (ImageButton) findViewById(R.id.cmd_enter);

        _cmdEnter.setOnClickListener(this);


        // get a handle on the scratchpad buttons and event handling

        _cmdLoadScratch = (Button) findViewById(R.id.cmd_load_scratch);

        _cmdLoadScratch.setOnClickListener(this);

        _cmdSaveScratch = (Button) findViewById(R.id.cmd_save_scratch);

        _cmdSaveScratch.setOnClickListener(this);


        // button for clearing buffers

        _cmdClear = (Button) findViewById(R.id.cmd_clear);

        _cmdClear.setOnClickListener(this);


        // set up and get a handle on the output list view using an array adapter

        _outputListView = (ListView) findViewById(R.id.lst_output);
        _outputArrayAdapter = new OutputStringArrayAdapter(this, _outputArrayList);

        _outputListView.setAdapter(_outputArrayAdapter);


        // show the startup about banner

        showAbout();


        // and let the interpreter show a little sample

        String print_hello = "print ">> ready..."";

        evalCodeStringSync(print_hello);

        _txtInput.setText("");

    }

[--code omitted--]
As highlighted in bold, to keep the onCreate method cleaner we have split most of the initialization code into a separate initialize method.
The snippet of code below, extracted from Listing 3–6, shows the input and output stream references we discussed earlier. They are the variables we will use to feed code to the interpreter and to receive results back. The code also shows the reference, CocoaDroidCommandInterpreter, to the CocoaBASIC interpreter engine itself. We will discuss this later when we look at the methods that use it.
    // The input and output streams that form the communications

    // channels with the Cocoa-BASIC interpreter

    protected ByteArrayInputStream _inputStream = null;

    protected ByteArrayOutputStream _outputStream = null;

    // The embedded Cocoa-BASIC interpreter instance reference

    protected CocoaDroidCommandInterpreter _commandInterpreter = null;
Implementing a Custom ArrayAdapter
From Listing 3–6, we also draw attention to this piece of code:
    // set up and get a handle on the output list view using an array adapter

    _outputListView = (ListView) findViewById(R.id.lst_output);

    _outputArrayAdapter = new OutputStringArrayAdapter(this, _outputArrayList);

    _outputListView.setAdapter(_outputArrayAdapter);
You might be wondering about the OutputStringArrayAdapter class we refer to in the snippet above. When we build up our ListView, we use a custom ArrayAdapter class, OutputStringArrayAdapter, instead of the standard Android one. Its implementation is shown in Listing 3–7.
Listing 3–7. OutputStringArrayAdapter — CocoaDroidActivity.java (partial)
/**

* Custom String ArrayAdapter class that allows us to manipulate the row colors etc.

*/

protected class OutputStringArrayAdapter extends ArrayAdapter<String>

{

    OutputStringArrayAdapter(Context context, ArrayList<String> stringArrayList)

    {

        super(context, android.R.layout.simple_list_item_1, stringArrayList);

    }


    public View getView(int position, View convertView, ViewGroup parent)
    {

        TextView txt = new TextView(this.getContext());

        txt.setTextColor(Color.GREEN);

        txt.setTextSize(TextSize.SMALL);

        txt.setText(this.getItem(position));

        return txt;

    }

}
The purpose of this class is essentially cosmetic—it serves mainly to override the getView method in order to apply a different look to the command history list child rows, and it changes the text font size and text color to fit in with the rest of the Activity. We want the history text entries slightly smaller and in green on a black background.
The Application XML Strings Table
The application code extensively (but not exclusively) uses strings stored in an XML strings table (strings.xml). We show the contents of the strings table in Listing 3–8. These values are retrieved throughout the application source code using the API getString method.
Listing 3–8. strings.xml
<?xml version="1.0" encoding="utf-8"?>

<resources>

    <string name="app_name">CocoaDroid</string>

    <string name="app_desc">CocoaDroid - BASIC for Android</string>

    <string name="app_copy_cocoabasic">CocoaBASIC Version 1.0 Copyright (C) 1996

 Chuck McManis. All Rights Reserved.</string>

    <string name="app_copy_cocoadroid">CocoaDroid Android Port Copyright (C) 2010

 Pieter Greyling. All Rights Reserved.</string>

    <string name="app_usage_01">Type in BASIC commands, scripts or programs and

 press Enter...</string>

    <string name="app_usage_02">Save and reload your session with Save and

 Load.</string>

    <string name="app_usage_03">Clear the buffers with Clear.</string>

    <string name="file_name_scratch_input">cocoadroid_scratch_input.txt"</string>

    <string name="file_name_scratch_output">"cocoadroid_scratch_output.txt"</string>

    <string name="file_name_work">"cocoadroid_work.txt"</string>

    <string name="file_name_samples">"program_templates/cocoadroid_basic_templates

.bas"</string>

    <string name="menu_work_load">Load Work</string>

    <string name="menu_work_save">Save Work</string>

    <string name="menu_samples_load">Load Samples</string>

    <string name="menu_app_about">About CocoaDroid</string>

    <string name="title_samples_file_load">Samples File Load</string>

    <string name="title_scratch_files_load">Scratch Files Load</string>

    <string name="title_scratch_files_save">Scratch Files Save</string>

    <string name="title_work_file_load">Work File Load</string>

    <string name="title_work_file_save">Work File Save</string>

    <string name="exception_on_samples_file_load">The Samples File could not be

 loaded! Please check your CocoaDroid installation.</string>

    <string name="exception_on_scratch_files_load">The Scratch Files could not be

 loaded! Save first.</string>

    <string name="exception_on_scratch_files_save">The Scratch Files could not be
 saved!</string>

    <string name="exception_on_work_file_load">The Work File could not be loaded! Save

 Work first.</string>

    <string name="exception_on_work_file_save">The Work File could not be

 saved!</string>

</resources>
Using XML Menu Layout Resources
We spoke earlier of the application menu. Figure 3–15 depicts its appearance.

Figure 3–15. CocoaDroid main menu
Instead of using pure Java code, our application menu is defined in the XML layout resource shown in Listing 3–9.
Listing 3–9. cocoadroid_main_menu.xml
<?xml version="1.0" encoding="utf-8"?>

<menu xmlns:android="http://schemas.android.com/apk/res/android">

    <item

            android:id="@+id/menu_itm_work_load"

            android:icon="@drawable/mnu_load_work"

            android:title="@string/menu_work_load">

    </item>

    <item

            android:id="@+id/menu_itm_work_save"

            android:icon="@drawable/mnu_save_work"

            android:title="@string/menu_work_save">

    </item>

    <item

            android:id="@+id/menu_itm_samples_load"
            android:icon="@drawable/mnu_load_samples"

            android:title="@string/menu_samples_load">

    </item>

    <item

            android:id="@+id/menu_itm_app_about"

            android:icon="@drawable/mnu_about"

            android:title="@string/menu_app_about">

    </item>

</menu>
Declaring Android UI layouts7 in XML resources like this provides more flexibility to support multiple physical screen configurations dynamically. Moreover, it supports changes to the user interface without recompilation of the code. This technique also follows the generally recommended principle of separating the presentation layout (UI) from the application logic (code).
Using an Android Menu Inflater
The menu8 is created using an Android MenuInflater9 inside the overridden method of the CocoaDroidActivity class (see Listing 3–10). This loads our cocoadroid_main_menu.xml resource file and inflates the menu at runtime.
Listing 3–10. onCreateOptionsMenu — CocoaDroidActivity.java
/**

* Implement our app menu using an XML menu layout and the ADK MenuInflater.

*/

@Override

public boolean onCreateOptionsMenu(Menu menu)

{

    // always first delegate to the base class in case of system menus

    super.onCreateOptionsMenu(menu);

    MenuInflater inflater = getMenuInflater();

    inflater.inflate(R.menu.cocoadroid_main_menu, menu);

    // true for a visible menu, false for an invisible one

    return true;

}
Our First Script, Hello Android BASIC!
We now understand some of the basic operations and the core ideas behind CocoaDroid. Let’s finally try to run some code with it!
Type this code into the input field and press the Run button with the green arrow.
let hi$ = "Hello Android"

print hi$, "Practical Book!"CocoaDroid should respond by printing the following to the evaluation output text field.
Hello Android Practical Book!The output should look something like what’s shown in Figure 3–16.
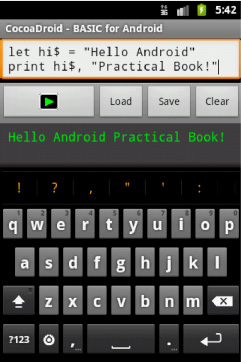
Figure 3–16. Hello Android in BASIC
Recall from the earlier partial Listing 3–6 of CocoaDroidActivity.java that this class handles clicks on UI Views centrally by implementing OnClickListener10 as follows:
public class CocoaDroidActivity extends Activity implements View.OnClickListenerThus, when we click on the Run button, the onClick method in Listing 3–11 is invoked.
Listing 3–11. onClick — CocoaDroidActivity.java
    /**

     * Centralized onClick listener for all views, particularly buttons.

     *

     * @param v

     */

    public void onClick(View v)

    {

        Log.d(TAG, "onClick(): ".concat(v.toString()));

        String codeString = _txtInput.getText().toString();

        switch (v.getId()) {

            case R.id.cmd_enter:

                new EvalCodeStringAsyncTask().execute(codeString);

                break;
            case R.id.cmd_load_scratch:

                loadScratchFiles();

                break;

            case R.id.cmd_save_scratch:

                saveScratchFiles();

                break;

            case R.id.cmd_clear:

                clearBuffers();

                break;

            default:

                // do nothing

                break;

        }

}The method extracts the textual code from the interpreter input field and then drops into the case statement condition for the run button based on the id of the View that was clicked (in this case the run Buttoncmd_enter). It then creates a new instance of the EvalCodeStringAsyncTask class, passing in the code that needs to be interpreted. This class takes care of running our code interpreter on a separate thread that doesn’t block the user interface main thread while the interpreter is evaluating the code.
Running BASIC Code Asynchronously Using an Android AsyncTask
To run our code safely on a separate thread, we will create our own subclass of the Android AsyncTask11 class. The Android Developers web site has a good introduction on the subject of writing threading code in Activities called “Painless Threading.”12
Our threaded class is called EvalCodeStringAsyncTask and its implementation is shown in Listing 3–12.
Listing 3–12. EvalCodeStringAsyncTask — CocoaDroidActivity.java
    /**

     * Handle program code interpretation as asynchronous operations.

     * android.os.AsyncTask<Params, Progress, Result>

     */

    protected class EvalCodeStringAsyncTask extends AsyncTask<String, Integer, String>

    {

        protected String doInBackground(String... codeString)

        {

            String result = "";

            Log.d(TAG, "doInBackground() [code]:
" + codeString[0]);

            result = evalCodeString(codeString[0]);

            Log.d(TAG, "doInBackground() [eval]:
" + result);

            publishProgress((int) (100)); // just to demonstrate how

            return result;

        }
        /**

         * We leave this here for the sake of completeness.

         * Progress update is not implemented.

         *

         * @param progress

         */

        @Override

        protected void onProgressUpdate(Integer... progress)

        {

            setProgressPercent(progress[0]);

        }


        /**

         * Update the GUI output work result edit field.

         *

         * @param result

         */

        @Override

        protected void onPostExecute(String result)

        {

            writeOutput(result);

        }

}The AsyncTask generic class takes the following arguments when declared:
android.os.AsyncTask<Params, Progress, Result>Paramsindicates the types that our implementation of the subclass’s overriddenexecutemethod will take. This is the same as for thedoInBackgroundmethod.Progressis the type for the overriddenonProgressUpdatemethod.Resultdeclares the type for the overridden methodonPostExecutethat executes when the work is done and is the return value of thedoInBackgroundmethod.
As per Listing 3–12, our implementation looks like this:
EvalCodeStringAsyncTask <String, Integer, String>When our task is fired, it runs the doInBackground method, which in turn calls the evalCodeString method. This method is shown in Listing 3–13.
Listing 3–13. evalCodeString — CocoaDroidActivity.java
    /**

     * Interpret and execute (evaluate) the given code fragment.

     * It is invoked by the EvalCodeStringAsyncTask.

     *

     * @param codeString

     * @return The result of the evaluation drawn off the interpreter output stream.

     */

    protected String evalCodeString(String codeString)

    {

        Log.d(TAG, "evalCodeString(): " + codeString);
        String result = null;


        // set up and direct the input and output streams

        try {

            _inputStream = inputStreamFromString(codeString);

            _outputStream = new ByteArrayOutputStream();


            // fire up the command interpreter to evaluate the source code buffer

            _commandInterpreter =

                 new CocoaDroidCommandInterpreter(_inputStream, _outputStream);

            try {

                _commandInterpreter.eval();

                // extract the resulting text output from the stream

                result = stringFromOutputStream(_outputStream);

            }

            catch (Throwable t) {

                result = ("UNSUPPORTED OPERATION!
[
" +

                          codeString + "
]
" + t.toString());

            }

        }

        catch (Throwable t) {

            result = ("UNSUPPORTED OPERATION!
[
" +

                       codeString + "
]
" + t.toString());

        }


        return result;

    }
First, the method creates an instance of a ByteArrayInputStream from the code string and an instance of ByteArrayOutputStream to act as OutputStream for the interpreter results. The code string is converted to a stream using a utility helper method, stringFromInputStream, which essentially does the following:
return (new ByteArrayInputStream(codeString.getBytes(_encoding)));The evalCodeString method next instantiates a new instance of the CocoaBASIC interpreter class, CocoaDroidCommandInterpreter, and passes in the references to the two stream instances. It then calls the eval method on the interpreter instance. The eval method is the entry point into the CocoaBASIC engine black box, which works with what is on the input stream and pipes the result back out via the output stream. This is then passed into another stream utility method, stringFromInputStream, which reads the bytes from the input stream and puts this buffer into a string as follows:
// extract the resulting text output from the stream

result = stringFromOutputStream(_outputStream);
This result is returned from the evalCodeString method and finally passed into a call on the onPostExecute method by the AsyncTask implementation. Our override of onPostExecute calls writeOutput, which is shown in Listing 3–14. This writes the previous result to the history list and the new result to the output text field where it appears to the user.
Listing 3–14. writeOutput — CocoaDroidActivity.java
    /**

     * Write code evaluation output to the result text view and roll the array list

     * with the stack of previous output results.

     */

    protected void writeOutput(String result)

    {

        if (0 == result.length() || "".equals(result.trim())) {

            result = "-- null or empty result --";

        }

        Log.d(TAG, "writeOutput(): " + result);

        // always add previous result to index 0; it is the top of the list

        _outputArrayList.add(0, _txtOutput.getText().toString());

        _outputArrayAdapter.notifyDataSetChanged();

        _txtOutput.setText(result); // to the scratch output area

    }
Now that we’ve looked in detail at the mechanisms at work when we submit a piece of code, let’s move on to some other useful little features of the CocoaDroidapplication.
Saving Your Latest Session in Scratch Files
As mentioned previously in the section about the elements of the main CocoaDroid Activity screen, the application supports saving the current contents of the input and output text fields into two private application text files we call session “scratch files.”
When we first try to use the Load button, the application complains about not finding the scratch files. It presents the alert dialog shown in Figure 3–17. Since it looks for the input scratch file first, that’s the one listed in the error alert dialog.

Figure 3–17. Scratch files not found alert
NOTE: As a rule, end-user applications should not give away too many details about the implementation of their internals. However, since this is a technical book for learning about implementation details, we decided to show the path and file name in the alert dialog. For a production release of the application, we would replace this alert message with something less revealing but perhaps more useful for an end-user.
The implementation of the method that wraps this functionality is shown in Listing 3–15. It is quite straightforward so we will not explain it further.
Listing 3–15. loadScratchFiles — CocoaDroidActivity.java
    /**

     * Reads work previously saved to the scratch files.

     * Note that we provide illustrative exception alerts which might or

     * might not be a wise thing for end-user applications in general.

     */

    protected void loadScratchFiles()

    {

        String scratch_input = "";

        String scratch_output = "";

        try {

            scratch_input = stringFromPrivateApplicationFile(this,

                    getString(R.string.file_name_scratch_input));

            scratch_output = stringFromPrivateApplicationFile(this,

                    getString(R.string.file_name_scratch_output));

            _txtInput.setText(scratch_input);

            _txtOutput.setText(scratch_output);

        }

        catch (Throwable t) {

            Log.e(TAG, "loadScratchFiles(): LOAD FAILED!", t);

            showOkAlertDialog(this,

                    String.format("%s
%s",

                            getString(R.string.exception_on_scratch_files_load),

                            t.toString()),

                    getString(R.string.title_scratch_files_load));

        }

    }
The stringFromPrivateApplicationFile and showOkAlertDialog methods we use in the listing were described in a previous chapter and can be reviewed from the downloadable book source code.
Clicking the Save button causes the application to save the scratch files and to be able to load them again later, so it should no longer complain about not finding the scratch files. Figure 3–18 shows the toast that is displayed when we do this. We will not list the implementation code for this. It is the inverse of the loading code we’ve already shown and holds no revelations from an Android programming perspective.

Figure 3–18. Saving scratch files
The Clear button shown in Figure 3–19 behaves predictably and simply clears the input and output fields. It does, however, also preserve a record of the contents of the output field by rolling it to the top of the history list.
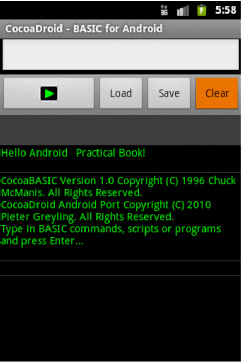
Figure 3–19. Clearing text fields
Figure 3–20 shows that when we now click the Load button, our previous session reappears. This works even if we exit the application and it gets unloaded by the Android runtime, even when the device or emulator is restarted. Only by explicitly deinstalling the application or by removing the application data using the system settings application can these files be removed.
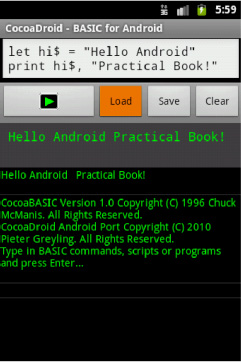
Figure 3–20. Loading the previous session
Using the Work File
Besides the scratch files, the application also supports saving the current contents of the input text field into another private application text file we call the “Work File.” This provides users with the opportunity to keep a separate little work area with snippets of code or a bigger program they are working on that will not be lost when they overwrite the scratch files.
As per Figure 3–21, the Load Work menu item is on the left of the top row of the main, and currently the only, application menu.
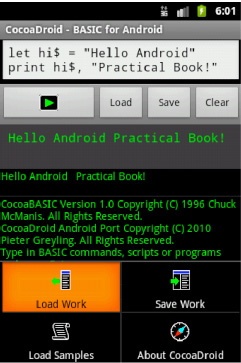
Figure 3–21. The Load Work menu item
When we first try to use this menu, the application will, as with the scratch files, complain about not finding the work file. It will present the alert dialog shown in Figure 3–22.
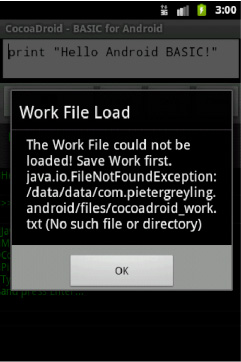
Figure 3–22. Work File Load alert
Like the scratch files, we create the work file by saving from the menu, as shown in Figures 3–23 and 3–24.
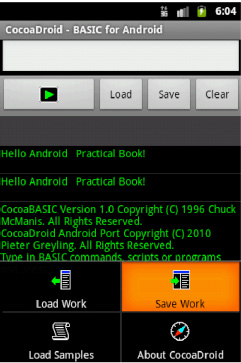
Figure 3–23. Save Work menu item
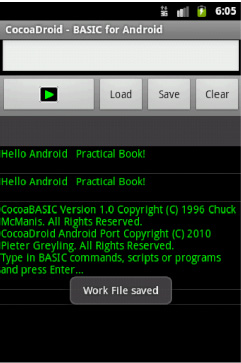
Figure 3–24. The work file is saved
We won’t spend more time on the work file since its implementation is identical to that of the scratch files.
Viewing the Files in the DDMS File Explorer
We should at this point be able to view the application files with the Dalvik Debug Monitor (DDMS) File Explorer which is part of the Android SDK Tools. Figure 3–25 shows the files in the application package namespace.

Figure 3–25. CocoaDroidapplication scratch and work files viewed with the DDMS File Explorer
We covered the DDMS and File Explorer tool in an earlier chapter as part of the Android Tools.
EMULATOR DATA DIRECTORY: You can find the application package data location in the /data/data/ directory on the AVD when using the emulator.
Using the CocoaDroid BASIC Samples
Since we are now comfortable with the application menus, go to the Load Samples menu item and select it. You should see the file contents as in Figure 3–26 loaded into the input edit text field.
At the top of the file you should see the SCRIPTS area. These are snippets of code with no line numbers. By scrolling down you’ll find the PROGRAMS area. See Figure 3–27. These are more involved code snippets with BASIC line numbers, which allow statements like GOSUB to function.
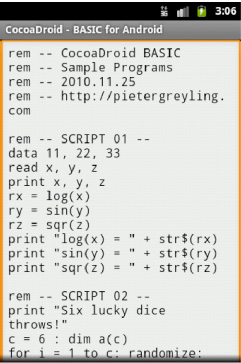
Figure 3–26. Loading Samples — Scripts
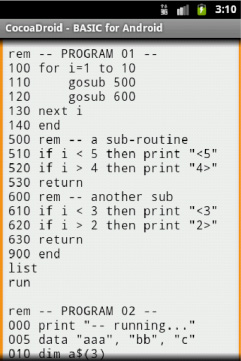
Figure 3–27. Loading Samples — Programs
Loading an Application Asset Resource
As mentioned before, the file containing the BASIC samples are stored in an application asset file. The data from this file is retrieved by the implementation of the load samples functionality as shown in Listing 3–16.
Listing 3–16. loadSamplesAssetFile— CommonAndroidCodeLibrary.java
    /**

     * Loads the example snippets from the samples asset file.

     * Note that we provide illustrative exception alerts which might or

     * might not be a wise thing for end-user applications in general.

     */

    private void loadSamplesAssetFile()

    {

        String buffer = "";

        try {

            buffer = stringFromAssetFile(this,

                    getString(R.string.file_name_samples));

            _txtInput.setText(buffer);

        }

        catch (Throwable t) {

            Log.e(TAG, "loadSamplesAssetFile(): LOAD FAILED!", t);

            showOkAlertDialog(this,

                    String.format("%s
%s",

                            getString(R.string.exception_on_samples_file_load),

                            t.toString()),

                    getString(R.string.title_samples_file_load));

        }

    }
If we refer back to the XML strings table section, we can see that the asset file name is declared as follows in strings.xml:
<string

name="file_name_samples">"program_templates/cocoadroid_basic_templates.bas"

</string>
Our program_templates directory lives under the standard application assets directory.
The implementation for the utility helper method, stringFromAssetFile, is shown in Listing 3–17.
Listing 3–17. stringFromAssetFile — CommonAndroidCodeLibrary.java
    /**

     * Reads the contents of an Asset File into a String and returns the String.

     */

    public static String stringFromAssetFile(Context context, String filename)

        throws  IOException

    {

        AssetManager am = context.getAssets();

        InputStream is = am.open(filename);

        String result = stringFromInputStream(is);

        is.close();

        return result;

    }
And the implementation method, stringFromInputStream, is in Listing 3–18.
Listing 3–18. stringFromInputStream— CommonAndroidCodeLibrary.java
    /**

     * Reads the stream contents of an InputStream into a String and returns the String.

     */

public static String stringFromInputStream(InputStream from)

            throws IOException

    {

        return stringFromInputStream(from, 8192);

    }


public static String stringFromInputStream(InputStream from, int buffSize)

            throws IOException

    {

        ByteArrayOutputStream into = new ByteArrayOutputStream();

        byte[] buf = new byte[buffSize];

        for (int n; 0 < (n = from.read(buf));) {

            into.write(buf, 0, n);

        }

        into.close();

        return (new String(into.toByteArray(), _encoding));

    }
These methods require knowledge of the data encoding (the variable _encoding) that should be used for the buffer contents. The encoding for the runtime is retrieved by the code in Listing 3–19 in a static block in the class CommonAndroidCodeLibrary:
Listing 3–19. Encoding — CommonAndroidCodeLibrary.java (partial)
protected static final String _encoding;

    protected static final String _newline;

    static {

        _encoding = System.getProperty("file.encoding");

        _newline = System.getProperty("line.separator");

    }
Running the CocoaDroid BASIC Sample Scripts
To run the samples, we will need to copy and paste snippets from the samples file into our input text field. This is a fairly intuitive process but we will present some images in order to give context for the more technical discussion that follows.
Figure 3–28 shows us selecting a section of script code.

Figure 3–28. Selecting sample script code
Figure 3–29 shows the Android clipboard Copy operation.

Figure 3–29. Copying sample script code
As in Figure 3–30, we should click Clear to cleanse the input edit text field before pasting in the code.
Figure 3–30. Clearing the buffer for sample code
Figure 3–31 shows the Android clipboard Paste operation.

Figure 3–31. Pasting sample script code
And Figure 3–32 shows the BASIC code pasted into the input work area and ready to run.
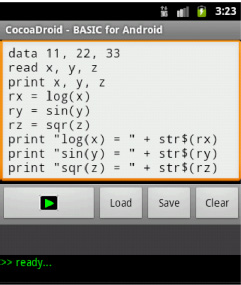
Figure 3–32. The sample script is ready
In Figure 3–33 we have run the code and can see the resulting output.

Figure 3–33. Running the sample script
Running the CocoaDroid BASIC Sample Programs
Now we will demonstrate following the same procedure with a program. A program is loosely defined as having BASIC line numbers and can thus take advantage of constructs like GOSUB/RETURN, which require a code line address.
We won’t go through all the steps in the routine as we did for scripts, but will give you just the required information to get started. We will also draw attention to what is new in working with programs.
Figure 3–34 shows the program we will use for the demonstration. It simulates rolling dice six times.
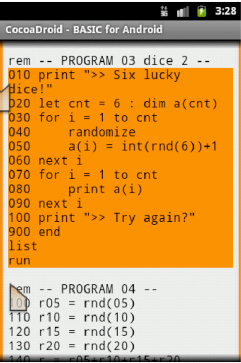
Figure 3–34. Selecting the sample program
Copy and paste this program into the input text field as before. As you can see from Figure 3–35, we have edited the code to roll the dice only twice.
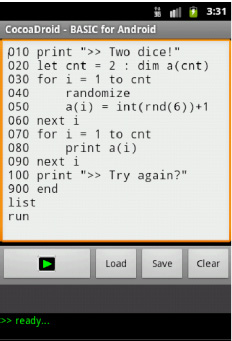
Figure 3–35. The edited program
Run this program and you should something similar to Figure 3–36 (We got two sixes!).
Notice the LIST and RUN commands at the end of the source file. And no, like in most dialects of BASIC, the case of commands and statements is not significant. So print is the same as PRINT.
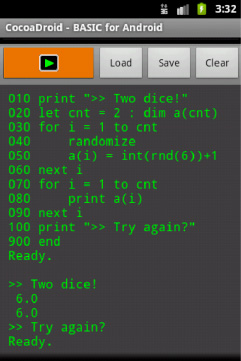
Figure 3–36. Running the program with LIST
Try removing the LIST statement and running it again (see Figure 3–37).
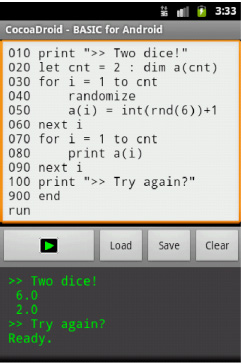
Figure 3–37. Running the program without LIST
At this point, we believe you now know enough to play around with bits of code and CocoaDroid on your own.
Running BASIC Code Synchronously
Before we finish the chapter, we want to show you the implementation of the CocoaDroid About menu item.
This might seem somewhat roundabout but the reason is that the banner message uses CocoaBASIC to display itself. The way it does this is different from executing other pieces of BASIC in that it does it synchronously. It uses a method called evalCodeStringSync that bypasses the AsyncTask infrastructure and calls the core evalCodeString method directly.

Figure 3–38. The About menu item
We provide the implementation for the About banner in Listing 3–20.
Listing 3–20. showAbout — CocoaDroidActivity.java
    /**

     * Start up our script engine with a copyright notice.

     * This also demonstrates the general principle of reusing the BASIC interpreter

     * by passing commands into the input stream and letting it do the work.

     */

    protected void showAbout()

    {

        // ask the BASIC interpreter to print the startup banner

        String aboutCommand =

                "PRINT "" + getString(R.string.app_copy_cocoabasic) + ""
";

        aboutCommand = aboutCommand +

                "PRINT "" + getString(R.string.app_copy_cocoadroid) + ""
";

        // also ask it to print a little usage message

        aboutCommand = aboutCommand +

                "PRINT "" + getString(R.string.app_usage_01) + """;

        // now submit the work using the synchronous evaluation

        evalCodeStringSync(aboutCommand);

        _txtInput.setText("");

    }
Listing 3–21 shows the implementation for the evalCodeStringSync method.
Listing 3–21. evalCodeStringSync — CocoaDroidActivity.java
    /**

     * Interpret and execute (evaluate) the given code fragment.

     * This version of evalCodeString is reserved by convention for internally

     * invoking non-user initiated interpreter code evaluation, i.e., from code.
     * It is not invoked by the EvalCodeStringAsyncTask whereas the companion

     * evalCodeString() method is.

     * @param codeString

     * @return The result of the evaluation drawn off the interpreter output stream.

     */

    protected String evalCodeStringSync(String codeString)

    {

        Log.d(TAG, "evalCodeStringSync(): " + codeString);

        // invoke eval bypassing use of an EvalCodeStringAsyncTask instance

        String result = evalCodeString(codeString);

        if (0 == result.length() || "".equals(result.trim())) {

            result = "-- null or empty result --";

        }

        writeOutput(result);

        // also place on input area since the user might not have entered this

        // the method might have been initiated by code and not by the Enter button

        _txtInput.setText(codeString);

        return result;

    }
Recall that we reviewed the core evalCodeString method in Listing 3–13. Feel free to refer back to that section.
In essence the evalCodeStringSync method allows us to issue short-lived pieces of code to the interpreter directly on the main thread of the user interface. Of course, all the usual caveats we discussed earlier then come into play.
Summary
In this chapter we have shown you how to create a no-frills but functionally complete onboard interpreter environment for CocoaBASIC, a dialect of the BASIC programming language.
Besides creating a useful and diverting application, we have also covered a large number of core Android programming techniques, including implementing asynchronous processing, using asset resources, creating custom array adapters, using XML menu resources and menu inflators, and more.
We hope you have fun playing with the CocoaDroidscripting environment!