
Chapter 8
Using the Google App Engine with Android
There are increasingly few applications written today that don't communicate with a web service of some type. Android applications are no exception: it is because an Android device is always connected to the Internet that it is such a compelling platform for application development. There are many options when it comes to developing the web services consumed by an Android device. From PHP to ASP, people have been creating web applications and services for many years. Java also offers a number of excellent web platforms, and if you find the use of Java attractive in Android, then you might find Java attractive for implementing your server-side logic. The traditional way of writing a web service in Java might include Java Enterprise Edition (J2EE) or Spring. These are powerful tools, but by definition they require a server or servers to run on, and servers require management.
Another consideration when creating a web service is scaling the application across a number of servers. This is a requirement for any application that becomes popular. I think it best to start planning for success from the beginning and choose a technology that is ready to scale. If you are going down the Spring or J2EE path, this means getting access to a number of servers, deploying your application, managing load balancing, and session handling. Not to mention setting up a database that can scale to hundreds of thousands of transactions a day – something that may require a commercial database, such as Oracle.
Although we have worked on many server-side projects and have spent time addressing the issues of scaling an application, we have grown a little tired of it all. In an ideal world, we would like to write our server-side logic and upload it to some service that simply handles the details of deployment, scaling, versioning, and high availability. The Google App Engine (GAE) is not perfect, but it is the closest thing we have found to an ideal server-side solution.
In this chapter we will cover GAE from a high level, exploring what it offers, how applications are developed to work with it, and some of its limitations. Following that, we will look at an example GAE project that serves a simple web service for tracking high scores. Lastly, we will see how to write an Android application to interact with this service, including displaying the location of users on a map.
Introducing Google App Engine
Google App Engine (GAE) is a service for running Internet-facing applications on Google hardware. This means you can write a web application using Java or Python, upload it to GAE, and have your application automatically scale up to meet user demand, in the same way Google's applications do. This is different from other hosting services, with which you are given a server or number of servers on which you can install and manage your application. Some people confuse GAE with services like Amazon's EC2, with which you can create and provision servers through a web service. Amazon's EC2 is an amazing service if your application requires access to the underlying OS – whether it is Windows, Linux, or something else. If your application fits nicely into the category of applications that don't require this level of access, GAE can save you the hassle of managing the hardware and OS your application is running on.
GAE supports two languages for handling the dynamic portion of your application: Java and Python. This chapter will focus on using Java and the Eclipse plugins that facilitate development and deployment. While GAE supports Java, it is not a full implementation of J2EE or any other web framework. GAE does support a subset of J2EE, allowing a lot of existing code and technologies to be used. For example, JSP is supported, along with most of the underlying technologies, like HttpServlets. If you are familiar with the basics of J2EE, you will be at home developing applications for GAE. As mentioned, GAE is a subset of J2EE, and a developer can get into trouble assuming a particular J2EE technology will work as expected or at all. After we discuss the basics of GAE, we will take a look at the portions of J2EE that are supported and to what extent.
GAE Java is also a subset of J2SE. Like Android, not all J2SE classes are present in the runtime. For example, AWT and Swing are missing. This makes sense because web applications do not use these libraries for rendering. However, AWT includes the Graphics2D classes, which are useful for image manipulation outside of a desktop environment. The absence of libraries like Graphics2D can be a bit of a shock when porting an existing an application. It is important to review the supported classes before committing to GAE.
NOTE: The JRE classes supported by GAE are listed on the JRE Class White List, which can be found here: http://code.google.com/appengine/docs/java/jrewhitelist.html
Getting Started with GAE
You must sign up with Google to get access to GAE. Do so at http://code.google.com/appengine/. Once you are logged in to the GAE application, you will see a web page like the one shown in Figure 8–1.

Figure 8–1. List of applications
Figure 8–1 lists a number of applications from my GAE account. When you first log in, no applications are listed, but the button at the bottom of the page allows you to create a new application. Figure 8–2 shows the page where a new application can be registered.
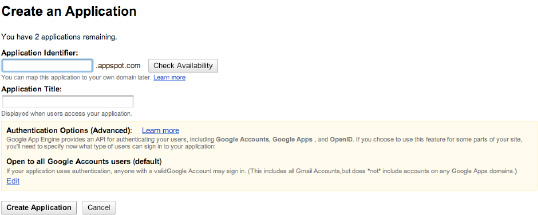
Figure 8–2. Creating a new GAE application
There is a place to enter a domain where your application will be available. By default, your application will be a sub-domain of the domain appspot.com. Your application will be available at this URL, but you can also set up your application to be any domain of your choosing. You are also prompted to enter an application title. This is just used to give your application a human readable name.
Once you create a new application, you will be brought to the dashboard view of the application. From this view, you can see statistics about your application as well as manage a number of settings. Figure 8–3 shows the dashboard for the GAE application we created to accompany this chapter.
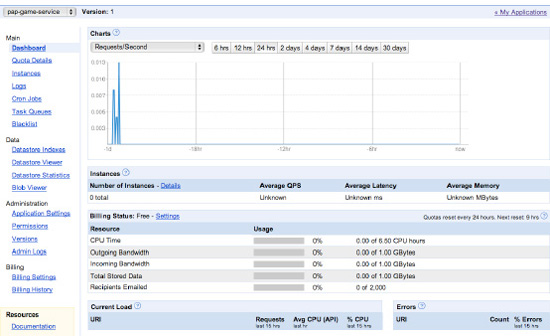
Figure 8–3. Dashboard for pap-game-service
The chart in Figure 8–3 shows the usage of the application in terms of request per second. As you can see, this application is not very active. As your usage increases, the data on this view becomes invaluable in understanding the usage of your application. On the left side of the page, you see a number of links that will display other details about your application.
Once you have an application set up with GAE, you will want to download and install the Eclipse plugin for GAE.
NOTE: Install the Eclipse GAE plugin by following the directions found here: http://code.google.com/appengine/docs/java/tools/eclipse.html
Using Eclipse with GAE
Once Eclipse is configured with the GAE plugin, you can create a new GAE project by selecting Web Application Project from the New Projects menu. Figure 8–4 shows the dialog that is presented.

Figure 8–4. Creating a web application project
In this dialog, you must provide a project name and a package for the source code. The project name can be anything – it does not need to be the same as the application created with GAE. The package can also be anything you find useful. At the bottom of Figure 8–4, you have the option to use two possible Google SDKs. At minimum you must select Use Google App Engine in order for this project to work with GAE. The option Use Google Web Toolkit allows you to use GWT with your application. GWT or Google Web Toolkit is a framework for writing your client-side logic in Java. We won't be covering GWT, but the combination of GWT and GAE is a powerful one. We encourage any Java developer to check out GWT, as it makes your Java skills relevant in the domain of web-based, client-side application development.
Once your application is created, you run it locally by right-clicking on your project and selecting Run As and then Web Application, as shown in Figure 8–5.
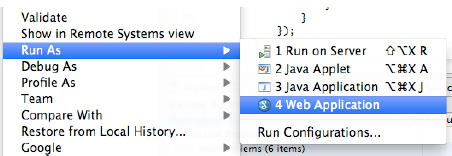
Figure 8–5. Running GAE locally
When you are developing your GAE application, you do so by running a version of it locally. Eclipse handles the details of this, but basically the GAE plug in launches a local web server and deploys your application. The local web server includes an implementation similar to the live GAE, and can reliably used to test your application. Once you run your application, it will be available at http://localhost:8888.
GAE Project Structure
Java-based GAE projects are organized like most typical Java web applications. Figure 8–6 shows how a project is organized in Eclipse.

Figure 8–6. GAE Project structure in Eclipse
In Figure 8–6, you see the file called index.html under the ‘war' directory. This file is the default web page served by this application. The war directory is used to store all static content for the web application; this includes html, css, image files, and JSP files. Also under the ‘war' directory is a directory called WEB-INF. This contains a web.xml file, which is used to describe the dynamic resources for this application. There is nothing special about a web.xml file used by GAE versus a web.xml from other Java web applications. It contains the definition of servlets, their access points, and other information one would expect in a web.xml file. In addition to the web.xml file in the WEB-INF directory, there is a folder called appengine-genereated. This contains a number of configuration files that are automatically generated. In general, these files can be ignored.
The rest of the project includes the Java source code and a file called jdoconfig.xml, which is used to configure a technology called Java Data Objects (JDO). JDO is a relational object mapping technology like Hibernate or JPA. We will take a closer look at the persistence features of GAE later.
A new GAE project is uninteresting, but is ready to be deployed once it is configured to your GAE account. Figure 8–7 shows the panel used to configure your project for deployment.
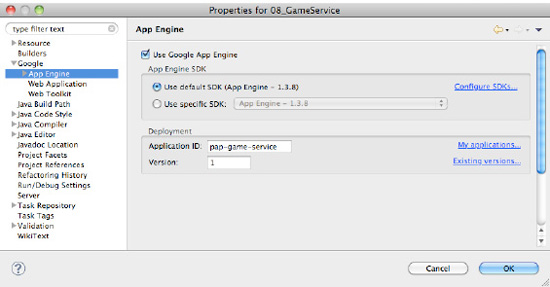
Figure 8–7. Configure GAE application for deployment
In Figure 8–7 the GAE-specific project settings are displayed. To prepare for deployment, you must fill out the Application ID field. The Application ID is the value you filled out when you created a new GAE application. It is the value you entered as the Application Identifier, as shown in Figure 8–7. The version should be the value 1. GAE has the ability to upload multiple versions of an application and then switch between them. This is a handy feature as an application grows in complexity, but we are going to work with a single version.
Once you have the GAE project settings filled out, the application can be deployed by right-clicking on your project and selecting Google, then Deploy to App Engine. Figure 8–8 shows the menu item.
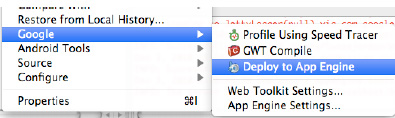
After selecting the menu item as shown in Figure 8–8, the dialog shown in Figure 8–9 is displayed. In this dialog, you must enter the credentials you used to create you GAE account.
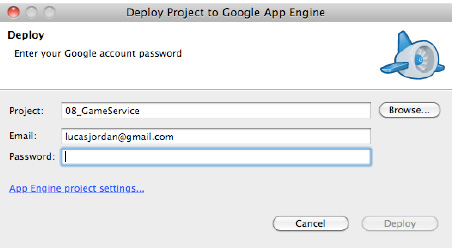
Figure 8–9. Entering your Google credentials
After hitting the Deploy button, the GAE plugin will perform a number of steps to prepare your application for deployment, and then deploy it. Figure 8–10 shows the type of output you should expect in the Eclipse Console.
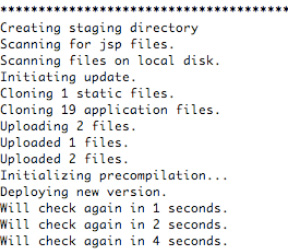
Figure 8–10. Output from a successful deployment
Eclipse and the GAE plugin provide a simple way to get a web page deployed on GAE. However, the default application is little more then a stub of an application. It is worth exploring some of the details of GAE so it can be appropriately evaluated as a possible solution for implementing a web service consumed by an Android application.
Charges for the Google App Engine Service
GAE is free to set up and free to deploy your application on. Google does charge for this service, but not until your application has consumed more than its daily quota for a particular service. This is handy for start-ups, which only have to pay once their application becomes popular enough to exceed the quota. Hopefully, a web application that exceeds its quota is profitable enough to at least cover those addition charges. The current costs and quotas for the most important GAE resources are shown in Table 8–1. GAE does have a number of other quotas for less commonly used resources.
Table 8–1. Google app engine quotas and costs for major resources
| Resource | Free Quota | Unit Cost |
| CPU Time | 6.5 CPU hours | $0.10/CPU hour |
| Bandwidth Out | 1.00 GBytes | $0.12/GByte |
| Bandwidth In | 1.00 GBytes | $0.10/Gbyte |
| Stored Data | 1.00 GBytes | $0.005/GByte-day |
| Recipients Emailed | 2,000 Emails | 0.0001/Email |
GAE does not charge for overages; you just get a warning that you have exceeded your quota. But we are sure that you would be shut off at some point. In order to increase the amount of a particular resource available, you set a budget and select how you want that money spent. For example, you can choose to spend an additional $5.00 a day and select the Bandwidth Intensive budget preset. This option makes the most sense for a site one of us runs, because the Bandwidth Out resource was maxing out, while the CPU Time barely changed when the number of users increased. This was due to the large number of images and the limited amount of dynamic content. The Bandwidth Intensive budget distributes that $5.00 as shown in Table 8–2.
Table 8–2. Bandwidth Intensive budget preset for $5.00
| Resource | Budget ($5.00) | Unit Cost | Paid Quota | Free Quota | Total Daily Quota |
| CPU Time | $0.50 | $0.10 | 5.00 | 6.50 | 11.50 CPU hours |
| Bandwidth Out | $2.80 | $0.12 | 23.33 | 1.0 | 24.33 GBytes |
| Bandwidth In | $0.70 | $0.10 | 6.99 | 1.0 | 7.99 GBytes |
| Stored Data | $1.00 | $0.005 | 200.00 | 1.0 | 201.00 GBytes |
| Recipients Emailed | $0.00 | $0.0001 | 0 | 2000 | 2000 Emails |
By setting a budget and increasing your daily quotas, Google will continue to server your application and only charge for the resources you consume over the free quotas. The budget presents are as follows:
- Standard (evenly distribute your budget over the available resources)
- CPU Intensive
- Bandwidth Intensive
- Storage Intensive
- Custom (select how your budget is applied to resources)
Google App Engine Services
Any web application of reasonable complexity will have to do more than just serve static content. In order to enable more complex applications, Google offers a number of services. Most of these are things you would expect from any application container, such as sending email. The GAE services use the normal Java classes to perform these functions where available. For example, to send email, your application would use the normal J2EE classes from the javax.mail package for most operations. But again, using the email example, there are some differences and limitations when running your code in GAE. These differences exist because any coding running on GAE must be scalable, so Google has removed the portions of each Java API that don't make sense in a massively distributed application. The biggest assumption GAE makes about your application is that it is stateless. Since your GAE application will be distributed among any number of servers and client requests will be disturbed evenly among these servers, your application must never assume that client request will be sent to the same server twice.
In some cases, Google's decisions make sense. In other cases, the limitations seem arbitrary or incomplete. The next section is an overview of each service, giving high-level detail and some notes on limitations.
App Engine Datastore
In a tiered web application, each server uses a database to store data. This database is queried to respond to users' requests and updated by their actions according to the application's business logic. When creating an application for GAE, Google provides access to a powerful, scalable data persistence service called the App Engine datastore. The App Engine datastore is a schema-less object datastore that supports custom queries and atomic transactions.
The App Engine datastore is what people are calling a No-SQL database, much like CouchDB or MongoDB. Basically each “row” in the App Engine datastore is a collection of key-value pairs. The key can be thought of as the column name, but this can lead to some confusion, because not all rows in a given table have to have the same keys. There are good reasons for this, and Google's track record for storing and serving data is proof that it knows what it's doing.
Not every developer is going to want to learn this new API for storing data, so GAE offers two wrappers around their App Engine datastore to make life easier for Java developers. The first wrapper is the Java Data Objects (JDO) API and the second is Java Persistence API (JPA). Neither of these two specifications is fully implemented by Google, and both offer only cursory functionality. Don't expect to be able to easily port an existing application that uses either of these technologies. However, if all you want to do is persist a handful of Plain Old Java Objects (POJOs), then Google's implementation of JDO and JPA will suffice.
Blobstore Java API
The Blobstore Java API is an API that allows GAE applications to store data that is too large for the App Engine datastore. In addition to storing larger chunks of data, the Blobstore API allows portions of a blob to be served without reading the entire blob into memory. This feature allows GAE applications to create scalable and efficient streaming applications, which might otherwise be impossible given GAE's stateless nature.
The Blobstore Java API does not have any particular limitations, since it is in effect a service to overcome the limitations of the App Engine datastore.
Channel API
The Channel API is used to create a persistent connection between your application and the client. This is done in many applications so messages or other data can be pushed from the server to the client. Historically, the client polling the server for messages has accomplished this, but in recent years, this has been accomplished by not closing a connection on the server side and sending new bytes to the client when available. With the advent of HTML5, this client-server behavior has been further refined and standardized. It makes sense that Google would want to support this type of messaging, given its support for HTML5 as a whole. It is interesting, though, that the HTML5 technology WebSockets is not used to implement this. We suspect that will change in the future, as HTML5 becomes more common.
Since GAE blocks access to a lot of the low level functions that would normally be used to accomplish this type of communication, they have provided a dedicated service to implement this. We don't consider this a limitation at all, since the API provided is the easiest we have ever used, when a comet-like service is required.
Images API
As mentioned, the AWT packages are absent from the Java implementation available on GAE. Since AWT contains a fully functionally image manipulation stack, this is a pretty big hole in the GAE runtime. Many simple web applications require some level of image manipulation, even if it is just to scale images before they are saved. To help plug this hole, GAE provides a number of canned functions for manipulating images. These include
- Resize
- Rotate
- Flip Horizontally
- Flip Vertically
- Crop
- I'm Feeling Lucky
The I'm Feeling Lucky function enhances dark and bright colors, which generally improves the visual quality of the image. The GAE supports the manipulation of images in the JPEG, PNG, GIF, BMP, TIFF, and ICO formats. If you application has no or limited image manipulation requirements, then GAE might still be valid option.
Mail API
The Mail API allows GAE applications to send and receive email. When it comes to sending email, a GAE application uses the standard javax.mail package. Your application can respond to any email address of the form [anyname]@appid.appspotmail.com. Emails sent to these types of addresses are treated as HTTP POST requests sent to the URL /_ah/mail/address.
The only limitation with the Mail API is that a quota governs the number of emails sent by your application, and incoming emails are counted toward your Bandwidth In quota. The limit on the number of emails that can be sent out makes sense, as this prevents the GAE from being a powerful tool to spammers.
Memcache
Web applications often make use of a shared, in-memory cache to improve performance when dealing with common data. GAE provides this functionality as the Memcache service. The GAE API for working with Memcache is identical to the JCache API specified by JSR 107. Memcache is important in GAE applications, not only through providing a caching API, but also through providing a way to store session data, since GAE is largely stateless. Calls to Memcache are governed by a Mamcache API Quota, which can be increased as needed.
Task Queues
The GAE JRE does not allow threads to be created or run. In order to create a background process, the Task Queues API must be used. The Task Queue API allows the developer to define a task by specifying an HTTP request be sent to given URL at a given time. In order to actually do the work of the task, the developer implements a Servlet that listens to the given URL. Since the Task API allows you to define repeating tasks, you can set up scheduled work, much like a CRON service.
Users and Authentication
At the time of this writing, GAE provides applications with the ability to authenticate users with OpenID and OAuth. This is a real value add, since you can have users simply use their existing Google (or other) account to log in to your application. Users can be marked as admins, allowing you some basic roll-based authentication.
XMPP
The XMPP service provides an API communicating with other XMPP services. XMPP services are things like Google Talk: you can send messages, receive messages, request invitations, and do other chat-related things. This is an interesting feature and a simple API to use; it is purely a value add for GAE application.
The Google App Engine is a unique development environment that offers a rich set of features and some inconvenient shortcomings. If your application fits with its limitations, it can be a powerful tool, freeing you from managing your own servers.
Examining a Sample GAE Application
In the accompanying source code to this chapter you will find an Eclipse project called 08_GameService. This project is a GAE application that provides a simple service for recording and querying high scores. These two services end points are defined by two Servlets. Let's take a look at the web.xml file for this project, shown in Listing 8–1.
<?xml version="1.0" encoding="utf-8"?>
<web-app xmlns:xsi="http://www.w3.org/2001/XMLSchema-instance"
xmlns="http://java.sun.com/xml/ns/javaee"
xmlns:web="http://java.sun.com/xml/ns/javaee/web-app_2_5.xsd"
xsi:schemaLocation="http://java.sun.com/xml/ns/javaee
http://java.sun.com/xml/ns/javaee/web-app_2_5.xsd" version="2.5">
<servlet>
<servlet-name>AddHighScoreServlet</servlet-name>
<servlet-class>com.ljordan.gameservice.AddHighScoreServlet</
servlet-class>
</servlet>
<servlet>
<servlet-name>QueryHighScoresServlet</servlet-name>
<servlet-class>com.ljordan.gameservice.QueryHighScoresServlet</
servlet-class>
</servlet>
<servlet-mapping>
<servlet-name>AddHighScoreServlet</servlet-name>
<url-pattern>/add_high_score</url-pattern>
</servlet-mapping>
<servlet-mapping>
<servlet-name>QueryHighScoresServlet</servlet-name>
<url-pattern>/query_high_scores</url-pattern>
</servlet-mapping>
<welcome-file-list>
<welcome-file>index.html</welcome-file>
</welcome-file-list>
</web-app>
As shown in Listing 9–1, there are two servlets defined, AddHighScoreServlet and QueryHighScoresServlet. These servlets respond to HTTP request at the URLs add_high_score and query_high_scores, respectively. In addition to the servlets, the web.xml file also indicates that the index.html file should be served when no page is specified. The index.html file contains a number of links that that can be used to interact with these services. Listing 8–2 shows a partial listing of the index.html file.
Listing 8–2. Links from index.html
//Add Highscore
<a href="
add_high_score?highscore=%7B%22username%22%3A%22ljordan%22%2C%22score%22%3A50%2C%22
longitude%22%3A-77.67%2C%22latitude%22%3A43.12%2C%22date%22%3A12345678%2C%22
gameName%22%3A%22orb+quest%22%7D
">Add Score: ljordan(50)</a>
//Query Highscores
<a href="query_high_scores">All</a>
<a href="query_high_scores?game_name=orb%20quest&username=ljordan">ljordan's orb quest
scores'</a>
a href="query_high_scores?game_name=orb%20quest&username=ljordan>r_score=
100">ljordan's orb quest scores' higher then 100</a>
In Listing 8–2, the first link will add a high score to the service. This is done by sending an HTTP GET to the URL add_high_score and specifying the parameter highscore. The value of highscore is a URL-encoded string, which in turn is a JSON representation of a HighScore object. To query for high scores, send an HTTP GET to the URL query_high_score and specify a number of parameters. The first query specifies no parameters and returns all high score values. The second query request high scores for the game “orb quest” that were earned by the user ljordan. The last query is similar to the previous, but restricts the high scores to those over the value 100. We will take a look at how these services are implemented, but first let's take a look at the Java representation of the HighScore class, as shown in Listing 8–3.
Listing 8–3. HighScore.java
@PersistenceCapable(identityType = IdentityType.APPLICATION)

public class HighScore {


        @PrimaryKey


        @Persistent(valueStrategy = IdGeneratorStrategy.IDENTITY)

        private Long key;

        @Persistent

        private String username;

        @Persistent

        private Long score;

        @Persistent

        private String gameName;

        @Persistent

        private Double longitude;

        @Persistent

        private Double latitude;

        @Persistent

        private Long date;


        public HighScore() {


        }


        public HighScore(JSONObject jsonObject) throws JSONException {


                if (jsonObject.has("key")) {

                        key = jsonObject.getLong("key");

                }

                if (jsonObject.has("username")) {

                        username = jsonObject.getString("username");

                }

                if (jsonObject.has("score")) {

                        score = jsonObject.getLong("score");

                }

                if (jsonObject.has("gameName")) {

                        gameName = jsonObject.getString("gameName");

                }

                if (jsonObject.has("longitude")) {

                        longitude = jsonObject.getDouble("longitude");

                }
                if (jsonObject.has("latitude")) {

                        latitude = jsonObject.getDouble("latitude");

                }

                if (jsonObject.has("date")) {

                        date = jsonObject.getLong("date");

                }

        }


        public JSONObject toJSONObject() throws JSONException {


                JSONObject result = new JSONObject();

                result.put("key", key);

                result.put("username", username);

                result.put("score", score);

                result.put("gameName", gameName);

                result.put("longitude", longitude);

                result.put("latitude", latitude);

                result.put("date", date);


                return result;


        }

//get/set methods omitted
In Listing 8–3 we see the interesting parts of the HighScore class. The HighScore class is a simple POJO annotated with some JDO specific annotations. As mentioned, JDO is an object-relation mapping tool. What this means is that JDO provides a way for you to specify a class as persistable, and JDO handles the details of setting up a table in a database to store instances of this class. In general, this happens by creating a table with the same name as the class, and creating columns for each field. There is a lot more to how object relational mapping technologies work, but for now, you just have to know that JDO marks a class as persistable by annotating it with PersistenceCapable. Each persistable class also requires a field to be used as the primary key for the table backing the class. In this case, we use the field called key of type Long. Lastly, JDO requires you to specify exactly which fields should be included when an Object is persisted. This is done by adding the annotation Persistable to each field that should be included.
There is a special constructor that takes a JSON object. It is used to create a HighScore object from any JSON sent by the client. Conversely, the method toJSONObject is used to serialize a HighScore object so it can be sent back to the client in valid JSON.
Adding the HighScore Service
The first service we should look at is the one for adding high scores. The class AddHighScoreServlet implements this service. Let's take a look at the source code, shown in Listing 8–4.
Listing 8–4. AddHighScoreServlet
@SuppressWarnings("serial")

public class AddHighScoreServlet extends HttpServlet {


        public final static String PARAM_HIGHSCORE = "highscore";
        public void doGet(HttpServletRequest req, HttpServletResponse resp)


                        throws IOException {

                String json = req.getParameter(PARAM_HIGHSCORE);


                resp.setContentType("application/json");


                Writer writer = resp.getWriter();


                PersistenceManager pm = PMF.get().getPersistenceManager();


                try {


                        HighScore highScore = new HighScore(new JSONObject(json));


                        pm.makePersistent(highScore);


                        writer.write(highScore.toJSONObject().toString());


                } catch (Exception e) {

                        throw new IOException(e);

                } finally {

                        pm.close();

                        writer.close();

                }


        }


}
The AddHighScoreServlet class in Listing 8–4 extends HttpServlet and responds to GET request in the method doGet. The method doGet looks for a JSON object as the value of the parameter highscore. The JSON text is parsed by creating a JSONObject, which is in turn used to create a new HighScore object. As the name of this class implies, its job is to write a HighScore object to the database. This is done by first getting an instance of PersistenceManager from the PFM factory class. The PersistenceManager, named pm, is used to write the object highScore to the database by calling makePersistent. Since adding the variable highScore to the database populates its key field, the object is written back to the client with the writer object.
Once JDO is set up, it is really easy to write objects to a database, or in this case, to the App Engine datastore. Getting JDO setup requires a little boilerplate. Let's start by taking a look at the PMF class, shown in Listing 8–5.
Listing 8–5. PMF.java
public final class PMF {

        private static final PersistenceManagerFactory pmfInstance = JDOHelper

                        .getPersistenceManagerFactory("transactions-optional");


        private PMF() {


        }


        public static PersistenceManagerFactory get() {


                return pmfInstance;

        }

}
In Listing 8–5 we see the class PMF, which is a simple class implementing a factory pattern. The whole point of the PMF class is to provide a convenient way to get at a PersistenceManagerFactory singleton from anyplace in your code. A PersistenceManagerFactory is the main class for interacting with the underlying datastore. As such, it is important to only create one per datastore, since scanning the persistent classes and validating the datastore is a lot of work.
The example project 08_GameService was created with the GAE tool in Eclipse, and by default JDO is automatically configured to work with JDO. The configuration is found in the file jdoconfig.xml as shown in Listing 8–6.
Listing 8–6. jdoconfig.xml
<?xml version="1.0" encoding="utf-8"?>

<jdoconfig xmlns="http://java.sun.com/xml/ns/jdo/jdoconfig"

   xmlns:xsi="http://www.w3.org/2001/XMLSchema-instance"

   xsi:noNamespaceSchemaLocation="http://java.sun.com/xml/ns/jdo/jdoconfig">


<persistence-manager-factory name="transactions-optional">


<property name="javax.jdo.PersistenceManagerFactoryClass"

           value="org.datanucleus.store.appengine.jdo.

DatastoreJDOPersistenceManagerFactory"/>

<property name="javax.jdo.option.ConnectionURL" value="appengine"/>

<property name="javax.jdo.option.NontransactionalRead" value="true"/>

<property name="javax.jdo.option.NontransactionalWrite" value="true"/>

<property name="javax.jdo.option.RetainValues" value="true"/>

<property name="datanucleus.appengine.autoCreateDatastoreTxns" value="true"/>

</persistence-manager-factory>

</jdoconfig>
In Listing 8–6 we can see that some assumptions are made by GAE. The first is that non-transactional reads and writes are enabled. This is not a big deal in our simple application, but more complex, more data sensitive applications my find this setting problematic. As mentioned previously, there are some holes in Google's JDO implementation. If transactional reading and writing is required, be sure to read Google's documentation closely. They are adding features all the time. Another thing to notice is that the ConnectionURL is set to appengine. Figure 8–11 shows this URL for a local version of the app engine.

In Figure 8–11 we see the local datastore that is used while developing a GAE application. On the right, you can see instances of HighScore that have been persisted through the SaveHighScoreServlet. This view into persisted object is handy when debugging your application, as you can write little scripts that populate this datastore with sample data. On the left side of Figure 8–11 we can see that there are options for interacting with a local version of a Task Queue, XMPP, and Inbound Mail. These other tools allow you to simulate running your code on the live GAE.
Querying the HighScore Service
To query for high scores, an HTTP GET request is sent to the QueryHighScoresServlet. This servlet converts the HTTP GET request into a valid JDO query and returns the results. Listing 8–7 shows the doGet method of QueryHighScoresServlet.
Listing 8–7. QueryHighScoresServlet.doGet()
@SuppressWarnings("serial")

public class QueryHighScoresServlet extends HttpServlet {


        private static final String PARAM_COUNT = "count";


        private static final String PARAM_GTR_LAT = "gtr_lat";

        private static final String PARAM_LST_LAT = "lst_lat";

        private static final String PARAM_GTR_LON = "gtr_lon";

        private static final String PARAM_LST_LON = "lst_lon";

        private static final String PARAM_GTR_SCORE = "gtr_score";

        private static final String PARAM_USERNAME = "username";

        private static final String PARAM_LST_SCORE = "lst_score";

        private static final String PARAM_GAMENAME = "game_name";


        public void doGet(HttpServletRequest req, HttpServletResponse resp)
                        throws IOException {


                String count = req.getParameter(PARAM_COUNT);


                String gtrLat = req.getParameter(PARAM_GTR_LAT);

                String lstLat = req.getParameter(PARAM_LST_LAT);

                String gtrLon = req.getParameter(PARAM_GTR_LON);

                String lstLon = req.getParameter(PARAM_LST_LON);

                String username = req.getParameter(PARAM_USERNAME);

                String gtrScore = req.getParameter(PARAM_GTR_SCORE);

                String lstScore = req.getParameter(PARAM_LST_SCORE);

                String gameName = req.getParameter(PARAM_GAMENAME);


                List<HighScore> highScores = queryHighScores(count, lstLat, gtrLat,


                                lstLon, gtrLon, username, lstScore, gtrScore, gameName);


                resp.setContentType("application/json");


                Writer writer = resp.getWriter();


                try {


                        JSONArray result = new JSONArray();


                        for (HighScore highscore : highScores) {

                                result.put(highscore.toJSONObject());

                        }

                        writer.write(result.toString());


                } catch (Exception e) {


                        throw new IOException(e);

                } finally {

                        writer.close();

                }

        }
In Listing 8–7, the doGet method finds all parameters passed in with the request. The values of these parameters are passed to the queryHighScores method. The result of the queryHighScores method is converted into JSONObjects, added to a JSONArray, and returned to the client. The heavy lifting of the doGet method is done in the queryHighScores method, shown in Listings 8–8 and 8–9.
Listing 8–8. QueryHighScoresServlet.queryHighScores()
        private List<HighScore> queryHighScores(String count, String lstLat,

                        String gtrLat, String lstLon, String gtrLon, String username,

                        String lstScore, String gtrScore, String gameName) {


                List<HighScore> results = new ArrayList<HighScore>();


                PersistenceManager pm = null;


                try {

                        pm = PMF.get().getPersistenceManager();


                        Map<String, String> paramNameToType = new HashMap<String,


 String>();

                        Map<String, Object> paramNameToValue = new HashMap<String,

 Object>();

                        List<String> filters = new ArrayList<String>();
                        if (lstLat != null) {


                                filters.add("latitude < plstLat");

                                paramNameToType.put("plstLat", "Double");

                                paramNameToValue.put("plstLat",

 Double.parseDouble(lstLat));

                        }

                        if (gtrLat != null) {

                                filters.add("latitude > pgtrLat");

                                paramNameToType.put("pgtrLat", "Double");

                                paramNameToValue.put("pgtrLat",

 Double.parseDouble(gtrLat));

                        }

                        if (lstLon != null) {

                                filters.add("longitude < plstLon");

                                paramNameToType.put("plstLon", "Double");

                                paramNameToValue.put("plstLon",

 Double.parseDouble(lstLon));

                        }

                        if (gtrLon != null) {

                                filters.add("longitude > pgtrLon");

                                paramNameToType.put("pgtrLon", "Double");

                                paramNameToValue.put("pgtrLon",

 Double.parseDouble(gtrLon));

                        }

                        if (username != null) {

                                filters.add("username == pusername");

                                paramNameToType.put("pusername", "String");

                                paramNameToValue.put("pusername", username);

                        }

                        if (lstScore != null) {

                                filters.add("score < plstScore");

                                paramNameToType.put("plstScore", "Long");

                                paramNameToValue.put("plstScore",

 Double.parseDouble(lstScore));

                        }

                        if (gtrScore != null) {

                                filters.add("score > pgtrScore");

                                paramNameToType.put("pgtrScore", "Long");

                                paramNameToValue.put("pgtrScore",

 Long.parseLong(gtrScore));

                        }

                        if (gameName != null) {

                                filters.add("gameName == pgameName");

                                paramNameToType.put("pgameName", "String");

                                paramNameToValue.put("pgameName", gameName);

                        }


                        Query query = pm.newQuery(HighScore.class);


                        query.setOrdering("score desc");


                        if (count != null) {

                                query.setRange(0, Long.parseLong(count));

                        }
In Listing 8–8 we must figure out which parameters are passed from the client. If a parameter is null, the client has not included that it in their query string. If a parameter is not null, append the appropriate String to the variable filters and populate the maps paramNameToType and paramNameToValue. These maps will be used later to propertyl construct our JDO query, as shown in Listing 8–9.
Listing 8–9. QueryHighScoresServlet.queryHighScores() (continued)
                        if (filters.size() == 0) {

                                for (Object obj : (List) query.execute()) {

                                        results.add((HighScore) obj);

                                }

                                return results;

                        } else {


                                StringBuffer filter = new StringBuffer();


                                ListIterator<String> li = filters.listIterator();


                                while (li.hasNext()) {

                                        filter.append(li.next());

                                        if (li.hasNext()) {

                                                filter.append(" & ");

                                        }

                                }


                                List values = new ArrayList();


                                StringBuffer parameters = new StringBuffer();

                                Iterator<Map.Entry<String, String>> i = paramNameToType

                                                .entrySet().iterator();


                                while (i.hasNext()) {


                                        Map.Entry<String, String> param = i.next();

                                        parameters.append(param.getValue());

                                        parameters.append(' '),

                                        parameters.append(param.getKey());

                                        if (i.hasNext()) {

                                                parameters.append(','),

                                        }

                                        values.add(paramNameToValue.get

(param.getKey()));

                                }

                                query.setFilter(filter.toString());

                                query.declareParameters(parameters.toString());


                                for (Object obj : (List) query.executeWithArray(values


                                                .toArray())) {

                                        results.add((HighScore) obj);

                                }

                                return results;

                        }


                } finally {


                        pm.close();

                }

        }
Listing 8–9 uses the bookkeeping done by Listing 8–8 to construct a JDO query with the correct information. The filters are basically the ‘where' clause from SQL. The map paramNameToType is used to tell JDO which strings in the filter are parameters and what their expected type is. Lastly, the map paramNameToValue is used to assign the parameters in the query their correct values. This is more complicated than simply constructing a big query string from the parameters because this technique prevents security threats similar to SQL injection. Once the query object is created with all the parts and pieces of the query, it is executed by calling executeWithArray. The method executeWithArray returns an untyped list containing the desired HighScore objects, which are returned to the client as JSON.
Creating a simple service to be run on GAE is not much different from creating a web application that lives in a servlet container like Tomcat, Glassfish, or the many other servlet containers. Taking advantage of the App Engine datastore is made easy by the preconfigured JDO setup. To help simulate other GAE services, the local version of the app engine provides a simple UI. We have several applications running on GAE, and every once in a while we are annoyed at GAEs' idiosyncrasies, but then we remember that it has never gone down in the three years we have used it.
Consuming GAE Services with Android
We have looked at the Google App Engine and a sample web service designed to run on it. We are now going to look at an Android application that uses this service. No, it is not a game – that's coming in another chapter. It is an application designed to give the user an overview of the high scores stored in the service. This sample Android project is called 09_GameManager. Figure 8–12 shows the first screen of the app.
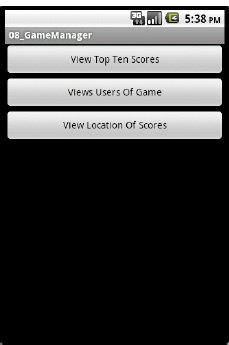
Figure 8–12. 09_GameManager
In Figure 8–12 we see three buttons. The first allows the user to view the top ten highest scores. The second allows the user to view scores based on user name and the game played. The last button displays a map of the top 100 high scores. Let's start by looking at the layout for the starting activity that is defined in main.xml, as shown in Listing 8–10.
Listing 8–10. main.xml
<?xml version="1.0" encoding="utf-8"?>

<LinearLayout

        xmlns:android="http://schemas.android.com/apk/res/android"

    android:orientation="vertical"

    android:layout_width="fill_parent"

    android:layout_height="fill_parent"

>

<Button

        android:id="@+id/viewTopTen"

    android:layout_width="fill_parent"

    android:layout_height="wrap_content"

    android:text="View Top Ten Scores"

/>

<Button

        android:id="@+id/usersOfGame"

    android:layout_width="fill_parent"

    android:layout_height="wrap_content"

    android:text="Views Users Of Game"

/>

<Button

        android:id="@+id/viewLocation"

    android:layout_width="fill_parent"

    android:layout_height="wrap_content"

    android:text="View Location Of Scores"

/>

</LinearLayout>
In Listing 8–10 we see a very simple layout, starting with a vertically oriented LinearLayout and then adding a button for each sub-activity. Listing 8–11 shows how these buttons are wired up to display different activities.
Listing 8–11. GameManager.java
public class GameManager extends Activity implements View.OnClickListener {


        public final static String SERVICE_URL = "http://pap-game-service.appspot.com/";


        private Button topTenButton;


        private Button usersOfGameButton;

        private Button locationButton;


        /** Called when the activity is first created. */


        @Override

        public void onCreate(Bundle savedInstanceState) {

                super.onCreate(savedInstanceState);

                setContentView(R.layout.main);


                topTenButton = (Button) findViewById(R.id.viewTopTen);


                usersOfGameButton = (Button) findViewById(R.id.usersOfGame);

                locationButton = (Button) findViewById(R.id.viewLocation);


                topTenButton.setOnClickListener(this);


                usersOfGameButton.setOnClickListener(this);
                locationButton.setOnClickListener(this);

        }


        @Override


        public void onClick(View button) {

                if (button == topTenButton) {

                        Intent intent = new Intent(this, TopTenActivity.class);

                        startActivity(intent);

                } else if (button == usersOfGameButton) {

                        Intent intent = new Intent(this, UsersOfGameActivity.class);

                        startActivity(intent);

                } else if (button == locationButton) {

                        Intent intent = new Intent(this, UsersLocationActivity.class);

                        startActivity(intent);

                }

                //unknown button.

        }

}
In Listing 8–11 we see the content of main.xml is set as the content by calling setContentView. Once the content has been set, each of the three buttons is found by passing their IDs to the method findViewById. In order to respond to a user clicking a button, we register this instance of GameManager as the click listener for each button by calling setOnClickListener.
NOTE: The sample project 08_GameManager is configured to use a live version of the 08_GameServices deployed at http://pap-game-service.appspot.com. You can change this to localhost:8888 and run game services locally if you wish.
When the user does click a button, the onClick method is called, where we test to see which button was pressed. Each button has a new activity associated with it and is started by first creating a new Intent and then calling startActivity. Each activity is declared in the AndroidManafest.xml file, as shown in Listing 8–12.
Listing 8–12. AndroidManafest.xml
<?xml version="1.0" encoding="utf-8"?>

<manifest xmlns:android="http://schemas.android.com/apk/res/android"

package="org.ljordan.gamemanager"

      android:versionCode="1"

      android:versionName="1.0">

<application android:icon="@drawable/icon" android:label="@string/app_name">

<uses-library android:name="com.google.android.maps" />


<activity android:name=".GameManager"


                  android:label="@string/app_name">

<intent-filter>

<action android:name="android.intent.action.MAIN" />

<category android:name="android.intent.category.LAUNCHER" />

</intent-filter>

</activity>


<activity android:name=".TopTenActivity"  android:label="Top Ten


 Scores!" />
<activity android:name=".UsersOfGameActivity"  android:label="Top Scores For User of Game" />

<activity android:name=".UsersLocationActivity"  android:label="Location of Best Players" />


                UserAndGameActivity


</application>


<uses-permission android:name="android.permission.INTERNET" />


</manifest>
The three sub-activities are defined within the element application, under the main activity. Activities are defined in the AndroidManafiest.xml file are given a name and a label. The label is displayed at the top of the activity when it is active. Also in this AndroidManafest.xml file we see that we require the INTERNET permission, this is done because we want to make an external service call to retrieve the high score information. We also want to use a map. This permission allows us to download the map tiles displayed in the MapView component.
Exploring the Top Ten Activity
Lets take a look at each of the three sub activities in turn, starting with the top ten scores as shown in Figure 8–13.
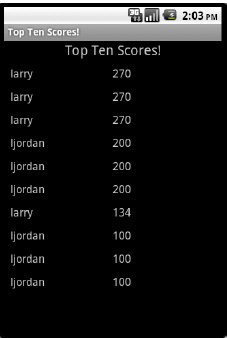
Figure 8–13. Top ten activity
In Figure 8–13 we see a simple list of scores. The highest at the top. This data was retrieved by the live GAE application described earlier in this chapter. Let's take a look at the source code for this activity and piece together how this information was retrieved and displayed. See Listing 8–13.
Listing 8–13. TopTenActivity.java (Constructor)
public class TopTenActivity extends Activity {


        public HttpClient client = new DefaultHttpClient();


        private TableLayout tableLayout;


        /** Called when the activity is first created. */


        @Override

        public void onCreate(Bundle savedInstanceState) {

                super.onCreate(savedInstanceState);

                setContentView(R.layout.topten);


                tableLayout = (TableLayout) findViewById(R.id.tableLayout);


                new GetTopTen().execute(10);


        }


//class continues…
In Listing 8–13 we see that the class TopTenActivity extends Activity and its onCreate method is called when it is displayed. The layout for this class is very simple; it just contains a TableLayout that is found in the onCreate method and stored in the variable tableLayout. The last thing done in the onCreate method is to create a new GetTopTen and call execute on it. GetTopTen is an AsyncTask that is responsible for making the service call. GetTopTen is shown in Listing 8–14.
Listing 8–14. TopTenActivity (GetTopTen class)
private class GetTopTen extends AsyncTask<Integer, Integer, JSONArray> {

        @Override

        protected JSONArray doInBackground(Integer... counts) {

                try {

                        StringBuilder fullUrl = new StringBuilder(

                                        GameManager.SERVICE_URL);


                        fullUrl.append("query_high_scores?count=");


                        fullUrl.append(counts[0]);


                        HttpGet get = new HttpGet(fullUrl.toString());


                        HttpResponse response = client.execute(get);


                        int statusCode = response.getStatusLine().getStatusCode();


                        if (statusCode == 200) {


                                HttpEntity entity = response.getEntity();

                                String json = EntityUtils.toString(entity);

                                return new JSONArray(json);

                        } else {

                                String reason = response.getStatusLine().getReasonPhrase();

                                throw new RuntimeException("Trouble getting scores(code="

                                                + statusCode + "):" + reason);

                        }
                } catch (Exception e) {


                        Log.w("TopTenActivity", e);

                        throw new RuntimeException(e);

                }

        }


        protected void onPostExecute(final JSONArray result) {


                runOnUiThread(new Runnable() {

                        @Override

                        public void run() {

                                try {

                                        displayResults(result);

                                } catch (JSONException e) {

                                        Log.w("TopTenActivity", e);

                                }

                        }

                });

        }

}
Listing 8–14 shows that TopTenActivity extends AsyncTask. The doInBackground is called in a separate thread from the UI, and is responsible for getting the top ten scores from the sample services. This is done by first creating an HttpGet object with the desired URL and then passing it into an HttpClient to execute. The URL is constructed concatenating the base URL defined as GameManager.SERVICE_URL with the service name query_high_scores. The number of results is specified by including the parameter count in the URL set to the first integer in the array counts.
An HttpResponse is the result of calling client.execute(). If this response has a successful return code (200), then we parse the result by constructing a new JSONArray and returning it.
The method onPostExecute is passed the JSONArray that was created at the end of doInBackground. This JSONArray then passed to the displayResults method by creating a new Runnable and passing it to the runOnUiThread. The method displayResults is shown in Listing 8–15.
Listing 8–15. TopTenActivity.java (displayResults())
protected void displayResults(JSONArray result) throws JSONException {

        tableLayout.removeAllViews();


        TableRow row = new TableRow(this);


        row.setLayoutParams(new LayoutParams(LayoutParams.FILL_PARENT,

                        LayoutParams.FILL_PARENT));


        TextView userTitleView = new TextView(this);


        userTitleView.setText("Username:");

        userTitleView.setTextSize(18);

        userTitleView.setPadding(10, 10, 100, 2);

        row.addView(userTitleView);
        TextView scoreTitleView = new TextView(this);


        scoreTitleView.setText("Score:");

        scoreTitleView.setTextSize(18);

        row.addView(scoreTitleView);


        for (int i = 0; i < result.length(); i++) {


                HighScore highscore = new HighScore(result.getJSONObject(i));


                row = new TableRow(this);


                row.setLayoutParams(new LayoutParams(LayoutParams.FILL_PARENT,

                                LayoutParams.FILL_PARENT));


                TextView userView = new TextView(this);


                userView.setText(highscore.getUsername());

                userView.setTextSize(16);

                userView.setPadding(10, 10, 100, 2);

                row.addView(userView);


                TextView scoreView = new TextView(this);


                scoreView.setText("" + highscore.getScore());

                scoreView.setTextSize(16);

                row.addView(scoreView);

                tableLayout.addView(row, new TableLayout.LayoutParams(

                                LayoutParams.FILL_PARENT, LayoutParams.FILL_PARENT));

        }

}
The displayResults method first creates a TableRow containing TextViews that will serve as headers for each column. Once the first row is created, a loop iterates over each entry in the JSONArray called result. Each entry in result is a JSONObject representing a single high score entry. This JSONObject is used to create HighScore object. The class HighScore is identical to the HighScore class used on the server, from Listing 8–3, except that all of the JDO related annotations are removed. Once we have a HighScore object, we simply create another TableRow and populate it with TextViews displaying the username and their score.
Viewing the Users of a Game
The second Activity available in this sample application allows the user to view the high scores for a particular user, for a particular game. Our purely utilitarian interface is displayed in Figure 8–14.

Figure 8–14. Users of game activity
In Figure 8–14 we see a place for the user to enter the their username and the name of a game. By clicking the button, the top ten scores for that user for that game are displayed. Much of the code for this Activity is identical, or only slightly different from the TopTenActivity. There are few differences worth pointing out, and these are found in the AsyncTask called GetUsersOfGame, which is analogous to the class GetTopTen from Listing 8–14. Listing 8–16 shows the AsyncTask GetUsersOfGame.
Listing 8–16. UsersOfGameActivity.java (GetUsersOfGame class)
private class GetUsersOfGame extends AsyncTask<Integer, Integer, JSONArray> {

        @Override

        protected JSONArray doInBackground(Integer... counts) {

                try {


                        String username = usernameEditText.getText().toString();


                        String gamename = gamenameEditText.getText().toString();


                        StringBuilder fullUrl = new StringBuilder(


                                        GameManager.SERVICE_URL);


                        fullUrl.append("query_high_scores?count=10");


                        fullUrl.append("&username=");

                        fullUrl.append(URLEncoder.encode(username, "UTF-8"));

                        fullUrl.append("&game_name=");

                        fullUrl.append(URLEncoder.encode(gamename, "UTF-8"));


                        HttpGet get = new HttpGet(fullUrl.toString());


                        HttpResponse response = client.execute(get);


                        int statusCode = response.getStatusLine().getStatusCode();


                        if (statusCode == 200) {
                                HttpEntity entity = response.getEntity();

                                String json = EntityUtils.toString(entity);

                                return new JSONArray(json);

                        } else {

                                String reason = response.getStatusLine().getReasonPhrase();

                                throw new RuntimeException("Trouble getting scores(code="

                                                + statusCode + "):" + reason);

                        }


                } catch (Exception e) {


                        Log.w("TopTenActivity", e);

                        throw new RuntimeException(e);

                }

        }


        protected void onPostExecute(final JSONArray result) {


                runOnUiThread(new Runnable() {

                        @Override

                        public void run() {

                                try {

                                        displayResults(result);

                                } catch (JSONException e) {

                                        Log.w("TopTenActivity", e);

                                }

                        }

                });

        }

}
Listing 8–16 shows the class GetUsersOfGame that is responsible for making the network call to our GAE services. The interesting thing about this class is how it constructs the query. The variable fullUrl is a StringBuilder that is constructed by appending the service name the base URL found in the variable GameManager.SERVICE_URL. The values for the parameters username and game_name are pulled from the EditText variables usernameEditText and gamenameEditText. Once the query is constructed and executed, the UI is updated in exactly the same way as the TopTenActivity.
Viewing a User's Location (MapView)
The UsersLocationActivity allows the user to view the location in the world where the highest scores are achieved. This gives us a real-time look at which region of the world is currently getting the highest scores. Figure 8–15 shows this activity.
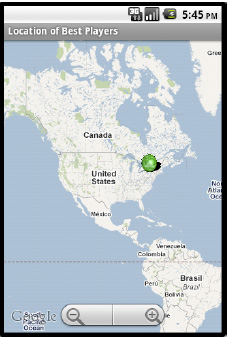
Figure 8–15. User's location activity
The map displayed in Figure 8–15 is from an optional Android package that provides a MapView component. On the map, you can see there is a circle over western New York. This is the location of the highest scored at the time of this writing. As people work through the example in this book, we should see the locations of other Android developers if they choose to submit scores to this service.
In order to enable an optional package, information must be entered into the AndroidManifest.xml file. Listing 8–12 shows the AndroidManifest.xml file for this project and the use-library element directs Android to include the map API.
In order to use a MapView, you must obtain a key from Google and include that key in your layout xml file. If you don't get a key, the example code for this project will not work correctly when you run it. The steps to generate a key for use with Google's Map API is different if you want to use the API on Android rather than a web page. In order obtain a key for use with Android, you first have to find the certificate fingerprint of the keystore you are using to sign your Android application. If you have not set up your own keystore, then chances are you are using the default one. Check in your home directory for a folder named “.android.” This should contain a file named “debug.keystore” that is used to sign applications while you are debugging your application. Figure 8–16 shows a terminal on a development machine.

Figure 8–16. Terminal showing content of debug.keystore
In Figure 8–16, you can see the command keytool was used to inspect the debug keystore. The command keytool comes with your JDK and should be on your command path if java is. The fuzzy bit at the bottom is where the md5 certificate fingerprint is displayed. You use this fingerprint at http://code.google.com/android/maps-api-signup.html to generate your Android Maps API key. Once you have that key, you can set up a MapView to work properly. In this example, this was done in the layout xml file called user_location.xml as shown in Listing 8–17.
Listing 8–17. user_location.xml
<?xml version="1.0" encoding="utf-8"?>

<LinearLayout

  xmlns:android="http://schemas.android.com/apk/res/android"

  android:layout_width="wrap_content"

  android:layout_height="wrap_content">


<com.google.android.maps.MapView


        android:id="@+id/mapview"

        android:layout_width="fill_parent"

        android:layout_height="fill_parent"

        android:clickable="true"

        android:apiKey="YOUR_MAP_API_KEY_GOES HERE"

    />


</LinearLayout>
In Listing 8–17 we see a single MapView element in a LinearLayout. The apiKey attribute of the MapView is where we want to stick our Android Map API key. If you run the application and no map tiles are displayed, there is a good chance something is wrong with your key.
The next thing to take a look at is the activity, and see how we add items to the map. Listing 8–18 shows this activity is setup in code.
Listing 8–18. UsersLocationActivity.java (partial)
public class UsersLocationActivity extends MapActivity {


        private MapView mapView;


        public HttpClient client = new DefaultHttpClient();


        /** Called when the activity is first created. */


        @Override

        public void onCreate(Bundle savedInstanceState) {

                super.onCreate(savedInstanceState);

                setContentView(R.layout.user_location);

                mapView = (MapView) findViewById(R.id.mapview);

                mapView.setBuiltInZoomControls(true);


                new GetTopTen().execute(100);


        }


        @Override


        protected boolean isRouteDisplayed() {

                // TODO Auto-generated method stub

                return false;

        }
In Listing 8–18 we see UsersLocationActivity extends MapActivity. MapActivity is a special subclass of Activity that must be used in order to display a MapView object. MapActivity is abstract and does not contain an implementation of the method isRouteDisplayed, so we must include an implementation in UsersLocationActivity. The isRouteDisplayed method simply returns false, since we don't want to display a route.
In the onCreate method of UsersLocationActivity the mapView variable is located in the layout in the usual way. Once the map view is found, we add the default controls by calling setBuiltInZoomControls to true. Lastly, we create a GetTopTen and execute it. GetTopTen is an AsyncTask and is shown in Listing 8–14. When GetTopTen is done running it passes the top 100 high scores to the method displayResults that adds the high scores to the map. Listing 8–19 shows this method.
Listing 8–19. UsersLocationActivity (displayResults)
protected void displayResults(JSONArray result) throws JSONException {

        Drawable drawable = this.getResources().getDrawable(

                        R.drawable.green_orb);


        HighscoreOverlay highscoreOverlay = new HighscoreOverlay(drawable);


        for (int i = 0; i < result.length(); i++) {


                HighScore highscore = new HighScore(result.getJSONObject(i));


                String username = highscore.getUsername();


                String score = "" + highscore.getScore();

                int latitude = (int) highscore.getLatitude().doubleValue() * 1000000;

                int longitude = (int) highscore.getLongitude().doubleValue() * 1000000;


                List<Overlay> mapOverlays = mapView.getOverlays();


                GeoPoint point = new GeoPoint(latitude, longitude);
                OverlayItem item = new OverlayItem(point, username, "Score: "


                                + score);


                highscoreOverlay.addOverlay(item);


                mapOverlays.add(highscoreOverlay);

        }

}
In Listing 8–19, the displayResults method takes a JSONArray called result. The result variable contains a number of JSONObjects that are used to construct HighScore objects. For each HighScore object, an OverlayItem is created and added to an instance of HighScoreOverlay, which we will look at in a moment. Each OverlayItem is constructed with a GeoPoint, specifying the location of the OverlayItem, and the username and score. The HighScoreOverlay class is used to aggregate multiple OverlayItems that share an icon. The icon used to display each point on the map is defined by the Drawable that is passed to the constructor of HighScoreOverlay. HighScoreOverlay is shown in Listing 8–20.
Listing 8–20. HighScoreOverlay Class
public class HighscoreOverlay extends ItemizedOverlay<OverlayItem> {


        private ArrayList<OverlayItem> mOverlays = new ArrayList<OverlayItem>();


        public HighscoreOverlay(Drawable defaultMarker) {


                super(boundCenterBottom(defaultMarker));

        }


        public void addOverlay(OverlayItem overlay) {


                mOverlays.add(overlay);

                populate();

        }


        @Override


        protected OverlayItem createItem(int i) {

                return mOverlays.get(i);

        }


        @Override


        public int size() {

                return mOverlays.size();

        }


        @Override


        protected boolean onTap(int index) {

                OverlayItem item = mOverlays.get(index);

                AlertDialog.Builder dialog = new AlertDialog.Builder(

                                UsersLocationActivity.this);

                dialog.setTitle(item.getTitle());

                dialog.setMessage(item.getSnippet());

                dialog.show();

                return true;

        }

}
Listing 8–20 shows that HighScoreOverlay extends the class ItemizedOverlay. ItemizedOverlay is class provided by the Android Maps API and is used as a starting point for creating collections of MapOverlays. In the constructor of HighScoreOverlay, we see that a Drawable is passed in and is used as the icon drawn on the map. The method boundCenterBottom is used to indicate that the bottom center of the icon should be drawn at the actual point on the map described by the longitude and latitude of the OverlayItems. The onTap method brings up a small dialog, displaying the name of the user and the high score they achieved, as shown in Figure 8–17.

Figure 8–17. Dialog for single map item
Consuming a web service hosted by Google App Engine is no different than consuming a service hosted on any platform. The advantage to using GAE with android is the simplicity of deployment and using Google's Eclipse plugins. If you want a low-cost, high availability server backing your Android application, GAE is an excellent choice.
Summary
In this chapter we explored Google App Engine in some detail. We looked at how an application is set up to run on Google's hardware and what tools are available to create that application. We also looked at some of the limitations of the Google App Engine, and a number of the services Google offers to help offset these limitations. The sample Google App Engine application in this chapter implements a simple web service for recording high scores earned by users. This service utilizes JDO and the App Engine datastore in order to save and serve HighScore objects. In the last section, we looked at an Android application that queries this service and displays information about user's high scores in different ways, including displaying the high scores on map.