This is a very exciting chapter. While command line interfaces (CLI) may not have the cachet of modern graphical user interfaces (GUI), especially those of phones, tablets, or the Web, the CLI is still a remarkably useful and effective user interface. This chapter details the design and implementation of the command line interface for pdCalc. By the end of this chapter, we will, for the first time, have a functioning, albeit feature incomplete, calculator, a significant milestone in our development.
5.1 The User Interface Abstraction
While we could design a fully functioning CLI in isolation, we know from our requirements that the feature complete calculator must have both a CLI and a GUI. Therefore, our overall design will be better served by first considering the commonality between these two interfaces and factoring this functionality into a common abstraction. Let’s consider two design alternatives to constructing a user interface abstraction: a top-down approach and a bottom-up approach.
Designing an abstract interface before considering the concrete types is akin to top-down design. In terms of a user interface, you first consider the barest essentials to which any UI must conform and create an abstract interface based on this minimalist concept. Refinement to the interface becomes necessary when the abstract concept misses something required to implement a concrete type. Designing an abstract interface after considering the concrete types is akin to bottom-up design. Again, in terms of a user interface, you first consider the needs of all the concrete types (CLI and GUI, in this case), look for the commonality between all types, and then distill the common features into an abstraction. Refinement to the interface becomes necessary when you add a new concrete type that requires additional features not considered when the abstraction was originally distilled.
Which strategy is better, in general, for creating an abstract interface, top-down or bottom-up? As is typical, the answer depends on the particular situation, personal comfort, and style. In this particular scenario, we are better served starting from the abstraction and working downward toward the concrete types (the top-down approach).
Why? In this instance, the top-down approach is essentially free. The user interface is one of pdCalc’s high-level modules, and we already defined the abstract interface for the UI module in Chapter 2 when we performed our initial decomposition. Let’s now turn the abstract module interface into a practical object-oriented design.
5.1.1 The Abstract Interface
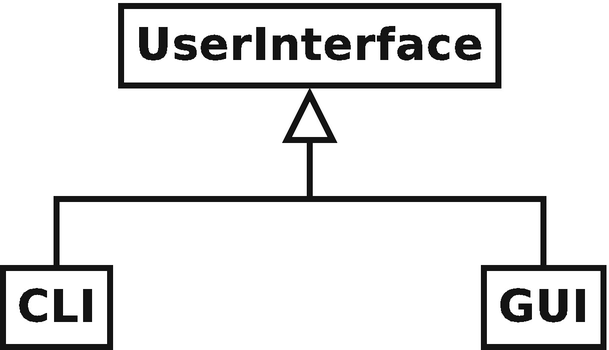
A minimal interface hierarchy
Consider the hierarchy depicted in Figure 5-1. Our goal is to design a minimal but complete interface, consistent with the Liskov Substitution Principle, for pdCalc’s UserInterface class that will work for both the CLI and the GUI. As was previously discussed, we already defined a high-level interface for this UI in Chapter 2. Let’s start from this predefined interface and refactor as necessary.
Referring to Table 2-2, we see that the complete interface for the UserInterface class consists of two event handling functions, postMessage() and stackChanged(), and one UserInterface raised event, commandEntered(). Interestingly, the UserInterface class is a publisher, an observer, an abstract user interface class, and the primary component of a module interface.
The two event handling functions, postMessage() and stackChanged(), are straightforward at the interface level. As we have done with previous observers, we will simply add these two functions to the public interface of the UserInterface class and create proxy observer classes to broker the communication by the publisher and the actual observer. These proxies are discussed in detail in the “User Interface Observers” section. Concrete user interfaces must handle the implementations for event handling uniquely based on how the individual UI interacts with the user. Hence, postMessage() and stackChanged() must both be pure virtual. Because there is no need for the UserInterface class to interject during event handling, I chose, for simplicity, to forgo the NVI pattern. However, as was discussed in Chapter 4, one could instead use the NVI pattern with trivial forwarding nonvirtual interface functions.
The UserInterface class ’s role as a publisher is slightly more complicated than its role as an observer. As we saw in Chapter 3 when designing the Stack class, the Stack implemented the publisher interface rather than substituted as a publisher. We therefore concluded that inheritance from the Publisher class should be private. For the UserInterface class, the relationship to the Publisher class is similar except the UserInterface class itself is not the publisher. The UserInterface class is an abstract interface for user interfaces in the system and is inheriting from the Publisher class only to enforce the notion that user interfaces must implement the publisher interface themselves. Both the CLI and the GUI classes will need to access public functions from Publisher (e.g., to raise events). Thus, the protected mode of inheritance is appropriate in this instance.
Further, recall from Chapter 3 that in order for the Stack class to implement the publisher interface, once we used private inheritance, we needed to hoist the Publisher class’s attach() and detach() functions into the Stack’s public interface. The same is true here using protected inheritance. The question, however, is, should the hoisting occur in the UserInterface class or in its derived classes? To answer this question, we need to ask how particular user interfaces will be used by pdCalc. Clearly, either a CLI or a GUI is-a UserInterface. Therefore, concrete user interfaces will publicly inherit from UserInterface and be expected to obey the LSP. Attaching or detaching events to or from a particular user interface must therefore be able to be accomplished without knowing the underlying UI type. Thus, the attach() and detach() functions must be visible as part of UserInterface’s public interface. Interestingly, in a rather unique implementation of the observer pattern, part of the publisher interface is implemented at the UserInterface level, while another part of the publisher interface is implemented at the derived class level.
The CommandEntered() function returns a string that is the name of the command entered event. It is needed for attaching or detaching this event and can be given any name unique to events in the UserInterface class.
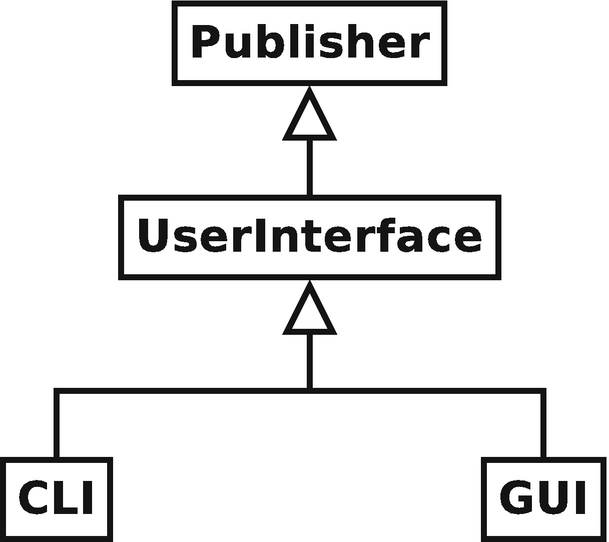
The user interface hierarchy
5.1.2 User Interface Events
Defining the UserInterface class does not complete the interface for the UI. Because the UserInterface class is an event publisher, we must also define the event data class that corresponds to the commandEntered() event . Additionally, defining the UserInterface class finally completes a publisher/observer pair, so we are finally ready to design and implement event proxy classes to broker events between the user interface and both the command dispatcher and the stack.
In Chapter 4, we saw that all commands are delivered to the command dispatcher via events. Specifically, the UI raises an event containing a specific command encoded as a string argument, the CommandInterpreter receives this event, and the string argument is passed to the CommandFactory, where a concrete command is retrieved for processing. As far as the command dispatcher is concerned, handling commandEntered() events is the same, irrespective of whether the encoded command string derives from the CLI or the GUI. Likewise, when the Stack class raises a stackChanged() event, the Stack is indifferent to the particular UserInterface that handles this event. We are therefore motivated to treat the issuing of commandEntered() events and the handling of stackChanged() events uniformly at the UserInterface class level in the user interface hierarchy.
We begin by examining the common infrastructure for raising commandEntered() events. The commandEntered() event is registered for all user interfaces in the constructor of the UserInterface class. Therefore, any derived user interface class can simply raise this event by calling the raise() function defined by the Publisher interface, which, by protected inheritance, is part of any concrete UI’s implementation. The signature of the raise() function requires the name of the event and the event’s data. Because the event’s name is predefined in the UserInterface’s constructor, the only additional functionality required to raise a command entered event is a uniform object for handling event data. Let’s now look at its design.
Command Data
In Chapter 3, we designed our event system to use push semantics for passing event data. Recall that push semantics simply means that the publisher creates an object containing the necessary information to handle an event and pushes that object to the observers when an event is raised. We also examined two techniques for handling event data. In the polymorphic technique, an event data object must publicly inherit from an abstract EventData class. Observers receive the event data through the abstract interface when the event is raised, and they retrieve the data by downcasting the event data to the appropriate derived class. In the type erasure technique, the event data does not need to derive from a common base class, provided a concrete observer understands how to any_cast the data to the appropriate type. The implementation of pdCalc implements events using the type erasure method. Since both techniques were described in Chapter 3, only the type erasure technique actually used in pdCalc will be discussed in the following.
For command entered events, the event data is trivially a string containing either a number to be entered on the stack or the name of a command to be issued. While we could create a distinct CommandEnteredData class that would accept this string in its constructor, the type erasure method actually admits a much simpler solution: the event data can simply be the string itself. When the event is caught by an observer, event data d is recovered by any_cast<string>(d) instead of any_cast<CommandEnteredData>(d).
Neither design for commandEntered() event data can be considered superior to the other – they just make opposing trade-offs. Using a CommandEnteredData class gives extra type specificity through abstraction at the expense of additional code and an additional function call to retrieve the abstracted string. Using a plain string as the event’s data is simple, lightweight, and efficient, but lacks the clarity enforced by the class abstraction. For a complex code base, introducing a new class to abstract the event data would probably be preferred. However, since we already described the class abstraction event data strategy in Chapter 3, for illustrative purposes, the commandEntered() event’s data was implemented using a plain string.
Now that we can raise UI events, let’s see how they’re handled.
User Interface Observers
The goal for this subsection is to construct the mechanics to enable classes to listen to events. Because the abstract user interface is both a source and sink for events, the UI serves as an ideal candidate to demonstrate how publishers and observers interact with each other.
In Chapter 3, we saw that observers are classes that register for and listen to events raised by publishers. Thus far, we have encountered both the CommandInterpreter and UserInterface classes that both need to observe events. While it is possible to make the CommandInterpreter or UserInterface an observer directly, I prefer constructing a dedicated observer intermediary between the publisher and the class that needs to observe an event. I have often nebulously referred to this intermediary as a proxy. We are now ready to give a more concrete meaning to this term.
The proxy pattern [11] is a design pattern that uses a class, the proxy, to serve as the interface for something else. The something else, let’s call it the target, is not strictly defined. It could be a network connection, a file, an object in memory, or, as in our case, simply another class. Often, the proxy pattern is used when the underlying target is impossible, inconvenient, or expensive to replicate. The proxy pattern uses a class buffer to allow the system to perceive the target as an object independent of its underlying composition. In our context, we are using the proxy pattern simply to buffer communication between publishers and observers.
Why are we bothering with the proxy pattern here? This strategy has several distinct advantages. First, it increases clarity in the target class’s public interface by replacing a generically named notify() function with a descriptively named event handling function. Second, an otherwise unnecessary inheritance from the Observer class is removed. Eliminating this dependency reduces coupling, increases cohesion, and facilitates reuse of the target in a setting where it is not an observer. Third, using a proxy class eliminates the ambiguity that arises for a target class that needs to listen to multiple events. Without using proxy classes, an observer would be required to disambiguate events in its single notify() function. Using an individual proxy for each event enables each event to call a unique handler function in the target object. The main disadvantage of implementing the observer pattern using a proxy is the slight cost of one extra indirection for handling each event. However, in situations where using the observer pattern is appropriate, the cost of an extra indirection is negligible.
Using the proxy pattern for implementing the observer pattern leads to the following two classes for handling commandEntered() and stackChanged() events: CommandIssuedObserver and StackUpdatedObserver, respectively. The CommandIssuedObserver mediates between commandEntered() events raised by the UI and observation in the command dispatcher. The StackUpdatedObserver mediates between stackChanged() events raised by the stack and observation in the UI. The implementation for both of these classes is relatively straightforward and very similar. By way of example, let’s examine the implementation for CommandIssuedObserver.
Because it mediates events between the UI as a publisher and the CommandInterpreter as the target of the observer, the CommandIssuedObserver’s constructor takes a reference to a CommandInterpreter instance, which it retains to callback to the command dispatcher when the UI raises a commandEntered() event. Recall that the CommandIssuedObserver will be stored by the UI in the Publisher’s event symbol table when the observer is attached to the event. The implementation of notifyImpl() is simply an any cast of the function’s parameter to a string followed by a call to CommandInterpreter’s commandEntered() function.
where ui is a UserInterface reference and ci is a CommandInterpreter instance. Note that since the attach() function was intentionally hoisted into the abstract UserInterface scope, attaching through a reference allows us to reuse the same call for both the CLI and the GUI. That is, registering events is accomplished through the abstract UI interface, which greatly simplifies user interface setup in pdCalc’s main() routine. The declaration and registration of StackUpdatedObserver are analogous.
The complete implementation of the observer proxy classes can be found in AppObservers.m.cpp. While the usage of the observer proxies is intertwined with the event observing classes, the proxies are not part of the interface for the target classes.
Hence, they are included in their own file. The attachment of the proxies to events is performed in main.cpp. This code structure preserves the loose binding between publishers and observers. Specifically, publishers know which events they can raise, but not who will observe them, while observers know which events they will watch, but not who raises them. Code external to both publishers and their observers binds the two together.
5.2 The Concrete CLI Class
The remainder of this chapter is devoted to detailing the CLI concrete class, a member of the user interface module. Let’s start by reexamining the CLI’s requirements.
5.2.1 Requirements
The requirements for pdCalc indicate that the calculator must have a command line interface, but what, precisely, is a CLI? My definition for a command line interface is any user interface to a program that responds to user commands interactively through text. Even if your definition for a command line interface is somewhat different, I believe we can certainly agree that a broad requirement simply indicating a program should have a CLI is woefully insufficient.
In a production development situation, when you encounter a requirement too vague to design a component, you should immediately seek clarification from your client. Notice I said when and not if. Regardless of how much effort you place up front trying to refine requirements, you always have incomplete, inconsistent, or changing requirements. This usually arises for a few reasons. Sometimes, it is due to a conscious effort not to spend the upfront time refining requirements. Sometimes, it arises from an inexperienced team member not understanding how to gather requirements properly. Often, however, it simply arises because the end user doesn’t know what they truly want or need until the product starts to take shape. I find this true even for small development projects for which I am my own customer! While you as the implementer always retain the expedient option of refining a requirement without engaging your customer, my experience indicates that this path invariably leads to rewriting the code repeatedly: once for what you thought the user wanted, once for what the user thought they wanted, and once for what the user actually wanted.
- 1.
The CLI should accept a text command for any command defined for the calculator (those that exists in the command factory plus undo, redo, help, and exit).
- 2.
The help command should display a list of all available commands and a short explanatory message.
- 3.
The CLI should accept space-separated commands in the order in which they should be processed. Recall that this order corresponds to Reverse Polish Notation. All commands on a line are processed after return is pressed.
- 4.
After commands are processed, the interface should display at most the top four elements of the stack plus the stack’s current size.
Surprisingly, the minimal requirements previously listed are sufficient to build a simple CLI. While these requirements are somewhat arbitrary, something specific needed to be chosen in order to describe a design and implementation. If you don’t like the resulting CLI, I highly encourage you to specify your own requirements and modify the design and implementation accordingly.
5.2.2 The CLI Design
The design of the CLI is remarkably simple. Because our overall architectural design placed the entire “business logic” of the calculator in the backend, the frontend is merely a thin layer that does nothing more than accept and tokenize input from the user, pass that input to the controller sequentially, and display the results. Let’s begin by describing the interface.
The Interface
While the interface is mostly self-explanatory, the arguments to both the constructor and the execute() function are worth explaining. To meet the requirements previously described, the execute() function could be written with no arguments. The two arguments included in the interface are simply optional features that can be turned on. The first argument dictates whether or not a banner is displayed when the CLI starts. The second argument controls command echoing. If echo is set to true, then each command is repeated before displaying the result. Both of these features could be hard-coded in the CLI, but I chose to add them as arguments to the execute() method for added flexibility.
The arguments to the constructor are slightly less obvious than the arguments to the execute() command. Almost by definition, a CLI takes input from cin and outputs results to cout or maybe cerr. However, hard-coding these standard I/O streams arbitrarily limits the usage of this class to that of a traditional CLI. Usually, I advocate limiting functionality to exactly what you need instead of anticipating more general usage. However, using C++ stream I/O is one of my few exceptions to my rule of thumb.
Let’s discuss why using references to base class C++ I/O streams is generally a good design practice. First, the desire to use different I/O modes is quite common. Specifically, redirection to or from files is a frequently requested modification to a CLI. In fact, we’ll see this request in Chapter 8! Second, implementing the generic vs. specific interface adds virtually no complexity. For example, instead of directly writing to cout, one simply keeps a reference to an output stream and writes to that instead. In the base case, this reference simply points to cout. Finally, using arbitrary stream input and output greatly simplifies testing. While the program may instantiate the Cli class using cin and cout, tests can instantiate the Cli class with either a file stream or a string stream. In this manner, interactive stream inputs and outputs can be simulated using strings or files. This strategy simplifies testing of the Cli class since inputs can be easily passed in and outputs easily captured as strings rather than through standard input and output.
Finally, note that the Cli class is declared as a part of the userInterface module in the UserInterface.m.cpp file, while it is defined in the partition userInterface:Cli in the file Cli.m.cpp. This somewhat strange construction is required due to an otherwise circular reference that would be created between UserInterface.m.cpp and Cli.m.cpp. Another alternative would have been to simply define the Cli class in the userInterface module instead of a partition, likely renaming Cli.m.cpp to UserInterface.cpp. This implementation detail has no bearing on the design of pdCalc – it is only a curiosity of file organization.
The Implementation
The main algorithm for the CLI is fairly simple. First, the CLI waits for the user to input a line. Second, this input line is tokenized by the Tokenizer class. The CLI then loops over each token in the input line and raises an event with the token string as the event’s data. The CLI terminates when it encounters either a quit or an exit token.
The only piece of the execute() function not previously explained is the Tokenizer class. Simply, the Tokenizer class is responsible for taking a string of text and splitting this string into individual space-separated tokens. Neither the CLI nor the Tokenizer determines the validity of tokens. Tokens are simply raised as events for the command dispatcher module to process. Note that as an alternative to writing your own, many libraries (e.g., boost) provide simple tokenizers.
The tokenization algorithm is relatively straightforward; we’ll see two separate implementations momentarily. First, however, why choose a class design for the Tokenizer instead of, say, a design employing a function returning a vector of strings? Realistically, both designs functionally work, and both designs are equally easy to test and maintain. However, I prefer the class design because it provides a distinct type for the Tokenizer. Let’s examine the advantages of creating a distinct type for tokenization.
First, using a Tokenizer class, the signatures for both foo() and bar() immediately inform the programmer the intent of the functions. We know these functions involve tokenization. Using a vector of strings leaves ambiguity without further documentation (I intentionally did not provide names for the arguments). More importantly, however, typing the tokenizer enables the compiler to ensure that bar() can only be called with a Tokenizer class as an argument, thus preventing a programmer from accidentally calling bar() with an unrelated collection of strings. Another benefit of the class design is that a Tokenizer class encapsulates the data structure that represents a collection of tokens. This encapsulation shields the interface to bar() from a decision to change the underlying data structure from, for example, a vector of strings to a list of strings (or, a generator, as we’ll see shortly). Finally, a Tokenizer class can encapsulate additional state information about tokenization (e.g., the original, pretokenized input), if desired. A collection of strings is obviously limited to carrying only the tokens themselves.
We now turn to the implementation of the Tokenizer class . I chose to present two separate implementations: a greedy tokenization and a lazy tokenization. The first approach, greedy tokenization, was the approach I took in the first edition of this book. The second approach, lazy tokenization, was only made trivial with the introduction of coroutines in C++20.
A tokenizer can be constructed from an input stream, it can state how many tokens it has parsed, and it can return an iterator to the beginning and ending of the token stream. Of course, more functionality can be added, but these member functions comprise the minimal set required for parsing tokens in pdCalc. Let’s now look at the individual implementations.
Lazy tokenizer
Two differences exist between the greedy and lazy implementations. First, trivially, the lazy routine needs to count and store the number of tokens (nTokens_) that are parsed. This step is unnecessary for the greedy algorithm because it retains all the tokens in a vector, which knows its own size. The second difference is that the lazy algorithm uses the co_yield operator and returns a generator (part of the cppcoro library [7]), which is discussed in detail in the sidebar. Essentially, the co_yield operator signals to the compiler that this function is a coroutine, which can be preempted and subsequently restarted at the point it yielded, in this case, resuming the for loop to parse the next token. co_yield permits returning a value, in this case, our lazily evaluated token.
It should be noted that while the two tokenizers have the same interface, their behavior is slightly different. First, the greedy tokenizer parses the stream once, but the tokens can be iterated over as many times as desired. The nTokens() function always returns the total number of tokens in the stream because the stream is completely parsed before nTokens() can be called. In contrast, the lazy tokenizer can only be iterated over once because the iteration causes the tokenization. The nTokens() function therefore returns the number of tokens parsed up to that point, which may be smaller than the total number of tokens in the input stream. Of course, if multiple iterations over the LazyTokenizer are desired, tokens could always be stored in a container as the stream was lazily parsed. The two tokenizers would then behave the same once the parse was completed.
Implementations of both the greedy tokenizer and the lazy tokenizer are provided in the Tokenizer.m.cpp source file. By default, pdCalc is configured to only use the lazy tokenizer. However, the two tokenizers are completely interchangeable. If you wish to try the greedy tokenizer, just change the tokenizer instantiated in CLI’s execute() function. Obviously, switching between the two tokenizers could be made compile time configurable using static polymorphism.
Coroutines are an old idea finally made standard in C++20. In my opinion, coroutines are a mix in terms of usability. Writing a coroutine itself is fairly straightforward, provided you don’t need to write the support code for managing the lifetime of the coroutine. In concrete terms, relative to Listing 5-1, implementing tokenize() is easy, but implementing generator<> is hard.
Unfortunately, a common library for coroutine utilization was not adopted as part of the C++20 standard (maybe C++23?). Fortunately, however, the high-quality cppcoro coroutines library exists [7], and you can rest assured knowing that its author has already implemented the hard parts of using coroutines for you. In my initial implementation of Listing 5-1, I wrote my own generator class. My implementation was not generic and was quite sloppy, but it did work as expected. However, understanding the implementation was not instructive to understanding pdCalc’s design. Ultimately, I decided that describing the detailed implementation of coroutines was beyond the scope of this book. Instead, I decided to use cppcoro’s generator class directly. The MIT licensed generator.hpp is included with pdCalc and is located in 3rdparty/cppcoro. Those readers interested in understanding the details of coroutines are referred to the excellent blog posts [6] by Lewis Baker, the creator of cppcoro. Our discussion will instead focus on the higher-level design goals of what coroutines are conceptually and how we are able to use them to better pdCalc’s design.
Coroutines are a generalization of subroutines that allow suspension of control by programatically ceding execution from within. Coroutines maintain their state and can be resumed later from the point at which they relinquished control. Effectively, coroutines provide a language mechanism to support cooperative multitasking (vs. the preemptive multitasking of threads).
One of the types that coroutines enable is generators. Generators are objects that generate a sequence as they are iterated upon. They are particularly useful when the sequence is infinite. The canonical implementation of a generator seems to be the generation of the Fibonacci numbers. The Fibonacci numbers, Fn, are defined by the following recursion:
F0 = 0, F1 = 1, Fn = Fn−1 + Fn−2, n > 1
Unfortunately, we must perform a greedy evaluation of all numbers up to the nth number. fibLoop() does not allow a lazy, sequential evaluation of the Fibonacci numbers by calling the function repeatedly.
The code works as long as we only want to generate the Fibonacci sequence once per program execution in a single-threaded environment. To fix the problem that the code can only be called once, we could add a reset flag as a parameter. However, now we’re just adding hacks, and we still haven’t fixed our inability to run in a multithreaded environment. Let’s try again.
If you are unfamiliar with the preceding syntax, especially the functional style of piping a range to a view, don’t fret. The ranges library is another new feature of C++20, which I’ll very briefly introduce in the next sidebar.
At this point, hopefully Listing 5-1 makes sense. Our lazy tokenizer is simply a generator of string tokens that are produced by looping over a stream, extracting each whitespace-separated string, and suspending execution until the next token is requested. It’s a beautiful design made easy by new C++20 language features.
The preceding seemingly correct code will compile, but the tokenizer will cause a segmentation fault when it is used. The reason is that while the tokenize() function appears to be a regular function call that simply returns, it is not. tokenize() is a resumable coroutine that is accessed via its returned generator, which, in this case, is stored in generator_. Here, generator_, a member variable, has a lifetime longer than the local variable t. When tokenize() is first called, everything works fine. The generator is initialized and in a ready state. However, since tokenize() captures its stream argument by reference, when the coroutine is advanced via iteration over generator_, t has gone out of scope and has been destroyed. Inside tokenize(), we are left advancing an istream_iterator<string> that is iterating over a destroyed istringstream. Obviously, this code will fail. Once you’ve reasoned this failure out, it makes perfect sense. However, to me, it was nonobvious the first time I encountered this error because my experience has trained me to interpret tokenize() as a single pass through function that only exists until control is returned to the caller. Of course, coroutine call semantics are different as coroutines exist until destroyed. The return of control to the caller does not destroy the local context inside the coroutine, which could contain references to function arguments. Instead, that state is stored for later resumption. Any referred to objects that have since gone out of scope become invalid. Programmer beware.
The implementation in Cli.m.cpp differs only in the fanciness of the printing. Note that whenever the stack changes, the CLI simply picks the top four (as specified in our requirements) entries of the stack (getElements() returns the minimum of nElements and the size of the stack), formats them in a string, and passes this string to the postMessage() function . For the CLI, postMessage() simply writes the string to the output stream.
Before we move on, let’s pause and reflect on how clean and brief the implementation for the CLI is. This simplicity is a direct result of pdCalc’s overall design. Whereas many user interfaces intermix the “business logic” with the display code, we meticulously designed these two layers to be independent. Interpretation and processing of commands, the “business logic,” resides entirely in the command dispatcher. Therefore, the CLI is only responsible for accepting commands, tokenizing commands, and reporting results. Furthermore, based on the design of our event system, the CLI has no direct coupling to the command dispatcher, a decision consistent with our MVC architecture. The command dispatcher does have a direct link to the user interface, but because of our abstraction, the command dispatcher binds to an abstract UserInterface rather than a specific user interface implementation. In this way, the Cli perfectly substitutes as a UserInterface (application of the LSP) and can trivially be swapped in or out as any one of many unique views to the calculator. While this flexibility may seem like overkill for the design of a calculator, the modularity of all of the components is beneficial from both a testing and separation of concerns standpoint even if the calculator were not slated to have another user interface.
The ranges library is one of the big four features of C++20, and a simple sidebar in no way does this library justice. However, we’ll take a very quick detour to get a cursory introduction.
The ranges library introduces, among a few other features, three major new constructs: the ranges concept, the range algorithms, and views. Ignoring the detailed C++ mechanics of how ranges are implemented with C++ concepts, logically, a range is an iterable collection demarcated by a beginning and an ending. While you may choose to implement your own ranges, beginning in C++20, the STL containers are ranges, so ranges are immediately accessible to everyone.
That’s much cleaner. Most, if not all, of the standard algorithms now come with range-based equivalents.
Three important things are occurring in the single line of code shown previously. First, and most obvious, all of the views are chained together. Second, the chaining of the views enables us to perform all of these operations in one loop over v. Third, because views are lazily evaluated, only the necessary actions are taken. For example, we’re not reversing all of v, only the even numbers. Additionally, we’re not squaring all of the even numbers, only the last five (or fewer if there are less than five even numbers in v).
That’s clearer. The ability to trivially create new named views from existing views both increases readability and enables reusability.
I’ll conclude this sidebar the same way I began it, by stating that this small sidebar in no way does ranges justice. If, however, this sidebar piqued your interest, I encourage you to read Eric Niebler’s article introducing ranges [26] and the Range-v3 User Manual [25]. Eric Niebler’s Range-v3 library formed the basis on which the C++ standard ranges library was built.
5.3 Tying It Together: A Working Program
Due to the modularity of the design, the entire calculator can be set up, assembled, and executed in just six executable statements! The logic within the main() function is easy to follow. From a maintenance perspective, any new programmer to the project would easily be able to trace the calculator’s logic and see that the functionality for each module is clearly divided into distinct abstractions. As will be seen in future chapters, the abstraction is even more powerful as more modules are added.
To get you started quickly, a project is included in the repository source code that builds an executable, pdCalc-simple-cli, using the preceding main() function as the application’s driver. The executable is a stand-alone CLI that includes all of the features discussed up to this point in the book.
In the next chapter, we’ll consider the design of the graphical user interface for our calculator. As soon as the GUI is complete, many users will quickly dismiss the CLI as simply an exercise or a relic from a previous era. Before doing so, I’d like to encourage the reader not to be so quick to judge the humble CLI. CLIs are very efficient interfaces, and they are typically much easier to script for tasks requiring large deployments or automation. As for pdCalc, personally, I prefer the CLI to the GUI due to its ease of use. Of course, maybe that is just an indication that I, too, am a relic from a previous era.