
Chapter 3: Windows Memory Acquisition
You already know some theory, but as you may know, in essence, there's no difference between theory and practice, but in reality there is. So, let's move on and dive into some practical tasks, starting with Windows memory acquisition, as Windows is the most widely used operating system.
What does it mean? It's the most common target for threat actors! It also means that you will face it very often during your incident response engagements (and some criminal cases, of course). Therefore it's a very good idea to start from learning how to acquire memory from a Windows host.
This chapter will introduce you to the four most common tools used for Windows memory acquisition, and—of course—you'll learn how to use them and obtain memory images for further analysis.
We'll cover the following topics:
- Understanding Windows memory-acquisition issues
- Preparing for Windows memory acquisition
- Acquiring memory with FTK Imager
- Acquiring memory with WinPmem
- Acquiring memory with Belkasoft Live RAM Capturer
- Acquiring memory with Magnet RAM Capture
Understanding Windows memory-acquisition issues
In the previous chapter, we covered the general concepts of memory dumping in detail and discussed possible issues. However, each operating system has its particular peculiarities. The main peculiarity related to memory extraction in Windows is the access to random-access memory (RAM), but first things first.
Remember that earlier, we talked about device memory, which is the area of physical memory that is reserved for devices? Such devices include video cards, audio cards, Peripheral Component Interconnect (PCI) cards, and so on. Their direct access to the physical memory is vital for their qualitative and effective operation. And do you remember what trying to access device memory can lead to? That's right—it can lead to unpredictable consequences.
The thing is, attempts to access or write to device memory are translated into requests sent to the corresponding device. However, different devices may react differently to an attempt to interact with a piece of physical memory reserved by them. In some cases, this can lead to changes in the critical data on which a device's functionality depends. From a forensic point of view, however, the consequence can be the loss of significant evidence, or, in the worst case, the freezing or shutting down of the system.
Access to physical memory in the Windows operating system is implemented through a DevicePhysicalMemory kernel object. Previously, this file was easy to work with, since it was fully accessible to the user-space programs. However, if we consider all the preceding information, it is quite clear that this approach was not entirely safe.
This has all changed with the release of Windows Server 2003 Service Pack 2 (SP2). Of course, user-space programs can still read this file, but write access is now possible exclusively from the kernel space. Now, acquisition tools must work at the kernel level or use special drivers to create memory dumps.
Another thing that has influenced the change in memory extraction tools is the widespread use of virtualization. This has resulted in a system crash when such tools are run on systems with Virtual Secure Mode (VSM) enabled. Nevertheless, the latest versions of the most used tools have already managed to deal with this issue.
Despite these changes, the number of tools for Windows memory acquisition is still large.
Let's look at some of the most commonly used tools in the next sections.
Preparing for Windows memory acquisition
Before we start to work with the imaging tools, we need to prepare a couple of things. Firstly, you need to find a flash drive that you will use to store both the tool itself and the created memory dump, so make sure it has enough space. Secondly, you need to sanitize it. This means that you need to forensically wipe the drive.
Important note
During the standard deletion process, metadata related to the deleted files is changed and the space where these files are located is marked as available for reuse. In other words, after deletion, the content of the files will reside on the drive and can be recovered. The formatting process is quite similar. A few certain master files are rewritten, but information can still be obtained from the drive. Thus, to delete files securely, you need to overwrite the content with zeros or random data.
To wipe drives, different tools and methods can be used, depending on the type of removable media. We already decided to use a flash drive; in this case, there are two quite effective and fast options, outlined as follows:
- Write a pre-prepared file proportional to the entire volume of the flash drive.
- Use the Secure Erase option.
Unfortunately, not all vendors have their own utilities that allow you to securely wipe their drives with the Secure Erase option. You can check this information on the official web page of the vendor of your flash drive.
When you have your flash drive sanitized, you can add some imaging tools there.
Acquiring memory with FTK imager
AccessData FTK Imager is one of the most popular free tools. It's commonly used both by forensic analysts and incident responders for disk image previews, or even live response, so it can be used not only for bit-by-bit imaging, but also for creating custom content images and, of course, memory images. Let's get a closer look! Follow these next steps:
- To get FTK Imager, go to the AccessData official web page at https://accessdata.com/products-services/forensic-toolkit-ftk/ftkimager.
- Choose Products & Services | FTK® Imager. Follow the Download FTK Imager today! link and press Download now. You will be asked to fill in a short form with your contact information. After that, a link will be sent to the email address you specified.
Now, you need to install FTK Imager on your flash drive. You can use the InstallShield Wizard tool, which provides step-by-step installation instructions.
To create memory dumps, FTK Imager loads a device driver into the kernel and starts to subsequently read memory through mapping the DevicePhysicalMemory kernel object. From a user's point of view, the process of memory acquisition with FTK Imager is very simple and intuitive. Follow these instructions to create your memory image:
- Connect the flash drive to the target system and run FTK Imager. The main window will appear, as shown here:

Figure 3.1 – FTK Imager main window
- Go to File and click on Capture Memory…, or find the associated icon on the toolbar. The following screenshot illustrates the former option:

Figure 3.2 – FTK Imager File menu
- In the dialog window, click Browse to choose the location where you want to store the memory dump. Also, you need to choose a name for the dump—by default, this is memdump.mem. We also recommend you check the Include pagefile checkbox, as shown here:

Figure 3.3 – Memory Capture dialog window
- Press the Capture Memory button. As a result, you will see a dialog like the one in the following screenshot, illustrating the progress of dump creation:

Figure 3.4 – Imaging progress
After a few minutes of waiting, we get our memory dump, which is a file with a .mem extension. The image is ready to be analyzed with your tool of choice—for example, the Volatility Framework.
FTK Imager is a powerful tool with a wide range of functionality, but we want you to have a choice, so let's look at some other tools.
Acquiring memory with WinPmem
WinPmem was originally developed by Google and was a part of the Rekall Framework, but has now been released as a standalone memory acquisition tool. The tool supports a wide range of Windows versions—from XP to 10—and has standalone executables both for 32- and 64-bit systems.
WinPmem utilizes three independent methods to create memory dumps, outlined as follows:
- Page table entry (PTE) remapping
- Use of the MMMapIoSpace kernel application programming interface (API)
- Traditional DevicePhysicalMemory mapping
The first of the preceding methods is used by default as it is considered the most stable. However, users can choose any other method manually.
To download this tool, go to the WinPmem repository on the Velocidex GitHub page, at https://github.com/Velocidex/WinPmem.
The page looks like this:

Figure 3.5 – WinPmem GitHub repository
On the right side of the page, go to Releases and download winpmem_mini_x64.exe. Copy this executable to your flash drive. This program does not require any additional dependencies and is self-contained. Also, you don't need to worry about x64 and x86 differences. WinPmem will load the correct driver automatically.
The following instructions will help you to acquire memory with WinPmem:
- Connect the flash drive to the target system. Run cmd or PowerShell as Administrator, which is shown in the following screenshot:
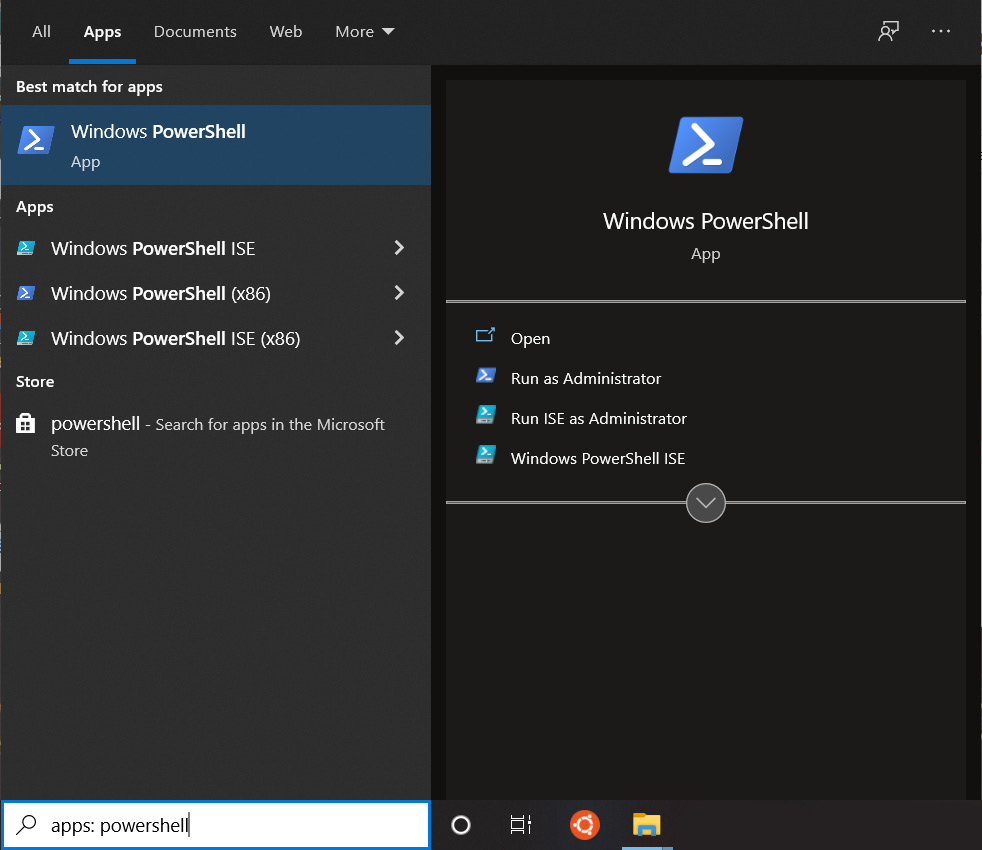
Figure 3.6 – Running PowerShell from the search box
- Move to your flash drive and run winpmem_mini_x64.exe with the name of the memory dump as the argument. As shown in the following screenshot, memdump.raw is the argument provided:

Figure 3.7 – WinPmem execution
- During the memory-dump process, you will be able to see all the related information, as shown in the following screenshot:

Figure 3.8 – Dump creation with WinPmem
After a while, we will get a raw memory dump with the specified name.
This is how we can extract Windows memory using PowerShell and WinPmem, but there is more to this. Let's add a couple more tools to our collection.
Acquiring memory with Belkasoft RAM Capturer
Belkasoft RAM Capturer is another free tool for memory acquisition. As with the previous tools outlined, it uses kernel drivers to extract the physical memory and create dumps. This tool is compatible with all 32- and 64-bit versions of Windows, including Windows XP, Windows Vista, Windows 7 and 8, Server 2003 and 2008, and Windows 10.
You will need to take the following steps:
- To get this tool, go to the Download tab on the official Belkasoft web page at https://belkasoft.com/.
- Choose Belkasoft Live RAM Capturer and leave your email in the specified field. After confirmation, you will receive a download link. From this link, you will get an archive with two x64 and x86 folders, which should be extracted to a flash drive.
- This time, you need to find out if you're dealing with an x64 or an x86 system. To do so, use the Search box on the taskbar. Type system and run the System Information application, as shown in the following screenshot:

Figure 3.9 – Running System Information from the search box
In the opened window, search for System Type under System Summary, as shown in the following screenshot. The x64-based PC value identifies 64-bit systems:
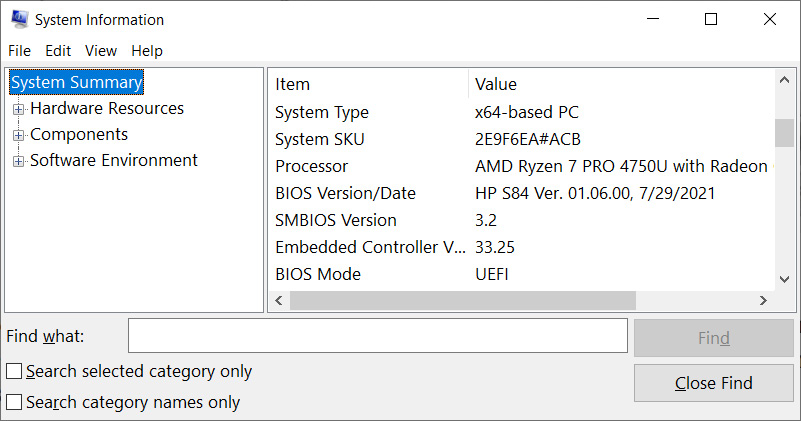
Figure 3.10 – System-type detection
In the case of an x64-based PC system type, you need to use Ram Capturer from the x64 folder; otherwise, choose another one from x86. You are ready to create a memory dump. Please take the following steps:
- Connect the flash drive to the target system and run the RamCapture executable.
- Type the output folder path in the specified field and press the Capture! button.
The process of dump creation will look like this:

Figure 3.11 – Imaging with Belkasoft RAM Capturer
Finally, we get the memory dump with a .mem extension. By default, the filename consists of the acquisition date, but you can always replace it with something more descriptive.
You can now create memory dumps using three different tools. Let's take a look at the last tool, but not the least one.
Acquiring memory with Magnet RAM Capture
Magnet Forensics also released its own free memory acquisition tool, called Magnet RAM Capture, which can be used to acquire memory from Windows systems. To extract the physical memory, Magnet RAM Capture uses a kernel-mode driver. It creates memory dumps in raw format, which is supported by both open source memory forensic tools and full-featured digital forensic suites.
To download Magnet RAM Capture, take the following steps:
- Go to the RESOURCES tab and then the FREE TOOLS tab on the official Magnet Forensics web page at https://www.magnetforensics.com/.
- Choose MAGNET RAM CAPTURE and fill in a short form. After confirmation, you will receive a download link. After downloading, copy MRCv120.exe to your flash drive.
Dumping memory with Magnet RAM Capture is very easy and straightforward, as the following instructions show:
- Connect the flash drive to the target system and run MRCv120.exe as Administrator.
- Choose a Segment size option in the drop-down menu (the default is Don't Split, and it's the recommended mode).
- Click on the Browse… button and choose the memory image filename and location.
- Click on the Start button.
The imaging process will start; you should wait for the progress bar to get to 100%. Here is an example of an imaging process with Magnet RAM Capture:
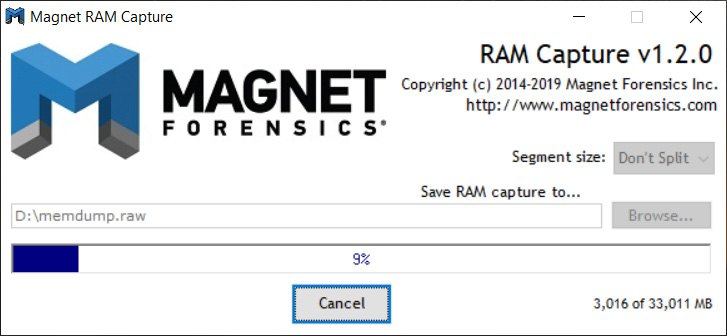
Figure 3.12 – Imaging process with Magnet RAM Capture
Once the process is finished, you'll find a raw memory image under the location you specified previously.
Summary
When creating memory images, you must consider not only the general concept but also factors unique to each individual operating system. For the Windows operating system, such a factor is access to the /Devices/PhysicalMemory kernel object.
Most modern tools use kernel drivers to create dumps, but some tools have their own unique approach, manifested by using alternatives to the classic /Devices/PhysicalMemory mapping.
Despite the variety of tools for Windows memory extraction, it is worth remembering that the best tool is the one that has been successfully tested on systems identical—or at least, very similar—to the target.
In this chapter, we have learned how to create memory dumps using various free tools. Now, it's time to start looking inside them! In the next chapter, we will get to know the tools for Windows memory-dump analysis and learn how to search for traces of user activity.