![]()
Consuming and Publishing Models on Azure Marketplace
The Azure Machine Learning Studio makes it easy to create new predictive models. But what if there was a way to harness the power of machine learning without having to understand the data science behind it? This is the promise of the Azure Machine Learning Marketplace. Think of it as the place where you can go find “baked” APIs that solve interesting problems thanks to machine learning. This chapter will introduce this marketplace, showing existing solutions from Microsoft and its partners. We will also show step by step how you can sell your own predictive models on Azure Marketplace.
What Are Machine Learning APIs?
The Machine Learning APIs enable developers or organizations to consume machine learning solutions instead of creating them. This is particularly important since the supply of good data scientists is very low at the moment. With these APIs, organizations can leverage the power of machine learning without hiring data scientists. The marketplace also allows data scientists to amplify their reach by selling their solutions to many more customers.
These APIs are exposed to the public in several locations today. They are exposed in the Azure Machine Learning Gallery, as shown in Figure 13-1. They can also be found in the Microsoft Azure Marketplace. The Microsoft Azure Marketplace is an online store for thousands of applications, add-ons, APIs, and data that are preconfigured to run on Windows Azure. Azure Marketplace does not sell only Microsoft products; it also has offerings from many vendors, including competitors such as Oracle, Box, MungoBD, Cloudera, and others. The store has many categories of products for virtual machines, application services, web applications, and many more. In this book, we will only focus on machine learning APIs.
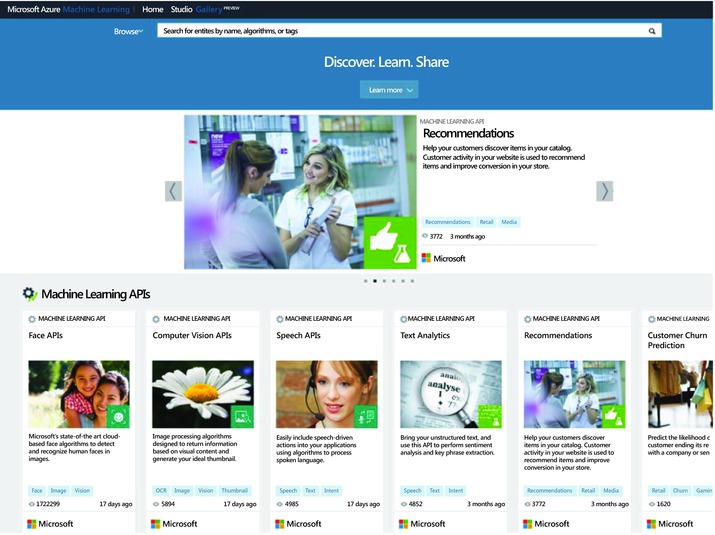
Figure 13-1. Machine Learning APIs showcased at http://gallery.azureml.net
As you can see in Figure 13-1, there are many ready-to-consume APIs, including the following:
- Face APIs: These APIs provide state-of-the-art algorithms to process face images, like face detection with gender and age prediction, face recognition, and face alignment. It is based on Bing technology. For more details, see www.projectoxford.ai/face.
- Speech APIs: Speech APIs provide the ability to process spoken language. With these APIs, developers can easily include the ability to convert spoken audio to text and convert text to speech. In certain cases, the APIs also allow for real-time interaction with the user as well. For more information, see www.projectoxford.ai/speech.
- Computer Vision APIs: The Computer Vision APIs are a collection of state-of-the-art image processing algorithms. For instance, you can analyze an image to categorize it, understand if it is adult content, or get the dominant color of the image. The API also supports extraction of text from imagery using Optical Character Recognition (OCR), and has a thumbnail generation capability. For more information, see www.projectoxford.ai/vision.
- Recommendations: This is a recommendation engine that allows you to do cross-selling or upselling on your website. Provided by Microsoft, this API offers both item-to-item and user-item recommendations. With item-to-item recommendations you can make suggestions based on the fact that those who bought product A also bought product B. For more personalized recommendations you can use the user-to-item recommendations based on the fact that users like you bought product A. Full details on this service is at https://datamarket.azure.com/dataset/amla/recommendations.
- Text Analytics: This API implements text mining using Azure Machine Learning. It uses Natural Language Processing techniques to mine data in English only, and no training is required. You can use it for sentiment analysis: in this case the API returns a score between zero and one. A score close to one indicates positive sentiment, while scores near zero denote negative sentiment. More details are available at https://datamarket.azure.com/dataset/amla/text-analytics.
- Customer Churn Prediction: Built by Microsoft with Azure Machine Learning, this API predicts the likelihood of attrition; it identifies which customers are most likely to terminate their relationship with their providers or retailers. More details are available at https://churn.cloudapp.net/.
- Forecasting with Autoregressive Integrated Moving Average (ARIMA): You can use this API to build forecasting models through the ARIMA time series algorithm. With this API you can address problems such as demand forecasting to forecast how much electricity will be consumed on a given week, or how many products will be sold in a given day. More details on this API are available at https://datamarket.azure.com/dataset/aml_labs/arima. Note that Azure Marketplace also offers two other APIs that use different Time Series algorithms. The first uses Exponential Smoothing (ETS), while the second employs both ETS and Seasonal Trend Decomposition (STL) to predict future outputs based on historical data. These are all built with Azure Machine Learning and published by Microsoft.
- Giving Score: Developed by Versium Analytics, this API enables nonprofit organizations to determine which of their contributors are most likely to make large donations or become repeat contributors. They can also use it to identify which prospects have a high probability to donate to charity. More details can be obtained at https://datamarket.azure.com/dataset/versium/lifedata-giving-score.
How to Use an API from Azure Marketplace
In this section, you will see how to use machine learning models from the Azure Marketplace. Specifically, you will see how to use the Recommendations API that was introduced in the previous section. We will demonstrate the Recommendations API with a sample application that is available on Azure Marketplace.
The goal of the Recommendations API is to generate a model that will use prior transaction data to recommend items that are of interest to customers. For instance, the recommendations model should be able to suggest to your customers which items they are most likely to want to purchase once they visit a particular product page. It can also recommend to the customer which other products they may want to visit, as shown in Figure 13-2.
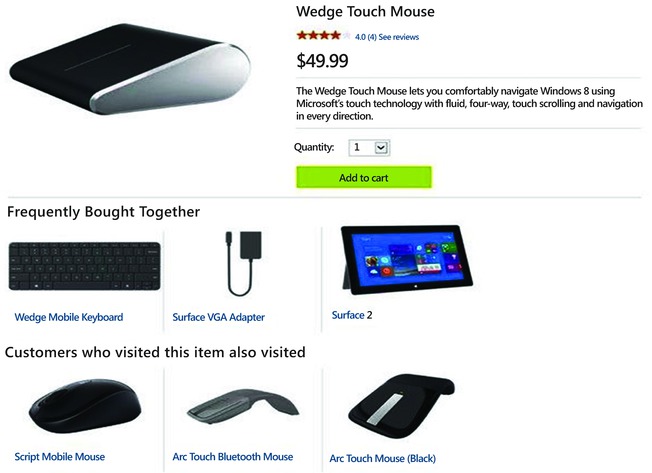
Figure 13-2. Sample Usage of the Recommendations API
To provide a concrete example from retail, the Recommendations API will allow you create a Customized Recommendations Model where, given an item (or a set of items) that the customer is interested in, it will predict which other products the customer is likely to want to purchase.
As outlined in Figure 13-3, in order to generate this predictive model, the Recommendations API needs you to provide two pieces of data:
- Your catalog: In the retail example, this is data about the products you sell. In its simplest format, you can think of this file as rows with information with the following format:
<Item Id>,<Item Name>,<Item Category>[,<Description>] - Your previous transactions: This is also called usage data. This file should have rows that describe prior user behavior so that the model can be trained. The schema for this file can be as simple as
<User Id>,<Item Id>[,<Time>,<Event>]
Figure 13-3. Recommendations API Diagram
Once this data is fed into the Recommendations API, it can create your customized recommendations model. Figure 13-3 shows the outline of the recommendation API.
You can obtain the sample application from the Recommendations API page as follows:
- Visit the Recommendations API page at https://datamarket.azure.com/dataset/amla/recommendations.
- The right pane shows pricing information. Under the pricing section find the link named Sample Application Guide. This link has information on the sample application. This right pane also has a link for Sample Application. Click this link to download the sample application.
- Now download the sample application on your computer and extract the ZIP file.
![]() Note To run the sample application, you must first sign up for the Recommendations API. To do this, go to the Recommendations API page at https://datamarket.azure.com/dataset/amla/recommendations. Sign up for the $0 subscription that provides up to 10,000 transactions per month for free!
Note To run the sample application, you must first sign up for the Recommendations API. To do this, go to the Recommendations API page at https://datamarket.azure.com/dataset/amla/recommendations. Sign up for the $0 subscription that provides up to 10,000 transactions per month for free!
Second, you also need an integrated development environment (IDE) for C# code. We use Visual Studio in this chapter.
After extracting the files from the sample application ZIP file, you can open the project file named AzureMLRecoSampleApp.csproj in Visual Studio or your preferred IDE. Follow these steps to build and test a recommender with this sample application.
- Figure 13-4 shows the sample application (SampleApp.cs) in Visual Studio. Note that lines 37 and 38 read the username and account key from the arguments. So you need to provide your username and account key for Azure Marketplace. If you have not subscribed to Azure Marketplace, you may do so now as follows.
- Visit https://datamarket.azure.com/.
- Click the link for Free Trial at the top right of the page. Follow the instructions to sign up for a free trial.

Figure 13-4. Illustrating the sample application in Visual Studio
- Next, open the properties file called AzureMLRecoSampleApp in Visual Studio.
- On line 58, the application loads the catalog from the sample catalog named catalog_small.txt in the Resources folder.
- Similarly, line 62 reads usage data from the usage_small.txt file from the Resources folder.
- Click the Debug tab on the left pane, and enter your username and account key in the text box named command line arguments. Note that you do not need commas between your arguments; simply leave spaces between your username and account key.
- Now hit F5 to compile and run the sample application. The results will appear on the console as show in Figures 13-5 and 13-6.
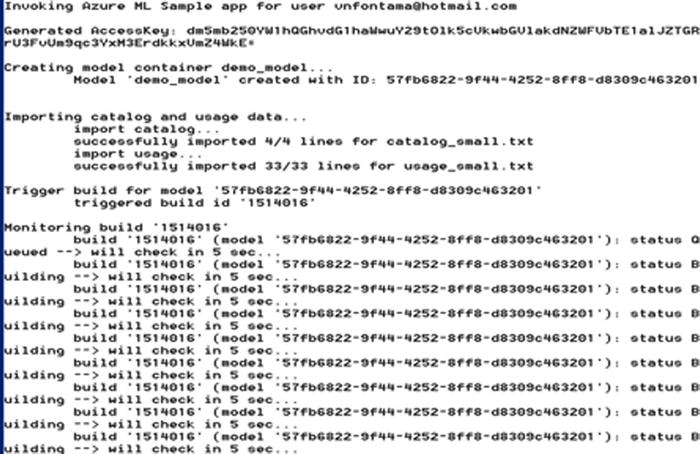
Figure 13-5. Output of the application while the recommendation model is being built
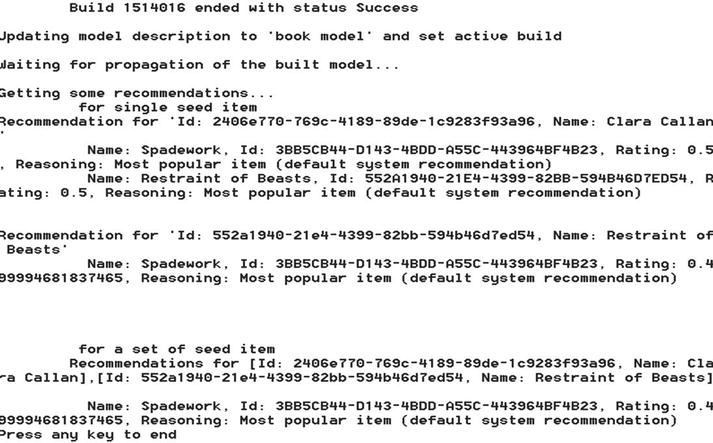
Figure 13-6. Output of the application showing recommendations from the recommendation model
Now let’s see how the sample application works since it shows how you can call the Recommender API from your own C# application. Lines 32 to 47 in the Main() function initialize the SampleApp application with your username and account key. On line 51, the application creates a new container for the recommendation model with the following code:
var modelId = sage.CreateModel(modelName);
Lines 55 to 63 load the catalog and user data with the following code:
Console.WriteLine("
Importing catalog and usage data...");
var resourcesDir = Path.Combine(Path.GetDirectoryName(Assembly.GetExecutingAssembly().Location),"Resources");

Console.WriteLine("	import catalog...");

var report =
sage.ImportFile(modelId, Path.Combine(resourcesDir,"catalog_small.txt"), Uris.ImportCatalog);

Console.WriteLine("	{0}", report);

Console.WriteLine("	import usage...");

report = sage.ImportFile(modelId, Path.Combine(resourcesDir, "usage_small.txt"), ris.ImportUsage);

Console.WriteLine("	{0}", report);
On line 68 the application triggers a build to create a recommendation model with the following code:
var buildId = sage.BuildModel(modelId,"build of " + DateTime.UtcNow.ToString("yyyyMMddHHmmss"));
Full details of the BuildModel function are on lines 198 to 232. The while loop on lines 76 to 90 checks the status of the model building. It checks the build status every 5 seconds until the job completes. Figure 13-5 shows the output of the application on the console.
When the model is built successfully, you can start testing with a few examples. In this case, the sample application tests the model with two examples from the catalog file (namely the books Clara Callan and Restraint of Beasts). On line 120 the application uses the following function call to get recommendations based on a single item:
sage.InvokeRecommendations(modelId, seedItems,false);
In this case, the sample application asks for a recommendation based on the book Clara Callan. In response, the model recommends two books, Spadework and Restraint of Beasts.
Line 125 also calls the InvokeRecommendations function. This time it passes true as the last function parameter. Setting this last argument to true allows you to get recommendations using many items as the seed. In this case, the sample application uses the books Clara Callan and Restraint of Beasts as the seed. For this set of items, the recommendation model returns one item, the book Spadework. The results are shown in the output listing in Figure 13-6.
sage.InvokeRecommendations(modelId, seedItems, true);
More details of the function InvokeRecommendations are available in lines 366 to 390 of the sample application. It is worth noting that you cannot build the sample application more than once with the same model name. On line 43 the model name is set to the constant string "demo_model". To rerun the sample application you need to change the name of the model in line 43; otherwise an exception will be thrown.
const string modelName = "demo_model";
Publishing Your Own Models in Azure Marketplace
In this section, you will see how to publish machine learning models in Azure Marketplace using the predictive maintenance model from Chapter 11 as an example. You can publish your models in Azure Marketplace with this three-step process.
- Create and publish a web service for your machine learning model.
- Obtain its API key and the details of the OData endpoint.
- Publish your model as an API in Azure Marketplace.
Your submitted API will be reviewed by Microsoft before publication. The approval will take a few business days. Let’s see how to implement each of the these three steps in more detail.
Creating and Publishing a Web Service for Your Machine Learning Model
In this example, you will use the predictive maintenance model we discussed in Chapter 11. The following two steps are required to deploy your model in production. With these steps you basically create a web service that can be called as an API.
- Create a Predictive experiment, and
- Publish your experiment as a web service.
Let’s review these steps in detail and see how they apply to your finished model built in Chapter 11. You can start this section by opening the predictive maintenance model in Azure Machine Learning Studio.
![]() Note The model we will discuss in this section is published as Predictive Maintenance Model in the Azure Machine Learning Gallery. You can access the Gallery at http://gallery.azureml.net/. Feel free to download this experiment to your workspace in Azure Machine Learning.
Note The model we will discuss in this section is published as Predictive Maintenance Model in the Azure Machine Learning Gallery. You can access the Gallery at http://gallery.azureml.net/. Feel free to download this experiment to your workspace in Azure Machine Learning.
To create a scoring experiment, follow these steps in Azure Machine Learning Studio.
- Run your experiment with the Run button at the bottom of Azure Machine Learning Studio.
- Select the Train Model module in the left branch containing the Boosted Decision Tree. This tells the tools that you plan to deploy the Boosted Decision Tree model in production. This step is only necessary if you have several training modules in your experiment.
- Next, click Set Up Web Service | Predictive Web Service [Recommended] at the bottom of Azure Machine Learning Studio. Azure Machine Learning will automatically create a predictive experiment.
- Your predictive experiment should appear as shown in Figure 13-7. You are now ready to deploy your new predictive experiment in production. To do this, move to the next step.
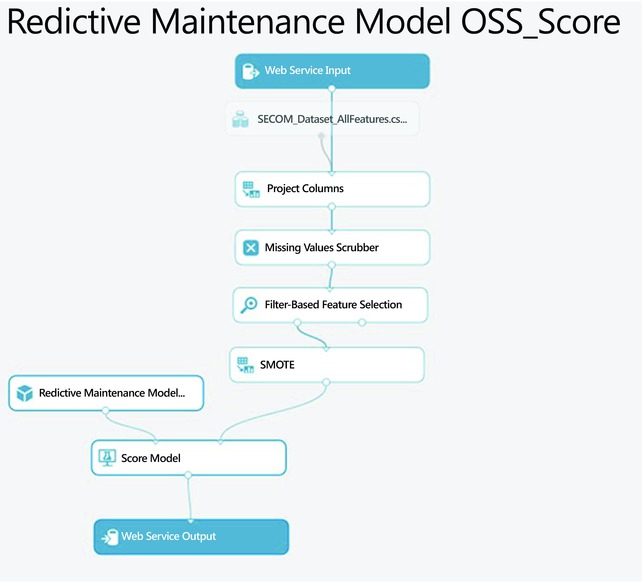
Figure 13-7. The scoring experiment ready for deployment as a web service
Publishing Your Experiment as a Web Service
At this point, your model is now ready to be deployed as a web service. To do so, follow these steps.
- Run your experiment with the Run button at the bottom of Azure Machine Learning Studio.
- Click the Deploy Web Service button at the bottom of Azure Machine Learning Studio. The tool will deploy your scored model as a web service. The result should appear as shown in Figure 13-8.
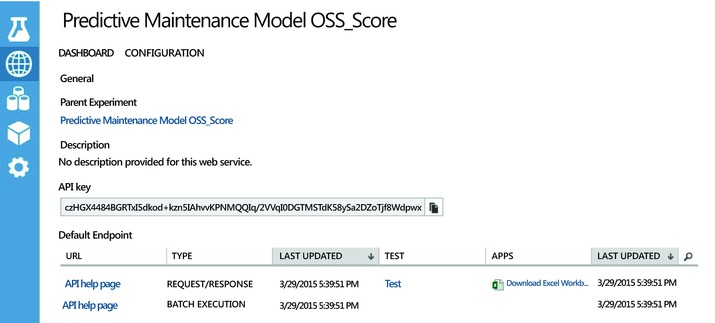
Figure 13-8. The results of the deployed model showing the API key and URLs for the service
Obtaining the API Key and the Details of the OData Endpoint
The dashboard in Figure 13-8 shows the API key for your new web service. You will need this to deploy your model in the marketplace. Next, you will need to get the URL of your OData endpoint. To obtain this from the same dashboard, click the first link named API help page for the Request/response service. This will open the page shown in Figure 13-9. Copy the OData endpoint address.
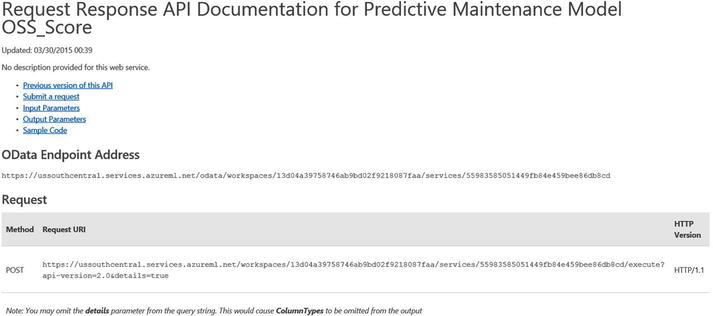
Figure 13-9. API documentation of the deployed predictive model
Publishing Your Model as an API in Azure Marketplace
Having deployed your model as a web service, you are ready to publish it to Azure Marketplace. To do this simply follow these steps.
- Visit Azure Marketplace at https://datamarket.azure.com/home and click Publish in the top menu on the page.
- Select data services from the menu on the left pane, and enter a name for your new service. See Figure 13-10 for details.
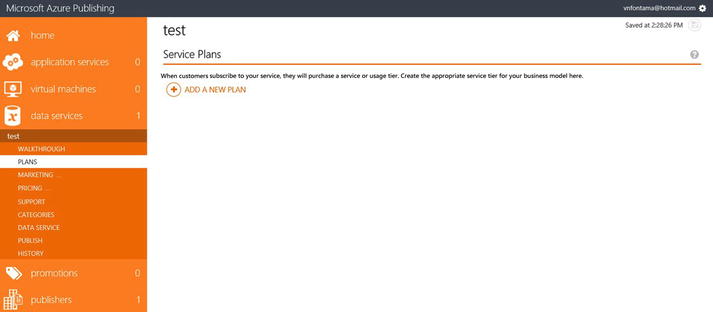
Figure 13-10. Creating a new data service in Azure Marketplace
- Click the link named Create a new service.
- Complete your seller profile. You also need to provide your banking details to receive payments from your customers.
- Under Plans, create pricing plans for your new service. Do browse other services on Azure Marketplace for examples of pricing plans.
- Provide marketing content in the Marketing submenu. This includes descriptions and images.
- In the pricing submenu, set prices for the countries covered by Azure Marketplace. You can set the prices per country manually. Even better, Azure can automatically calculate prices per country if you click the autoprice link.
- Under the Data Services tab, select Web Services as your data source.
- Enter the URL of your OData service (from the last section) in the Service URL text field.
- Choose Header as the Authentication scheme.
- For Header Name, enter Authorization.
- In Header Value, enter Bearer. Click the space bar, and then paste your API key (the one you obtained in the previous section).
- Check the box labeled This service is OData.
- Now click Test Connection. Figure 13-11 shows the completed form. The header name and value are encrypted.
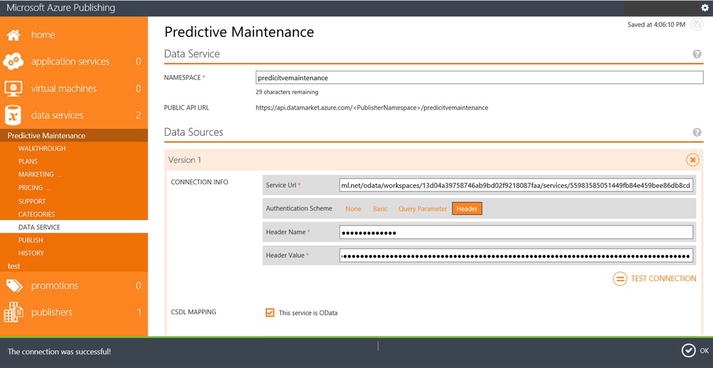
Figure 13-11. Completed form for Data Service tab
- Be sure to select Machine Learning in the Categories tab.
- After testing, select Publish and choose Push to staging. The tool will tell you if there are any issues with your submission.
- Once you are ready, choose Request approval to push to production. Microsoft will review your submission for approval. This can take a few business days.
Congratulations, you have just published your first predictive model in Azure Marketplace. Once approved, you can start earning money from your own predictive model.
Summary
As you saw in this chapter, Azure Marketplace is a great opportunity for you to make money from your predictive models. Azure Marketplace is an online site for buying and selling data and Machine Learning solutions. This chapter introduced this marketplace, showing existing Machine Learning APIs from Microsoft and its partners. You saw how to consume services from Azure Marketplace. Specifically, you reviewed the Recommendations API, a potent recommendation engine available as an API service from Azure Marketplace. You also saw step by step how to sell your own predictive models on Azure Marketplace.