Services are objects that provide common functionality to support other building blocks in an application, such as directives, components, and pipes. What’s important about services is the way that they are used, which is through a process called dependency injection. Using services can increase the flexibility and scalability of an Angular application, but dependency injection can be a difficult topic to understand. To that end, I start this chapter slowly and explain the problems that services and dependency injection can be used to solve, how dependency injection works, and why you should consider using services in your own projects. In Chapter 20, I introduce some more advanced features that Angular provides for service. Table 19-1 puts services in context.
Table 19-1
Putting Services in Context
Question
Answer
What are they?
Services are objects that define functionality required by other building blocks such as components or directives. What separates services from regular objects is that they are provided to building blocks by an external provider, rather than being created directly using the new keyword or received by an input property.
Why are they useful?
Services simplify the structure of applications, make it easier to move or reuse functionality, and make it easier to isolate building blocks for effective unit testing.
How are they used?
Classes declare dependencies on services using constructor parameters, which are then resolved using the set of services for which the application has been configured. Services are classes to which the @Injectable decorator has been applied.
Are there any pitfalls or limitations?
Dependency injection is a contentious topic, and not all developers like using it. If you don’t perform unit tests or if your applications are relatively simple, the extra work required to implement dependency injection is unlikely to pay any long-term dividends.
Are there any alternatives?
Services and dependency injection are hard to avoid because Angular uses them to provide access to built-in functionality. But you are not required to define services for your own custom functionality if that is your preference.
Avoid the need to distribute shared objects manually
Use services
1–14, 21–28
Declare a dependency on a service
Add a constructor argument with the type of the service you require
15–20
Preparing the Example Project
I continue using the example project in this chapter that I have been working with since Chapter 11. To prepare for this chapter, I have removed most of the pipes from the data binding expressions in the table of products and also removed the select element that was used to choose how many products were displayed, as shown in Listing 19-1.
Removing the Pipe from the productTable.component.html File in the src/app Folder
Run the following command in the example folder to start the TypeScript compiler and the development HTTP server:
ng serve
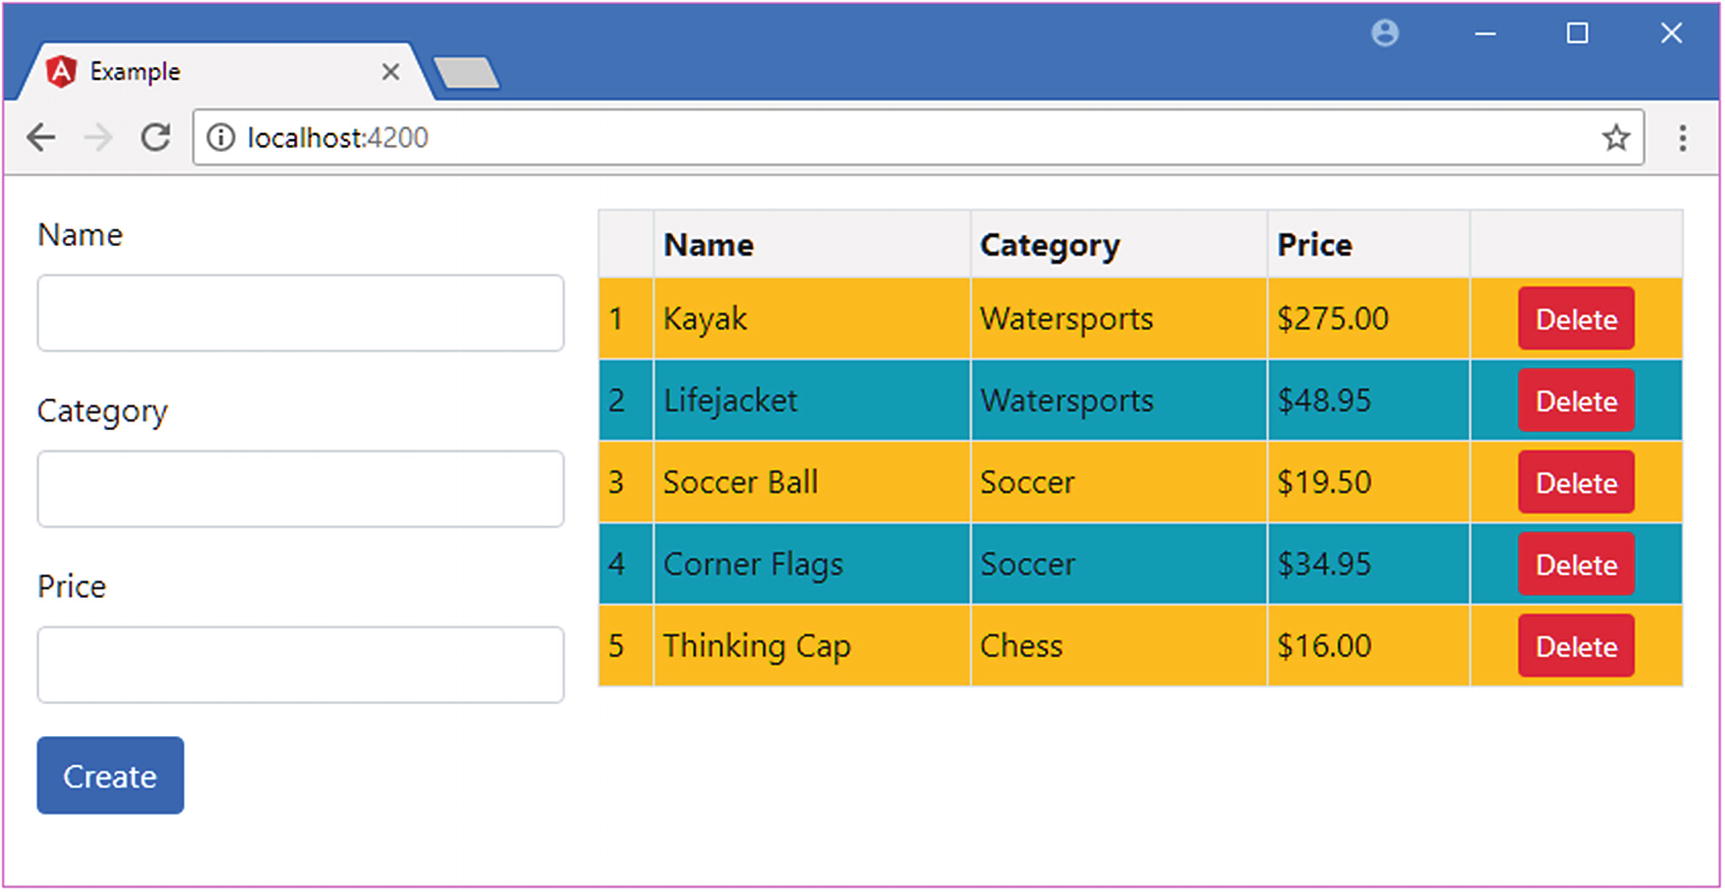
Open a new browser window and navigate to http://localhost:4200 to see the content shown in Figure 19-1.
Figure 19-1
Running the example application
Understanding the Object Distribution Problem
In Chapter 17, I added components to the project to help break up the monolithic structure of the application. In doing this, I used input and output properties to connect components together, using host elements to bridge the isolation that Angular enforces between a parent component and its children. I also showed you how to query the contents of the template for view children, which complements the content children feature described in Chapter 16.
These techniques for coordinating between directives and components can be powerful and useful if applied carefully. But they can also end up as a general tool for distributing shared objects throughout an application, where the result is to increase the complexity of the application and to tightly bind components together.
Demonstrating the Problem
To help demonstrate the problem, I am going to add a shared object to the project and two components that rely on it. I created a file called discount.service.ts to the src/app folder and defined the class shown in Listing 19-2. I’ll explain the significance of the service part of the file name later in the chapter.
export class DiscountService {
private discountValue: number = 10;
public get discount(): number {
return this.discountValue;
}
public set discount(newValue: number) {
this.discountValue = newValue || 0;
}
public applyDiscount(price: number) {
return Math.max(price - this.discountValue, 5);
}
}
Listing 19-2
The Contents of the discount.service.ts File in the src/app Folder
The DiscountService class defines a private property called discountValue that is used to store a number that will be used to reduce the product prices in the data model. This value is exposed through getters and setters called discount, and there is a convenience method called applyDiscount that reduces a price while ensuring that a price is never less than $5.
For the first component that makes use of the DiscountService class, I added a file called discountDisplay.component.ts to the src/app folder and added the code shown in Listing 19-3.
import { Component, Input } from "@angular/core";
import { DiscountService } from "./discount.service";
@Component({
selector: "paDiscountDisplay",
template: `<div class="bg-info text-white p-2">
The discount is {{discounter.discount}}
</div>`
})
export class PaDiscountDisplayComponent {
@Input("discounter")
discounter: DiscountService;
}
Listing 19-3
The Contents of the discountDisplay.component.ts File in the src/app Folder
The DiscountDisplayComponent uses an inline template to display the discount amount, which is obtained from a DiscountService object received through an input property.
For the second component that makes use of the DiscountService class, I added a file called discountEditor.component.ts to the src/app folder and added the code shown in Listing 19-4.
import { Component, Input } from "@angular/core";
import { DiscountService } from "./discount.service";
@Component({
selector: "paDiscountEditor",
template: `<div class="form-group">
<label>Discount</label>
<input [(ngModel)]="discounter.discount"
class="form-control" type="number" />
</div>`
})
export class PaDiscountEditorComponent {
@Input("discounter")
discounter: DiscountService;
}
Listing 19-4
The Contents of the discountEditor.component.ts File in the src/app Folder
The DiscountEditorComponent uses an inline template with an input element that allows the discount amount to be edited. The input element has a two-way binding on the DiscountService.discount property that targets the ngModel directive. Listing 19-5 shows the new components being enabled in the Angular module.
import { NgModule } from "@angular/core";
import { BrowserModule } from "@angular/platform-browser";
import { ProductComponent } from "./component";
import { FormsModule, ReactiveFormsModule } from "@angular/forms";
import { PaAttrDirective } from "./attr.directive";
import { PaModel } from "./twoway.directive";
import { PaStructureDirective } from "./structure.directive";
import { PaIteratorDirective } from "./iterator.directive";
import { PaCellColor } from "./cellColor.directive";
import { PaCellColorSwitcher } from "./cellColorSwitcher.directive";
import { ProductTableComponent } from "./productTable.component";
import { ProductFormComponent } from "./productForm.component";
import { PaToggleView } from "./toggleView.component";
import { PaAddTaxPipe } from "./addTax.pipe";
import { PaCategoryFilterPipe } from "./categoryFilter.pipe";
import { LOCALE_ID } from "@angular/core";
import localeFr from '@angular/common/locales/fr';
import { registerLocaleData } from '@angular/common';
import { PaDiscountDisplayComponent } from "./discountDisplay.component";
import { PaDiscountEditorComponent } from "./discountEditor.component";
Enabling the Components in the app.module.ts File in the src/app Folder
To get the new components working, I added them to parent component’s template, positioning the new content underneath the table that lists the products, which means that I need to edit the productTable.component.html file, as shown in Listing 19-6.
Adding Component Elements in the productTable.component.html File in the src/app Folder
These elements correspond to the components’ selector properties in Listing 19-3 and Listing 19-4 and use data bindings to set the value of the input properties. The final step is to create an object in the parent component that will provide the value for the data binding expressions, as shown in Listing 19-7.
import { Component, Input, ViewChildren, QueryList } from "@angular/core";
import { Model } from "./repository.model";
import { Product } from "./product.model";
import { DiscountService } from "./discount.service";
@Component({
selector: "paProductTable",
templateUrl: "productTable.component.html"
})
export class ProductTableComponent {
discounter: DiscountService = new DiscountService();
@Input("model")
dataModel: Model;
getProduct(key: number): Product {
return this.dataModel.getProduct(key);
}
getProducts(): Product[] {
return this.dataModel.getProducts();
}
deleteProduct(key: number) {
this.dataModel.deleteProduct(key);
}
dateObject: Date = new Date(2020, 1, 20);
dateString: string = "2020-02-20T00:00:00.000Z";
dateNumber: number = 1582156800000;
}
Listing 19-7
Creating the Shared Object in the productTable.component.ts File in the src/app Folder
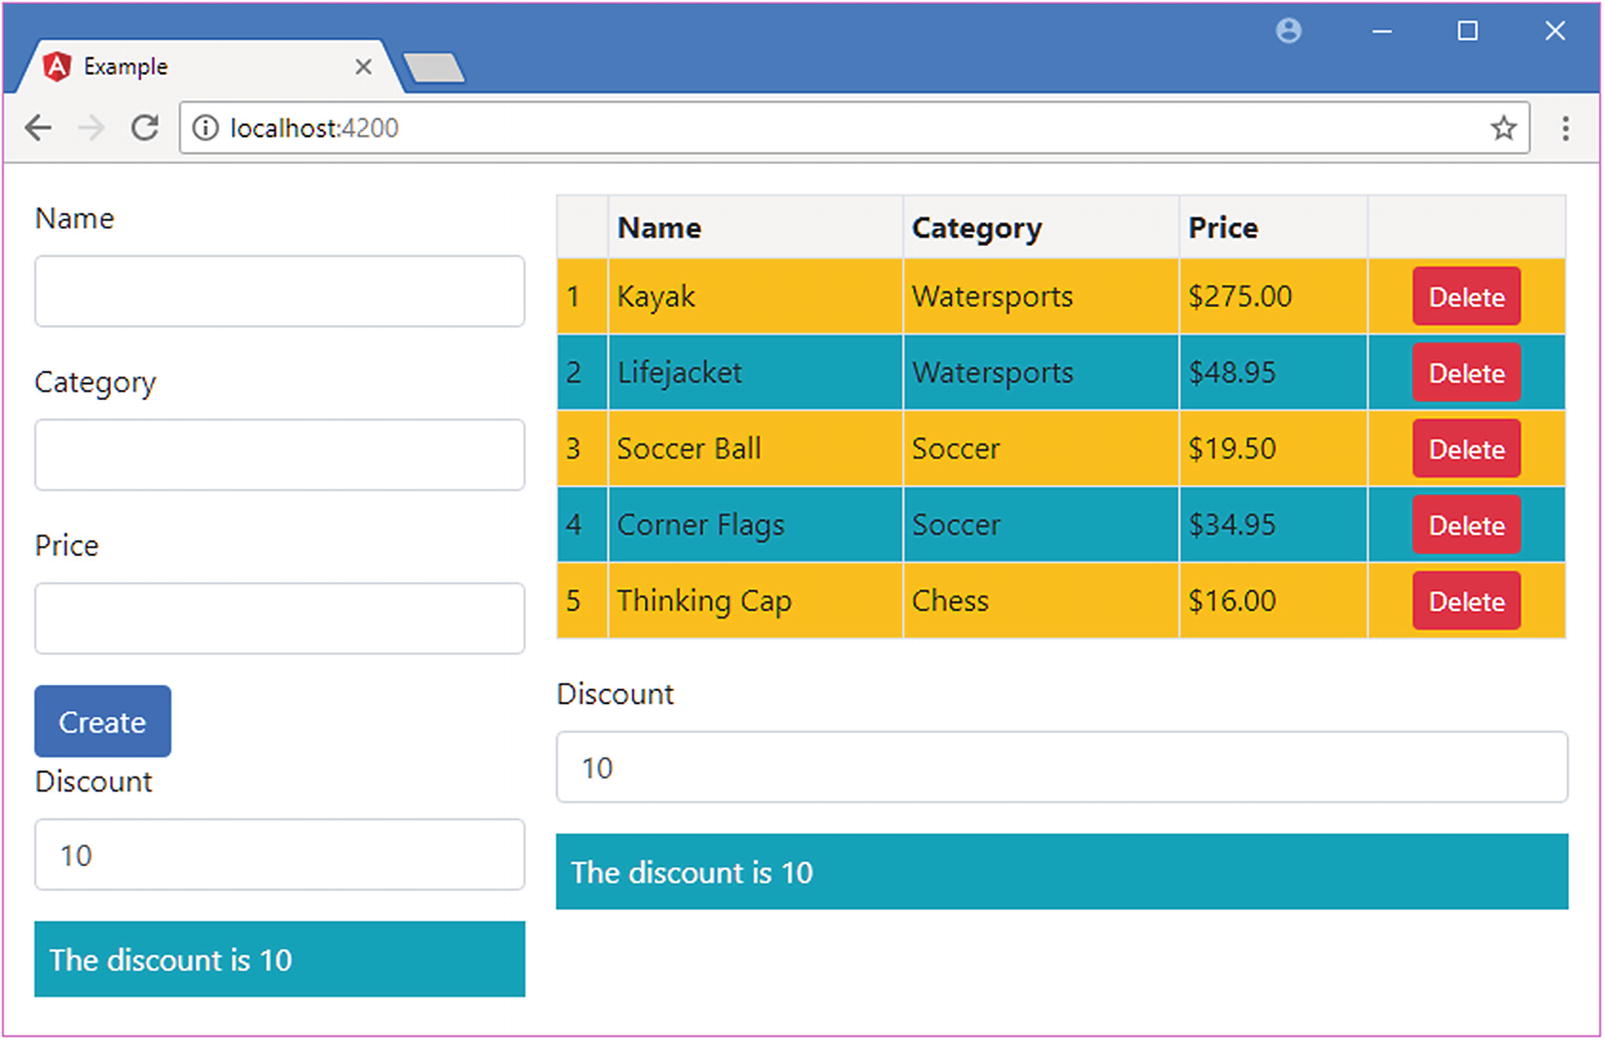
Figure 19-2 shows the content from the new components. Changes to the value in the input element provided by one of the components will be reflected in the content presented by the other component, reflecting the use of the shared DiscountService object and its discount property.
Figure 19-2
Adding components to the example application
The process for adding the new components and the shared object was straightforward and logical, until the final stage. The problem arises in the way that I had to create and distribute the shared object: the instance of the DiscountService class.
Because Angular isolates components from one another, I had no way to share the DiscountService object directly between the DiscountEditorComponent and DiscountDisplayComponent. Each component could have created its own DiscountService object, but that means changes from the editor component wouldn’t be shown in the display component.
That is what led me to create the DiscountService object in the product table component, which is the first shared ancestor of the discount editor and display components. This allowed me to distribute the DiscountService object through the product table component’s template, ensuring that a single object was shared with both of the components that need it.
But there are a couple of problems. The first is that the ProductTableComponent class doesn’t actually need or use a DiscountService object to deliver its own functionality. It just happens to be the first common ancestor of the components that do need the object. And creating the shared object in the ProductTableComponent class makes that class slightly more complex and slightly more difficult to test effectively. This is a modest increment of complexity, but it will occur for every shared object that the application requires—and a complex application can depend on a lot of shared objects, each of which ends up being created by components that just happen to be the first common ancestor of the classes that depend on them.
The second problem is hinted at by the term first common ancestor. The ProductTableComponent class happens to be the parent of both of the classes that depend on the DiscountService object, but think about what would happen if I wanted to move the DiscountEditorComponent so that it was displayed under the form rather than the table. In this situation, I have to work my way up the tree of components until I find a common ancestor, which would end up being the root component. And then I would have to work my way down the component tree adding input properties and modifying templates so that each intermediate component could receive the DiscountService object from its parent and pass it on to any children who have descendants that need it. And the same applies to any directives that depend on receiving a DiscountService object, where any component whose template contains data bindings that target that directive must make sure they are part of the distribution chain, too.
The result is that the components and directives in the application become tightly bound together. A major refactoring is required if you need to move or reuse a component in a different part of the application and the management of the input properties and data bindings become unmanageable.
Distributing Objects as Services Using Dependency Injection
There is a better way to distribute objects to the classes that depend on them, which is to use dependency injection, where objects are provided to classes from an external source. Angular includes a built-in dependency injection system and supplies the external source of objects, known as providers. In the sections that follow, I rework the example application to provide the DiscountService object without needing to use the component hierarchy as a distribution mechanism.
Preparing the Service
Any object that is managed and distributed through dependency injection is called a service, which is why I selected the name DiscountService for the class that defines the shared object and why that class is defined in a file called discount.service.ts. Angular denotes service classes using the @Injectable decorator, as shown in Listing 19-8. The @Injectable decorator doesn’t define any configuration properties.
import { Injectable } from "@angular/core";
@Injectable()
export class DiscountService {
private discountValue: number = 10;
public get discount(): number {
return this.discountValue;
}
public set discount(newValue: number) {
this.discountValue = newValue || 0;
}
public applyDiscount(price: number) {
return Math.max(price - this.discountValue, 5);
}
}
Listing 19-8
Preparing a Class as a Service in the discount.service.ts File in the src/app Folder
Tip
Strictly speaking, the @Injectable decorator is required only when a class has its own constructor arguments to resolve, but it is a good idea to apply it anyway because it serves as a signal that the class is intended for use as a service.
Preparing the Dependent Components
A class declares dependencies using its constructor. When Angular needs to create an instance of the class—such as when it finds an element that matches the selector property defined by a component—its constructor is inspected, and the type of each argument is examined. Angular then uses the services that have been defined to try to satisfy the dependencies. The term dependency injection arises because each dependency is injected into the constructor to create the new instance.
For the example application, it means that the components that depend on a DiscountService object no longer require input properties and can declare a constructor dependency instead. Listing 19-9 shows the changes to the DiscountDisplayComponent class.
import { Component, Input } from "@angular/core";
import { DiscountService } from "./discount.service";
Declaring a Dependency in the discountDisplay.component.ts File in the src/app Folder
The same change can be applied to the DiscountEditorComponent class, replacing the input property with a dependency declared through the constructor, as shown in Listing 19-10.
import { Component, Input } from "@angular/core";
import { DiscountService } from "./discount.service";
Declaring a Dependency in the discountEditor.component.ts File in the src/app Folder
These are small changes, but they avoid the need to distribute objects using templates and input properties and produce a more flexible application. I can now remove the DiscountService object from the product table component, as shown in Listing 19-11.
import { Component, Input, ViewChildren, QueryList } from "@angular/core";
import { Model } from "./repository.model";
import { Product } from "./product.model";
import { DiscountService } from "./discount.service";
@Component({
selector: "paProductTable",
templateUrl: "productTable.component.html"
})
export class ProductTableComponent {
// discounter: DiscountService = new DiscountService();
@Input("model")
dataModel: Model;
getProduct(key: number): Product {
return this.dataModel.getProduct(key);
}
getProducts(): Product[] {
return this.dataModel.getProducts();
}
deleteProduct(key: number) {
this.dataModel.deleteProduct(key);
}
dateObject: Date = new Date(2020, 1, 20);
dateString: string = "2020-02-20T00:00:00.000Z";
dateNumber: number = 1582156800000;
}
Listing 19-11
Removing the Shared Object in the productTable.component.ts File in the src/app Folder
And since the parent component is no longer providing the shared object through data bindings, I can remove them from the template, as shown in Listing 19-12.
Removing the Data Bindings in the productTable.component.html File in the src/app Folder
Registering the Service
The final change is to configure the dependency injection feature so that it can provide DiscountService objects to the components that require them. To make the service available throughout the application, it is registered in the Angular module, as shown in Listing 19-13.
import { NgModule } from "@angular/core";
import { BrowserModule } from "@angular/platform-browser";
import { ProductComponent } from "./component";
import { FormsModule, ReactiveFormsModule } from "@angular/forms";
import { PaAttrDirective } from "./attr.directive";
import { PaModel } from "./twoway.directive";
import { PaStructureDirective } from "./structure.directive";
import { PaIteratorDirective } from "./iterator.directive";
import { PaCellColor } from "./cellColor.directive";
import { PaCellColorSwitcher } from "./cellColorSwitcher.directive";
import { ProductTableComponent } from "./productTable.component";
import { ProductFormComponent } from "./productForm.component";
import { PaToggleView } from "./toggleView.component";
import { PaAddTaxPipe } from "./addTax.pipe";
import { PaCategoryFilterPipe } from "./categoryFilter.pipe";
import { LOCALE_ID } from "@angular/core";
import localeFr from '@angular/common/locales/fr';
import { registerLocaleData } from '@angular/common';
import { PaDiscountDisplayComponent } from "./discountDisplay.component";
import { PaDiscountEditorComponent } from "./discountEditor.component";
import { DiscountService } from "./discount.service";
Registering a Service in the app.module.ts File in the src/app Folder
The NgModule decorator’s providers property is set to an array of the classes that will be used as services. There is only one service at the moment, which is provided by the DiscountService class.
When you save the changes to the application, there won’t be any visual changes, but the dependency injection feature will be used to provide the components with the DiscountService object they require.
Reviewing the Dependency Injection Changes
Angular seamlessly integrates dependency injection into its feature set. Each time that Angular encounters an element that requires a new building block, such as a component or a pipe, it examines the class constructor to check what dependencies have been declared and uses its services to try to resolve them. The set of services used to resolve dependencies includes the custom services defined by the application, such as the DiscountService service that has been registered in Listing 19-13, and a set of built-in services provided by Angular that are described in later chapters.
The changes to introduce dependency injection in the previous section didn’t result in a big-bang change in the way that the application works—or any visible change at all. But there is a profound difference in the way that the application is put together that makes it more flexible and fluid. The best demonstration of this is to add the components that require the DiscountService to a different part of the application, as shown in Listing 19-14.
Adding Components in the productForm.component.html File in the src/app Folder
These new elements duplicate the discount display and editor components so they appear below the form used to create new products, as shown in Figure 19-3.
Figure 19-3
Duplicating components with dependencies
There are two points of note. First, using dependency injection made this a simple process of adding elements to a template, without needing to modify the ancestor components to provide a DiscountService object using input properties.
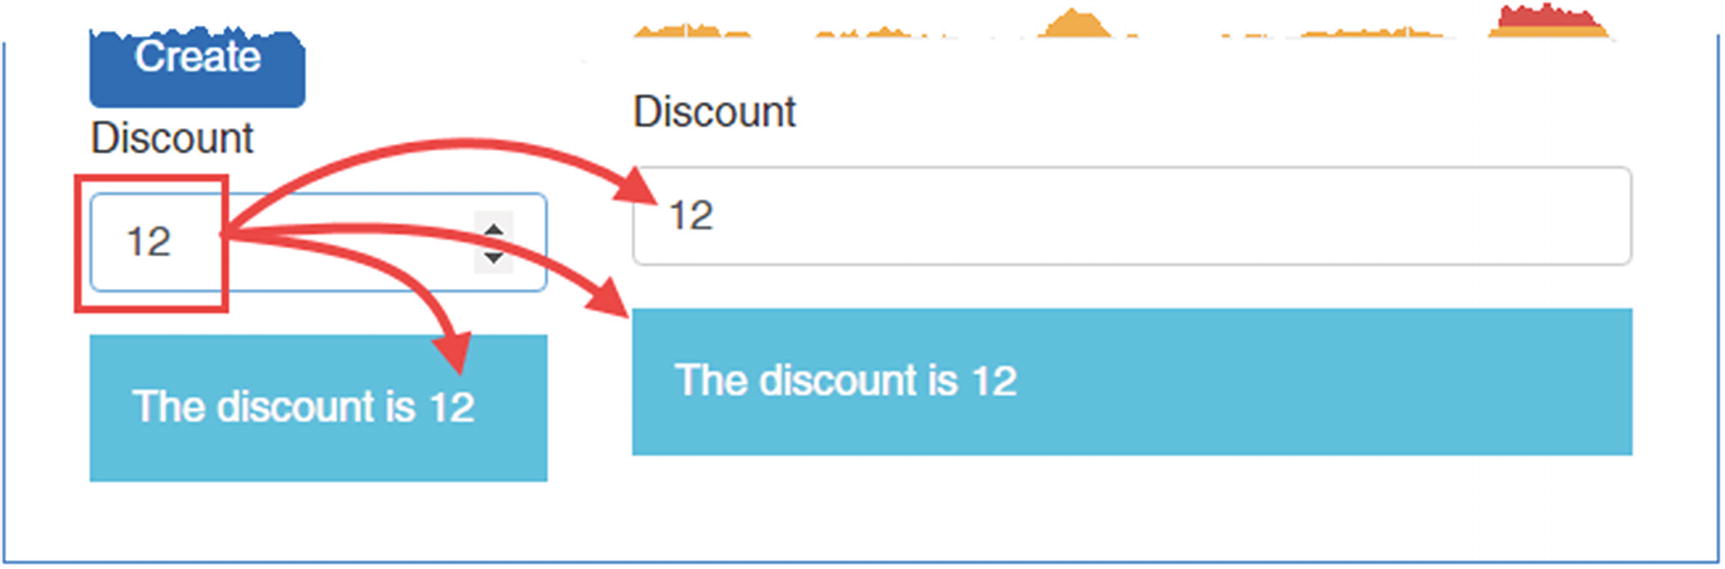
The second point of note is that all the components in the application that have declared a dependency on DiscountService have received the same object. If you edit the value in either of the input elements, the changes will be reflected in the other input element and in the string interpolation bindings, as shown in Figure 19-4.
Figure 19-4
Checking that the dependency is resolved using a shared object
Declaring Dependencies in Other Building Blocks
It isn’t just components that can declare constructor dependencies. Once you have defined a service, you can use it more widely, including in other building blocks in the application, such as pipes and directives, as demonstrated in the sections that follow.
Declaring a Dependency in a Pipe
Pipes can declare dependencies on services by defining a constructor with arguments for each required service. To demonstrate, I added a file called discount.pipe.ts to the src/app folder and used it to define the pipe shown in Listing 19-15.
import { Pipe, Injectable } from "@angular/core";
import { DiscountService } from "./discount.service";
The Contents of the discount.pipe.ts File in the src/app Folder
The PaDiscountPipe class is a pipe that receives a price and generates a result by calling the DiscountService.applyDiscount method, where the service is received through the constructor. The pure property in the @Pipe decorator is false, which means that the pipe will be asked to update its result when the value stored by the DiscountService changes, which won’t be recognized by the Angular change-detection process.
Tip
As explained in Chapter 18, this feature should be used with caution because it means that the transform method will be called after every change in the application, not just when the service is changed.
Listing 19-16 shows the new pipe being registered in the application’s Angular module.
import { NgModule } from "@angular/core";
import { BrowserModule } from "@angular/platform-browser";
import { ProductComponent } from "./component";
import { FormsModule, ReactiveFormsModule } from "@angular/forms";
import { PaAttrDirective } from "./attr.directive";
import { PaModel } from "./twoway.directive";
import { PaStructureDirective } from "./structure.directive";
import { PaIteratorDirective } from "./iterator.directive";
import { PaCellColor } from "./cellColor.directive";
import { PaCellColorSwitcher } from "./cellColorSwitcher.directive";
import { ProductTableComponent } from "./productTable.component";
import { ProductFormComponent } from "./productForm.component";
import { PaToggleView } from "./toggleView.component";
import { PaAddTaxPipe } from "./addTax.pipe";
import { PaCategoryFilterPipe } from "./categoryFilter.pipe";
import { LOCALE_ID } from "@angular/core";
import localeFr from '@angular/common/locales/fr';
import { registerLocaleData } from '@angular/common';
import { PaDiscountDisplayComponent } from "./discountDisplay.component";
import { PaDiscountEditorComponent } from "./discountEditor.component";
import { DiscountService } from "./discount.service";
Applying a Pipe in the productTable.component.html File in the src/app Folder
The discount pipe processes the price to apply the discount and then passes on the value to the currency pipe for formatting. You can see the effect of using the service in the pipe by changing the value in one of the discount input elements, as shown in Figure 19-5.
Figure 19-5
Using a service in a pipe
Declaring Dependencies in Directives
Directives can also use services. As I explained in Chapter 17, components are just directives with templates, so anything that works in a component will also work in a directive.
To demonstrate using a service in a directive, I added a file called discountAmount.directive.ts to the src/app folder and used it to define the directive shown in Listing 19-18.
import { Directive, HostBinding, Input,
SimpleChange, KeyValueDiffer, KeyValueDiffers,
ChangeDetectorRef } from "@angular/core";
import { DiscountService } from "./discount.service";
The Contents of the discountAmount.directive.ts File in the src/app Folder
Directives don’t have an equivalent to the pure property used by pipes and must take direct responsibility for responding to changes propagated through services. This directive displays the discounted amount for a product. The selector property matches td elements that have a pa-price attribute, which is also used as an input property to receive the price that will be discounted. The directive exports its functionality using the exportAs property and provides a property called discountAmount whose value is set to the discount that has been applied to the product.
There are two other points to note about this directive. The first is that the DiscountService object isn’t the only constructor parameters in the directive’s class.
The KeyValueDiffers and ChangeDetectorRef parameters are also dependencies that Angular will have to resolve when it creates a new instance of the directive class. These are examples of the built-in services that Angular provides that deliver commonly required functionality.
The second point of note is what the directive does with the services it receives. The components and the pipe that use the DiscountService service don’t have to worry about tracking updates, either because Angular automatically evaluates the expressions of the data bindings and updates them when the discount rate changed (for the components) or because any change in the application triggers an update (for the impure pipe). The data binding for this directive is on the price property, which will trigger a change if is altered. But there is also a dependency on the discount property defined by the DiscountService class. Changes in the discount property are detected using the services received through the constructor, which are similar to the ones used to track changes in iterable sequences described in Chapter 16 but which operate on key-value pair objects, such as Map objects or regular objects that define properties, such as DiscountService. When Angular invokes the ngDoCheck method, the directive uses the key-value pair differ to see whether there has been a change. (This change direction could also have been handled by keeping track of the previous update in the directive class, but I wanted to provide an example of using the key-value differ feature.)
The directive also implements the ngOnChanges method so that it can respond to changes in the value of the input property. For both types of update, the updateValue method is called, which calculates the discounted price and assigns it to the discountAmount property.
Listing 19-19 registers the new directive in the application’s Angular module.
import { NgModule } from "@angular/core";
import { BrowserModule } from "@angular/platform-browser";
import { ProductComponent } from "./component";
import { FormsModule, ReactiveFormsModule } from "@angular/forms";
import { PaAttrDirective } from "./attr.directive";
import { PaModel } from "./twoway.directive";
import { PaStructureDirective } from "./structure.directive";
import { PaIteratorDirective } from "./iterator.directive";
import { PaCellColor } from "./cellColor.directive";
import { PaCellColorSwitcher } from "./cellColorSwitcher.directive";
import { ProductTableComponent } from "./productTable.component";
import { ProductFormComponent } from "./productForm.component";
import { PaToggleView } from "./toggleView.component";
import { PaAddTaxPipe } from "./addTax.pipe";
import { PaCategoryFilterPipe } from "./categoryFilter.pipe";
import { LOCALE_ID } from "@angular/core";
import localeFr from '@angular/common/locales/fr';
import { registerLocaleData } from '@angular/common';
import { PaDiscountDisplayComponent } from "./discountDisplay.component";
import { PaDiscountEditorComponent } from "./discountEditor.component";
import { DiscountService } from "./discount.service";
import { PaDiscountPipe } from "./discount.pipe";
import { PaDiscountAmountDirective } from "./discountAmount.directive";
Registering a Directive in the app.module.ts File in the src/app Folder
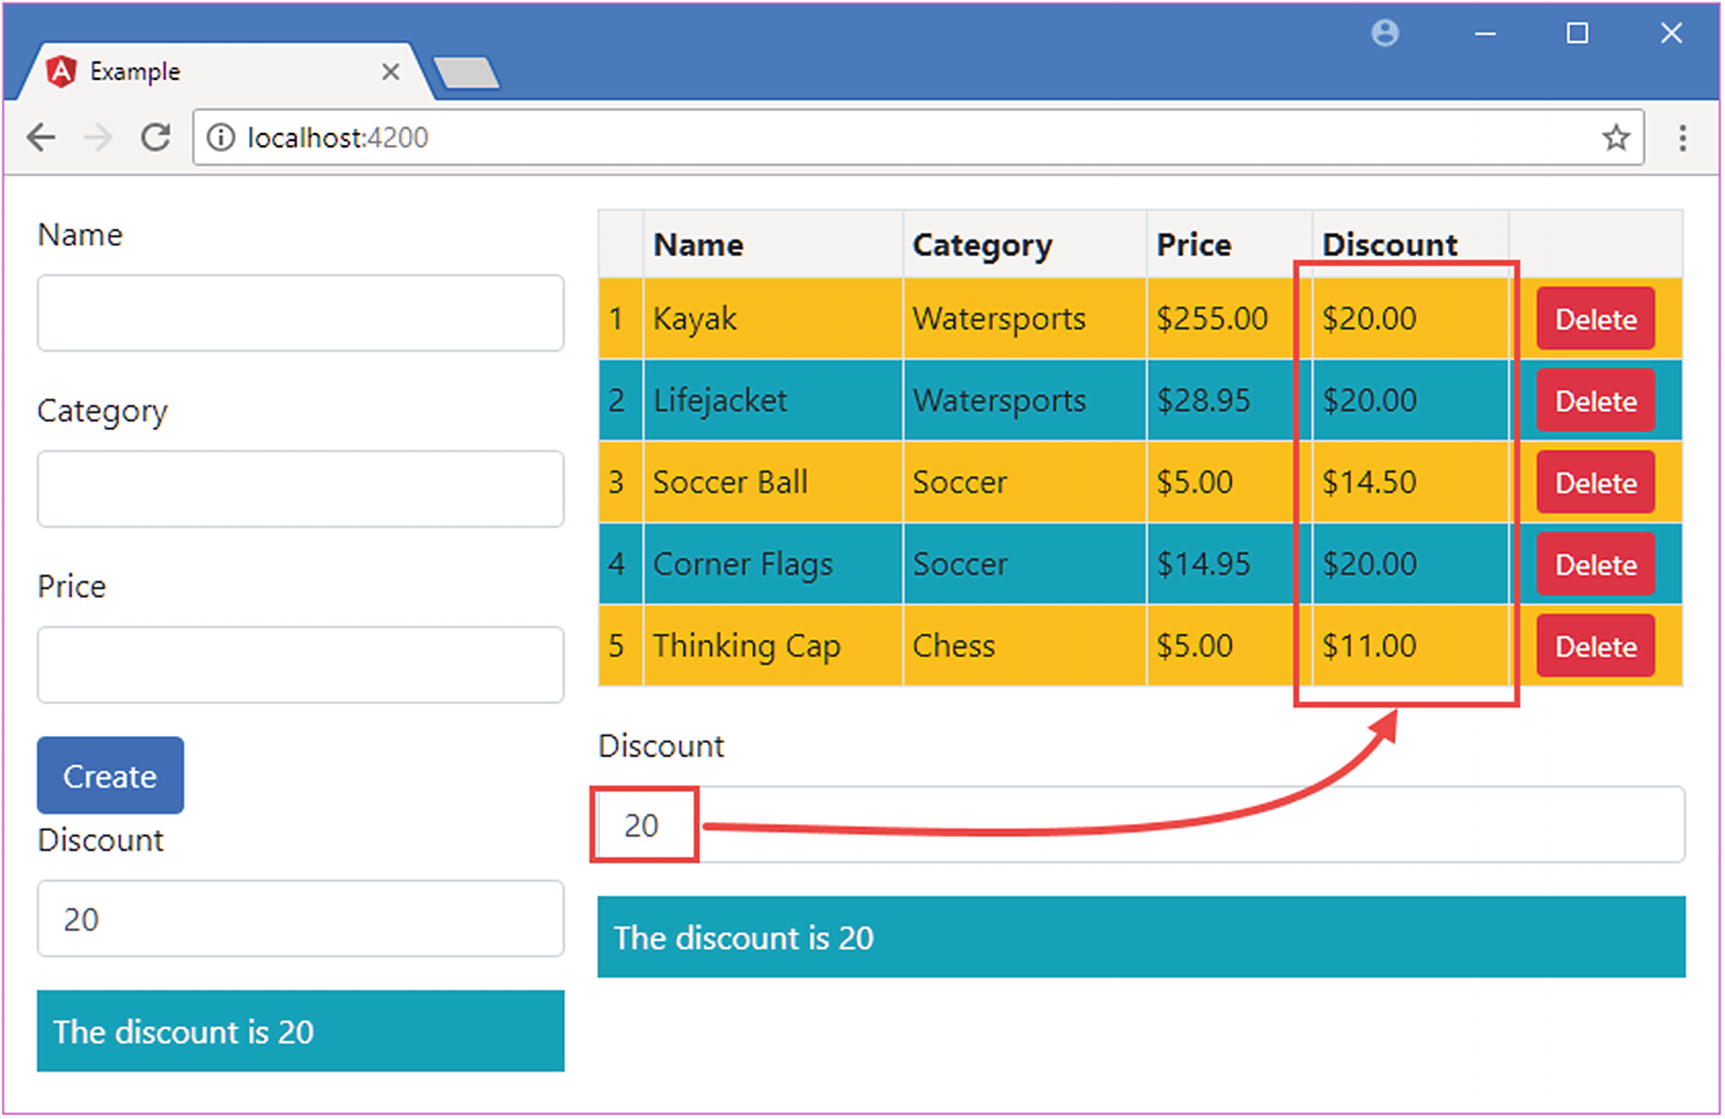
To apply the new directive, Listing 19-20 adds a new column to the table, using a string interpolation binding to access the property provided by the directive and pass it to the currency pipe.
Creating a New Column in the productTable.component.html File in the src/app Folder
The directive could have created a host binding on the textContent property to set the contents of its host element, but that would have prevented the currency pipe from being used. Instead, the directive is assigned to the discount template variable, which is then used in the string interpolation binding to access and then format the discountAmount value. Figure 19-6 shows the results. Changes to the discount amount in either of the discount editor input elements will be reflected in the new table column.
Figure 19-6
Using a service in a directive
Understanding the Test Isolation Problem
The example application contains a related problem that services and dependency injection can be used to solve. Consider how the Model class is created in the root component:
import { ApplicationRef, Component } from "@angular/core";
import { Model } from "./repository.model";
import { Product } from "./product.model";
import { ProductFormGroup } from "./form.model";
@Component({
selector: "app",
templateUrl: "app/template.html"
})
export class ProductComponent {
model: Model = new Model();
addProduct(p: Product) {
this.model.saveProduct(p);
}
}
The root component is defined as the ProductComponent class, and it sets up a value for its model property by creating a new instance of the Model class. This works—and is a perfectly legitimate way to create an object—but it makes it harder to perform unit testing effectively.
Unit testing works best when you can isolate one small part of the application and focus on it to perform tests. But when you create an instance of the ProductComponent class, you are implicitly creating an instance of the Model class as well. If you were to run tests on the root component’s addProduct method and you found a problem, you would have no indication of whether the problem was in the ProductComponent or Model class.
Isolating Components Using Services and Dependency Injection
The underlying problem is that the ProductComponent class is tightly bound to the Model class, which is, in turn, tightly bound to the SimpleDataSource class. Dependency injection can be used to tease apart the building blocks in an application so that each class can be isolated and tested on its own. In the sections that follow, I walk through the process of breaking up these tightly coupled classes, following essentially the same process as in the previous section but delving deeper into the example application.
Preparing the Services
The @Injectable decorator is used to denote services, just as in the previous example. Listing 19-21 shows the decorator applied to the SimpleDataSource class.
import { Injectable } from "@angular/core";
import { Product } from "./product.model";
@Injectable()
export class SimpleDataSource {
private data:Product[];
constructor() {
this.data = new Array<Product>(
new Product(1, "Kayak", "Watersports", 275),
new Product(2, "Lifejacket", "Watersports", 48.95),
new Product(3, "Soccer Ball", "Soccer", 19.50),
new Product(4, "Corner Flags", "Soccer", 34.95),
new Product(5, "Thinking Cap", "Chess", 16));
}
getData(): Product[] {
return this.data;
}
}
Listing 19-21
Denoting a Service in the datasource.model.ts File in the src/app Folder
No other changes are required. Listing 19-22 shows the same decorator being applied to the data repository, and since this class has a dependency on the SimpleDataSource class, it declares it as a constructor dependency rather than creating an instance directly.
import { Injectable } from "@angular/core";
import { Product } from "./product.model";
import { SimpleDataSource } from "./datasource.model";
Denoting a Service and Dependency in the repository.model.ts File in the src/app Folder
The important point to note in this listing is that services can declare dependencies on other services. When Angular comes to create a new instance of a service class, it inspects the constructor and tries to resolve the services in the same way as when dealing with a component or directive.
Registering the Services
These services must be registered so that Angular knows how to resolve dependencies on them, as shown in Listing 19-23.
import { NgModule } from "@angular/core";
import { BrowserModule } from "@angular/platform-browser";
import { ProductComponent } from "./component";
import { FormsModule, ReactiveFormsModule } from "@angular/forms";
import { PaAttrDirective } from "./attr.directive";
import { PaModel } from "./twoway.directive";
import { PaStructureDirective } from "./structure.directive";
import { PaIteratorDirective } from "./iterator.directive";
import { PaCellColor } from "./cellColor.directive";
import { PaCellColorSwitcher } from "./cellColorSwitcher.directive";
import { ProductTableComponent } from "./productTable.component";
import { ProductFormComponent } from "./productForm.component";
import { PaToggleView } from "./toggleView.component";
import { PaAddTaxPipe } from "./addTax.pipe";
import { PaCategoryFilterPipe } from "./categoryFilter.pipe";
import { LOCALE_ID } from "@angular/core";
import localeFr from '@angular/common/locales/fr';
import { registerLocaleData } from '@angular/common';
import { PaDiscountDisplayComponent } from "./discountDisplay.component";
import { PaDiscountEditorComponent } from "./discountEditor.component";
import { DiscountService } from "./discount.service";
import { PaDiscountPipe } from "./discount.pipe";
import { PaDiscountAmountDirective } from "./discountAmount.directive";
import { SimpleDataSource } from "./datasource.model";
Registering the Services in the app.module.ts File in the src/app Folder
Preparing the Dependent Component
Rather than create a Model object directly, the root component can declare a constructor dependency that Angular will resolve using dependency injection when the application starts, as shown in Listing 19-24.
import { ApplicationRef, Component } from "@angular/core";
import { Model } from "./repository.model";
import { Product } from "./product.model";
import { ProductFormGroup } from "./form.model";
@Component({
selector: "app",
templateUrl: "template.html"
})
export class ProductComponent {
//model: Model = new Model();
constructor(private model: Model) { }
addProduct(p: Product) {
this.model.saveProduct(p);
}
}
Listing 19-24
Declaring a Service Dependency in the component.ts File in the src/app Folder
There is now a chain of dependencies that Angular has to resolve. When the application starts, the Angular module specifies that the ProductComponent class needs a Model object. Angular inspects the Model class and finds that it needs a SimpleDataSource object. Angular inspects the SimpleDataSource object and finds that there are no declared dependencies and therefore knows that this is the end of the chain. It creates a SimpleDataSource object and passes it as an argument to the Model constructor in order to create a Model object, which can then be passed to the ProductComponent class constructor to create the object that will be used as the root component. All of this happens automatically, based on the constructors defined by each class and the use of the @Injectable decorator.
These changes don’t create any visible changes in the way that the application works, but they do allow a completely different way of performing unit tests. The ProductComponent class requires that a Model object is provided as a constructor argument, which allows for a mock object to be used.
Breaking up the direct dependencies between the classes in the application means that each of them can be isolated for the purposes of unit testing and provided with mock objects through their constructor, allowing the effect of a method or some other feature to be consistently and independently assessed.
Completing the Adoption of Services
Once you start using services in an application, the process generally takes on a life of its own, and you start to examine the relationships between the building blocks you have created. The extent to which you introduce services is—at least in part—a matter of personal preference.
A good example is the use of the Model class in the root component. Although the component does implement a method that uses the Model object, it does so because it needs to handle a custom event from one of its child components. The only other reason that the root component has for needing a Model object is to pass it on via its template to the other child component using an input property.
This situation isn’t an enormous problem, and your preference may be to have these kinds of relationships in a project. After all, each of the components can be isolated for unit testing, and there is some purpose, however limited, to the relationships between them. This kind of relationship between components can help make sense of the functionality that an application provides.
On the other hand, the more you use services, the more the building blocks in your project become self-contained and reusable blocks of functionality, which can ease the process of adding or changing functionality as the project matures.
There is no absolute right or wrong, and you must find the balance that suits you, your team, and, ultimately, your users and customers. Not everyone likes using dependency injection, and not everyone performs unit testing.
My preference is to use dependency injection as widely as possible. I find that the final structure of my applications can differ significantly from what I expect when I start a new project and that the flexibility offered by dependency injection helps me avoid repeated periods of refactoring. So, to complete this chapter, I am going to push the use of the Model service into the rest of the application, breaking the coupling between the root component and its immediate children.
Updating the Root Component and Template
The first changes I will make are to remove the Model object from the root component, along with the method that uses it and the input property in the template that distributes the model to one of the child components. Listing 19-25 shows the changes to the component class.
import { Component } from "@angular/core";
//import { Model } from "./repository.model";
//import { Product } from "./product.model";
//import { ProductFormGroup } from "./form.model";
@Component({
selector: "app",
templateUrl: "template.html"
})
export class ProductComponent {
//model: Model = new Model();
//constructor(private model: Model) { }
//addProduct(p: Product) {
// this.model.saveProduct(p);
//}
}
Listing 19-25
Removing the Model Object from the component.ts File in the src/app Folder
The revised root component class doesn’t define any functionality and now exists only to provide the top-level application content in its template. Listing 19-26 shows the corresponding changes in the root template to remove the custom event binding and the input property.
<div class="row m-2">
<div class="col-4 p-2">
<paProductForm></paProductForm>
</div>
<div class="col-8 p-2">
<paProductTable></paProductTable>
</div>
</div>
Listing 19-26
Removing the Data Bindings in the template.html File in the src/app Folder
Updating the Child Components
The component that provides the form for creating new Product objects relied on the root component to handle its custom event and update the model. Without this support, the component must now declare a Model dependency and perform the update itself, as shown in Listing 19-27.
import { Component, Output, EventEmitter, ViewEncapsulation } from "@angular/core";
import { Product } from "./product.model";
import { ProductFormGroup } from "./form.model";
import { Model } from "./repository.model";
@Component({
selector: "paProductForm",
templateUrl: "productForm.component.html",
//styleUrls: ["productForm.component.css"],
//encapsulation: ViewEncapsulation.Emulated
})
export class ProductFormComponent {
form: ProductFormGroup = new ProductFormGroup();
newProduct: Product = new Product();
formSubmitted: boolean = false;
constructor(private model: Model) { }
//@Output("paNewProduct")
//newProductEvent = new EventEmitter<Product>();
submitForm(form: any) {
this.formSubmitted = true;
if (form.valid) {
//this.newProductEvent.emit(this.newProduct);
this.model.saveProduct(this.newProduct);
this.newProduct = new Product();
this.form.reset();
this.formSubmitted = false;
}
}
}
Listing 19-27
Working with the Model in the productForm.component.ts File in the src/app Folder
The component that manages the table of product objects used an input property to receive a Model object from its parent but must now obtain it directly by declaring a constructor dependency, as shown in Listing 19-28.
import { Component, Input } from "@angular/core";
import { Model } from "./repository.model";
import { Product } from "./product.model";
import { DiscountService } from "./discount.service";
@Component({
selector: "paProductTable",
templateUrl: "productTable.component.html"
})
export class ProductTableComponent {
//discounter: DiscountService = new DiscountService();
constructor(private dataModel: Model) { }
//@Input("model")
//dataModel: Model;
getProduct(key: number): Product {
return this.dataModel.getProduct(key);
}
getProducts(): Product[] {
return this.dataModel.getProducts();
}
deleteProduct(key: number) {
this.dataModel.deleteProduct(key);
}
dateObject: Date = new Date(2020, 1, 20);
dateString: string = "2020-02-20T00:00:00.000Z";
dateNumber: number = 1582156800000;
}
Listing 19-28
Declaring a Model Dependency in the productTable.component.ts File in the src/app Folder
You will see the same functionality displayed in the browser window when all of the changes have been saved and the browser reloads the Angular application—but the way that the functionality is wired up has changed substantially, with each component obtaining the share objects it needs through the dependency injection feature, rather than relying on its parent component to provide it.
Summary
In this chapter, I explained the problems that dependency injection can be used to address and demonstrated the process of defining and consuming services. I described how services can be used to increase the flexibility in the structure of an application and how dependency injection makes it possible to isolate building blocks so they can be unit tested effectively. In the next chapter, I describe the advanced features that Angular provides for working with services.